Thinking out loud
Where we share the insights, questions, and observations that shape our approach.
V2X: What needs to be done to accelerate the implementation
Technology that allows vehicles to communicate wirelessly with other vehicles and road infrastructure is the go-to solution of the future. Regrettably, for the time being, the business justification for V2X roll-out by most OEMs remains beyond reach. What are the prospects for the coming years and what can be done to bring the vision of mass V2X implementation closer?
The role of V2X in supporting ADAS and AV
To begin with the basics, let's explore the dynamics of change today when it comes to automation in the automotive industry .
The relationship between ADAS (i.e., the systems that currently prevail) and V2X (new type systems) is best captured in the chart below. It shows that the higher the SAE automation levels are, the more the role of V2X technology is emphasized.
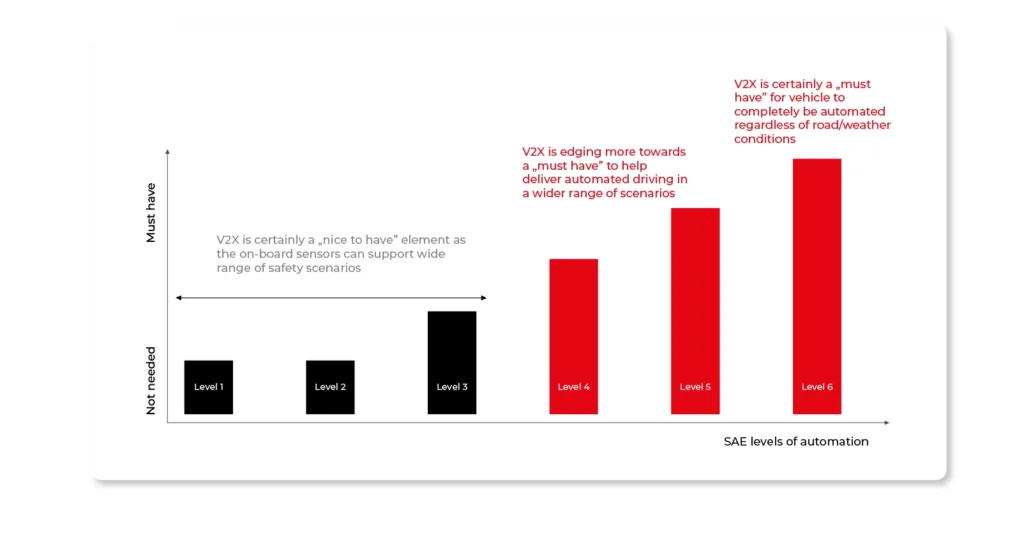
Levels 0 to 2 represent the dominance of old-style, sensor-based security systems. Higher levels of automation are already more oriented toward extensive collaboration:
- Between vehicles,
- Between vehicles and infrastructure.
Advanced Driver Assistance Systems (ADAS) for the past 20 years have relied mainly on elements such as onboard sensors (cameras, radars, ultrasound). Low-level automation worked for a while, but it has its shortcomings. Primarily it is about its maximum range, which is only up to 200 meters. The other thing is its low performance in contact with obstacles, such as blind bends and densely parked vehicles.
Meanwhile, sensing technologies have developed so widely that today it is possible to fully collaborate in such configurations as:
- V2V – Vehicle-to-Vehicle.
- V2D – Vehicle-to-device.
- V2P – Vehicle-to-pedestrian.
- V2H – Vehicle-to-home.
- V2G – Vehicle-to-grid.
- V2I – Vehicle-to-Infrastructure.
The most optimistic scenario assumes, among other things, that most vehicles will be able to connect with each other on highways. And this will markedly increase road safety.
Does this mean that as automotive development continues, V2X will replace existing ADAS solutions? Not necessarily. Yet, it is possible that V2X will greatly expand the applications of current and future driver assistance systems. Thus, it will facilitate reaching greater levels of vehicle autonomy.
V2X: benefits and unique selling points
V2X technology, which enables vehicle-to-vehicle and vehicle-to-infrastructure information exchange, is considered a resource worth having and developing in any automotive company. This is chiefly due to the numerous benefits that can be achieved in terms of traffic efficiency and safety. Here are just some of them.
- Addressing the LoS (Lack of Sight) problem which involves the non-visibility of another object. V2X can even detect elements that are invisible or undetectable by traditional sensors. This includes "blind spots" in the side mirror or objects behind a sharp bend.
- Early warning. Drivers of connected vehicles learn in a timely manner about dangers on multi-lane roads, especially high-speed roads. This allows them to react to the problem at an early stage. It is advisable to know that a vehicle's ABS system is activated within 1 mile of another vehicle equipped with V2X.
- Reducing congestion and streamlining traffic. With the technology described here, such modern fleet management methods as platooning can be successfully applied (see the following paragraphs for more details on this thread).
- Driving assistance even in adverse weather conditions. Fog interferes with " standard" sensors, such as cameras. Meanwhile, the V2X also performs well during limited visibility.
- Efficient alerting. Approaching emergency vehicles can signal their presence from a great distance. Drivers are therefore able to quickly form an emergency lane on the highway.
- Attaining higher levels of vehicle autonomy. Partially autonomous vehicles perform well in a wide range of scenarios on the road (including merging scenarios).
Are there any limitations when implementing V2X?
One of the obstacles facing OEMs at this point is insufficient demand. Although the technology is up and running and there are already many use cases around the world, consumers are reluctant to pay extra for it. This is happening for a good reason.
For example, most customers don't understand why they should pay extra for safety-related functionalities. These are already regulated by law anyway, and besides, they are guaranteed as part of ADAS (and these systems are already included in the basic vehicle price). Let's also bear in mind that a high level of data penetration in a car is not always possible. Most cars are still not high-tech enough. Many features would therefore simply be unavailable. So - why should we incur the cost of it anyway?
Beyond that, there is a long delay between the availability of the technology and the existence of a sufficient number of cars equipped with it. Meanwhile, to talk about V2X on a large scale, these two factors must exist in parallel.
Also, the road infrastructure is not necessarily designed to handle V2X. City authorities still have to focus on "putting out the current fires," so technological development sometimes takes a back seat. Besides, not all of the city's road investment is being carried out at the same time due to limited funds.
Of course, in the long run, safer roads and less congestion are the goal worth achieving, but things can't be done all at once. Examples from specific regions of the world, described in the following paragraphs, in fact, illustrate this point well.
DSRC vs. C-V2X
In the framework of V2X, there are two competing technology solutions:
DSRC - Dedicated Short-Range Communication
A form of wireless communication technology defined by the 802.11p standard. It is essentially an amendment to the IEEE 802.11 (WLAN) standard that defines changes and enhancements in order to effectively support Intelligent Transport Systems (ITS).
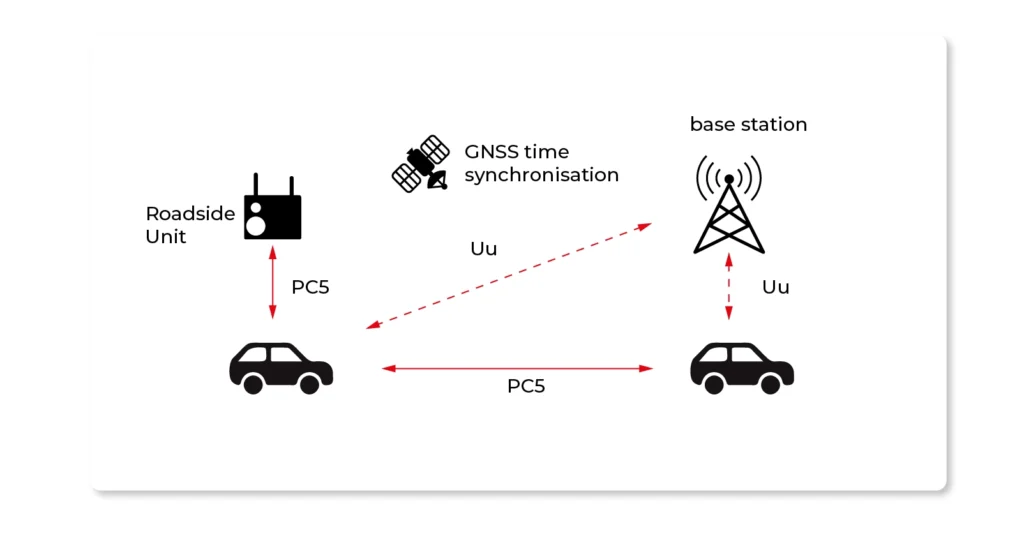
C-V2X - Cellular – V2X
A form of a wireless communication solution using mobile network technology. C-V2X has two modes of operation: PC5 (Direct communication) and Uu (Indirect method of communication using a cellular network).
Implementation of systems in specified regions of the world
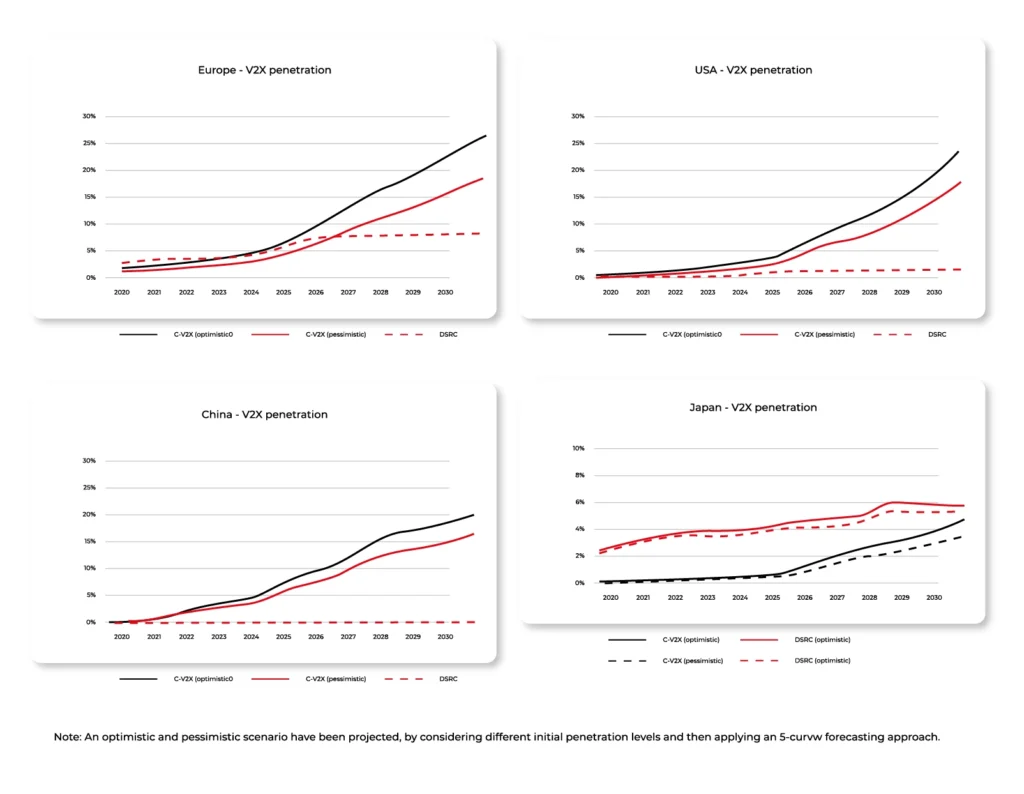
After decades of development of the aforementioned technology, it is slowly becoming apparent that DSRC is giving way to the popularity of C-V2X. Although the former system still dominates in Europe and the US, this will certainly not last forever. According to experts, before long US and European OEMs will prefer C-V2X in their vehicles exclusively. For the time being, however, both solutions are operating equally in these markets.
This is quite different from China, where the use of Cellular V2X has been embraced without question. For what it's worth, the issue is a bit more complicated in another Asian region, namely Japan, where DSRC-based ETC (electronic toll collection) has been under development for many years. In the Land of the Cherry Blossom, there is uncertainty about which way to eventually head. Cautious predictions, however, point to a slow transition to C-V2X.
Fundamentals for developing V2X
One thing to realize with V2X is that the benefits are spread across all traffic users. For this to happen, however, some key driving forces are needed for the introduction and market adoption of this technology. These are:
- Platooning.
- Fuel efficiency.
- Smart cities.
- Driver and pedestrian safety.
- Platooning
Trucks moving in a single formation is an environmentally friendly and commercially viable solution. But what does it have in common with V2X? Quite a lot, because for platooning to take place, advanced communications technology is a must.
V2X allows trucks in a platoon to coordinate braking and acceleration among each other. It also makes it possible to perform many complex maneuvers .
Main beneficiaries
Carriers, fleet operators and the entire logistics industry, in general, would benefit enormously from V2X technology. This would not only optimize the transportation costs themselves but also fit in with increasingly stringent emissions standards.
- Fuel efficiency
Governments around the world strive to reduce their environmental impact by cutting emissions. In Europe, for instance, the EC Strategy on Sustainable and Smart Mobility is being prepared, outlining plans to reduce them by up to 90 (!) percent by 2050. To achieve this goal, policymakers are looking for technologies that help comply with the aforementioned limits. V2X shows huge potential in this regard.
Example? Solutions such as GLOSA (green light speed optimization) minimize the need for a car to come to a complete stop just before traffic lights and then restart the engine or accelerate. Consequently, fuel consumption and harmful gas emissions are reduced.
Main beneficiaries
Environmental policymakers and regulators are (and will be) under mounting pressure related to emissions. V2X can play a key role in this puzzle, and it is up to policymakers to adopt and implement this technology.
The advantages of the aforementioned technology, however, can also be enjoyed by OEMs. Since V2X reduces fuel consumption, the driver spends less on a monthly basis. Such information can be quoted in marketing communications.
- Smart cities
The idea of a smart city is based on interconnected technologies and systems for collecting and using data. So it is quite natural that for functioning, smart cities need V2K solutions.
They enable communication between vehicles and buildings, signals, pedestrians, and other road users. All information is transmitted in real-time, so you gain greater awareness of your surroundings and current needs. More broadly, such intelligent transportation and road infrastructure management systems help reduce congestion. Noise levels, pollution in densely populated areas, and the likelihood of collisions are also curbed.
Automated urban logistics is the future of urbanization - without any doubt.
Main beneficiaries
Connected through VCX, a smart urban area can offer many benefits not only for overall security, but also for local commerce and the quality of life for its residents.
City authorities can plan individual processes more efficiently, resulting in real savings. In a potential scenario, city-funded traffic operators are immediately notified of incidents via V2X and smart cameras. By doing so, they warn other road users of the danger or make an instant decision to set up a detour. If necessary, they prioritize emergency vehicles.
Urban businesses are also enjoying the perks of a V2X-equipped smart city. That's because they benefit from shorter times for transporting goods from the place of manufacture to the point of trade. This is due to less congestion on the roads, intelligent route planning, and fully automated city logistics.
- Driver and pedestrian safety
Traffic collisions, injuries, and deaths not only incur unit costs but also seriously drain the public budget.
The solution to these problems may lie exactly in V2X technology, which makes it possible to identify more hazards on the road than ever before. Drivers can react more quickly to dangerous maneuvers by other road users and make early decisions that could potentially affect someone's health or life.
Main beneficiaries
Consumer purchasing power and public opinion certainly have a bearing on the success of V2X deployment. If road users understand that such solutions actually contribute to safety, they will be eager to push them.
Local politicians will also benefit from the achievements of new connected vehicle technologies. They, in fact, often base their election campaigns on claims related to reducing road accidents in their regions. And V2X is helping to fulfill those promises.
Who will implement first - cities or OEMs?
An important question to be answered is who will ultimately be responsible for the introduction and development of V2X. And who will begin to do it on a large scale. The answer is not straightforward.
From the very outset, cities are faced with the difficult task of making significant infrastructure investments. For this, funds have to be obtained at some point, especially since once implemented solutions still have to be sustained. Certainly, though, the benefits associated with V2X are well worth the funds expended on this technology.
On the other hand, we have OEMs that need a trigger to push their products forward. This must be fostered by the right market environment (a sufficient number of vehicles with V2X capabilities) and the commitment of the authorities responsible for maintaining public infrastructure. At this point, there are also constraints related to consumer reluctance, e.g. in the face of excessively high vehicle data penetration rates.
So, it all boils down to goodwill, openness to change, and the fact that certain technologies need to mature on the market.


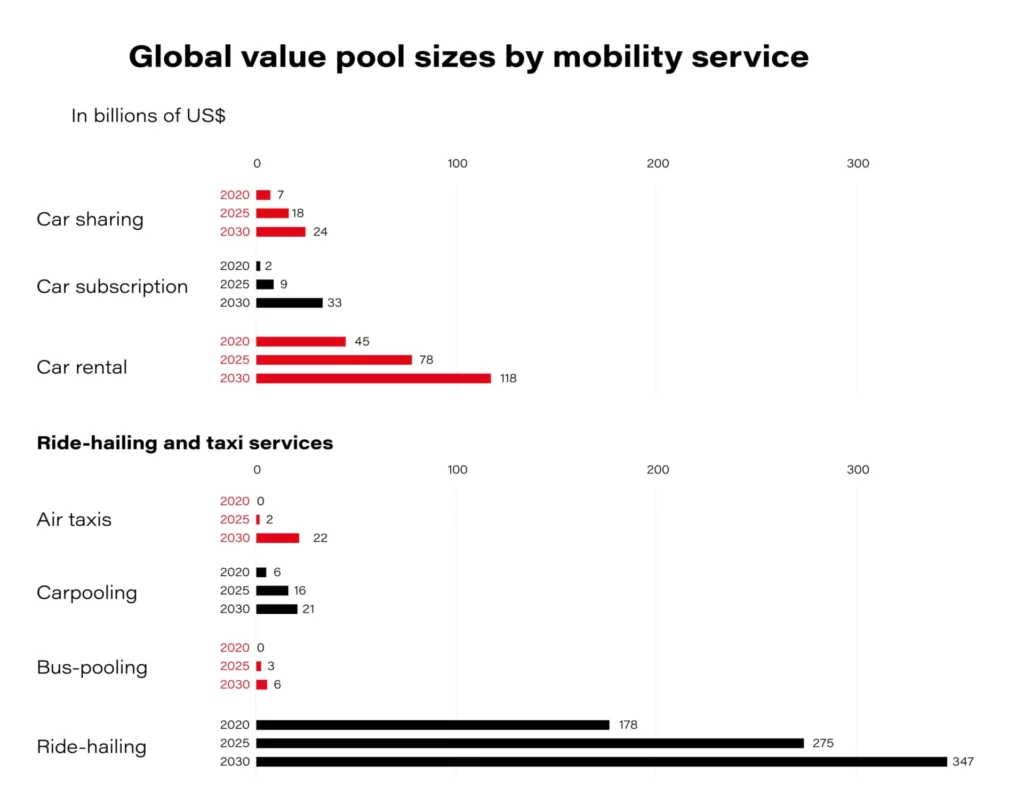
How new mobility services change the automotive industry
The automotive industry is changing right before our very eyes. Today, services based on the CASE model are looming on the horizon. They are capturing an increasing market share and gaining more and more each year in total dollar value. What's in store for the automotive sector and how automotive enterprises can seize these opportunities?
New mobility services are emerging rapidly
By 2030, over 30 percent of the projected increase in vehicle sales due to urbanization and macroeconomic growth will be unlikely to happen owing to the shared mobility expansion.
In China, the European Union, and the United States, which are countries supporting shared mobility solutions , the mobility market could reach 28 percent annual growth from 2015 to 2030 . Of course- this would be the most optimistic scenario. FutureBridge specialists expect the shared mobility market to grow significantly over the next five to seven years at a CAGR of 16 percent from 2018, reaching 180 billion dollars by 2025 . How can the growing demand for new mobility services be explained?
On the one hand, the automotive industry deals with changing consumer preferences . One travels by car covering shorter distances, but much more frequently. And it doesn’t have to be by car at all, as new means of transportation are becoming more accessible.
On the other hand, soaring car prices (though cars lose their value a few months after the purchase) prompt us to search for other, cheaper alternatives that provide optimal driving comfort anyway.
How will companies relying on the traditional car ownership model respond to this trend? They will provide new services such as substitution models, in which, for a once-off monthly payment, you can have a new car with insurance, maintenance, roadside assistance, etc. Subscriptions will soon account for about 15% of new car sales and should have risen to 25% by 2025. In this context, new mobility in the form of rental and ride-sharing services, which are also part of the transformation on the roads, also becomes significant.
The third thing is growing technology, based on the CASE model(Connectivity, Autonomous driving, Shared mobility, Electrification,) that empowers the development of new mobility services on an unprecedented scale. According to Microsoft experts, by 2030 virtually all new cars will have been connected devices, functioning as data centers on wheels.
6 leading new mobility services
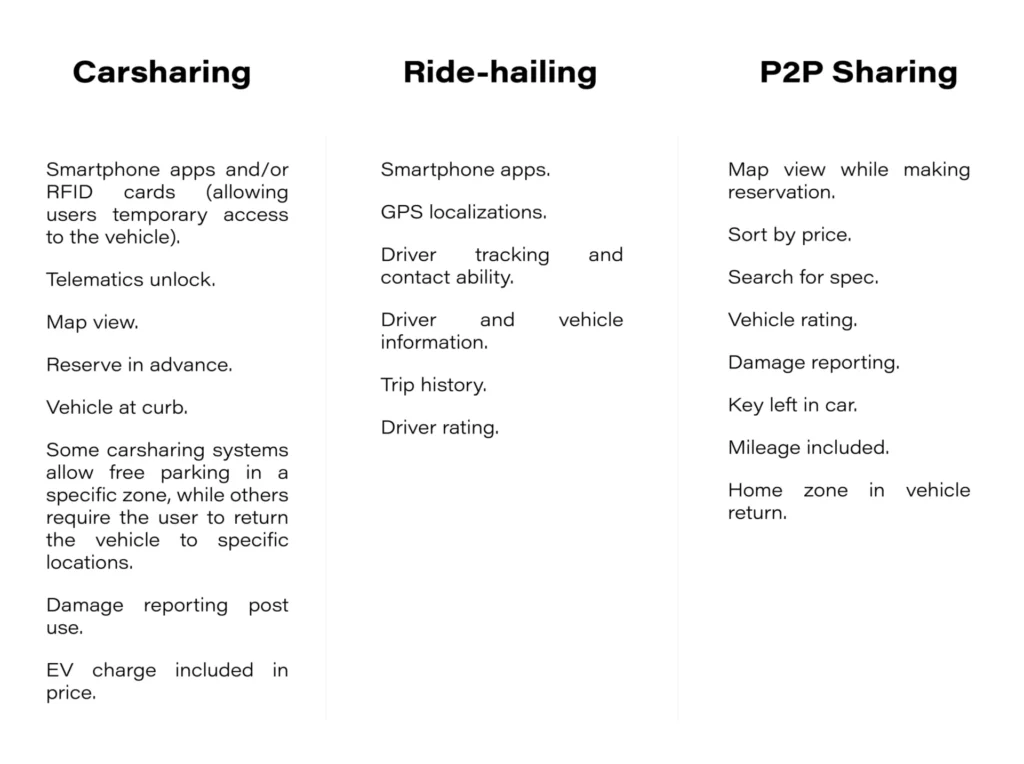
Carsharing
A short-term car rental model that allows users to choose a vehicle and pick-up/drop-off location. Users can determine vehicles and flexible rent times. Operators gain high ROI with high utilization and minimal staffing.
Examples: citybee, E-VAI, fetch
Ride-hailing
A form of cab rental in which the drivers are usually contractors using their private vehicles rather than direct employees. The user has immediate availability and payment is handled through the operator. The benefits are also the ability to track and monitor journeys. For operators instead, traditional fleet costs must be handled by the drivers. It’s an easily scalable service.
Examples: Uber, Lyft, Bolt, marcel, OLA
P2P Sharing
this service allows vehicle owners to rent their vehicles when they are not currently in use. BMW-run ReachNow is piloting a version of this type of service, which allows Mini owners to offer their currently unused vehicles for rent. The benefits for users are the lower costs than traditional vehicle rental. Meanwhile, the operator has no fleet to manage and gets access to an easily scalable model of business.
Examples: HoppyGo, SnappCar
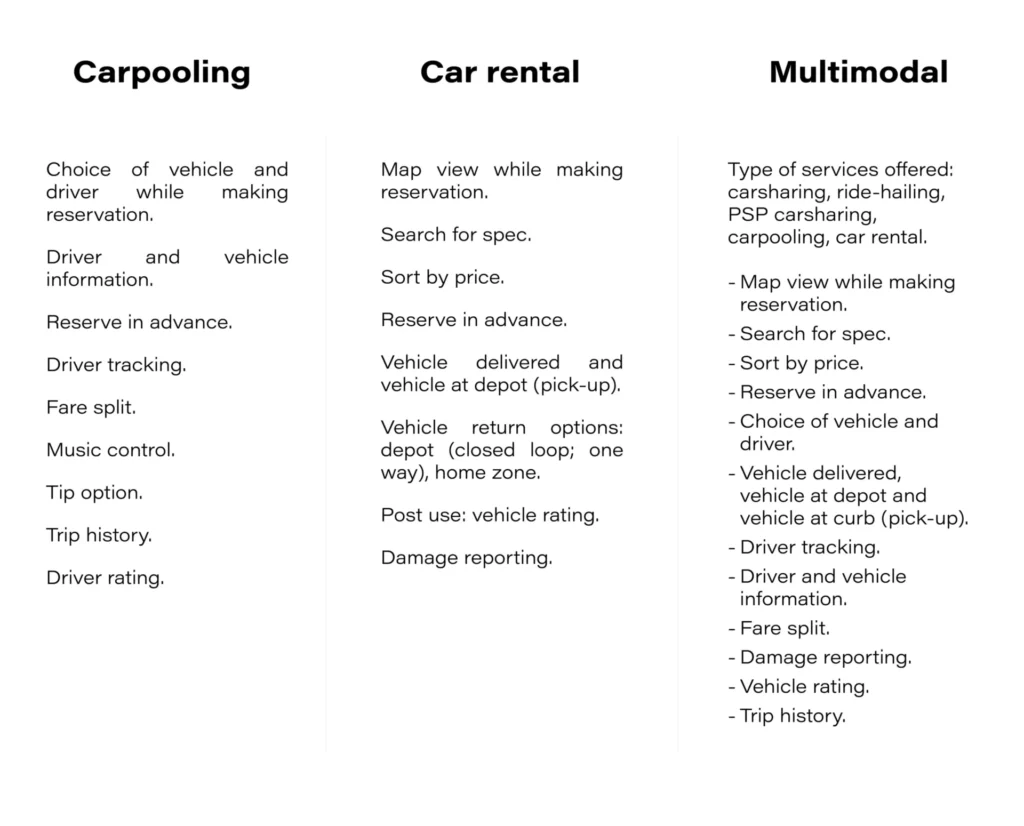
Carpooling
Allows users to join an already scheduled trip. The operating company acts as an "intermediary" through which rides can be announced and joined. Carpooling can apply both to people taking a trip alone and to those who want to share rides to reduce the total cost of the trip for a single passenger. It’s a cheap and environmentally friendly service. What is more, the operator has a higher margin per ride and no fleet to manage.
Examples: BlaBlaCar, GoMore, liftshare
Car rental
The evolution of the traditional car rental by the day, allowing users to rent cars for different periods without the traditional hassle associated with this type of service. From the user's point of view, such new services enable an easier and quicker process of vehicle rental. Also, it’s possible to choose a vehicle before finalizing the rental. In turn, the operator has less staffing than a traditional rental and can utilize already existing fleets.
Examples: Audi Silvercar, Hertz, Sixt, PORSCHE DRIVE, UBEEQO
Multimodal
An integrator of public transport mobility services, as well as other modes of transportation, such as public transportation, rail networks, and even cabs. The goal of such services is to get people from their starting point to their destination in the fastest, cheapest, or most efficient way, depending on individual needs. In this model, the operator gets access to additional potential users and has relatively low costs of deployment due to a lack of physical assets.
Examples: FREE2MOVE, whim, Google Maps
Which new mobility services are growing the fastest?
Of the 55 providers of the aforementioned new mobility services operating in European countries, the most popular are those in the area of carsharing (51%) . The second most popular are car rental services (20%) , followed by P2P sharing (13%) .
In terms of ownership, most new mobility services were OEM owned (over 36%), although many of them were independent (over 38%). Also included were OEM invested services (31%).
Technologies and functionalities fueling the development of new mobility services
Mobility services are based on advanced software that uses, at least, the Internet of Things, to transfer data from the vehicle to the cloud. Then the individual information is available on the user's mobile application.
For services based on unmanned vehicle rental, modern security features have been considered when it comes to opening and closing the car.
With a view to minimizing possible problems, the developers of digital new mobility services are also introducing a fault reporting option.
Below is a selection of the most common functionalities and technologies in detail for each new mobility service in Europe.
All of these and other options provide guidance and a certain pattern of behavior for future developing OEMs.
Key factors crucial for the development of new mobility services
CASE trends provide new opportunities for the vehicles of the future. However, the interrelationships between software, in-car sensors, and electronic systems require a huge amount of resources , especially when we are talking about reliable operations that translate into a competitive advantage of new mobility services and popularity among potential users.
Therefore, if you want to develop in this area, consider at least these few factors.
- Cybersecurity . In addition to creating huge amounts of code, what also matters is that your user data tracking processes comply with the standards and regulations that apply in your geographic region.
- Careful listening to user needs. In order to compete with technology start-ups, OEMs should focus on innovative digital solutions oriented towards actual consumer expectations . What matters is flexibility, when it comes to the portfolio of functionalities.
- Certainly, emotion is a factor that must be taken into account. Solution providers should care about providing unique experiences and sensations that will make the user eager to re-use a particular service, and in the process, spread it to their community.
- Flexibility and scalability . You need to be prepared not only to meet the changing expectations of customers who come in with feedback but also to expand functionality to include those that competitors already have (or to offer completely innovative solutions).
- Being ready to expand the offering . For example, with new types of vehicles: not only internal combustion but also hybrid, electric; not only cars but also city scooters, etc.
If you want to deal with the challenges that come with developing new mobility services and are considering the above and other growth factors, contact Grape Up. We can help you expand your business in terms of features and values appreciated by today's conscious consumers.
How to set up Kafka integration test
Do you consider unit testing as not enough solution for keeping the application's reliability and stability? Are you afraid that somehow or somewhere there is a potential bug hiding in the assumption that unit tests should cover all cases? And also is mocking Kafka not enough for project requirements? If even one answer is ‘yes’, then welcome to a nice and easy guide on how to set up Integration Tests for Kafka using TestContainers and Embedded Kafka for Spring!
What is TestContainers?
TestContainers is an open-source Java library specialized in providing all needed solutions for the integration and testing of external sources. It means that we are able to mimic an actual database, web server, or even an event bus environment and treat that as a reliable place to test app functionality. All these fancy features are hooked into docker images, defined as containers. Do we need to test the database layer with actual MongoDB? No worries, we have a test container for that. We can not also forget about UI tests - Selenium Container will do anything that we actually need.
In our case, we will focus on Kafka Testcontainer.
What is Embedded Kafka?
As the name suggests, we are going to deal with an in-memory Kafka instance, ready to be used as a normal broker with full functionality. It allows us to work with producers and consumers, as usual, making our integration tests lightweight.
Before we start
The concept for our test is simple - I would like to test Kafka consumer and producer using two different approaches and check how we can utilize them in actual cases.
Kafka Messages are serialized using Avro schemas.
Embedded Kafka - Producer Test
The concept is easy - let's create a simple project with the controller, which invokes a service method to push a Kafka Avro serialized message.
Dependencies:
dependencies {
implementation "org.apache.avro:avro:1.10.1"
implementation("io.confluent:kafka-avro-serializer:6.1.0")
implementation 'org.springframework.boot:spring-boot-starter-validation'
implementation 'org.springframework.kafka:spring-kafka'
implementation('org.springframework.cloud:spring-cloud-stream:3.1.1')
implementation('org.springframework.cloud:spring-cloud-stream-binder-kafka:3.1.1')
implementation('org.springframework.boot:spring-boot-starter-web:2.4.3')
implementation 'org.projectlombok:lombok:1.18.16'
compileOnly 'org.projectlombok:lombok'
annotationProcessor 'org.projectlombok:lombok'
testImplementation('org.springframework.cloud:spring-cloud-stream-test-support:3.1.1')
testImplementation 'org.springframework.boot:spring-boot-starter-test'
testImplementation 'org.springframework.kafka:spring-kafka-test'
}
Also worth mentioning fantastic plugin for Avro. Here plugins section:
plugins {
id 'org.springframework.boot' version '2.6.8'
id 'io.spring.dependency-management' version '1.0.11.RELEASE'
id 'java'
id "com.github.davidmc24.gradle.plugin.avro" version "1.3.0"
}
Avro Plugin supports schema auto-generating. This is a must-have.
Link to plugin: https://github.com/davidmc24/gradle-avro-plugin
Now let's define the Avro schema:
{
"namespace": "com.grapeup.myawesome.myawesomeproducer",
"type": "record",
"name": "RegisterRequest",
"fields": [
{"name": "id", "type": "long"},
{"name": "address", "type": "string", "avro.java.string": "String"
}
]
}
Our ProducerService will be focused only on sending messages to Kafka using a template, nothing exciting about that part. Main functionality can be done just using this line:
ListenableFuture<SendResult<String, RegisterRequest>> future = this.kafkaTemplate.send("register-request", kafkaMessage);
We can’t forget about test properties:
spring:
main:
allow-bean-definition-overriding: true
kafka:
consumer:
group-id: group_id
auto-offset-reset: earliest
key-deserializer: org.apache.kafka.common.serialization.StringDeserializer
value-deserializer: com.grapeup.myawesome.myawesomeconsumer.common.CustomKafkaAvroDeserializer
producer:
auto.register.schemas: true
key-serializer: org.apache.kafka.common.serialization.StringSerializer
value-serializer: com.grapeup.myawesome.myawesomeconsumer.common.CustomKafkaAvroSerializer
properties:
specific.avro.reader: true
As we see in the mentioned test properties, we declare a custom deserializer/serializer for KafkaMessages. It is highly recommended to use Kafka with Avro - don't let JSONs maintain object structure, let's use civilized mapper and object definition like Avro.
Serializer:
public class CustomKafkaAvroSerializer extends KafkaAvroSerializer {
public CustomKafkaAvroSerializer() {
super();
super.schemaRegistry = new MockSchemaRegistryClient();
}
public CustomKafkaAvroSerializer(SchemaRegistryClient client) {
super(new MockSchemaRegistryClient());
}
public CustomKafkaAvroSerializer(SchemaRegistryClient client, Map<String, ?> props) {
super(new MockSchemaRegistryClient(), props);
}
}
Deserializer:
public class CustomKafkaAvroSerializer extends KafkaAvroSerializer {
public CustomKafkaAvroSerializer() {
super();
super.schemaRegistry = new MockSchemaRegistryClient();
}
public CustomKafkaAvroSerializer(SchemaRegistryClient client) {
super(new MockSchemaRegistryClient());
}
public CustomKafkaAvroSerializer(SchemaRegistryClient client, Map<String, ?> props) {
super(new MockSchemaRegistryClient(), props);
}
}
And we have everything to start writing our test.
@ExtendWith(SpringExtension.class)
@SpringBootTest
@AutoConfigureMockMvc
@TestInstance(TestInstance.Lifecycle.PER_CLASS)
@ActiveProfiles("test")
@EmbeddedKafka(partitions = 1, topics = {"register-request"})
class ProducerControllerTest {
All we need to do is add @EmbeddedKafka annotation with listed topics and partitions. Application Context will boot Kafka Broker with provided configuration just like that. Keep in mind that @TestInstance should be used with special consideration. Lifecycle.PER_CLASS will avoid creating the same objects/context for each test method. Worth checking if tests are too time-consuming.
Consumer<String, RegisterRequest> consumerServiceTest;@BeforeEach
void setUp() {
DefaultKafkaConsumerFactory<String, RegisterRequest> consumer = new DefaultKafkaConsumerFactory<>(kafkaProperties.buildConsumerProperties();
consumerServiceTest = consumer.createConsumer();
consumerServiceTest.subscribe(Collections.singletonList(TOPIC_NAME));
}
Here we can declare the test consumer, based on the Avro schema return type. All Kafka properties are already provided in the .yml file. That consumer will be used as a check if the producer actually pushed a message.
Here is the actual test method:
@Test
void whenValidInput_therReturns200() throws Exception {
RegisterRequestDto request = RegisterRequestDto.builder()
.id(12)
.address("tempAddress")
.build();
mockMvc.perform(
post("/register-request")
.contentType("application/json")
.content(objectMapper.writeValueAsBytes(request)))
.andExpect(status().isOk());
ConsumerRecord<String, RegisterRequest> consumedRegisterRequest = KafkaTestUtils.getSingleRecord(consumerServiceTest, TOPIC_NAME);
RegisterRequest valueReceived = consumedRegisterRequest.value();
assertEquals(12, valueReceived.getId());
assertEquals("tempAddress", valueReceived.getAddress());
}
First of all, we use MockMvc to perform an action on our endpoint. That endpoint uses ProducerService to push messages to Kafka. KafkaConsumer is used to verify if the producer worked as expected. And that’s it - we have a fully working test with embedded Kafka.
Test Containers - Consumer Test
TestContainers are nothing else like independent docker images ready for being dockerized. The following test scenario will be enhanced by a MongoDB image. Why not keep our data in the database right after anything happened in Kafka flow?
Dependencies are not much different than in the previous example. The following steps are needed for test containers:
testImplementation 'org.testcontainers:junit-jupiter'
testImplementation 'org.testcontainers:kafka'
testImplementation 'org.testcontainers:mongodb'
ext {
set('testcontainersVersion', "1.17.1")
}
dependencyManagement {
imports {
mavenBom "org.testcontainers:testcontainers-bom:${testcontainersVersion}"
}
}
Let's focus now on the Consumer part. The test case will be simple - one consumer service will be responsible for getting the Kafka message and storing the parsed payload in the MongoDB collection. All that we need to know about KafkaListeners, for now, is that annotation:
@KafkaListener(topics = "register-request")
By the functionality of the annotation processor, KafkaListenerContainerFactory will be responsible to create a listener on our method. From this moment our method will react to any upcoming Kafka message with the mentioned topic.
Avro serializer and deserializer configs are the same as in the previous test.
Regarding TestContainer, we should start with the following annotations:
@SpringBootTest
@ActiveProfiles("test")
@Testcontainers
public class AbstractIntegrationTest {
During startup, all configured TestContainers modules will be activated. It means that we will get access to the full operating environment of the selected source. As example:
@Autowired
private KafkaListenerEndpointRegistry kafkaListenerEndpointRegistry;
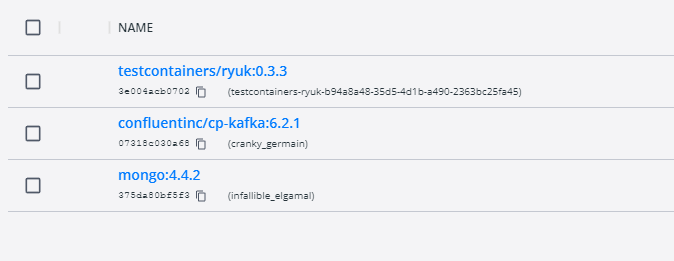
@Container
public static KafkaContainer kafkaContainer = new KafkaContainer(DockerImageName.parse("confluentinc/cp-kafka:6.2.1"));
@Container
static MongoDBContainer mongoDBContainer = new MongoDBContainer("mongo:4.4.2").withExposedPorts(27017);
As a result of booting the test, we can expect two docker containers to start with the provided configuration.
What is really important for the mongo container - it gives us full access to the database using just a simple connection uri. With such a feature, we are able to take a look what is the current state in our collections, even during debug mode and prepared breakpoints.
Take a look also at the Ryuk container - it works like overwatch and checks if our containers have started correctly.
And here is the last part of the configuration:
@DynamicPropertySource
static void dataSourceProperties(DynamicPropertyRegistry registry) {
registry.add("spring.kafka.bootstrap-servers", kafkaContainer::getBootstrapServers);
registry.add("spring.kafka.consumer.bootstrap-servers", kafkaContainer::getBootstrapServers);
registry.add("spring.kafka.producer.bootstrap-servers", kafkaContainer::getBootstrapServers);
registry.add("spring.data.mongodb.uri", mongoDBContainer::getReplicaSetUrl);
}
static {
kafkaContainer.start();
mongoDBContainer.start();
mongoDBContainer.waitingFor(Wait.forListeningPort()
.withStartupTimeout(Duration.ofSeconds(180L)));
}
@BeforeTestClass
public void beforeTest() {
kafkaListenerEndpointRegistry.getListenerContainers().forEach(
messageListenerContainer -> {
ContainerTestUtils
.waitForAssignment(messageListenerContainer, 1);
}
);
}
@AfterAll
static void tearDown() {
kafkaContainer.stop();
mongoDBContainer.stop();
}
DynamicPropertySource gives us the option to set all needed environment variables during the test lifecycle. Strongly needed for any config purposes for TestContainers. Also, beforeTestClass kafkaListenerEndpointRegistry waits for each listener to get expected partitions during container startup.
And the last part of the Kafka test containers journey - the main body of the test:
@Test
public void containerStartsAndPublicPortIsAvailable() throws Exception {
writeToTopic("register-request", RegisterRequest.newBuilder().setId(123).setAddress("dummyAddress").build());
//Wait for KafkaListener
TimeUnit.SECONDS.sleep(5);
Assertions.assertEquals(1, taxiRepository.findAll().size());
}
private KafkaProducer<String, RegisterRequest> createProducer() {
return new KafkaProducer<>(kafkaProperties.buildProducerProperties());
}
private void writeToTopic(String topicName, RegisterRequest... registerRequests) {
try (KafkaProducer<String, RegisterRequest> producer = createProducer()) {
Arrays.stream(registerRequests)
.forEach(registerRequest -> {
ProducerRecord<String, RegisterRequest> record = new ProducerRecord<>(topicName, registerRequest);
producer.send(record);
}
);
}
}
The custom producer is responsible for writing our message to KafkaBroker. Also, it is recommended to give some time for consumers to handle messages properly. As we see, the message was not just consumed by the listener, but also stored in the MongoDB collection.
Conclusions
As we can see, current solutions for integration tests are quite easy to implement and maintain in projects. There is no point in keeping just unit tests and counting on all lines covered as a sign of code/logic quality. Now the question is, should we use an Embedded solution or TestContainers? I suggest first of all focusing on the word “Embedded”. As a perfect integration test, we want to get an almost ideal copy of the production environment with all properties/features included. In-memory solutions are good, but mostly, not enough for large business projects. Definitely, the advantage of Embedded services is the easy way to implement such tests and maintain configuration, just when anything happens in memory.
TestContainers at the first sight might look like overkill, but they give us the most important feature, which is a separate environment. We don't have to even rely on existing docker images - if we want we can use custom ones. This is a huge improvement for potential test scenarios.
What about Jenkins? There is no reason to be afraid also to use TestContainers in Jenkins. I firmly recommend checking TestContainers documentation on how easily we can set up the configuration for Jenkins agents.
To sum up - if there is no blocker or any unwanted condition for using TestContainers, then don't hesitate. It is always good to keep all services managed and secured with integration test contracts.

AAOS Hello World: How to build your first app for Android Automotive OS
Android Automotive OS is getting more recognition as automotive companies are looking to provide their customers with a more tailored experience. Here we share our guide to building the first app for AAOS.
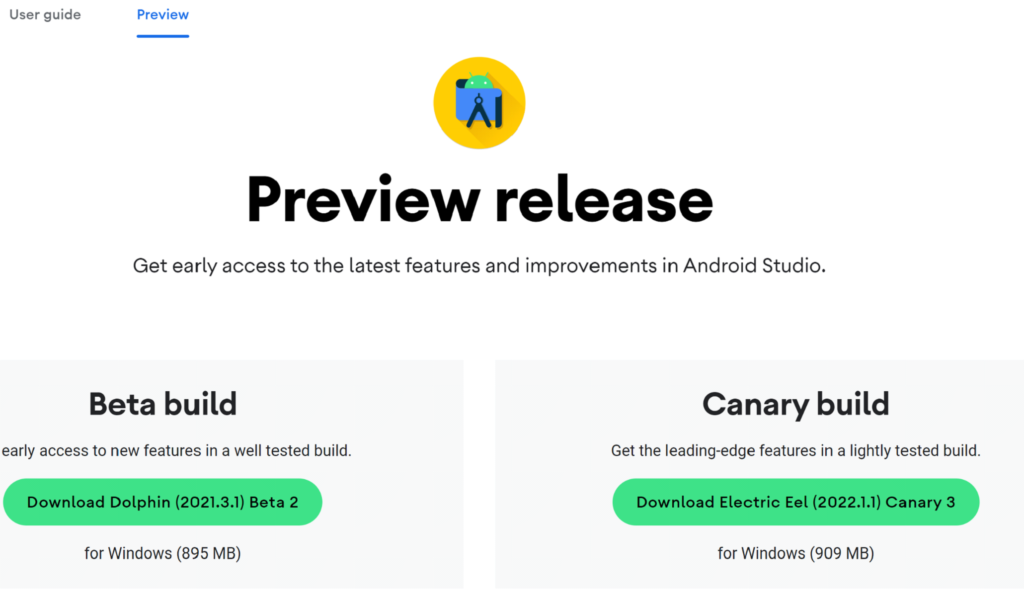
Before you start, read our first article about AAOS and get to know our review to be aware of what to expect. Let’s try making a simple Hello World app for android automotive. To get an IDE, go to Android Studio Preview | Android Developers and get a canary build:
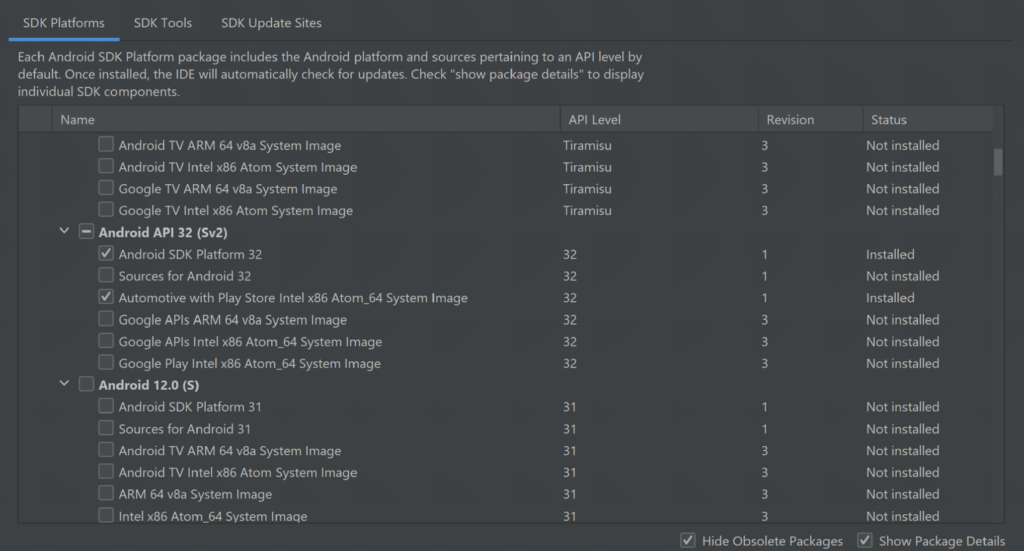
In the next step, prepare SDK, check and download the Automotive system image in SDK manager. You can get any from api32, Android 9, or Android 10, but I do not recommend the newest one as it is very laggy and crashes a lot right now. There are also Volvo and Polestar images.
For those you need to add links to SDK Update Sites:
https://developer.volvocars.com/sdk/volvo-sys-img.xml
https://developer.polestar.com/sdk/polestar2-sys-img.xml
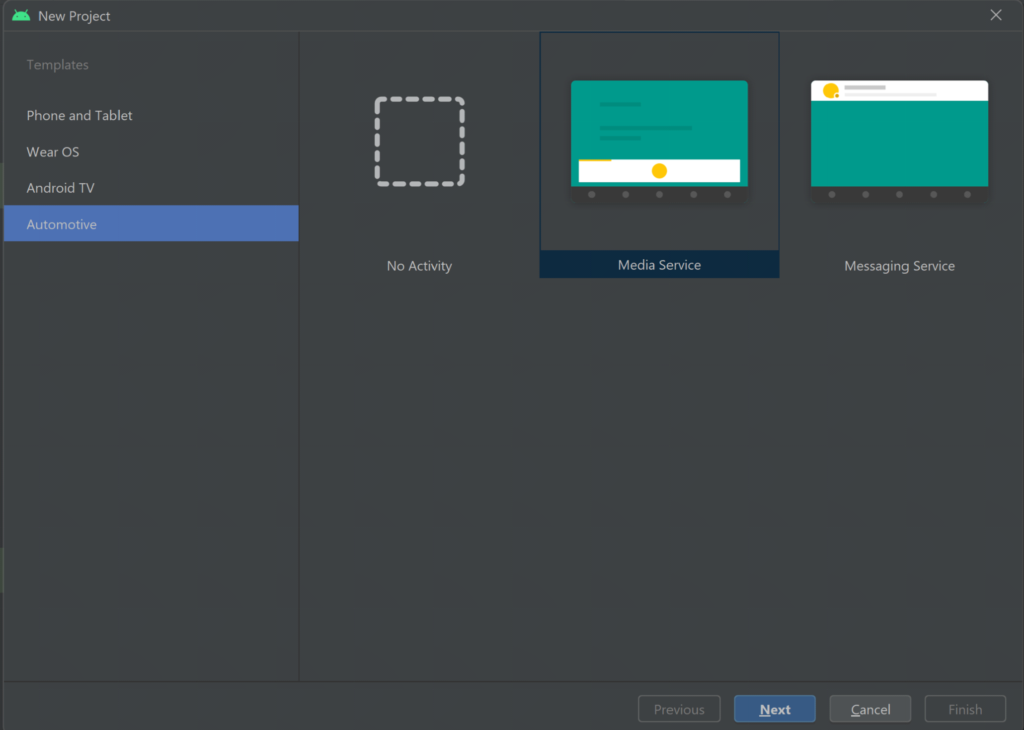
Start a new project, go to File> New Project and choose automotive with no activity
A nice and clean project should be created, without any classes: Go to build.gradle and add the car app library into dependencies, refresh the project to make it get
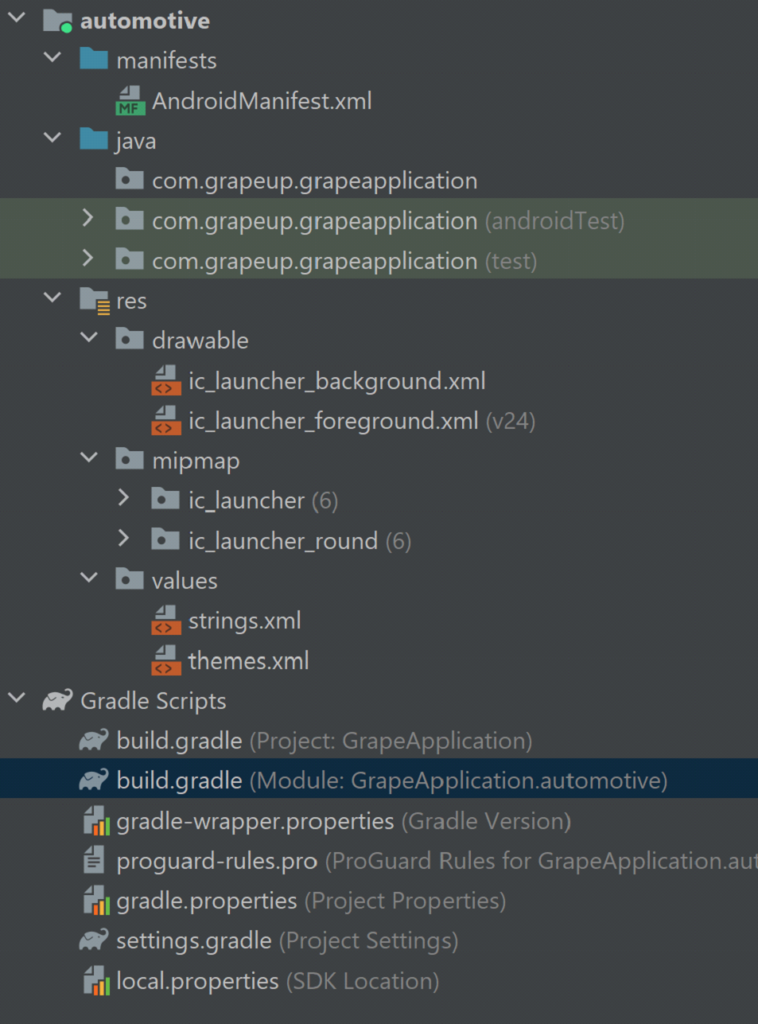
our new dependency:
implementation "androidx.car.app:app-automotive:1.2.0-rc01"
Let's write some code, first our screen class. Name it as you want and make it extend Screen class from android.car.app package and make it implement required methods:
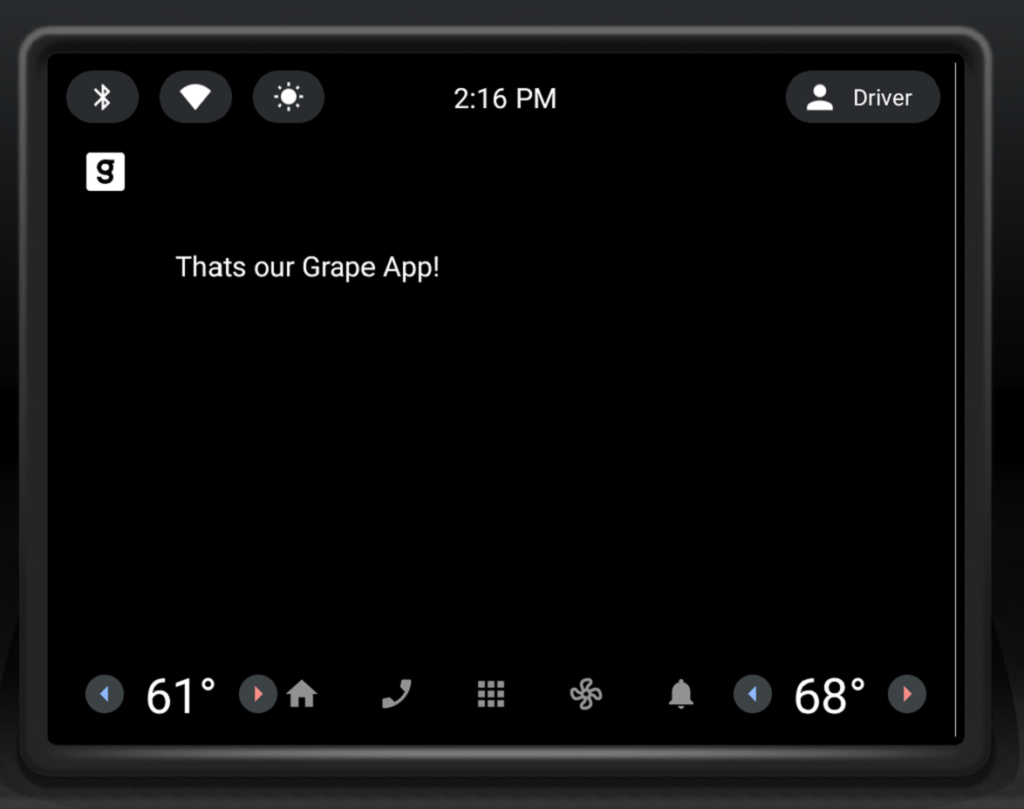
public class GrapeAppScreen extends Screen {
public GrapeAppScreen(@NonNull CarContext carContext) {
super(carContext);
}
@NonNull
@Override
public Template onGetTemplate() {
Row row = new Row.Builder()
.setTitle("Thats our Grape App!").build();
return new PaneTemplate.Builder(
new Pane.Builder()
.addRow(row)
.build()
).setHeaderAction(Action.APP_ICON).build();
}
}
That should create a simple screen with our icon and title, now create another class extending CarAppService from the same package and as well make it implement the required methods. From createHostValidator() method return a static one that allows all hostnames for the purpose of this tutorial and return brand new session with our screen in onCreateSession() , pass CarContext using Session class getCarContext() method:
public class GrapeAppService extends CarAppService {
public GrapeAppService() {}
@NonNull
@Override
public HostValidator createHostValidator() {
return HostValidator.ALLOW_ALL_HOSTS_VALIDATOR;
}
@NonNull
@Override
public Session onCreateSession() {
return new Session() {
@Override
@NonNull
public Screen onCreateScreen(@Nullable Intent intent) {
return new GrapeAppScreen(getCarContext());
}
};
}
}
Next, move to AndroidManifest and add various features inside the main manifest tag:
<uses-feature
android:name="android.hardware.type.automotive"
android:required="true" />
<uses-feature
android:name="android.software.car.templates_host"
android:required="true" />
<uses-feature
android:name="android.hardware.wifi"
android:required="false" />
<uses-feature
android:name="android.hardware.screen.portrait"
android:required="false" />
<uses-feature
android:name="android.hardware.screen.landscape"
android:required="false" />
Inside the Application tag add our service and activity, don’t forget minCarApiLevel as lack of this will throw an exception on app start:
<application
android:allowBackup="true"
android:appCategory="audio"
android:icon="@mipmap/ic_launcher"
android:label="@string/app_name"
android:roundIcon="@mipmap/ic_launcher_round"
android:supportsRtl="true"
android:theme="@style/Theme.GrapeApplication">
<meta-data android:name="androidx.car.app.minCarApiLevel"
android:value="1"
/>
<service
android:name="com.grapeup.grapeapplication.GrapeAppService"
android:exported="true">
<intent-filter>
<action android:name="androidx.car.app.CarAppService" />
</intent-filter>
</service>
<activity
android:name="androidx.car.app.activity.CarAppActivity"
android:exported="true"
android:label="GrapeApp Starter"
android:launchMode="singleTask"
android:theme="@android:style/Theme.DeviceDefault.NoActionBar">
<intent-filter>
<action android:name="android.intent.action.MAIN" />
<category android:name="android.intent.category.LAUNCHER" />
</intent-filter>
<meta-data
android:name="distractionOptimized"
android:value="true" />
</activity>
</application>
Now we can upload our application to the device, verify that you have an automotive emulator created, use automotive configuration, and hit run. The app is run in Google Automotive App Host, so if it is your first application on this device, it may require you to get to the play store and get it.

That’s how it looks:
The last thing, we’ll add a navigation button that will pop a Toast . Modify onGetTemplate() in Screen class, add Action and ActionStrip :
Action action = new Action.Builder()
.setOnClickListener(
() -> CarToast.makeText(getCarContext(), "Hello!", CarToast.LENGTH_SHORT).show())
.setTitle("Say hi!")
.build();
ActionStrip actionStrip = new
Add it to PaneTemplate:
return new PaneTemplate.Builder(
new Pane.Builder()
.addRow(row)
.build()
) .setActionStrip(actionStrip)
.setHeaderAction(Action.APP_ICON)
.build();
That’s our HelloWorld app:

Now you have the HelloWorld example app up and running using Car App Library. It takes care of displaying and arranging everything on the screen for us. The only responsibility is to add screens and actions we would like to have(and a bit of configuration). Check the Car app library to explore more of what can be done with it, play around with creating your app, and definitely check our blog soon for more AAOS app creation content.

How more connected vehicles on the road will impact the insurance industry
By 2023, there will be over 350 million connected cars on the road . What can the insurance industry do about it? It turns out that quite a bit, as automotive companies, introducing the latest technological advances, are enabling new ways to mix driver behavior. This is of great importance in the context of creating offers, but not only. At stake is to maintain the position and competitiveness in the field of motor insurance.
The automotive and car insurance industries are changing
The automotive market is already experiencing changes driven by innovative technologies. More often than not, these are based on the software-defined vehicle (SDV) trend.
If the vehicle is equipped with embedded connectivity, it is able to provide very detailed vehicle and driver behavior data, such as:
● sudden acceleration or braking,
● taking sharp turns,
● peak activity times (nighttime drivers are more vulnerable),
● average speed and acceleration,
● performing dangerous maneuvers.
BBI & UBI and ADAS
Behavior-based (pay-how-you-drive) and usage-based insurance – UBI – (pay-as-you-drive) are the future of car insurance programs . Meanwhile, as vehicles become smarter, more connected, and automated, insurers evaluate not only the driver's behavior but also the car s/he is driving. This evaluation takes into account, among other things, the amount of advanced driver assistance systems (ADAS) that affect the safety of the vehicle's occupants.
Autonomous vehicles
And Deloitte analysts note that self-driving (AV) cars, which are an interesting novelty now but will in time be a standard on par with human-driven vehicles, are also likely to force fundamental changes in insurers' product ranges, as in the risk assessment, pricing, and business models.
Connected cars
Change is already happening, and it will become even more pronounced in the years ahead. IoT Analytics predicts that by 2025, the total number of IoT devices worldwide will exceed 27 billion. Plus, experts predict that there will be 7.2 billion active smartphones and more than 400 million connected vehicles on the road during the same period.
This all clearly shows that we are in an entirely different reality than we were just a few or a dozen years ago. Car insurers need to understand this if they want to maintain their foothold.
Telematics technologies are an obvious step into the future of the insurance industry
Insurance companies have been offering usage-based and behavior-based products for years based on data from either additional devices or mobile apps. This is a fast-growing product area since the UBI market is predicted to be worth more than $105 billion in 2027 , up 23.61% annually.
The best position in this arena is attained by businesses that started investing in telematics technology early and now can take pride in well-developed telematics products.
We are talking about brands such as State Farm®, Nationwide, Allstate, and Progressive. Yet at the same time, companies that deemed telematics a passing trend and therefore didn't invest in it lost a very large amount of market share. The result? Now they have to catch up and race to keep up with the competition.
TSPs understand the potential of connected vehicle data
Insuring companies are not the only ones who recognize the importance of implementing their telematics-based solutions. Telematics services providers understand that value as well, so they invest in building out new capabilities of their products.
This is the case with GEICO , the second-largest auto insurer in the U.S. (right after Progressive). As Ajit Jain, vice president of Insurance Operations at Berkshire Hathaway claims : GEICO had clearly missed the business and were late in terms of appreciating the value of telematics. They have woken up to the fact that telematics plays a big role in matching rate to risk. They have a number of initiatives, and, hopefully, they will see the light of day before, not too long, and that'll allow them to catch up with their competitors, in terms of the issue of matching rate to risk .
Telematics companies see potential in partnering with the insurance industry
Insurance companies are not the only ones who recognize the importance of implementing new data-driven technology solutions. The relationship is two-way, as telematics industry representatives, in turn, are willing to invest in collaboration with insurers and put the customer from this market sector first.
For example, Cambridge Mobile Telematics (CMT), the world's largest telematics provider, has recently announced the expansion of its proprietary DriveWell® telematics platform to networked vehicles. Their flagship software has previously collected sensor data from millions of IoT devices, including smartphones, tags, in-car cameras, third-party devices, etc. From now on, that scope continues to expand by specifically including connected vehicles to create a unified view of driver and vehicle behavioral risk.
This synergy of all acquired data is mainly dedicated to customers in the auto insurance industry, who gain insight into what is happening on the road and behind the wheel. As Hari Balakrishnan, CTO and founder of CMT explains : There is a wave of innovative IoT data sources coming that will be critical to understanding driving risk and lowering crash rates. CMT fuses these disparate data sources to produce a unified view of driving .
Current UBI solutions can be flawed
Existing methods of data collection for insurers also rely on modern technologies, but these can be unreliable. All three methods have their drawbacks: devices plugged into the On-Board Diagnostic (OBD) system, smartphone apps and tags stuck to the windshield.
The first method provides insight into the driver's precise behavior data, downloaded directly from the engine control module (ECM). Weaknesses? The fact that OBD-II devices are limited to the data found in the ECM, for example, while those from other vehicle components remain inaccessible.
In this respect, mobile apps are certainly better, providing insurers with a simple way to launch their own telematics-based program . . In addition, data is collected every time the user drives the vehicle. The disadvantage, however, is that the software does not connect directly to the vehicle's systems. Therefore, the data points are subject to a margin of error, and it also happens that the automatic driving recognition fails and includes in the scoring journeys as a passenger in another car, for example.
Bluetooth-based tags, which is the last solution described here, are installed on the vehicle's windshield or rear window. Like mobile apps, the tags have no direct connection to the vehicle's systems and are therefore prone to bugs.
The conclusions are obvious
Thus, there is a lot to suggest that if an insurer is looking for truly reliable technology, it should opt to use embedded telematics, or data. This is what enables dynamic and, above all, unconditional data collection to reliably assess the risk associated with individual clients.
The data sent by connected cars is more accurate, more detailed, and in much larger quantities compared to other solutions. And this allows insurance companies to better understand customers and their behavior and, based on this information, offer products that are better suited to their needs, as well as more profitable.
Industry insiders don't need much convincing about the advantages of telematics and connected cars over other driver data collection solutions. Data from cars connected to the network are instantly obtainable. Of course, you can enrich it and give it context by using information from smartphones, but in most cases, it is not even necessary. So why invest in something unreliable, which by definition has vulnerabilities and does not meet 100 percent of your needs, when you can opt for a more comprehensive technology that offers more features right from the start.
Considerable importance of connected car data for the insurance industry
Connected car data is the subsequent step in building the ultimate telematics-based products. It is acquired without the need to install additional components. All it takes is a vehicle user's consent to use the data, and then the insurance company obtains the data directly from the OEM.

The information obtained from UBI vehicles can be used successfully and all stakeholders benefit: insurers, as they gain a better understanding of their customers and can better assess risk; OEMs, as it allows them to monetize the data; and finally consumers, who receive a better, more personalized offer this way. J.D. Power points out that 83% of policyholders who had positive claims experience renewed their policies, compared to only 10% who gave negative reviews .
In addition, such reliable data serves not only to improve the profitability of an insurance portfolio, but also to improve road safety. Insurers can offer incentives that will encourage their customers to continuously improve their driving style and increase their care for themselves and other road users.
Even now, market leaders who understand the value of investing in innovation are offering their customers the opportunity to share data from connected cars for UBI/BBI purposes. One example is the State Farm® brand, which offers discounts based on driving behavior. The driver's on-the-road behavior ( sharp braking or no braking, rapid acceleration, swift turns) and driving mileage are automatically sent to the data manager after each trip, so be sure to enable data sharing and location services on your saved vehicle. This information is used to update your Drive Safe & Save discount each time you renew your policy. The safer you drive, the more you can save .
Likewise, Ford Motor Company is increasingly shifting toward using driver data in UBI programs based on connected vehicles. To that end, the automotive giant has partnered with a mobility and analytics brand. Their joint project is expected to empower drivers with more control over how much they pay for their car insurance. Drivers can voluntarily share their driving data from activated Ford vehicles with Arity's centralized telematics platform, and it will then be delivered via Arity's API. Drivesight® to insurers. The obtained risk index can be used to price auto insurance by any participating insurer .
Currently, connected cars are only one option, as many insurance companies are still using, for example, mobile applications in parallel. However, we can already see that the trend of using CC data is present on the market and the number of companies offering such an option to their clients will grow. This is something to be reckoned with.
Significant benefits
For insurers, the benefits are tangible. According to Swiss Re, with 20,000 claims handled per year, the average savings after implementing the above technologies amounted to 10-30 USD per claim .
Telematics also helps to curb so-called claims inflation. Increasingly advanced vehicles are equipped with complex components, which can be costly to replace. Fortunately, today's insurer has the ability to create its own strategy based on the changing cost of spare parts and damage history for major car models. This enables them to develop new pricing that includes inflated compensation costs.
The sooner, the better
Leveraging data and analytics based on artificial intelligence is guaranteed to drive growth. Expanded sources of information improve the customer experience and help streamline operational processes. The benefits are thus evident across the entire value chain. We can confidently say that never before in history has technology been so intertwined with the insurance industry.
That's why all insurance companies should start working on incorporating connected car data into their programs now. The sooner they do, the better positioned they will be when such vehicles become mainstream on the road. After all, the share of new vehicles with built-in connectivity will reach 96% in 2030 .
That's what Evangelos Avramakis, Head Digital Ecosystems R&D, Swiss Re Institute Research & Engagement advises insurance companies to do: Starting small then scaling fast might be a good strategy (...) There is so much you can do with data. But you need to take a different approach, depending on whether you want to improve claims processing or create new products. Conversely, this is what Nelson Tham, eAdmin Expert Asia, P&C Business Management, thinks about implementations: Whenever an SME thinks about digitalization, it intimidates them. But it need not be the case if we start small. They can begin by reviewing their internal processes, see how data flows, turn that into structured data, then analyze this data for more meaningful insights .
How the insurance industry should approach the subject?
Insurers should start by answering key questions like: where connected car data will deliver the most value for my business? What internal capabilities do we have and need? Do we have the required infrastructure, process and skills to leverage connected car data? What investments in technology are necessary to deliver on our goals?
Lastly, they need to consider whether they can better and faster achieve those goals by building required capabilities in-house or working with partners.
A good business and technology partner for the insurance industry is fundamental
Using connected car data is not that straightforward. It requires know-how and the right technology background, as well as finding the right partner to collaborate with.
A well-matched partner will help change the current operating model, by combining automotive and technology competencies and at the same time understanding the specifics of the insurance industry. Some processes simply have to be carried out in a comprehensive and holistic way.
At GrapeUp, we help implement new approaches to an existing strategy. Operating at the intersection of automotive and insurance, we specialize in the technologies of tomorrow. Contact us if you want to boost your business performance.
Challenging beginnings of developing apps for Android Automotive OS
Quite a new droid around. The operating system has been in the market for a while, still missing a lot, but it is out, already implemented in cars, and coming for more. Polestar and Volvo were the first to bring Android Automotive OS to their Polestar 2 and XC40 Recharge.
Other car manufacturers like PSA, Ford, Honda, GM, and more announced that they are going to bring Android Automotive OS to their cars or just hinted about cooperating with Google Mobile Services. Part of implementations coming with Google Automotive Services(GAS): Play Store, Google Maps, Google Assistant, another part without, own app stores, assistants. What's most interesting for now is to bring your application to the store.
Building apps for the Android Automotive Operating System
Creating an android app for automotive doesn't differ that much from mobile and is similar to android auto. Starting in an android studio, setting it up for canary releases to get the emulators. The first issue is that Android Automotive OS emulation needs an Intel CPU right now and doesn't support Apple M1 or AMD. Available emulators start on Android 9(Pie), with Google and a custom one for Polestar 2, Android 10(Q) also with Volvo, skinned to look like XC40 cockpit, Android 11 and freshly released Android 12(API 32) emulators are Google only. To get your hands on custom versions for Volvo or Polestar 2, you need to add links to SDK update sites .
Challenges with Google Automotive Services
Lack of documentation and communication
Diving into the details of development and Android Automotive Operating System in general, the main thing you are going to spot is a problem with documentation and communication with Google, as the Android Automotive car feels like it is lacking options and solutions.
Developers and mobile groups are complaining about it, some of them trying to establish a communication channel and get Google on the other side. Google is not providing a clear roadmap for AAOS, and it is risky or at least could be expensive to develop applications right now. Some parts of the Operating System code hint at certain features, but documentation is silent about them.
Limited options to improve AAOS user experience
Automotive applications are run in a shell (Google Automotive App Host) similar to those for Android Auto, and they do not have Activity thus UI can't be changed. Apps are automatically rendered, and all of them look similar.
There is still an option to install a regular application through ADB, but this might sound easy only for an emulator. Options for app developers to brand their applications are very limited, actually it is just an app icon at the top side of the screen and a color of progress bars, like those showing how much of a podcast or song you listened to already.
Car manufacturers and automotive OEMs have more options to reflect their brand and style of an interior. They can customize colors, typography, layouts, and more. There is still a requirement to follow design patterns for automotive, and Google is providing a whole design system page .
Mandatory review
Applications submitted to the store are mandatory for an additional review. Reviewers have to be able to perform a full check, logins, payments, etc., so they need to be provided with all required data and accounts. That adds additional uncertainty with innovation and going beyond what is expected, as the reviewer has to agree that our app meets the requirements.
Focus on an infotainment system
Right now, the documentation states that supported categories for Android Automotive OS apps are focused on in-vehicle infotainment experience: Media, Navigation, Point of Interest, and Video. Compared to Android Auto, it is missing Messaging category and adds Video. Requirements are in place for all apps in general or specific categories and most of those requirements follow the principle to make the app very simple and not distract the driver.
How does it work? If you don't have a payment option set on your account, it should ask you to add it on another device. You can't ask a user to agree to recurring payments or purchase multiple items at once. It is not allowed even if you are not driving, and that appears to be inconsistent with the video app category. For example, it is not allowed to work at all during driving, but can display video normally when stopped.
Play Store right now presents a handful of applications, fairly easy to count all of them, most of them being in-vehicle infotainment systems : media(music and podcasts) and navigation apps. Nothing is stated about mixing categories, and none of the existing apps seems to cover more than one category.
Sensor data
Android Automotive Operating System being an integral part of the car, brings ideas about controlling features of a car, or at least reading them and reacting within an application accordingly. Emulation provides just a few options to simulate car state, ignition, speed, gear, parking brake, low fuel level, night mode, and environment sensors(temperature, pressure, etc.). There is an option to load a recording of sensor reads.
There are definitely more sensors that we are missing here that could have come in handy, and there is an extensive list of vehicle property ids to be read, with possible extensions from a car manufacturer and an option to subscribe for a callback informing us that property changed.
Managing car features
Coming to controlling a car's features leaves us with scarce information. The first thing that came to my mind was getting all the permissions through ADB, and it brought joy when permissions like car climate change appeared, but no service or anything is provided to control those features. Documentation reveals that there is a superuser responsible for running OEM apps that are controlling e.g. air-conditioning, but for now, there is no option for a dev to make your own app that will open a window for you.
The infotainment system should be possible to make and bring all the information you can get on a car screen(worth mentioning Android Automotive Operating System should be able to control the display behind the steering wheel, that is missed in documentation as well), but do not forget that there is no such category and possibly won't get through mandatory check.
What to look forward to in the upcoming future
After all, AAOS is here to standardize what we will see in our cars. It brings our most used applications, without plugging in the phone. We can choose our favorite navigation application and make shortcut icons for the most visited places. Our vehicle will remember where we were with our podcast and what playlist was on.
Looks like the system releases are becoming more frequent, Google is adding features that are necessary to control everything correctly from different cars. We should see it in more and more cars as this cuts costs for manufacturers and saves on developing applications. Custom skins and customizations for the screens can bring a bit of your style to your car.
Android Automotive Operating System summed up
That summary of what is going on in Automotive Android Operating System and Google Automotive Services might show there is a slight mess, both around code and documentation. That seems to be the feeling of most of the devs sharing their experiences. It is risky to develop apps without having a clear understanding of which way is the new droid going and without any board or support medium, at least to gather developers together.
That being said, it is a great time to put your app in the store and be there first. Explore what could get through the check and how far they let apps develop. We would love to get in the car at some point over a phone over an NFC spot and let it quickly adjust everything for you, with your key apps.
Do you want to start building apps for AAOS? Here is our guide to help you create AAOS Hello World .
What's new in the truck industry
64% of truck industry CEOs say the future success of their organization hinges upon the digital revolution. This should come as no surprise, as transportation as we knew it a decade or two ago is slowly fading into obscurity.
Operating standards in the industry are improving, and values such as speed, efficiency, eco-friendliness, and safety are reverberating in announcements at industry conferences and in truck industry reports.
Self-driving, fully autonomous vehicles, mainly electrically powered and based on AI and the Internet of things , are transforming 21st-century transportation. It is well worth taking a look at examples of solutions implemented by innovators with substantial development capital.
Solutions that translate into safety and driving performance of larger vehicles
Some innovations, in particular, are shifting the industry forward. And they are literally doing so. Developments like autonomous vehicles, electric-powered trucks, Big Data , and cloud computing have modified the way goods and people are transported. Smart analytics allows for more efficient supply chains, but not only that. It also enhances driving safety and the experience of traveling long distances.
High-tech trucks break down less frequently and cause fewer accidents. And self-driving technologies, which are still being developed, enable you to save time and money.
AI, Big Data, Internet of things
Better location tracking, improved ambient sensing, and enhanced fleet management . All these benefits can be achieved by implementing IoT solutions.
Composed of devices and detectors in the vehicle and in the road infrastructure, the network is a space for the continuous exchange of data in real-time . It provides information about the conditions on the route, but also whether the cargo is stable (tilt at the level of the pallet or package), and whether the pressure in the tires is at the right level. This facilitates the work of drivers, shippers, and management.
This solution is applied, for instance, at one of the globally leading logistics companies, Kuehne + Nagel. The company uses IoT sensors and a cloud-based platform in its daily work. It simply works.
The use of artificial intelligence algorithms is equally important. Advanced Big Data analytics , coupled with AI, allows companies to make decisions based on accurate, quality data. According to Supply Chain Management World research, 64 percent of executives believe that big data and coupled technologies will empower and change the industry forever. This is because it will improve performance forecasting and goal formulation even further.
Performance indicators are measured in this way by the logistics company Geodis. With their proprietary Neptune platform, they leverage real-time coordination of transportation activities. With one app and a few clicks, carriers and customers can manage all activities during transport.
Failure prevention
Software-based solutions in the trucking industry are eradicating a number of issues that have previously been the bane of the industry. These include breakdowns, which sometimes take a fleet's operationally significant "arsenal" out of circulation. You can find out about such incidents even before they happen.
Drivers of the new Mercedes-Benz eActros, for example, have recently been able to make use of the intelligent Mercedes-Benz Uptime system. This service is based on more than 100 specific rules that continuously monitor processes such as charging. On top of that, they control the voltage history associated with the high-voltage battery.
All information required in terms of reliability is available to customers via a special portal in the cloud. In this way, the German manufacturer wants to keep unexpected faults to a minimum and facilitate the planning of maintenance work for the fleet.
Self-driving vehicles
Automated trucks equipped with short and long-distance radars, sensors, cameras, 3D mapping, and laser detection are poised to revolutionize the industry. They are also a solution to the problem of the driver shortage, though, as a matter of fact, we still have to wait a while for fully autonomous trucks.
However, there are many indications that there will be increased investment in such solutions. Just take a look at the proposals from tech giants in the US like Tesla, Uber, Cruise, and Waymo.
The latter offers the original Waymo VIA solution, promising van and bus drivers an unparalleled autonomous driving experience. Waymo Driver's intelligent driving assistant, based on simulations with the most challenging driving scenarios, is capable of making accurate decisions already in the natural road environment. WD sees and detects what's happening on the road, in addition to being able to handle complex tasks of accelerating, braking, and navigating a wide turning circle.
Sustainable drive
The sustainability trend is now powering multiple industries, with the truck industry being no exception. So it should come as no surprise that a rising number of large transport vehicles are being electrified.
Tesla is investing in electric trucks, and doubly so, because in addition to making their Semi Truck an electric vehicle, Elon Musk's brand has additionally created its own charging infrastructure - a network of superchargers under the brand, the Tesla Supercharger Network. As a result, ST trucks are able to drive 800 km on full batteries, and an additional 600 km of range can be attained after 30 minutes of charging.
Another giant, Volkswagen , is also following a similar approach. It is investing in electric trucks with solid-state batteries that, unlike lithium-ion batteries, provide greater safety and an improved quick-charging capability. In the long run, this is intended to lead to an increase of up to 250% in the range of kilometers covered.
The mission to reduce CO2 emissions in truck transport is also being actively promoted by VOLTA. Their all-electric trucks are designed to reduce exhaust tailpipe emissions to 1,191,000 tonnes by 2025. A slightly smaller, but still impressive goal has been set by England's Tevva Electric Trucks. Their vehicles are expected to reduce CO2 emissions by 10 million tons by the next decade.
Giants already know what's at stake
Companies like Tesla, Nikola Corporation, Einride, Daimler, and Volkswagen already understand the need to enter the electric vehicle market with bold proposals. Major players in the automotive market are also targeting synergistic collaborations. For instance, BMW, Daimler, Ford, and Volkswagen are teaming up to build a high-powered European charging network. Each charging point will be 350 kW and use the Combined Charging System (CCS) standard to work with most electric vehicles, including trucks.
Another major collaboration involves Volkswagen Group Research and the American company QuantumScape. The latter is conducting research on solid-state lithium metal batteries for large electric cars. This partnership is expected to enable the production of solid-state batteries on an industrial level.
Smooth energy management
Truck electrification is not all that is needed. It is also essential that electric vehicles have an adequate range and unhindered access to charging infrastructure. In addition, optimizing consumption and increasing energy efficiency is also one of the challenges.
It is with these needs in mind that Proterra has developed special Proterra APEX connected vehicle intelligence telematics software to assist electric fleets with real-time energy management. Electric batteries are constantly monitored and real-time alerts appear on dashboards. Fleet managers also have access to configurable reports.
Meanwhile, the Fleetboard Charge Management developed by Mercedes offers a comprehensive view of all interactions between e-trucks and the company's charging stations. Users can see what the charging time is and monitor the current battery status. Beyond that, they can view the history of previous events. They can also adjust individual settings such as departure times and final expected battery status.
Truck Platooning
More technologically advanced trucks can be linked together. Platooning, or interconnected lines of vehicles traveling in a single formation allows for substantial savings. Instead of multiple trucks "scattered" on the road, the idea is to have a single, predictable in many ways string of vehicles moving in a highly efficient and low-emission manner.
How is this possible? The answer is simple: telematics. Telecommunication devices enable the seamless sending, receiving, and storing of information. Josh Switkes, a founder of Peloton, a leader in automated vehicles, explains how the system functions: We’re sending information directly from the front truck to the rear truck, information like engine torque, vehicle speed, and brake application .
Although platooning is not yet widespread, it may soon become a permanent fixture on European roads thanks to Ensemble . As part of this project, specialists, working with brands such as DAF, DAIMLER, MAN, IVECO, SCANIA, and VOLVO Group, are analyzing the impact of platooning on infrastructure, road safety, and traffic flow. However, the fuel savings alone are already said to be 4.5% for the leading truck and 10% for the truck following it.
Smart sensors
Developers of automotive and truck industry technologies are focusing particularly on safety issues. These can be aided by intelligent sensors that allow a self-driving vehicle to generate alerts and take proactive action. This is how VADA works. This is Volvo ’s active driver assistance system, already being standard on the Volvo VNR and VNL models.
The advanced collision warning system, which combines radar sensors with a camera, alerts the driver seconds before an imminent collision. If you are too slow to react, the system can implement emergency braking automatically in order to avoid a crash.
Innovative design
Changes are also taking place at the design stage of large vehicles. This is particularly emphasized by the makers of these cutting-edge models. One of the leaders in this field is VOLTA , which advertises its ability to create "the world's safest commercial vehicles".
Their Volta Zero model provides easy and low level boarding and alighting from either side directly on the sidewalk. That's possible because the vehicle doesn't have an internal combustion engine, so the engineers were able to overhaul previously established rules.
Dynamic route mapping and smart monitoring
While GPS is nothing new, the latest software uses the technology to a more advanced degree. For instance, for so-called dynamic route mapping, i.e. selecting the shortest, most convenient route, allowing for possible congestion. Importantly, this works flexibly, adapting not only to road conditions but also, for example, to unexpected increases in loading, etc.
Volta Zero also relies on the advanced route and vehicle monitoring. Using the Sibros OTA Deep Logger, you can receive up-to-date information on individual vehicles and the entire fleet.
Shipping is not like it used to be
Apart from the passenger car market changes, a similar revolution is underway in the truck and van industry. This transformation is called for as the problem is not only a shortage of professional drivers but also reducing the cost of transportation and increasing volume. So any loss-reduction initiative is of paramount value.
As for the solutions we have mentioned in this article, they will certainly not all be widely implemented in the next few years. For example, it is difficult to expect only electric-powered autonomous trucks to be on the road as early as 2027. What can be widely rolled out now is, for example, optimization of cargo loading (by predicting when the truck will arrive), better route finding (via advanced GPS), or predictive maintenance (early repair before it generates logistics costs). It is only the second step to progress toward full electrification and autonomization.
Regardless of how the truck industry evolves over the next few or so years, it is definite that the changes will be based on the idea of a digital revolution, advanced software, and smart components.
All this is geared to enhance mobility services, bringing aspects such as driving comfort, business efficiency, and safety to a new level. This is a fact well known to the big OEM players and to the tech and automotive companies that year after year are competing with each other in innovations.
How to get effective computing services: AWS Lambda
In the modern world, we are constantly faced with the need not only to develop applications but also to provide and maintain an environment for them. Writing scalable, fault-tolerant, and responsive programs is hard, and on top of that, you’re expected to know exactly how many servers, CPUs, and how much memory your code will need to run – especially when running in the Cloud. Also, developing cloud native applications and microservice architectures make our infrastructure more and more complicated every time.
So, how not worry about underlying infrastructure while deploying applications? How do get easy-to-use and manage computing services? The answer is in serverless applications and AWS Lambda in particular.
What you will find in this article:
- What is Serverless and what we can use that for?
- Introduction to AWS Lambda
- Role of AWS Lambda in Serverless applications
- Coding and managing AWS Lambda function
- Some tips about working with AWS Lambda function
What is serverless?
Serverless computing is a cloud computing execution model in which the cloud provider allocates machine resources on-demand, taking care of the servers on behalf of their customers. Despite the name, it does not involve running code without servers, because code has to be executed somewhere eventually. The name “serverless computing” is used because the business or person that owns the system does not have to purchase, rent, or provision servers or virtual machines for the back-end code to run on. But with provided infrastructure and management you can focus on only writing code that serves your customers.
Software Engineers will not have to take care of operating system (OS) access control, OS patching, provisioning, right-sizing, scaling, and availability. By building your application on a serverless platform, the platform manages these responsibilities for you.
The main advantages of AWS Serverless tools are :
- No server management – You don’t have to provision or maintain any servers. There is no software or runtime to install or maintain.
- Flexible scaling – You can scale your application automatically.
- High availability – Serverless applications have built-in availability and fault tolerance.
- No idle capacity – You don't have to pay for idle capacity.
- Major languages are supported out of the box - AWS Serverless tools can be used to run Java, Node.js, Python, C#, Go, and even PowerShell.
- Out of the box security support
- Easy orchestration - applications can be built and updated quickly.
- Easy monitoring - you can write logs in your application and then import them to Log Management Tool.
Of course, using Serverless may also bring some drawbacks:
- Vendor lock-in - Your application is completely dependent on a third-party provider. You do not have full control of your application. Most likely, you cannot change your platform or provider without making significant changes to your application.
- Serverless (and microservice) architectures introduce additional overhead for function/microservice calls - There are no “local” operations; you cannot assume that two communicating functions are located on the same server.
- Debugging is more difficult - Debugging serverless functions is possible, but it's not a simple task, and it can eat up lots of time and resources.
Despite all the shortcomings, the serverless approach is constantly growing and becoming capable of more and more tasks. AWS takes care of more and more development and distribution of serverless services and applications. For example, AWS now provides not only Lambda functions(computing service), but also API Gateway(Proxy), SNS(messaging service), SQS(queue service), EventBridge(event bus service), and DynamoDB(NoSql database).
Moreover, AWS provides Serverless Framework which makes it easy to build computing applications using AWS Lambda. It scaffolds the project structure and takes care of deploying functions, so you can get started with your Lambda extremely quickly.
Also, AWS provides the specific framework to build complex serverless applications - Serverless Application Model (SAM). It is an abstraction to support and combine different types of AWS tools - Lambda, DynamoDB API Gateway, etc.
The biggest difference is that Serverless is written to deploy AWS Lambda functions to different providers. SAM on the other hand is an abstraction layer specifically for AWS using not only Lambda but also DynamoDB for storage and API Gateway for creating a serverless HTTP endpoint. Another difference is that SAM Local allows you to run some services, including Lambda functions, locally.
AWS Lambda concept
AWS Lambda is a Function-as-a-Service(FaaS) service from Amazon Web Services. It runs your code on a high-availability compute infrastructure and performs all of the administration of the compute resources, including server and operating system maintenance, capacity provisioning and automatic scaling, code monitoring, and logging.
AWS Lambda has the following conceptual elements:
- Function - A function is a resource that you can invoke to run your code in Lambda. A function has code to process the events that you pass into the function or that other AWS services send to the function. Also, you can add a qualifier to the function to specify a version or alias.
- Execution Environment - Lambda invokes your function in an execution environment, which provides a secure and isolated runtime environment. The execution environment manages the resources required to run your function. The execution environment also provides lifecycle support for the function's runtime. At a high level, each execution environment contains a dedicated copy of function code, Lambda layers selected for your function, the function runtime, and minimal Linux userland based on Amazon Linux.
- Deployment Package - You deploy your Lambda function code using a deployment package. AWS Lambda currently supports either a zip archive as a deployment package or a container image that is compatible with the Open Container Initiative (OCI) specification.
- Layer - A Lambda layer is a .zip file archive that contains libraries, a custom runtime, or other dependencies. You can use a layer to distribute a dependency to multiple functions. With Lambda Layers, you can configure your Lambda function to import additional code without including it in your deployment package. It is especially useful if you have several AWS Lambda functions that use the same set of functions or libraries. For example, in a layer, you can put some common code about logging, exception handling, and security check. A Lambda function that needs the code in there, should be configured to use the layer. When a Lambda function runs, the contents of the layer are extracted into the /opt folder in the Lambda runtime environment. The layer need not be restricted to the language of the Lambda function. Layers also have some limitations: each Lambda function may have only up to 5 layers configured and layer size is not allowed to be bigger than 250MB.
- Runtime - The runtime provides a language-specific environment that runs in an execution environment. The runtime relays invocation events, context information, and responses between Lambda and the function. AWS offers an increasing number of Lambda runtimes, which allow you to write your code in different versions of several programming languages. At the moment of this writing, AWS Lambda natively supports Java, Go, PowerShell, Node.js, C#, Python, and Ruby. You can use runtimes that Lambda provides, or build your own.
- Extension - Lambda extensions enable you to augment your functions. For example, you can use extensions to integrate your functions with your preferred monitoring, observability, security, and governance tools.
- Event - An event is a JSON-formatted document that contains data for a Lambda function to process. The runtime converts the event to an object and passes it to your function code.
- Trigger - A trigger is a resource or configuration that invokes a Lambda function. This includes AWS services that you can configure to invoke a function, applications that you develop, or some event source.
So, what exactly is behind AWS Lambda?
From an infrastructure standpoint, every AWS Lambda is part of a container running Amazon Linux (referenced as Function Container). The code files and assets you create for your AWS Lambda are called Function Code Package and are stored on an S3 bucket managed by AWS. Whenever a Lambda function is triggered, the Function Code Package is downloaded from the S3 bucket to the Function container and installed on its Lambda runtime environment. This process can be easily scaled, and multiple calls for a specific Lambda function can be performed without any trouble by the AWS infrastructure.
The Lambda service is divided into two control planes. The control plane is a master component responsible for making global decisions about provisioning, maintaining, and distributing a workload. A second plane is a data plane that controls the Invoke API that runs Lambda functions. When a Lambda function is invoked, the data plane allocates an execution environment to that function, chooses an existing execution environment that has already been set up for that function, then runs the function code in that environment.
Each function runs in one or more dedicated execution environments that are used for the lifetime of the function and then destroyed. Each execution environment hosts one concurrent invocation but is reused in place across multiple serial invocations of the same function. Execution environments run on hardware virtualized virtual machines (microVMs). A micro VM is dedicated to an AWS account but can be reused by execution environments across functions within an account. MicroVMs are packed onto an AWS-owned and managed hardware platform (Lambda Workers). Execution environments are never shared across functions and microVMs are never shared across AWS accounts.
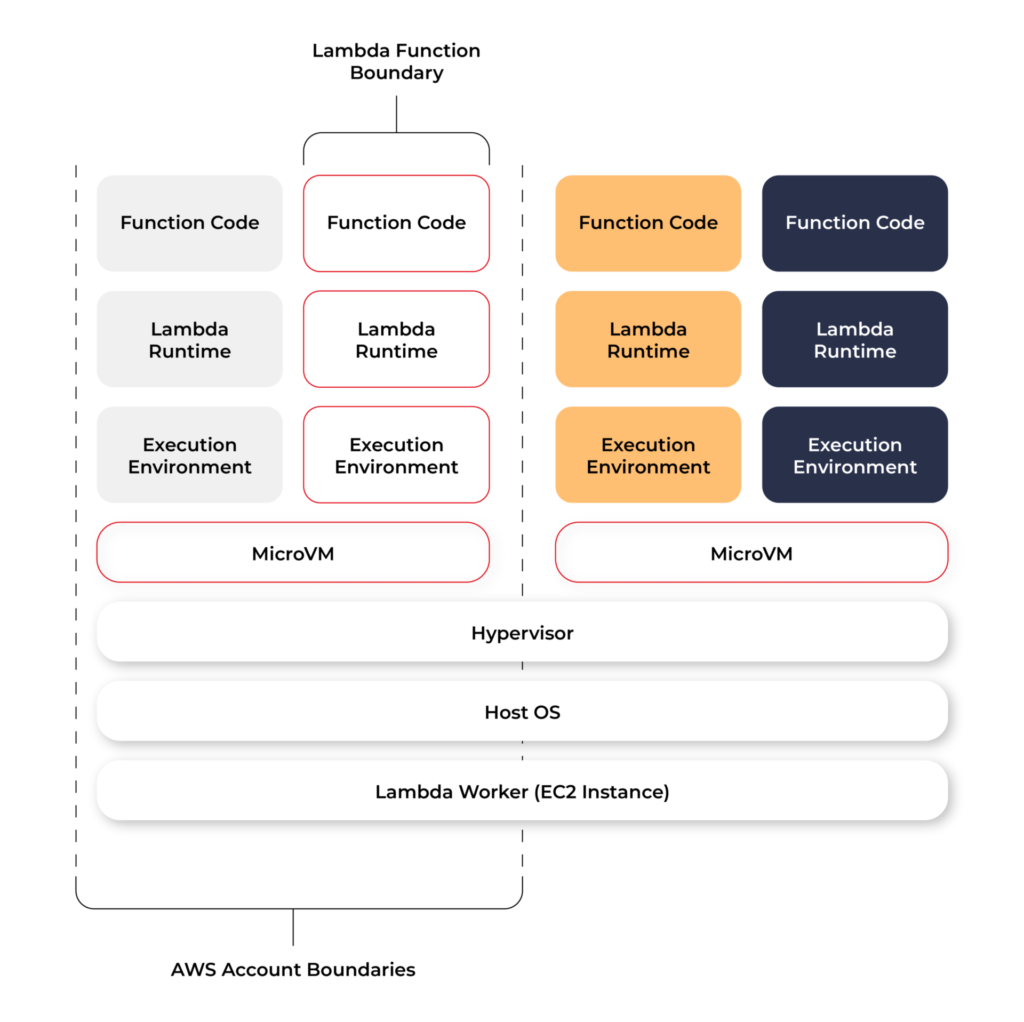
Even though Lambda execution environments are never reused across functions, a single execution environment can be reused for invoking the same function, potentially existing for hours before it is destroyed.
Each Lambda execution environment also includes a writeable file system, available at /tmp . This storage is not accessible to other execution environments. As with the process state, files are written to /tmp remain for the lifetime of the execution environment.
Cold start VS Warm start
When you call a Lambda Function, it follows the steps described above and executes the code. After finishing the execution, the Lambda Container stays available for a few minutes, before being terminated. This is called a Cold Start.
If you call the same function and the Lambda Container is still available (haven’t been terminated yet), AWS uses this container to execute your new call. This process of using active function containers is called Warm Container and it increases the response speed of your Lambda.
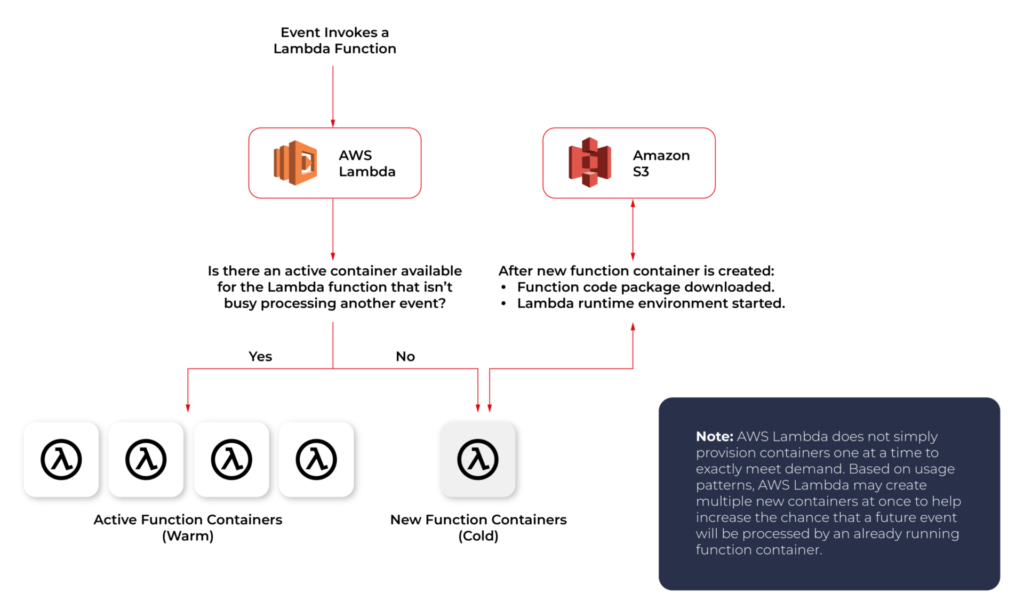
Role of AWS Lambda in serverless applications
There are a lot of use cases you can use AWS Lambda for, but there are killer cases for which Lambda is best suited:
- Operating serverless back-end
The web frontend can send requests to Lambda functions via API Gateway HTTPS endpoints. Lambda can handle the application logic and persist data to a fully-managed database service (RDS for relational, or DynamoDB for a non-relational database).
- Working with external services
If your application needs to request services from an external provider, there's generally no reason why the code for the site or the main application needs to handle the details of the request and the response. In fact, waiting for a response from an external source is one of the main causes of slowdowns in web-based services. If you hand requests for such things as credit authorization or inventory checks to an application running on AWS Lambda, your main program can continue with other elements of the transaction while it waits for a response from the Lambda function. This means that in many cases, a slow response from the provider will be hidden from your customers, since they will see the transaction proceeding, with the required data arriving and being processed before it closes.
- Near-realtime notifications
Any type of notifications, but particularly real-time, will find a use case with serverless Lambda. Once you create an SNS, you can set triggers that fire under certain policies. You can easily build a Lambda function to check log files from Cloudtrail or Cloudwatch. Lambda can search in the logs looking for specific events or log entries as they occur and send out notifications via SNS. You can also easily implement custom notification hooks to Slack or another system by calling its API endpoint within Lambda.
- Scheduled tasks and automated backups
Scheduled Lambda events are great for housekeeping within AWS accounts. Creating backups, checking for idle resources, generating reports, and other tasks which frequently occur can be implemented using AWS Lambda.
- Bulk real-time data processing
There are some cases when your application may need to handle large volumes of streaming input data, and moving that data to temporary storage for later processing may not be an adequate solution.If you send the data stream to an AWS Lambda application designed to quickly pull and process the required information, you can handle the necessary real-time tasks.
- Processing uploaded S3 objects
By using S3 object event notifications, you can immediately start processing your files by Lambda, once they land in S3 buckets. Image thumbnail generation with AWS Lambda is a great example for this use case, the solution will be cost-effective and you don’t need to worry about scaling up - Lambda will handle any load.
AWS Lambda limitations
AWS Lambda is not a silver bullet for every use case. For example, it should not be used for anything that you need to control or manage at the infrastructure level, nor should it be used for a large monolithic application or suite of applications.
Lambda comes with a number of “limitations”, which is good to keep in mind when architecting a solution.
There are some “hard limitations” for the runtime environment: the disk space is limited to 500MB, memory can vary from 128MB to 3GB and the execution timeout for a function is 15 minutes. Package constraints like the size of the deployment package (250MB) and the number of file descriptors (1024) are also defined as hard limits.
Similarly, there are “limitations” for the requests served by Lambda: request and response body synchronous event payload can be a maximum of 6 MB while an asynchronous invocation payload can be up to 256KB. At the moment, the only soft “limitation”, which you can request to be increased, is the number of concurrent executions, which is a safety feature to prevent any accidental recursive or infinite loops from going wild in the code. This would throttle the number of parallel executions.
All these limitations come from defined architectural principles for the Lambda service:
- If your Lambda function is running for hours, it should be moved to EC2 rather than Lambda.
- If the deployment package jar is greater than 50 MB in size, it should be broken down into multiple packages and functions.
- If the request payloads exceed the limits, you should break them up into multiple request endpoints.
It all comes down to preventing deploying monolithic applications as Lambda functions and designing stateless microservices as a collection of functions instead. Having this mindset, the “limitations” make complete sense.
AWS Lambda examples
Let’s now take a look at some AWS Lambda examples. We will start with a dummy Java application and how to create, deploy and trigger AWS Lambda. We will use AWS Command Line Interface(AWS CLI) to manage functions and other AWS Lambda resources.
Basic application
Let’s get started by creating the Lambda function and needed roles for Lambda execution.

This trust policy allows Lambda to use the role's permissions by giving the service principal lambda.amazonaws.com permission to call the AWS Security Token Service AssumeRole action. The content of trust-policy.json is the following:

Then let’s attach some permissions to the created role. To add permissions to the role, use the attach-policy-to-role command. Start by adding the AWSLambdaBasicExecutionRole managed policy.

Function code
As an example, we will create Java 11 application using Maven.
For Java AWS Lambda provides the following libraries:
- com.amazonaws:aws-lambda-java-core – Defines handler method interfaces and the context object that the runtime passes to the handler. This is a required library.
- com.amazonaws:aws-lambda-java-events – Different input types for events from services that invoke Lambda functions.
- com.amazonaws:aws-lambda-java-log4j2 – An appender library for Apache Log4j 2 that you can use to add the request ID for the current invocation to your function logs.
Let’s add Java core library to Maven application:

Then we need to add a Handler class which will be an entry point for our function. For Java function this Handler class should implement com.amazonaws.services.lambda.runtime.RequestHandler interface. It’s also possible to set generic input and output types.

Now let’s create a deployment package from the source code. For Lambda deployment package should be either .zip or .jar. To build a jar file with all dependencies let’s use maven-shade-plugin .
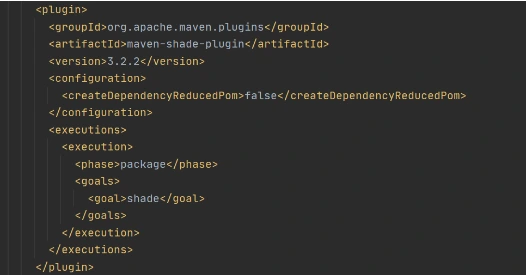
After running mvn package command, the resulting jar will be placed into target folder. You can take this jar file and zip it.
Now let’s create Lambda function from the generated deployment package.

Once Lambda function is deployed we can test it. For that let’s use invoke-command.

out.json means the filename where the content will be saved. After invoking Lambda you should be able to see a similar result in your out.json :

More complicated example
Now let’s take a look at a more complicated application that will show the integration between several AWS services. Also, we will show how Lambda Layers can be used in function code. Let’s create an application with API Gateway as a proxy, two Lambda functions as some back-end logic, and DynamoDB as data storage. One Lambda will be intended to save a new record into the database. The second Lambda will be used to retrieve an object from the database by its identifier.
Let’s start by creating a table in DynamoDB. For simplicity, we’ll add just a couple of fields to that table.

Now let’s create a Java module where some logic with database operations will be put. Dependencies to AWS DynamoDB SDK should be added to the module.

Now let’s add common classes and models to work with the database. This code will be reused in both lambdas.
Model entity object:
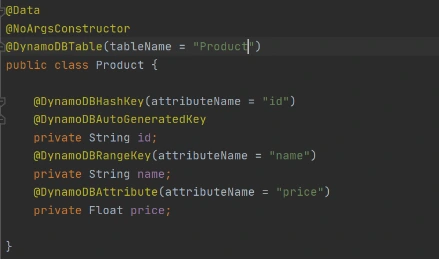
Adapter class to DynamoDB client.

Implementation of DAO interface to provide needed persistent operations.

Now let’s build this module and package it into a jar with dependencies. From that jar, a reusable Lambda Layer will be created. Compress fat jar file as a zip archive and publish it to S3. After doing that we will be able to create a Lambda Layer.

Layer usage permissions are managed on the resource. To configure a Lambda function with a layer, you need permission to call GetLayerVersion on the layer version. For functions in your account, you can get this permission from your user policy or from the function's resource-based policy. To use a layer in another account, you need permission on your user policy, and the owner of the other account must grant your account permission with a resource-based policy.
Function code
Now let’s add this shared dependency to both Lambda functions. To do that we need to define a provided dependency in pom.xml.
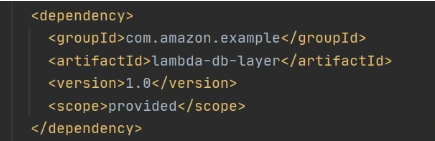
After that, we can write Lambda handlers. The first one will be used to persist new objects into the database:

NOTE : in case of subsequent calls AWS may reuse the old Lambda instance instead of creating a new one. This offers some performance advantages to both parties: Lambda gets to skip the container and language initialization, and you get to skip initialization in your code. That’s why it’s recommended not to put the creation and initialization of potentially reusable objects into the handler body, but to move it to some code blocks which will be executed once - on the initialization step only.
In the second Lambda function we will extract object identifiers from request parameters and fetch records from the database by id:

Now create Lambda functions as it was shown in the previous example. Then we need to configure layer usage for functions. To add layers to your function, use the update-function-configuration command.

You must specify the version of each layer to use by providing the full Amazon Resource Name (ARN) of the layer version. While your function is running, it can access the content of the layer in the /opt directory. Layers are applied in the order that's specified, merging any folders with the same name. If the same file appears in multiple layers, the version in the last applied layer is used.
After attaching the layer to Lambda we can deploy and run it.
Now let’s create and configure API Gateway as a proxy to Lambda functions.

This operation will return json with the identifier of created API. Save the API ID for use in further commands. You also need the ID of the API root resource. To get the ID, run the get-resources command.

Now we need to create a resource that will be associated with Lambda to provide integration with functions.


Parameter --integration-http-method is the method that API Gateway uses to communicate with AWS Lambda. Parameter --uri is a unique identifier for the endpoint to which Amazon API Gateway can send requests.
Now let’s make similar operations for the second lambda( get-by-id-function ) and deploy an API.

Note. Before testing API Gateway, you need to add permissions so that Amazon API Gateway can invoke your Lambda function when you send HTTP requests.

Now let’s test our API. First of all, we’ll try to add a new product record:

The result of this call will be like this:

Now we can retrieve created object by its identifier:

And you will get a similar result as after POST request. The same object will be returned in this example.
AWS Lambda tips
Debugging Lambda locally
You can use AWS SAM console with a number of AWS toolkits to test and debug your serverless applications locally. For example, you can perform step-through debugging of your Lambda functions. The commands sam local invoke and sam local start-api both support local step-through debugging of your Lambda functions. To run AWS SAM locally with step-through debugging support enabled, specify --debug-port or -d on the command line. For example:

Also for debugging purposes, you can use AWS toolkits which are plugins that provide you with the ability to perform many common debugging tasks, like setting breakpoints, executing code line by line, and inspecting the values of variables. Toolkits make it easier for you to develop, debug, and deploy serverless applications that are built using AWS.
Configure CloudWatch monitoring and alerts
Lambda automatically monitors Lambda functions on your behalf and reports metrics through Amazon CloudWatch. To help you monitor your code when it runs, Lambda automatically tracks the number of requests, the invocation duration per request, and the number of requests that result in an error. Lambda also publishes the associated CloudWatch metrics. You can leverage these metrics to set CloudWatch custom alarms. The Lambda console provides a built-in monitoring dashboard for each of your functions and applications. Each time your function is invoked, Lambda records metrics for the request, the function's response, and the overall state of the function. You can use metrics to set alarms that are triggered when function performance degrades, or when you are close to hitting concurrency limits in the current AWS Region.
Beware of concurrency limits
For those functions whose usage scales along with your application traffic, it’s important to note that AWS Lambda functions are subject to concurrency limits. When functions reach 1,000 concurrent executions, they are subject to AWS throttling rules. Future calls will be delayed until your concurrent execution averages are back below the threshold. This means that as your applications scale, your high-traffic functions are likely to see drastic reductions in throughput during the time you need them most. To work around this limit, simply request that AWS raise your concurrency limits for the functions that you expect to scale.
Also, there are some widespread issues you may face working with Lambda:
Limitations while working with database
If you have a lot of reading/writing operations during one Lambda execution, you may probably face some failures due to Lambda limitations. Often the case is a timeout on Lambda execution. To investigate the problem you can temporarily increase the timeout limit on the function, but a common and highly recommended solution is to use batch operations while working with the database.
Timeout issues on external calls
This case may occur if you call a remote API from Lambda that takes too long to respond or that is unreachable. Network issues can also cause retries and duplicated API requests. To prepare for these occurrences, your Lambda function must always be idempotent. If you make an API call using an AWS SDK and the call fails, the SDK automatically retries the call. How long and how many times the SDK retries is determined by settings that vary among each SDK. To fix the retry and timeout issues, review the logs of the API call to find the problem. Then, change the retry count and timeout settings of the SDK as needed for each use case. To allow enough time for a response to the API call, you can even add time to the Lambda function timeout setting.
VPC connection issues
Lambda functions always operate from an AWS-owned VPC. By default, your function has full ability to make network requests to any public internet address — this includes access to any of the public AWS APIs. You should configure your functions for VPC access when you need to interact with a private resource located in a private subnet. When you connect a function to a VPC, all outbound requests go through your VPC. To connect to the internet, configure your VPC to send outbound traffic from the function's subnet to a NAT gateway in a public subnet.

Software-defined vehicle and fleet management
With the development of artificial intelligence, the Internet of Things, and cloud solutions, the amount of data we can retrieve from a vehicle is expanding every year. Manufacturers improve efficiency in converting this data into new services and enhance their own offerings based on the information received from connected car systems. Can software-defined vehicle solutions be successfully applied to enabling fleet management systems for hundreds or even thousands of models? Of course, it can, and even should! This is what today's market, which is becoming steadily more car-sharing and micro mobility-based, expects and needs.
Netflix, Spotify, Glovo, and Revolut have taught us that entertainment, ordering food, or banking is now literally at our fingertips, available here and now, whenever we need or want it. Contactless, mobile-first processes, that reduce queues and provide flexibility, are now entering every area of the economy, including transportation and the automotive industry .
Three things: saving time, sparing money, and ecological trends dramatically change the attitude toward owning a car or choosing means of transport. Companies such as Uber, Lyft, or Bird cater to the needs of the younger generation, preferring renting over ownership.
The data-driven approach has become a cornerstone for automotive companies - both new, emerging startups and older, decades-old business models, such as car rental companies. None of the companies operating in this market can exist without a secure and well-thought-out IT platform for fleet management. At least if they want to stay relevant and compete.
It is the software - on an equal footing, or even first before the unique offer - that determines the success of such a company and allows it to manage a fleet of vehicles , which sometimes includes hundreds, if not thousands of models.
Depending on the purpose of the vehicles, the business model, and the scale of operations, solutions based on software will obviously vary, but they will be beneficial to both the fleet manager and the vehicle renter. They allow you to have an overall view of the situation, extract more useful information from received data and reasonably scale costs.
Among the potential entities that should be interested in improvements in this matter, the following types of fleets can be specifically mentioned:
- city e-scooters, bicycles, and scooters;
- car rentals;
- city bus fleets;
- tour operators;
- transport and logistics companies;
- cabs;
- public utility vehicles (e.g., fire departments, ambulances, or police cars) and government limousines;
- automobile mechanics;
- small private fleets (e.g., construction or haulage companies)
- insurers' fleets;
- automobile manufacturers' fleets (e.g., replacement or test vehicles).
The benefits of managing your fleet with cloud software and the Internet of Things (IoT)
Real-time vehicle monitoring (GPS)
A sizeable fleet implies a lot of responsibility and potentially a ton of problems. That's why it's so important to promptly locate each vehicle included and monitor it in real-time:
- the distance along the route,
- the place where the car was parked,
- place of breakdown.
This is especially useful in the context of a bus fleet, but also in the sharing-economy group of vehicles : city e-scooters, bicycles, and scooters. In doing so, the business owner can react quickly to problems.
Recovering lost or stolen vehicles
The real-time updated location, working due to IoT and wireless connectivity , also enables operations in emergency cases. This is because it allows you to recover a stolen or abandoned vehicle.
These benefits will be appreciated, for example, by people in charge of logistics transport fleets. After all, vehicles can be stolen in overnight parking lots. In turn, the fight against abandoned electric 2-wheelers will certainly be of interest to owners of the startups, which often receive complaints about scooters abandoned outside the zone, in unusual places, such as in fields or ditches in areas where there is no longer a sidewalk.
Predictive maintenance
We should also mention advanced predictive analytics for parts and components such as brakes, tires, and engines. The strength of such solutions is that you receive a warning (vehicle health alerts) even before a failure occurs.
The result? Reduced downtime, better resource planning, and streamlined decision-making. According to estimates, these are savings of $2,000 per vehicle per year.
More convenient vehicle upgrades - comprehensive OTA (Over-the-Air)
Over-the-Air (OTA) car updates are vital for safety and usability. Interconnected and networked vehicles can be updated in one go , simultaneously. This saves the time otherwise required to manually configure each system one by one. In addition, operations can also be performed on vehicles that happen to be out of the country.
Such a facility applies to virtually all industries relying on extensive fleets, especially in the logistics, transportation, and tourism sectors.
Intermediation in renting
A growing number of services are focusing on service that is fast, simplified, and preferably remote. For instance, many rooms or apartment rentals on Airbnb rely on self-service check-in and check-out, using special lockups and codes.
Similar features are offered by software-defined vehicles , which can now be rented "off the street", without the need for service staff. The customer simply selects a vehicle and, via a smartphone app, unlocks access to it. Quick, easy, and instant.
Loyalty scheme for large fleets
Vehicle and software providers are well aware that new technology comes with great benefits, but also with a degree of investment. In order to make such commitments easier to decide upon, attractive loyalty schemes are being rolled out for larger fleets.
So as a business owner you reap double benefits. And at the same time you test, on lucrative terms, which solutions work best for you.
Improved fleet utilization
Cloud and IoT software enables more practical use of the entire fleet of available vehicles and accurately pinpoints bottlenecks or areas where the most downtime occurs.
This is an invaluable asset in the context of productivity-driven businesses, where even a few hours of delay can result in significant losses.
By contrast, artificial intelligence(AI)-based predictions (for example, information about an impending failure) offered to commercial fleets provide fleet managers with more anticipatory data , which can significantly cut business costs. Other benefits include improved emissions control or higher environmental standards.
Increasing safety
Minimized almost to zero danger of hacking into the system contributes to the security of the fleet-based business.
Case study: Ford Pro™ Telematics
Revenues based on software and digital services is not a bad deal for all informed participants in the business environment. Some big players like Ford have based their entire business model, on this idea. With their Ford Pro™ series of solutions, they want to become an accelerator for highly efficient and sustainable business. Their offering is based on market-ready commercial vehicles to suit almost any business needs and on all-electric trucks and vans. They are developing telematics in particular.
Ford Chief Executive Jim Farley puts it bluntly: We are the Tesla of this industry.
Bold assumptions? Yes, but also an equally bold implementation. Created in May 2021, a standalone Ford Pro™ unit is to focus exclusively on commercial and government customers. The new model also serves as a prelude to expanding digital service offers for retail customers.
The objective is to increase Ford Pro's annual revenue to $45 billion by 2025, up 67% from 2019.
Streamlined vehicle repairs
Managing a large group of vehicles also necessitates regular inspections and repairs, and at different times for different vehicles. This entails the need to control each unit individually.
The risk this poses is that information about the problem may not reach decision-makers in time, and besides, instead of the service and product, the executive is constantly focused on responding to anomalies. New technologies partially eliminate this problem.
As part of the Ford Pro Telematics Essentials package, vehicle owners receive real-time alerts on vehicle status in the form of engine diagnostic codes, vehicle recalls, and more. There's also a scheduled service tracking feature and, in the near future, remote locking/unlocking, which will further enhance fleet management.
Driver behavior insights
Human-centered technology can help improve driver performance and road safety. Various sensors and detectors inside Ford vehicles provide a lot of interesting information about the driver's behavior. They monitor the frequency and suddenness of actions such as braking or accelerating. Knowledge of this type of behavior allows for better fleet planning and improved driver safety.
Fuel efficiency analysis
Fuel is one of the major business costs for companies managing a large number of vehicles. Ford Pro™ Telematics, therefore, approaches customers with a solution to monitor fuel consumption and engine idle time.
This functionality is designed to optimize performance and reduce expenses. Better exhaust control also indirectly lowers operating costs.
Manage all-electric vehicle charging with E-Telematics
Telematics also provides an efficient way to manage a fleet consisting of electric vehicles. There are many indications that due to increasingly stringent environmental standards, they will form the backbone of various operations.
That's why Ford has developed its own E-Telematics software. It enables comprehensive monitoring of the charging status of the electric vehicle fleet. In addition, it helps drivers find and pay for public charging points and facilitates reimbursement for charging at home.
The system also offers the ability to accurately compare the efficiency and economic benefits of electric vehicles versus gas-powered ones.
Better cooperation with insurers
Cloud-based advanced telematics software not only provides a better customer experience. What also counts is a streamlined collaboration with insurance providers and the delivery of vehicle rental services to clients of such companies.
This, of course, requires a special tool that enables:
- remote processing of the case reported by the customer,
- making the information available to the rental company,
- allowing rental company personnel to provide a vehicle that meets the driver's needs.
The goal is to provide replacement cars for the customers of partnering insurers .
Touchless and counter-less experience
It includes verifying a customer and unlocking a car using a mobile app . This translates into greater customer satisfaction and the introduction of new business models. With the introduction of mobile apps in app stores, queues can be shortened. This results in a simplified rental process. From now on, it is more intuitive and focused on user experience and benefits. Because nowadays customers expect mobile and contactless service.
Case study: car rental
The leading rental enterprise teamed up with Grape Up to provide counter-less rental services and a touchless experience for their customers . By leveraging a powerful touchless platform and telematics system used by the rental enterprise, the company was able to build a more customer-friendly solution and tackle more business challenges, such as efficient stolen car recovery and car insurance replacement.
Software-defined vehicle solutions in vehicle fleets. How do implement them sensibly?
Technological changes that we are experiencing in the entertainment industry or e-commerce have also made their way into the automotive sector as well as micro-mobility and car rentals. There are many indications that there is no turning back.
Solutions such as real-time tracking, predictive maintenance, and driverless rental are the future. They help manufacturers execute their key processes more efficiently and track and manage their fleets effectively. In turn, the end customer receives an intuitive and convenient tool that fosters brand loyalty and makes life easier.
Of course, they need to be implemented properly. A large role is played by the quality of software. The key is the efficient flow of data and their cooperation with devices inside the vehicle. That is why it is worth choosing for business cooperation such a company that not only has the appropriate technological competence, but also the knowledge and experience gained during other such projects and implementations for the automotive industry.
Cloud solutions and AI software to serve the transport in cities of the future
Cities of the future are spaces that are comfortable to live in, eco-friendly, safe, and intelligently managed. It's hard to imagine such a futuristic scenario without the use of advanced technology. Preferably one that combines various elements within one coherent data processing system. Especially great potential lies in solutions at the crossroads of automotive, telematics, and AI. Let's dive into the transport in cities of the future.

GPS data
GPS technology gives developers the ability to monitor the vehicle position in real-time, and on top of that generate the data on parameters such as speed, distance, and travel time. Using this kind of telemetry information , combined with fuel level, speed limits, traffic information, and the estimated time of arrival, the urban transportation passengers can be instantly alerted to ongoing, but also predicted delays and problems on route.
An advanced version of this system can also propose different routes, to avoid building up traffic in congested areas and reduce the average travel time of the passengers, making everyone happy.
Sensors and detectors
Installed along roads, such elements collect data on traffic volumes, vehicle speeds, and which lanes are being occupied. Sensors embedded in roads are used today by about 25% of smart city stakeholders in the United States (Otonomo study).
Additionally, the so-called agglomerative clustering algorithm helps to identify clusters of places or destinations.
Connected Vehicles (CV)
The latest generation of intelligent transportation systems works closely with the Internet of Things (IoT), specifically the Internet of Vehicles(IoV). This allows for increased efficiency, mobility, and safety of autonomous cars.
Wireless connectivity provides communication in indoor and outdoor environments . There is possible interaction:
- Vehicle-to-vehicle (V2V),
- Vehicle to Vehicle Sensor (V2S),
- Vehicle-road infrastructure (V2R),
- Vehicle-Internet (V2I).
In the latter case, the vehicle couples with ITS infrastructure: traffic signs, traffic lights, and road sensors.
Digital twin (case study: Antwerp)
A digital twin is a kind of bridge between the digital and physical worlds . It supports decision-makers in their complex decisions about the quality of life in the city, allowing them to budget even more effectively.
In the Belgian city of Antwerp a digital twin, a 3D digital replica of the city, was launched in 2018. The model features real-time values from air quality and traffic sensors.
The city authorities can see exactly what the concentration of CO2 emissions and noise levels are in the city center. They also notice to what extent limited car traffic in certain city areas affects traffic emissions.
Automated Highway Systems (AHS)
Connected vehicles have opened the way for further innovations. Automated highway systems will be among them. Fully autonomous cars will move along designated lanes. The flow of cars will be controlled by a central city system.
The new solution will allow the causes of congestion on highways to be pinpointed and reduces the likelihood of collisions.
Traffic zone division
Traditional traffic zoning takes into account the social and economic factors of an area. Whereas today, this can be based on much better data downloaded in real-time from smartphones. You can see exactly where most vehicles are accumulating at any given time. These are not always "obvious" places, because, for instance, at 3 p.m. there may be heavier traffic on a small street near a popular corporation than on an exit road in the city center.
This modern categorization simplifies the city's complex road network, enabling more efficient traffic planning without artificial division into administrative boundaries.
Possibilities vs. practice
There are some interesting findings from a study conducted in 2021 by the analytics firm Lead to Market. It aimed to determine how cities are using vehicle data to enhance urban life. Today, these are being used for:
- alleviating bottlenecks in cities for business travelers and tourists (36%),
- better management of roads and infrastructure (18%),
- spatial and urban planning (18%),
- managing accident scenes (14%),
- improving parking (6%),
- mitigating environmental impacts (2%).
Surprisingly, however, only 22% of respondents use vehicle data for real-time daily traffic management. What could be the reason behind this? Ben Wolkow, CEO of Otonomo, points to one main reason: data dispersion. Today, it comes from a variety of sources. Meanwhile: for connected vehicle data to power smart city development in a meaningful way, they need to shift to a single connected data source .
It's good to know that data from connected vehicles currently account for less than one-tenth of smart city analysis. But experts agree that this will be changing in favor of new solutions.
Technology that shapes the city
Vehicles are becoming increasingly intelligent and connected. Hardware, software, and sensors can now be fully integrated into the digital infrastructure. On top of that, full communication between vehicles and sensors on and off the road is made possible. Wireless connectivity, AI , edge computing, and IoT are supporting predictive and analytical processes in larger metropolitan areas.
The biggest challenge, however, is the skillful use of data and its uninterrupted retrieval. It is, therefore, crucial to find a partner with whom you can co-develop, e.g. some reliable traffic analysis software.
Predictive transport model and automotive. How can smart cities use data from connected vehicles?
There are many indications that the future lies in technology. Specifically, it belongs to connected and autonomous vehicles(CAVs), which, combined with 5G, AI, and machine learning, will form the backbone of the smart cities of the future. How will data from vehicles revolutionize city life as we've known it so far?
Data is "fuel" for the modern, smart cities
The UN estimates that by 2050, about 68 percent of the global population will live in urban areas. This raises challenges that we are already trying to address as a society.
Technology will significantly support connected, secure, and intelligent vehicle communication using vehicle-to-vehicle (V2V), vehicle-to-infrastructure (V2I), and vehicle-to-everything (V2X) protocols. All of this is intended to promote better management of city transport, fewer delays, and environmental protection.
This is not just empty talk, because in the next few years 75% of all cars will be connected to the internet, generating massive amounts of data. One could even say that data will be a kind of "fuel" for mobility in the modern city . It is worth tapping into this potential. There is much to suggest that cities and municipalities will find that such innovative traffic management, routing, and congestion reduction will translate into better accessibility and increased safety. In this way, many potential crises related to overpopulation and excess of cars in agglomerations will be counteracted.
What can smart cities use connected car data for?
Traffic estimation and prediction systems
Data from connected cars, in conjunction with Internet of Things (IoT) sensor networks, will help forecast traffic volumes. Alerts about traffic congestion and road conditions can also be released based on this.
Parking and signalization management
High-Performance Computing and high-speed transmission platforms with industrial AI /5G/ edge computing technologies help, among other things, to efficiently control traffic lights and identify parking spaces, reducing the vehicle’s circling time in search of a space and fuel being wasted.
Responding to accidents and collisions
Real-time processed data can also be used to save the lives and health of city traffic users. Based on data from connected cars , accident detection systems can determine what action needs to be taken (repair, call an ambulance, block traffic). In addition, GPS coordinates can be sent immediately to emergency services, without delays or telephone miscommunication.
Such solutions are already being used by European warning systems, with the recently launched eCall system being one example. It works in vehicles across the EU and, in the case of a serious accident, will automatically connect to the nearest emergency network, allowing data (e.g. exact location, time of the accident, vehicle registration number, and direction of travel) to be transmitted, and then dial the free 112 emergency number. This enables the emergency services to assess the situation and take appropriate action. In case of eCall failure, a warning is displayed.
Reducing emissions
Less or more sustainable car traffic equals less harmful emissions into the atmosphere. Besides, data-driven simulations enable short- and long-term planning, which is essential for low-carbon strategies.
Improved throughput and reduced travel time
Research clearly shows that connected and automated vehicles add to the comfort of driving. The more such cars on the streets, the better the road capacity on highways.
As this happens, the travel time also decreases. By a specific amount, about 17-20 percent. No congestion means that fewer minutes have to be spent in traffic jams. Of course, this generates savings (less fuel consumption), and also for the environment (lower emissions).
Traffic management (case studies: Hangzhou and Tallinn)
Intelligent traffic management systems (ITS) today benefit from AI . This is apparent in the Chinese city of Hangzhou, which prior to the technology-transportation revolution ranked fifth among the most congested cities in the Middle Kingdom.
Data from connected vehicles there helps to efficiently manage traffic and reduce congestion in the city's most vulnerable districts. They also notify local authorities of traffic violations, such as running red lights. All this without investing in costly municipal infrastructure over a large area. Plus, built-in vehicle telematics requires no maintenance, which also reduces operating costs.
A similar model was compiled in Estonia by Tallinn Transport Authority in conjunction with German software company PTV Group. A continuously updated map illustrates, among other things, the road network and traffic frequency in the city.
Predictive maintenance in public transport
Estimated downtime costs for high-utilization fleets, such as buses and trucks, range from $448 to $760 daily . Just realize the problem of one bus breaking down in a city. All of a sudden, you find that delays affect not just one line, but many. Chaos is created and there are stoppages.
Fortunately, with the trend to equip more and more vehicles with telematics systems, predictive maintenance will be easier to implement. This will significantly increase the usability and safety of networked buses . Meanwhile, maintenance time and costs will drop.
Creating smart cities that are ahead of their time
Connected vehicle data not only make smart cities much smarter, but when leveraged for real-time safety, emergency planning, and reducing congestion, it saves countless lives and enables a better, cleaner urban experience – said Ben Wolkow, CEO of Otonomo.
The digitization of the automotive sector is accelerating the trend of smart and automated city traffic management. A digital transport model can forecast and analyze the city’s mobility needs to improve urban planning.
How AI is transforming automotive and car insurance
The car insurance industry is experiencing a real revolution today. Insurers are more and more carefully targeting their offers using AI and machine learning features. Such innovations significantly enhance business efficiency, eliminate the risk of accidents and their consequences, and enable adaptation to modern realities.
Changes are needed today
Approximately $25 billion is "frozen" with insurers annually due to problems such as fraud, claims adjustment, delays in service garages, etc. However, customers are not always happy with the insurance amounts they receive and the fact that they often have to accept undervalued rates. The reason for this is that due to limited data, it is difficult to accurately identify the culprit of the incident. It is also often the case that compensation is based on rates lower than the actual value of the damage.
Insurers today need to be aware of the ecosystem in which they operate . Clients are becoming more demanding and, according to an IBM Institute for Business Value (IBV) study, 50 percent of them prefer tailor-made products based on individual quotes. The very model of cooperation between businesses is also changing, as relations between insurance providers and car manufacturers are growing tighter. All of this is linked to the fact that cars are becoming increasingly autonomous, allowing them to more closely monitor traffic incidents and driver behavior as well as manage risk. Estimates suggest there will be as many as one trillion connected devices by 2025, and by 2030 there will be an increasing percentage of vehicles with automated features (ADAS).
No wonder there's an increasing buzz about changes in the car insurance industry. And these are changes based on technology. The use of artificial intelligence , machine learning, and advanced data analytics in the cloud will allow for seamless adaptation to market expectations.
CASE STUDY
SARA Assicurazioni and Automobile Club Italia are already encouraging drivers to install ADAS systems in exchange for a 20% discount on their insurance premiums. Indeed, it has been demonstrated that such systems can slash the rate of liability claims for personal injury by 4-25% and by 7-22% for property damage.
Why is this so important for insurers who want to face the reality?
Artificial intelligence-based pricing models provide a significant reduction in the time needed to introduce new offerings and to make optimal decisions. The risk of being mispriced is also lowered, as is the time it takes to launch insurance products.
The new AI-based insurance reality is happening as we speak. The digital-first companies like Lemonade, with their high flexibility in responding to market changes, are showing customers what solutions are feasible. In doing so, they put pressure on those companies that still hesitate to test new models.

Areas of change in car insurance due to AI
Artificial intelligence and related technologies are having a huge impact on many aspects of the insurance industry : quoting, underwriting, distribution, risk and claims management, and more.

Changes in insurance distribution
Artificial intelligence algorithms smoothly create risk profiles so that the time required to purchase a policy is reduced to minutes. Smart contracts based on blockchain instantly authenticate payments from an online account. At the same time, contract processing and payment verification is also vastly streamlined, reducing insurers' client acquisition cost.
Advanced risk assessment and reliable pricing
Traditionally, insurance premiums are determined using the "cost-plus" method. This includes an actuarial assessment of the risk premium, a component for direct and indirect costs, and a margin. Yet it has quite a few drawbacks.
One of them is the inability to easily account for non-technical price determinants, as well as the inability to react quickly to shifting market conditions.
How is risk calculated? For car insurance companies, the assessment refers to accidents, road crashes, breakdowns, theft, and fatalities.
These days, all these aspects can be controlled by leveraging AI, coupled with IoT data that provides real-time insights. Customized pricing of policies, for instance, can take into account GPS device dataon a vehicle’s location, speed, and distance traveled. This way, you can see whether the vehicle spends most of its time in the driveway or if, conversely, it frequently travels on highways, particularly at excessive speeds.
In addition, insurance companies can use a host of other sensor and camera data, as well as reports and documents from previous claims. Having all this information gathered, algorithms are able to reliably determine risk profiles.
CASE STUDY
Ant Financial, a Chinese company that offers an ecosystem of merged digital products and services, specializes in creating highly detailed customer profiles. Their technology is based on artificial intelligence algorithms that assign car insurance points to each customer, similarly to credit scoring. They take into account such detailed factors as lifestyle and habits. Based on this, the app shows an individual score, assigning a product that matches the specific policyholder.
An in-depth analysis of claims
The cooperation between an insurance company and its client is based on the premise that both parties are pursuing to avoid potential losses. Unfortunately, sometimes accidents, breakdowns or thefts occur and a claims process must be implemented. Artificial intelligence, integrated IoT data, and telematics come in handy irrespective of the type of claims we are handling.
- These technologies are suitable for, among other things, automatically generating not only damage information but also repair cost estimates.
- Machine learning techniques can estimate the average cost of claims for various client segments.
- Sending real-time alerts, in turn, enables the implementation of predictive maintenance.
- Once an image has been uploaded, an extensive database of parts and prices can be created.
The drivers themselves gain control as they can carry out the process of registering the damage from A to Z: take a photo, upload it to the insurer's platform and get an instant quote for the repair costs. From now on, they are no longer reliant on workshop quotes, which were often highly overestimated in line with the principle: "the insurer will pay anyway".
Fraud prevention
29 billion dollars in annual losses These are losses to auto insurers that occur due to fraud. Fraudsters want to scam a company out of insurance money based on illegally orchestrated events. How to prevent this? The answer is AI.
Analyzed data retrieved from cameras and sensors can reconstruct the details of a car accident with high precision. So, having an accident timeline generated by artificial intelligence facilitates accident investigation and claims management.
CASE STUDY
An advanced AI-based incident reconstruction has been tested lately on 200,000 vehicles as part of a collaboration between Israel's Project Nexar and a Japanese insurance company.
Assistance in the event of accidents
According to data from the OECD, car accident fatalities could be reduced by 44 percent if emergency medical services had access to real-time information about the injuries of involved parties.
Still, real-time assistance has great potential not only for public services but also in the context of auto insurance.
By leveraging AI to perform this, insurers can provide drivers with quick and semi-automated responses during collisions and accidents . For example, a chatbot can instruct the driver on how to behave, how to call for help, or how to help fellow passengers. All this is essential in the context of saving lives. At the same time, it is a way of reducing the consequences of an accident.
Transparent decision making (client perspective)
New technologies offer solutions to many problems not only for insurers but also for clients. The latter often complain about discrimination and unfair, from their point of view, calculations of policies and compensation.
"Smart automated gatekeepers" are superior in multiple ways to the imperfect solutions of traditional models. This is because, based on a number of reliable parameters, they facilitate the creation of more authoritative and personalized pricing policies. Data-rich and automated risk and damage assessments pay off for consumers because they have decision-making power based on how their actions affect insurance coverage.
The opportunities and future of AI in car insurance
McKinsey's analysis says that across functions and use cases AI investments are worth $1.1 trillion in potential annual value for the insurance industry.
The direction of changes is outlined in two ways: first by increasingly connected and software-equipped vehicles with more sensors. Second, by the changing analytical skills of insurers. Data-driven vehicles will certainly affect more reliable and real-time consistent repair costs and, consequently, claims payments. And when it comes to planning offers and understanding the client, AI is an enabler of change for personalized, real-time service (24/7 virtual assistance) and for creating flexible policies. All signs indicate that such "abstract" parameters as education or earnings will cease to play a major role in this regard.

As can be inferred from the diagram above, the greater the impact of a given technology on an insurance company's business , the longer the time required for its implementation. Therefore, it is vital to consider the future on a macro scale, by planning the strategy not for 2 years, but for 10.
The decisions you make today have a bearing on improving operational efficiency, minimizing costs, and opening up to individual client needs, which are becoming more and more coupled with digital technologies.
Vehicle automation - where we are today and what problems we are facing
Tesla has Autopilot, Cadillac has Super Cruise, and Audi uses Travel Assist. While there are many names, their functionality is essentially similar. ADAS(advanced driver-assistance systems) assists the driver while on the road and sets the path we need to take toward autonomous driving. And where does your brand rank in terms of vehicle automation?
Consumers’ Reports data shows that 92 percent of new cars have the ability to automate speed with adaptive cruise control, and 50 percent can control both steering and speed. Although we are still two levels away from a vehicle that will be fully controlled by algorithms ( see the infographic below ), which, according to independent experts, is unlikely to happen within the next 10 years (at least when it comes to traditional car traffic), ADAS systems are finding their way into new vehicles year after year, and drivers are slowly learning to use them wisely.

On the six-step scale of vehicle automation - starting at level 0, where the vehicle is not equipped with any driving technology, and ending at level 5 (fully self-driving vehicle) - we are now at level 3. ADAS systems, which are in a way the foundation for a fully automated vehicle, combine automatic driving, acceleration, and braking solutions under one roof.
However, in order for this trend to be adopted by the market and grow dynamically year by year, we need to focus on functional software and the challenges facing the automotive industry .
The main threats facing automated driving support systems
1. The absence of a driver monitoring system
Well-designed for functionality and UX, ADAS can effectively reduce driver fatigue and stress during extended journeys. However, for this to happen it needs to be equipped with an effective driver monitoring system.
Why is this significant? With the transfer of some driving responsibility into the hands of advanced technology, the temptation to "mind their own business" can arise in the driver. And this often results in drivers scrolling through their social media feeds on their smartphones. When automating driving, it is important to involve the driver, who must be constantly aware that their presence is essential to driving.
Meanwhile, Consumer Reports, which surveyed dozens of such systems in vehicles from leading manufacturers, reports that just five of them: BMW, Ford, Tesla, GM and Subaru - have fitted ADAS with such technology.
According to William Wallace - safety policy manager at Consumer Reports, "The evidence is clear: if a car facilitates people’s distraction from the road, they will do it - with potentially fatal consequences. It's critical that active driving assistance systems have safety features that actually verify that drivers are paying attention and are ready to take action at all times. Otherwise, the safety risks of these systems may ultimately outweigh their benefits."
2. Lack of response to unexpected situations
According to the same institution, none of the systems tested reacted well to unforeseen situations on the road, such as construction, potholes, or dangerous objects on the roadway. Such deficiencies in functionality in current systems, therefore, create a potential risk of accidents, because even if the system guides the vehicle flawlessly along designated lanes (intermittent lane-keeping or sustained lane-keeping system) the vehicle will not warn the driver in time to take control of the car when it becomes necessary to readjust the route.
There are already existing solutions on the market that can effectively warn the driver of such occurrences, significantly increase driving comfort and "delegate" some tasks to intelligent software. These are definitely further elements on the list of things worth upgrading driving automation systems within the coming years.
3. Inadequate UX and non-intuitive user experience
All technological innovations at the beginning of their development breed resistance and misunderstanding. It's up to the manufacturer and the companies developing software to support vehicle automation to create systems that are straightforward and user-friendly. Having simple controls, clear displays and transparent feedback on what the system does with the vehicle is an absolute "must-have" for any system. The driver needs to understand right from the outset in which situations the system should be used when to take control of the vehicle and what the automation has to offer.
4. Lack of consistency in symbols and terminology
Understanding the benefits and functionality of ADAS systems is certainly not made easier by the lack of market consistency. Each of the leading vehicle manufacturers uses different terminology and symbols for displaying warnings in vehicles. The buyer of a new vehicle does not know if a system named by Toyota offers the same benefits as a completely different named system available from Ford or BMW and how far the automation goes.
Sensory overload affects driver frustration, misunderstanding of automation, or outright resentment, and this is reflected in consumer purchasing decisions and, thus, in the development of systems themselves. It is challenging to track their impact on safety and driving convenience when the industry has not developed uniform naming and consistent labeling to help enforce the necessary safety features and components of such systems.
5. System errors
Automation systems in passenger cars are fairly new and still in development. It's natural that in the early stages they can make mistakes and sometimes draw the wrong conclusions from the behavior of drivers or neighboring vehicles. Unfortunately, mistakes - like the ones listed below - cause drivers to disable parts of the system or even all of it because they simply don't know how to deal with it.
- Lane-keeping assists freaking out in poorer weather;
- Steering stiffening and automatically slowing down when trying to cross the line;
- Sudden acceleration or braking of a vehicle with active cruise control - such as during overtaking maneuvers or entering a curve on a highway exit or misreading signs on truck trailers.
How to avoid such errors? The solution is to develop more accurate models that detect which lanes are affected by signs or traffic lights.
Vehicle automation cannot happen automatically
Considering the number of potential challenges and risks that automakers face when automating vehicles, it's clear that we're only at the beginning of the road to the widespread adoption of these technologies. This is a defining moment for their further development, which lays the foundation for further action.
On the one hand, drivers are already beginning to trust them, use them with greater frequency, and expect them in new car models. On the other hand, many of these systems still have the typical flaws and shortcomings of "infancy," which means that with their misunderstanding or overconfidence in their capabilities, driver frustration can result, or in extreme cases, accidents. The role of automotive OEMs and software developers is to create solutions that are simple and intuitive and to listen to market feedback even more attentively than before. A gradual introduction of such solutions to the market, so that consumers have time to learn and grasp them, will certainly facilitate automation to a greater extent and ultimately the creation of fully automated vehicles. For now, the path leading to them is still long and bumpy.
How insurers can use telematics technology to improve customer experience and increase market competitiveness
As technology is evolving in the car insurance and data-defined vehicles markets, the generational cross-section of people who use them is also undergoing transformation. Currently, two generations, in particular, are coming to the fore: Millennials and Gen Z. They are interested in service and product offerings that are as personalized and tailor-made as possible, rather than generic. Adding to that the rapid development of vehicle connectivity, now is the perfect time for insurers to roll out and scale up their telematics products offer.
Based on research by Allison+Partners, consumers within the youngest generation view the car simply as yet another life-enhancing device. What's more, about 70% of Generation Z consumers don't have a driver's license, and 30% of this group have no intention or desire to get one. This makes them more interested in carpooling using an autonomous vehicle. More than 45 percent of respondents feel comfortable with this. Thus, "urban mobility" players such as Uber and Lyft, as also e-scooter providers and on-demand car rental services are in demand . All of these are capable of filling the empty gap in the public transport infrastructure.
There is another interesting point. Those who do decide to get a driver's license and buy a car on their own, however, face the hassle of costly insurance . The amounts are especially exorbitant for the least experienced drivers, who in fact pay more for their year of birth stamped on their ID cards. There is even talk of the "age tax" phenomenon. Interestingly, young age does not always go hand in hand with traffic violations or dangerous driving behavior. Generations Y and Z are therefore advocating that car insurance should be reassessed, with more emphasis on personalization .
Telematics - technology that supports contemporary society's needs

Consumers today, particularly younger ones, expect cars to be as innovative as possible, as this directly translates into comfort and safety. Above all, personalized experiences, reliable connection, and comfort count. All this is a recipe for success in the future of mobility as a service .
Individual online services should be consolidated into comprehensive mobility platforms. This will ensure that the user no longer has to switch between applications, and autonomous driving will generate new opportunities for innovative business models.
Utilizing telematics data opens the door to improving customer experience, unlocking new revenue streams, and increasing market competitiveness.
A modular and extensible telematics architecture provides tremendous opportunities for all pro-change agents.
This allows you to organize data handling, filter it and add missing information at various stages of processing. And it will not be an overstatement to say that in a technology-oriented information society, it is data that is the most valuable resource these days.
They can be used in all business processes, interacting with the customer experience and responding to their needs. Especially those who represent the younger generations of the future, namely Millennials and Gen Z.
Telematics platforms and the future of the automotive industry
The processed information is also used to train AI/ML models and to monitor system behavior. When you add to this the fact that they are extracted and included in real-time, you gain the added value of the rapid response. This then results in service satisfaction and sustained business performance.
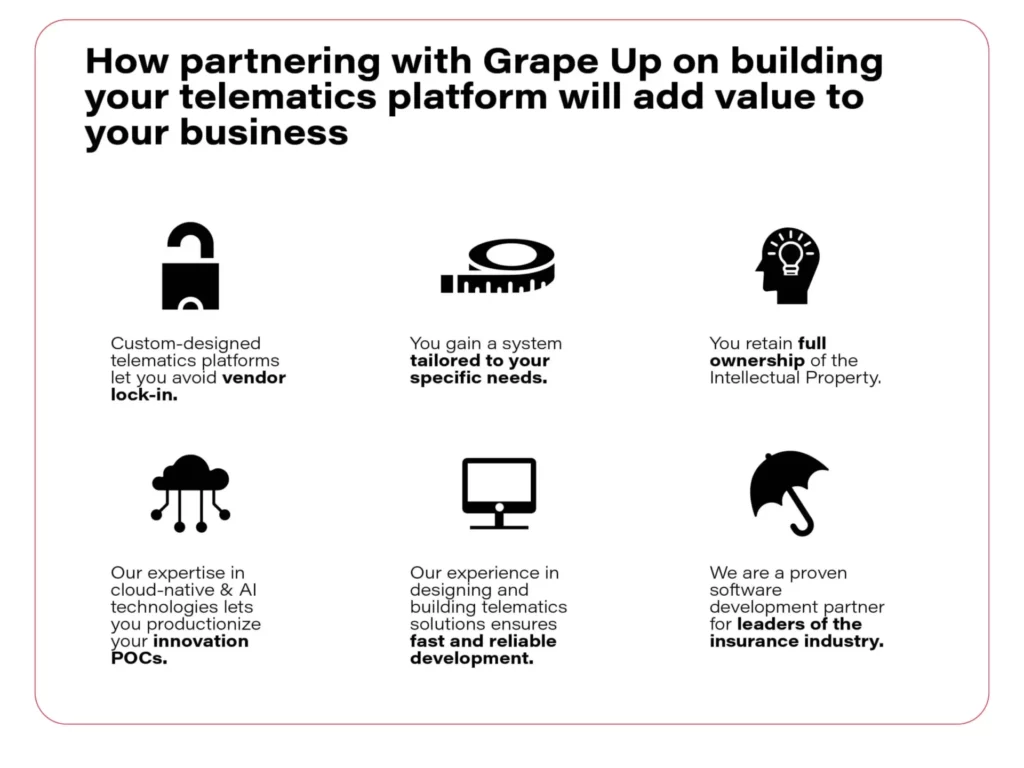
On the other hand, driving data collected from various sources offer a full insight into what is actually happening on the road, how drivers behave, and what decisions they make while driving. Insurers benefit from this, but so do car manufacturers and companies that deal with shared mobility in its broader sense.
All these advantages are seemingly speaking for themselves. And this is just the beginning because the future of telematics is looking very bright. The results of IoT Analytics research indicate that by 2025 the total number of IoT devices will have exceeded 27 billion globally. For comparison, it is important to add that currently there are 1.06 billion passenger cars on the roads around the world. Specialists predict that in just these few years this value will increase by more than 400 million connected vehicles .
What will the end customer and the insurers themselves gain from applying telematics technology in automotive insurance?
Crash detection
The real-time feature of a telematics platform allows to detect accidents instantly and take proactive actions to mitigate the damages. Car location and sensor data can be used to trigger the crash alerts, coordinate emergency services dispatch, and reconstruct the crash timeline.
Such solutions are already being implemented, for example at IBM. Their Telematics Hub enables the management of crash and accident data in real-time and with a low probability of error. The tool can distinguish a false event from a real one, generate incident reports, and evaluate driver behavior.
Roadside assistance
According to Highway England, there are over 224,000 car breakdowns a year on England's busiest roads. That's an average of 25 cars per hour. In contrast, in another Anglo-Saxon country, the U.S., there are 1.76 million calls for roadside assistance per year.
Roadside assistance is an optional add-on to drivers' personal car insurance. It’s a popular service among the drivers but it needs to be further developed which requires leveraging real-time data processing. Those insurance providers that offer remote service or that minimize time spent on the side of the road are gaining a competitive advantage.
Monitoring vehicle activity allows pinpointing its location in case of an emergency. Once notified of the breakdown, assistance can be dispatched to the customer position, and the nearest available replacement vehicle can be booked.
UBI & BBI
Behavior-based (pay-how-you-drive) and usage-based insurance - UBI - (pay-as-you-drive) are the future of car insurance programs . Together with value-added services like automated crash detection or roadside assistance, they will determine the competitiveness and market share of insurance companies.
Handling large volumes of real-time data from every telematics device, like connected cars, mobile apps, and black boxes to extract crucial information and offer insights to customers, requires a robust and scalable telematics platform.
Experts point out many advantages of UBI schemes over the conventional solutions offered so far. The most important of these are:
- Potential discounts.
- The authorities and insurance claims adjusters have facilitated accident investigations.
- Drivers become motivated to improve their performance and eliminate risky driving behaviors and unsafe habits.
- Enhancing customer loyalty.
- Providing personalized, value-added services to insurance plans to serve customer interests more effectively.
Stolen vehicle recovery
The demand for targeted technologies for vehicle tracking and recovery comes in handy for insurance companies, which face the problem of issuing sizable amounts of compensation for stolen vehicles on a daily basis.
It's not true that younger generations are fickle and unwilling to take out insurance. Generation Z consumers and Millenials accounted for 39% of consumers buying auto insurance in 2018. This figure is increasing year on year and applies not only to compulsory insurance but also to additional plans. The problem is that in many cases theft insurance offers, if there are any, are based on statistical indicators rather than actual data, for instance, the high crime rate of this type in a given area. Besides, customers are often dissatisfied with amounts based on market values that are lower than expected.
So here, too, data-driven individualization is needed, and that's what telematics provides.
For instance, by gathering data about customer behavior, insurers can build driver profiles that allow them to set up alerts that are triggered by unusual or suspicious behavior. Another thing is real-time vehicle tracking. The alarm service can be activated on-demand or automatically, and the car establishes a connection to the operations center. It is also possible to document theft. Information detected by the vehicle is collected and then exported and made available for viewing by the appropriate people.
Telematics technology is an answer to a need, but also a challenge
The Millennials and Generation Z expect a holistic customer experience. Digital offerings must bring together a variety of products designed to make life easier and accommodate each individual's consumer personality.
This is exactly the task facing telematics today, which is not just an incomprehensible and distant technology. It is essentially something that allows you to adapt to society's changing service and experience-related expectations.
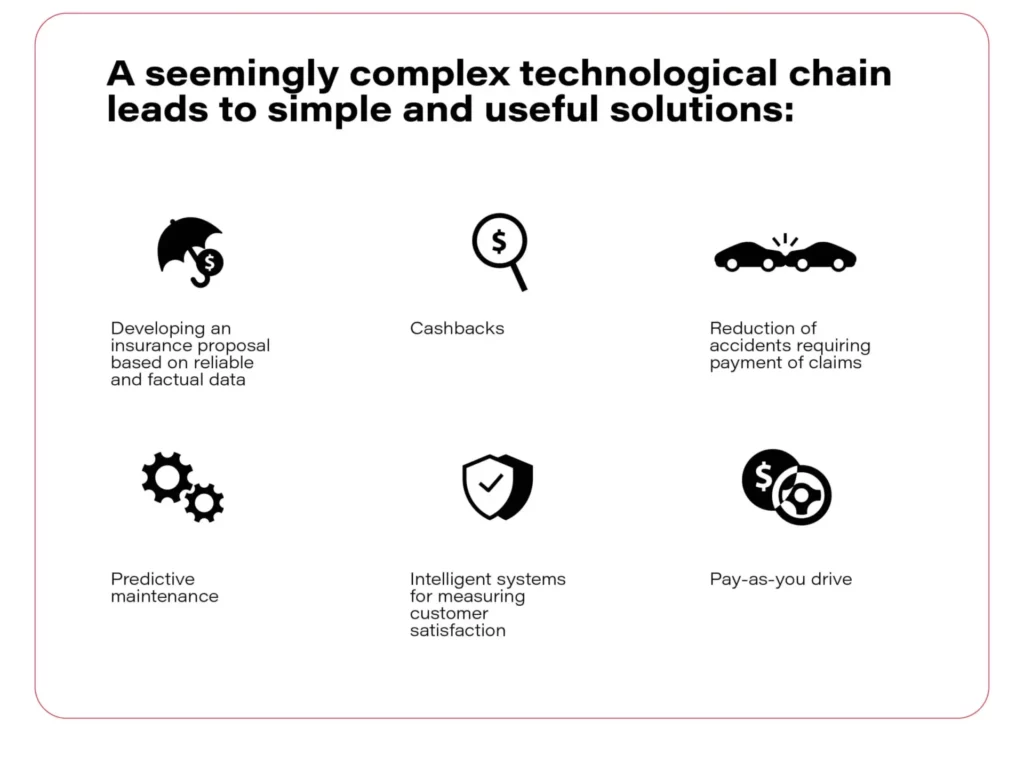
However, the new expectations of shared mobility, autonomous vehicles, and personalized data insurance offers are linked to new sacrifices that end customers must also be prepared to make. These include, for example, the need to share more and more data. Yet, the younger generations are already declaring their readiness. According to the Majesco survey, almost half of generation Z are also willing to share data if they see value in doing so. Questions in the survey also referred to the car and driver data-based insurance industry.
There are also massive challenges for insurers themselves, where data processing is still only at an initial stage. The technological capabilities of individual insurance companies need to be continuously developed. Ideally, driving data, and the software used to collect and process it, should not be scattered but planned holistically. This ultimately leads to the conscious use of telematics and to better management of situations requiring insurance payouts.
Grape Up helps you realize the potential of telematics by applying the automotive and insurance industry expertise to create scalable, cloud-native solutions.
Big picture of Spring Cloud Gateway
In my life, I had an opportunity to work in a team that maintains the Api Gateway System. The creation of this system began more than 15 years ago, so it is quite a long time ago considering the rate of technology changing. The system was updated to Java 8, developed on a light-way server which is Tomcat Apache, and contained various tests: integration, performance, end-to-end, and unit test. Although the gateway was maintained with diligence, it is obvious that its core contains a lot of requests processing implementation like routing, modifying headers, converting request payload, which nowadays can be delivered by a framework like Spring Cloud Gateway. In this article, I am going to show the benefits of the above-mentioned framework.
The major benefits, which are delivered by Spring Cloud Gateway:
- support to reactive programming model: reactive http endpoint, reactive web socket
- configuring request processing (routes, filters, predicates) by java code or yet another markup language (YAML)
- dynamic reloading of configuration without restarting the server (integration with Spring Cloud Config Server)
- support for SSL
- actuator Api
- integration gateway to Service Discovery mechanism
- load-balancing mechanisms
- rate-limiting (throttling) mechanisms
- circuit breakers mechanism
- integration with Oauth2 due to providing security features
Those above-mentioned features have an enormous impact on the speed and easiness of creating an Api gateway system. In this article, I am going to describe a couple of those features.
Due to the software, the world is the world of practice and systems cannot work only in theory, I decided to create a lab environment to prove the practical value of the Cloud Spring Gateway Ecosystem. Below I put an architecture of the lab environment:
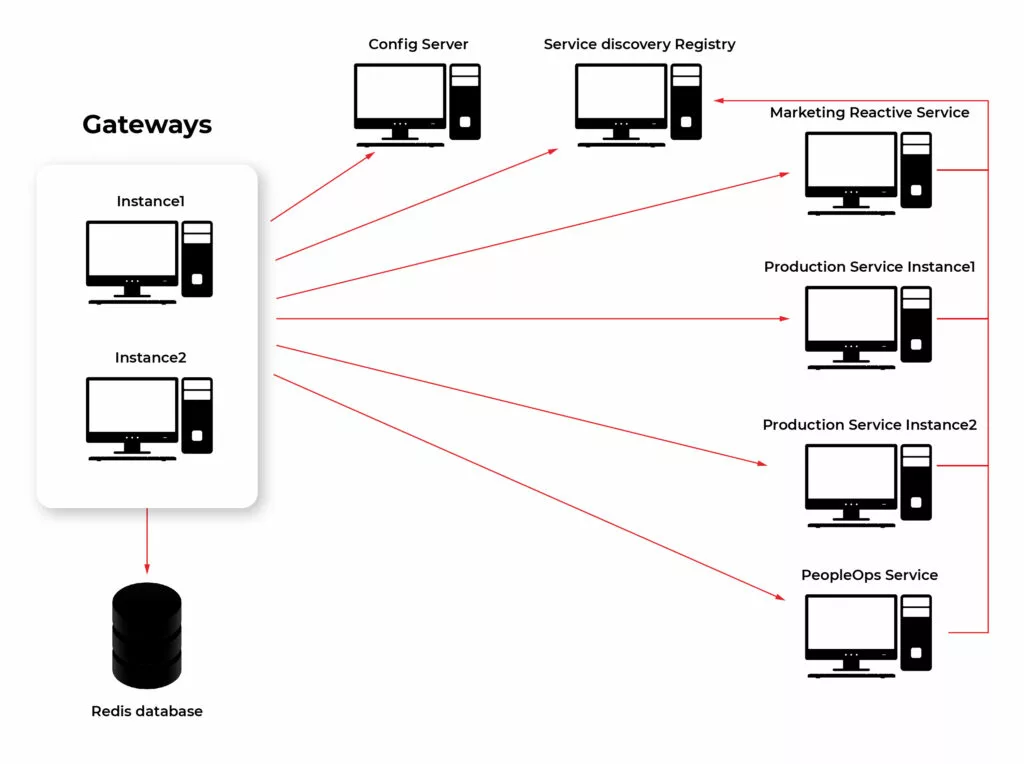
Building elements of Spring Cloud Gateway
The first feature of Spring Cloud Gateway I am going to describe is a configuration of request processing. It can be considered the heart of the gateway. It is one of the major parts and responsibilities. As I mentioned earlier this logic can be created by java code or by YAML files. Below I add an example configuration in YAML and Java code way. Basic building blocks used to create processing logic are:
- Predicates – match requests based on their feature (path, hostname, headers, cookies, query)
- Filters – process and modify requests in a variety of ways. Can be divided depending on their purpose:
- gateway filter - modify the incoming http request or outgoing http response
- global filter - special filters applying to all routes so long as some conditions are fulfilled
Details about different implementations of getaway building components can be found in docs: https://cloud.spring.io/spring-cloud-gateway/reference/html/ .
Example of configuring route in Java DSL:
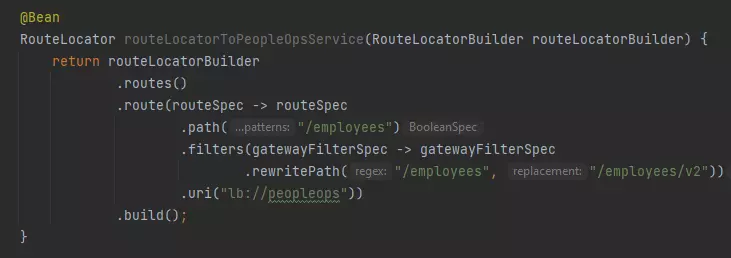
Configuration same route with YAML:
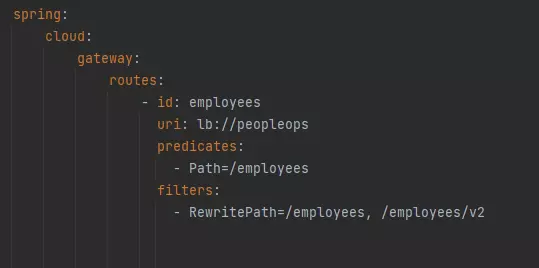
Spring Cloud Config Server integrated with Gateway
Someone might not be a huge fan of YAML language but using it here may have a big advantage in this case. It is possible to store configuration files in Spring Cloud Config Server and once configuration changes it can be reloaded dynamically. To do this process we need to use the Actuator Api endpoint.
Dynamic reloading of gateway configuration shows the picture below. The first four steps show request processing consistent with the current configuration. The gateway passes requests from the client to the “employees/v1” endpoint of the PeopleOps microservice (step 2). Then gateway passes the response back from the PeopleOps microservice to the client app (step 4). The next step is updating the configuration. Once Config Server uses git repository to store configuration, updating means committing recent changes made in the application.yaml file (step 5 in the picture). After pushing new commits to the repo is necessary to send a GET request on the proper actuator endpoint (step 6). These two steps are enough so that client requests are passed to a new endpoint in PeopleOps Microservice (steps 7,8,9,10).
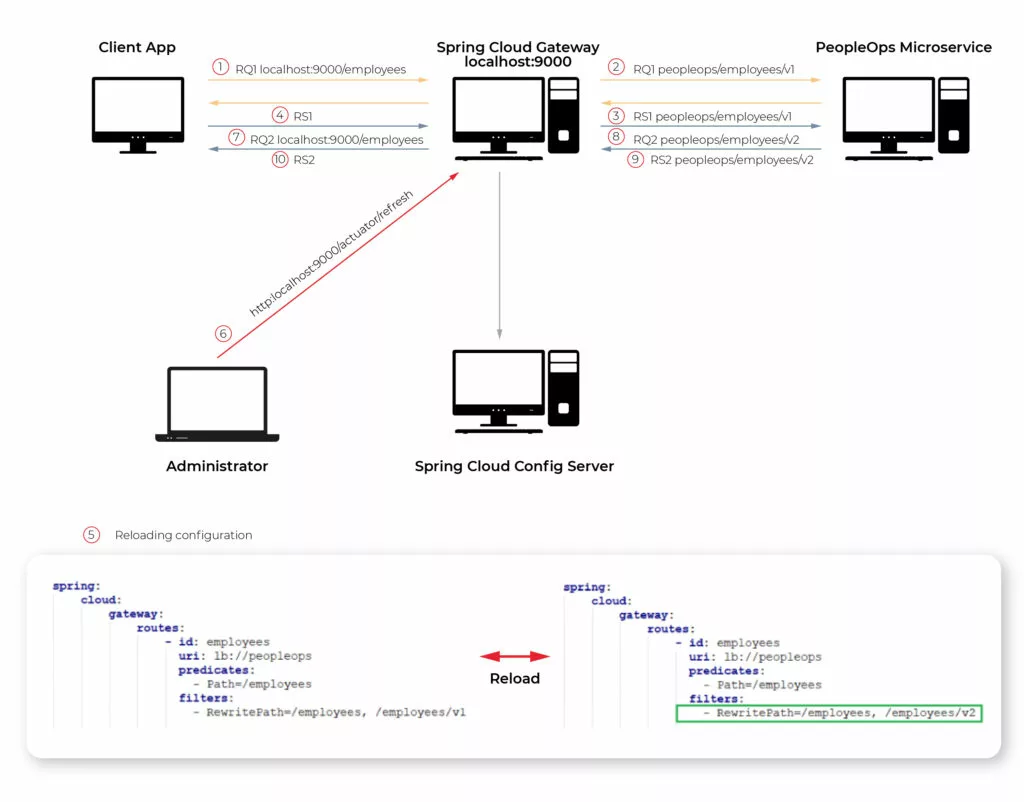
Reactive web flow in Api Gateway
As the documentation said Spring Cloud Gateway is built on top of Spring Web Flux. Reactive programming gains popularity among Java developers so Spring Gateway offers to create fully reactive applications. In my lab, I created Controller in a Marketing microservice which generates article data repetitively every 4 seconds. The browser observes this stream of requests. The picture below shows that 6 chunks of data were received in 24 seconds.
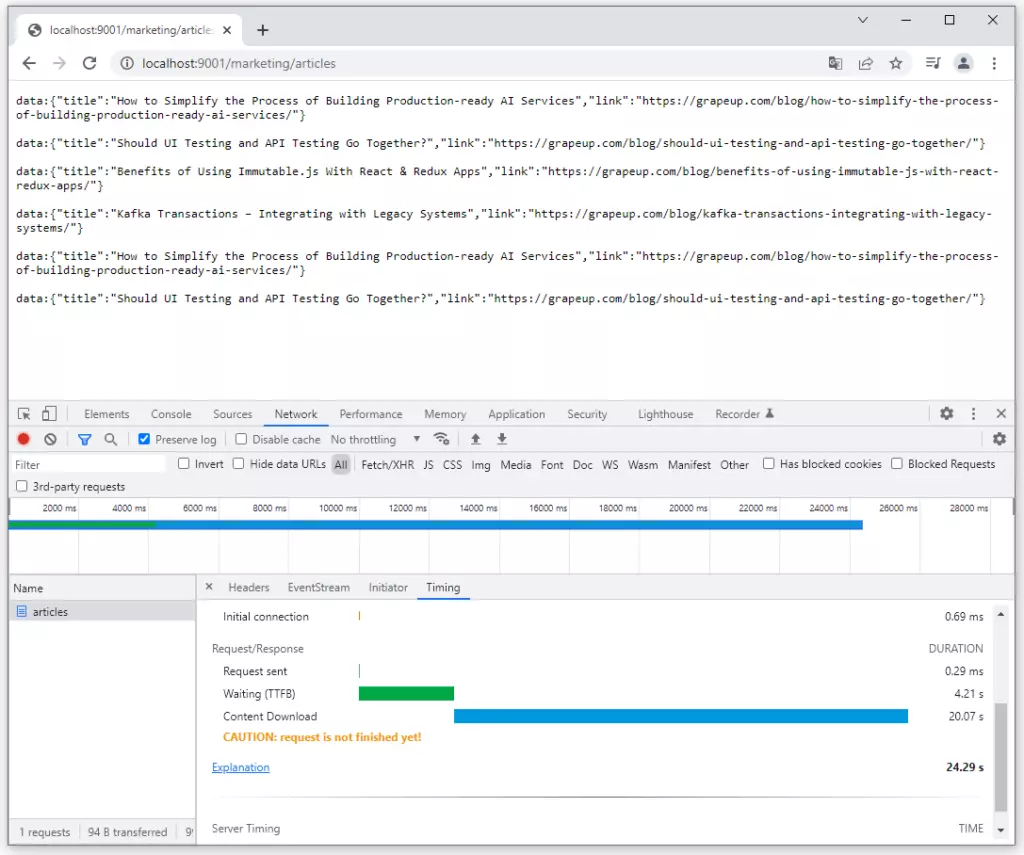
I do not dive into reactive programming style deeply, there are a lot of articles about the benefits and differences between reactive and other programming styles. I just put the implementation of a simple reactive endpoint in the Marketing microservice below. It is accessible on GitHub too: https://github.com/chrrono/Spring-Cloud-Gateway-lab/blob/master/Marketing/src/main/java/com/grapeup/reactive/marketing/MarketingApplication.java

Rate limiting possibilities of Gateway
The next feature of Spring Cloud Gateway is the implementation of rate-limiting (throttling) mechanisms. This mechanism was designed to protect gateways from harmful traffic. One of the examples might be distributed denial-of-service (DDoS) attack. It consists of creating an enormous number of requests per second which the system cannot handle.
The filtering of requests may be based on the user principles, special fields in headers, or other rules. In production environments, mostly several gateways instance up and running but for Spring Cloud Gateway framework is not an obstacle, because it uses Redis to store information about the number of requests per key. All instances are connected to one Redis instance so throttling can work correctly in a multi-instances environment.
Due to prove the advantages of this functionality I configured rate-limiting in Gateway in the lab environment and created an end-to-end test, which can be described in the picture below.
The parameters configured for throttling are as follows: DefaultReplenishRate = 4, DefaultBurstCapacity = 8. It means getaways allow 4 Transactions (Request) per second (TPS) for the concrete key. The key in my example is the header value of “Host” field, which means that the first and second clients have a limit of 4TPS separately. If the limit is exceeded, the gateway replies by http response with 429 http code. Because of that, all requests from the first client are passed to the production service, but for the second client only half of the requests are passed to the production service by the gateway, and another half are replied to the client immediately with 429 Http Code.
If someone is interested in how I test it using Rest Assured, JUnit, and Executor Service in Java test is accessible here: https://github.com/chrrono/Spring-Cloud-Gateway-lab/blob/master/Gateway/src/test/java/com/grapeup/gateway/demo/GatewayApplicationTests.java
Service Discovery
The next integration subject concerns the service discovery mechanism. Service discovery is a service registry. Microservice starting registers itself to Service Discovery and other applications may use its entry to find and communicate with this microservice. Integration Spring Cloud Gateway with Eureka service discovery is simple. Without the creation of any configuration regarding request processing, requests can be passed from the gateway to a specific microservice and its concrete endpoint.
The below Picture shows all registering applications from my lab architecture created due to a practical test of Spring Cloud Gateway. “Production” microservice has one entry for two instances. It is a special configuration, which enables load balancing by a gateway.
Circuit Breaker mention
The circuit breaker is a pattern that is used in case of failure connected to a specific microservice. All we need is to define Spring Gateway fallback procedures. Once the connection breaks down, the request will be forwarded to a new route. The circuit breaker offers more possibilities, for example, special action in case of network delays and it can be configured in the gateway.
Experiment on your own
I encourage you to conduct your own tests or develop a system that I build, in your own direction. Below, there are two links to GitHub repositories:
- https://github.com/chrrono/config-for-Config-server (Repo for keep configuration for Spring Cloud Config Server)
- https://github.com/chrrono/Spring-Cloud-Gateway-lab (All microservices code and docker-compose configuration)
To establish a local environment in a straightforward way, I created a docker-compose configuration. This is a link for the docker-compose.yml file: https://github.com/chrrono/Spring-Cloud-Gateway-lab/blob/master/docker-compose.yml
All you need to do is install a docker on your machine. I used Docker Desktop on my Windows machine. After executing the “docker-compose up” command in the proper location you should see all servers up and running:
To conduct some tests I use the Postman application, Google Chrome, and my end-to-end tests (Rest Assured, JUnit, and Executor Service in Java). Do with this code all you want and allow yourself to have only one limitation: your imagination 😊
Summary
Spring Cloud Gateway is a huge topic, undoubtedly. In this article, I focused on showing some basic building components and the overall intention of gateway and interaction with others spring cloud services. I hope readers appreciate the possibilities and care by describing the framework. If someone has an interest in exploring Spring Cloud Gateway on your own, I added links to a repo, which can be used as a template project for your explorations.