Thinking out loud
Where we share the insights, questions, and observations that shape our approach.
How to choose a technological partner to develop data-driven innovation
Insurance companies, especially those focused on life and car insurance, in their offers are placing more and more emphasis on big data analytics and driving behavior-based propositions. We should expect that this trend will only gain ground in the future. And this raises further questions. For instance, what should be taken into account when choosing a technological partner for insurance-technology-vehicle cooperation?
Challenges in selecting a technology partner
The potential of telematics insurance programs encourages auto insurers to move from traditional car insurance and build a competitive advantage on collected data.
No wonder technology partners are sought to support and develop increasingly innovative projects. Such synergistic collaboration brings tangible benefits to both parties.
As we explained in the article How to enable data-driven innovation for the mobility insurance , the right technology partner will ensure:
- data security;
- cloud and IoT technology selection;
- the reliability and scalability of the proposed solutions.
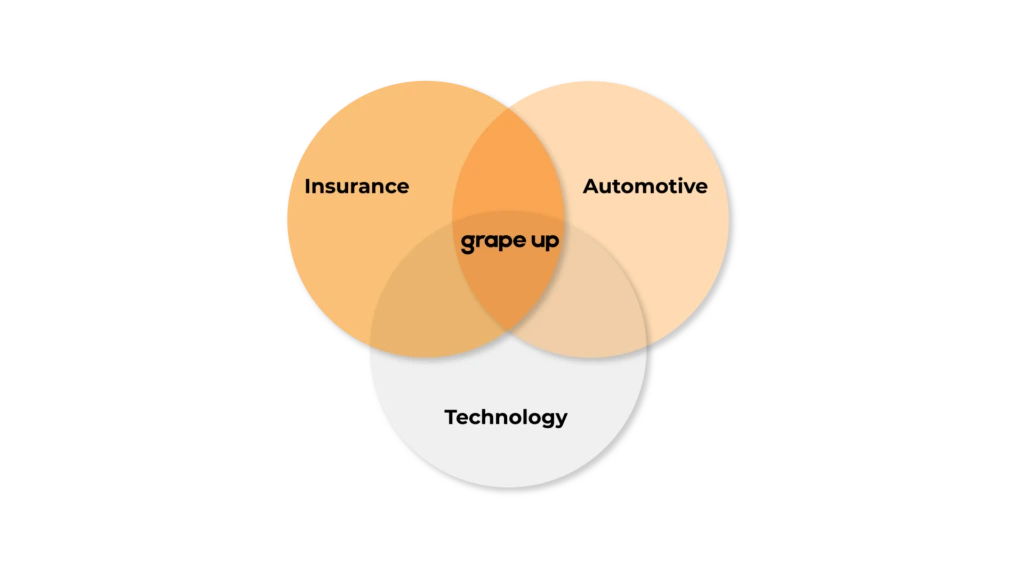
Finding such a partner, on the other hand, is not easy, because it must be a company that efficiently navigates in as many as three areas: AI/cloud technology, automotive, and insurance . You need a team of specialists who operate naturally in the software-defined vehicle ecosystem , and who are familiar with the characteristics of the P&C insurance market and the challenges faced by insurance clients.
Aim for the cloud. The relevance of AI and data collection and analytics technologies
Information is the most important asset of the 21st century. The global data collection market in 2021 was valued at $1.66 billion. No service based on the Internet of Things and AI could operate without a space to collect and analyze data. Therefore, the ideal insurance industry partner must deliver proprietary and field-tested cloud solutions . And preferably those that are dependable. Cloud services offered these days by insurance partners include:
- cloud R&D,
- cloud and edge computing,
- system integration,
- software engineering,
- cloud platforms development.
Connectivity between the edge device and the cloud must be stable and fast. Mobility devices often operate in limited connectivity conditions, therefore car insurance businesses should leverage multiple methods to ensure an uninterrupted connection. Dynamic switching of cellular, satellite, and Wi-Fi communications combined with globally distributed cloud infrastructure results in reliable transmission and low latency.
A secure cloud platform is capable of handling an increasing number of connected devices and providing them all with the required APIs while maintaining high observability.
As a result, the data collected is precise, valid, and reliable . They provide full insight into what is happening on the road, allowing you to better develop insurance quotes. No smart data-driven automation is possible without it.
Data quality, on the other hand, also depends on the technologies implemented inside the vehicle ( which we will discuss further below) and on all intermediate devices, such as the smartphone. The capabilities of a potential technology partner must therefore reach far beyond basic IT skills and most common technologies.
Telemetry data collection
Obviously, data acquisition and collection is not enough, because information about what is happening on the road, usage and operation of components in itself is just a "record on paper". But to make such a project a reality, you still need to implement advanced analytical tools and telematics solutions.
Real-time data streaming from telematics devices, mobile apps, and connected car systems gives access to driving data, driver behavior analysis, and car status. It enables companies to provide insurance policies based on customer driving habits .
Distributed AI
AI models are an integral part of modern vehicles. They predict front and rear collision, control damping of the suspension based on the road ahead, recognize road signs, or lanes. Modern infotainment applications suggest routes and settings depending on driver behavior and driving conditions.
Empowering the automotive industry to build software-defined vehicles. Automotive aspect
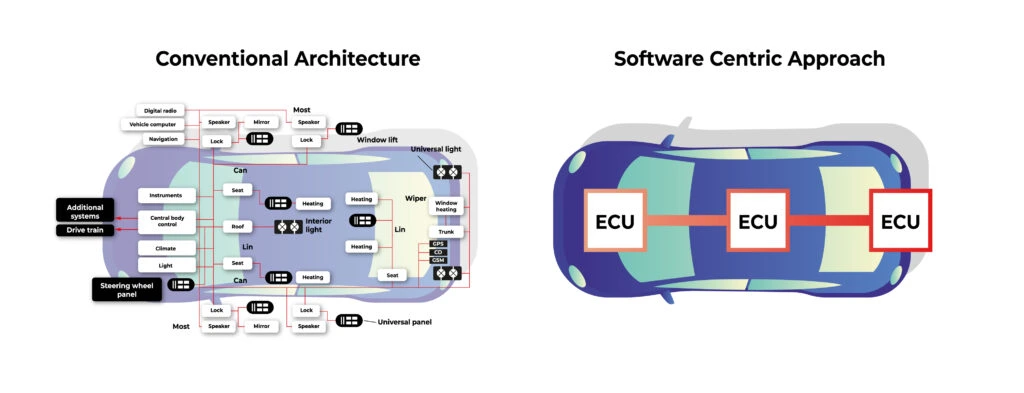
Today it is necessary to take into consideration a strategy towards modern, software-defined vehicles. According to Daimler AG, this can be expressed by the letters “CASE”:
- C onnected.
- A utonomous
- S hared.
- E lectric.
This idea means the major focus is going to be put on making the cars seamlessly connected to the cloud, support or advancements in autonomous driving based on electric power.
Digitalization and evolution of the computer hardware caused a natural evolution of the vehicle. New SoC’s (System on a Chip, integrated board containing CPU, memory, and peripherals) are multipurpose and powerful enough to handle not just a single task but multiple, simultaneously. It would not be an exaggeration to say that the cars of the future are smart spaces that combine external solutions (e.g. cloud computing, 5G) with components that work internally (IoT sensors). Technology solution providers must therefore work in two directions, understanding the specifics of both these ecosystems. Today, they cannot be separated.
The partner must be able to operate at the intersection of cloud technologies, AI and telemetry data collection. Ideally, they should know how these technologies can be practically used in the car. Such a service provider should also be aware of the so-called bottlenecks and potential discrepancies between the actual state and the results of the analysis. This knowledge comes from experience and implementation of complex software-defined vehicle projects.
Enabling data-driven innovation for mobility insurance. Insurance context
There are companies on the market that are banking on the innovative combination of automotive and automation. Although you have to separate the demand of OEMs and drivers from the demand of the insurance industry.
It's vital that the technology partner chosen by an insurance company is aware of this. This, naturally, involves experience supported by a portfolio for similar clients and specific industry know-how. The right partner will understand the insurer's expectations and correctly define their needs, combining them with the capabilities of a software-defined vehicle .
From an insurer's standpoint, the key solutions will be the following:
- Roadside assistance . For accurately determining the location of an emergency (this is important when establishing the details of an incident with conflicting stakeholders’ versions).
- Crash detection. To take proactive measures geared toward mitigating the consequences.
- UBI and BBI. The data gathered from mobile devices, plug-in dongles, or the vehicle embedded onboard systems can be processed and used to build risk profiles and tailored policies based on customers’ driving styles and patterns.
Technology and safety combined
The future of technology-based insurance policies is just around the corner. Simplified roadside assistance, drive safety support, stolen vehicle identification, personalized driving feedback, or crash detection- all of these enhance service delivery, benefit customers, and increase profitability in the insurance industry.
Once again, it is worth highlighting that the real challenge, as well as opportunity, is to choose a partner that can handle different, yet consistent, areas of expertise.
If you also want to develop data-driven innovation in your insurance company, contact GrapeUp. Browse our portfolio of automo tive & insurance projects .

Mood focused car enhancement - driving experience coupled with technological sense
Driving a car must evoke certain emotions and associations. Without them, a vehicle loses its soul, becomes a machine like any other and it is extremely hard for it to win popularity in a market filled to the brim. For years, brands have been striving to build their individual character and stand out with features such as unique design, performance, safety, or high quality of workmanship. With the proliferation of digital technologies, there is now one more element in the OEMs' toolkit: mood-building. From now on, drivers themselves can decide how they want to feel at a given moment. It's time for mood focused car enhancement . Digital technology will allow them to attain this state.
Up until now, remarkable driving sensations have typically been achieved by manufacturers through smooth driving, luxurious interior design or high-end sound systems. With modern technology, all of these elements can be combined into one seamless, sensory experience . In the vehicles of the future , the installed software will enable the creation of holistic experiences in which different senses are involved, and the driver's experience addresses sensations at both the functional level of the vehicle and the emotional level. Sound, color, scents, temperature, mood lighting, or tactile experiences (such as a massaging seat for the driver) can all create a one-of-a-kind experience that would distinguish the brand and offer the driver something that other manufacturers won't be able to give.
This suggests that sensor technology will become an important distinguishing mark in the user experience and will allow brands to more effectively influence purchase decisions and build consumer loyalty to a particular brand. According to PwC research, 86 percent of buyers are willing to pay more for a better customer experience.
Contextualizing the vehicle according to driving time, who is driving, or what mood they are in is already emerging as a trend set by major car brands.
Just as we approach the personalization of our own cell phones or computer accounts, we are already beginning to approach the personalization and contextualization of our own vehicles. As the implementations outlined below show, you can already see real-life examples of this today.
Manufacturers are using cloud solutions and AI not only to create a new vehicle functionality but also to induce us into a specific mood to make driving more enjoyable.
BMV My Modes use case
A whole new dimension of personalization and driving experience has recently been ventured by the BMW brand. With its BMW iX model, it is promoting a solution called "My Modes" . It features different colors and layout of the infotainment system with a curved display and digital cockpit. The user, depending on their mood, can change the color and sound theme (BMW IconicSounds Electric) in their vehicle.
Two popular modes are worth examining, namely Expressive and Relax. The former focuses on an active driving experience. Abstract patterns and vibrant colors stimulate action, inspire, and broaden thought paths. The experience is enhanced by interior audio that reflects the context of where you are at a given moment.
The Relax mode, as the name suggests, is designed to promote tranquility and well-being. The images displayed on the screens are inspired by nature and evoke associations of bliss and harmony. This is accompanied by discrete and serene sounds in the background.
https://youtu.be/vg6B0FY3mc4?t=266
Ford Mindfulness concept: Attention (to) safety
Mindfulness. A keyword in automotive safety in the broadest sense, but also - increasingly - in vehicle design. Focusing attention on the present and on real needs is becoming the status quo. This approach to on-board technology helps create electrified and autonomous vehicles where the driver and passengers can travel safely and pleasantly, being present in the moment. This is being developed by the Ford brand with the Mindfulness Concept Car.
According to Mark Higbie, senior advisor, Ford Motor Company, who helped introduce mindfulness into the Ford workplace: A car by itself is not mindful. But how a car is used and the behaviors that it supports, can be. Ford’s goal with this concept is to create experiences that encourage greater awareness. With unique features and embedded technologies, Ford is providing drivers and passengers with new ways to be mindful while in a Ford vehicle, anywhere along the road of life.
Features perfectly suited to your needs
The Mindfulness Concept Car is a vehicle that helps reduce distractions and stress, enhance travelers' well-being, and increase their level of sanitation. The latter is especially important given the pandemic reality.
Hygienic = safe
The pilot-activated Unlock Purge air conditioning system is geared to give the cabin a shot of clean, fresh air even before you enter the car. A more hygienic environment inside the car is also guaranteed by UV-C light diodes, which stop viruses and germs from multiplying.
Clean air is facilitated by a premium filter that removes almost all dust, odors, smog, allergens and bacteria-sized particles. It's an option specifically designed with allergy sufferers in mind.
The car that takes care of your health
Modern Ford cars prioritize individual driver characteristics, including what's going on in the driver's body that could potentially affect travel safety.
The Mindfulness Concept Car uses data from external measuring devices. These take real-time physiological data from the driver. Feedback on selected health parameters is then displayed on an in-car screen.
Additionally, an electrically activated driver seat provides a stimulating impact on breathing and heart rate.
Relaxing"here and now"
Ford's new addition allows you to fully indulge in an experience of tranquility and harmony. Mood lighting combined with temperature climate control provides specific moods inside the cockpit, such as refreshing dawn, relaxing blue sky and starry night.
Mindful driving guides are also provided in the new car concept. For instance, when the car is parked, the driver is instructed in yoga-based mini exercises that help relax the body and mind. The Powernap function, on the other hand, comes in handy during breaks on long journeys: a reclining seat, neck support and soothing sounds help drivers to fall asleep in a less stressful environment between travel points.
Speaking of relaxation, it's also interesting to note that the adaptive air conditioning provides calming cool air and simulates deep breathing. This happens especially after a dangerous incident, such as emergency braking (which is also supported by smart technology).
Personalized premium audio
The newly developed Ford's vehicle is a true host of new technologies to improve the existing driving experience. This applies, for instance, to the loudspeakers, including the B&O headrest speakers and the overhead speakers. Together they provide the finest possible listening experience.
The B&O Beosonic™ equalizer enables you to select sound spaces to suit your mood, such as: "Energetic", "Relaxed", "Warm". The other playlists, in turn, are tailored to fit a specific situation and location. A troublesome traffic jam? The car itself will turn on the calming tunes.
Vehicles tailored to the users' context and mood
Improving the driver's mood in the car is slowly becoming an equally important factor as safety, functionality or economy. Vehicle interiors will therefore be increasingly adapted to individual desires and moods (human context), but also to occasions and situations (driving environment context).
OEMs are already aware of this, and major automotive giants today are testing solutions that allude to almost a spa-like salon experience. They are doing so with no coincidence. Predictions from the consulting firm Walker say that customer experience will overtake product superiority and price, which so far have been the key differentiator between companies. Emotions and experience therefore have a direct impact on purchasing decisions and brand loyalty. This can be summed up by the phrase: through the senses to the mind.


Parking is plain sailing... Provided that your car is equipped with automated valet parking
Among the many vehicle functions that intelligent software increasingly performs for us, parking is certainly the one that the majority of us would be most willing to leave to algorithms. While a ride on the highway can be seamless or a long road trip can be smooth, it is also the moment when the engine slows down and the search for a parking space, for a significant number of drivers, becomes a real test of skills. How about getting it automated? This would be beneficial not only for the driver but also for OEM-s, who can use such technology in factories and when loading and unloading vehicles onto ships or trains. Automated Valet Parking developed in BMW iX shows that this process has already started.
Parking difficulties are influenced not only by the dynamically changing circumstances of each parking operation and the large number of factors that must be monitored but also by overloaded parking lots and the endless chase for a time. According to statistics, it is in parking lots that the highest number of collisions and accidents occur, and it is this element that drivers often point out as causing them the most trouble.
According to the National Safety Council statistics, over 60,000 people are injured in parking lots every year. What is more, there are more than 50,000 crashes in parking lots and garages annually. In contrast, according to insurer Moneybarn, 60 percent of drivers found parallel parking to be stressful.
Leaving security in the hands of technology
It's no wonder that car companies around the world are looking for a foothold in exactly this part of automation, which could allow them to convince users to place their confidence in fully autonomous vehicles.
Increased safety - which can definitely be influenced by the introduction of such solutions - has always been at the forefront of all ratings showing driver approval of SVD (software-defined vehicle) technology . With automatic parking, the driver additionally receives time-savings, convenience, and reduced stress, because they do not have to waste energy on searching for a free spot, nor think about where they parked their vehicle. An algorithm and a system of networked sensors make the parking decisions for the driver. All the driver has to do is leave the car in a special drop-off/pick-up zone and confirm parking in the application. After shopping at the mall or a meeting, the user again confirms the vehicle pick-up in the app and proceeds to the zone where their vehicle is already parked.
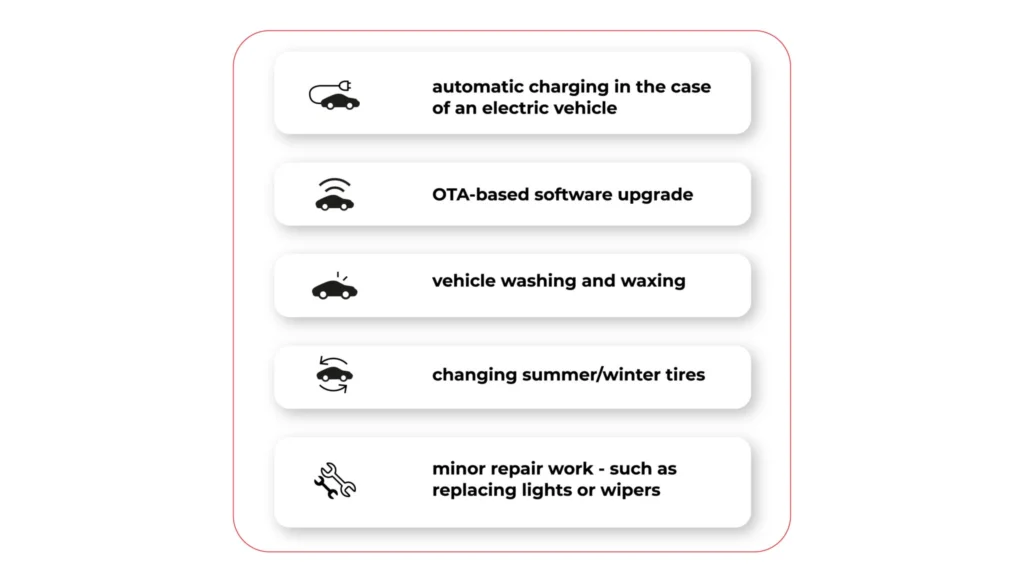
This stress-free handover of the car into the trusted hands of a "digital butler", opens up new service opportunities also for OEMs and companies cooperating with the automotive industry . While the driver can go shopping or go to the movies in peace, the vehicle can be serviced during this time. Among the potential applications are services such as:
- automatic charging in the case of an electric vehicle;
- OTA-based software upgrade;
- vehicle washing and waxing
- changing summer/winter tires;
- minor repair work - such as replacing lights or wipers.
Let's take a look at two of the most impressive use cases in this area that have appeared on the market recently. The first one is the Automated Valet Parking project, implemented in partnership with top car manufacturers and technology providers, with BMW leading the way. The second one is the offer of Nvidia, which managed to start cooperation with Mercedes-Benz in this field.
BMW Autonomous Valet Parking
Futurists of the 20th century predicted that the next century would bring us an era of robots able to perform most daily human activities on their own, in an intelligent, autonomous, and efficient way. Although this vision was a gross exaggeration, today on the market there are solutions that can clearly be described as innovative or ahead of their time.
An example? BMW and their all-electric flagship SUV, BMW iX, which communicates with external infrastructure and parks 100 percent without the driver’s input. The owner of the vehicle simply steps out of the car, handing it over to the "technological guardian".
The data exchange here takes place in three tracks: vehicle, smartphone app, and underground garage parts (cameras + sensors). The driver activates the Autonomous Valet Parking (AVP) option in the application, thanks to which the vehicle is able to maneuver independently around the garage without his participation. And all this with maximum safety, both in terms of collision-avoidance and protection of expensive items inside the vehicle.
This project would be much harder without the modern 5G network equipment provided by Deutsche Telekom. Why a fifth-generation network? Because compared to traditional WLAN solutions, it allows to dynamically enable, disable and update capabilities through API.
The flexible configuration and very low latency allow to shape the bandwidth and prioritize the vehicle connectivity traffic, making the connection stable, fast and reliable. This is one of the key requirements for any Connected Car system which is coupled with Autonomous Vehicle capabilities - if the connection is not reliable, latency is too high, or another device takes over the bandwidth, it may result in jerk, stuttering ride, as the data from external sensors is transferred late.
However, these are not all the surprises that the BWM Group has in store for their customers. In addition to parking, the driver can also benefit from other automated service functions such as washing or intelligent refueling. The solution is universal and can also be used by other OEMs.
https://youtu.be/iz_yKaa8QgM
Nvidia cooperate with Mercedes-Benz
There are many indications that Voice Assistant will be growing. For example, in 2020 in the U.S. alone, about 20 million people will make purchases via smartphone using voice-activated features [statista.com]. This trend isn't sparing the automotive industry, either, with technology providers racing to create software that would revolutionize such cumbersome tasks as parking. One of the forerunners is the semiconductor giant Nvidia, which created the Nvidia Drive Concierge service . It's an artificial intelligence-based software assistant that - literally - gives the floor to the driver, but also lets technology come to the fore.
"Hey Nvidia!" What does this voice command remind you of? Most often it is associated with another conversational voice assistance system, namely Siri. You are on the right track, because NDC works on a similar principle. The driver gives a command, and the assistant is able to recognize a specific voice, assign it to the vehicle owner and respond.
By far the most interesting functionality is the ability to integrate the software with Nvidia Drive AV autonomous technology, or on-demand parking. This works in a very intuitive way. All you have to do is get out of the vehicle, activate the function and watch as the "four wheels" steer themselves towards a parking space. And they do it in a collision-free manner, regardless of whether it's parallel, perpendicular or angled parking. It will work the same way in the reverse direction. If you want to leave a parking space, you simply hail the car, it pulls up on its own and is ready to continue its journey.
Sounds like total abstraction? It's already happening. Nvidia has teamed up with one of the world's leading OEMs, Mercedes-Benz. Starting in 2024, all next-generation Benz vehicles will be powered by Nvidia Drive AGX Orin technology, along with sensors and software. For the German company, automated parking services will therefore soon become common knowledge.
This is what Jensen Huang, founder and CEO of Nvidia, said about the collaboration: Together, we're going to revolutionize the car ownership experience, making the vehicle software programmable and continuously upgradable via over-the-air updates. Every future Mercedes-Benz with the Nvidia Drive system will come with a team of expert AI and software engineers continuously developing, refining and enhancing the car over its lifetime.
Automated Valet Parking: innovation at the cutting edge of technology
Vehicle automation and the resulting cooperation between OEMs and suppliers of new technologies is now entering new dimensions. Also in this area that many drivers associate with something very cumbersome, which often generates anxiety.
The integration of Nvidia Orin systems at Mercedes-Benz or the comprehensive AVP at BMW are prime examples of how new solutions at the intersection of AI , IoT, and 5G are becoming, to some extent, guardians of safety and guarantors of comfort from start to finish. It's also a good springboard to talk about fully automated vehicles.
Not only the self-driving vehicles: 9 use cases of AI in transportation
Accidents, traffic congestion, lack of parking lots and poor state of roads. These are the 4 Horsemen of the Road Apocalypse that on occasion haunt cities around the globe. Have they come to settle in the largest agglomerations for good? Can AI in transportation combat them and make mobility smoother, more comfortable, and safer? Practical solutions introduced by the biggest transport companies from all over the world show that it is possible. And we do not have to wait for fully self-driving cars to use the advantages of AI. The changes are happening right before our eyes.
In 1900, the number of vehicles in the USA - the only country that produced cars at the time - reached 4192 vehicles. Today, the number of motor cars is estimated to be around 600 million, and with the current growth in production, this number is expected to double in the next 30 years. Our cities are congested, polluted and in many places getting around in a car during rush hour borders on the miraculous. Not to mention the real endurance test that drivers' nerves are put to.
Government agencies and shipping companies must explore solutions that reduce the number of vehicles in cities and equip urban infrastructure and cars with tools that effectively offset the side effects of technological globalization. The Internet of Things and artificial intelligence are coming to the rescue to facilitate a new class of intelligent transportation systems (ITS), not only for automotive but also for rail, marine, and aircraft transportation.
By analyzing massive amounts of data from vehicles and connecting the road infrastructure into a seamless network of information exchange , many aspects of transportation can be successfully addressed. The benefits of using AI in this market area are not only for cities and drivers but also for transport companies, pedestrians, and the environment. The whole transport ecosystem benefits from it, not just one of its constituent parts. We should all care about the development of these technologies and the broadest possible use of them in transport.
Thanks to the above-mentioned technologies, new trends are developing, such as micro-mobility, shared mobility or, especially in the Netherlands and Scandinavia, the idea of mobility-as-a-service (MaaS), which encourages drivers to give up their own vehicle and exchange it for one in which transport is provided as a service.
Benefits of introducing AI in transportation
According to Market Data Forecast, the global transportation AI market will be worth around $3.87 billion by 2026 and is estimated to grow at a CAGR of 15.8% between 2021 and 2026. And it's no wonder that more and more businesses are embracing these solutions. The benefits of using AI technology in transportation are truly far-reaching and, indeed, their future is looking bright. With the development of data analytics and more modern sensors gathering information, new and innovative applications are bound to emerge.
Today, key benefits of using AI in transportation include:
- increasing transportation safety;
- detecting market trends;
- relieving traffic congestion;
- reducing greenhouse gas emissions, air pollution, and noise;
- improved transportation design and management;
- better management of urban space and reclaiming specific urban areas for residents;
- analyzing travel needs and pedestrian behavior.
9 use cases of AI in transportation
When talking about using AI in transportation, self-driving cars are the most often mentioned examples that stir the imagination. Although such solutions have already been tested on the city streets (e.g. Waymo and Cruise in California) and occasionally we hear news about reaching by the manufacturer the highest (5th) level of automation, we are still a little away from the dissemination of vehicles that do not need any attention of the driver.
The main challenges faced by autonomous driving remain unchanged. First, detection of objects on the road and their categorization, and second, making the right decisions by the neural network, decision tree, or, in most cases, complicated hybrid model.
In 95% of cases, the neural network controlling the vehicles is already behaving correctly and making the best possible decisions. But there is still a marginal 5%, and this level is the most difficult to achieve at the moment. It simply takes time and more data to "train" a neural network. With the dropping price of LIDARs [light detection and ranging sensors], high resolutions camera, and the computing power of the GPUs [graphic processing units] increasing, it is only a matter of the next few years before this barrier is overcome - first in limited controlled areas (e.g. factories and harbors), the form of autonomized truck transport, and then using city vehicles.
Meanwhile, there are already more than a dozen advanced technologies on the road today that are taking advantage of the AI ‘’goodies’’ and changing the way we control vehicle flow, driver safety, and driving behavior. Let's take a closer look at them.
1.Traffic detection & traffic signs
If traffic regulations were boiled down to one simple rule that even a few-year-old child could understand, red and green lights would definitely be second to none. Meanwhile, there are hundreds of road accidents each year related to running the red light and not stopping the vehicle at the right moment. Many factors contribute to this, such as driver fatigue, inclement weather, misuse of cell phones while driving, or simply rushing and time pressure.
People make mistakes and always will, these cannot be avoided. However, we have started to teach the machine to recognize traffic lights and eradicate such mistakes (the first attempts were made by BMW and Mercedes). With this technology, the braking system will react automatically when the driver tries to run a red light, and thus we can prevent disaster.
2. Pedestrian detection
The unpredictability of pedestrians and their different behavior on the road is one of the main factors holding back the mass introduction of autonomous cars. Thanks to computer vision, AI already recognizes trees, unusual objects, and pedestrians without much of a struggle, and can warn drivers of a human approaching the roadway. The problem arises when a pedestrian is carrying groceries, holding a dog on a lead, or is in a wheelchair. Their unusual shape increases the difficulty for the machine to properly identify a human. Although it must be admitted that by using various object detection functions - based on motion, textures, shapes, or gradients - it is practically 100% successful.
However, the pedestrian's intention still remains a great challenge. Will he or she step onto the road or not? Are they only walking by the side of the road, or do they intend to cross it? These elements are always ambiguous and a neural network is needed to predict them effectively. To this end, the human pose estimation method comes in handy. It is based on the dynamics of the human skeleton and is capable of predicting human intentions in real-time.
3.Traffic Flow Analysis
Noise, smog, clogged city arteries, stressed drivers, economic losses, greenhouse gas emissions - traffic congestion and vehicle crowding in cities give rise to numerous undesirable phenomena. AI can effectively help counteract all of them and make transportation much more efficient and convenient.
By relying on in-vehicle sensors, municipal CCTV cameras, and even drones to monitor vehicle flow, the algorithms can watch and keep track of the traffic both on highways and in the city. This allows them to warn drivers of potential congestion or accidents and direct the flow of vehicles in an efficient manner. It is also invariably useful for the town and urban planners involved in constructing new roads and improving the city's infrastructure. With prior traffic analysis and the vast amount of data available, AI can identify the best planning solutions and help reduce undesirable situations right at the planning stage.
4.Inspection of dangerous turns, traffic circles and bike lanes
On a macro scale AI can help us change the entire road network, and on a micro-scale- a single intersection or traffic circle that needs repair. The analysis of the material provided by intelligent algorithms can calculate the trajectory of vehicles entering the bend, analyze the risk of potential conflicts between vehicles - pedestrians - cyclists, the speed at which vehicles enter the bend, or the waiting time at the traffic lights. The analysis of all this invaluable information can help optimize a given road section, and improve the safety and convenience of transport.
5.Computer Vision-Powered Parking Management
Entering the city center by car and finding a parking lot is often a struggle. If we connect the city's parking lots into an efficient network of sensors that monitor available spaces, the length of time vehicles are parked, and the hours when vehicles are most heavily congested, this key aspect of traffic can be greatly enhanced. With maps embedded in vehicles, AI can facilitate finding free parking spots, alert you to potential parking overcrowding, and - something actually pretty common - allow you to find your car when you forget where you parked it.
Such solutions are particularly useful in places such as airports, sports stadiums or arenas, where traffic must be smooth, and a high volume of visitors may pose a threat to safety.
6. Automated license plate recognition
A useful application of AI and computer vision is car license plate recognition. This type of technology is often used when entering highways, tunnels, ferries, or restricted areas constrained by gates or barriers. AI helps verify whether a given vehicle is on the list of registrations that, due to the fee paid or the drivers' status, are allowed to access a given area.
License plate recognition by algorithms is also a well-proven tool in the hands of the police and security services, who in this way are able to pinpoint the route of a particular vehicle or verify the driver's alibi.
7. Road condition monitoring
Each year potholes cause $3,000,000,000 worth of damage to vehicles in the U.S. alone. Intelligent algorithms can warn drivers of surprises lurking on the roads and monitor the condition of the road surface, so they can notify the authorities in advance of potential spots that will soon need fixing. This is enabled by linking the camera to ADAS, which applies machine learning to gather real-time information from the road surface where it is moving.
In this way, the driver can be warned not only of roadway damage but also of wet surfaces, ice, potholes or dangerous road debris. All of this improves safety for travelers, prevents accidents, and saves money - both in terms of drivers' finances and city funds.
8. Automatic Traffic Incident Detection
Video surveillance has been with us on the roads for ages, but it wasn't until the system was supported by AI solutions that it became possible to detect traffic incidents more efficiently, respond faster and provide information to traffic users practically in real-time.
By linking cameras within an ITS system, using computer vision technology, and equipping vehicles with intelligent sensors, we can detect different types of accidents. Intelligent algorithms save lives, prevent serious accidents and warn road users of hazardous situations by recommending safer travel options.
The most commonly detected traffic incidents include:
- pedestrians or animals entering on the road;
- vehicles moving too fast or too slowly;
- vehicles blocking the passage;
- detection of debris on the road;
- identification of vehicles moving in the wrong direction
9. Driver Monitoring
Finally, there is a full category of artificial intelligence solutions that apply directly in the interior of the car and affect the drivers themselves (we covered this in more depth in this article ). Among them, three are particularly noteworthy:
- driver’s fatigue monitoring - by detecting the driver's face and estimating the position of the head, the system can detect drowsiness and emotions of the driver and thus prevent an accident.
- alerts when the driver gets distracted - for instance, when they reach for their cell phone, veer out of their lane, or turn around in the back seat to talk to fellow passengers.
- emergency assist systems - when the driver is not responsive and does not operate the vehicle, the car first tries to wake the driver by braking and pulling safety belts, and if it fails pulls over and calls emergency.
AI in transportation: setting the course for change
Given the speed at which computer processing power is changing and the number of sensors from which data is being collected , fully automated cars on city roads are likely to be a question of the nearest 5-10 years. Change is happening at an exponential rate and today's applications of AI in transportation are just the first glimpse of the possibilities offered by intelligent algorithms. Change is essential and inevitable, e.g. due to the challenges facing the global community when it comes to global warming.
An increasing number of people live in cities, own not one but two vehicles, and want to travel to work or do their shopping in comfort. Transport companies and city managers must join forces with IT companies to fully tap into the potential of AI and change transport to be more efficient, environmentally friendly and suited to the way we want to use our cities. This is the only way we can make transportation sustainable and remove obstacles on the way to a zero-carbon economy and smart cities. Otherwise, we may face a vision of the future in which scientists predict traffic congestion 10 times worse than we experience today.
Cloud development overview for non-cloud developers
Introduction
This article covers basic concepts of web applications that are designed to be run in Cloud environment and are intended for software engineers who are not familiar with Cloud Native development but work with other programming concepts/technologies. The article gives an overview of the basics from the perspective of concepts that are already known to non-cloud developers including mobile and desktop software engineers.
Basic concepts
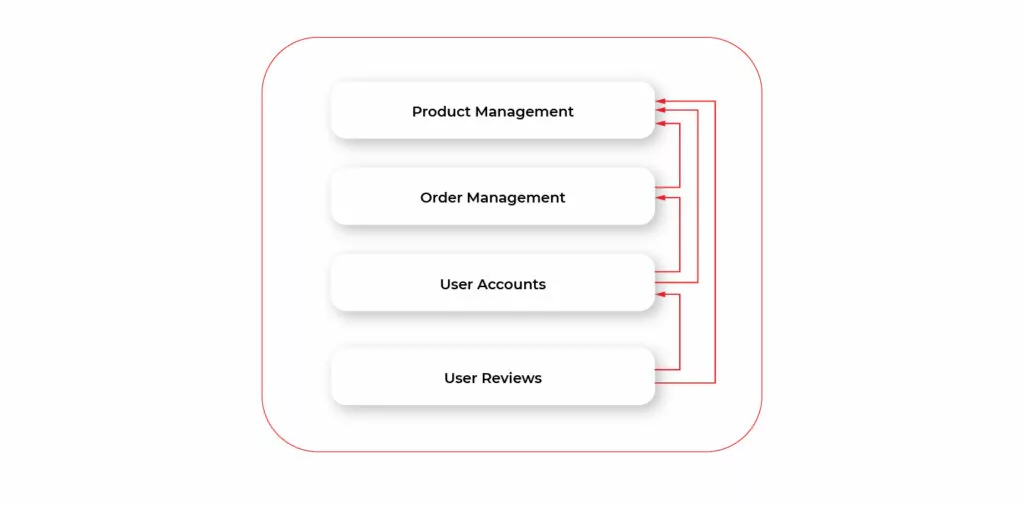
Let’s start with something simple. Let’s imagine that we want to write a web application that allows users to create an account, order the products and write reviews on them. The simplest way is to have our backend app as a single app combining UI and code. Alternatively, we may split it frontend and into the backend, which just provides API.
Let’s focus on the backend part. The whole communication between its components happens inside of a single app, on a code level. From the executable file perspective, our app is a monolithic piece of code: it’s a single file or package. Everything looks simple and clean: the code is split into several logical components, each component has its own layers. The possible overall architecture may look as follows:
But as we try to develop our app we'll quickly figure out that the above approach is not enough in the modern world and modern web environment. To understand what's wrong with the app architecture we need to figure out the key specificity of web apps compared to desktop or mobile apps. Let’s describe quite simple yet very important points. While being obvious to some (even non-web) developers the points are crucial for understanding essential flaws of our app while running in the modern server environment.
Desktop or mobile app runs on the user's device. This means that each user has their own app copy running independently. For web apps, we have the opposite situation. In a simplified way, in order to use our app user connects to a server and utilizes an app instance that runs on that server. So, for web apps, all users are using a single instance of the app. Well, in real-world examples it's not strictly a single instance in most cases because of scaling. But the key point here is that the number of users, in a particular moment of time is way greater than the number of app instances. In consequence, app error or crash has incomparably bigger user impact for web apps. I.e., when a desktop app crashes, only a single user is impacted. Moreover, since the app runs on their device they may just restart the app and continue using it. In case of a web app crash, thousands of users may be impacted. This brings us to two important requirements to consider.
- Reliability and testability
Since all the code is placed in a single (physical) app our changes to one component during development of the new features may impact any other existing app component. Hence, after implementing a single feature we have to retest the whole app. If we have some bug in our new code that leads to a crash, once the app crashes it becomes unavailable to all the users. Before we figure out the crash we have some downtime when users cannot use the app. Moreover to prevent further crashes we have to roll back to a previous app version. And if we delivered some fixes/updates along with the new feature we’ll lose those improvements. - Scalability
Consider the number of users is increased during a short period. In case of our example app, this may happen due to, e.g., discounts or new attractive products coming in. It quickly turns out that one app instance running is not enough. We have too many requests and app “times out” requests it cannot handle. We may just increase the number of running instances of the app. Hence, each instance will independently handle user orders. But after a closer look, it turns out that we actually don’t need to scale the whole app. The only part of the app that needs to handle more requests is creating and storing orders for a particular product. The rest of the app doesn’t need to be scaled. Scaling other components will result in unneeded memory growth. But since all the components are contained in a monolith (single binary) we can only scale all of them at once by launching new instances.
The other thing to consider is network latency which adds important limitations compared to mobile or desktop apps. Even though the UI layer itself runs directly in the browser (javascript), any heavy computation or CRUD operation requires http call. Since such network calls are relatively slow (compared to interactions between components in code) we should optimize the way we work with data and some server-side computations.
Let’s try to address the issues we described above.
Microservices
Let’s make a simple step and split our app into a set of smaller apps called microservices. The diagram below illustrates the general architecture of our app rethinks using microservices.
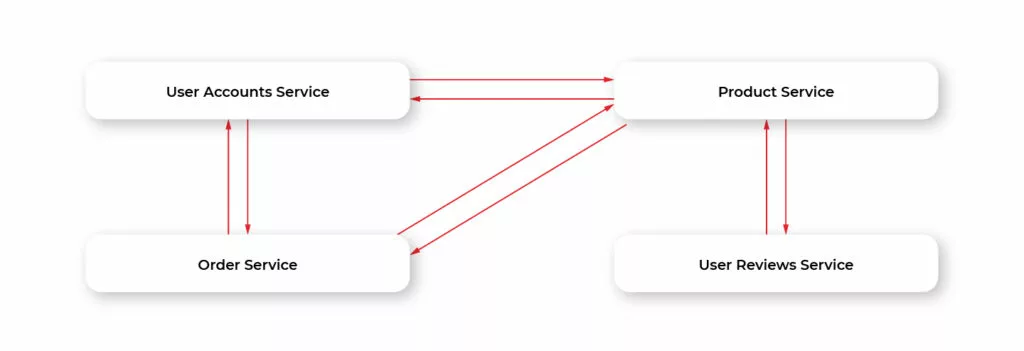
This helps us solve the problems of monolithic apps and has some additional advantages.
• Implementing a new feature (component) results in adding a new service or modifying the existing one. This reduces the complexity of the development and increases testability. If we have a critical bug we will simply disable that service while the other app parts will still work (excluding the parts that require interaction with the disabled service) and contain any other changes/fixes not related to the new feature.
• When we need to scale the app we may do it only for a particular component. E.g., if a number of purchases increase we may increment the number of running instances of Order Service without touching other ones.
• Developers in a team can work fully independently while developing separate microservices. We’re also not limited by a single language. Each microservice may be written in a different language.
• Deployment becomes easier. We may update and deploy each microservice independently. Moreover, we can use different server/cloud environments for different microservices. Each service can use its own third-party dependency services like a database or message broker.
Besides its advantages, microservice architecture brings additional complexity that is driven by the nature of microservice per se: instead of a single big app, we now have multiple small applications that have to communicate with each other through a network environment.
In terms of desktop apps, we may bring up here the example of inter-process communication, or IPC. Imagine that a desktop app is split into several smaller apps, running independently on our machine. Instead of calling methods of different app modules within a single binary we now have multiple binaries. We have to design a protocol of communication between them (e.g., based on OS native IPC API), we have to consider the performance of such communication, and so on. There may be several instances of a single app running at the same time on our machine. So, we should find out a way to determine the location of each app within the host OS.
The described specificity is very similar to what we have with microservices. But instead of running on a single machine microservice apps run in a network which adds even more complexity. On the other hand, we may use already existing solutions, like http for communicating between services (which is how microservices communicate in most cases) and RESTful API on top of it.
The key thing to understand here is that all the basic approaches described below are introduced mainly to solve the complexity resulting from splitting a single app into multiple microservices.
Locating microservices
Each microservice that calls API of another microservice (often called client service) should know its location. In terms of calling REST API using http the location consists of address and port. We can hardcode the location of the callee in the caller configuration files or code. But the problem is that can be instantiated, restarted, or moved independently of each other. So, hardcoding is not a solution as if the callee service location is changed the caller will have to be restarted or even recompiled. Instead, we may use Service Registry pattern.
To put it simply, Service Registry is a separate application that holds a table that maps a service id to its location. Each service is registered in Service Registry on startup and deregistered on shutdown. When client service needs to discover another service it gets the location of that service from the registry. So, in this model, each microservice doesn’t know the concrete location of its callee services but just their ids. Hence, if a certain service changes its location after restart the registry is updated and its client services will be able to get this new location.
Service discovery using a Service registry may be done in two ways.
1. Client-side service discovery. Service gets the location of other services by directly querying the registry. Then calls discovered the service’s API by sending a request to that location. In this case, each service should know the location of the Service Registry. Thus, its address and port should be fixed.
2. Server-side service discovery. Service may send API call requests along with service id to a special service called Router. Router retrieves the actual location of the target service and forwards the request to it. In this case, each service should know the location of the Router.
Communicating with microservices
So, our application consists of microservices that communicate. Each has its own API. The client of our microservices (e.g., frontend or mobile app) should use that API. But such usage becomes complicated even for several microservices. Another example, in terms of desktop interprocess communication, imagines a set of service apps/daemons that manage the file system. Some may run constantly in the background, some may be launched when needed. Instead of knowing details related to each service, e.g., functionality/interface, the purpose of each service, whether or not it runs, we may use a single facade daemon, that will have a consistent interface for file system management and will internally know which service to call.
Referring back to our example with the e-shop app consider a mobile app that wants to use its API. We have 5 microservices, each has its own location. Remember also, that the location can be changed dynamically. So, our app will have to figure out to which services particular
requests should be sent. Moreover, the dynamically changing location makes it almost impossible to have a reliable way for our client mobile app to determine the address and port of each service.
The solution is similar to our previous example with IPC on the desktop. We may deploy one service at a fixed known location, that will accept all the requests from clients and forward each request to the appropriate microservice. Such a pattern is called API Gateway.
Below is the diagram demonstrating how our example microservices may look like using Gateway:
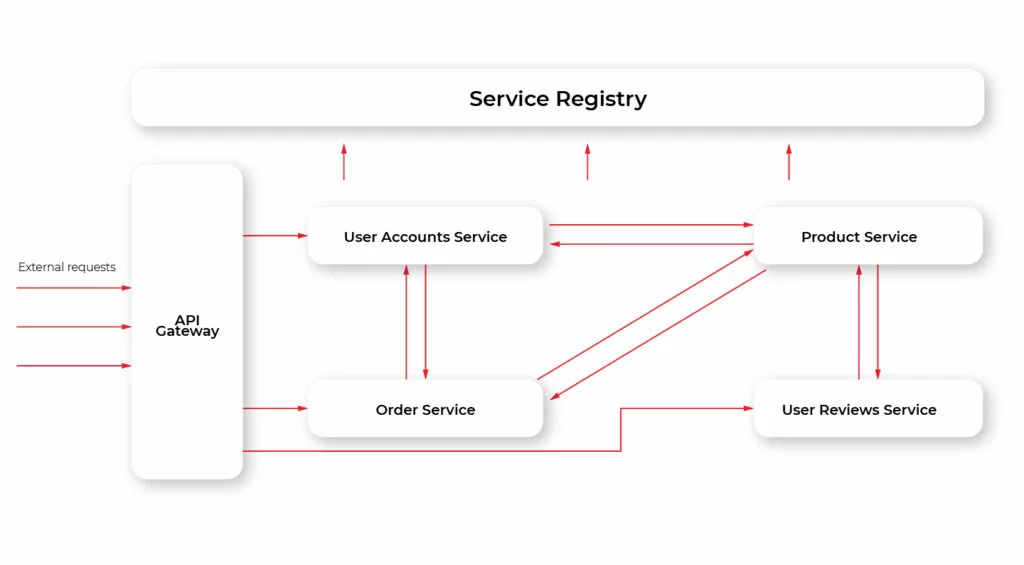
Additionally, this approach allows unifying communication protocol. That is, different services may use different protocols. E.g., some may use REST, some AMQP, and so on. With API Gateway these details are hidden from the client: the client just queries the Gateway using a single protocol (usually, but not necessarily REST) and then the Gateway translates those requests into the appropriate protocol a particular microservice uses.
Configuring microservices
When developing a desktop or mobile app we have several devices the app should run on during its lifecycle. First, it runs on the local device (either computer or mobile device/simulator in case of mobile app) of the developers who work on the app. Then it’s usually run on some dev device to perform unit tests as part of CI/CD. After that, it’s installed on a test device/machine for either manual or automated testing. Finally, after the app is released it is installed on users’ machines/devices. Each type of device
(local, dev, test, user) implies its own environment. For instance, a local app usually uses dev backend API that is connected to dev database. In the case of mobile apps, you may even develop using a simulator, that has its own specifics, like lack or limitation of certain system API. The backend for the app’s test environment has DB with a configuration that is very close to the one used for the release app. So, each environment requires a separate configuration for the app, e.g., server address, simulator specific settings, etc. With a microservices-based web app, we have a similar situation. Our microservices usually run in different environments. Typically they are dev, test, staging, and production. Hardcoding configuration is no option for our microservices, as we typically move the same app package from one environment to another without rebuilding it. So, it’s natural to have the configuration external to the app. At a minimum, we may specify a configuration set per each environment inside the app. While such an approach is good for desktop/mobile apps it has provides a limitation for a web app. We typically move the same app package/file from one environment to another without recompiling it. A better approach is to externalize our configuration. We may store configuration data in database or external files that are available to our microservices. Each microservice reads its configuration on startup. The additional benefit of such an approach is that when the configuration is updated the app may read it on the fly, without the need for rebuilding and/or redeploying it.
Choosing cloud environment
We have our app developed with a microservices approach. The important thing to consider is where would we run our microservices. We should choose the environment that allows us to take advantage of microservice architecture. For cloud solutions, there are two basic types of environment: Infrastructure as a Service, or IaaS, and Platform as a Service, or PaaS. Both have ready-to-use solutions and features that allow scalability, maintainability, reliability which require much effort to achieve on on-premises. and Each of them has advantages compared to traditional on-premises servers.
Summary
In this article, we’ve described key features of microservices architecture for the cloud-native environment. The advantages of microservices are:
- app scalability;
- reliability;
- faster and easier development
- better testability.
To fully take advantage of microservice architecture we should use IaaS or PasS cloud environment type.

Digital twin factory in the automotive industry - so the future is happening today
Retail stores and factories are being cloned for the virtual world, for familiarity and efficiency. Now it's time for automotive, which is more and more willing to use digital twin factory. This innovative technology perfectly bridges the real and virtual worlds. It is already happening now, for instance in BMW factories.
Digital twin and Industry 4.0
The fourth industrial revolution necessitates the use of advanced data-driven technologies. This includes digital twins. It's an idea that allows you to simulate products, services, and entire processes for creating more efficient and faster quality solutions. By using video, images, diagrams or other data for advanced 3D mapping, a new virtual reality is created.
This concept is becoming increasingly common in various market sectors, including automotive . Not only individual vehicle parts , but even entire factories are already being created in the digital space. The latter can be seen, for example, at BMW.
But it is also being used in many other sectors, not just the industry as such. For instance, tests are being carried out to use the technology for surgical treatment of patients with heart conditions - so digital twins would be used for the advanced replication and examination of internal organs. Besides, they would enable faster development of prototypes of even such machines as airplanes. Architects, by contrast, no longer have to rely solely on their imagination in such a scenario, but can use perfectly reproduced models of skyscrapers, accurate down to the nearest centimeter.
Digital twins enter factories now
Just imagine this scenario: the opening gate of a manufacturing plant. Coating a car door with paint. Workers, going from section to section, carrying out their jobs. Except that these are just very realistic simulations. And the workers are, in fact, only avatars. This is how the idea of the digital twin in the automotive industry can be summarized. It's creating a separate, comprehensively perceived manufacturing process.
The digital twin in the automotive industry includes a virtual replica of the entire car and its physical behavior, including software, electronics, mechanisms, etc. And it can additionally store all performance and sensor data in real-time, as well as configuration changes, service history, and warranty information.
Making the digital twin a reality at BMW
This trend is already becoming widespread. For example, at the German BMW factory. The virtual three-dimensional replica of the vehicle factory used by the company is a space reproduced down to the smallest detail, which can be accessed using a screen or VR goggles. Why " dabble" in such technology at all? To save money, at least, among other things. Non-physical, virtual resources allow you to test or improve assembly line parts without having to move or operate on heavy machinery.
Machine learning algorithms also help in managing robots. These, in a simulated version, can make various complex moves to make the process as streamlined as possible. And all this without wasting energy on time-consuming tests. Besides, this way robots learn new ways of working.
Advanced software also simulates,e.g., the behavior of workers: their paths of movement and actions. By doing so, an attempt is made to minimize possible ergonomic problems. Frank Bachmann, BMW's factory manager, says the time needed to plan the factory's operations has been reduced by at least 25 percent . Anyway, the changes are happening as we speak , because even before the individual parts of the drive systems for electric vehicles leave the BMW plant, the entire production process is already finalized in the virtual version of the Regensburg factory.
The aforementioned benefits are such a boon for BMW that the company intends to develop more of this type of technology. Their soon-to-be-introduced twin factory model is expected to be a replica of the factory in Hungary, and subsequently, this will apply to other factories around the world.
Innovation driven by synergistic collaboration
BMW is an automotive giant that promotes and uses the virtual technology of tomorrow not alone, but with the right support from technology companies that are responsible for the software implementation. In the case of the German automotive brand, the partner is the chip company, Nvidia. It uses its proprietary Omniverse system, which offers the possibility to simulate the entire production process, taking into account even such physical factors as gravity.
Clearly, everything is to be conducted in the framework of photorealistic detail. This complex virtual environment allows for the creation of diverse 3D models. It's also innovative in the sense that Omniverse's open file standard is compatible with numerous computer-aided design packages. Richard Kerris, general manager of Omniverse at Nvidia, refers to the project as "one of the most complex simulations ever made".
But the solutions do not close at Invidia, and automotive companies can also choose from other offers of technological implementations. And there is every indication that there will be more and more of these offerings. For example, in November 2021, Amazon unveiled the AWS IoT TwinMaker , a service that generates digital duplicates of real-world systems for business. An immersive 3D view of systems and operations enables optimizing efficiency, increasing production, and improving performance. So does the platform-as-a-service (PaaS) offering, Azure Digital Twins . It enables the creation of digitally based models of various environments such as buildings, factories, power grids, and even entire cities.
Use cases, in other words: how can the concept of digital twin be used in the automotive industry?
It may seem to some that creating digital twins in the automotive industry is unnecessary "gadgetry" or blind following of trends.
After all, why simulate the creation of a vehicle? Isn't it better to spend time, energy, and resources on improving what is already underway? Isn't it better to invest in the REAL production result? All of this is not so simple. Especially when you realize that this technology is not just about virtualizing the vehicle development stage. The idea behind digital twin factories focuses not so much on the development of the cars themselves, but on the entire broad ecosystem. It is about creating and sustaining, in a controlled environment, the entire production environment:
- logistics,
- employees,
- deployment of machinery,
- chain value.
Ding Zhao, a Carnegie Mellon University professor specializing in artificial intelligence and digital simulations, argues that simulations are crucial to the industry. This is the case for two reasons. First, it's about simulating dangerous situations. Under "normal" circumstances, this is often simply impossible. Just as impossible is running machines for millions of cycles each time, only to collect the necessary data for analysis.
The simulation, therefore, takes into account the entire environment of the production process. It is a comprehensive and all-encompassing view of the problem. A virtual answer to the question of real needs, and of real benefits. And these are numerous.
Prediction first
The digital twin gives people in charge of maintaining productivity in a factory an important "weapon" to fight against financial loss. It's called predictive maintenance. Predicting what's to come saves resources and allows us to better plan future production and sales activities.
This ranges from product testing, determining maintenance needs and line improvements, to turnover planning. For instance, different types of chassis can be tested in diverse weather conditions. In a virtual world, of course. What is more, such solutions can be tested right away by customers, who will thus immediately share their impressions of the product. So you get feedback even before the solution is released on the market.
OEMs can maintain a twin vehicle of each VIN and software number and can do updates wirelessly (SOTA) or temporarily enable or disable some features.
In the simulation, for example, you can also pay attention to functionalities that drivers rarely use. If something doesn't work, you can back out of the idea, even before it is implemented.
In addition, it is also possible to configure the infrastructure of factories so that employees can be trained remotely without physically installing the equipment. This opens up further possibilities for the internationalization of a brand. In this way, a manufacturing company in the U.S. can train a new team in Japan even before the plant in the Land of Cherry Blossoms is completed.
Improving manufacturing capabilities
The technology described here yields huge savings not only in terms of money but also in terms of time. In the traditional automotive industry, companies have to focus too long on verifying new features or designs. And all because they have to wait for the production process to be completed.
The digital twin clears this hurdle. You can easily test the impact of a new machine with new features and parameters for your production output. It's a fast, yet reliable way to verify the success and performance of an innovative project.
Effective data management
Virtual simulation technology allows for reliable data analysis , both present, and past. All data, e.g. regarding stoppages or configuration changes, are collected in real-time. So you can see exactly when machine stoppages are likely to occur. And not only that.
As a result, people in decision-making positions can plan uninterrupted production with minimal financial loss. And car dealers, having an insight into a vehicle's service history, know exactly what they are marketing.
Based on this, you can also better anticipate customers' demand and improve customer satisfaction when using the car.
Importantly, the data collected is integrated and unified across several sources simultaneously. It is not a problem to get insight into performance data, driver behavior data , and archived information on previous models.
Perfect finish
As you may be aware, the production of a new model may take even 5-6 years, therefore even a minor oversight may disturb the stability of a company, especially when it concerns the flagship and widely advertised model. For image and financial reasons, it is particularly significant today that the product is competitive, reliable and perfectly developed.
What is the conclusion? Even a small omission can impair the stability of a company, especially when it involves its flagship and widely advertised model. For image and financial reasons, what matters today is that the product is competitive, reliable and perfectly developed.
The digital twin, which allows design and simulation in a completely virtual environment, favors the creation of products perfect in every detail. High-performance rendering and visualization tools allow you to select from a wide variety of materials and textures. And nothing stands in the way of optimizing airflow or heat emission. Every detail will be planned.
Why use a digital twin?
There are many benefits when using a digital twin in automotive. A simulation of this type means:
- an optimal design of the production process already at the digital copy stage, rather than on a "living organism".
- saving time and money. By "getting ahead" of future production problems.
- a better estimate of production line extension costs
- an easier analysis of each stage of the production process for so-called "bottlenecks".
- faster, more interactive communication between vehicle designers, stakeholders and end customers.
- improved ergonomics at all workstations in the plant.
- the determination of product behavior throughout the life cycle. Thus facilitating R&D work.
- the ability to reuse proven models and quickly evaluate the impact of changes.
- an option to integrate all data between the previous vehicle generation and the current vehicle design in a digital model.
Clearly, this is one of the most cost-effective data-driven manufacturing concepts today.
Digital Twin factory. No longer science fiction
The concept of digital twins in the automotive industry is the future, not science fiction. Before long, every factory or building will have a digital counterpart, helping to better manage it.
The digital and real worlds will seamlessly intertwine. The convergence of physical and virtual versions offers the possibility of overcoming various challenges that are now commonplace in the automotive value chain.
The most powerful giants, with BMW at the forefront, know this. Everything indicates that soon every manufacturer in the industry will have to consider investing in such solutions at some stage and to some extent. Anyway, from the company's point of view, it is not a sacrifice, but a chance to develop against the competition. And an opportunity to achieve numerous measurable benefits.
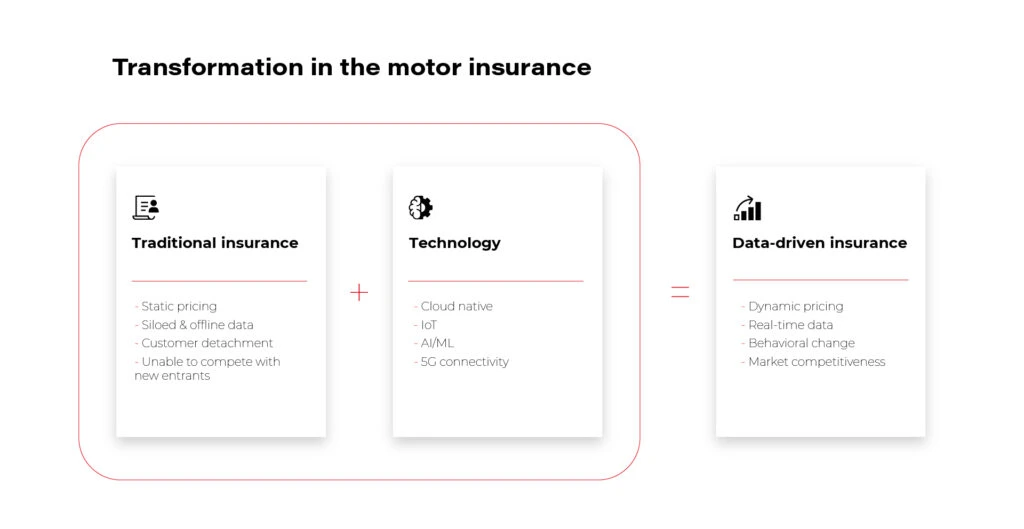
How to enable data-driven innovation for the mobility insurance
Digitalization has changed the way we shop, work, learn and take care of our health or travel. Cars are no longer used just to get from A to B. They are jam-packed with technology that connects us to the world, enhances safety, prevents breakdowns, and even provides entertainment. With the rise of the Internet of Things and artificial intelligence, a vehicle is no longer understood solely in terms of its performance and sleek design. It has become software on wheels, a gateway to new worlds - not just physical, but also virtual. And if the nature of insurance itself is changing, then the company offering insurance must keep up with these changes as well. Insurance needs digital innovation, as much as any other market area.
These days customers are looking for customization, personalization, and understanding their needs on an almost organic level. Data and advanced analytics allow us to effectively satisfy these needs. Thanks to them, it is possible to fine-tune the offer, not so much for a specific group, but for a particular person - their habits, daily schedule, interests, health restrictions, or aesthetic preferences. And in the case described by us - a person's driving style and commuting patterns .
If you think about it, the insurer has the perfect tool in their hands. If they can tap into the potential of the software-defined vehicle and equip it with the right applications, there will be nearly zero chance of inaccurate insurance risk estimates. Data doesn't lie and shows a factual, not imaginary picture of a driver's driving style and behavior on the road.
While in the traditional insurance model pricing is static and data is collected offline and not aligned with the driver's actual preferences, new technologies such as the cloud, the IoT, and AI allow for these limitations to be effectively lifted.
With them, an offering is created that competes in the marketplace, generates new revenue streams within the company, and builds customer loyalty.
Data-driven innovation - easier said than done. Or maybe not?
The transformation of a vehicle from a traditionally understood mechanical device into a "smartphone on four wheels," as Akio Toyoda once said about modern vehicles, takes time and will not happen overnight. But year by year it already happens, and as the new car models distributed by the big corporations show, this process is actually underway.
Read our article on the latest trends in the automotive industry
The so-called software-defined vehicle that we are developing with our clients at Grape Up is a vehicle that moves through an ecosystem of numerous variables, accessed by different players and technologies.
Clearly, one such provider can be - and should be - the insurer whose products have been tied to the automotive market invariably since 1897, when a certain Gilbert J. Loomis, a resident of Dayton, Ohio, first purchased an automotive liability insurance policy.
However, for insurance companies to play an integral role in the use of vehicle-generated data, the driver must receive a precisely functioning and secure service from which they will derive real benefits. Without building specific technical competencies and software-defined vehicle knowledge , the insurer cannot achieve these goals.
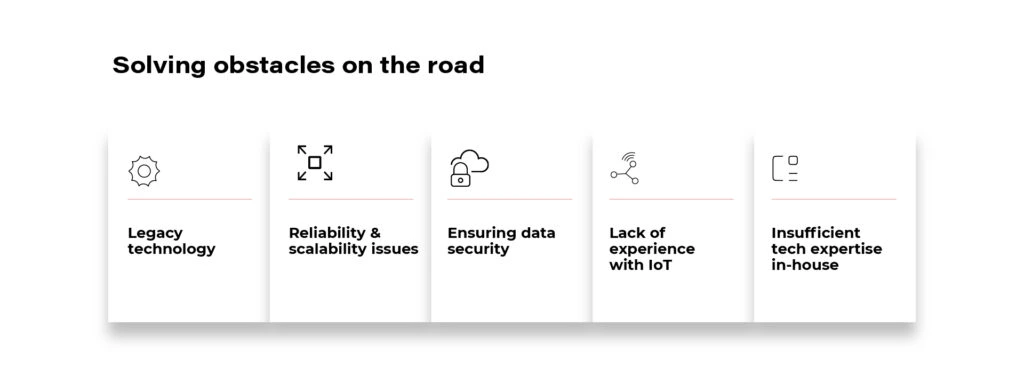
Only by creating this type of business unit from scratch in-house, or by partnering with software companies, will they be able to compete with insurtech startups like, e.g. Lemonade, which builds their businesses from the ground up based on AI and data analytics .
The right technology partner will take care of:
- data security;
- selection of cloud and IoT technologies;
- and will ensure the reliability and scalability of the proposed solutions.
During this time, the insurer can focus on what they do best - developing insurance competencies and tweaking their offers.
How to choose the right technology partner?
Just as customers are looking for insurance that accommodates their driving and lifestyle, an insurance company should select a technology partner that has more than just technical skills to offer. After all, changing the model in which a traditional insurance company operates does not boil down to creating a digital sales channel on the Internet and launching a modern website. We are talking about a completely different scale of operations requiring the insurance company to be embedded in a completely new, rapidly developing environment.
Therefore they need a partner who naturally navigates the software-defined vehicle ecosystem, understands its specifics, and has experience in working with the automotive industry. Besides, it should be someone knowledgeable about the specifics of the P&C insurance market and the challenges faced by the insurance client.

It is only at the intersection of these three areas: technology, automotive, and insurance, that competencies are built to effectively compete against modern insurtechs.
Like in the Japanese philosophy of ikigai, which explains how to find one's sense of purpose and give meaning to one's work, both companies can build valuable, useful solutions for users. They will bring satisfaction not only to customers but also to the insurance company, which will open a new revenue channel and meet the needs of the market.
Developing software for connected cars - common challenges and how to tackle them
Automotive is transforming into a hyper-connected, software-driven industry that goes far beyond the driving experience. How to build applications in such an innovative environment? What are the main challenges of providing software for connected cars and how to deal with them? Let’s dive into the process of utilizing the capabilities of the cloud to move automotive forward.
People have always aimed for the clouds. From Icarus in Greek mythology, first airplanes and spaceships to dreams about flying cars – our culture and history of technology development express a strong desire to go beyond our limits. Although the vision from Back to the Future and other Sci-Fi movies didn’t come true and our cars cannot be used as flying vehicles, our cars actually are in the cloud.
Meanwhile, the idea of the Internet of Things came true; our devices are connected to the Internet . We have smartphones, smartwatches, smart homes and, as it turns out, smart cars. We are able to communicate with them to gather data or even remotely control them. The possibilities are only limited by hardware, but even it is constantly improving to follow the pace of rapid changes triggered by software development.
Offerings on the automotive market are developing rapidly with numerous features and promised experiences to the end customer. By using cutting-edge technologies, utilizing cloud platforms, and working with innovative software developers, automakers provide solutions to even the most demanding needs . And while our user experience is improving at an accelerated pace, there is still a broad list of challenges to tackle.
In this article, we dive into the technology behind the latest trends, take into account the most demanding areas of developing software in the cloud, and explain how proper solution empowers the change that affects us all.
Challenging determinants of the cloud revolution in automotive
Connecting with your car through a smartphone or utilizing information about traffic provided to your vehicle thanks to the platforms that accumulate data registered by other drivers is extremely useful.
Those innovative changes wouldn’t be possible without cloud infrastructure . And as there is no way back from moving to the cloud, the transition creates challenges in various areas: safety, security, responsiveness, integrity , and more.
Safety in the automotive sector
How to create a solution that doesn’t affect the safety of a driver? When developing new services, you cannot forget about the basics. Infotainment provided to vehicles is more advanced for every new release of a car and can be really engaging. The amount of delivered information combined with increasingly larger displays may lead to distraction and create dangerous situations. It’s worth mentioning that some of the colors may even impair the driver’s vision!
Integration with the cloud usually enables some of the remote commands. When implementing them, there are a lot of restrictions that need to be kept in mind. Some of them are obvious, such as you don’t want to disable the engine when a car is being driven 100km/h, but others may be much more complicated and unseen at first.
Providing security for car owners
Enabling services for your vehicle in the cloud, despite being extremely helpful to improve your experience, creates another way to break into your car. Everyone would like to open a car without using keys, but using a mobile phone, voice, or a fingerprint instead. And as these solutions seem modern and fancy, there is a big responsibility on the software side to do it securely.
Responsiveness enabling the seamless user experience
Customer-facing services need to deliver a seamless experience to the end-user. The customer doesn’t want to wait a minute or even ten seconds for unlocking a car door. These services need to do it immediately or not at all, as an issue with opening the doors just because the system had a ‘lag’ is not acceptable behavior.
Data integrity is a must
Another very important concept associated with providing solutions utilizing cloud technologies is data integrity. Information collected by your vehicle should be useful and up to date. You don’t want a situation when the mobile application says that the car has a range of 100km, but in the morning, it turns out that the tank is almost empty, and you need to refuel it before going to work.
How to integrate and utilize mobile devices to connect with your vehicle?
When discussing how to use mobile phones to control cars, a very important question occurs; how to communicate with the car? There is no simple answer, as it all depends on what model and version of a car it is, as depending on a provider, the vehicles are equipped with various technologies. Some of them are equipped with BLE, Wi-Fi Hotspots, or RFID tags, while others don’t offer a direct connection to the car, and the only way is to go through the backend side. Most of the manufacturers will expose some API over the Internet without providing a direct connection from mobile to the car. In such cases, usually, it’s a good practice to create your own backend which handles all API flaws. To do so, your system will need a platform to have a reliable solution.
When the limitation of hardware is met, there is always an option to equip the car with a custom device, which will expose a proper communication channel and will be integrated with the vehicle. To do so, it may use the OBD protocol. It gives us full control over the communication part, however, it’s expensive and hard to maintain the solution.
Building a platform to solve the challenges
There is no simple answer on how to solve the mentioned challenges and implement a resilient system that will deliver all necessary functionalities with the highest quality. However, it’s very important to remember that such a solution should be scalable and utilize cloud-native patterns. When designing a system for connected cars, the natural choice is to go with the microservice architecture. The implementation of the system is one thing, and partly this topic was covered in the previous article , but on the other hand, the very important aspect is a runtime, the platform. Choosing the wrong setup of virtual machines or having to deploy everything manually can lead to downtime of the system. Having a system that isn’t available for the customer constantly can damage your business.
Kubernetes to the rescue! As probably you know, Kubernetes is a container orchestration platform, which allows running workload in pods. The platform itself helped us to deliver many features faster and with ease to our clients. Nowadays, Kubernetes is so easily accessible that you can spin up a cluster in minutes using existing service providers like AWS or Azure. It allows you to increase the speed of delivery of new features, as they may be deployed immediately! What’s very important with Kubernetes, is its abstraction from infrastructure. The development team with expertise in Kubernetes is able to work on any cloud provider. Furthermore, mission-critical systems can successfully implement Kubernetes for their use cases as well.
Automotive cloud beyond car manufacturers
Automotive cloud is not only a domain of car manufacturers. As mentioned earlier, they offer digital services to integrate with their cars, but numerous mobility service providers integrate with these APIs to implement their own use cases.
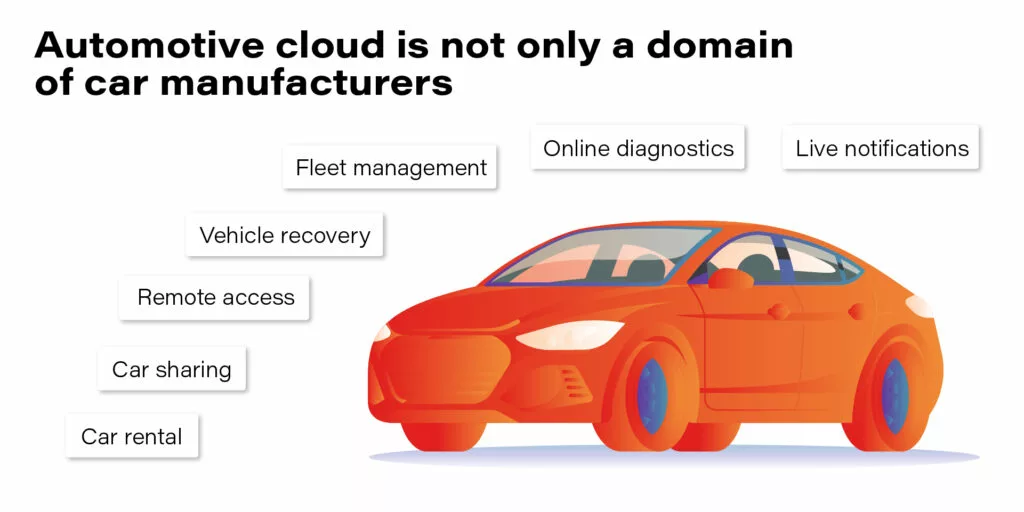
- Live notifications
- Online diagnostics
- Fleet management
- Vehicle recovery
- Remote access
- Car sharing
- Car rental
The best practices of providing cloud-native software for the automotive industry
Working with the leading auto motive brands and being engaged in numerous projects meant to deliver innovative applications. Our team have collected a group of helpful practices which make development easier and improve user experience. There are some must-have practices when it comes to delivering high-quality software, such as CI/CD, Agile, DevOps, etc., – they are crucial yet well-known for the experienced development team and we don’t focus on them in this article. Here we share tips dedicated for teams working with app delivery for automotive.
Containerize your vehicle
One of the things we’ve learned collaborating with Porsche is that vehicles are equipped with ECUs and installing software on them isn’t easy. However, Kubernetes helps to mitigate that challenge, as we can mock the target ECU by docker image with specialized operating systems and install software directly in it. That’s a good approach to create an integration environment that shortens the feedback loop and helps deliver software faster and better.
Asynchronous API
In the IoT ecosystem, you can’t rely too much on your connection with edge devices. There are a lot of connectivity challenges, for example, a weak cellular range. You can’t guarantee when your command to the car will be delivered and if the car will respond in milliseconds or even at all. One of the best patterns here is to provide the asynchronous API. It doesn’t matter on which layer you’re building your software if it’s a connector between vehicle and cloud or a system communicating with the vehicle’s API provider. Asynchronous API allows you to limit your resource consumption and avoid timeouts that leave systems in an unknown state.
Let’s take a very simple example of a mobile application for locking the car remotely.
Synchronous API scenario
- A customer presses a button on the application to lock the car.
- The request is sent and is waiting for a response.
- The request needs to be delegated to the car which may take some time.
- The backend component crashes and starts without any knowledge about the previous request.
- The application gets a timeout.
- What now? Is the car locked? What should be displayed to the end-user?
Asynchronous API scenario
- The customer presses a button on the application to lock the car.
- The request is sent and ended immediately.
- The request needs to be delegated to the car which may take some time.
- The backend component crashes and starts without any knowledge about the previous request.
- The car sends a request with the command result through the backend to the application.
- Application displays: “Car is locked.”
With asynchronous API, there’s always a way to resend the response. With synchronous API, after you lose connection, the system doesn’t know where to resend response out of the box. As you may see, the asynchronous pattern handles this case perfectly.
Digital Twin
DigDigital Twin is a virtual model of a process, a product or a service, in case of automotive – a digital cockpit of a car. This pattern helps to ensure the integrity of data and simplify the development of new systems by its abstraction over the vehicle. The concept is based on the fact that it stores the actual state of the vehicle in the cloud and constantly updates it based on data sent from a car. Every feature requiring some property of vehicle should be integrated with Digital Twin to limit direct integrations with a car and improve the execution time of operations.
Implementation of Digital Twin may be tricky though, as it all depends on the vehicle manufacturer and API it provides. Sometimes it doesn’t expose enough properties or doesn’t provide real-time updates. In such cases, it’s even impossible to implement this pattern.
Software for Connected Cars - Summary
We believe that the future will look more futuristic than we could have ever imagined. Autonomous cars, smart cars, smart homes, every device tries to make our lives easier. It’s not known when and how these solutions will fully utilize Artificial Intelligence to make this experience even better. Everything connects as numerous IoT devices are connected which provides us with unlimited possibilities.
T he automotive industry is currently transforming, and it isn’t only focusing on the driving experience anymore. There is a serious focus on connected mobility and other customer-oriented services to enhance our daily routines and habits. However, as software providers, we should keep in mind that automotive is a mature industry. The first connected car solutions were built years ago, and it’s challenging to integrate with them. These best practices should help focus on customer experience. Unreliable systems won’t encourage anyone to use it, and bad reviews can easily destroy a brilliant idea.
The automotive industry is experiencing a challenging transformation. We can notice these changes with every new model of a car and with every new service released. However, to keep up with the pace of the changing world, the industry needs modern technologies and reliable solutions, such as Kubernetes. And on top of that cloud-native application, software created with the best practices by experienced engineers who use the customer-first approach.
Over-The-Air upgrade: How to develop the concept successfully
July 2021, Porsche recalls 43 000 of its newest EVs: Taycan and Taycan Cross. Why? Due to software issues resulting in power loss. How could this have been prevented while reducing costs and fixing the defects in one go on all cars? The answer is short and comes from the mouths of everyone working in the automotive industry: Over-The-Air Upgrade.
Although hard to implement correctly, the cost of not having the ability to remotely upgrade software and firmware in the vehicle is huge. Today it’s not the question of „IF” and „WHEN”, (since the automotive industry has long known the answers to these questions), today it’s the question of „HOW”.
Upgrading a GPS or infotainment application is one thing, but upgrading the vehicle's firmware is another. And it does not matter whether it's a car, an e-scooter, or a smartphone. The principles are always the same. We will try to outline them in this article.
Let's start from the beginning - what are the core benefits of the over-the-air upgrade.
OTA allows for remote diagnosis. Initial diagnosis done remotely helps with better planning of repairs, as well as with predictive maintenance – both giving a better customer experience and reducing the cost for the OEMs, especially during the warranty period.
The upgrade can also happen on the production line while waiting for shipment. The vehicle always has the newest stable version of the firmware and software, reducing the amount of manual work required for the whole vehicle lifecycle.
The only part of the car life cycle where the Over-The-Air Upgrade is not really useful is aftersales.
Key benefits of implementing an over-the-air upgrade are:
- An ability to remain compliant with evolving industry standards through vehicle lifetime.
- It helps to reduce warranty and recall costs by reducing service center visits or help desk calls for the vehicle (it also works on the production line, while waiting for shipment).
- The vehicle always has the newest stable version of the firmware and software, reducing the amount of manual work required for the whole vehicle lifecycle.
- An ability to resolve issues remotely, so the customer doesn’t have to waste time traveling on-site.
- An ability to update multiple vehicles simultaneously, reducing time required to update the whole fleet.
SOTA - the most common implementation of over-the-air upgrade
SOTA is used widely by almost every OEM to update navigation systems (maps, POIs) and sometimes other infotainment applications, like voice assistance. As opposed to the firmware update, the failure of the software update is rarely critical to vehicle operations. It can result in inconvenience when due to update failure, the navigation system crashes or fails to display a map.
This is also the part that makes the customer experience bad if SOTA is done without due diligence because the software makes the infotainment appealing and responsive . And yet no one likes slow or difficult-to-use applications or services. Especially when they're intended to boost driving satisfaction.
Firmware over-the-air-upgrade is a different beast
With FOTA, we play a much more demanding game. That’s why it’s important to separate software updates from firmware updates.
First, it’s just easier for a developer to focus on his part of the job, the specific application. Secondly, the firmware part is riskier and more complex, and the update might not be required that often.
The complication comes partially from the idea of replacing the Operating System of the ECUSoC and partially from the criticality of the systems. Computers controlling engine operations, ESPTC, gearbox, or electronic chassis controller are required for safe and reliable operations of the vehicle.
Firmware Over-The-Air Update Failure in the update process, resulting in critical fault of this kind of subsystem, in most cases, makes the vehicle inoperable, beyond repair capabilities of regular users. The cost of restoring the vehicle to an operational state is fully on the manufacturer’s side. This is obviously the scenario that should be avoided at all costs.
Key requirements for implementation of (F)OTA successfully
- Automatic recovery corrupted updates
Firmware updates should be atomic. The whole process should be successful, or the system should automatically roll back to the previous/ existing version of the software. The problem does not have to be caused by a bug in the original image – the package can be corrupted in transit, or the transfer might be interrupted and result in a partial package being in the process.
- Internet connectivity consistency
Parts of the firmware being updated, especially ones regarding device to network connectivity, should never break away if the SoC is connected to the internet – otherwise, the next version might be never installed automatically. It’s important especially if the device does not have a way to notify the user about the problem or allow them to reconfigure the network settings.
- Code provenance, code identity, code compatibility and code integrity – security of the executed program
Firmware update in most cases regards critical systems . The wireless update is tempting, but it must be secure, especially regarding verifying the identity of authors of change and source of the update – as well as if the code was not replaced or altered during transit. If the edge device can cryptographically confirm code signs, it can be installed. Additionally, there should be a way for the update system to confirm if the package is built for that specific it’s being installed on.
- Secure communication medium for package transport
All channels used for the update should be secure. Ideally, it should be a mutual TLS, but even a regular secure TLS connection is sufficient as long as the whole path is secure (both local connection and in the cloud).
- [NICE-TO-HAVE] Sending OTA firmware updates in chunks and partial updates support
It’s easier to handle updates that are sent in chunks. When the connection is unstable, the whole download process does not have to be repeated. Additionally, if partial updates are supported, a small update takes less time to install and less bandwidth to transfer.
- [NICE-TO-HAVE] Separate base system layer from the installed software
If the application and data layer is not part of the firmware update, it’s easier to develop the applications, safely update the system without breaking the data, and securely update the system without breaking the applications. Combined with partial updates, it also helps with making updates faster.
Opposite to the chip flashing using a wired connection, the failure is not really an option – if the device cannot boot, even to some basic OS functions, it is bricked – unless you are an expert with specialistic hardware, it may be really hard to directly write new firmware to the chip to overwrite the faulty or broken version.
And what if a broken package is written to the device?
Does not matter if it was a human error, device issue, or just really bad luck – in the end, the important part is to make sure the user does not end up with a broken vehicle. The battle-tested solution for this problem is AB filesystems – or AB slots.
The idea is rather simple – system areas in storage are duplicated. Graphically speaking, there are two fully operational versions of the system being installed simultaneously on the single device, and there is a programmatical switch in the bootloader which selects the OS to start.
In regular operation, a single system, let’s call it “A”, is being continuously used while the other one, “B”, is the exact copy of the “A”, but works as a backup. If the “A” fails to start, the bootloader switches to the other version. During the update, the inactive partition is overwritten with the update packages – either whole partition or subset of files, depending on the type of update. If the update finishes and the checksum of the result is correct, as the last step, the bootloader configuration is changed to run from the “B” slot, and the device restarts.
As previously stated – if something fails, the bootloader, after a failed attempt, will switch back to the previous, working version. This makes this approach safe, allowing us to retry the upgrade process. Otherwise, the update is successful and there are two approaches:
- Leave the old version on the other partition and remain to boot from the slot selected after the update process.
- Copy the contents of the upgraded partition to the other slot t o have two copies of the same version .
The same approach is used in modern smartphones, and as a direct continuation, the same approach was selected for Android Automotive OS – which is a Google Android Open-Source Project (AOSP) implementation-specific for the automotive industry.
Currently, both Volvo (including, of course, Polestar) and General Motors use AAOS for their newest vehicles as an infotainment system. Being an open system, a lot of applications can be developed for cars from different OEMs and leverage the bigger, open market – plus of course, the code is open source, and a lot of work on things like upgrade system (OTA), application delivery, connection to subsystems (air conditioning, navigation, interior buttons) is already finished and can be reused.
Building using open and tested frameworks and code is just easier – and a proven way to update both application and system is an asset when starting from scratch with new infotainment firmware and software.
How Porsche developed a digital twin to win the race for the virtual car concept
NASA used a precursor to these technologies to bring the Apollo 13 astronauts back to Earth. Lockheed Martin claims these types of solutions are one of six game-changing technologies in the defense industry. The opinion-forming Gartner includes them in its list of ten strategic technologies that can streamline corporate decision-making processes. When Porsche and Volkswagen Group reach for them, it’s a signal for the automotive industry to become interested in digital twin technology for good.
Although the concept of a digital twin had been developing in the space industry since the 1970s, it was not until the 1990s that it was first mentioned in the literature (the book entitled Mirror World, by David Gelernter). In industry, the technology was recognized even later, 30 years after the Apollo mission, when the authority in the field of PLM - Michael Grieves - disseminated it.
Today, the technology, which was officially named Digital Twin by NASA just over 10 years ago, is placed on the pinnacle of key solutions at the convergence of the virtual and real world. It works well wherever there is a high number of failures, work of coupled systems, and where the production process is long and burdened with numerous risks.
The automotive industry is one of these sectors, as demonstrated by the virtual car concept developed by Porsche for the new Taycan. What is a digital twin and what benefits does it bring?
- test prototypes for their functionality, durability and user expectations;
- predict defects and analyze possible design errors;
- save time and financial means;
- reduce design and production risks;
- improve monitoring capabilities of vehicle fleets;
- and best of all - it enables continuous product improvement, as it often collects data from not only one, but thousands of objects. This makes it learn faster and predict defects more precisely, as it is based on knowledge gathered from a vast number of sources.
In the case of cars, these could be sensors from dozens of systems spanning the entire vehicle lifecycle: from research and development to the manufacturing plant and OTA updates , to connected services .
„Chassis twin” - a virtual car concept developed by Porsche for TaycanThe „chassis twin” project has been in the process of development at Porsche for the past three years and then it was continued by the CARIAD company (the Volkswagen Group's vehicle software provider). The air suspension of the new Porsche Taycan was chosen as the main object.
Why the chassis and not the entire car? Because it is this part of the vehicle that is subjected to the most strain, especially on racetracks.
Porsche engineers used intelligent neural algorithms to centrally analyze the data, and in-car sensor data was collected not only from Porsche cars but also from Volkswagen Group vehicles. This increased the data pool by over 20 times. The "chassis twin" concept enables chassis loads to be detected, even if they are not noticeable inside the cabin, and notify the driver before faults appear, even when no suspicious sound or vibration has yet been noted by the driver or mechanic.
The data collected by the vehicles is sent via Porsche Connect to a central system in the cloud , where an algorithm calculates the relevant durability and vehicle operation thresholds for the whole fleet of vehicles to create a baseline. When these are possibly exceeded, the driver of a specific vehicle receives a notification via Porsche Communication Management (PCM), that the chassis may require inspection. Looped into the computational work, the algorithm recommends not only the type of service needed but also the scope of work to be carried out in the service center.
By removing a faulty or overloaded component early on, the driver will not only be able to avert potential malfunctions, but also keep the vehicle in better overall condition.
In the future, based on a vehicle's digital usage history, Porsche or a partner insurance broker can offer extended warranties and better services to the driver . The data can be classified, analyzed, and used not only for repairs to a specific vehicle but to predict life-cycle events for the entire product. This allows Porsche to create new services and features, and to test different scenarios for the development of a particular vehicle line. Thus, it saves the time and resources required to bring ill-conceived solutions into reality.
The other possible use case is that drivers themselves can use the data collected by the digital twin to negotiate with the prospective buyer. The buyer can view the vehicle's overall condition and chassis service history.
As for drivers' concerns about their own privacy, the manufacturer assures that it collects data anonymously and the system does not store any information that could identify the driver directly. The future of the concepts digitization of the automotive industry is gaining pace year after year. The digital twin concept may prove to be one of the key technologies that will push software-defined vehicles to new tracks and help companies create safer cars, provide new services and increase vehicle lifespan.
So far, half of the Taycan users have signed up for the Porsche pilot program, which collects data from the chassis of their sporty electric cars. In 2022, the program is to launch at a test level, and only sensor data directly from the mechatronic components will be evaluated. In the future, the concept is to reach its full potential, making it possible, among other things, to calculate the wear and tear of specific components without the need for physical measuring devices.
How will the "chassis twin" model developed by Porsche work out ? The future will tell. What is certain is that a return to the past is only possible in the movies. In 2022, Volkswagen is commencing an era in which a virtual equivalent will soon await the driver, in addition to their actual real vehicle.
How OEMs can leverage subscription business model
The subscription business model outperforms the non-subscription business as we observe the shift from ownership towards usership. The success of services like Netflix for movies, Spotify for music, Microsoft Game Pass for video games quickly spreads outside from the entertainment industry. For industries based on the services, not on physical products, the shift from one-time or reoccurring payment to subscription-based service is easier.
Not-so-warm welcome for subscription model in automotive
It’s harder to justify monthly payments for the service if it enables the device or feature already present in the product you have already paid for. The huge backlash in media happened in a reaction to BMW’s announcement in 2020 that the company has been considering selling heated seats as a subscription-based feature.
Most of the criticism was associated with the fact that the overall price of the car was the same, and obviously, it was already equipped with the electric pad in the seat, while there was no additional software for handling the feature - it was just enabling and disabling the button. Some of the journalists even called that “simple-feature-as-a-service.” That resulted in nightmarish marketing for the idea and postponed the implementation of similar models by other OEMs, encouraging them to rethink the risk of making similar announcements.
Subscription business models become new normal
But in the last few years, a lot has changed. People get used to the subscription payment model appreciating its benefits. Also, more and more features in the car are based on the software , so it’s just easier to justify additional payment over the initial vehicle purchase. The overall reception of the idea shifted from mostly negative to neutral or positive.
At this point, customers understand that sometimes building-in hardware that is not activated can be cheaper than making hundreds of configuration versions. Also, the vehicle manufacturers start to learn how to better advertise the benefits of the subscription business model and how to better pick the features that fit this kind of model. It also enabled certain flexibility if this is a corporate vehicle, with basic default configuration, and the driver would like to add Apple CarPlay or enable additional convenience features, like opening the car with the smartphone.
How OEMs can successfully implement a subscription model
For OEMs planning to start with this business model, the moment for building a platform supporting subscription-based services is now. Not just the payment system, because the subscription business model is based on the idea that the feature can be enabled and disabled on the fly, basically making Connected Car a key requirement , while OTA makes it much more robust long-term .
It all starts with requirements. Let’s try first to distinguish typical types of feature purchase for a vehicle:
- Standard equipment (automatically activated in production phase)
- Runtime - associated with the driver or limited-time licenses
- Lifetime - associated with the vehicle, does not expire
- Purchased on an initial configuration in a dealership
- Purchased aftersales (either in dealership or online)
- Subscription - associated with driver or vehicle, can expire
- Automatic re-subscription (e.g., no end time)
- Manual re-subscription (e.g., end time after X months)
The other key aspect is offering differentiation between countries, regions, and continents. The same feature may be available as a subscription in the EU while only available as a one-time purchase in the USA.
To make the offer complete, the manufacturer may allow buying a custom offer specific to geographical location - for example, the additional package offered when the driver enters Nürburgring - 24 hours of additional racing time-tracking features.
Building a system for the new model
Our system has to handle all those use cases. To accomplish that, we need to build a solution in which the scheduler (sometimes called cron, from the name of Linux job scheduler) is the core component. It is responsible for triggering notifications or events at specific periods - for example, resubscription notification monthly, to trigger the payment, or license cancellation event after a configured period.
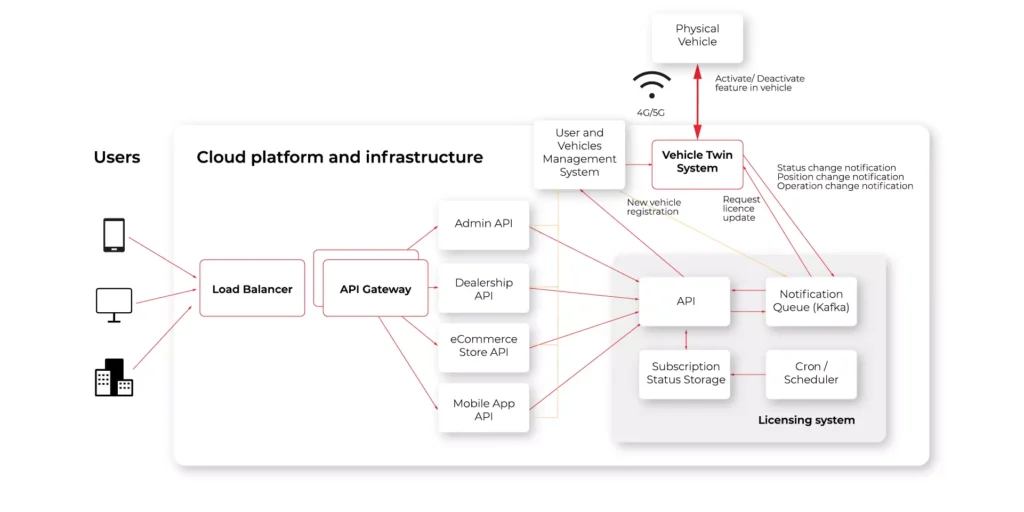
The scheduler itself is just a single, small part of the system. The other important piece is the database for storing the subscription status and the API backend for retrieving and updating the values. Consistency is crucial, as the feature getting disabled by mistake leads to a bad user experience.
The system has to be connected to the vehicle . In most cases, this is done asynchronously through queues like Kafka or RabbitMQ. This gives better stability and reliability than direct connections.
Lastly, we need to ensure that the feature is actually enabled or disabled in the vehicle. This means the vehicle has to receive the correct, unique license for that feature when it’s enabled, and revoke it when it is disabled (alternatively, the license can be automatically pushed every, for example, 30 days, with expiration time set to 33-35 days, to prevent feature loss when connectivity or payment problems occur.
To avoid building an additional retry mechanism into the licensing system itself, it’s better to update the feature state using Digital Twin. In this case, the digital representation of the vehicle is updated with the new license, and it is then responsible to synchronize itself with the vehicle when the internet connection to the car is available. This makes the system conformant to the single-responsibility principle, so the license system does not have to know or understand the vehicle connectivity.
That’s the basic architecture of our system for handling licenses and subscriptions of digital services. Obviously, that’s just the beginning. For OEMs, where the scale of digital business grows exponentially, the next important topic would be the reliability of the system. For that, scaling to meet the demand is important, as well as caching the current state of licenses to avoid complex queries.
Apart from that, this is enough to start with the feature activation and deactivation and handling subscriptions. Of course, it must be connected to mobile apps and online stores for purchases and to payment systems, but those are already used by most enterprises.
Is this really the future? It seems like we can’t avoid it anymore, especially with shared mobility growth, the ability to unlock temporarily additional features is tempting. Imagine grabbing a Ferrari for a weekend to take it to the track, enabling an additional 50HP and an advanced AI for measuring your times and proposing a better moment to break before the turn and accelerate afterward. And paying for only 2 days. This may make all the difference in convincing customers to the new subscription business models.
Distributed quality assurance: How to manage QA teams around the world to cooperate successfully on a single project
Ensuring distributed quality assurance and managing a QA team is not always as straightforward as one may think it is. There is no way to predict the exact number of bugs being introduced into the code and therefore, there is no way to calculate the precise time when those issues are going to be fixed. The planning process is very fluid and very often the development team requires QA team’s attention and help to reproduce the issue. Such challenges arise even in the most usual team setups when there’s just one team. Then what about a project that is so big, that there are three QA teams working together on ensuring the quality and writing automation tests?
Distributed Quality Assurance
Scaling the project by introducing more teams arise many different kinds of challenges. Sometimes the teams work in different, just slightly overlapping time zones. Sometimes it is a different culture and language. Sometimes, if said teams are hired by different vendors, the processes may differ. Rarely, this is a combination of all of those factors.
We are going to take a look at precisely that situation. The project included multiple teams writing automated Selenium tests for a single, large-scale web project simultaneously. Testers were working from Europe, Asia, and the US. Due to customer policy – all the source code for automation tests had to be pushed to a single Git repository.
Initially, there was no cooperation process defined as other teams joining the project organically when parts of the application they were responsible for, were integrated into the system. At this point, nobody anticipated an inevitable disaster.
The realization came in when suddenly a new pull request came in. After six months of work, thousands of lines of the code, and multiple developers contributing - it was impossible to review such a big change and its impact on all other code – especially to foresee a possibility of invisible conflicts.
At this point, we knew that we must create a common process for all teams. We can’t just discard 6 months of development, but at the same time, we can’t merge it without thorough verification. One of the ideas was to split the work into multiple groups of branches – each team having their own set of development/integration/master, etc., but this contradicted the very idea of cooperation between the teams.
First, we’ve asked to split the huge PR into feature branches – possibly, one branch per test or one branch per feature being tested - and then merge them one by one. Going forward, all new tests should be added the same way, as relatively small pull requests instead of large chunks of code that are impossible to digest during the code review process.
It was necessary to remind the teams that in such a setting, being synced with the latest changes saves everyone a ton of work. The process that we’ve introduced made it mandatory to pull the latest code from the development branch at least once a day to make sure there are no new conflicts.
Then we’ve created separate pipelines for the other teams to test their changes, as even with small worktime overlap, it was still a blocker.
Additionally, the process requires at least two approvers from different teams to merge the changes into the development branch – this way teams do not only keep an eye on code quality but also make sure changes from other teams do not impact their work.
It may sound just like a few small steps, but overall, the implementation of the new approach took almost two months. This includes various meetings, agreements, presentations, and writing down the processes. On top of that, teams had to take care of integrating all PRs, big and small, into a new “version zero” codebase, which then was used as a fresh starting point.
The process was written down on a Confluence page accessible for all team members in all teams. It does not just include the rules initially accepted by the teams, but also coding standards, style guide, and links to the agile delivery process used for that particular project. Afterward, the result was presented to all teams and agreed to use from then on. And together we’ve decided to have a weekly sync just for the QA teams.
Key takeaways
The resulting process is working very well for us. It is a scaled-up version of the process we have used internally in our team, so the implementation went smooth and swift. The velocity of the automation tests development also improved over time, as less time was spent on fixing conflicts and going through PRs.
Of course, this process is not a one-size-fits-all solution and does not answer all the questions you might have if you want to implement a similar solution into your QA automation development. Their project includes shared code, such as libraries, which someone is obliged to maintain and take responsibility for. The technical debt reduction also has to be agreed upon and split evenly between the teams. All in all, if the development is based on a solid foundation like the described process, it’s easier to agree on smaller things on the go.

How to simplify the process of building production-ready AI services and reduce the time for resource management in the automotive industry?
While the automotive industry is rapidly changing by adopting a software-first strategy, like in other sectors, automotive enterprises struggle with productionizing AI and ML R&D projects. Machine Learning and Data Science teams face numerous challenges, including determining the proper technology, automating workflows, managing computing resources, managing data, and building solutions meeting internal regulations. All these issues can complicate the project even before the kick-off.
So, how do we support AI teams to overcome typical challenges and enable ML engineers and Data Scientists to focus on creating and bringing artificial intelligence algorithms to production?
The implementation of a dedicated deployment platform is a solution that is well suited for the automotive industry . In particular, it allows you to:
- accelerate the productionization of AI and ML applications;
- provide an easy and quick project and user onboarding;
- simplify access to data and computing resources;
- ensure high scalability -even when the number of accounts far exceeds thousands of users.
To illustrate the process of working on the platform, let's have a look at a project that the Grape Up expert team had the opportunity to implement.
Building AI and ML deployment platform using proven cloud-native technologies - practical use case
Our client - a well-recognized sports car manufacturer - set us the goal of designing a reliable and extensible architecture capable of handling hundreds of customer accounts for the platform. Tools were to be selected for the project to ensure the scalability and flexibility of operations. The idea was to provide fast and efficient production of AI/ML software .
Along with building the platform architecture leveraging Terraform orchestrating Cloud Formation scripts, Grape Up ensured efficient migration of existing environments. The solution was integrated with Continuous Integration pipelines and the E2E tests set. To reap the benefits of high-quality performance in multiple regions worldwide, the platform was hosted on the AWS cloud.
Results?
An AI Deployment Platform was delivered , which was capable of managing a huge number of AI/ML projects and allowed for streamlined processes to create, test, and deploy artificial intelligence and machine learning models into production for Data Science teams.
Developers were guided through the company's deployment processes and supported with reusable blueprints that could be leveraged at the initial steps of the development.
The cloud-native toolkit that was created provided flexibility and agility, at the same time supporting innovation in the vendor's operations. After introducing improvements to the platform, the customer could reduce the code by 80%, while retaining high quality and testability.
All those solutions allowed AI software development teams to work more efficiently and reduce time-to-market for new products and services.
Should UI testing and API testing go together?
If you have ever worked on writing UI automation tests, you probably came to the point when your test suite is so extensive that it takes a long time to run all the cases. And if the suite keeps on expanding, the situation won't look better. Applications are growing and the number of tests will constantly increase. Luckily, there is a solution to speed up test runs. In this article, we present the advantages of using some help in the form of API testing in the UI test suite, focusing on the aspect of test execution time.
How can API Requests help you?
- Tests will be easier to maintain - UI is constantly changing when API requests are persistent (for the most part)
- You will get immediate tests result from the business logic side
- You can find bugs and solve problems faster and in a more effective way
- You will see a significant improvement in the test execution time
If there are some unwanted issues in the application, we want to be able to discover them as fast as possible. That’s why test execution time is significant in the development cycle. Before we focus on the API requests, first let’s take a small step back and take a look at the test from the UI side only.
Customer path
UI testing is literally the path that the customer is taking through the app, and it is crucial to write automation tests for these workflows. Sometimes we need to repeat the same steps in many feature files (especially if we are taking care of data independence ) and it is not necessary to go over them again on UI side in each test.
Imagine that as a customer you can configure your car through the app. You can start with choosing a basic model and then add some extra equipment for your vehicle. Let’s take a look at this example written in Gherkin:
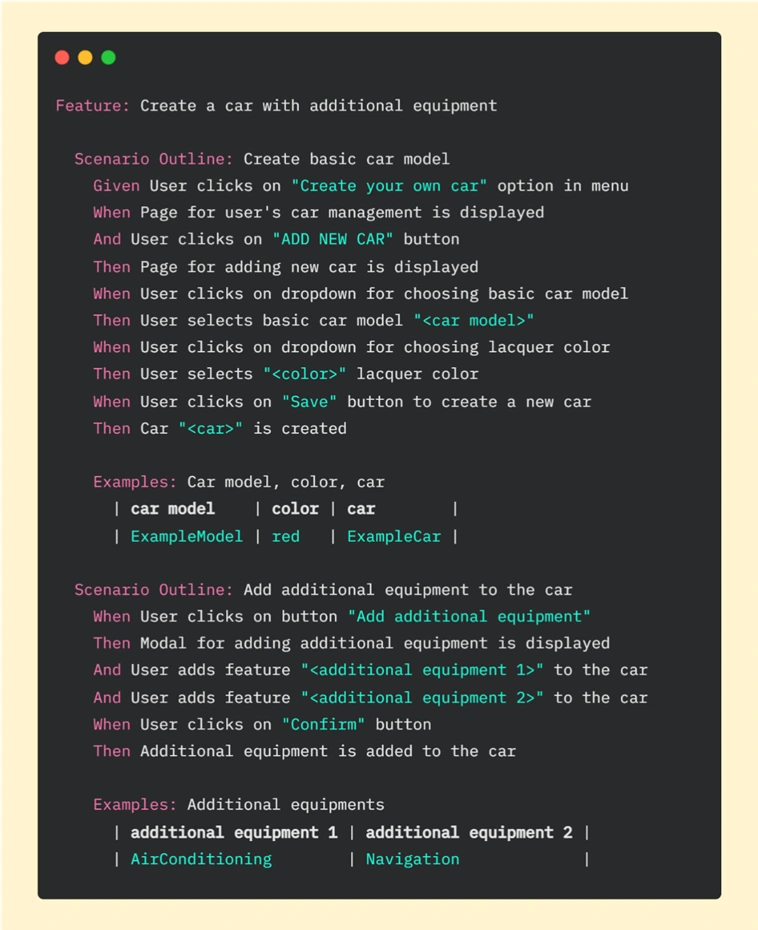
It is basic functionality, so we went through this workflow step by step on the UI side. In this test, we have many components that need to be fully loaded - pages, buttons, modals, and dropdowns. Every action takes some time - loading individual elements and clicking on them. It takes 51.63s. in total to run this scenario in PyCharm:
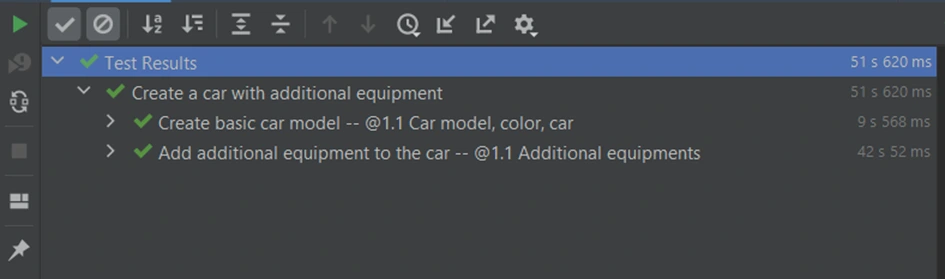
API enters the stage
Let’s now consider another case. What if customers change their minds about the color of the vehicle or they want to add or delete extra equipment? We need to be able to edit the order. Let's create an additional test for this workflow.
If we want to edit the vehicle, first we need to have one. We can start the Edit car test by creating a new vehicle using all the steps from the previous feature file, but we can also use API help here. Replacing repeatable steps with API requests will allow us to focus on the new functionality on the UI side. Let’s look at the Gherkin file for editing a car:

In the first scenario of this feature, we are creating a car (via API) and in the second one editing the vehicle (through UI). In scenario “Create test car via API” we created the same car as in the previous feature “Create a car with additional equipment” , where everything was done on the UI side. If we look at the result now, we can see that the whole test (creating and editing a car) took less than 17 seconds:

Part for creating a vehicle by API took 11.107 seconds. To run these steps on the UI side we needed more than 50 seconds. To be precise we’ve just saved 40.513 seconds in one test! Imagine that we have another 10 or more tests that need that functionality - it can be a big time saver.
A request for help
Key for benefit from API in UI test suite is to use popular Python library called Requests – it allows us to easily send HTTP requests. Basic POST requests can take the following form:
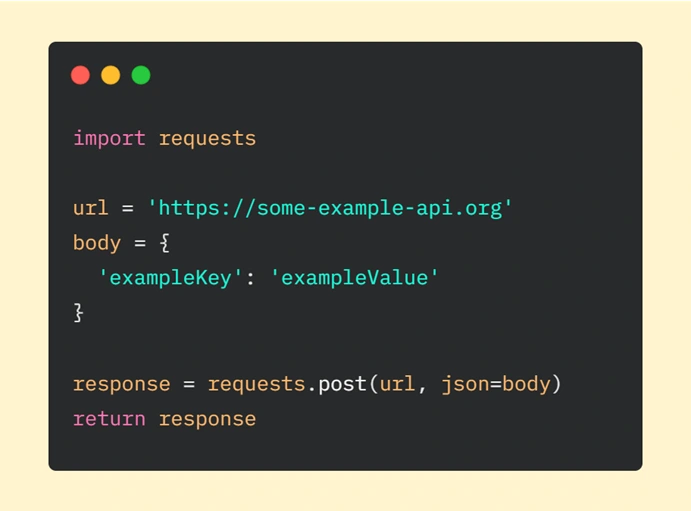
We have to start with importing the ‘requests’ module. Then we are declaring the URL of the request and data we want to send (provided as a dictionary). The next step is to make an HTTP request where we are passing our parameters (url is required, json – optional - it’s a JSON object which will be sent to the mentioned URL). In the end, we are returning the response from the server.
In our car application, this example will be a little expanded. What exactly is hidden behind lines of code responsible for creating a vehicle via API requests? I will focus on the first step of this scenario: 'Car “<car> from the model “<model>” and lacquer color “<color>” is created via API request’ . If we look deeper, we can see step implementation:
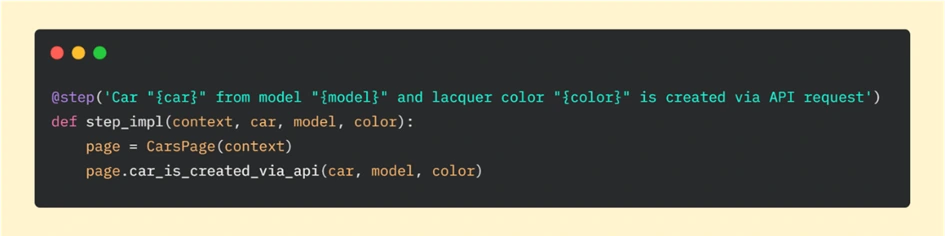
And then if we go further to the car_is_created_via_api function, we can analyze requests sent to API:
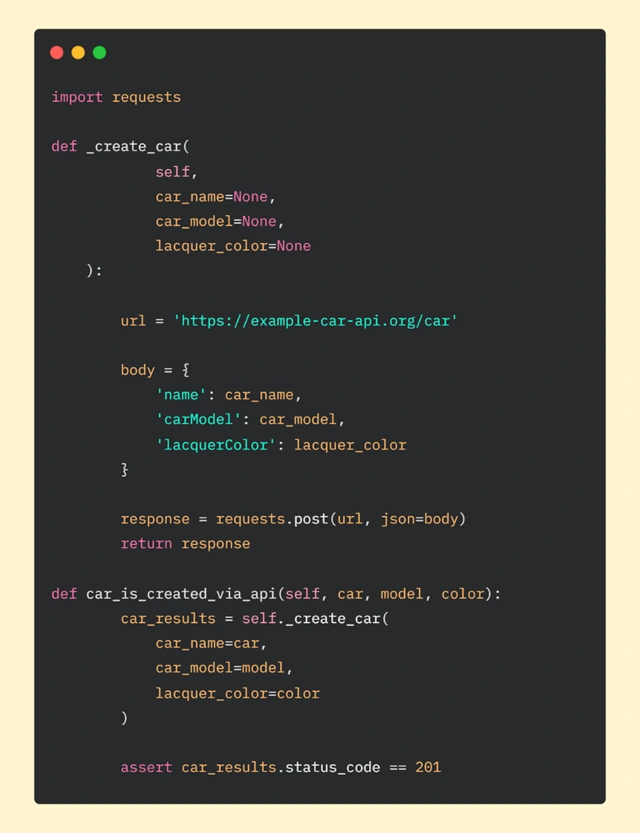
In car_is_created_via_api method, we are calling function _create_car which is responsible for requesting API. We are also passing parameters: car, model, and color. They will be used in the body of our request.
As in the basic example, in _create_car function we are declaring URL (our car API) and body. Then we are making a POST request and in the final step, we are returning the response.
After getting the response from the server, at the end of the car_is_created_function , we want to use assertion to check if we got the correct status code. Getting code 201 means that everything went as we hoped. Another result will tell us that something is wrong and we will be able to quickly (hopefully) find the gap in the code.
Good Team
We went together through the advantages of using API help in the UI automation tests suite and a comparison of two approaches to testing. We also focused on speeding up tests suite execution time using Python library Requests . We believe that after reading this article you can see that API requests can be great companions and you are encouraged to start using this concept in your test automation projects.

What trends will set the course of change in the automotive industry for 2022
The turn of the year is a perfect time for summaries, planning future activities, and market research. It is no different in the automotive industry, which is subject to dynamic changes. Their direction is obviously determined by software development. It seems that in the next few years this will be a crucial competence of each vehicle manufacturer. Maybe equally as important as producing the engine!
If you listen to CARIAD, Stellantis, Tesla, Audi, and others, you will learn that each and every one of these companies believes that the future of the automotive industry is software-centric . As the name says, if you want to achieve that, you have to learn how to build software and this may be a bumpy road for most of the OEM’s. How to align a legacy, waterfall approach of building cars with the lean, agile software development paradigms, or modern, disruptive cloud and AI technologies? CARIAD already seems to know, Stellantis says they have a plan, Porsche is at full speed, and Tesla was born that way. Exciting times. And it will only get more interesting!
Buzzword of the year: OTA or EV? Both!
If you are a car geek and digitalization fan, you probably know what were the hottest car premieres in 2021. But do you know what all these cars have in common?
- Audi e-Tron GT
- Ford Mustang Mach-E
- Mercedes EQS
- BMW iX
- Rivian R1T
- Lucid Air
All of them are electric – because electricity is here to stay! They are all smartphones on wheels because software is the new V8! And all of them take advantage of the hottest trend in connectivity: OTA (over-the-air updates), which means the possibility of adding new features through updates without visiting the dealership. Straight from the cloud. It, at the same time, builds a highway for the creation of new revenue streams and a completely new level of customer care provided by vehicle manufacturers.
It means all the predictions and all the trends we have seen in recent years are here to stay, but now all OEMs are on board, and the trends will play a much more significant role.
Let’s take a look at those that we think are worth highlighting as the automotive trends for 2022 and above.
What should we look for next year and above?

Change 1: Electrification is gaining power
There is no escape from electricity - mainly due to the challenges facing zero emissions. All data indicate that 2021 will end up as the year with the highest sales of these vehicles (EV and PHEV combined), reaching 6.4 million units worldwide [EV Volumes]. This would be a 98% increase compared to the previous year. It is likely that the EV sector will face changes in the next 10 years, comparable to what happened in the internal combustion engine vehicles during the first 100 years of development!
What influences (and will continue to influence) the increasing consumer interest in electrics? There are numerous factors. Let's list the most significant ones.
The spread of other EVs
Urban scooters, bicycles, and electric mopeds are no longer a surprise and are increasingly becoming the dominant mode of transport in congested city centers. With the spread of the shared mobility trend, which makes it easy to rent out vehicles for a flexible period of time, consumers are gaining confidence in them and begin to notice the advantages of this solution, which is reflected in their future purchasing decisions when it comes to new cars.
New legislation on EVs
The UK, France, Norway, and Germany are implementing laws to ban the sale of new petrol cars by 2025. California wants to reach this goal in 2035 and replace its entire fleet of diesel buses with electric ones as early as 2029. Changes in legislation inevitably trigger changes in vehicle production and affect other sectors. For instance, the construction industry, which will be obliged to equip buildings with sockets and an electrical grid that will allow the charging of electrics in their own homes, which is already done in the USA.
Increased range of EV
The range of electric vehicles has always been a challenge compared to petrol vehicles. The problem was not just the short life of the battery itself, but also the limited network of available chargers. With the development of new technologies for extracting minerals necessary for making batteries and ways of power storage, these factors will gradually become marginalized.
- Tesla announces it is phasing out the use of cobalt in its batteries to produce a $25,000 electric vehicle in three years - although it is already leading the way in new car sales in Europe.

- Lilac Solutions, a company supported by Bill Gates' Breakthrough Energy Ventures, is implementing technology that allows lithium to be extracted without draining groundwater.
- Alternatives to lithium-ion battery technology are emerging, such as the solid-state batteries being developed by Toyota.
- There are also growing claims that it is not batteries but supercapacitors that will power electric vehicles. Instead of storing energy in chemical form, like a battery, they hold it in an electric field. This makes them more durable and ensures a longer life cycle.
- In 2019, there were 175,000 public EV chargers in Europe. By 2025, it is estimated that this number will reach 1.3 million, and in 2030 it will already be 2.9 million [ EV volumes]. With the development of connected car technology, this will enable more charging points to be found efficiently and without hassle, and will substantially extend the possibility of a seamless journey.
Change 2: Seamless connectivity and on-board services
OK, 5G is the thing! In China all their biggest cities already have 5G coverage, now the USA and Europe must and will follow. 5G takes internet connectivity to another level . This is and will be a complete game-changer in several areas:
- V2X for building a mesh of connected vehicles, road infrastructure and third party devices.
- Autonomous driving applications with hybrid cloud and edge systems, requiring very low latency.
- Real-time telematics for tracking the status and location of vehicles almost in real-time, which will make driving safer and more comfortable, save time, reduce vehicle operating costs or allow the purchase of an insurance policy tailored to the driver's driving style.
You can read more on this topic here and here .
Change 3: Better UX/UI solutions and use of augmented reality
Cockpits of modern vehicles are filled with screens. Pushing all controls, buttons, and knobs to touchscreens decreases production costs and makes the vehicle look more premium. At the same time, customers report that the vehicle interfaces are increasingly harder to operate. Also, the old, slow, or stuttering infotainment makes the whole look & feel of the vehicle worse.
This forces manufacturers to put more effort into the UI/UX design, as well as improving other, safer ways to interact with vehicles. A great example of this are solutions already familiar to consumers in other market sectors - voice assistants and gesture recognition, as well as the most developing technology in this field, i.e. augmented reality.
The latter is increasingly used in vehicles in the form of a Heads-Up Display on the windshield. The following applications can be listed in the vehicles entering the market:
- Intelligent Terrain Mapping - which assists the driver whilst driving by displaying directions, a road map and information about upcoming landmarks.
- Automated Parking Assistance - which, by means of additional lines and indicators on the camera, can make parking or difficult maneuvers easier.
- Augmented Marketing - combining AG with sales and entertainment - not only in the form of offers displayed on the windshield, but also in the course of selling vehicles and advertising them, when you can feel the driving experience without having direct contact with the vehicle.
- Intuitive Road Safety - warning of dangerous driving, pedestrians in lanes, or drivers drifting into the other lane.
You can read more on this topic here
Change 4: Increased focus on cybersecurity and data privacy
The connected car operates in a V2X ecosystem consisting of data networks, road infrastructure, other vehicles, and third-party applications. In such an environment, the threat level of cyberattacks is at a very high level. Hence, in the coming years, those involved in the automotive industry must make the utmost efforts to protect not only consumers' sensitive data but also their lives and health.
That cyber attacks will occur is more than certain. The industry's task is to adapt current technology and regulations so that potential threats are minimized at the point a vehicle leaves the factory.
Cyber security should be at the heart of every SVD vehicle leaving the factory. Especially since we're not just talking about the sensors that will be programmed but entire production chains, which can also become potential targets for attack.
In order to prevent such activities, as of 2018, more than 80 organizations from around the world, have created the ISO/SAE 21434: "Road vehicles - Cybersecurity engineering" standard, which encompasses a set of guidelines for securing vehicle design, manufacturing, maintenance and decommissioning processes. These guidelines define cybersecurity processes for different phases of vehicle development, specifically:
- addressing and mitigating process vulnerabilities;
- identifying unsecured ECU (engine control unit) connection protocols;
- and unsecure aftermarket products and services.
The software industry, however, which supplies software to OEMs, must be prepared for the European Commission's regulations on AI-related rules . The regulations are expected to cover:
- the potential risks that artificial intelligence applications can create;
- requirements for AI systems for high-risk applications;
- specific responsibilities of artificial intelligence users and high-risk application providers;
- proposals for compliance evaluation before marketing the AI system;
- governance structure for AI applications at European and national level.
In the interim period, the regulation may be effective in the second half of 2022. The second half of 2024 is the earliest period of application of the regulation to AI application operators.
Change 5: Expanding software development capabilities
The transition from a vehicle company to a company dealing with software on four wheels is a complex and challenging process. Such a transformation inevitably awaits all automotive companies in the coming years. It is worth noting a few factors that are critical to the success of this endeavor.
- Companies need to build their internal software development structures, become attractive employers for software engineers and gain great partnerships in the software development world.
- Increased focus on reliable internet connectivity for all produced vehicles, as well as cloud connected car systems.
- Work on regulatory compliance in terms of GDPR, data collected from vehicles and cybersecurity.
- Constant growth of software development teams and departments, as well as new partnerships regarding software, cloud and AI.
Change - the only certain thing in the automotive industry
Changes related to the reduction of CO2, the development of the Internet of Things, or automation will affect most industries in the coming years. However, the automotive sector , where technological, social, ecological, and consumer trends meet, may become a litmus test for the upcoming developments.
Just as new technologies took the telecommunications or smart building industry by storm a few years ago, they will now begin to change the way we use vehicles. Can we set a date when we can say with a high degree of certainty: this year will be the year of the connected car ? Unlikely.
Just as the marketing specs failed, who claimed each year: that this year will definitely be the year of mobile.
These changes grow exponentially, remaining unnoticed for a long time, but suddenly we realize that they are already with us. We live in a world where they have already become commonplace and everyone benefits from them. Companies working at the intersection of the automotive industry should not let this moment slip by. There comes a time when the car will become our second phone.