Thinking out loud
Where we share the insights, questions, and observations that shape our approach.
The hidden cost of overengineering microservices: How we cut cloud costs by 82%
When microservices are overused, complexity and costs skyrocket. Here’s how we consolidated 25 services into 5 - simplifying architecture and slashing cloud spend without sacrificing stability.
It’s hard to predict exactly how microservice architecture will evolve, what pros and cons will surface, and what long-term impact it will have. Microservices can offer significant benefits — like scalability, independent deployments, and improved fault isolation — but they also introduce hidden challenges, such as increased complexity, communication overhead, and maintenance costs.
While this architectural approach brings flexibility in managing systems, prioritizing critical components, and streamlining release and testing processes, it won’t magically fix everything — architecture still needs to make sense. Applying the wrong architecture can create more problems than it solves. Poorly designed microservices may lead to inefficiencies, tight coupling in unexpected places, and operational overhead that outweighs their advantages.
Entry point: reclaiming architectural simplicity
The project we took on was an example of microservice architecture applied without tailoring it to the actual shape and needs of the system. Relatively small and simple applications were over-decoupled. Not only were different modules and domains split into separate services, but even individual layers — such as REST API, services containing business logic, and database repositories — were extracted into separate microservices. This is a classic case of solving a simple problem with a complex tool, without adapting to the context.
Our mission was to refactor the system — not just at the code level, but at the architectural level — with a primary focus on reducing the long-term maintenance costs. To achieve this, we’ve decided to retain the microservice approach, but with a more pragmatic level of granularity. Instead of 25 microservices, we consolidated the system into just 5 thoughtfully grouped services, reduced cache instances from 3 to 1 and migrated 10 databases into 5.
Consulting the system
Before making any decisions, we conducted a thorough audit of the system’s architecture, application performance, efficiency, and overall cost. Looking at the raw architectural diagram alone is rarely enough — we wanted to observe the system in action and pay close attention to key metrics. This live analysis provided critical insights into configuring the new applications to better meet the system's original requirements while reducing operational costs.
Cloud Provider access
To truly understand a system’s architecture, it’s essential to have access to the cloud provider's environment — with a wide set of permissions. This level of visibility pays off significantly. The more detailed your understanding at this stage, the more opportunities you uncover for optimization and cost savings during consolidation.
Monitoring tools access
Most systems include monitoring tools to track their health and performance. These insights help identify which metrics are most critical for the system. Depending on the use case, the key factor might be computing power, memory usage, instance count, or concurrency. In our case, we discovered that some microservices were being unnecessarily autoscaled. CPU usage was rising — not due to a lack of resources, but because of accumulating requests in the next microservices in the chain that performed heavy calculations and interacted with external APIs. Understanding these patterns enabled us to make informed decisions about application container configurations and auto scaling strategies.
Refactoring, consolidating, and optimizing cloud architecture
We successfully consolidated 25 microservices into 5 independent, self-sufficient applications, each backed by one of 5 standardized databases — down from a previously fragmented set of 10 and a single cache instance instead of 3. Throughout this transformation, we stick to a core refactoring principle: system inputs and outputs must remain unchanged. Internally, however, architecture and data flow were redesigned to improve efficiency and maintainability.
We carefully defined domain boundaries to determine which services could be merged. In most cases, previously separated layers — REST proxies, service logic, and repositories — were brought together in an unified application within a single domain. Some applications required database migrations, resulting in consolidated databases structured into multiple schemas to preserve legacy boundaries.
Although we estimated resource requirements for the new services, production behavior can be unpredictable — especially when pre-launch workload testing isn't possible. To stay safe, we provisioned a performance buffer to handle unexpected spikes.
While cost reduction was our main goal, we knew we were dealing with customer-facing apps where stability and user experience come first. That’s why we took a safe and thoughtful approach — focusing on smart consolidation and optimization without risking reliability. Our goal wasn’t just to cut costs, but to do it in a way that also improved the system without impacting end-users.
Challenges and risks of architecture refactoring
Limited business domain knowledge
It’s a tough challenge when you're working with applications and domains without deep insight into the business logic. On one hand, it wasn’t strictly required since we were operating on a higher architectural level. But every time we needed to test and fix issues after consolidation, we had to investigate from scratch — often without clear guidance or domain expertise.
Lack of testing opportunities
In maintenance-phase projects, it's common that dedicated QA support or testers with deep system knowledge aren’t available — which is totally understandable. At this point, we often rely on the work done by previous developers: verifying what types of tests exist, how well they cover the code and business logic, and how effective they are at catching real issues.
Parallel consolidation limitations
The original system’s granularity made it difficult for more than one developer to work on consolidating a single microservice simultaneously. Typically, each domain was handled by one developer, but in some cases, having multiple people working together could have helped prevent issues during such a complex process.
Backward compatibility
Every consolidated application had to be 100% backward-compatible with the pre-consolidation microservices to allow for rollbacks if needed. That meant we couldn’t introduce any breaking changes during the transition — adding extra pressure to get things right the first time.
Distributed configuration
The old system’s over-granular design scattered configuration across multiple services and a config server. Rebuilding that into a unified configuration required careful investigation to locate, align, and centralize everything in one application.
End-user impact
Since the system was customer-facing, any bug or functionality gap after consolidation could directly affect users. This raised the stakes for every change and reinforced the need for a cautious, thoughtful rollout.
Architectural refactoring comes with risks and understanding them upfront is key to delivering both system reliability and cost efficiency.
What we gained: lower costs, higher reliability, and a sustainable system
Cloud cost reduction
After consolidation, overall cloud infrastructure costs were reduced by 82% . This was a direct result of architectural refactoring, microservices reduction, and more efficient resource usage.
Monitoring tool efficiency
The new architecture also lowered the load on external monitoring tools, leading up to 70% drop in related costs .
Indirect cost savings
While we didn’t have full access to some billing metrics, we know that many tools charge based on factors like request volume, microservice count and internal traffic. Simplifying the core of the system brought savings across these areas too.
Simplified maintenance
Shrinking from 25 microservices to 5 dramatically reduced the effort required for feature development, domain-specific releases, and CI/CD pipeline management. Once we removed the facade of complexity, it became clear the system wasn’t as complicated as it seemed. Onboarding new developers is now much faster and easier — which also opens the door to rethinking how many engineers are truly needed for ongoing support.
Zero downtime deployment
Since we were working with a customer-facing system, minimizing downtime for each release was critical. By consolidating functionality into 5 clearly defined, domain scoped applications, we made it possible to achieve zero downtime deployments in production.
Reduced complexity
Consolidation clarified how the system works and gave developers a wider view of its components. With cohesive domains and logic housed in fewer applications, it’s now easier to follow business flows, implement efficient solutions, debug issues, and write effective tests.
---
Every decision made at a given moment usually feels like the right one — and often it is. But if something remains important over time, it’s worth revisiting that decision in light of new context and evolving circumstances. As our case clearly shows, taking the time to reevaluate can truly pay off — both literally and figuratively.

Consumer Privacy Protection Act: What Canada’s privacy overhaul means for the auto industry
Cars used to just get us from point A to point B. Today, they function more like high-tech hubs that track GPS locations, store phone contacts, and gather details about our driving habits. This shift hasn’t escaped the attention of lawmakers and regulators. In Canada, conversations about data privacy have become louder and more urgent , especially with the Consumer Privacy Protection Act (CPPA) on the way.
Even though the CPPA is designed to handle personal data in general, it still lays down important rules for handling personal information. In other words, if you’re in the automotive business, you’ll want to pay close attention. Understanding how this new legislation applies to the data you collect and protect is critical for maintaining trust with customers and staying on the right side of the law.
The CPPA at a glance
Think of the Consumer Privacy Protection Act as the next chapter in Canada’s privacy story. Currently, the Personal Information Protection and Electronic Documents Act (PIPEDA) guides how companies handle personal data. But as online services grow more complex, the government wants to give Canadians stronger rights and clearer protections.
CPPA aims to refine or replace key parts of PIPEDA, focusing on three main things: giving people more control over their data, making sure businesses are upfront about what they do with it, and creating tougher consequences for those who violate the rules.
Key provisions
- Consent
Under the CPPA, organizations must get informed, meaningful permission before collecting or using someone’s personal data.
- Data portability and erasure
The CPPA allows individuals to direct the secure transfer of their data, which simplifies switching providers. Plus, you can request that a company delete your information if it’s no longer needed or you no longer agree to its use.
- Algorithmic transparency
Companies using AI and machine learning must be prepared to explain how they arrive at certain conclusions if they rely on personal information. No more mystery algorithms making big calls without any explanation.
- Penalties and enforcement
In the past, fines for privacy violations could be sizable, but the CPPA raises the stakes. Businesses that break the rules could face penalties of up to 5% of their global revenue or CAD 25 million, whichever is greater.
CPPA implications for the automotive sector
Modern vehicles collect a surprising amount of personal information, from real-time locations to driver preferences. Although the CPPA doesn’t single out car manufacturers or dealers, it covers any organization that handles personal data. That puts the automotive industry on notice for meeting these new standards, and here’s what that might look like:
1. Consent and transparency
- Drivers should know exactly what data their vehicle is collecting, how it’s being used, and who sees it. Clearer privacy notices are needed to avoid complex legal language whenever possible.
- While the CPPA emphasizes explicit consent, it doesn’t require opt-in or opt-out choices for every single scenario. Still, offering these options shows respect for drivers’ control over their own data and helps build trust.
2. Data minimization and retention
- If certain information isn’t essential for safety alerts, maintenance reminders, or other valid functions, OEMs shouldn’t gather it.
- Rather than holding onto everything, develop guidelines that clearly define how long data is stored and destroy it once it’s no longer needed.
3. Data security measures
- Connected cars face cyber threats just like computers and smartphones. Strong safeguards (encryption, firewalls, regular audits) help prevent breaches.
- Be prepared to show regulators you have solid security strategies in place, such as incident response plans and routine vulnerability checks.
4. Rights to erasure and portability
- When a driver requests that you remove their personal data, it shouldn’t be a struggle. Have a clear process for swift and permanent deletion.
- Whether it’s transferring service history to another dealership or updating digital profiles, make sure customers can take their data elsewhere with minimal friction.
5. Enforcement and fines
- The CPPA ties potential fines to a company’s global revenue, which means large automotive players could face steep financial hits if they fall short.
- Privacy regulators will have more power to investigate, so expect them to keep a closer eye on your data practices.
Privacy compliance isn’t the only area automakers need to watch.
Bill C-27 introduced the CPPA, but it also includes the Artificial Intelligence and Data Act (AIDA), which sets rules for AI-powered systems. While the CPPA focuses on protecting personal data, AIDA applies to high-impact AI applications like those used in autonomous driving, predictive maintenance, and driver behavior analysis.
If AI plays a role in setting insurance rates, making in-car recommendations, or adjusting vehicle safety settings, companies may need to document AI training methods, track potential biases, and provide explanations for automated decisions that affect individuals.
The CPPA already requires transparency when personal data feeds into AI-driven outcomes, but AIDA adds another layer of oversight.
6 practical steps to keep automotive data privacy on track

The future of vehicle information exchange
The Consumer Privacy Protection Act already affects modern vehicles, which capture everything from location data to driver habits and phone contacts.
However, because the CPPA is designed for all businesses, many people anticipate future rules specifically tailored to connected cars. Such regulations would go beyond the CPPA’s general standards, addressing the unique ways automotive data flows through telematics, in-car apps, and onboard sensors.
On the international front, the EU Data Act sets out rules for cross-border data handling, which matters if your cars or data move beyond Canada’s borders. The US Right to Repair Act also gives drivers and independent repair shops greater access to diagnostic information, raising new questions about how personal data is managed.
With these overlapping developments, it’s wise for automotive companies to adopt a comprehensive approach to privacy and data sharing. One that covers both home-grown regulations and global shifts.
Need help adapting to new rules?
As an OEM, you need to balance international obligations, regional privacy laws, and the technical demands of connected vehicles.
We’re here to assist. Our team not only provides IT consulting but also develops custom software solutions to help you meet complex regulatory requirements.


New EU Battery Passport rules: What’s changing for OEMs?
The road to electrification isn’t straightforward, and concerns about battery sustainability, safety, and lifecycle management are growing. For years, battery manufacturers, automotive OEMs , and other industries have faced a key challenge: tracking and verifying a battery’s entire lifecycle, from production to recycling.
Until now, important details about a battery's origin, carbon footprint, and material makeup have been hard to access. This has led to inconsistent sustainability claims, challenges in second-life applications, and regulatory confusion.
Now, consumers, industries, and regulators are demanding more transparency . To meet this demand, the EU is introducing the Digital Battery Passport as part of the Eco-design for Sustainable Products Regulation (ESPR) and the EU Battery Regulation.
This new approach could bring benefits like increased recycling revenue, reduced carbon emissions, and lower recycling costs. It will also give consumers the information they need to make more sustainable choices.
But what does the Digital Battery Passport actually entail, and how will it impact the entire battery value chain?
Understanding the Digital Battery Passport
The Digital Battery Passport is an electronic record that stores critical information about a battery, providing transparency across its entire lifecycle.
It serves as a structured database that allows different stakeholders (including regulators, manufacturers, recyclers, and consumers) to retrieve relevant battery data.
This passport is part of the EU's broader effort to support a circular economy and making sure that batteries are sourced sustainably, used responsibly, and recycled properly.
The information stored in the Battery Passport falls into several key areas:
- General battery and manufacturer details such as model identification, production date, and location.
- Carbon footprint data , including emissions generated during production and expected lifetime energy efficiency.
- Supply chain due diligence , ensuring responsible sourcing of raw materials like lithium, cobalt, and nickel.
- Battery performance and durability – State of Health (SoH), charge cycles, and degradation tracking.
- End-of-life management – Guidance for battery recycling, second-life applications, and disposal.
The goal is to bring transparency and accountability to battery production, prevent greenwashing, and confirm that sustainability claims are backed by verifiable data.
How the Battery Passport’s implementation will affect OEMs
While the responsibility varies, OEMs must verify that all batteries in their vehicles meet EU regulations before being sold. This includes confirming supplier compliance, tracking battery data, and preparing for enforcement.
The responsibility for issuing the Battery Passport lies with the economic operator who places the battery on the market or puts it into service in the EU.

Meeting the Battery Passport requirements
OEMs must incorporate Battery Passport requirements into procurement strategies, data infrastructure , and compliance processes to avoid supply chain disruptions and regulatory penalties.
Here’s what OEMs must do to comply:

FAQs about the Digital Battery Passport
Who needs to implement a Battery Passport, and by when?
Starting February 18, 2027, all EV batteries, industrial batteries over 2 kWh, and light means of transport (LMT) batteries (including those used in e-bikes, e-scooters, and other lightweight electric vehicles) sold in the EU must include a Digital Battery Passport.
OEMs, battery manufacturers, importers, and distributors will need to comply by this deadline.
However, some requirements take effect earlier:
- February 18, 2025 – Companies must start reporting the carbon footprint of their batteries.
- August 18, 2026 – The European Commission will finalize the implementation details and provide further technical clarifications.
What information must be included in the Battery Passport?
The Battery Passport stores comprehensive battery lifecycle data, structured into four access levels:
1) Publicly available information (Accessible to everyone, including consumers and regulators)
This section contains general battery identification and sustainability data, which must be available via a QR code on the battery.
- Battery model, manufacturer details, and plant location
- Battery category, chemistry, and weight
- Date of manufacture (month/year)
- Carbon footprint declaration and sustainability data
- Critical raw materials content (e.g., cobalt, lithium, nickel, lead)
- Presence of hazardous substances
2) Information available to authorities and market surveillance bodies
- Safety and compliance test results
- Detailed chemical composition (anode, cathode, electrolyte materials)
- Instructions for battery dismantling, recycling, and repurposing
- Risk and security assessments
3) Private information (Available to battery owners & authorized third parties)
This section contains real-time performance and operational data and is accessible to the battery owner, fleet operators, and authorized maintenance providers.
- State of Health (SoH) & expected lifetime
- Charge/discharge cycles and total energy throughput
- Thermal event history and operational temperature logs
- Warranty details and remaining usable life in cycles
- Original capacity vs. current degradation rate
- Battery classification status: "original," "repurposed," "remanufactured," or "waste"
4) Information available only to the European Commission, National Regulatory Bodies & market surveillance authorities
This is the most restricted category, which contains highly technical and competitive data that is only accessible to designated authorities for compliance verification and regulatory oversight.
- Additional technical compliance reports and proprietary safety testing results
- Performance benchmarking and lifecycle assessment reports
- Detailed breakdown of emissions calculations and regulatory certifications
A note on secure access and retrieval
Each Battery Passport must be linked to a QR code with a unique identifier to allow standardized and secure data retrieval via a cloud-based system.
QR codes “shall be printed or engraved visibly, legibly and indelibly on the battery.” If the battery is too small to have a QR code engraved on it, or it is not possible to engrave it, the code should be included with the battery’s documentation and packaging.
What happens if an OEM fails to comply?
Non-compliance with the Battery Passport requirements carries serious consequences for OEMs and battery manufacturers.
- Batteries without a passport will be banned from sale in the EU starting in 2027.
- Fines and penalties may be imposed for missing transparency and reporting obligations.
- Legal and reputational risks will increase, particularly if battery safety, sustainability, or performance issues arise.
Given these risks, proactive compliance planning is essential. OEMs must act now to integrate Battery Passport requirements into their supply chains and product development strategies.
Will repaired or second-life batteries need a new passport?
Yes. Batteries that are repaired, repurposed, or remanufactured must receive a new Battery Passport linked to the original battery’s history. Recycled batteries entering the market after 2027 must also follow passport regulations, keeping second-life batteries traceable. This allows used batteries to be resold or repurposed in energy storage applications.
Will the Battery Passport apply to older batteries?
No. The regulation only applies to batteries placed on the market after February 18, 2027. However, OEMs that remanufacture or recycle batteries after this date must take care of compliance before reselling or repurposing them.
How to store EU Battery Passport data: Two approaches
Companies need to decide how to store and manage the large volumes of data required for compliance. There are two main options:
- Blockchain-based systems – A decentralized ledger where data is permanently recorded and protected from tampering. This preserves long-term transparency and integrity.
- Cloud-based systems – A centralized storage model that allows for real-time updates, scalability, and flexibility. This makes managing compliance data easier.
Each option has its benefits.
Blockchain offers security and traceability, which makes it ideal for regulatory audits and builds consumer trust. Cloud storage provides flexibility, which allows companies to manage and update battery lifecycle data efficiently.
Many companies may choose a hybrid solution, using blockchain for immutable regulatory data and cloud storage for real-time operational tracking.
Regulatory landscape: A complex web of compliance
The Digital Battery Passport is part of a broader effort to improve data transparency, sustainability, and resource management. However, it doesn’t exist in isolation. Companies working in global supply chains must navigate a growing web of regulations across various jurisdictions.
The EU Battery Regulation aligns with major policy initiatives like the EU Data Act, which governs access to and sharing of industrial data, and the Ecodesign for Sustainable Products Regulation (ESPR), which broadens sustainability requirements beyond energy efficiency. These laws reflect the EU’s push for a circular economy, but they also present significant compliance challenges for OEMs, battery manufacturers, and recyclers.
Outside the EU, similar regulatory trends are emerging. Canada’s Consumer Privacy Protection Act (CPPA) expands on the country's existing privacy framework, while the California Consumer Privacy Act (CCPA) and China’s Personal Information Protection Law (PIPL) set strict rules for how businesses collect, store, and share data.
While these laws focus on privacy, they also signal a global move toward tighter control over digital information, which is closely tied to the requirements for battery passports.
How an IT partner can help OEMs prepare for the EU Battery Passport
Here’s where an IT enables can help.
- Make Battery Passport data easy to access – Set up systems that store and connect passport data with Battery Management Systems (BMS) and internal databases.
- Make sure QR codes work properly – Integrate tracking so every battery’s passport is linked and scannable when needed.
- Simplify compliance reporting – Automate data collection for regulators, recyclers, and customers to reduce manual work.
- Manage second-life batteries – Track when batteries are repurposed or remanufactured and update their passports without losing original data.
- Choose the right storage – Whether it’s cloud, blockchain, or a hybrid approach, IT support ensures that battery data stays secure and available.
With the 2027 deadline approaching, OEMs need systems that make compliance manageable.
Let’s talk about the best way to integrate the Battery Passport requirements.
How to manage operational challenges to sustain and maximize ROAI
Companies invest in artificial intelligence expecting better efficiency, smarter decisions, and stronger business outcomes. But too often, AI projects stall or fail to make a real impact. The technology works, but the real challenge is getting it to fit within business operations to maximize ROAI.
People resist change, legacy systems slow adoption down, compliance rules create obstacles, and costs pile up. More than 80% of AI projects never make it into production, double the failure rate of traditional IT projects. The gap between ambition and actual results is clear, but it doesn’t have to stay that way.
This article breaks down the biggest challenges holding companies back and offers practical ways to move past them. The right approach makes all the difference in turning AI from an experiment into a lasting source of business value.
Overcoming resistance to change
AI brings new ways of working, but not everyone feels comfortable with the shift. Employees often worry about job security, with 75% of U.S. workers concerned that AI could eliminate certain roles and 65% feeling uneasy about how it might affect their own positions.
Uncertainty grows when employees don’t understand how artificial intelligence fits into their work. People are more likely to embrace change when they see how technology supports them rather than disrupts what they do.
Open conversations and hands-on experience with new tools help break down fear. When companies provide training that focuses on practical benefits, employees gain confidence in using the technology instead of feeling like it’s something happening to them.
Leaders play a big role in setting the tone. Encouraging teams to test AI in small ways, celebrating early wins, and keeping communication clear makes tech feel like an opportunity rather than a threat. When employees see real improvements in their work, resistance turns into curiosity, and curiosity leads to stronger adoption.
But even when employees are ready, another challenge emerges - making it work with the technology already in place. That step is crucial if you want to maximize ROAI.
Integrating AI with legacy systems and managing costs
Many companies rely on applications built long before AI became essential to business operations. These legacy systems often store data in outdated formats, operate on rigid architectures, and struggle to handle the computing demands that technology requires. Adding new tools to these environments without careful planning leads to inefficiencies, increased costs, and stalled projects.

Technical challenges are only one piece of the puzzle, though. Even after AI is up and running, costs can add up fast. Businesses that don’t plan for ongoing expenses risk turning it into a financial burden instead of a long-term asset.
Upfront investments are just the beginning. As AI scales, companies face:
- Rising cloud and computing expenses – Models require significant processing power. Cloud services offer scalability, but expenses climb quickly as usage grows.
- Continuous updates and maintenance – AI systems need regular tuning and retraining to stay accurate. Many businesses underestimate how much this adds to long-term costs.
- Vendor lock-in risks – Relying too much on a single provider can lead to higher fees down the road. Limited flexibility makes it harder to switch to more affordable options.
Without a clear financial strategy, technology can become more expensive than expected. The right approach keeps costs under control while maximizing business value.
How to manage costs to maximize ROAI
- A clear breakdown of costs, from infrastructure to ongoing maintenance, helps businesses avoid unexpected expenses. Companies can make smarter investment decisions that lead to measurable returns when they understand both short-term and long-term costs.
- A mix of on-premise and cloud resources helps balance performance and cost. Sensitive data and frequent AI workloads can remain on-premise for security reasons, while cloud services provide flexibility and handle peak demand without major infrastructure upgrades.
- Open-source tools offer advanced capabilities without the high price tags of proprietary platforms. These solutions are widely supported and customizable, which helps cut software costs and reduces reliance on a single vendor.
- Some AI projects bring more value than others. Companies that focus on high-impact areas like process automation, predictive maintenance, or data-driven decision-making see more substantial returns. Prioritizing these helps you maximize ROAI.
AI delivers the best results when businesses plan for financial risks. Managing costs effectively allows companies to scale AI without stretching budgets too thin. But costs are only one part of the challenge - AI adoption also comes with regulatory and ethical responsibilities that businesses must address to maintain trust and compliance.
Staying ahead of AI regulations and ethical risks
Laws around AI are tightening, and companies that don’t adapt could face legal penalties or damage to their reputation.
AI regulations vary by region. The EU’s AI Act introduces strict rules, especially for high-risk applications, while the U.S. takes a more flexible approach that leaves room for industry-led standards. Countries like China are pushing for tighter controls, particularly around AI-generated content. Businesses that operate globally must navigate this mix of regulations and make sure they’re compliant in every market.
Beyond regulations, ethical concerns are just as pressing. AI models can reinforce biases, misuse personal data, or lack transparency in decision-making. Without the proper safeguards, technology can lead to discrimination, privacy violations, or decisions that users don’t understand. Customers and regulators expect it to be explainable and fair.
How to stay compliant and ethical without slowing innovation
- Keep up with AI regulations – Compliance isn’t a one-time task. Businesses need to monitor AI and data-related laws in key markets and adjust policies accordingly. Regular audits help ensure AI systems follow evolving legal standards.
- Make decisions transparent – AI models shouldn’t feel like a black box. Clear documentation, model explainability tools, and decision-tracking give businesses and users confidence in outcomes.
- Address bias and fairness – These models are only as far as the data they’re trained on. Regular bias testing, diverse training datasets, and fairness audits reduce the risk of unintended discrimination.
- Protect user privacy – Systems handle vast amounts of sensitive data. Strong encryption, anonymization techniques, and transparent data usage policies help prevent breaches and maintain user trust.
Maximize ROAI with Grape Up
Grape Up helps companies make AI a natural part of their business. With experience in AI development and system integration, the team works closely with organizations to bring tech into real operations without unnecessary costs or disruptions.
A strong background in software engineering and data infrastructure allows us to support businesses in adopting artificial intelligence in a way that fits their existing technology. We focus on practical, effective implementation when working with cloud environments or on-premises systems.
As technological advancements also come with responsibilities, we help companies stay on top of regulatory requirements and ethical considerations.
How is your company approaching AI adoption?
REPAIR Act and State Laws: What automotive OEMs must prepare for
Right to Repair is becoming a key issue in the U.S., with the REPAIR Act (H.R. 906) at the center. This proposed federal law would require OEMs to give vehicle owners and independent repair shops access to vehicle-generated data and critical repair tools.
The goal? Protect consumer choice and promote fair competition in the automotive repair market, preventing manufacturers from monopolizing repairs.
For OEMs, it means growing pressure to open up data and tools that were once tightly controlled. The Act could fundamentally change how repairs are managed , forcing companies to rethink their business models to avoid risks and stay competitive.
We’ll walk you through the REPAIR Act’s key provisions and practical steps automotive OEMs can take to adapt early and avoid compliance risks.
What’s inside the REPAIR Act (H.R. 906)
The REPAIR Act (H.R. 906), also known as the Right to Equitable and Professional Auto Industry Repair Act, aims to give consumers and independent repair shops access to vehicle data, tools, and parts that are crucial for repairs and maintenance.
Its goal is to level the playing field between manufacturers and independent repairers while protecting consumer choice. This could mean significant changes in how OEMs manage vehicle data and repair services.
REPAIR Act timeline – where are we now
The REPAIR Act (H.R. 906) was introduced in February 2023 and forwarded to the full committee in November 2023.

As of January 3, 2025, the bill has not moved beyond the full committee stage and was marked "dead" because the 118th Congress ended before its passage. But the message remains clear - Right to Repair isn’t going away. The growing momentum behind repair access and data rights is reshaping the conversation.
REPAIR Act provisions
Which obligations for manufacturers are covered by the Repair Act?
1) Access to vehicle-generated data
- Direct data access: OEMs would be required to provide vehicle owners and their repairers with real-time, wireless access to vehicle-generated data. This includes diagnostics, service, and operational data.
- Standardized access platform: OEMs must develop a common platform for accessing telematics data to provide consistent and easy access across all vehicle models.
2) Standardized repair information and tools
- Fair access: Critical repair manuals, tools, software, and other resources must be made available to consumers and independent repair shops at fair and reasonable costs.
- No barriers: OEMs cannot restrict access to essential repair information. The aim is to prevent them from monopolizing repair services.
3) Ban on OEM part restrictions
- Aftermarket options: The Act prohibits manufacturers from requiring the use of OEM parts for non-warranty repairs. Consumers can choose aftermarket parts and independent service providers.
- Fair competition: This provision supports competition by allowing aftermarket parts manufacturers to offer compatible alternatives without interference.
4) Cybersecurity and data protection
- Security standards: The National Highway Traffic Safety Administration (NHTSA) will set standards to balance data access with cybersecurity.
- Safe access: OEMs can apply cryptographic protections for telematics systems and over-the-air (OTA) updates, provided they do not block legal access to data for independent repairers and vehicle owners.]
These provisions go beyond theory and will directly affect how OEMs handle repairs and manage data access. Even more challenging? The existing patchwork of state laws that already demand similar access makes compliance tricky.
Complex regulatory landscape: How Right to Repair influences automotive OEMs
The regulatory environment for the Right to Repair in the U.S. is becoming increasingly complex, with state-level laws already in effect and a potential nationwide federal law still pending. This evolving framework presents both immediate and long-term challenges for automotive OEMs, requiring them to navigate overlapping requirements and conflicting standards.
State-level laws: A growing patchwork
As of February 2025, several states have enacted comprehensive Right to Repair laws.

Massachusetts and Maine have laws explicitly targeting automotive manufacturers. (Automakers have sued to block the law’s implementation in Maine.)
These regulations require manufacturers to provide vehicle owners and independent repairers with access to diagnostic and repair information, as well as a standardized telematics platform.
Other states like California, Minnesota, New York, Colorado, and Oregon have focused on consumer electronics or agricultural equipment without directly impacting automotive OEMs.
However, the broader push for repair rights means automotive manufacturers cannot ignore the implications of this trend.
Additionally, as of early 2025, 20 states had active Right to Repair legislation, reflecting the momentum behind this movement. While most of these bills remain under consideration, they highlight the growing pressure for more open access to repair information and vehicle data.
Federal vs. state regulations: Compliance challenges
The pending federal REPAIR Act (H.R. 906) aims to create a unified national framework for the Right to Repair, focusing on vehicle-generated data and repair tools. However, until it becomes law, OEMs must comply with varying state laws that could contradict or go beyond future federal requirements.
Key scenarios:
- If the REPAIR Act includes a preemption clause , federal law will override conflicting state laws, providing a single set of rules for OEMs.
- If preemption is not included , OEMs will face a dual compliance burden, adhering to both federal and state-specific requirements.
This uncertainty complicates planning and increases the risk of non-compliance, making it essential for OEMs to prepare now.
Global pressures: The EU's Right to Repair mandates
The U.S. isn’t the only region focusing on the Right to Repair. European Union regulations are setting global standards for OEMs selling internationally.
- European Court of Justice Ruling (October 2023): Automotive manufacturers cannot limit repair data access under cybersecurity claims, expanding rights for independent repairers.
- EU Data Act (September 12, 2025): Requires OEMs to provide third-party access to vehicle-generated data, making open data compliance mandatory for the EU market.
For OEMs operating internationally, aligning early with these standards is a smart move. While the 2024 Right to Repair Directive doesn’t directly target vehicles, it reflects the broader trend toward increased data access and repairability.
How automotive OEMs should prepare for the Right to Repair (Even without a federal law)
Waiting is risky. Regardless of whether the REPAIR Act becomes law, preparation is key. Waiting for final outcomes could lead to costly adjustments and missed opportunities. Here’s where to start:
1. Develop a standardized vehicle data access platform
Why: Regulations require open and transparent data-sharing for diagnostics and updates. Without a standardized platform, compliance becomes difficult.
How: Focus on building a secure platform that gives vehicle owners and independent repair shops transparent access to the necessary data.
2. Provide open access to repair information and tools
Why: Some states already require OEMs to provide critical repair information and tools at fair prices. This trend is likely to expand.
How: Start creating a centralized repository for repair manuals, diagnostic tools, and other key resources.
3. Strengthen cybersecurity without restricting repair access
Why: Protecting data is critical, but legitimate repairers need safe entry points for service.
How: Develop security protocols that protect key vehicle functions without blocking legitimate access. This means securing software updates and repair-related data while allowing repairers safe entry points for diagnostics and service.
4. Improve OTA software update capabilities
Why: Having strong OTA capabilities helps comply with future regulations requiring real-time access and updates.
How: Upgrade your current OTA systems to allow secure updates and diagnostics. Include tools authorized third parties can use for updates and software repairs.
5. Transition to modular and repairable product design
Why: Designing products for easier repair reduces costs and improves compliance.
How: Shift toward using modular components that can be replaced individually. Avoid locking parts to specific manufacturers, as some states have banned this practice. Modular designs also support longer spare part availability, which many laws will require.
6. Align supply chain and warranty systems with Right-to-Repair laws
Why: Warranty terms and parts availability are common regulatory targets.
How: Make spare parts available for several years after the sale of a vehicle. Update warranty policies to allow third-party repairs and non-OEM parts without penalty.
7. Monitor regulations and adapt quickly
Why: The regulatory landscape is evolving rapidly. Staying informed about new laws and adjusting plans early will help avoid costly last-minute changes.
How: Track new laws and build flexible systems that can easily adjust as regulations change.
How an IT enabler helps OEMs prepare for Right to Repair
Managing compliance can feel overwhelming, but it doesn’t have to disrupt operations. An IT enabler helps manufacturers build systems and processes that meet regulatory demands without adding unnecessary complexity.
Here’s how:
Turning regulations into practical solutions
Right to Repair regulations vary across states and countries. An IT enabler translates these requirements into practical tools - systems for managing access to repair data, diagnostics, and tools – to make compliance more manageable.
Building the right technology
OEMs need reliable platforms that allow repairers to access diagnostic data and tools while keeping vehicle systems secure. IT experts develop scalable solutions that work across different models and markets without compromising safety.
Balancing security and access
Access to repair data must be balanced with strong security. IT solutions help protect sensitive vehicle functions while providing authorized repairers with the necessary information.
Keeping operations simple
Compliance shouldn’t add complexity. Automating key processes and streamlining workflows lets internal teams focus on core operations rather than administrative tasks.
Long-term support
Laws and standards evolve. IT partners provide continuous updates and maintenance to keep systems aligned with the latest regulations, reducing the risk of falling behind.
Delivering custom solutions
Every manufacturer has unique needs. Whether it’s updating your warranty system for third-party repairs, improving OTA update capabilities, or adapting your supply chain for spare part availability, custom solutions help you stay compliant and competitive.
At Grape Up , we help OEMs adapt to Right to Repair regulations with practical solutions and long-term support.
We have experience working with automotive, insurance, and financial enterprises, building systems that account for differences in regulations across various states.
Preparing for changes? Contact us today.
From secure diagnostics to repair information management, we provide the expertise and tools to help you stay compliant and ready for what’s next.
The key to ROAI: Why high-quality data is the real engine of AI success
Data might not literally be “the new oil,” but it’s hard to ignore its growing impact on companies' operations. By some estimates, the world will generate over 180 zettabytes of data by the end of 2025 . Yet, many organizations still struggle to turn that massive volume into meaningful insights for their AI projects.
According to IBM, poor data quality already costs the US economy alone $3.1 trillion per year - a staggering figure that underscores just how critical proper governance is for any initiative, AI included.
On the flip side, well-prepared data can dramatically boost the accuracy of AI models, shorten the time it takes to get results and reduce compliance risks. That’s why the high quality of information is increasingly recognized as the biggest factor in an AI project’s success or failure and a key to ROAI.
In this article, we’ll explore why good data practices are so vital for AI performance, what common pitfalls often derail organizations, and how usage transparency can earn customer trust while delivering a real return on AI investment.
Why data quality dictates AI outcomes
An AI model’s accuracy and reliability depend on the breadth, depth, and cleanliness of the data it’s trained on. If critical information is missing, duplicated, or riddled with errors, the model won’t deliver meaningful results, no matter how advanced it is. It’s increasingly being recognized that poor quality leads to inaccurate predictions, inefficiencies, and lost opportunities.
For example, when records contain missing values or inconsistencies, AI models generate results that don’t reflect reality. This affects everything from customer recommendations to fraud detection, making AI unreliable in real-world applications. Additionally, poor documentation makes it harder to trace data sources, increasing compliance risks and reducing trust in AI-driven decisions.
The growing awareness has made data governance a top priority across industries as businesses recognize its direct impact on AI performance and long-term value.
Metrics for success: Tracking the impact of quality data on AI
Even with the right data preparation processes in place, organizations benefit most when they track clear metrics that tie data quality to AI performance. Here are key indicators to consider:

Monitoring these metrics lets organizations gain visibility into how effectively their information supports AI outcomes. The bottom line is that quality data should lead to measurable gains in operational efficiency, predictive accuracy, and overall business value. In other words - it's the key to ROAI.
However, even with strong data quality controls, many companies struggle with deeper structural issues that impact AI effectiveness.
AI works best with well-prepared data infrastructures
Even the cleanest sets won’t produce value if data infrastructure issues slow down AI workflows. Without a strong data foundation, teams spend more time fixing errors than training AI models.
Let's first talk about the people - they too are, after all, key to ROAI.
The right talent makes all the difference
Fixing data challenges is about tools as much as it is about people.
- Data engineers make sure AI models work with structured, reliable datasets.
- Data scientists refine data quality, improve model accuracy, and reduce bias.
- AI ethicists help organizations build responsible, fair AI systems.
Companies that invest in data expertise can prevent costly mistakes and instead focus on increasing ROAI.
However, even with the right people, AI development still faces a major roadblock: disorganized, unstructured data.
Disorganized data slows AI development
Businesses generate massive amounts of data from IoT devices, customer interactions, and internal systems. Without proper classification and structure, valuable information gets buried in raw, unprocessed formats. This forces data teams to spend more time cleaning and organizing instead of implementing AI in their operations.
- How to improve it: Standardized pipelines automatically format, sort, and clean data before it reaches AI systems. A well-maintained data catalog makes information easier to locate and use, speeding up development.
Older systems struggle with AI workloads
Many legacy systems were not built to process the volume and complexity of modern AI workloads. Slow query speeds, storage limitations, and a lack of integration with AI tools create bottlenecks. These issues make it harder to scale AI projects and get insights when they are needed.
- How to improve it: Upgrading to scalable cloud storage and high-performance computing helps AI process data faster. Moreover, integrating AI-friendly databases improves retrieval speeds and ensures models have access to structured, high-quality inputs.
Beyond upgrading to cloud solutions, businesses are exploring new ways to process and use information.
- Edge computing moves data processing closer to where it’s generated to reduce the need to send large volumes of information to centralized systems. This is critical in IoT applications, real-time analytics, and AI models that require fast decision-making.
- Federated learning allows AI models to train across decentralized datasets without sharing raw data between locations. This improves security and is particularly valuable in regulated industries like healthcare and finance, where data privacy is a priority.
Siloed data limits AI accuracy
Even when companies maintain high-quality data, access restrictions, and fragmented storage prevent teams from using it effectively. AI models trained on incomplete datasets miss essential context, which in turn leads to biased or inaccurate predictions. When different departments store data in separate formats or systems, AI cannot generate a full picture of the business.
- How to improve it: Breaking down data silos allows AI to learn from complete datasets. Role-based access controls provide teams with the right level of data availability without compromising security or compliance.
Fixing fragmented data systems and modernizing infrastructure is key to ROAI, but technical improvements alone aren’t enough. Trust, compliance, and transparency play just as critical a role in making AI both effective and sustainable.
Transparency, privacy, and security: The trust trifecta
AI relies on responsible data handling. Transparency builds trust and improves outcomes, while privacy and security keep organizations compliant and protect both customers and businesses from unnecessary risks. When these three elements align, people are more willing to share data, AI models become more effective, and companies gain an edge.
Why transparency matters
82% of consumers report being "highly concerned" about how companies collect and use their data, with 57% worrying about data being used beyond its intended purpose. When customers understand what information is collected and why, they’re more comfortable sharing it. This leads to richer datasets, more accurate AI models, and smarter decisions. Internally, transparency helps teams collaborate more effectively by clarifying data sources and reducing duplication.
Privacy and security from the start - a key to ROAI
While transparency is about openness, privacy and security focus on protecting data. Main practices include:

Compliance as a competitive advantage
Clear records and responsible data practices reduce legal risks and allow teams to focus on innovation instead of compliance issues. Customers who feel their privacy is respected are more willing to engage, while strong data practices can also attract partners, investors, and new business opportunities.
Use data as the strategic foundation for AI
The real value of AI comes from turning data into real insights and innovation - but none of that happens without a solid data foundation.
Outdated systems, fragmented records, and governance gaps hold back AI performance. Fixing these issues ensures AI models are faster, smarter, and more reliable.
Are your AI models struggling with data bottlenecks?
Do you need to modernize your data infrastructure to support AI at scale?
We specialize in building, integrating, and optimizing data architectures for AI-driven businesses.
Let’s discuss what’s holding your AI back and how to fix it.
Contact us to explore solutions tailored to your needs.
The foundation for AI success: How to build a strategy to increase ROAI
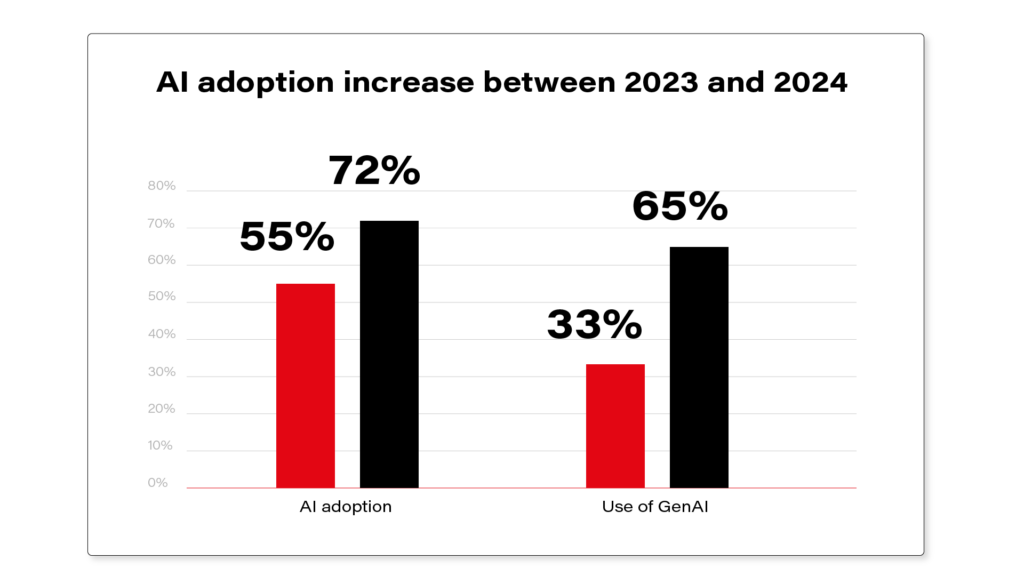
AI adoption is on the rise but turning it into real business value is another story. 74% of companies struggle to scale AI initiatives , and only a tiny fraction - just 26% - develop the capabilities needed to move beyond proofs of concept. The real question on everyone's mind is - How to increase ROAI?
One of the biggest hurdles is proving the impact. In 2023, the biggest challenge for businesses was demonstrating AI’s usefulness in real operations . Many companies invest in this technology without a clear plan for how it will drive measurable results.
Even with these challenges, the adoption keeps growing. McKinsey's 2024 Global Survey on AI reported that 65% of respondents' organizations are regularly using Generative AI in at least one business function, nearly doubling from 33% in 2023. Businesses know its value, but making artificial intelligence work at scale takes more than just enthusiasm.
Source: https://www.mckinsey.com/capabilities/quantumblack/our-insights/the-state-of-ai
That’s where the right approach makes all the difference. A holistic strategy, strong data infrastructure, and efficient use of talent can help you increase ROAI and turn technology into a competitive advantage. But you need to start with building a foundation for AI investments and implementation first.
Why AI must be aligned with business goals
Too many AI projects fail when companies focus on the technology first instead of the problem it’s meant to solve. Investing in artificial intelligence just because it’s popular leads to expensive pilots that never scale, systems that complicate workflows instead of improving them, and wasted budgets with nothing to show for it.
Start with the problem, not the technology
Before committing resources, leadership needs to ask:
- What’s the goal? Is the priority cutting maintenance costs, making faster decisions, or detecting fraud more accurately? If the objective isn’t clear, neither will the results.
- Is AI even the right solution? Some problems don’t need machine learning. Sometimes, better data management or process improvements do the job just as well, without the complexity or cost of AI.
Choosing AI use cases that deliver real value
Once AI aligns with business goals, the next challenge is selecting initiatives that generate measurable impact. Companies often waste millions on projects that fail to solve real business problems, can’t scale, or disrupt workflows instead of improving them.
See which factors must align for AI to create tangible business value:

How responsible AI ties back to business results
Responsible AI protects long-term business value by creating systems that are transparent, fair, and aligned with user expectations and regulatory requirements. Organizations that take a proactive approach to AI governance minimize risks while building solutions that are both effective and trusted.
One of the biggest gaps in AI adoption is the lack of consistent oversight . Without regular audits and monitoring, models can drift, introduce bias, or generate unreliable results. Businesses need structured frameworks to keep AI reliable, adaptable, and aligned with real-world conditions. This also means actively managing ethical issues, explainability, and data security to maintain performance and trust.
As regulations evolve, compliance is no longer an afterthought. AI used in critical areas like fraud detection, risk assessment, and automated decision-making requires continuous monitoring to meet regulatory expectations. Companies that embed AI governance from the start avoid operational risks.
Another key challenge is trust . When AI-driven decisions lack transparency, scepticism grows. Users and stakeholders need clear visibility into how AI operates to build confidence. Companies that make decisions transparent and easy to understand improve adoption across their organization, and ultimately increase ROAI.
Measuring AI success and proving ROAI
The real test of AI’s success is whether it improves daily operations and delivers measurable business value. When teams work more efficiently, revenue grows, and risks become easier to manage, the investment is clearly paying off.
Key indicators of AI success
Is AI reducing manual effort? Automating repetitive tasks helps employees focus on more strategic work. If delays still slow operations or fraud detection overwhelms teams with false positives, AI may not be delivering real efficiency. Faster approvals and quicker customer issue resolution indicate AI is making a difference.
Is AI improving financial outcomes? Accurate forecasting cuts waste, and AI-driven pricing boosts profit margins. If automation isn’t lowering operational costs or streamlining workflows, it may not be adding real value.
Is AI strengthening security and compliance? Fraud detection prevents financial losses when it catches real threats without unnecessary disruptions. Compliance automation eases the burden of manual oversight, while AI-driven security reduces the risk of data breaches. If risks remain high, AI may need adjustments.
To prove AI’s return on investment, companies need to establish success criteria upfront , track AI performance over time, and compare different configurations (e.g., Generative AI use cases, LLM models ) to confirm the technology delivers cost savings and tangible benefits .
The hidden costs of AI initiatives and the challenge of scaling
Investing in artificial intelligence goes beyond development. Many companies focus on building and implementing models but underestimate the effort required to scale, maintain, and integrate them into existing systems. Costs accumulate over time, and without proper planning, AI projects can stall, and budgets stretch.
One of the highest ongoing costs is data . AI relies on clean, structured information, but collecting, storing, and maintaining it requires continuous effort. Over time, models need regular updates to remain accurate as well. Fraud tactics change, regulations evolve, and systems produce unreliable results without adjustments, leading to costly mistakes.
This becomes even more challenging when AI moves from a controlled pilot to full-scale implementation . A model that performs well in one department may not integrate easily across an entire organization. Expanding its use often exposes hidden costs, workflow disruptions, and technical limitations that weren’t an issue on a smaller scale.
Scaling AI successfully also requires coordination across different teams . While ML engineers refine models, business teams track measurable outcomes, and compliance teams manage regulatory requirements. You need these groups to align early.
AI must also integrate with existing enterprise systems without disrupting workflows, which requires dedicated infrastructure investments . Many legacy IT environments weren’t designed for AI-driven automation, which leads to increased costs for adaptation, cloud migration, and security improvements.
Companies that navigate these challenges effectively see real gains from AI. However, aligning strategy, execution, and scaling AI efficiently isn’t always straightforward. That’s where expert guidance makes a difference.
See how Grape Up helps businesses increase ROAI
Grape Up helps business leaders turn AI from a concept into a practical tool that delivers measurable ROAI by aligning technology with real business needs.
We work with companies to define AI roadmaps, making sure every initiative has a clear purpose and contributes to strategic goals. Our team supports data infrastructure and AI integration , so new solutions fit smoothly into existing systems without adding complexity.
From strategy to execution, Grape Up helps you increase ROAI. Make technology a real business asset adapted for long-term success.
Top 10 AI integration companies to consider in 2025
Artificial Intelligence has evolved from a specialized technology into a fundamental business imperative. However, the initial excitement around GenAI tools has given way to a more nuanced understanding - successful AI adoption requires a comprehensive organizational transformation, not just technological implementation.
This reality has highlighted a critical challenge: finding experienced AI integration partners who can "translate" AI software into genuine business value.
Recent industry analysis reveals a dramatic acceleration in AI adoption. According to McKinsey's latest survey, 72% of organizations now utilize AI solutions, marking a significant increase from 50% in previous years.
Generative AI has emerged as a particular success story, with 65% of organizations reporting regular usage - nearly double the previous year's figures. Organizations are deploying AI across diverse functions, from advanced data analysis and process automation to personalized customer experiences and strategic forecasting.
Investment trends reflect this growing confidence in AI's potential. Most organizations now allocate over 20% of their digital budgets to AI technologies, with 67% of executives planning to increase these investments over the next three years.
Quite often, they rely on AI integration companies to help them maximize benefits of investment in artificial intelligence.
Strategic goals: From implementation to innovation
Organizations approaching AI adoption typically balance immediate operational improvements with long-term strategic transformation:
Immediate priorities:
- Enhancing operational efficiency and productivity
- Reducing operational costs through automation
- Improving employee experience and workflow optimization
- Accelerating decision-making processes through data-driven insights
- Streamlining customer service operations
Strategic objectives:
- Business model innovation and market differentiation
- Sustainable revenue growth through AI-enabled capabilities
- Enhanced market positioning and competitive advantage
- Integration of sustainable practices and responsible AI usage
- Comprehensive data intelligence and operational effectiveness
Success stories: AI in action
The transformative potential of AI is already evident across multiple sectors:
Financial services
American Express has revolutionized customer engagement through AI-powered predictive analytics, achieving a 20% increase in customer engagement and more effective retention strategies. Similarly, Klarna demonstrated remarkable efficiency gains, with their AI assistant effectively replacing 700 human customer service agents while improving service quality.
Manufacturing
Siemens has implemented AI-driven monitoring systems across their manufacturing facilities, significantly reducing maintenance costs and minimizing production downtime. GE's application of AI in supply chain management has resulted in 10-15% inventory cost reduction and dramatically improved delivery efficiency.
Retail
Walmart's AI-powered inventory strategies have transformed retail operations, improving inventory turnover and reducing holding costs. Target has leveraged AI for personalized marketing, achieving significant improvements in conversion rates and customer engagement.
AI implementation challenges
Despite these successes, AI implementation often faces significant obstacles:
Infrastructure barriers
Many organizations struggle with legacy systems that aren't equipped for AI workloads. Complete system overhauls are often impractical due to cost and risk considerations, limiting AI integration to specific processes rather than enabling comprehensive transformation.
Data management complexities
Smaller organizations frequently lack robust data management policies, resulting in inefficient data handling and integration challenges. Data engineers often spend disproportionate time resolving basic data source connections rather than focusing on AI implementation.
Security and governance
Organizations must navigate complex security considerations, particularly when handling sensitive data. Only 29% of practitioners express confidence in their generative AI applications' production readiness, highlighting significant governance challenges.
Implementation challenges
The proliferation of open-source AI models presents its own challenges. These generic solutions often fail to address specific business needs and provide inadequate control over proprietary data, potentially compromising organizational AI strategies.
The path forward: AI strategic partnership
These challenges emphasize that successful AI adoption requires more than technical expertise. Organizations need strategic partners who can:
- Navigate complex technical infrastructure challenges
- Implement robust data management strategies
- Address security concerns effectively
- Bridge organizational skill gaps
- Develop customized solutions aligned with business objectives
- Establish meaningful performance metrics
- Balance technological capabilities with strategic goals
This comprehensive understanding of both technical and strategic considerations is crucial for identifying the right AI consulting partner - one who can guide organizations through their unique AI transformation journey.
10 leading AI integration companies: Detailed profiles
1. Binariks
Binariks specializes in custom AI and machine learning solutions, focusing on healthcare, fintech, and insurance sectors. Their approach emphasizes tailored development and operational efficiency.
Service offerings
- Custom AI Model Development
- Predictive Analytics Solutions
- NLP Applications
- Computer Vision Systems
- Generative AI Implementation
Notable achievements
- Fleet tracking system with FHIR integration
- Medicare analytics platform optimization (20x cost reduction)
- Gamified meditation application development
- B2B health coaching platform transformation
- Medical appointment scheduling system
2. Grape Up
Grape Up supports global enterprises in building and maintaining mission-critical systems through the strategic use of AI, cloud technologies, and modern delivery practices. Working with major players in automotive , manufacturing , finance , and insurance , Grape Up drives digital transformation and delivers tangible business outcomes.
Service portfolio
Data & AI Services
- Data and AI Infrastructure : Establishing the technical foundations for large-scale AI initiatives, from data pipelines to the deployment of machine learning solutions.
- Machine Learning Operations : Deploying and maintaining ML models in production to ensure consistent performance, reliability, and easy scalability.
- Generative AI Applications : Using generative models to boost automation efforts, enhance customer experiences, and power new digital services.
- Tailored AI Consulting and Solutions : Advising organizations on how to integrate AI into existing processes and developing solutions aligned with specific objectives.
Software Design & Engineering Services
- A pplication Modernization with Generative AI : Modernizing legacy software by incorporating generative AI, reducing development time and improving overall performance.
- End-to-End Digital Product Developmen t: Designing, building, and launching digital products that tackle practical challenges and meet user needs.
- Cloud-First Infrastructure : Establishing and optimizing cloud environments to ensure security, scalability, and cost-effectiveness.
Success stories
- AI-Powered Customer Support for a Leading Manufacturer : Implemented an intelligent support solution to deliver quick, accurate responses and lower operational costs.
- LLM Hub for a Major Insurance Provider : Built a centralized platform that connects multiple AI chatbots for better customer engagement and streamlined operations.
- Accelerated AI/ML Deployment for a Sports Car Brand : Designed a rapid deployment system to speed up AI application development and production.
- Voice-Driven Car Manual : Enabled real-time, personalized guidance via generative AI in mobile apps and infotainment systems.
- Generative AI Chatbot for Enhanced Operations : Created a context-aware chatbot tapping into multiple data sources for secure, on-demand insights.
Check out case studies by Grape Up - https://grapeup.com/case-studies/
3. BotsCrew

Founded in 2016, BotsCrew has emerged as a specialist in generative AI agents and voice assistants. The company has developed over 200 AI solutions, serving global brands including Adidas, FIBA, Red Cross, and Honda.
Core competencies
- Generative AI Development
- Conversational AI Systems
- Custom Chatbot Solutions
- AI Strategy Consulting
Key implementations
- Honda: AI voice agent deployment with 15,000+ interactions
- Red Cross: Internal AI assistant covering 65% of queries
- Choose Chicago: Website AI agent engaging 500k+ visitors
4. Addepto
Addepto has established itself as a leading AI consulting firm, earning recognition from Forbes, Deloitte, and the Financial Times. The company combines strategic advisory services with hands-on implementation expertise, specializing in process automation and optimization for global enterprises.
Service portfolio
- AI Strategy & Consulting: Strategic guidance and transformation roadmap development
- Generative AI Development : Text, image, code, and multi-modal solutions
- A gentic AI : Autonomous systems for decision-making
- Custom Chatbot Solutions : Advanced NLU-powered conversational systems
- Machine Learning & Predictive Analytics
- Computer Vision Applications
- Natural Language Processing Solutions
Proprietary products
- ContextClue: Knowledge base assistant for document research
- ContextCheck : Open-source RAG evaluation tool
Success stories
Addepto's portfolio spans multiple industries with notable implementations:
- Aviation sector optimization through intelligent documentation systems
- AI-powered recycling process enhancement
- Real estate transaction automation
- Manufacturing predictive analytics
- Supply chain optimization for parcel delivery
- Advanced luggage tracking systems
- Retail compliance automation
- Energy sector ETL optimization
5. Miquido

With 12 years of experience and 250+ successful digital products, Miquido offers comprehensive AI services integrated with broader digital transformation capabilities. Their client portfolio includes Warner, Dolby, Abbey Road Studios, and Skyscanner.
Technical expertise
- Generative AI Solutions
- Machine Learning Systems
- D ata Science Services
- Computer Vision Applications
- Python Development
- RAG Implementation
- Strategic AI Consulting
Notable implementations
- Nextbank: Credit scoring system (97% accuracy, 500M+ applications)
- PZU: Pioneer Google Assistant deployment
- Pangea: Rapid deployment platform (90%+ efficiency improvement)
Each of these companies brings unique strengths and specialized expertise to the AI consulting landscape. Their success stories and diverse project portfolios demonstrate the practical impact of well-implemented AI solutions across various industries.
6. Cognizant
Cognizant focuses on digital transformation and AI integration across various industries. The company has garnered numerous awards for its excellence in AI technologies, including the AI Breakthrough Award for Best Natural Language Generation Platform.
Service portfolio
- AI and Machine Learning Solutions : Implementing advanced AI technologies to enhance decision-making processes and operational efficiency.
- Cloud Services: Facilitating seamless migration to cloud-based architectures to improve scalability and agility.
- Data Management and Analytics : Providing tools for effective data aggregation, analysis, and visualization to drive informed business decisions.
- Digital Transformation Consulting: Assisting organizations in adopting innovative technologies to modernize their operations.
- Generative AI Services : Developing solutions that leverage generative AI for various applications, including healthcare administration.
Success stories:
- Generative AI: Increased coding productivity by 100% and reduced rework by 50%.
- Intelligent Underwriting Tool: Streamlined underwriting processes for a global reinsurance company.
- AI for Biometric Data Protection: Automated real-time masking of Aadhaar numbers for compliance.
- Campaign Conversion Improvement: Enhanced ad performance, increasing click-through and conversion rates.
- Cloud-Based AI Analytics for Mining: Improved real-time monitoring and efficiency in ore transportation.
- Fraud Loss Reduction: Saved a global bank $20M through expedited check verification.
- Preventive Care AI Solution: Identified at-risk patients for drug addiction, lowering healthcare costs.
7. SoluLab

SoluLab specializes in next-generation digital solutions, combining domain expertise with technical excellence to address complex business challenges through AI, blockchain, and web development.
Service portfolio
- AI Consulting : Provides end-to-end guidance for AI adoption, from feasibility analysis and use case identification to ROI-focused implementation strategies. Their team assesses existing infrastructure and creates tailored roadmaps that prioritize scalability and measurable outcomes.
- AI Application Development : Delivers custom AI-powered applications focusing on intelligent automation, real-time analytics, and predictive modeling. They follow agile methodologies to ensure solutions align with evolving business needs.
- Large Language Model Fine-Tuning : Specializes in optimizing pre-trained models like GPT and BERT for specific business domains, ensuring efficient deployment with minimal latency and continuous performance monitoring.
- Generative AI Development : Creates innovative applications for content generation and creative workflow automation, with robust monitoring systems to optimize performance and maintain ethical AI practices.
- AI Chatbot Development : Designs conversational AI solutions that enhance customer engagement and streamline communication, with seamless integration across platforms like WhatsApp and Slack.
- AI Agent Development : Builds autonomous decision-making systems for tasks ranging from customer service to supply chain optimization, featuring real-time learning capabilities for dynamic process improvement.
Success stories
- Gradient: Developed an advanced AI platform that combines stable diffusion and GPT-3 integration for seamless image and text generation.
- InfuseNet: Created a comprehensive AI platform that enables businesses to import and process data from various sources using advanced models like GPT-4, FLAN, and GPT-NeoX, focusing on data security and business growth.
- Digital Quest: Implemented an AI-powered ChatGPT solution for a travel business, enhancing customer engagement and travel recommendations through seamless communication.
8. LeewayHertz

LeewayHertz is a specialized AI services company with deep expertise in machine learning, natural language processing, and computer vision. They focus on helping businesses adopt AI technologies through strategic consulting and implementation services, with a strong emphasis on delivering measurable outcomes and maximum value for their clients.
Service portfolio
- AI/ML Strategy Consulting : Provides strategic guidance to help businesses align their AI initiatives with organizational goals, ensuring maximum value from AI investments.
- Custom AI Development : Creates tailored solutions including specialized machine learning models and NLP applications to address specific business challenges.
- Generative AI : Develops advanced tools for content creation and virtual assistants, designed to enhance engagement and operational efficiency.
- Computer Vision : Builds sophisticated applications for image and video analysis, enabling process automation and enhanced security measures.
- Data Analytics : Delivers insights-driven solutions that optimize decision-making processes and operational efficiency.
- AI Integration : Ensures seamless deployment and ongoing support for integrating AI solutions into existing systems and workflows.
Success stories
- Wine Recommendation LLM App: Developed a sophisticated large language model application for a Swiss wine e-commerce company, featuring personalized recommendations, multilingual capabilities, and real-time inventory management.
- Compliance and Security Access Platform: Created an LLM-powered application that streamlines access to compliance benchmarks and audit data, enhancing user experience and providing valuable industry insights.
- Medical Assistant AI: Implemented an advanced healthcare solution utilizing algorithms and Natural Language Processing to improve data gathering, analysis, and diagnostic workflows for enhanced patient care.
- Machinery Troubleshooting Application: Developed an LLM-powered solution for a Fortune 500 manufacturing company that integrates machinery data with safety policies to provide rapid troubleshooting and enhanced safety protocol management.
- WineWizzard Recommendation Engine: Built an AI-powered engine delivering personalized wine suggestions and detailed product information to boost customer engagement and satisfaction.
9. Ekimetrics
Ekimetrics is a specialized data science and analytics consulting firm focused on helping businesses leverage data for strategic decision-making and performance improvement. The company combines expertise in statistical modeling, machine learning, and artificial intelligence to deliver actionable insights tailored to client needs across industries. Their approach integrates advanced analytics with practical business applications to drive measurable results.
Service portfolio
- AI-Powered Marketing Solutions : Optimizes marketing strategies and budget allocations through advanced mix models and attribution systems, ensuring maximum ROI for marketing investments.
- C ustomer Analytics : Provides AI-driven analysis of customer data to uncover behavioral patterns, preferences, and segmentation opportunities, enabling improved marketing personalization and engagement.
- Predictive Modeling : Implements machine learning algorithms for forecasting trends and consumer actions, helping businesses anticipate demand and make informed strategic decisions.
- Operational Excellence : Streamlines processes and optimizes supply chain management through AI-powered automation and workflow optimization.
- Sustainability Solutions : Offers AI tools for environmental impact assessment, including carbon footprint analysis and strategies for achieving net-zero goals.
- Custom AI Solutions : Develops tailored AI applications in partnership with clients to address specific business challenges while ensuring scalability and long-term value.
Success stories
- Nestlé Customer Insights: Delivered advanced analytics and customer insights enabling Nestlé to refine marketing strategies and enhance consumer engagement across their product portfolio.
- Ralph Lauren Predictive Analytics: Implemented predictive modeling solutions that improved customer behavior understanding and inventory management, leading to more accurate sales forecasting.
- McDonald's Data Strategy: Partnered with McDonald's to analyze customer data and optimize menu offerings, resulting in improved customer satisfaction and sales performance.
10. BCG X

BCG X is a division of Boston Consulting Group that pioneers transformative business solutions through advanced technology and AI integration. With a powerhouse team of nearly 3,000 experts spanning technologists, scientists, and designers, BCG X builds innovative products, services, and business models that address critical global challenges. Their distinctive approach combines predictive and generative AI capabilities to deliver scalable solutions that help organizations revolutionize their operations and customer experiences.
Service portfolio
- Advanced AI Integration : Developing comprehensive predictive AI solutions that transform data into strategic insights, enabling clients to make informed decisions and anticipate market trends.
- Digital Product Innovation : Creating cutting-edge digital platforms and products that leverage AI capabilities to deliver exceptional user experiences and drive business value.
- Enterprise Transformation : Orchestrating end-to-end digital transformations that combine AI technology, process optimization, and organizational change to achieve sustainable results.
- Customer Experience Design : Crafting AI-powered customer journeys that deliver personalized experiences, enhance engagement, and maximize lifetime value through data-driven insights.
- Technology Architecture : Building robust, scalable technology foundations that enable rapid innovation and seamless integration of advanced AI capabilities across the enterprise.
Success stories
- Global Financial Services Transformation: Partnered with a leading bank to implement AI-driven risk assessment and customer service solutions, resulting in 40% faster processing times and improved customer satisfaction scores.
- Retail Innovation Initiative: Developed and deployed an AI-powered inventory management system for a major retailer, reducing stockouts by 30% and increasing supply chain efficiency.
- Healthcare Analytics Platform: Created a comprehensive data analytics platform for a healthcare provider network, enabling predictive patient care modeling and improved resource allocation.
- Manufacturing Optimization: Implemented advanced AI solutions in production processes for a global manufacturer, leading to 25% reduction in operational costs and improved quality control.
- Digital Product Launch: Collaborated with a consumer goods company to develop and launch an AI-enabled digital product suite, resulting in new revenue streams and enhanced market position.
Ready to accelerate your AI journey?
Are you looking for a strategic partner with deep expertise in cloud-native solutions, real-time data streaming, and user-centred AI product development? Grape Up is here to help. Our team of experts specializes in tailoring AI solutions that align with your organization’s unique goals. We help you deliver measurable, sustainable outcomes.

Apache Kafka fundamentals
Nowadays, we have plenty of unique architectural solutions. But all of them have one thing in common – every single decision should be done after a solid understanding of the business case as well as the communication structure in a company. It is strictly connected with famous Conway’s Law:
“Any organization that designs a system (defined broadly) will produce a design whose structure is a copy of the organization's communication structure.”
In this article, we go deeper into the Event-Driven style, and we discover when we should implement such solutions. This is when Kafka comes to play.
The basic definition taken from the Apache Kafka site states that this is an open-source distributed event streaming platform . But what exactly does it mean? We explain the basic concepts of Apache Kafka, how to use the platform, and when we may need it.
Apache Kafka is all about events
To understand what the event streaming platform is, we need to have a prior understanding of an event itself. There are different ways of how the services can interact with each other – they can use Commands, Events, or Queries. So, what is the difference between them?
- Command – we can call it a message in which we expect something to be done - like in the army when the commander gives an order to soldiers. In computer science, we are making requests to other services to perform some action, which causes a system state change. The crucial part is that they are synchronous, and we expect that something will happen in the future. It is the most common and natural method for communication between services. On the other hand, you do not really know if your expectation will be fulfilled by the service. Sometimes we create commands, and we do not expect any response (it is not needed for the caller.)
- Event – the best definition of an event is a fact. It is a representation of the change which happened in the service (domain). It is essential that there is no expectation of any future action. We can treat an event as a notification of state change. Events are immutable. In other words - it is everything necessary for the business. This is also a single source of truth, so events need to precisely describe what happened in the system.
- Query – in comparison to the others, the query is only returning a response without any modifications in the system state. A good example of how it works can be an SQL query.
Below there is a small summary which compares all the above-mentioned ways of interaction:
Now we know what the event is in comparison to other interaction styles. But what is the advantage of using events? To understand why event-driven solutions are better than synchronous request-response calls, we have to learn a bit about software architecture history.
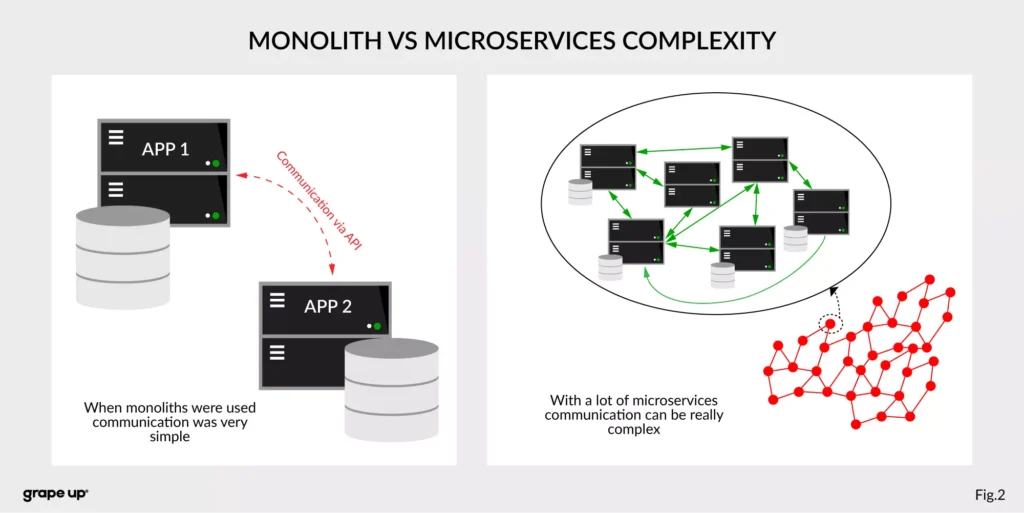
The figure describes a difference between a system that has old monolith architecture and a system with new modern microservice architecture.
The left side of the figure presents an API communication between two monoliths. In this case, communication is straightforward and easy. There is a different problem though such monolith solutions are very complex and hard to maintain.
The question is, what happens if we want to use, instead of two big services, a few thousands of small microservices . How complex will it be? The directed graph on the right side is showing how quickly the number of calls in the system can grow, and with it, the number of shared resources. We can have a situation when we need to use data from one microservice in many places. That produces new challenges regarding communication.
What about communication style?
In both cases, we are using a request-response style of communication (figure below), and we need to know how to use API provided by the server from the caller perspective. There must be some kind of protocol to exchange messages between services.
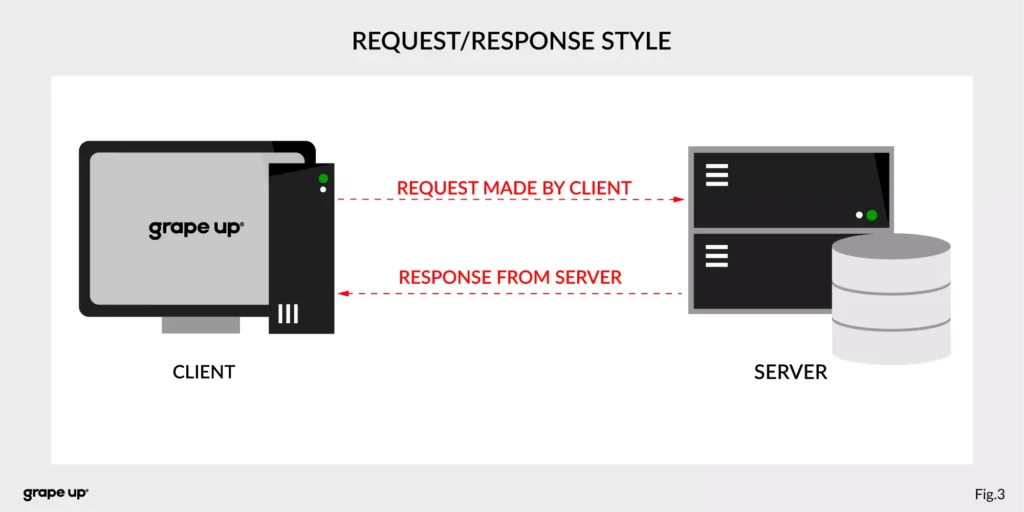
So how to reduce the complexity and make an integration between services easier? To answer this – look at the figure below.
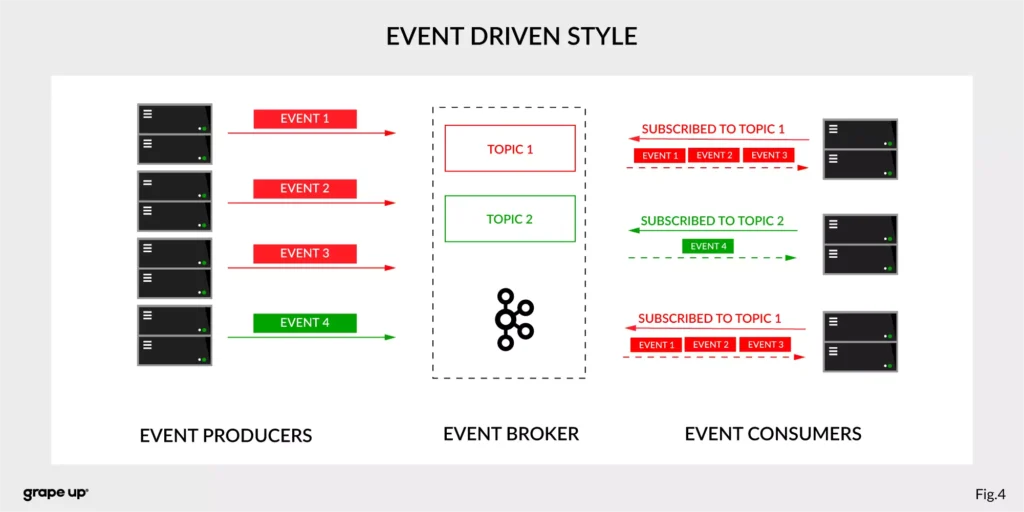
In this case, interactions between event producers and consumers are driven by events only. This pattern supports loose coupling between services, and what is more important for us, the event producer does not need to be aware of the event consumer state. It is the essence of the pattern. From the producer's perspective, we do not need to know who or how to use data from the topic.
Of course, as usual, everything is relative. It is not like the event-driven style is always the best. It depends on the use case. For instance, when operations should be done synchronously, then it is natural to use the request-response style. In situations like user authentication, reporting AB tests, or integration with third-party services, it is better to use a synchronous style. When the loose coupling is a need, then it is better to go with an event-driven approach. In larger systems, we are mixing styles to achieve a business goal.
The name of Kafka has its origins in the word Kafkaesque which means according to the Cambridge dictionary something extremely unpleasant, frightening, and confusing, and similar to situations described in the novels of Franz Kafka.
The communication mess in the modern enterprise was a factor to invent such a tool. To understand why - we need to take a closer look at modern enterprise systems.
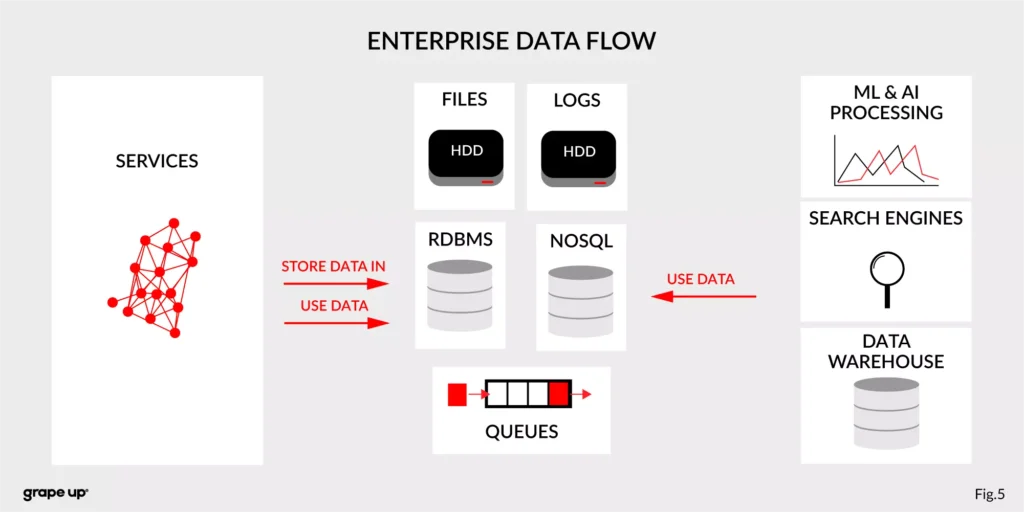
The modern enterprise systems contain more than just services. They usually have a data warehouse, AI and ML analytics, search engines, and much more. The format of data and the place where data is stored are various – sometimes a part of the data is stored in RDBMS, a part in NoSQL, and other in file bucket or transferred via a queue. They can have different formats and extensions like XML, JSON, and so on. Data management is the key to every successful enterprise. That is why we should care about it. Tim O’Reilly once said:
„We are entering a new world in which data may be more important than software.”
In this case, having a good solution for processing crucial data streams across an enterprise is a must to be successful in business. But as we all know, it is not always so easy.
How to tame the beast?
For this complex enterprise data flow scenario, people invented many tools/methods. All to make this enterprise data distribution possible. Unfortunately, as usual, to use them, we have to make some tradeoffs. Here we have a list of them:
- Database replication, Mirroring, and Log Shipping - used to increase the performance of an application (scaling) and backup/recovery.
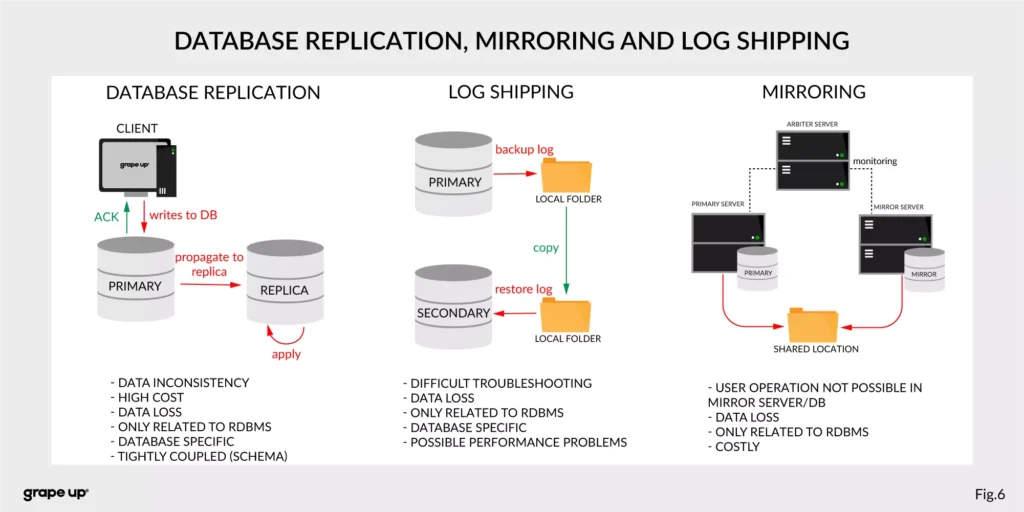
- ETL – Extract, Transform, Load - used to copy data from different sources for analytics/reports.
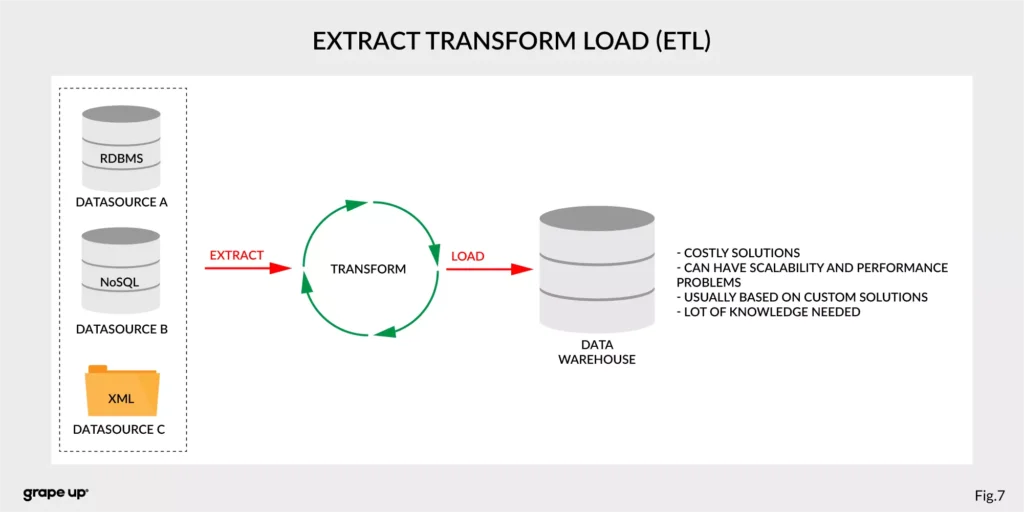
- Messaging systems - provide asynchronous communication between systems.
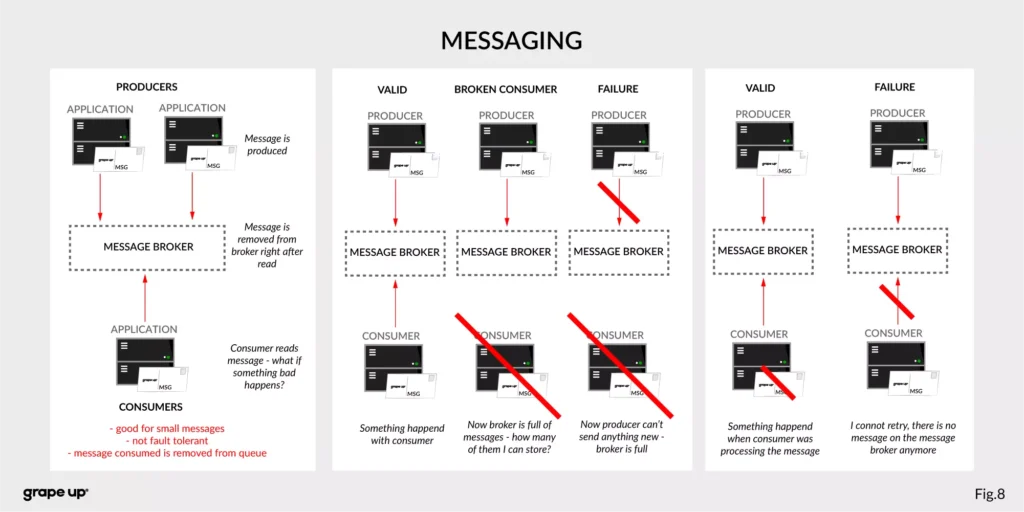
As you can see, we have a lot of problems that we need to take care of to provide correct data flow across an enterprise organization. That is why Apache Kafka was invented. One more time we have to go to the definition of Apache Kafka. It is called a distributed event streaming platform. Now we know what the event is and how event-driven style looks like. So as you probably can guess, event streaming, in our case, means capturing, storing, manipulating, processing, reacting, and routing event streams in real-time. It is based on three main capabilities – publishing/subscribing, storing, and processing. These three capabilities make this tool very successful.
- Publishing/Subscribing provides an ability to read/write to streams of events and even more – you can continuously import/export data from different sources/systems.
- Storing is also very important here. It solves the abovementioned problems in messaging. You can store streams of events for as long as you want without being afraid that something will be gone.
- Processing allows us to process streams in real-time or use history to process them.
But wait! There is one more word to explain – distributed. Kafka system internally consists of servers and clients. It uses a high-performance TCP Protocol to provide reliable communication between them. Kafka runs as a cluster on one or multiple servers which can be easily deployed in the cloud or on-prem in single or multiple regions. There are also Kafka Connect servers used for integration with other data sources and other Kafka Clusters. Clients that can be implemented in many programming languages have a special role to read/write and process event streams. The whole ecosystem of Kafka is distributed and of course like every distributed system has a lot of challenges regarding node failures, data loss, and coordination.
What are the basic elements of Apache Kafka?
To understand how Apache Kafka works let first explain the basic elements of the Kafka ecosystem.
Firstly, we should take a look at the event. It has a key, value, timestamp, and optional metadata headers. A key is used not only for identification, but it is used also for routing and aggregation operations for events with the same key.
As you can see in the figure below - if the message has no key attached, then data is sent using a round-robin algorithm. The situation is different when the event has a key attached. Then the events always go to the partition which holds this key. It makes sense from the performance perspective. We usually use ids to get information about objects, and in that case, it is faster to get it from the same broker than to look for it on many brokers.
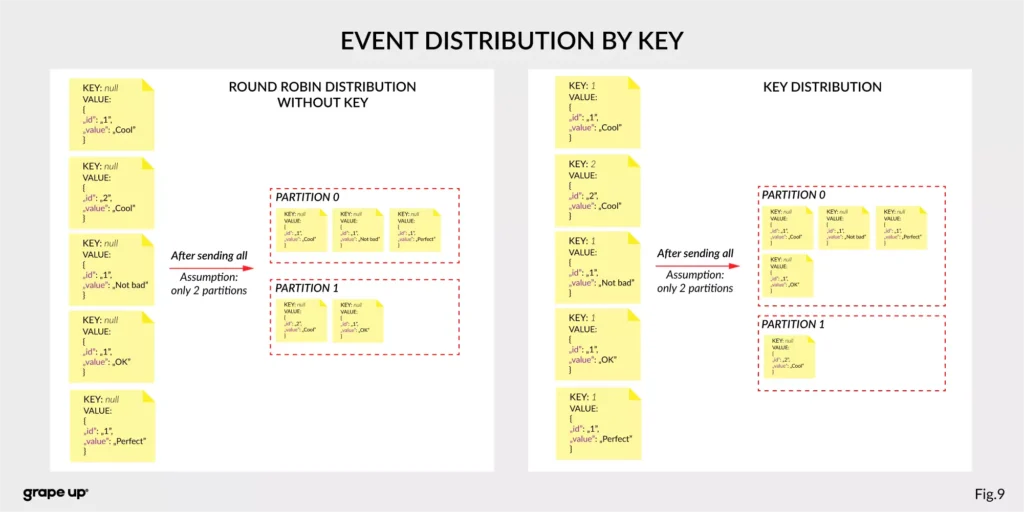
The value, as you can guess, stores the essence of the event. It contains information about the business change that happened in the system.
There are different types of events:
- Unkeyed Event – event in which there is no need to use a key. It describes a single fact of what happened in the system. It could be used for metric purposes.
- Entity Event – the most important one. It describes the state of the business object at a given point in time. It must have a unique key, which usually is related to the id of the business object. They are playing the main role in event-driven architectures.
- Keyed Event – an event with a key but not related to any business entity. The key is used for aggregation and partitioning.
Topics –storage for events. The analogy to a folder in a filesystem, where the topic is like a folder that organizes what is inside. An example name of the topic, which keeps all orders events in the e-commerce system can be “ orders” . Unlike in other messaging systems, the events stay on the topic after reading. It makes it very powerful and fault-tolerant. It also solves a problem when the consumer will process something with an error and would like to process it again. Topics can always have zero, single, and multiple producers and subscribers.
They are divided into smaller parts called partitions. A partition can be described as a “commit log”. Messages can be appended to the log and can be read only in the order from the beginning to the end. Partitions are designed to provide redundancy and scalability. The most important fact is that partitions can be hosted on different servers (brokers), and that gives a very powerful way to scale topics horizontally.
Producer – client application responsible for the creation of new events on Kafka Topic. The producer is responsible for choosing the topic partition. By default, as we mentioned earlier round-robin is used when we do not provide any key. There is also a way of creating custom business mapping rules to assign a partition to the message.
Consumer – client application responsible for reading and processing events from Kafka. All events are being read by a consumer in the order in which they were produced. Each consumer also can subscribe to more than one topic. Each message on the partition has a unique integer identifier ( offset ) generated by Apache Kafka which is increased when a new message arrives. It is used by the consumer to know from where to start reading new messages. To sum up the topic, partition and offset are used to precisely localize the message in the Apache Kafka system. Managing an offset is the main responsibility for each consumer.
The concept of consumers is easy. But what about the scaling? What if we have many consumers, but we would like to read the message only once? That is why the concept of consumer group was designed. The idea here is when consumer belongs to the same group, it will have some subset of partitions assigned to read a message. That helps to avoid the situation of duplicated reads. In the figure below, there is an example of how we can scale data consumption from the topic. When a consumer is making time-consuming operations, we can connect other consumers to the group, which helps to process faster all new events on the consumer level. We have to be careful though when we have a too-small number of partitions, we would not be able to scale it up. It means if we have more consumers than partitions, they are idle.
But you can ask – what will happen when we add a new consumer to the existing and running group? The process of switching ownership from one consumer to another is called “rebalance.” It is a small break from receiving messages for the whole group. The idea of choosing which partition goes to which consumer is based on the coordinator election problem.
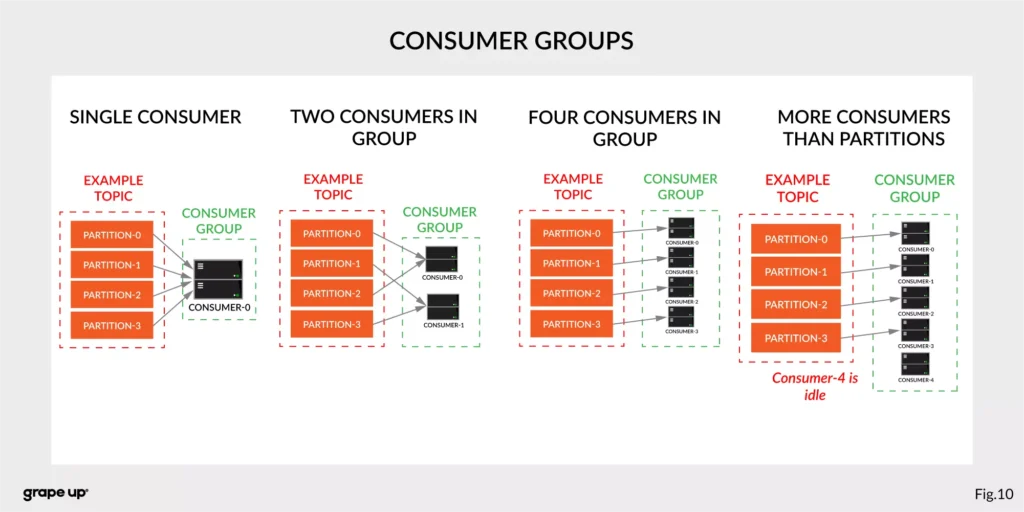
Broker – is responsible for receiving and storing produced events on disk, and it allows consumers to fetch messages by a topic, partition, and offset. Brokers are usually located in many places and joined in a cluster . See the figure below.
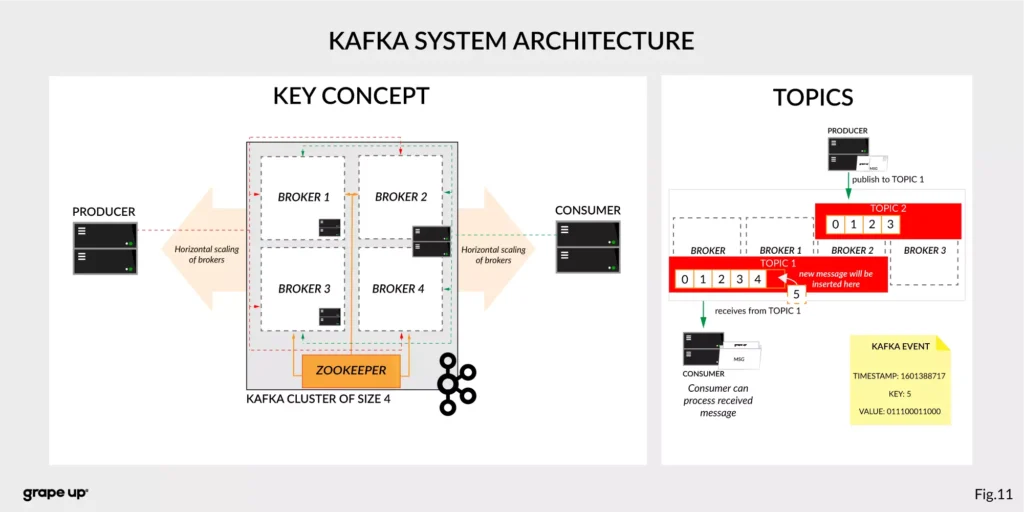
Like in every distributed system, when we use brokers we need to have some coordination. Brokers, as you can see, can be run on different servers (also it is possible to run many on a single server). It provides additional complexity. Each broker contains information about partitions that it owns. To be secure, Apache Kafka introduced a dedicated replication for partitions in case of failures or maintenance. The information about how many replicas do we need for a topic can be set for every topic separately. It gives a lot of flexibility. In the figure below, the basic configuration of replication is shown. The replication is based on the leader-follower approach.
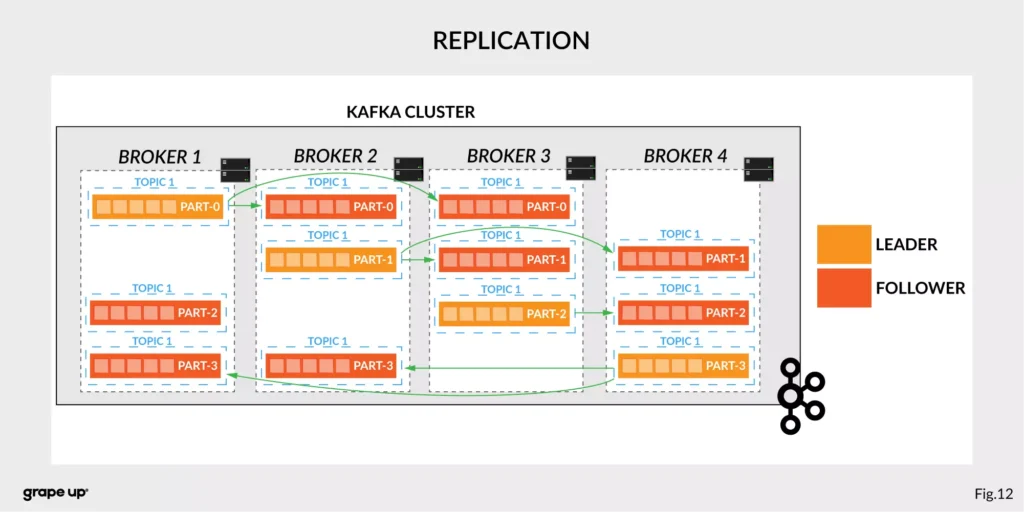
Everything is great! We have found all advantages of using Kafka in comparison to more traditional approaches. Now it is time to say something when to use it.
When to use Apache Kafka?
Apache Kafka provides a lot of use cases. It is widely used in many companies, like Uber, Netflix, Activision, Spotify, Slack, Pinterest, Coursera, LinkedIn, etc. We can use it as a:
- Messaging system – it can be a good alternative to the existing messaging systems. It has a lot of flexibility in configuration, better throughput, and low end-to-end latency.
- Website Activity tracking – it was the original use case for Kafka. Activity tracking on the website generates a high volume of data that we have to process. Kafka provides real-time processing for event-streams, which can be sometimes crucial for the business.
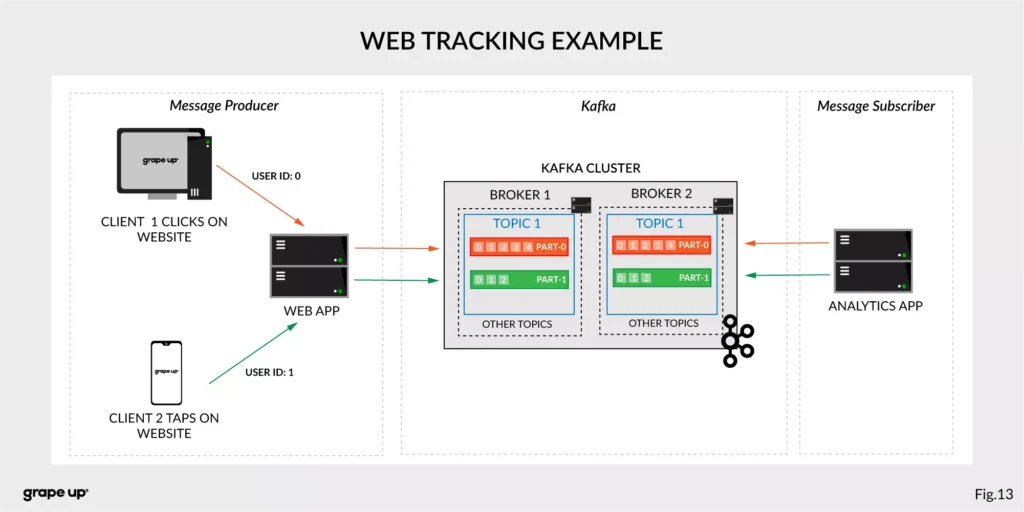
Figure 13 presents a simple use case for web tracking. The web application has a button that generates an event after each click. It is used for real-time analytics. Clients' events that are gathered on TOPIC 1. Partitioning is using user-id so client 1 events (user-id = 0) are stored in partition 0 and client 2 (user-id = 1) are stored in partition 1. The record is appended and offset is incremented on a topic. Now, a subscriber can read a message, and present new data on a dashboard or even use older offset to show some statistics.
- Log aggregation – it can be used as an alternative to existing log aggregation solutions. It gives a cleaner way of organizing logs in form of the event streams and what is more, gives a very easy and flexible way to gather logs from many different sources. Comparing to other tools is very fast, durable, and has low end-to-end latency.
- Stream processing – is a very flexible way of processing data using data pipelines. Many users are aggregating, enriching, and transforming data into new topics. It is a very quick and convenient way to process all data in real-time.
- Event sourcing – is a system design in which immutable events are stored as a single source of truth about the system. A typical use case for event sourcing can be found in bank systems when we are loading the history of transactions. The transaction is represented by an immutable event which contains all data describing what exactly happened in our account.
- Commit log – it can be used as an external commit-log for distributed systems. It has a lot of mechanisms that are useful in this use case (like log-compaction, replication, etc.)
Summary
Apache Kafka is a powerful tool used by leading tech enterprises. It offers a lot of use cases, so if we want to use a reliable and durable tool for our data, we should consider Kafka. It provides a loose coupling between producers and subscribers, making our enterprise architecture clean and open to changes. We hope you enjoyed this basic introduction to Apache Kafka and you will try to dig deeper into how it works after this article.
Looking for guidance on implementing Kafka or other event-driven solutions?
Get in touch with us to discuss how we can help.
Sources:
- kafka.apache.org/intro
- confluent.io/blog/journey-to-event-driven-part-1-why-event-first-thinking-changes-everything/
- hackernoon.com/by-2020-50-of-managed-apis-projected-to-be-event-driven-88f7041ea6d8
- ably.io/blog/the-realtime-api-family/
- confluent.io/blog/changing-face-etl/
- infoq.com/articles/democratizing-stream-processing-kafka-ksql-part2/
- cqrs.nu/Faq
- medium.com/analytics-vidhya/apache-kafka-use-cases-e2e52b892fe1
- confluent.io/blog/transactions-apache-kafka/
- martinfowler.com/articles/201701-event-driven.html
- pluralsight.com/courses/apache-kafka-getting-started#
- jaceklaskowski.gitbooks.io/apache-kafka/content/kafka-brokers.html
Bellemare, Adam. Building event-driven microservices: leveraging distributed large-scale data . O'Reilly Media, 2020.
Narkhede, Neha, et al. Kafka: the Definitive Guide: Real-Time Data and Stream Processing at Scale . O'Reilly Media, 2017.
Stopford, Ben. Designing Event-Driven Systems, Concepts and Patterns for Streaming Services with Apache Kafka , O'Reilly Media, 2018.

How to build an Android companion app to control a car with AAOS via Wi-Fi
In this article, we will explore how to create an application that controls HVAC functions and retrieves images from cameras in a vehicle equipped with Android Automotive OS (AAOS) 14.

The phone must be connected to the car's Wi-Fi, and communication between the Head Unit and the phone is required. The Android companion app will utilize the HTTP protocol for this purpose.
In AAOS 14, the Vehicle Hardware Abstraction Layer (VHAL) will create an HTTP server to handle our commands. This functionality is discussed in detail in the article " Exploring the Architecture of Automotive Electronics: Domain vs. Zone ".
Creating the mobile application
To develop the mobile application, we'll use Android Studio. Start by selecting File -> New Project -> Phone and Tablet -> Empty Activity from the menu. This will create a basic Android project structure.
Next, you need to create the Android companion app layout, as shown in the provided screenshot.

Below is the XML code for the example layout:
<?xml version="1.0" encoding="utf-8"?>

<!-- Copyright 2013 The Android Open Source Project -->
<LinearLayout xmlns:android="http://schemas.android.com/apk/res/android"
    xmlns:app="http://schemas.android.com/apk/res-auto"
    android:id="@+id/view"
    android:layout_width="fill_parent"
    android:layout_height="fill_parent"
    android:orientation="vertical">

    <LinearLayout
        android:layout_width="match_parent"
        android:layout_height="match_parent"
        android:layout_weight="1"
        android:orientation="vertical">

        <Button
            android:id="@+id/evs"
            android:layout_width="match_parent"
            android:layout_height="wrap_content"
            android:text="EVS ON" />

        <LinearLayout
            android:layout_width="match_parent"
            android:layout_height="wrap_content"
            android:orientation="horizontal">

            <TextView
                android:id="@+id/temperatureText"
                android:layout_width="wrap_content"
                android:layout_height="wrap_content"
                android:layout_marginStart="20dp"
                android:layout_marginTop="8dp"
                android:layout_marginEnd="20dp"
                android:text="16.0"
                android:textSize="60sp" />

            <LinearLayout
                android:layout_width="match_parent"
                android:layout_height="wrap_content"
                android:orientation="vertical">

                <Button
                    android:id="@+id/tempUp"
                    android:layout_width="match_parent"
                    android:layout_height="wrap_content"
                    android:text="Temperature UP" />

                <Button
                    android:id="@+id/tempDown"
                    android:layout_width="match_parent"
                    android:layout_height="wrap_content"
                    android:text="Temperature Down" />
            </LinearLayout>
        </LinearLayout>

        <Button
            android:id="@+id/getPhoto"
            android:layout_width="match_parent"
            android:layout_height="wrap_content"
            android:text="GET PHOTO" />

        <ImageView
            android:id="@+id/evsImage"
            android:layout_width="match_parent"
            android:layout_height="wrap_content"
            app:srcCompat="@drawable/grapeup_logo" />

    </LinearLayout>

    <View
        android:layout_width="fill_parent"
        android:layout_height="1dp"
        android:background="@android:color/darker_gray" />
</LinearLayout>
Adding functionality to the buttons
After setting up the layout, the next step is to connect actions to the buttons. Here's how you can do it in your MainActivity :
Button tempUpButton = findViewById(R.id.tempUp);
tempUpButton.setOnClickListener(new View.OnClickListener() {
    @Override
    public void onClick(View v) {
        tempUpClicked();
    }
});

Button tempDownButton = findViewById(R.id.tempDown);
tempDownButton.setOnClickListener(new View.OnClickListener() {
    @Override
    public void onClick(View v) {
        tempDownClicked();
    }
});

Button evsButton = findViewById(R.id.evs);
evsButton.setOnClickListener(new View.OnClickListener() {
    @Override
    public void onClick(View v) {
        evsClicked();
    }
});

Button getPhotoButton = findViewById(R.id.getPhoto);
getPhotoButton.setOnClickListener(new View.OnClickListener() {
    @Override
    public void onClick(View v) {
        Log.w("GrapeUpController", "getPhotoButton clicked");
        new DownloadImageTask((ImageView) findViewById(R.id.evsImage))
            .execute("http://192.168.1.53:8081/");
    }
});
Downloading and displaying an image
To retrieve an image from the car’s camera, we use the DownloadImageTask class, which downloads a JPEG image in the background and displays it:
private class DownloadImageTask extends AsyncTask<String, Void, Bitmap> {
    ImageView bmImage;

    public DownloadImageTask(ImageView bmImage) {
        this.bmImage = bmImage;
    }

    @Override
    protected Bitmap doInBackground(String... urls) {
        String urldisplay = urls[0];
        Bitmap mIcon11 = null;
        try {
            Log.w("GrapeUpController", "doInBackground: " + urldisplay);
            InputStream in = new java.net.URL(urldisplay).openStream();
            mIcon11 = BitmapFactory.decodeStream(in);
        } catch (Exception e) {
            Log.e("Error", e.getMessage());
            e.printStackTrace();
        }
        return mIcon11;
    }

    @Override
    protected void onPostExecute(Bitmap result) {
        bmImage.setImageBitmap(result);
    }
}
Adjusting the temperature
To change the car’s temperature, you can implement a function like this:
private void tempUpClicked() {
    mTemperature += 0.5f;

    new Thread(new Runnable() {
        @Override
        public void run() {
            doInBackground("http://192.168.1.53:8080/set_temp/" +
                String.format(Locale.US, "%.01f", mTemperature));
        }
    }).start();

    updateTemperature();
}
Endpoint overview
In the above examples, we used two endpoints: http://192.168.1.53:8080/ and http://192.168.1.53:8081/.
- The first endpoint corresponds to the AAOS 14 and the server implemented in the VHAL , which handles commands for controlling car functions.
- The second endpoint is the server implemented in the EVS Driver application. It retrieves images from the car’s camera and sends them as an HTTP response.
For more information on EVS setup in AAOS, you can refer to the articles " Android AAOS 14 - Surround View Parking Camera: How to Configure and Launch EVS (Exterior View System) " and " Android AAOS 14 - EVS network camera. "
EVS driver photo provider
In our example, the EVS Driver application is responsible for providing the photo from the car's camera. This application is located in the packages/services/Car/cpp/evs/sampleDriver/aidl/src directory. We will create a new thread within this application that runs an HTTP server. The server will handle requests for images using the v4l2 (Video4Linux2) interface.

Each HTTP request will initialize v4l2, set the image format to JPEG, and specify the resolution. After capturing the image, the data will be sent as a response, and the v4l2 stream will be stopped. Below is an example code snippet that demonstrates this process:
#include <errno.h>
#include <fcntl.h>
#include <linux/videodev2.h>
#include <stdint.h>
#include <stdio.h>
#include <string.h>
#include <sys/ioctl.h>
#include <sys/mman.h>
#include <unistd.h>
#include "cpp-httplib/httplib.h"

#include <utils/Log.h>
#include <android-base/logging.h>

uint8_t *buffer;
size_t bufferLength;
int fd;

static int xioctl(int fd, int request, void *arg)
{
    int r;
    do r = ioctl(fd, request, arg);
    while (-1 == r && EINTR == errno);

    if (r == -1) {
        ALOGE("xioctl error: %d, %s", errno, strerror(errno));
    }

    return r;
}

int print_caps(int fd)
{
    struct v4l2_capability caps = {};
    if (-1 == xioctl(fd, VIDIOC_QUERYCAP, &caps))
    {
        ALOGE("Querying Capabilities");
        return 1;
    }

    ALOGI("Driver Caps:\n"
          "  Driver: \"%s\"\n"
          "  Card: \"%s\"\n"
          "  Bus: \"%s\"\n"
          "  Version: %d.%d\n"
          "  Capabilities: %08x\n",
          caps.driver,
          caps.card,
          caps.bus_info,
          (caps.version >> 16) & 0xff,
          (caps.version >> 24) & 0xff,
          caps.capabilities);

    v4l2_format format;
    format.type = V4L2_BUF_TYPE_VIDEO_CAPTURE;
    format.fmt.pix.pixelformat = V4L2_PIX_FMT_MJPEG;
    format.fmt.pix.width = 1280;
    format.fmt.pix.height = 720;
    LOG(INFO) << __FILE__ << ":" << __LINE__ << " Requesting format: "
              << ((char*)&format.fmt.pix.pixelformat)[0]
              << ((char*)&format.fmt.pix.pixelformat)[1]
              << ((char*)&format.fmt.pix.pixelformat)[2]
              << ((char*)&format.fmt.pix.pixelformat)[3]
              << "(" << std::hex << std::setw(8)
              << format.fmt.pix.pixelformat << ")";

    if (ioctl(fd, VIDIOC_S_FMT, &format) < 0) {
        LOG(ERROR) << __FILE__ << ":" << __LINE__ << " VIDIOC_S_FMT failed " << strerror(errno);
    }

    format.type = V4L2_BUF_TYPE_VIDEO_CAPTURE;
    if (ioctl(fd, VIDIOC_G_FMT, &format) == 0) {
        LOG(INFO) << "Current output format:  "
                  << "fmt=0x" << std::hex << format.fmt.pix.pixelformat << ", " << std::dec
                  << format.fmt.pix.width << " x " << format.fmt.pix.height
                  << ", pitch=" << format.fmt.pix.bytesperline;

        if (format.fmt.pix.pixelformat == V4L2_PIX_FMT_MJPEG) {
            ALOGI("V4L2_PIX_FMT_MJPEG detected");
        }
        if (format.fmt.pix.pixelformat == V4L2_PIX_FMT_YUYV) {
            ALOGI("V4L2_PIX_FMT_YUYV detected");
        }
    } else {
        LOG(ERROR) << "VIDIOC_G_FMT failed";
    }

    return 0;
}

int init_mmap(int fd)
{
    struct v4l2_requestbuffers req{};
    req.count = 1;
    req.type = V4L2_BUF_TYPE_VIDEO_CAPTURE;
    req.memory = V4L2_MEMORY_MMAP;

    if (-1 == xioctl(fd, VIDIOC_REQBUFS, &req))
    {
        perror("Requesting Buffer");
        return 1;
    }

    struct v4l2_buffer buf{};
    buf.type = V4L2_BUF_TYPE_VIDEO_CAPTURE;
    buf.memory = V4L2_MEMORY_MMAP;
    buf.index = 0;
    if (-1 == xioctl(fd, VIDIOC_QUERYBUF, &buf))
    {
        perror("Querying Buffer");
        return 1;
    }

    buffer = (uint8_t *)mmap(NULL, buf.length, PROT_READ | PROT_WRITE, MAP_SHARED, fd, buf.m.offset);
    bufferLength = buf.length;
    ALOGI("Length: %d\nAddress: %p\n", buf.length, buffer);
    ALOGI("Image Length: %d\n", buf.bytesused);

    return 0;
}

size_t capture_image(int fd)
{
    struct v4l2_buffer buf{};
    buf.type = V4L2_BUF_TYPE_VIDEO_CAPTURE;
    buf.memory = V4L2_MEMORY_MMAP;
    buf.index = 0;
    if (-1 == xioctl(fd, VIDIOC_QBUF, &buf))
    {
        perror("Query Buffer");
        return 0;
    }

    if (-1 == xioctl(fd, VIDIOC_STREAMON, &buf.type))
    {
        perror("Start Capture");
        return 0;
    }

    fd_set fds;
    FD_ZERO(&fds);
    FD_SET(fd, &fds);
    struct timeval tv{};
    tv.tv_sec = 2;
    int r = select(fd + 1, &fds, NULL, NULL, &tv);
    if (-1 == r)
    {
        perror("Waiting for Frame");
        return 0;
    }

    if (-1 == xioctl(fd, VIDIOC_DQBUF, &buf))
    {
        perror("Retrieving Frame");
        return 0;
    }

    return buf.bytesused;
}

bool initGetPhoto()
{
    fd = open("/dev/video0", O_RDWR);
    if (fd == -1)
    {
        perror("Opening video device");
        return false;
    }

    if (print_caps(fd))
        return false;

    if (init_mmap(fd))
        return false;

    return true;
}

bool closeGetPhoto()
{
    int type = V4L2_BUF_TYPE_VIDEO_CAPTURE;
    if (ioctl(fd, VIDIOC_STREAMOFF, &type) == -1) {
        perror("VIDIOC_STREAMOFF");
    }

    // Tell the L4V2 driver to release our streaming buffers
    v4l2_requestbuffers bufrequest;
    bufrequest.type = V4L2_BUF_TYPE_VIDEO_CAPTURE;
    bufrequest.memory = V4L2_MEMORY_MMAP;
    bufrequest.count = 0;
    ioctl(fd, VIDIOC_REQBUFS, &bufrequest);

    close(fd);

    return true;
}

void getPhotoTask()
{
    ALOGI("getPhotoTask starting ");
    ALOGI("HTTPServer starting ");

    httplib::Server svr;

    svr.Get("/", [](const httplib::Request &, httplib::Response &res) {
        ALOGI("HTTPServer New request /");

        bool result = initGetPhoto();
        ALOGI("initGetPhoto %b", result);
        size_t imgSize = capture_image(fd);
        ALOGI("capture_image %zu", imgSize);

        closeGetPhoto();
        res.set_content((char *)buffer, imgSize, "image/jpeg");
    });

    ALOGI("HTTPServer listen");
    svr.listen("0.0.0.0", 8081);
}
How the code works
1. Initialization : The initGetPhoto() function opens the video device (/dev/video0) and sets up the necessary format and memory mappings for capturing images using the v4l2 interface.
2. Image Capture : The capture_image() function captures an image from the video stream. It uses select() to wait for the frame and then dequeues the buffer containing the image.
3. HTTP Server : The getPhotoTask() function starts an HTTP server using the cpp-httplib library. When a request is received, the server initializes the camera, captures an image, and sends it as a JPEG response.
4. Cleanup : After capturing the image and sending it, the closeGetPhoto() function stops the video stream, releases the buffers, and closes the video device.
This setup ensures that each image is captured on demand, allowing the application to control when the camera is active and minimizing unnecessary resource usage.
Conclusion
In this article, we walked through the process of creating an Android companion app that allows users to control HVAC functions and retrieve images from a car's camera system using a simple HTTP interface. The application was developed in Android Studio, where we designed a user-friendly interface and implemented functionality to adjust the vehicle's temperature and capture images remotely. On the server side, we extended the EVS Driver by incorporating a custom thread to handle HTTP requests and capture images using v4l2, providing a basic yet effective solution for remote vehicle interaction.
This project serves as a conceptual demonstration of integrating smartphone-based controls with automotive systems, but it’s important to recognize that there is significant potential for improvement and expansion. For instance, enhancing the data handling layer to provide more robust error checking, utilizing the HTTP/2 protocol for faster and more efficient communication, and creating a more seamless integration with the EVS Driver could greatly improve the performance and reliability of the system.
In its current form, this solution offers a foundational approach that could be expanded into a more sophisticated application, capable of supporting a wider range of automotive functions and delivering a more polished user experience. Future developments could also explore more advanced security features, improved data formats, and tighter integration with the broader ecosystem of Android Automotive OS to fully leverage the capabilities of modern vehicles.

How to build real-time notification service using Server-Sent Events (SSE)
Most of the communication on the Internet comes directly from the clients to the servers. The client usually sends a request, and the server responds to that request. It is known as a client-server model, and it works well in most cases. However, there are some scenarios in which the server needs to send messages to the clients. In such cases, we have a couple of options: we can use short and long polling, webhooks, websockets, or event streaming platforms like Kafka. However, there is another technology, not popularized enough, which in many cases, is just perfect for the job. This technology is the Server-Sent Events (SSE) standard.
Learn more about services provided by Grape Up
You are at Grape Up blog, where our experts share their expertise gathered in projects delivered for top enterprises. See how we work.
Enabling the automotive industry to build software-defined vehicles
Empowering insurers to create insurance telematics platforms
Providing AI & advanced analytics consulting
What are Server-Sent Events?
SSE definition states that it is an http standard that allows a web application to handle a unidirectional event stream and receive updates whenever the server emits data. In simple terms, it is a mechanism for unidirectional event streaming.
Browsers support
It is currently supported by all major browsers except Internet Explorer.
Message format
The events are just a stream of UTF-8 encoded text data in a format defined by the Specification. The important aspect here is that the format defines the fields that the SSE message should have, but it does not mandate a specific type for the payload, leaving the freedom of choice to the users.
{
"id": "message id <optional>",
"event": "event type <optional>",
"data": "event data –plain text, JSON, XML… <mandatory>"
}
SSE Implementation
For the SSE to work, the server needs to tell the client that the response’s content-type is text/eventstream . Next, the server receives a regular HTTP request, and leaves the HTTP connection open until no more events are left or until the timeout occurs. If the timeout occurs before the client receives all the events it expects, it can use the built-in reconnection mechanism to reestablish the connection.
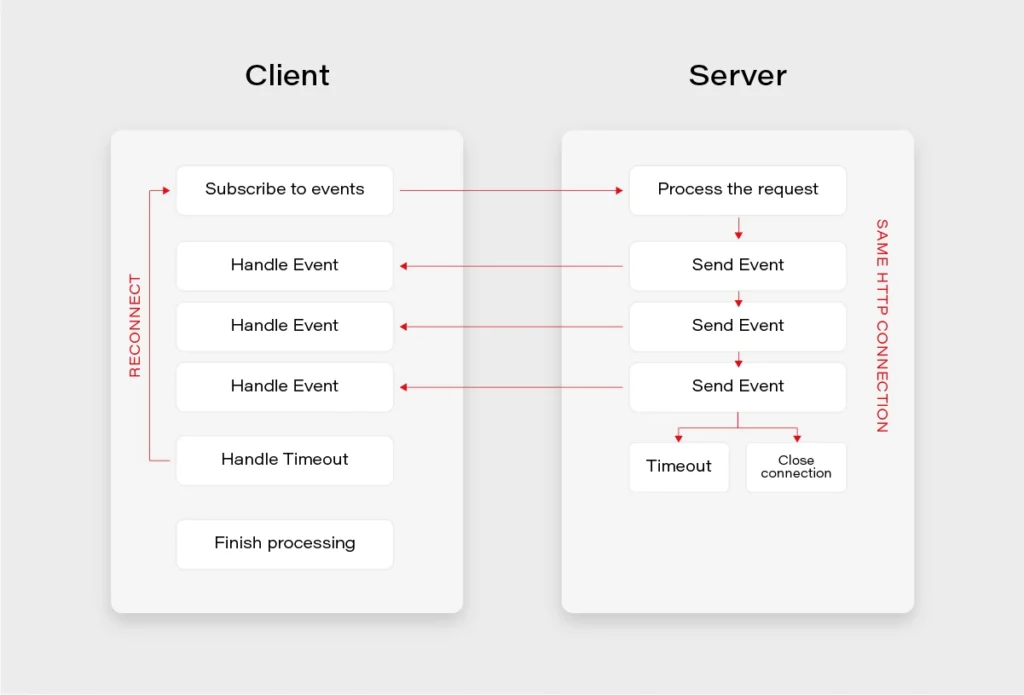
Simple endpoint (Flux):
The simplest implementation of the SSE endpoint in Spring can be achieved by:
- Specifying the produced media type as text/event-stream,
- Returning Flux type, which is a reactive representation of a stream of events in Java.
@GetMapping(path = "/stream-flux", produces = MediaType.TEXT_EVENT_STREAM_VALUE)
public Flux<String> streamFlux() {
return Flux.interval(Duration.ofSeconds(1))
.map(sequence -> "Flux - " + LocalTime.now().toString());
ServerSentEvent class:
Spring introduced support for SSE specification in version 4.2 together with a ServerSentEvent class. The benefit here is that we can skip the text/event-stream media type explicit specification, as well as we can add metadata such as id or event type.
@GetMapping("/sse-flux-2")
public Flux<ServerSentEvent> sseFlux2() {
return Flux.interval(Duration.ofSeconds(1))
.map(sequence -> ServerSentEvent.builder()
.id(String.valueOf(sequence))
.event("EVENT_TYPE")
.data("SSE - " + LocalTime.now().toString())
.build());
}
SseEmitter class:
However, the full power of SSE comes with the SseEmitter class. It allows for asynchronous processing and publishing of the events from other threads. What is more, it is possible to store the reference to SseEmitter and retrieve it on subsequent client calls. This provides a huge potential for building powerful notification scenarios.
@GetMapping("/sse-emitter")
public SseEmitter sseEmitter() {
SseEmitter emitter = new SseEmitter();
Executors.newSingleThreadExecutor().execute(() -> {
try {
for (int i = 0; true; i++) {
SseEmitter.SseEventBuilder event = SseEmitter.event()
.id(String.valueOf(i))
.name("SSE_EMITTER_EVENT")
.data("SSE EMITTER - " + LocalTime.now().toString());
emitter.send(event);
Thread.sleep(1000);
}
} catch (Exception ex) {
emitter.completeWithError(ex);
}
});
return emitter;
}
Client example:
Here is a basic SSE client example written in Javascript. It simply defines an EventSource and subscribes to the message event stream in two different ways.
// Declare an EventSource
const eventSource = new EventSource('http://some.url');
// Handler for events without an event type specified
eventSource.onmessage = (e) => {
// Do something - event data etc will be in e.data
};
// Handler for events of type 'eventType' only
eventSource.addEventListener('eventType', (e) => {
// Do something - event data will be in e.data,
// message will be of type 'eventType'
});
SSE vs. Websockets
When it comes to SSE, it is often compared to Websockets due to usage similarities between both of the technologies.
- Both are capable of pushing data to the client,
- Websockets are bidirectional – SSE unidirectional,
- In practice, everything that can be done with SSE, and can also be achieved with Websockets,
- SSE can be easier,
- SSE is transported over a simple HTTP connection,
- Websockets require full duplex-connection and servers to handle the protocol,
- Some enterprise firewalls with packet inspection have trouble dealing with Websockets – for SSE that’s not the case,
- SSE has a variety of features that Websockets lack by design, e.g., automatic reconnection, event ids,
- Only Websockets can send both binary and UTF-8 data, SSE is limited to UTF-8,
- SSE suffers from a limitation to the maximum number of open connections (6 per browser + domain). The issue was marked as Won’t fix in Chrome and Firefox.
Use Cases:
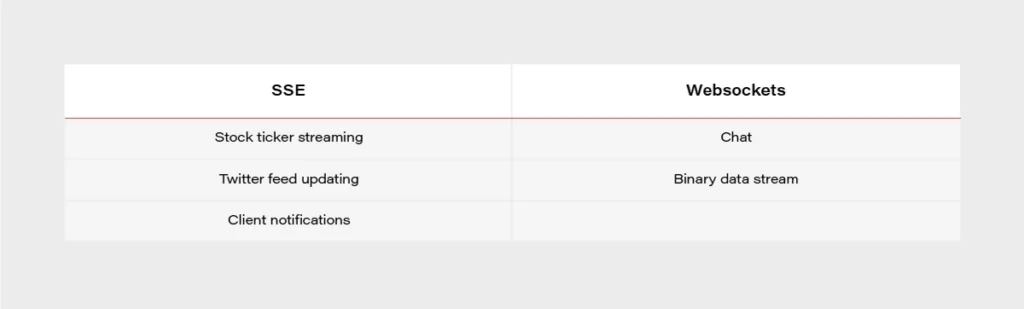
Notification Service Example:
A controller providing a subscribe to events and a publish events endpoints.
@Slf4j
@RestController
@RequestMapping("/events")
@RequiredArgsConstructor
public class EventController {
public static final String MEMBER_ID_HEADER = "MemberId";
private final EmitterService emitterService;
private final NotificationService notificationService;
@GetMapping
public SseEmitter subscribeToEvents(@RequestHeader(name = MEMBER_ID_HEADER) String memberId) {
log.debug("Subscribing member with id {}", memberId);
return emitterService.createEmitter(memberId);
}
@PostMapping
@ResponseStatus(HttpStatus.ACCEPTED)
public void publishEvent(@RequestHeader(name = MEMBER_ID_HEADER) String memberId, @RequestBody EventDto event) {
log.debug("Publishing event {} for member with id {}", event, memberId);
notificationService.sendNotification(memberId, event);
}
}
A service for sending the events:
@Service
@Primary
@AllArgsConstructor
@Slf4j
public class SseNotificationService implements NotificationService {
private final EmitterRepository emitterRepository;
private final EventMapper eventMapper;
@Override
public void sendNotification(String memberId, EventDto event) {
if (event == null) {
log.debug("No server event to send to device.");
return;
}
doSendNotification(memberId, event);
}
private void doSendNotification(String memberId, EventDto event) {
emitterRepository.get(memberId).ifPresentOrElse(sseEmitter -> {
try {
log.debug("Sending event: {} for member: {}", event, memberId);
sseEmitter.send(eventMapper.toSseEventBuilder(event));
} catch (IOException | IllegalStateException e) {
log.debug("Error while sending event: {} for member: {} - exception: {}", event, memberId, e);
emitterRepository.remove(memberId);
}
}, () -> log.debug("No emitter for member {}", memberId));
}
}
To sum up, Server-Sent Events standard is a great technology when it comes to a unidirectional stream of data and often can save us a lot of trouble compared to more complex approaches such as Websockets or distributed streaming platforms.
A full notification service example implemented with the use of Server-Sent Events can be found on my github: https://github.com/mkapiczy/server-sent-events
If you're looking to build a scalable, real-time notification system or need expert guidance on modern software solutions, Grape Up can help . Our engineering teams help enterprises design, develop, and optimize their software infrastructure.
Get in touch to discuss your project and see how we can support your business.
Sources:
- https://www.baeldung.com/spring-server-sent-events
- https://www.w3.org/TR/eventsource/
- https://stackoverflow.com/questions/5195452/websockets-vs-server-sent-events-eventsource
- https://www.telerik.com/blogs/websockets-vs-server-sent-events
- https://simonprickett.dev/a-look-at-server-sent-events/
Generative AI for connected cars: Solution-oriented chatbots for personalized user support
Generative AI is becoming a major player in automotive innovation. The market is already valued at USD 480.22 million in 2024 , and it’s expected to grow to USD 3,900.03 million by 2034, with a steady annual growth rate of 23.3%. Moreover, by 2025, the global automobile sector will invest $11.1 billion in cognitive and AI technologies. These numbers show how quickly the industry is picking up on this technology’s potential.
GenAI is making its mark across various areas. From manufacturing optimization to autonomous driving, its impact is undeniable. Predictive maintenance systems identify issues early, AI-powered tools optimize vehicle development, and talking to in-car assistants is starting to feel like a scene out of a sci-fi movie.
Speaking of sci-fi, pop culture has always loved the idea of talking cars. There is K.I.T.T. (Knight Industries Two Thousand), of course, but also all Transformers and tons of cartoons, starting with Lightning McQueen. Is it just pure fiction? Not at all (except McQueen, for many reasons 😊)! Early attempts at smarter cars started with examples like a 2004 Honda offering voice-controlled navigation and Ford’s 2007 infotainment system. Fast forward to now, and we have a VW Golf with a GPT-based assistant that’s more conversational than ever.
But honestly, the most resourceful one is K.I.T.T. – it activates all onboard systems, diagnoses itself, and uses company resources (there is an episode when K.I.T.T. withdraws money from the company bank account using an ATM). In 1982, when the show first aired, it was just pure science fiction. But what about now? Is it more science or fiction? With Generative AI growing rapidly in automotive, we have to revisit that question.
Let’s break it down!
Prerequisites
Let’s assume we would like to create a solution-oriented chatbot connected with a car. By “solution-oriented,” I mean one that is really useful, able not only to change the attractive interior lighting but also to truly solve owners’ issues.
The idea is to use Generative AI, a large language model with its abilities in reasoning, problem-solving, and language processing.
Therefore, the first question is – where should the model be planted – in the cloud or a car?
For the first option, you need a constant Internet connection (which is usually not guaranteed in cars). In contrast, the second option typically involves a smaller and less versatile model, and you still need a lot of resources (hardware, power) to run it. The truth lies, as usual, in between (cloud model if available, local one otherwise), but today we’ll focus on the cloud model only.
The next step is to consider the user-facing layer. The perfect one is integrated into the car, isn’t it? Well, in most cases, yes, but there are some drawbacks.
The first issue is user-oriented – if you want to interact with your car when being outside of it, your mobile phone is probably the most convenient option (or a smartwatch, like Michael from Knight Rider). Also, infotainment systems are comprehensively tested and usually heavily sealed into cars, so introducing such a bot is very time-consuming. Therefore, the mobile phone is our choice.
We don’t want to focus on this application today, however. Depending on the target operating system, it probably should use speech-to-text recognition and text-to-speech generation and stream data both ways for a better user experience.
The core part is the chatbot backend – a regular application connecting the frontend and the LLM. It should be able to call external APIs and use two sources of knowledge – live car data and company-owned data sources.
Basics
Let’s gather the components. There is a customer-facing layer – the mobile application; then there is our main backend application, the LLM, of course, and some services to provide data and functionalities.

The diagram above is conceptual, of course. The backend is probably cloud-hosted, too, and cloud services linked to car services form the essence of the “connected cars” pattern.
The main concept for the application is “tool calling” – the LLM ability to call predefined functions with structuralized arguments. That’s why the backend is surrounded by different services. In a perfect world, those should be separated microservices designed for different use cases. However, this architecture is not scenario-based. There is no “if-else-if” ladder or so. The LLM determines how to utilize the tools based on its own decision-making process.
The sample conversation schema might look like the one presented below.

As you can see, the chatbot service calls the LLM, and the LLM returns command “call function A.” Then, the service calls the function and returns the response to the LLM (not the user!).
This approach is very flexible as functions (a.k.a. tools) might execute actions and return useful data. Also, the LLM may decide to use a function based on another function result. In the case above, it can, for example, use one function to check the climate control system status and discover that it’s running in the “eco mode”. Then, it might decide to call the “set mode” function with the argument “max AC” to change the mode. After that, the LLM can return an answer to the user with a message like “It should be fixed now”.
To build such an application, all you need to call the LLM like that (OpenAI GPT-4o example):
{
  "model": "gpt-4o",
  "messages": [
    {
      "role": "user",
      "content": "My AC is ineffective! Fix it!"
    }
  ],
  "tools": [
    {
      "type": "function",
      "function": {
        "name": "get AC status",
        "description": "Return current status of the climate control system"
      }
    },
    {
      "type": "function",
      "function": {
        "name": "set AC mode",
        "description": "Sets up the specified mode for the climate control system",
        "parameters": {
          "type": "object",
          "properties": {
            "mode": {
              "type": "string",
              "description": "Desired mode",
              "enum": ["ECO", “NORMAL”, "MAX AC"]
            }
          },
          "required": ["mode"]
        }
      }
    }
  ],
  "tool_choice": "auto"
}
As you can see, the response schema does not bother us here – the assumption is that the LLM is able to understand any reasonable response.
Dive
The subtitle should be a “deep dive”, but honestly, we’re just scratching the surface today. Nevertheless, let’s focus a little bit more.
So far, we have the user-facing application and the backend service. Now, let’s make it useful.
The AC example mentioned above is perfectly valid, but how can it be achieved? Let’s say there is an API for interaction with the AC in the car. It’s typical for all PHEVs and EVs and available for some HEVs, too, when you can turn on your AC remotely via the mobile app. However, the real value lies in the connected car
There is no IP address of the car hardcoded in the application. Usually, there is a digital twin in the cloud (a cloud service that represents the car). The application calls the twin, and the twin notifies the vehicle. There should also be some pub/sub queue in between to handle connectivity tier disruptions. Also, the security layer is extremely important. We don’t want anybody even to play the radio at max volume during a quiet night ride, not to mention turning off the lights or engaging breaks.
Which brings us to the list of possible actions.
Let’s assume all systems in the car are somehow connected, maybe using a common bus or a more modern ethernet-like network. Still, some executors, such as brakes, should be isolated from the system.
So, there is no “brake API” to stop a car. However, it may be beneficial for mechanics to execute some "dangerous" actions programmatically, e.g., to increase the pressure in the braking system without actually pressing the pedal. If this is the case, such functionalities should be accessible exclusively through a local connection without the need for digital twin integration. Therefore, we can assume there are two systems in the car – local and cloud-integrated, no matter the nature of the isolation (physical, network, or software). Let’s focus on the connected car aspect.
I believe the system should be able to change the vehicle settings, even if there is a risk that the driver could be surprised by an unauthorized change in the steering feel while taking a turn. This way, the chatbot might be useful and reduce support load by adjusting car settings based on the user's preferences. To avoid misusage, we can instruct the chatbot by prompt engineering to confirm each change with the user before execution and, of course, implement best-in-class security for all components. We can also allow certain operations only if the car is parked.
Which brings us back to the list of possible actions.
For the sake of this article, let’s assume the chatbot can change various car settings. Examples include:
- Climate control settings
- Driver assistant sensitivity and specific functions toggles
- Navigation System settings, like route type or other functions toggles
- 360 camera system settings, like brightness adjustment
- Sound system settings like equalizer
- Wiper settings
- Notifications settings
- Active steering system settings
This list is not complete, and the best thing is – it doesn’t need to be, as adding new functions (tool definition + API availability) might be a part of the future system OVA update.
What about reading real-time data? Should we connect to the car directly and read the status? Let’s leave this option for another article 😉 and focus on communication via the cloud.
There are two possibilities.
We can provide more tools to get data per source/component (a reminder – LLM decides to call for data, which then triggers an API call, and the LLM processes the received response). Alternatively, we could implement a single tool, “get vehicle data,” that collects and merges all data available from all data sources.
For the latter approach, two ways are available – do we really need a tool? Maybe we should inject the current state into each conversation, as it’s probably beneficial to have the current state anyway to solve all cases?
Let me give the standard consultant reply to those questions.
It depends.
More data in the context means extended response time and a higher bill. Also, some cases don’t need the entire context or don’t need it at all. On the other hand, if you let the LLM decide which part of the context is necessary (which function to call), it will also affect the time and cost.
The next part is the “cost” of collecting data. Some data sources might be slow or consume valuable in-car resources to calculate (maybe not appropriate) data.
My advice would be to start collecting all data in the background during session creation and attach it to the session progressively when ready. Additionally, provide the LLM with the capability to wait for data if it has not yet been supplied. This should be implemented as a function to handle instances where the user requests data-related action, but the necessary data is not yet available
The second part is splitting the data. You can use a much smaller LLM to decide which context data is necessary to answer the current question and remove unnecessary information to keep it concise.
The last part is company data. All LLM models are trained based on thousands of manuals available over the Internet, but this is usually not sufficient. Your chatbot should have the car manual at its fingertips, so the general knowledge is not enough. Therefore, you need to provide it. You can execute the RAG procedure and add some content to the context for each prompt, but my advice would be to hide it behind a function, too. Then, the LLM may decide when to call it to get some extra information if needed.
Use cases of Generative AI for connected cars
OK, we have all the components in place – there is the frontend, the backend, the model, and the toolbox. Can it be useful? As you would expect!
In the examples below, I will skip the part where the LLM commands the backend to perform an action, and the backend calls an API. I will also omit the process of the API response traveling back through the backend to the LLM. Additionally, I will assume that no new data is added to the context, so the LLM must decide which data it needs. Besides that, make sure that your context contains some system prompts to better explain all possibilities to the assistant.
Here are some examples.
User: I think my Lane Keeping Assist activates too frequently. Can you check it?
Assistant: [get driver assistance settings]
Assistant: [diagnose sensors]
Assistant: Everything looks good, but I can see that the Lane Keeping Assist mode is set to “fast”. Do you want me to lower the setting to “medium”?
User: Yes, please.
Assistant: [change LKA settings]
Assistant: It should be better now.
In the example above, the user has a problem with one of the driver assistance components. The system proposes and, after confirmation, executes settings changes, so the driver doesn’t need to find a proper setting in the on-board computer.
Check another case.
User: Whenever I’m parking the car in my garage, I can barely see anything in my rear camera. There is not much light there, but maybe you help me in some other way?
Assistant: [get camera settings]
Assistant: I can increase the brightness of the camera, but then it might be too bright for other places. What do you think?
User: Yes, please do that.
Assistant: [change settings]
Assistant: Here you are; let me know if you want me to roll back the change.
Usually, there is no brightness setting available for the user. To adjust it, the user would need to schedule a service department meeting, spend some time, and pay for the facility. The assistant may do it in a few seconds for free.
User: There are so many notifications in the car, so I can’t hear the important ones!
Assistant: [check last notifications]
Assistant: If you find some of my notifications unnecessary, I can mute some of them. What do you think?
User: Yes, please turn off the speeding avoidance warning.
Assistant: I can’t turn it off due to legal requirements, but I can replace the sound with vibration. feedback on the acceleration pedal. Do you want me to do that?
User: Sounds great!
Assistant: [adjust settings]
Assistant: It’s done. I hope you’ll be less distracted.
In this case, the assistant solves the issue of annoying notifications. Note the alternative solution suggestion and knowledge about the legal aspect. We can achieve it with proper function descriptions.
User: It seems my car can’t connect to the Internet.
Assistant: [check the connection] -> no connection to the car from the cloud service
Assistant: It seems your car is disconnected. Can you please check the cellular network signal icon on the infotainment main screen?
User: I can see the signal is good.
Assistant: [check last logs]
Assistant: I can see there were some issues with your connection before. Please try to open the settings in the car infotainment and restart the communication module. I’ll guide you through the process.
User: OK, what should I do?
Assistant: [check user manual]
Assistant: Go to “Settings”, then “Connectivity”, then “Cellular” and then click “Restart module”. Confirm when asked.
User: OK
Assistant: [check the connection]
Assistant: I can see the connection is restored. Can you confirm that? If not, I can schedule a service meeting for you.
User: No need; it works now!
In the last example, the Assistant guides the user using logs, the manual, and after checking real-time conditions. Without the LLM, the user would need to visit the dealer or at least use online support assistance.
Final words
With modern technology, we can bring some science fiction concepts to real life. Maybe WARP speed is not possible yet, but at least a car itself can give us solutions to problems recently solved only in much more expensive ways.
The beauty of it is – it’s really simple. Of course, there is a user-facing application to be made, the security to be ensured, and a bunch of functions to be implemented, but with modern connected cars, those elements are in place anyway. The tricky, novel part is a very simple application that uses the LLM as the brain power of the system.
As you can see the “ Attention is all you need ” paper that started the LLM revolution has allowed humanity to bring to life concepts present in our culture for decades. On the other hand, would this article have been ever written if its authors hadn’t watched the K.I.T.T. in their childhood? We will never know.

LLM comparison: Find the best fit for legacy system rewrites
Legacy systems often struggle with performance, are vulnerable to security issues, and are expensive to maintain. Despite these challenges, over 65% of enterprises still rely on them for critical operations.
At the same time, modernization is becoming a pressing business need, with the application modernization services market valued at $17.8 billion in 2023 and expected to grow at a CAGR of 16.7%.
This growth highlights a clear trend: businesses recognize the need to update outdated systems to keep pace with industry demands.
The journey toward modernization varies widely. While 75% of organizations have started modernization projects, only 18% have reached a state of continuous improvement.
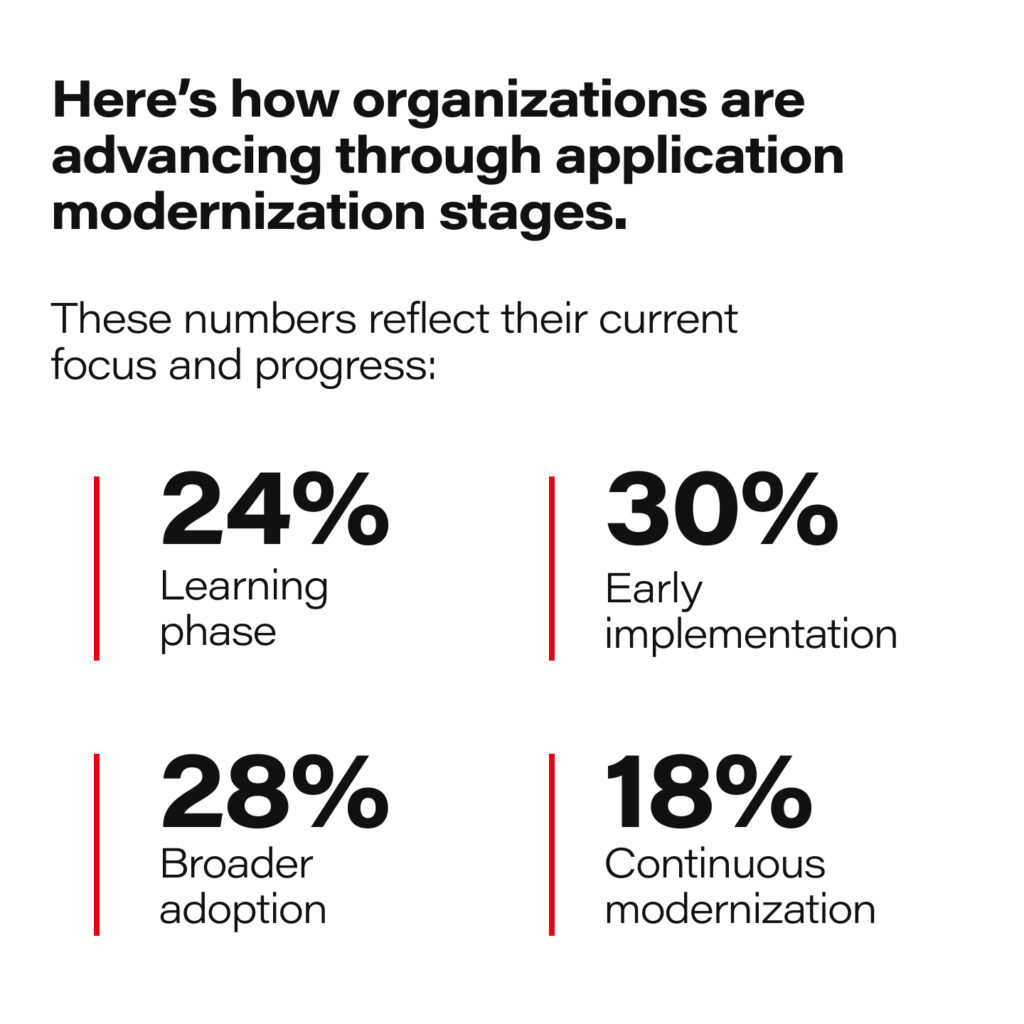
Data source: https://www.redhat.com/en/resources/app-modernization-report
For many, the process remains challenging, with a staggering 74% of companies failing to complete their legacy modernization efforts. Security and efficiency are the primary drivers, with over half of surveyed companies citing these as key motivators.
Given these complexities, the question arises: Could Generative AI simplify and accelerate this process?
With the surging adoption rates of AI technology, it’s worth exploring if Generative AI has a role in rewriting legacy systems.
This article explores LLM comparison, evaluating GenAI tools' strengths, weaknesses, and potential risks. The decision to use them ultimately lies with you.
Here's what we'll discuss:
- Why Generative AI?
- The research methodology
- Generative AI tools: six contenders for LLM comparison
- OpenAI backed by ChatGPT-4o
- Claude-3-sonnet
- Claude-3-opus
- Claude-3-haiku
- Gemini 1.5 Flash
- Gemini 1.5 Pro
- Comparison summary
Why Generative AI?
Traditionally, updating outdated systems has been a labor-intensive and error-prone process. Generative AI offers a solution by automating code translation, ensuring consistency and efficiency. This accelerates the modernization of legacy systems and supports cross-platform development and refactoring.
As businesses aim to remain competitive, using Generative AI for code transformation is crucial, allowing them to fully use modern technologies while reducing manual rewrite risks.
Here are key reasons to consider its use:
- Uncovering dependencies and business logic - Generative AI can dissect legacy code to reveal dependencies and embedded business logic, ensuring essential functionalities are retained and improved in the updated system.
- Decreased development time and expenses - automation drastically reduces the time and resources required for system re-writing. Quicker development cycles and fewer human hours needed for coding and testing decrease the overall project cost.
- Consistency and accuracy - manual code translation is prone to human error. AI models ensure consistent and accurate code conversion, minimizing bugs and enhancing reliability.
- Optimized performance - Generative AI facilitates the creation of optimized code from the beginning, incorporating advanced algorithms that enhance efficiency and adaptability, often lacking in older systems.
The LLM comparison research methodology
It could be tough to compare different Generative AI models to each other. It’s hard to find the same criteria for available tools. Some are web-based, some are restricted to a specific IDE, some offer a “chat” feature, and others only propose a code.
As our goal was the re-writing of existing projects , we aimed to create an LLM comparison based on the following six main challenges while working with existing code:
- Analyzing project architecture - understanding the architecture is crucial for maintaining the system's integrity during re-writing. It ensures the new code aligns with the original design principles and system structure.
- Analyzing data flows - proper analysis of data flows is essential to ensure that data is processed correctly and efficiently in the re-written application. This helps maintain functionality and performance.
- Generating historical b acklog - this involves querying the Generative AI to create Jira (or any other tracking system) tickets that could potentially be used to rebuild the system from scratch. The aim is to replicate the workflow of the initial project implementation. These "tickets" should include component descriptions and acceptance criteria.
- Converting code from one programming language to another - language conversion is often necessary to leverage modern technologies. Accurate translation preserves functionality and enables integration with contemporary systems.
- Generating new code - the ability to generate new code, such as test cases or additional features, is important for enhancing the application's capabilities and ensuring comprehensive testing.
- Privacy and security of a Generative AI tool - businesses are concerned about sharing their source codebase with the public internet. Therefore, work with Generative AI must occur in an isolated environment to protect sensitive data.
Source projects overview
To test the capabilities of Generative AI, we used two projects:
- Simple CRUD application - The project utilizes .Net Core as its framework, with Entity Framework Core serving as the ORM and SQL Server as the relational database. The target application is a backend system built with Java 17 and Spring Boot 3.
- Microservice-based application - The application is developed with .Net Core as its framework, Entity Framework Core as the ORM, and the Command Query Responsibility Segregation (CQRS) pattern for handling entity operations. The target system includes a microservice-based backend built with Java 17 and Spring Boot 3, alongside a frontend developed using the React framework

Generative AI tools: six contenders for LLM comparison
In this article, we will compare six different Generative AI tools used in these example projects:
- OpenAI backed by ChatGPT-4o with a context of 128k tokens
- Claude-3-sonnet - context of 200k tokens
- Claude-3-opus - context of 200k tokens
- Claude-3-haiku - context of 200k tokens
- Gemini 1.5 Flash - context of 1M tokens
- Gemini 1.5 Pro - context of 2M tokens
OpenAI
OpenAI's ChatGPT-4o represents an advanced language model that showcases the leading edge of artificial intelligence technology. Known for its conversational prowess and ability to manage extensive contexts, it offers great potential for explaining and generating code.
- Analyzing project architecture
ChatGPT faces challenges in analyzing project architecture due to its abstract nature and the high-level understanding required. The model struggles with grasping the full context and intricacies of architectural design, as it lacks the ability to comprehend abstract concepts and relationships not explicitly defined in the code.
- Analyzing data flows
ChatGPT performs better at analyzing data flows within a program. It can effectively trace how data moves through a program by examining function calls, variable assignments, and other code structures. This task aligns well with ChatGPT's pattern recognition capabilities, making it a suitable application for the model.
- Generating historical backlog
When given a project architecture as input, OpenAI can generate high-level epics that capture the project's overall goals and objectives. However, it struggles to produce detailed user stories suitable for project management tools like Jira, often lacking the necessary detail and precision for effective use.
- Converting code from one programming language to another
ChatGPT performs reasonably well in converting code, such as from C# to Java Spring Boot, by mapping similar constructs and generating syntactically correct code. However, it encounters limitations when there is no direct mapping between frameworks, as it lacks the deep semantic understanding needed to translate unique framework-specific features.
- Generating new code
ChatGPT excels in generating new code, particularly for unit tests and integration tests. Given a piece of code and a prompt, it can generate tests that accurately verify the code's functionality, showcasing its strength in this area.
- Privacy and security of the Generative AI tool
OpenAI's ChatGPT, like many cloud-based AI services, typically operates over the internet. However, there are solutions to using it in an isolated private environment without sharing code or sensitive data on the public internet. To achieve this, on-premise deployments such as Azure OpenAI can be used, a service offered by Microsoft where OpenAI models can be accessed within Azure's secure cloud environment.
Best tip
Use Reinforcement Learning from Human Feedback (RLHF): If possible, use RLHF to fine-tune GPT-4. This involves providing feedback on the AI's outputs, which it can then use to improve future outputs. This can be particularly useful for complex tasks like code migration.
Overall
OpenAI's ChatGPT-4o is a mature and robust language model that provides substantial support to developers in complex scenarios. It excels in tasks like code conversion between programming languages, ensuring accurate translation while maintaining functionality.
- Possibilities 3/5
- Correctness 3/5
- Privacy 5/5
- Maturity 4/5
Overall score: 4/5
Claude-3-sonnet
Claude-3-Sonnet is a language model developed by Anthropic, designed to provide advanced natural language processing capabilities. Its architecture is optimized for maintaining context over extended interactions, offering a balance of intelligence and speed.
- Analyzing project architecture
Claude-3-Sonnet excels in analyzing and comprehending the architecture of existing projects. When presented with a codebase, it provides detailed insights into the project's structure, identifying components, modules, and their interdependencies. Claude-3-Sonnet offers a comprehensive breakdown of project architecture, including class hierarchies, design patterns, and architectural principles employed.
- Analyzing data flows
It struggles to grasp the full context and nuances of data flows, particularly in complex systems with sophisticated data transformations and conditional logic. This limitation can pose challenges when rewriting projects that heavily rely on intricate data flows or involve sophisticated data processing pipelines, necessitating manual intervention and verification by human developers.
- Generating historical backlog
Claude-3-Sonnet can provide high-level epics that cover main functions and components when prompted with a project's architecture. However, they lack detailed acceptance criteria and business requirements. While it may propose user stories to map to the epics, these stories will also lack the details needed to create backlog items. It can help capture some user goals without clear confirmation points for completion.
- Converting code from one programming language to another
Claude-3-Sonnet showcases impressive capabilities in converting code, such as translating C# code to Java Spring Boot applications. It effectively translates the logic and functionality of the original codebase into a new implementation, leveraging framework conventions and best practices. However, limitations arise when there is no direct mapping between frameworks, requiring additional manual adjustments and optimizations by developers.
- Generating new code
Claude-3-Sonnet demonstrates remarkable proficiency in generating new code, particularly in unit and integration tests. The AI tool can analyze existing codebases and automatically generate comprehensive test suites covering various scenarios and edge cases.
- Privacy and security of the Generative AI tool
Unfortunately, Anthropic's privacy policy is quite confusing. Before January 2024, they used clients’ data to train their models. The updated legal document ostensibly provides protections and transparency for Anthropic's commercial clients, but it’s recommended to consider the privacy of your data while using Claude.
Best tip
Be specific and detailed : provide the GenerativeAI with specific and detailed prompts to ensure it understands the task accurately. This includes clear descriptions of what needs to be rewritten, any constraints, and desired outcomes.
Overall
The model's ability to generate coherent and contextually relevant content makes it a valuable tool for developers and businesses seeking to enhance their AI-driven solutions. However, the model might have difficulty fully grasping intricate data flows, especially in systems with complex transformations and conditional logic.
- Possibilities 3/5
- Correctness 3/5
- Privacy 3/5
- Maturity 3/5
Overall score: 3/5
Claude-3-opus
Claude-3-Opus is another language model by Anthropic, designed for handling more extensive and complex interactions. This version of Claude models focuses on delivering high-quality code generation and analysis with high precision.
- Analyzing project architecture
With its advanced natural language processing capabilities, it thoroughly examines the codebase, identifying various components, their relationships, and the overall structure. This analysis provides valuable insights into the project's design, enabling developers to understand the system's organization better and make decisions about potential refactoring or optimization efforts.
- Analyzing data flows
While Claude-3-Opus performs reasonably well in analyzing data flows within a project, it may lack the context necessary to fully comprehend all possible scenarios. However, compared to Claude-3-sonnet, it demonstrates improved capabilities in this area. By examining the flow of data through the application, it can identify potential bottlenecks, inefficiencies, or areas where data integrity might be compromised.
- Generating historical backlog
By providing the project architecture as an input prompt, it effectively creates high-level epics that encapsulate essential features and functionalities. One of its key strengths is generating detailed and precise acceptance criteria for each epic. However, it may struggle to create granular Jira user stories. Compared to other Claude models, Claude-3-Opus demonstrates superior performance in generating historical backlog based on project architecture.
- Converting code from one programming language to another
Claude-3-Opus shows promising capabilities in converting code from one programming language to another, particularly in converting C# code to Java Spring Boot, a popular Java framework for building web applications. However, it has limitations when there is no direct mapping between frameworks in different programming languages.
- Generating new code
The AI tool demonstrates proficiency in generating both unit tests and integration tests for existing codebases. By leveraging its understanding of the project's architecture and data flows, Claude-3-Opus generates comprehensive test suites, ensuring thorough coverage and improving the overall quality of the codebase.
- Privacy and security of the Generative AI tool
Like other Anthropic models, you need to consider the privacy of your data. For specific details about Anthropic's data privacy and security practices, it would be better to contact them directly.
Best tip
Break down the existing project into components and functionality that need to be recreated. Reducing input complexity minimizes the risk of errors in output.
Overall
Claude-3-Opus's strengths are analyzing project architecture and data flows, converting code between languages, and generating new code, which makes the development process easier and improves code quality. This tool empowers developers to quickly deliver high-quality software solutions.
- Possibilities 4/5
- Correctness 4/5
- Privacy 3/5
- Maturity 4/5
Overall score: 4/5
Claude-3-haiku
Claude-3-Haiku is part of Anthropic's suite of Generative AI models, declared as the fastest and most compact model in the Claude family for near-instant responsiveness. It excels in answering simple queries and requests with exceptional speed.
- Analyzing project architecture
Claude-3-Haiku struggles with analyzing project architecture. The model tends to generate overly general responses that closely resemble the input data, limiting its ability to provide meaningful insights into a project's overall structure and organization.
- Analyzing data flows
Similar to its limitations in project architecture analysis, Claude-3-Haiku fails to effectively group components based on their data flow relationships. This lack of precision makes it difficult to clearly understand how data moves throughout the system.
- Generating historical backlog
Claude-3-Haiku is unable to generate Jira user stories effectively. It struggles to produce user stories that meet the standard format and detail required for project management. Additionally, its performance generating high-level epics is unsatisfactory, lacking detailed acceptance criteria and business requirements. These limitations likely stem from its training data, which focused on short forms and concise prompts, restricting its ability to handle more extensive and detailed inputs.
- Converting code from one programming language to another
Claude-3-Haiku proved good at converting code between programming languages, demonstrating an impressive ability to accurately translate code snippets while preserving original functionality and structure.
- Generating new code
Claude-3-Haiku performs well in generating new code, comparable to other Claude-3 models. It can produce code snippets based on given requirements or specifications, providing a useful starting point for developers.
- Privacy and security of the Generative AI tool
Similar to other Anthropic models, you need to consider the privacy of your data, although according to official documentation, Claude 3 Haiku prioritizes enterprise-grade security and robustness. Also, keep in mind that security policies may vary for different Anthropic models.
Best tip
Be aware of Claude-3-haiku capabilities : Claude-3-haiku is a natural language processing model trained on short form. It is not designed for complex tasks like converting a project from one programming language to another.
Overall
Its fast response time is a notable advantage, but its performance suffers when dealing with larger prompts and more intricate tasks. Other tools or manual analysis may prove more effective in analyzing project architecture and data flows. However, Claude-3-Haiku can be a valuable asset in a developer's toolkit for straightforward code conversion and generation tasks.
- Possibilities 2/5
- Correctness 2/5
- Privacy 3/5
- Maturity 2/5
Overall score: 2/5
Gemini 1.5 Flash
Gemini 1.5 Flash represents Google's commitment to advancing AI technology; it is designed to handle a wide range of natural language processing tasks, from text generation to complex data analysis. Google presents Gemini Flash as a lightweight, fast, and cost-efficient model featuring multimodal reasoning and a breakthrough long context window of up to one million tokens.
- Analyzing project architecture
Gemini Flash's performance in analyzing project architecture was found to be suboptimal. The AI tool struggled to provide concrete and actionable insights, often generating abstract and high-level observations instead.
- Analyzing data flows
It effectively identified and traced the flow of data between different components and modules, offering developers valuable insights into how information is processed and transformed throughout the system. This capability aids in understanding the existing codebase and identifying potential bottlenecks or inefficiencies. However, the effectiveness of data flow analysis may vary depending on the project's complexity and size.
- Generating historical backlog
Gemini Flash can synthesize meaningful epics that capture overarching goals and functionalities required for the project by analyzing architectural components, dependencies, and interactions within a software system. However, it may fall short of providing granular acceptance criteria and detailed business requirements. The generated epics often lack the precision and specificity needed for effective backlog management and task execution, and it struggles to generate Jira user stories.
- Converting code from one programming language to another
Gemini Flash showed promising results in converting code from one programming language to another, particularly when translating from C# to Java Spring Boot. It successfully mapped and transformed language-specific constructs, such as syntax, data types, and control structures. However, limitations exist, especially when dealing with frameworks or libraries that do not have direct equivalents in the target language.
- Generating new code
Gemini Flash excels in generating new code, including test cases and additional features, enhancing application reliability and functionality. It analyzed the existing codebase and generated test cases that cover various scenarios and edge cases.
- Privacy and security of the Generative AI tool
Google was one of the first in the industry to publish an AI/ML privacy commitment , which outlines our belief that customers should have the highest level of security and control over their data stored in the cloud. That commitment extends to Google Cloud Generative AI products. You can set up a Gemini AI model in Google Cloud and use an encrypted TLS connection over the internet to connect from your on-premises environment to Google Cloud.
Best tip
Use prompt engineering: Starting by providing necessary background information or context within the prompt helps the model understand the task's scope and nuances. It's beneficial to experiment with different phrasing and structures; refining prompts iteratively based on the quality of the outputs. Specifying any constraints or requirements directly in the prompt can further tailor the model's output to meet your needs.
Overall
By using its AI capabilities in data flow analysis, code translation, and test creation, developers can optimize their workflow and concentrate on strategic tasks. However, it is important to remember that Gemini Flash is optimized for high-speed processing, which makes it less effective for complex tasks.
- Possibilities 2/5
- Correctness 2/5
- Privacy 5/5
- Maturity 2/5
Overall score: 2/5
Gemini 1.5 Pro
Gemini 1.5 Pro is the largest and most capable model created by Google, designed for handling highly complex tasks. While it is the slowest among its counterparts, it offers significant capabilities. The model targets professionals and developers needing a reliable assistant for intricate tasks.
- Analyzing project architecture
Gemini Pro is highly effective in analyzing and understanding the architecture of existing programming projects, surpassing Gemini Flash in this area. It provides detailed insights into project structure and component relationships.
- Analyzing data flows
The model demonstrates proficiency in analyzing data flows, similar to its performance in project architecture analysis. It accurately traces and understands data movement throughout the codebase, identifying how information is processed and exchanged between modules.
- Generating historical backlog
By using project architecture as an input, it creates high-level epics that encapsulate main features and functionalities. While it may not generate specific Jira user stories, it excels at providing detailed acceptance criteria and precise details for each epic.
- Converting code from one programming language to another
The model shows impressive results in code conversion, particularly from C# to Java Spring Boot. It effectively maps and transforms syntax, data structures, and constructs between languages. However, limitations exist when there is no direct mapping between frameworks or libraries.
- Generating now code
Gemini Pro excels in generating new code, especially for unit and integration tests. It analyzes the existing codebase, understands functionality and requirements, and automatically generates comprehensive test cases.
- Privacy and security of the Generative AI tool
Similarly to other Gemini models, Gemini Pro is packed with advanced security and data governance features, making it ideal for organizations with strict data security requirements.
Best tip
Manage context: Gemini Pro incorporates previous prompts into its input when generating responses. This use of historical context can significantly influence the model's output and lead to different responses. Include only the necessary information in your input to avoid overwhelming the model with irrelevant details.
Overall
Gemini Pro shows remarkable capabilities in areas such as project architecture analysis, data flow understanding, code conversion, and new code generation. However, there may be instances where the AI encounters challenges or limitations, especially with complex or highly specialized codebases. As such, while Gemini Pro offers significant advantages, developers should remain mindful of its current boundaries and use human expertise when necessary.
- Possibilities 4/5
- Correctness 3/5
- Privacy 5/5
- Maturity 3/5
Overall score: 4/5
LLM comparison summary

Embrace AI-driven approach to legacy code modernization
Generative AI offers practical support for rewriting legacy systems. While tools like GPT-4o and Claude-3-opus can’t fully automate the process, they excel in tasks like analyzing codebases and refining requirements. Combined with advanced platforms for data analysis and workflows, they help create a more efficient and precise redevelopment process.
This synergy allows developers to focus on essential tasks, reducing project timelines and improving outcomes.

Transition towards data-driven organization in the insurance industry: Comparison of data streaming platforms
Insurance has always been an industry that relied heavily on data. But these days, it is even more so than in the past. The constant increase of data sources like wearables, cars, home sensors, and the amount of data they generate presents a new challenge. The struggle is in connecting to all that data, processing and understanding it to make data-driven decisions .
And the scale is tremendous. Last year the total amount of data created and consumed in the world was 59 zettabytes, which is the equivalent of 59 trillion gigabytes. The predictions are that by 2025 the amount will reach 175 zettabytes.
On the other hand, we’ve got customers who want to consume insurance products similarly to how they consume services from e-tailers like Amazon.
The key to meeting the customer expectations lies in the ability to process the data in near real-time and streamline operations to ensure that customers get the products they need when they want them. And this is where the data streaming platforms come to help.
Traditional data landscape
In the traditional landscape businesses often struggled with siloed data or data that was in various incompatible formats. Some of the commonly used solutions that should be mentioned here are:
- Big Data systems like Cassandra that let users store a very large amount of data.
- Document databases such as Elasticsearch that provide a rich interactive query model.
- And relational databases like Oracle and PostgreSQL
That means there were databases with good query mechanisms, Big Data systems capable of handling huge volumes of data, and messaging systems for near-real-time message processing.
But there was no single solution that could handle it all, so the need for a new type of solution became apparent. One that would be capable of processing massive volumes of data in real-time , processing the data from a specific time window while being able to scale out and handle ordered messages.
Data streaming platforms- pros & cons and when should they be used
Data streaming is a continuous stream of data that can be processed, stored, analyzed, and acted upon as it's generated in real-time. Data streams are generated by all types of sources, in various formats and volumes.
But what benefits does deploying data streaming platforms bring exactly?
- First of all, they can process the data in real-time.
- Data in the stream is an ordered, replayable, and fault-tolerant sequence of immutable records.
- In comparison to regular databases, scaling does not require complex synchronization of data access.
- Because the producers and consumers are loosely coupled with each other and act independently, it’s easy to add new consumers or scale down.
- Resiliency because of the replayability of stream and the decoupling of consumers and producers.
But there are also some downsides:
- Tools like Kafka (specifically event streaming platforms) lack features like message prioritization which means data can’t be processed in a different order based on its importance.
- Error handling is not easy and it’s necessary to prepare a strategy for it. Examples of those strategies are fail fast, ignore the message, or send to dead letter queue.
- Retry logic doesn’t come out of the box.
- Schema policy is necessary. Despite being loosely coupled, producers and consumers are still coupled by schema contract. Without this policy in place, it’s really difficult to maintain the working system and handle updates. Data streaming platforms compared to traditional databases require additional tools to query the data in the stream, and it won't be so efficient as querying a database.
Having covered the advantages and disadvantages of streaming technology, it’s important to consider when implementing a streaming platform is a valid decision and when other solutions might be a better choice.
In what cases data streaming platforms can be used:
- Whenever there is a need to process data in real-time, i.e., feeding data to Machine Learning and AI systems.
- When it’s necessary to perform log analysis, check sensor and data metrics.
- For fraud detection and telemetry.
- To do low latency messaging or event sourcing.
When data streaming platforms are not the ideal solution:
- The volume of events or messages is low, i.e., several thousand a day.
- When there is a need for random access to query the data for specific records.
- When it’s mostly historical data that is used for reporting and visualization.
- For using large payloads like big pictures, videos, or documents, or in general binary large objects.
Example architecture deployed on AWS
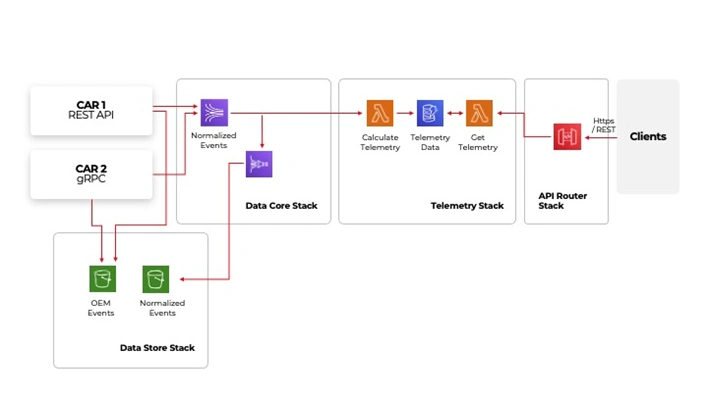
On the left-hand side, there are integrations points with vehicles. The way how they are integrated may vary depending on OEM or make and model. However, despite the protocol they use in the end, they will deliver data to our platform. The stream can receive the data in various formats, in this case, depending on the car manufacturer. The data is processed and then sent to the normalized events. From where it can be sent using a firehose to AWS S3 storage for future needs, i.e., historical data analysis or feeding Machine Learning models . After normalization, it is also sent to the telemetry stack, where the vehicle location and information about acceleration, braking, and cornering speed is extracted and then made available to clients through an API.
Tool comparison
There are many tools available that support data streaming. This comparison is divided into three categories- ease of use, stream processing, and ordering & schema registry and will focus on Apache Kafka as the most popular tool currently in use and RocketMQ and Apache Pulsar as more niche but capable alternatives.
It is important to note that these tools are open-source, so having a qualified and experienced team is necessary to perform implementation and maintenance.
Ease of use
- It is worth noticing that commonly used tools have the biggest communities of experts. That leads to constant development, and it becomes easier for businesses to find talent with the right skills and experience. Kafka has the largest community as Rocket and Pulsar are less popular.
- The tools are comprised of several services. One of them is usually a management tool that can significantly improve user experience. It is built in for Pulsar and Rocket but unfortunately, Kafka is missing it.
- Kafka has built-in connectors that help integrate data sources in an easy and quick way.
- Pulsar also has an integration mechanism that can connect to different data sources, but Rocket has none.
- The number of client libraries has to do with the popularity of the tool. And the more libraries there are, the easier the tool is to use. Kafka is widely used, and so it has many client libraries. Rocket and Pulsar are less popular, so the number of libraries available is much smaller.
- It’s possible to use these tools as a managed service. In that scenario, Kafka has the best support as it is offered by all major public cloud providers- AWS, GCP, and Azure. Rocket is offered by Alibaba Cloud, Pulsar by several niche companies.
- Requirement for extra services for the tools to work. Kafka requires ZooKeeper, Rocket doesn’t require any additional services and Pulsar requires both Zookeeper and BooKKeeper to manage additionally.
Stream processing
Kafka is a leader in this category as it has Kafka Streams. It is a built-in library that simplifies client applications implementation and gives developers a lot of flexibility. Rocket, on the other hand, has no built-in libraries, which means there is nothing to simplify the implementation and it does require a lot of custom work. Pulsar has Pulsar Functions which is a built-in function and can be helpful, but it’s basic and limited.
Ordering & schema registry
Message ordering is a crucial feature. Especially when there is a need to use services that are processing information based on transactions. Kafka offers just a single way of message ordering, and it’s through the use of keys. The keys are in messages that are assigned to a specific partition, and within the partition, the order is maintained.
Pulsar works similarly, either within partition with the use of keys or per producer in SinglePartition mode when the key is not provided.
RocketMQ works in a different way, as it ensures that the messages are always ordered. So if a use case requires that 100% of the messages are ordered then this is the tool that should be considered.
Schema registry is mainly used to validate and version the messages.
That’s an important aspect, as with asynchronous messaging, the common problem is that the message content is different from what the client app is expecting, and this can cause the apps to break.
Kafka has multiple implementations of schema registry thanks to its popularity and being hosted by major cloud providers. Rocket is building its schema registry, but it is not known when it will be ready. Pulsar does have its own schema registry, and it works like the one in Kafka.
Things to be aware of when implementing data streaming platform
- Duplicates. Duplicates can’t be avoided, they will happen at some point due to problems with things like network availability. That’s why exactly-once delivery is a useful feature that ensures messages are delivered only once.
- However, there are some issues with that. Firstly, a few of the out-of-the-box tools support exactly-once delivery and it needs to be set up before starting streaming. Secondly, exactly-once delivery can significantly slow down the stream. And lastly, end-user apps should recognize the messages they receive so that they don’t process duplicates.
- “Black Fridays”. These are scenarios with a sudden increase in the volume of data to process. And to handle these spikes in data volume, it is necessary to plan the infrastructure capacity beforehand. Some of the tools that have auto-scaling natively will handle those out of the box, like Kinesis from AWS. But others that are custom built will crash without proper tuning.
- Popular deployment strategies are also a thing to consider. Unfortunately, deploying data streaming platforms is not a straightforward operation, the popular deployment strategies like blue/green or canary deployment won’t work.
- Messages should always be treated as a structured entity. As the stream will accept everything, that we put in it, it is necessary to determine right from the start what kind of data will be processed. Otherwise, the end user applications will eventually crash if they receive messages in an unexpected format.
Best practices while deploying data streaming platforms
- Schema management. This links directly with the previous point about treating the messages as a structured entity. Schema promotes common data model and ensures backward/forward compatibility.
- Data retention. This is about setting limits on how long the data is stored in the data stream. Storing the data too long and constantly adding new data to the stream will eventually cause that you run out of resources.
- Capacity planning and autoscaling are directly connected to the “Black Fridays” scenario. During the setup, it is necessary to pay close attention to the capacity planning to make sure the environment will cope with sudden spikes in data volume. However, it’s also a good practice to plan for failure scenarios where autoscaling kicks in due to some other issue in the system and spins out of control.
- If the customer data geo-location is important to the specific use case from the regulatory perspective, then it is important to set up separate streams for different locations and make sure they are handled by local data centers.
- When it comes to disaster recovery, it is always wise to be prepared for unexpected downtime, and it’s easier to manage if there is the right toolset set up.
It used to be that people were responsible for the production of most data, but in the digital era, the exponential growth of IoT has caused the scales to shift, and now machine and sensor data is the majority. That data can help businesses build innovative products, services and make informed decisions.
To unlock the value in data, companies need to have a complex strategy in place. One of the key elements in that strategy is the ability to process data in real-time so choosing the tool for the streaming platform is extremely important.
The ability to process data as it arrives is becoming essential in the insurance industry. Streaming platforms help companies handle large data volumes efficiently, improving operations and customer service. Choosing the right tools and approach can make a big difference in performance and reliability.

From data to decisions: The role of data platforms in automotive
Connected, autonomous, and electric cars are changing the automotive industry. Yet, the massive amount of data they generate often remains siloed across different systems, making management and collaboration challenging.
This article examines how data platforms unify information, connecting teams across departments - from engineering to customer support - to analyze trends, address operational challenges, and refine strategies for success.
How are data platforms transforming the automotive industry?
Data platforms resolve fragmentation issues by consolidating data from various sources into a unified system. This structure not only improves data accessibility within departments but also enables secure collaboration with trusted external partners
The impact of this approach is clear: improved safety through fewer accidents, better performance thanks to real-time analytics, and quicker development of features supporting solutions such as advanced driver assistance systems and personalized in-car experiences .
As the demand for effective data solutions accelerates, the global automotive data management market , valued at $1.58 billion in 2021, is projected to grow by 20.3% annually through 2030. This rapid development underscores how essential platforms are for addressing the increasing complexity of modern automotive operations, making them vital tools for staying competitive and meeting customer expectations.
Defining data platforms in automotive
Combined with a structured data architecture that defines how information is ingested, stored, and delivered, the platform acts as the operational backbone that transforms this architecture into a functional system. By removing duplications, cutting down on storage expenses, and making it easier to manage data , the platform helps OEMs spend less time on technical hassles and more time gaining meaningful insights that drive their business forward.
In an industry where data flows through multiple departments, this centralized approach ensures that knowledge is not only easily available but also readily applicable to innovative solutions.
Data platforms as the engine for data-driven insights
Unlike standalone systems that only store or display information, automotive data platforms support the processing and integration of information, making it analysis-ready.
Here's a closer look at how it works:
Data ingestion
Automotive platforms handle a variety of inputs, categorized into real-time and batch-processed data. Real-time information, such as CAN bus telemetry, GPS tracking, and ADAS sensor outputs, supports immediate diagnostics and safety decisions.
Batch processing, on the other hand, involves data that is collected over time and processed collectively at scheduled intervals. Examples include maintenance records, dealership transactions, and even unstructured feedback logs.
Many platforms offer hybrid processing to meet specific operational and analytical needs.
Moreover, there are some unique methods used in the automotive industry to gather data, including:
- Over-the-air (OTA) updates: remotely deliver software or firmware updates to vehicles to improve performance, fix bugs, or add features without requiring a service visit.
- Vehicle-to-Everything (V2X) communication: capture real-time data on traffic, infrastructure, and environmental conditions.
These industry-focused techniques enable companies to obtain data critical for operational and strategic insights.
Data processing and storage
Processing involves cleansing for reliability, normalizing for consistency, and transforming data to meet specific requirements, such as diagnostics or performance analytics. These steps ensure the information is accurate and tailored for its intended use.
The processed information is stored in centralized repositories: data warehouses for structured records (e.g., transactions) and data lakes for semi-structured or unstructured inputs (e.g., raw sensor data or feedback logs). Centralized storage allows quick, flexible access for teams across the organization.
Fundamental principles for a modern data platform
- Scalability and simplicity: Easily expandable to accommodate growing data needs.
- Flexibility and cost-efficiency: Adaptable to evolving requirements without high overhead costs.
- Real-time decision-making: Providing immediate access to critical information.
- Unified data access: Breaking down silos for a complete organizational view.
Data platforms in automotive: Key applications for efficiency and revenue
Many companies recognize the importance of data, but only a few use it effectively to gain meaningful insights about their business and customers. Better use of information can help your company drive more informed decisions about products and operations. Consider this:
-> Is data being used to improve the customer experience in tangible ways?
-> Are your teams focused on creating new solutions, or are they spending too much time preparing and organizing data?
Data platforms serve as the foundation for specific use cases:
Customer services and new revenue opportunities
Data on vehicle usage and driver behavior supports personalized services and drives innovative business models. Examples include:
- Maintenance reminders : Platforms analyze usage data to alert drivers about upcoming service needs.
- Third-party partnerships : For example, insurers can access driving behavior data through controlled platforms and offer tailored policies like pay-as-you-drive.
- Infotainment : Secure data-sharing capabilities allow developers to design custom infotainment systems and other features, creating new revenue opportunities for companies.
Operational efficiency
Let’s look at where else the platforms are used to solve real-world challenges. It’s all about turning raw information into revenue-growing results.
In predictive maintenance , access to consistent sensor data helps identify patterns, reduce vehicle downtime, prevent unexpected breakdowns, and ensure proactive safety measures.
Ford’s data platform illustrates how unifying data from over 4,600 sources - including dealership feedback, repair records, and warranty services - can drive new business models. By centralizing diverse inputs, Ford demonstrates the potential for predictive insights to address customer needs and refine operational strategies.
In supply chain management , integrating data from manufacturing systems and inventory tools supports precise resource allocation and production scheduling.
Volkswagen 's collaboration with AWS and Siemens on the Industrial Cloud is a clear example of how data platforms optimize these operations. By connecting data from global plants and suppliers, Volkswagen has achieved more precise production scheduling and management.
Product development benefits from data unification that equips engineers with the visibility they need to resolve performance challenges faster, ensuring continuous improvement in vehicle designs. This integrated approach ensures better collaboration across teams. Aggregated data highlights frequent problems in vehicle components, while customer feedback guides the creation of features aligned with market demands, driving higher-quality outcomes and user satisfaction.
Fleet management also sees significant improvements through the use of data platforms. Real-time information collected from vehicles allows for improved route planning while reducing fuel consumption and delivery times. Additionally, vehicle usage data helps optimize fleet operations by preventing overuse and extending vehicle lifespans.
Regulatory compliance
Another key advantage of centralizing data is easier compliance with regulations such as GDPR and the EU Data Act. A unified system simplifies managing access, tracking usage, and securely sharing information. It also supports meeting safety and environmental standards by providing quick access to the data required for audits and reporting.
What’s next for automotive data platforms
While some data platforms' capabilities are already in place, the following represent emerging trends and transformational predictions that will define the future:
AI-powered personalization
Platforms are evolving to deliver even more sophisticated personalization. In the future, they’ll integrate data from multiple sources - vehicles, mobile apps, and smart home devices - to create a unified profile for each driver. This will enable predictive services, like suggesting vehicle configurations for specific trips or dynamically adjusting settings based on the driver’s schedule and habits.
Connected ecosystems
Future platforms may process data from smart cities, energy grids, and public transport systems, creating a holistic view for better decision-making. For example, they could optimize fleet operations by aligning vehicle usage with real-time energy availability and urban traffic flow predictions, expanding opportunities for sustainability and efficiency.
Real-time data processing
The next generation of platforms will handle larger volumes of information with greater speed, supporting developments like autonomous systems and advanced simulations. By combining historical data with real-world inputs, they will improve predictive capabilities; for instance, refining AI algorithms for better safety outcomes or optimizing fleet routes to reduce emissions and costs.
Enhanced cybersecurity
Looking ahead, data platforms will incorporate more advanced security measures, such as decentralized systems like blockchain to safeguard data integrity. They will also provide proactive threat detection, using AI to identify and mitigate risks before breaches occur. This will be critical as vehicles and ecosystems become increasingly connected.
These advancements will not only address current challenges but also redefine how vehicles interact with their environment, improving functionality, safety, and sustainability.
Ready to change your automotive data strategy?
As the industry evolves with connectivity, autonomy, and electrification, the need for dependable and flexible systems grows.
Need a secure, scalable platform designed for automotive requirements?
Whether you're creating one from scratch or improving an existing system, we can help provide solutions that improve operational efficiency and create new revenue opportunities.