Spring AI framework overview – introduction to AI world for Java developers

In this article, we explain the fundamentals of integrating various AI models and employing different AI-related techniques within the Spring framework. We provide an overview of the capabilities of Spring AI and discuss how to utilize the various supported AI models and tools effectively.
Understanding Spring AI - Basic concepts
Traditionally, libraries for AI integration have primarily been written in Python, making knowledge of this language essential for their use. Additionally, their integration in applications written in other languages implies the writing of a boilerplate code to communicate with the libraries. Today, Spring AI makes it easier for Java developers to enable AI in Java-based applications.
Spring AI aims to provide a unified abstraction layer for integrating various AI LLM types and techniques (e.g., ETL, embeddings, vector databases) into Spring applications. It supports multiple AI model providers, such as OpenAI, Google Vertex AI, and Azure Vector Store, through standardized interfaces that simplify their integration by abstracting away low-level details. This is achieved by offering concrete implementations tailored to each specific AI provider.
Generating data: Integration with AI models
Spring AI API supports all main types of AI models, such as chat, image, audio, and embeddings. The API for the model is consistent across all model types. It consists of the following main components:
1) Model interfaces that provide similar methods for all AI model providers. Each model type has its own specific interface, such as ChatModel for chat AI models and ImageModel for image AI models. Spring AI provides its own implementation of each interface for every supported AI model provider.
2) Input prompt/request class that is used by the AI model (via model interface) providing user input (usually text) instructions, along with options for tuning the model’s behavior.
3) Response for output data produced by the model. Depending on the model type, it contains generated text, image, or audio (for Chat Image and Audio models correspondingly) or more specific data like floating-point arrays in the case of Embedding models.
All AI model interfaces are standard Spring beans that can be injected using auto-configuration or defined in Spring Boot configuration classes.
Chat models
The chat LLMs gnerate text in response to the user’s prompts. Spring AI has the following main API for interaction with this type of model.
- The ChatModel interface allows sending a String prompt to a specific chat AI model service. For each supported AI chat model provider in Spring AI, there is a dedicated implementation of this interface.
- The prompt class contains a list of text messages (queries, typically a user input) and a ChatOptions object. The ChatOptions interface is common for all the supported AI models. Additionally, every model implementation has its own specific options for class implementation.
- The ChatResponse class encapsulates the output of the AI chat model, including a list of generated data and relevant metadata.
- Furthermore, the chat model API has a ChatClient class , which is responsible for the entire interaction with the AI model. It encapsulates the ChatModel, enabling users to build and send prompts to the model and retrieve responses from it. ChatClient has multiple options for transforming the output of the AI model, which includes converting raw text response into a custom Java object or fetching it as a Flux-based stream.
Putting all these components together, let’s give an example code of Spring service class interacting with OpenAI chat API:
// OpenAI model implementation is available via auto configuration
// when ‘org.springframework.ai:spring-ai-openai-spring-boot-starter'
// is added as a dependency
@Configurationpublic class ChatConfig {
// Defining chat client bean with OpenAI model
    @Bean
    ChatClient chatClient(ChatModel chatModel) {
return ChatClient.builder(chatModel)
.defaultSystem("Default system text")
.defaultOptions(
OpenAiChatOptions.builder()
.withMaxTokens(123)
.withModel("gpt-4-o")
.build()
).build();
}
}@Servicepublic class ChatService {
private final ChatClient chatClient;
...
public List<String> getResponses(String userInput) {
var prompt = new Prompt(
userInput,
// Specifying options of concrete AI model options
            OpenAiChatOptions.builder()
                .withTemperature(0.4)
                .build()
        );
var results = chatClient.prompt(prompt)
.call()
.chatResponse()
.getResults();
return results.stream()
.map(chatResult -> chatResult.getOutput().getContent())
.toList();
}
}
Image and Audio models
Image and Audio AI model APIs are similar to the chat model API; however, the framework does not provide a ChatClient equivalent for them.
For image models the main classes are represented by:
- ImagePrompt that contains text query and ImageOptions
- ImageModel for abstraction of the concrete AI model
- ImageResponse containing a list of the ImageGeneration objects as a result of ImageModel invocation.
Below is the example Spring service class for generating images:
@Servicepublic class ImageGenerationService {
// OpenAI model implementation is used for ImageModel via autoconfiguration
    // when ‘org.springframework.ai:spring-ai-openai-spring-boot-starter’ is
    // added as a dependency
private final ImageModel imageModel;
...
public List<Image> generateImages(String request) {
var imagePrompt = new ImagePrompt(
// Image description and prompt weight
new ImageMessage(request, 0.8f),
// Specifying options of a concrete AI model
            OpenAiImageOptions.builder()
                .withQuality("hd")
                .withStyle("natural")
                .withHeight(2048)
                .withWidth(2048)
                .withN(4)
                .build()
        );
var results = imageModel
.call(imagePrompt)
.getResults();
return results.stream()
.map(ImageGeneration::getOutput)
.toList();
}
}
When it comes to audio models there are two types of them supported by Spring AI: Transcription and Text-to-Speech.
The text-to-speech model is represented by the SpeechModel interface. It uses text query input to generate audio byte data with attached metadata.
In transcription models , there isn't a specific general abstract interface. Instead, each model is represented by a set of concrete implementations (as per different AI model providers). This set of implementations adheres to a generic "Model" interface, which serves as the root interface for all types of AI models.
Embedding models
1. The concept of embeddings
Let’s outline the theoretical concept of embeddings for a better understanding of how the embeddings API in Spring AI functions and what its purpose is.
Embeddings are numeric vectors created through deep learning by AI models. Each component of the vector corresponds to a certain property or feature of the data. This allows to define the similarities between data (like text, image or video) using mathematical operations on those vectors.
Just like 2D or 3D vectors represent a point on a plane or in a 3D space, the embedding vector represents a point in an N-dimensional space. The closer points (vectors) are to each other or, in other words, the shorter the distance between them is, the more similar the data they represent is. Mathematically the distance between vectors v1 and v2 may be defined as: sqrt(abs(v1 - v2)).
Consider the following simple example with living beings (e.g., their text description) as data and their features:
Is Animal (boolean) Size (range of 0…1) Is Domestic (boolean) Cat 1 0,1 1 Horse 1 0,7 1 Tree 0 1,0 0
In terms of the features above, the objects might be represented as the following vectors: “cat” -> [1, 0.1, 1] , “horse” -> [1, 0.7, 1] , “tree” -> [0, 1.0, 0]
For the most similar animals from our example, e.g. cat and horse, the distance between the corresponding vectors is sqrt(abs([1, 0.1, 1] - [1, 0.7, 1])) = 0,6 While comparing the most distinct objects, that is cat and tree gives us: sqrt(abs([1, 0.1, 1] - [0, 1.0, 0])) = 1,68
2. Embedding model API
The Embeddings API is similar to the previously described AI models such as ChatModel or ImageModel.
- The Document class is used for input data. The class represents an abstraction that contains document identifier, content (e.g., image, sound, text, etc), metadata, and the embedding vector associated with the content.
- The EmbeddingModel interface is used for communication with the AI model to generate embeddings. For each AI embedding model provider, there is a concrete implementation of that interface. This ensures smooth switching between various models or embedding techniques.
- The EmbeddingResponse class contains a list of generated embedding vectors.
Storing data: Vector databases
Vector databases are specifically designed to efficiently handle data in vector format. Vectors are commonly used for AI processing. Examples include vector representations of words or text segments used in chat models, as well as image pixel information or embeddings.
Spring AI has a set of interfaces and classes that allow it to interact with vector databases of various database vendors. The primary interface of this API is the VectorStore , which is designed to search for similar documents using a specific similarity query known as SearchRequest.
It also has methods for adding and removing the Document objects. When adding to the VectorStore, the embeddings for documents are typically created by the VectorStore implementation using an EmbeddingMode l. The resulting embedding vector is assigned to the documents before they are stored in the underlying vector database.
Below is an example of how we can retrieve and store the embeddings using the input documents using the Azure AI Vector Store.
@Configurationpublic class VectorStoreConfig {
...
@Bean
public VectorStore vectorStore(EmbeddingModel embeddingModel) {
var searchIndexClient = ... //get azure search index client
return new AzureVectorStore(
searchIndexClient,
embeddingModel,
true,
 // Metadata fields to be used for the similarity search
            // Considering documents that are going to be stored in vector store
            // represent books/book descriptions
            List.of(MetadataField.date("yearPublished"),
                MetadataField.text("genre"),
                MetadataField.text("author"),
                MetadataField.int32("readerRating"),
                MetadataField.int32("numberOfMainCharacters")));
    }
}
@Service
public class EmbeddingService {
private final VectorStore vectorStore;
...
public void save(List<Document> documents) {
 // The implementation of VectorStore uses EmbeddingModel to get embedding vector
        // for each document, sets it to the document object and then stores it
        vectorStore.add(documents);
    }
public List<Document> findSimilar(String query,
double similarityLimit,
                                      Filter.Expression filter) {
return vectorStore.similaritySearch(
SearchRequest.query(query) // used for embedding similarity search
// only having equal or higher similarity
.withSimilarityThreshold(similarityLimit)
// search only documents matching filter criteria
                .withFilterExpression(filter)
                .withTopK(10)
// max number of results
        );
    }
public List<Document> findSimilarGoodFantasyBook(String query) {
var goodFantasyFilterBuilder = new FilterExpressionBuilder();
var goodFantasyCriteria = goodFantasyFilterBuilder.and(
goodFantasyFilterBuilder.eq("genre", "fantasy"),
goodFantasyFilterBuilder.gte("readerRating", 9)
).build();
return findSimilar(query, 0.9, goodFantasyCriteria);
}
}
Preparing data: ETL pipelines
The ETL, which stands for “Extract, Transform, Load” is a process of transforming raw input data (or documents) to make it applicable or more efficient for the further processing by AI models. As the name suggests, the ETL consists of three main stages: extracting the raw data from various data sources, transforming data into a structured format, and storing the structured data in the database.
In Spring AI the data used for ETL in every stage is represented by the Document class mentioned earlier. Here are the Spring AI components representing each stage in ETL pipeline:
- DocumentReader – used for data extraction, implements Supplier<List<Document>>
- DocumentTransformer – used for transformation, implements Function<List<Document>, List<Document>>
- DocumentWriter – used for data storage, implements Consumer<List<Document>>
The DocumentReader interface has a separate implementation for each particular document type, e.g., JsonReader, TextReader, PagePdfDocumentReader, etc. Readers are temporary objects and are usually created in a place where we need to retrieve the input data, just like, e.g., InputStream objects. It is also worth mentioning that all the classes are designed to get their input data as a Resource object in their constructor parameter. And, while Resource is abstract and flexible enough to support various data sources, such an approach limits the reader class capabilities as it implies conversion of any other data sources like Stream to the Resource object.
The DocumentTransformer has the following implementations:
- TokenTextSplitter – splits document into chunks using CL100K_BASE encoding, used for preparing input context data of AI model to fit the text into the model’s context window.
- KeywordMetadataEnricher – uses a generative AI model for getting the keywords from the document and embeds them into the document’s metadata.
- SummaryMetadataEnricher – enriches the Document object with its summary generated by a generative AI model.
- ContentFormatTransformer – applies a specified ContentFormatter to each document to unify the format of the documents.
These transformers cover some of the most popular use cases of data transformation. However, if some specific behavior is required, we’ll have to provide a custom DocumentTransformer.
When it comes to the DocumentWriter , there are two main implementations: VectorStore, mentioned earlier, and FileDocumentWriter, which writes the documents into a single file. For real-world development scenarios the VectorStore seems the most suitable option. FileDocumentWriter is more suitable for simple or demo software where we don't want or need a vector database.
With all the information provided above, here is a clear example of what a simple ETL pipeline looks like when written using Spring AI:
public void saveTransformedData() {
// Get resource e.g. using InputStreamResource
    Resource textFileResource = ...
    TextReader textReader = new TextReader(textFileResource);
   // Assume tokenTextSplitter instance in created as bean in configuration
    // Note that the read() and split() methods return List<Document> objects
    vectorStore.write(tokenTextSplitter.split(textReader.read()));
}
It is worth mentioning that the ETL API uses List<Document> only to transfer data between readers, transformers, and writers. This may limit their usage when the input document set is large, as it requires the loading of all the documents in memory at once.
Converting data: Structured output
While the output of AI models is usually raw data like text, image, or sound, in some cases, we may benefit from structuring that data. Particularly when the response includes a description of an object with features or properties that suggest an implicit structure within the output.
Spring AI offers a Structured Output API designed for chat models to transform raw text output into structured objects or collections. This API operates in two main steps: first, it provides the AI model with formatting instructions for the input data, and second, it converts the model's output (which is already formatted according to these instructions) into a specific object type. Both the formatting instructions and the output conversion are handled by implementations of the StructuredOutputConverter interface.
There are three converters available in Spring AI:
- BeanOutputConverter<T> – instructs AI model to produce JSON output using JSON Schema of a specified class and converts it to the instances of the that class as an output.
- MapOutputConverter – instructs AI model to produce JSON output and parses it into a Map<String, Object> object
- ListOutputConverter – retrieves comma separated items form AI model creating a List<String> output
Below is an example code for generating a book info object using BeanOutputConverter:
public record BookInfo (String title,
String author,
int yearWritten,
int readersRating) { }

@Service
public class BookService {
private final ChatClient chatClient;
// Created in configuration of BeanOutputConverter<BookInfo> typeBookInfo> type
private final StructuredOutputConverter<BookInfo> bookInfoConverter;
...
public final BookInfo findBook() {
return chatClient.prompt()
.user(promptSpec ->
promptSpec
.text("Generate description of the best " +
"fantasy book written by {author}.")
.param("author", "John R. R. Tolkien"))
.call()
.entity(bookInfoConverter);
}
}
Production Readiness
To evaluate the production readiness of the Spring AI framework, let’s focus on the aspects that have an impact on its stability and maintainability.
Spring AI is a new framework. The project was started back in 2023. The first publicly available version, the 0.8.0 one, was released in February 2024. There were 6 versions released in total (including pre-release ones) during this period of time.
It’s an official framework of Spring Projects, so the community developing it should be comparable to other frameworks, like Spring JPA. If the framework development continues, it’s expected that the community will provide support on the same level as for other Spring-related frameworks.
The latest version, 1.0.0-M4, published in November, is still a release candidate/milestone. The development velocity, however, is quite good. Framework is being actively developed: according to the GitHub statistics, the commit rate is 5.2 commits per day, and the PR rate is 3.5 PRs per day. We may see it by comparing it to some older, well-developed frameworks, such as Spring Data JPA, which has 1 commit per day and 0.3 PR per day accordingly.
When it comes to bug fixing, there are about 80 bugs in total, with 85% of them closed on their official GitHub page. Since the project is quite new, these numbers may not be as representable as in other older Spring projects. For example, Spring Data JPA has almost 800 bugs with about 90% fixed.
Conclusion
Overall, the Spring AI framework looks very promising. It might become a game changer for AI-powered Java applications because of its integration with Spring Boot framework and the fact that it covers the vast majority of modern AI model providers and AI-related tools, wrapping them into abstract, generic, easy-to-use interfaces.

Grape Up guides enterprises on their data-driven transformation journey
Ready to ship? Let's talk.
Check related articles
Read our blog and stay informed about the industry's latest trends and solutions.
How to build hypermedia API with Spring HATEOAS
Have you ever considered the quality of your REST API? Do you know that there are several levels of REST API? Have you ever heard the term HATEOAS? Or maybe you wonder how to implement it in Java? In this article, we answer these questions with the main emphasis on the HATEOAS concept and the implementation of that concept with the Spring HATEOAS project.
Learn more about services provided by Grape Up
You are at Grape Up blog, where our experts share their expertise gathered in projects delivered for top enterprises. See how we work.
Enabling the automotive industry to build software-defined vehicles
Empowering insurers to create insurance telematics platforms
Providing AI & advanced analytics consulting
What is HATEOAS?
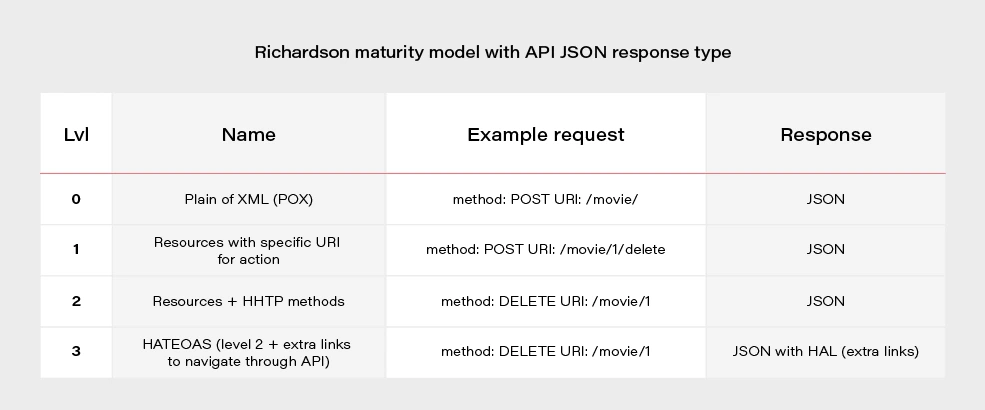
H ypermedia A s T he E ngine O f A pplication S tate - is one of the constraints of the REST architecture. Neither REST nor HATEOAS is any requirement or specification. How you implement it depends only on you. At this point, you may ask yourself - how RESTful your API is without using HATEOAS? This question is answered by the REST maturity model presented by Leonard Richardson. This model consists of four levels, as set out below:
- Level 0
The API implementation uses the HTTP protocol but does not utilize its full capabilities. Additionally, unique addresses for resources are not provided. - Level 1
We have a unique identifier for the resource, but each action on the resource has its own URL. - Level 2
We use HTTP methods instead of verbs describing actions, e.g., DELETE method instead of URL .../delete - Level 3
The term HATEOAS has been introduced. Simply speaking, it introduces hypermedia to resources. That allows you to place links in the response informing about possible actions, thereby adding the possibility to navigate through API.
Most projects these days are written using level 2. If we would like to go for the perfect RESTful API, we should consider HATEOAS.
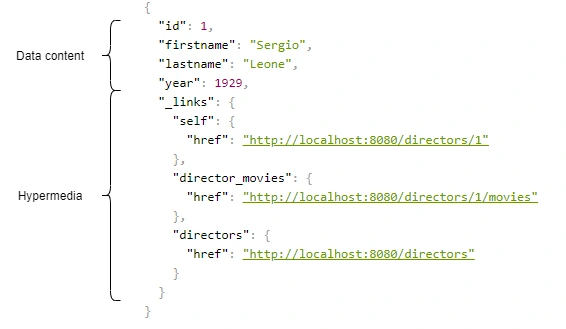
Above, we have an example of a response from the server in the form of JSON+HAL. Such a resource consists of two parts: our data and links to actions that are possible to be performed on a given resource.
Spring HATEOAS 1.x.x
You may be asking yourself how to implement HATEOAS in Java? You can write your solution, but why reinvent the wheel? The right tool for this seems to be the Spring Hateoas project. It is a long-standing solution on the market because its origins date back to 2012, but in 2019 we had a version 1.0 release. Of course, this version introduced a few changes compared to 0.x. They will be discussed at the end of the article after presenting some examples of using this library so that you better understand what the differences between the two versions are. Let’s discuss the possibilities of the library based on a simple API that returns us a list of movies and related directors. Our domain looks like this:
@Entity
public class Movie {
@Id
@GeneratedValue
private Long id;
private String title;
private int year;
private Rating rating;
@ManyToOne
private Director director;
}
@Entity
public class Director {
@Id
@GeneratedValue
@Getter
private Long id;
@Getter
private String firstname;
@Getter
private String lastname;
@Getter
private int year;
@OneToMany(mappedBy = "director")
private Set<Movie> movies;
}
We can approach the implementation of HATEOAS in several ways. Three methods represented here are ranked from least to most recommended.
But first, we need to add some dependencies to our Spring Boot project:
<dependency>
<groupId>org.springframework.boot</groupId>
<artifactId>spring-boot-starter-hateoas</artifactId>
</dependency>
Ok, now we can consider implementation options.
Entity extends RepresentationModel with links directly in Controller class
Firstly, extend our entity models with RepresentationModel.
public class Movie extends RepresentationModel<Movie>
public class Director extends RepresentationModel<Director>
Then, add links to RepresentationModel within each controller. The example below returns all directors from the system. By adding two links to each director - to himself and to the entire collection. A link is also added to the collection. The key elements of this code are two methods with static imports:
-
linkTo() -
methodOn()
@GetMapping("/directors")
public ResponseEntity<CollectionModel<Director>> getAllDirectors() {
List<Director> directors = directorService.getAllDirectors();
directors.forEach(director -> {
director.add(linkTo(methodOn(DirectorController.class).getDirectorById(director.getId())).withSelfRel());
director.add(linkTo(methodOn(DirectorController.class).getDirectorMovies(director.getId())).withRel("directorMovies"));
});
Link allDirectorsLink = linkTo(methodOn(DirectorController.class).getAllDirectors()).withSelfRel());
return ResponseEntity.ok(CollectionModel.of(directors, allDirectorsLink));
}
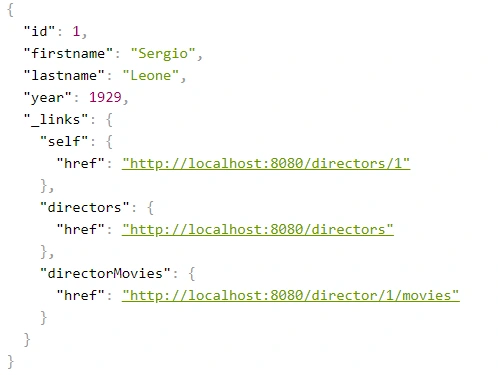
This is the response we get after invoking such controller:
We can get a similar result when requesting a specific resource.
@GetMapping("/directors/{id}")
public ResponseEntity<Director> getDirector(@PathVariable("id") Long id) {
return directorService.getDirectorById(id)
.map(director -> {
director.add(linkTo(methodOn(DirectorController.class).getDirectorById(id)).withSelfRel());
director.add(linkTo(methodOn(DirectorController.class).getDirectorMovies(id)).withRel("directorMovies"));
director.add(linkTo(methodOn((DirectorController.class)).getAllDirectors()).withRel("directors"));
return ResponseEntity.ok(director);
})
.orElse(ResponseEntity.notFound().build());
}
The main advantage of this implementation is simplicity. But making our entity dependent on an external library is not a very good idea. Plus, the code repetition for adding links for a specific resource is immediately noticeable. You can, of course, bring it to some private method, but there is a better way.
Use Assemblers - SimpleRepresentationModelAssembler
And it’s not about assembly language, but about a special kind of class that converts our resource to RepresentationModel.
One of such assemblers is SimpleRepresentationModelAssembler. Its implementation goes as follows:
@Component
public class DirectorAssembler implements SimpleRepresentationModelAssembler<Director> {
@Override
public void addLinks(EntityModel<Director> resource) {
Long directorId = resource.getContent().getId();
resource.add(linkTo(methodOn(DirectorController.class).getDirectorById(directorId)).withSelfRel());
resource.add(linkTo(methodOn(DirectorController.class).getDirectorMovies(directorId)).withRel("directorMovies"));
}
@Override
public void addLinks(CollectionModel<EntityModel<Director>> resources) {
resources.add(linkTo(methodOn(DirectorController.class).getAllDirectors()).withSelfRel());
}
}
In this case, our entity will be wrapped in an EnityModel (this class extends RepresentationModel ) to which the links specified by us in the addLinks() will be added. Here we overwrite two addLinks() methods - one for entire data collections and the other for single resources. Then, as part of the controller, it is enough to call the toModel() or toCollectionModel() method ( addLinks() are template methods here), depending on whether we return a collection or a single representation.
@GetMapping
public ResponseEntity<CollectionModel<EntityModel<Director>>> getAllDirectors() {
return ResponseEntity.ok(directorAssembler.toCollectionModel(directorService.getAllDirectors()));
}
@GetMapping(value = "directors/{id}")
public ResponseEntity<EntityModel<Director>> getDirectorById(@PathVariable("id") Long id) {
return directorService.getDirectorById(id)
.map(director -> {
EntityModel<Director> directorRepresentation = directorAssembler.toModel(director)
.add(linkTo(methodOn(DirectorController.class).getAllDirectors()).withRel("directors"));
return ResponseEntity.ok(directorRepresentation);
})
.orElse(ResponseEntity.notFound().build());
}
The main benefit of using the SimpleRepresentationModelAssembler is the separation of our entity from the RepresentationModel , as well as the separation of the adding link logic from the controller.
The problem arises when we want to add hypermedia to the nested elements of an object. Obtaining the effect, as in the example below, is impossible in a current way.
{
"id": "M0002",
"title": "Once Upon a Time in America",
"year": 1984,
"rating": "R",
"directors": [
{
"id": "D0001",
"firstname": "Sergio",
"lastname": "Leone",
"year": 1929,
"_links": {
"self": {
"href": "http://localhost:8080/directors/D0001"
}
}
}
],
"_links": {
"self": {
"href": "http://localhost:8080/movies/M0002"
}
}
}
Create DTO class with RepresentationModelAssembler
The solution to this problem is to combine the two previous methods, modifying them slightly. In our opinion, RepresentationModelAssembler offers the most possibilities. It removes the restrictions that arose in the case of nested elements for SimpleRepresentationModelAssembler . But it also requires more code from us because we need to prepare DTOs, which are often done anyway. This is the implementation based on RepresentationModelAssembler :
@Component
public class DirectorRepresentationAssembler implements RepresentationModelAssembler<Director, DirectorRepresentation> {
@Override
public DirectorRepresentation toModel(Director entity) {
DirectorRepresentation directorRepresentation = DirectorRepresentation.builder()
.id(entity.getId())
.firstname(entity.getFirstname())
.lastname(entity.getLastname())
.year(entity.getYear())
.build();
directorRepresentation.add(linkTo(methodOn(DirectorController.class).getDirectorById(directorRepresentation.getId())).withSelfRel());
directorRepresentation.add(linkTo(methodOn(DirectorController.class).getDirectorMovies(directorRepresentation.getId())).withRel("directorMovies"));
return directorRepresentation;
}
@Override
public CollectionModel<DirectorRepresentation> toCollectionModel(Iterable<? extends Director> entities) {
CollectionModel<DirectorRepresentation> directorRepresentations = RepresentationModelAssembler.super.toCollectionModel(entities);
directorRepresentations.add(linkTo(methodOn(DirectorController.class).getAllDirectors()).withSelfRel());
return directorRepresentations;
}
}
When it comes to controller methods, they look the same as for SimpleRepresentationModelAssembler , the only difference is that in the ResponseEntity the return type is DTO - DirectorRepresentation .
@GetMapping
public ResponseEntity<CollectionModel<DirectorRepresentation>> getAllDirectors() {
return ResponseEntity.ok(directorRepresentationAssembler.toCollectionModel(directorService.getAllDirectors()));
}
@GetMapping(value = "/{id}")
public ResponseEntity<DirectorRepresentation> getDirectorById(@PathVariable("id") String id) {
return directorService.getDirectorById(id)
.map(director -> {
DirectorRepresentation directorRepresentation = directorRepresentationAssembler.toModel(director)
.add(linkTo(methodOn(DirectorController.class).getAllDirectors()).withRel("directors"));
return ResponseEntity.ok(directorRepresentation);
})
.orElse(ResponseEntity.notFound().build());
}
Here is our DTO model:
@Builder
@Getter
@EqualsAndHashCode(callSuper = false)
@Relation(itemRelation = "director", collectionRelation = "directors")
public class DirectorRepresentation extends RepresentationModel<DirectorRepresentation> {
private final String id;
private final String firstname;
private final String lastname;
private final int year;
}
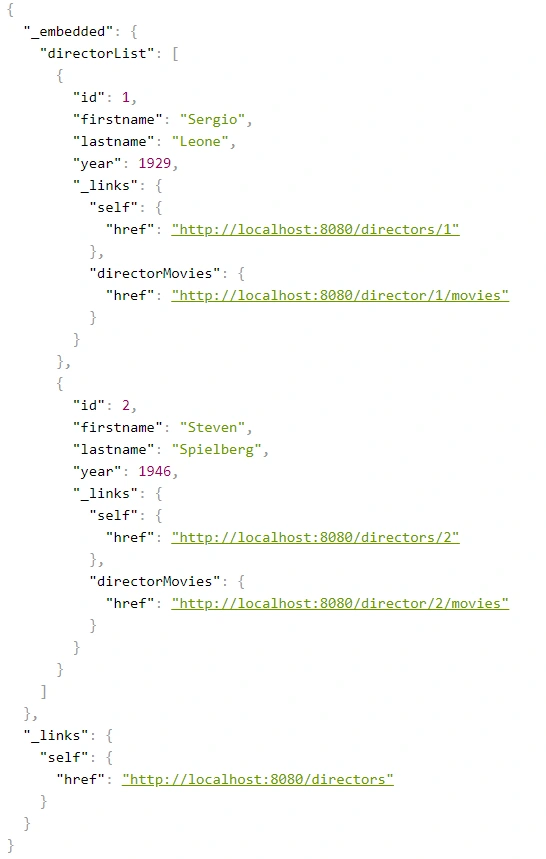
The @Relation annotation allows you to configure the relationship names to be used in the HAL representation. Without it, the relationship names match the class name and a suffix List for the collection.
By default, JSON+HAL looks like this:
{
"_embedded": {
"directorRepresentationList": [
…
]
},
"_links": {
…
}
}
However, annotation @Relation can change the name of directors :
{
"_embedded": {
"directors": [
…
]
},
"_links": {
…
}
}
Summarizing the HATEOAS concept, it consists of a few pros and cons.
Pros:
- If the client uses it, we can change the API address for our resources without breaking the client.
- Creates good self-documentation, and table of contents of API to the person who has the first contact with our API.
- Can simplify building some conditions on the frontend, e.g., whether the button should be disabled / enabled based on whether the link to corresponding the action exists.
- Less coupling between frontend and backend.
- Just like writing tests imposes on us to stick to the SRP principle in class construction, HATEOAS can keep us in check when designing API.
Cons:
- Additional work needed on implementing non-business functionality.
- Additional network overhead. The size of the transferred data is larger.
- Adding links to some resources can be sometimes complicated and can introduce mess in controllers.
Changes in Spring HATEOAS 1.0
Spring HATEOAS has been available since 2012, but the first release of version 1.0 was in 2019.
The main changes concerned the changes to the package paths and names of some classes, e.g.
Old New ResourceSupport RepresentationModel Resource EntityModel Resources CollectionModel PagedResources PagedModel ResourceAssembler RepresentationModelAssembler
It is worth paying attention to a certain naming convention - the replacement of the word Resource in class names with the word Representation . It occurred because these types do not represent resources but representations, which can be enriched with hypermedia. It is also more in the spirit of REST. We are returning the resource representations, not the resources themselves. In the new version, there is a tendency to move away from constructors in favor of static construction methods - .of() .
It is also worth mentioning that the old version has no equivalent for SimpleRepresentationModelAssembler . On the other hand, the ResourceAssembler interface has only the toResource() method (equivalent - toModel() ) and no equivalent for toCollectionModel() . Such a method is found in RepresentationModelAssembler and is the toModelCollection() method.
The creators of the library have also included a script that migrates old package paths and old class names to the new version. You can check it here .
Big picture of Spring Cloud Gateway
In my life, I had an opportunity to work in a team that maintains the Api Gateway System. The creation of this system began more than 15 years ago, so it is quite a long time ago considering the rate of technology changing. The system was updated to Java 8, developed on a light-way server which is Tomcat Apache, and contained various tests: integration, performance, end-to-end, and unit test. Although the gateway was maintained with diligence, it is obvious that its core contains a lot of requests processing implementation like routing, modifying headers, converting request payload, which nowadays can be delivered by a framework like Spring Cloud Gateway. In this article, I am going to show the benefits of the above-mentioned framework.
The major benefits, which are delivered by Spring Cloud Gateway:
- support to reactive programming model: reactive http endpoint, reactive web socket
- configuring request processing (routes, filters, predicates) by java code or yet another markup language (YAML)
- dynamic reloading of configuration without restarting the server (integration with Spring Cloud Config Server)
- support for SSL
- actuator Api
- integration gateway to Service Discovery mechanism
- load-balancing mechanisms
- rate-limiting (throttling) mechanisms
- circuit breakers mechanism
- integration with Oauth2 due to providing security features
Those above-mentioned features have an enormous impact on the speed and easiness of creating an Api gateway system. In this article, I am going to describe a couple of those features.
Due to the software, the world is the world of practice and systems cannot work only in theory, I decided to create a lab environment to prove the practical value of the Cloud Spring Gateway Ecosystem. Below I put an architecture of the lab environment:
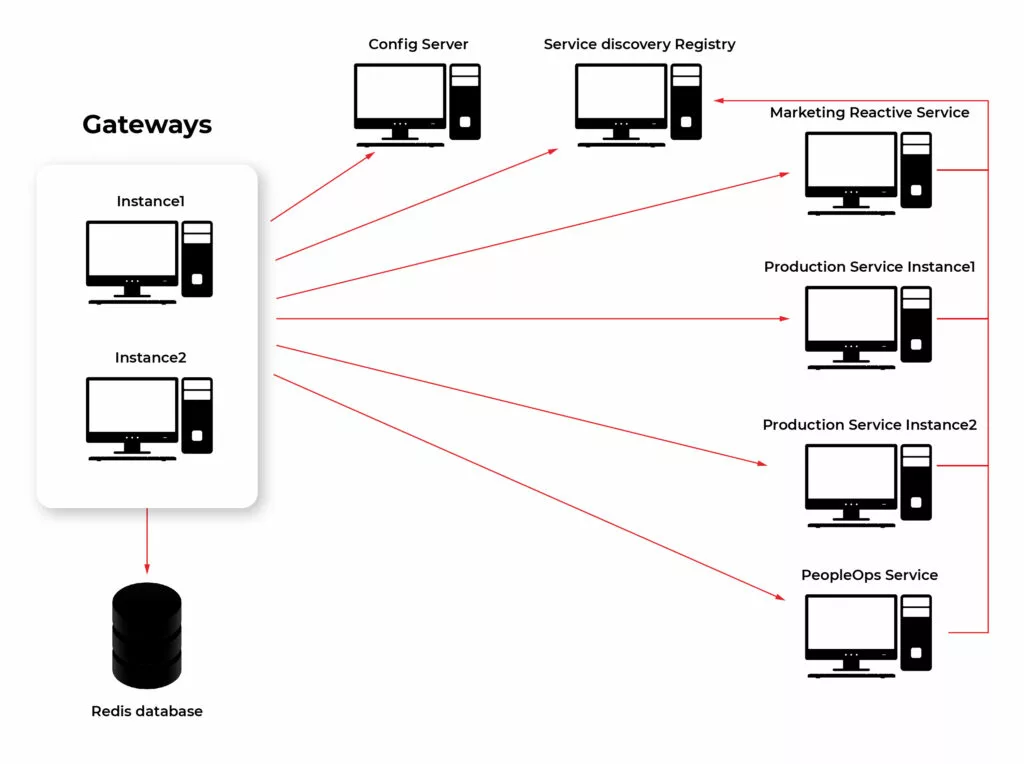
Building elements of Spring Cloud Gateway
The first feature of Spring Cloud Gateway I am going to describe is a configuration of request processing. It can be considered the heart of the gateway. It is one of the major parts and responsibilities. As I mentioned earlier this logic can be created by java code or by YAML files. Below I add an example configuration in YAML and Java code way. Basic building blocks used to create processing logic are:
- Predicates – match requests based on their feature (path, hostname, headers, cookies, query)
- Filters – process and modify requests in a variety of ways. Can be divided depending on their purpose:
- gateway filter - modify the incoming http request or outgoing http response
- global filter - special filters applying to all routes so long as some conditions are fulfilled
Details about different implementations of getaway building components can be found in docs: https://cloud.spring.io/spring-cloud-gateway/reference/html/ .
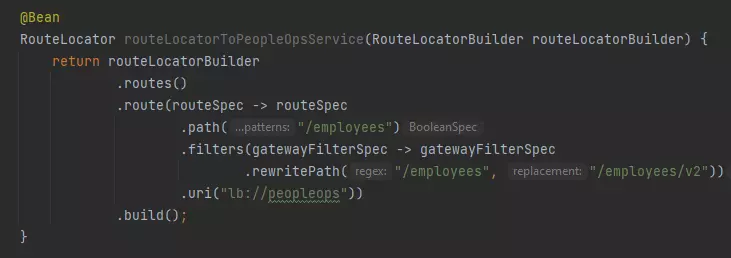
Example of configuring route in Java DSL:
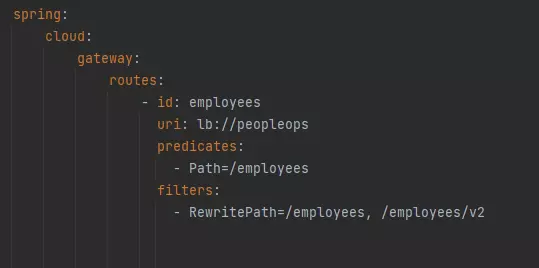
Configuration same route with YAML:
Spring Cloud Config Server integrated with Gateway
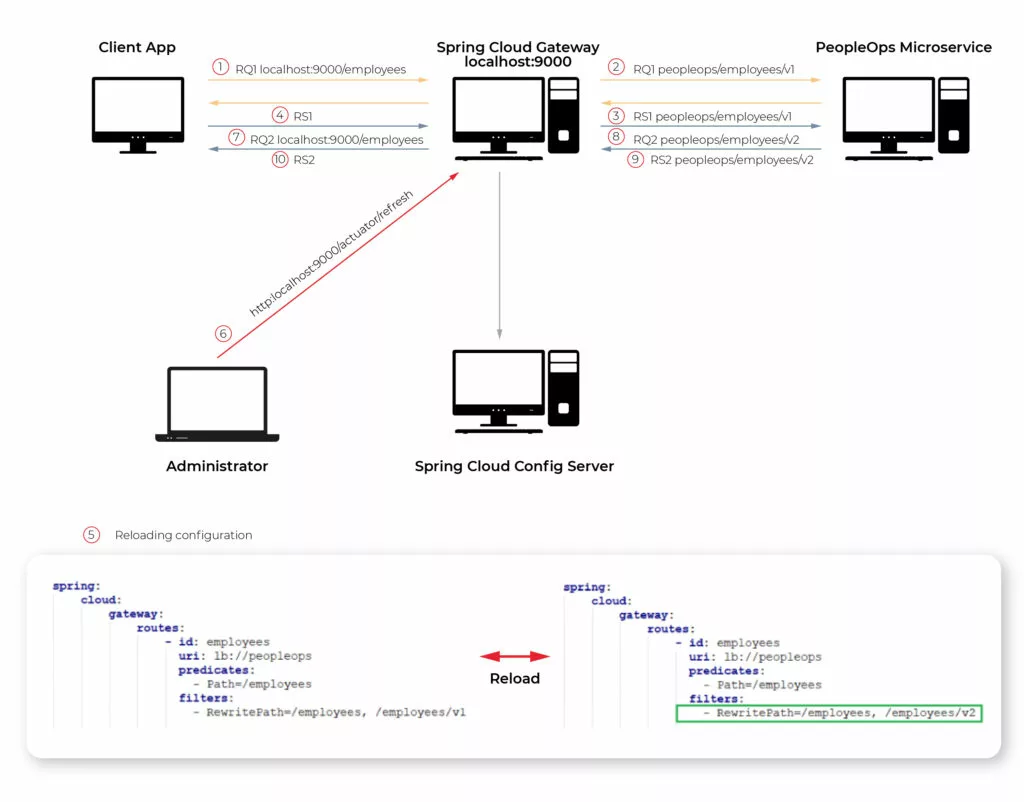
Someone might not be a huge fan of YAML language but using it here may have a big advantage in this case. It is possible to store configuration files in Spring Cloud Config Server and once configuration changes it can be reloaded dynamically. To do this process we need to use the Actuator Api endpoint.
Dynamic reloading of gateway configuration shows the picture below. The first four steps show request processing consistent with the current configuration. The gateway passes requests from the client to the “employees/v1” endpoint of the PeopleOps microservice (step 2). Then gateway passes the response back from the PeopleOps microservice to the client app (step 4). The next step is updating the configuration. Once Config Server uses git repository to store configuration, updating means committing recent changes made in the application.yaml file (step 5 in the picture). After pushing new commits to the repo is necessary to send a GET request on the proper actuator endpoint (step 6). These two steps are enough so that client requests are passed to a new endpoint in PeopleOps Microservice (steps 7,8,9,10).
Reactive web flow in Api Gateway
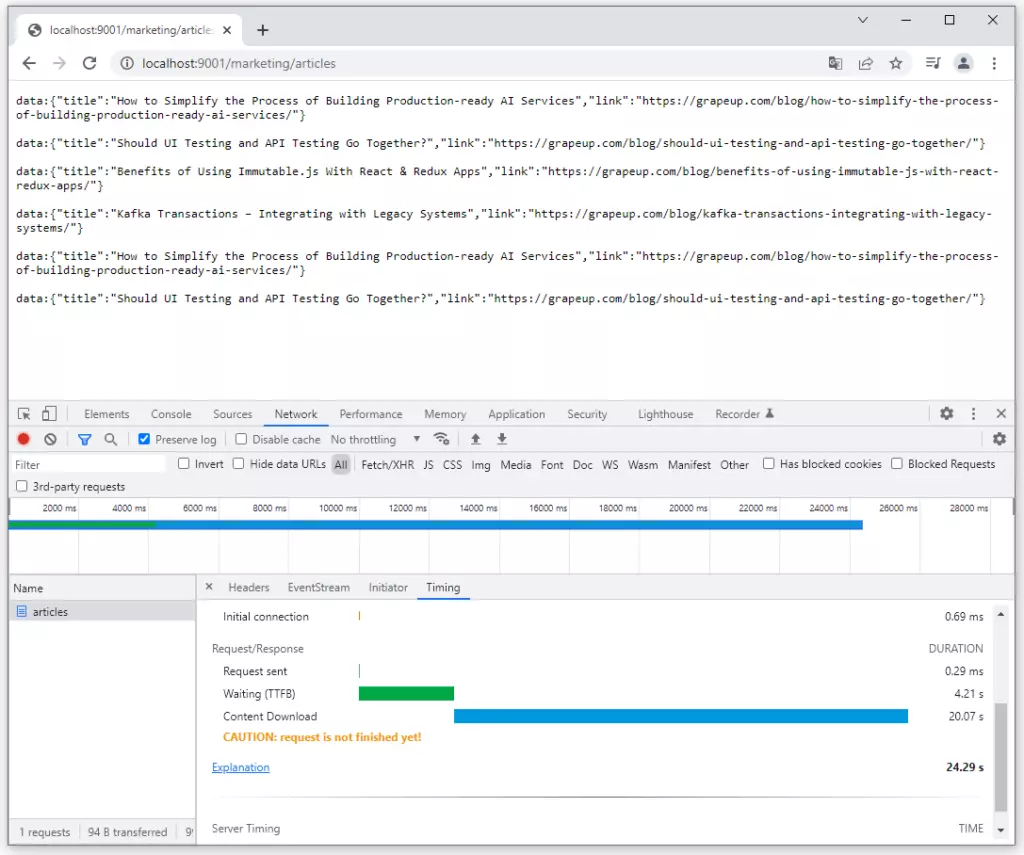
As the documentation said Spring Cloud Gateway is built on top of Spring Web Flux. Reactive programming gains popularity among Java developers so Spring Gateway offers to create fully reactive applications. In my lab, I created Controller in a Marketing microservice which generates article data repetitively every 4 seconds. The browser observes this stream of requests. The picture below shows that 6 chunks of data were received in 24 seconds.
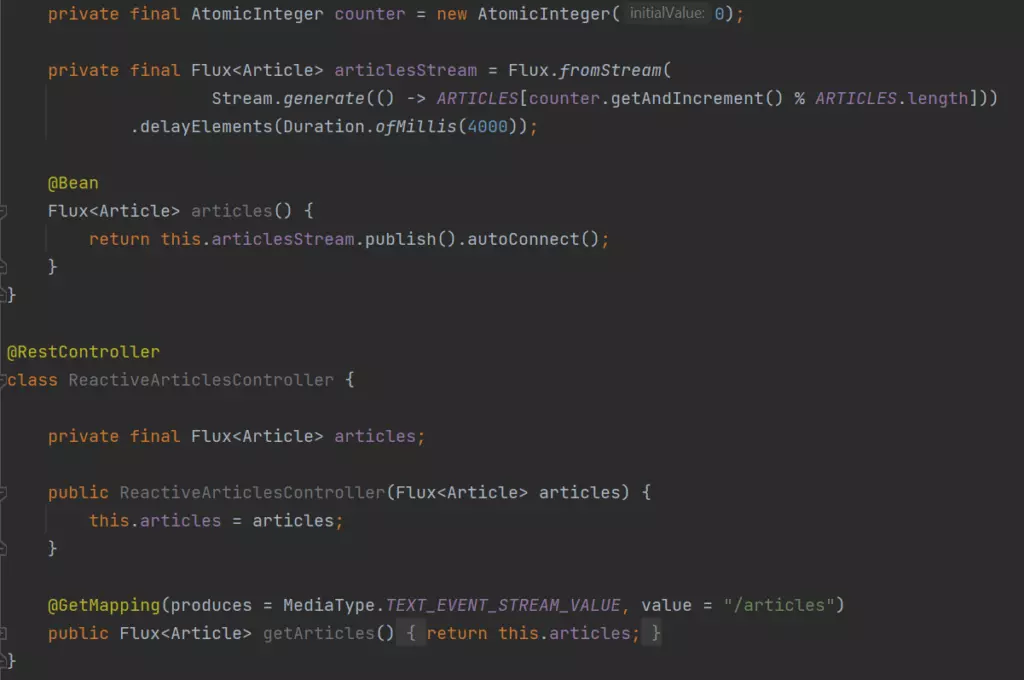
I do not dive into reactive programming style deeply, there are a lot of articles about the benefits and differences between reactive and other programming styles. I just put the implementation of a simple reactive endpoint in the Marketing microservice below. It is accessible on GitHub too: https://github.com/chrrono/Spring-Cloud-Gateway-lab/blob/master/Marketing/src/main/java/com/grapeup/reactive/marketing/MarketingApplication.java
Rate limiting possibilities of Gateway
The next feature of Spring Cloud Gateway is the implementation of rate-limiting (throttling) mechanisms. This mechanism was designed to protect gateways from harmful traffic. One of the examples might be distributed denial-of-service (DDoS) attack. It consists of creating an enormous number of requests per second which the system cannot handle.
The filtering of requests may be based on the user principles, special fields in headers, or other rules. In production environments, mostly several gateways instance up and running but for Spring Cloud Gateway framework is not an obstacle, because it uses Redis to store information about the number of requests per key. All instances are connected to one Redis instance so throttling can work correctly in a multi-instances environment.
Due to prove the advantages of this functionality I configured rate-limiting in Gateway in the lab environment and created an end-to-end test, which can be described in the picture below.
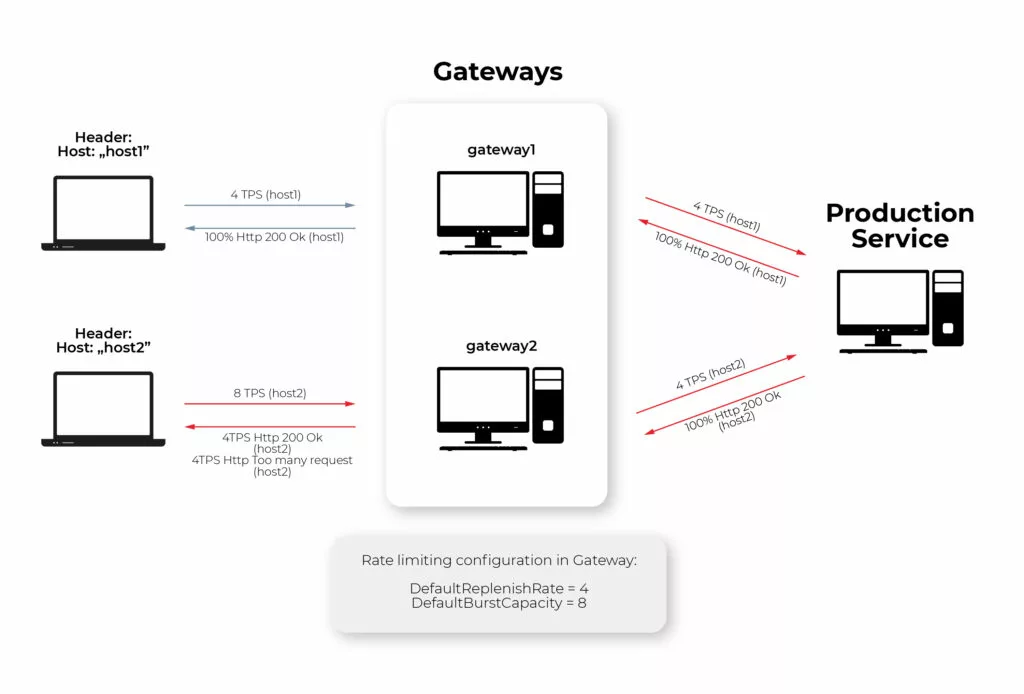
The parameters configured for throttling are as follows: DefaultReplenishRate = 4, DefaultBurstCapacity = 8. It means getaways allow 4 Transactions (Request) per second (TPS) for the concrete key. The key in my example is the header value of “Host” field, which means that the first and second clients have a limit of 4TPS separately. If the limit is exceeded, the gateway replies by http response with 429 http code. Because of that, all requests from the first client are passed to the production service, but for the second client only half of the requests are passed to the production service by the gateway, and another half are replied to the client immediately with 429 Http Code.
If someone is interested in how I test it using Rest Assured, JUnit, and Executor Service in Java test is accessible here: https://github.com/chrrono/Spring-Cloud-Gateway-lab/blob/master/Gateway/src/test/java/com/grapeup/gateway/demo/GatewayApplicationTests.java
Service Discovery
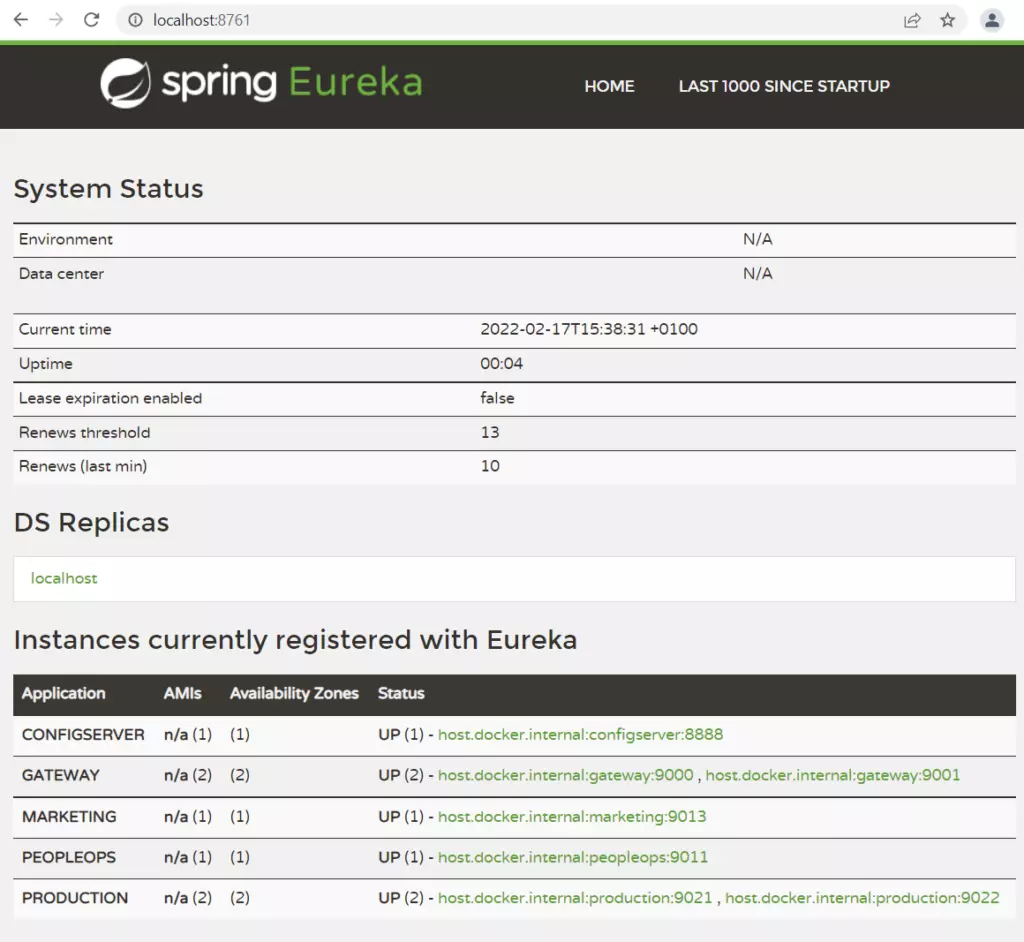
The next integration subject concerns the service discovery mechanism. Service discovery is a service registry. Microservice starting registers itself to Service Discovery and other applications may use its entry to find and communicate with this microservice. Integration Spring Cloud Gateway with Eureka service discovery is simple. Without the creation of any configuration regarding request processing, requests can be passed from the gateway to a specific microservice and its concrete endpoint.
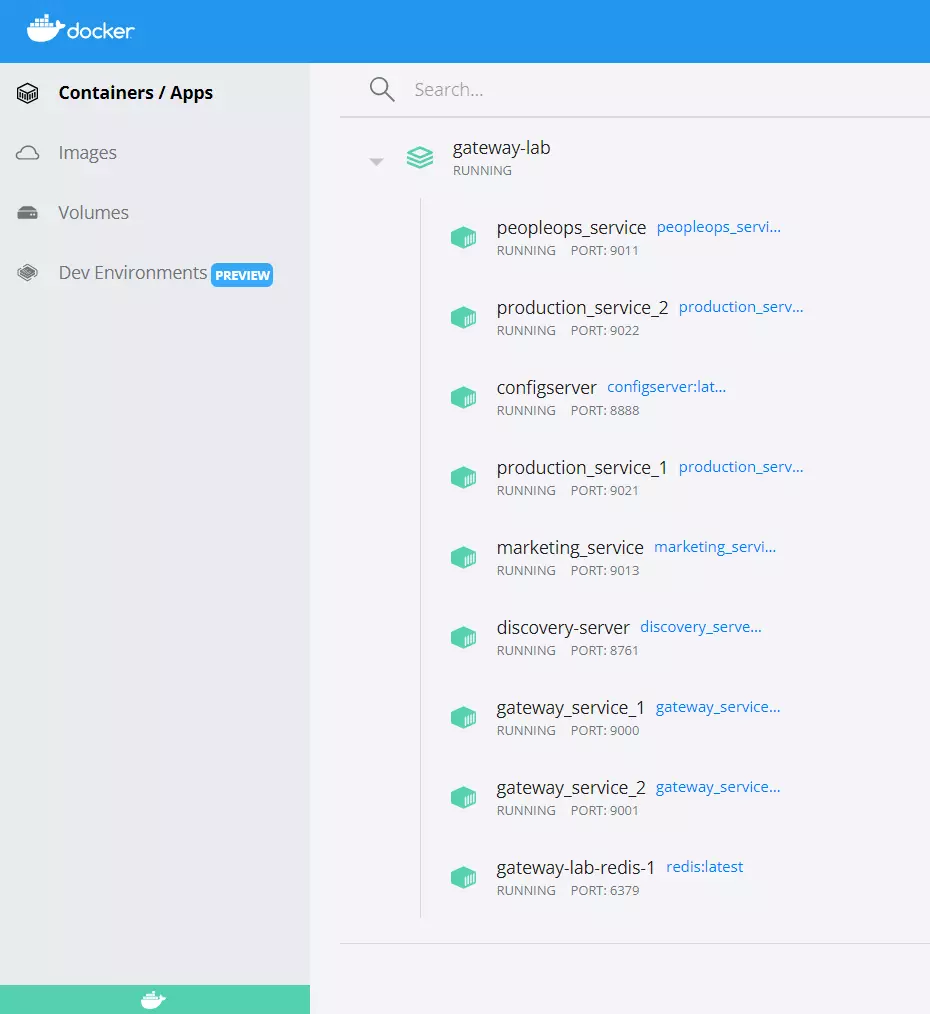
The below Picture shows all registering applications from my lab architecture created due to a practical test of Spring Cloud Gateway. “Production” microservice has one entry for two instances. It is a special configuration, which enables load balancing by a gateway.
Circuit Breaker mention
The circuit breaker is a pattern that is used in case of failure connected to a specific microservice. All we need is to define Spring Gateway fallback procedures. Once the connection breaks down, the request will be forwarded to a new route. The circuit breaker offers more possibilities, for example, special action in case of network delays and it can be configured in the gateway.
Experiment on your own
I encourage you to conduct your own tests or develop a system that I build, in your own direction. Below, there are two links to GitHub repositories:
- https://github.com/chrrono/config-for-Config-server (Repo for keep configuration for Spring Cloud Config Server)
- https://github.com/chrrono/Spring-Cloud-Gateway-lab (All microservices code and docker-compose configuration)
To establish a local environment in a straightforward way, I created a docker-compose configuration. This is a link for the docker-compose.yml file: https://github.com/chrrono/Spring-Cloud-Gateway-lab/blob/master/docker-compose.yml
All you need to do is install a docker on your machine. I used Docker Desktop on my Windows machine. After executing the “docker-compose up” command in the proper location you should see all servers up and running:
To conduct some tests I use the Postman application, Google Chrome, and my end-to-end tests (Rest Assured, JUnit, and Executor Service in Java). Do with this code all you want and allow yourself to have only one limitation: your imagination 😊
Summary
Spring Cloud Gateway is a huge topic, undoubtedly. In this article, I focused on showing some basic building components and the overall intention of gateway and interaction with others spring cloud services. I hope readers appreciate the possibilities and care by describing the framework. If someone has an interest in exploring Spring Cloud Gateway on your own, I added links to a repo, which can be used as a template project for your explorations.
Native bindings for JavaScript - why should I care?
At the very beginning, let’s make one important statement: I am not a JavaScript Developer. I am a C++ Developer, and with my skill set I feel more like a guest in the world of JavaScript. If you’re also a Developer, you probably already know why companies today are on the constant lookout for web developers - the JavaScript language is flexible and has a quite easy learning curve. Also, it is present everywhere from computers, to mobile devices, embedded devices, cars, ATMs or washing machines - you name it. Writing portable code that may be run everywhere is tempting and that's why it gets more and more attention.
Desktop applications in JavaScript
In general, JavaScript is not the first or best fit for desktop applications. It was not created for that purpose and it lacks GUI libraries like C++, C#, Java or even Python. Even though it has found its niche.
Just take a look at the Atom text editor. It is based on Electron [1], a framework to run JS code in a desktop application. The tool internally uses chromium engine so it is more or less a browser in a window, but still quite an impressive achievement to have the same codebase for both Windows, macOS and Linux. It is quite meaningful for those that want to use agile processes. Especially because it is really easy to start with an MVP and have incremental updates with new features often, as it is the same code.
Native code and JavaScript? Are you kidding?
Since JavaScript works for desktop applications, one may think: why bother with native bindings then? But before you also think so, consider the fact that there are a few reasons for that, usually performance issues:
- Javascript is a script, virtualized language. In some scenarios, it may be of magnitude slower than its native code equivalent [2].
- Javascript is characterized by garbage collection and has a hard time with memory consuming algorithms and tasks.
- Access to hardware or native frameworks is sometimes only possible from a native, compiled code.
Of course, this is not always necessary. In fact, you may happily live your developer life writing JS code on a daily basis and never find yourself in a situation when creating or using native code in your application is unavoidable. Hardware performance is still on the uphill and often there is no need to even profile an application. On the other hand, once it happens, every developer should know what options are available for them.
The strange and scary world of static typing
If a JavaScript Developer who uses Electron finds out that his great video encoding algorithm does not keep up with the framerate, is that the end of his application? Should he rewrite everything in assembler?
Obviously not. He might try to use the native library to do the hard work and leverage the environment without a garbage collector and with fast access to the hardware - or maybe even SIMD SSE extensions. The question that many may ask is: but isn’t it difficult and pointless?
Surprisingly not. Let’s dig deeper into the world of native bindings when as an opposite to JavaScript, you often have to specify the type of variable or return value for functions in your code.
First of all, if you want to use Electron or any framework based on NodeJS, you are not alone - you have a small friend called “nan” (if you have seen “wat”[3] you are probably already smiling). Nan is a “native abstraction for NodeJS” [4] and thanks to its very descriptive name, it is enough to say that it allows to create add-ons to NodeJS easily. As literally everything today you can install it using the npm below:
$ npm install --save nan
Without getting into boring, technical details, here is an example of wrapping C++ class to a JavaScript object:
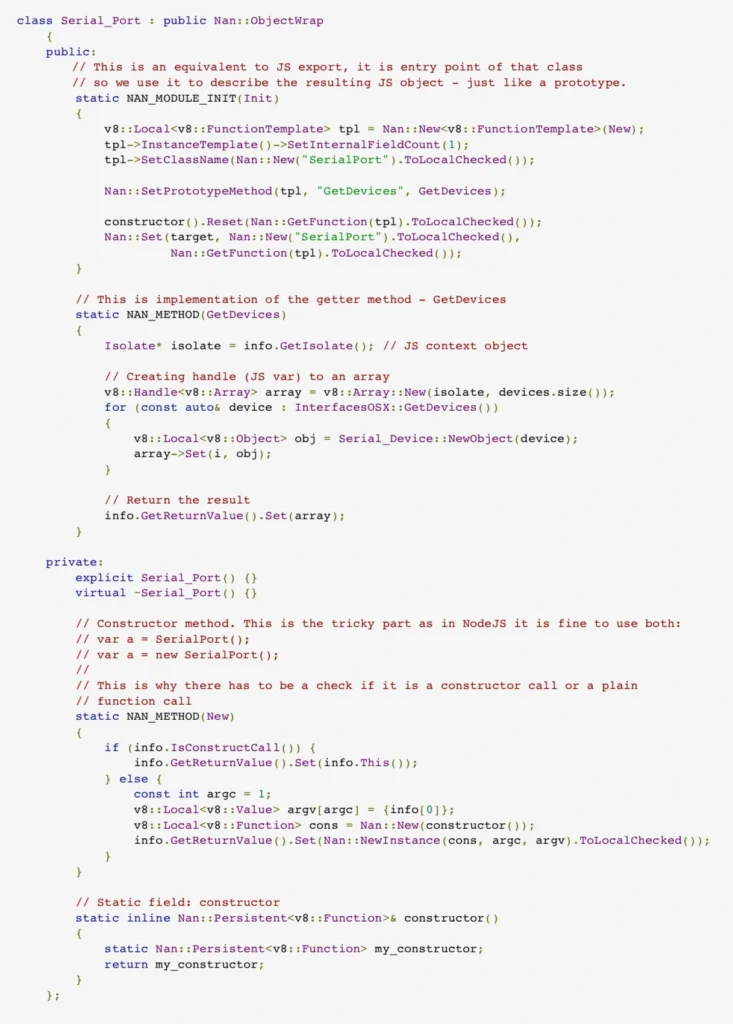
Nothing really fancy and the code isn’t too complex either. Just a thin wrapping layer over the C++ class. Obviously, for bigger frameworks there will be much code and more problems to solve, but in general we have a native framework bound with the JavaScript application.
Summary
The bad part is that we, unfortunately, need to compile the code for each platform to use it and by each platform we usually mean windows, linux, macOS, android and iOS depending on our targets. Also, it is not rocket science, but for JavaScript developers that never had a chance to compile the code it may be too difficult.
On the other hand, we have a not so perfect, but working solution for writing applications that run on multiple platforms and handle even complex business logic . Programming has never been a perfect world, it has always been a world of trade-offs, beautiful solutions that never work and refactoring that never happens. In the end, when you are going to look for yet another compromise between your team’s skills and the client’s requirements for the next desktop or mobile application framework, you might consider using JavaScript.
Interested in our services?
Reach out for tailored solutions and expert guidance.