Android Automotive OS 11 Camera2 and EVS – Two different camera subsystems up and running

Android Automotive OS, AAOS in short, is a vehicle infotainment operating system that has gained a lot of traction recently, with most of the OEMs around the world openly announcing new versions of their infotainment based on Android. AAOS is based on the AOSP (Android Open Source Project) source code, which makes it fully compatible with Android, with additions that make it more useful in cars – different UI, integration with hardware layer, or vehicle-specific apps.
For OEMs and Tier1s, who are deeply accustomed to infotainment based on QNX/Autosar/Docker/Linux, and software developers working on AAOS apps, it’s sometimes difficult to quickly spin-up the development board or emulator supporting external hardware that has no out-of-the-box emulation built by Google. One of the common examples is camera access, which is missing in the official AAOS emulator these days, but the hardware itself is quite common in modern vehicles – which makes implementation of applications similar to Zoom or MS Teams for AAOS tempting to app developers.
In this article, I will explain how to build a simple test bench based on a cost-effective Raspberry Pi board and AAOS for developers to test their camera application. Examples will be based on AAOS 11 running on Raspberry Pi 4 and our Grape Up repository. Please check our previous article: “Build and Run Android Automotive OS on Raspberry Pi 4B” for a detailed description of how to run AAOS on this board.
Android Automotive OS has 2 different subsystems to access platform cameras: Camera2 and EVS. In this article, I will explain both how we can use it and how to get it running on Android Automotive OS 11.
Exterior View System (EVS)
EVS is a subsystem to display parking and maneuvering camera image. It supports multiple cameras’ access and view. The main goal and advantage of that subsystem is that it boots quickly and should display a parking view before 2 seconds, which is required by law.

Source https://source.android.com/docs/automotive/camera-hal
As you can see on the attached diagram, low layers of EVS depend on OEM source code. OEM needs to deliver Camera and Display implementation. However, Android delivers a sample application (/hardware/interfaces/automotive/evs/1.0), which uses Linux V4L2 and OpenGL to grab camera frames and display them. You can find more information about EVS at https://source.android.com/docs/automotive/camera-hal
In our example, we will use samples from Android. Additionally, I assume you build our Raspberry Pi image (see our article), as it has multiple changes that allow AAOS to reliably run on RPi4 and support its hardware.
You should have a camera connected to your board via USB. Please check if your camera is detected by V4L2. There should be a device file:
/dev/video0Then, type on the console:
su

setprop persist.automotive.evs.mode 1
This will start the EVS system.
To display camera views:
evs_appType Ctrl-C to exit the app and go back to the normal Android view.
Camera2
Camera2 is a subsystem intended for camera access by “normal” Android applications (smartphones, tablets, etc.). It is a common system for all Android applications, recently slowly being replaced by CameraX. The developer of an Android app uses Java camera API to gain access to the camera.
Camera2 has three main layers, which are shown in the diagram below:
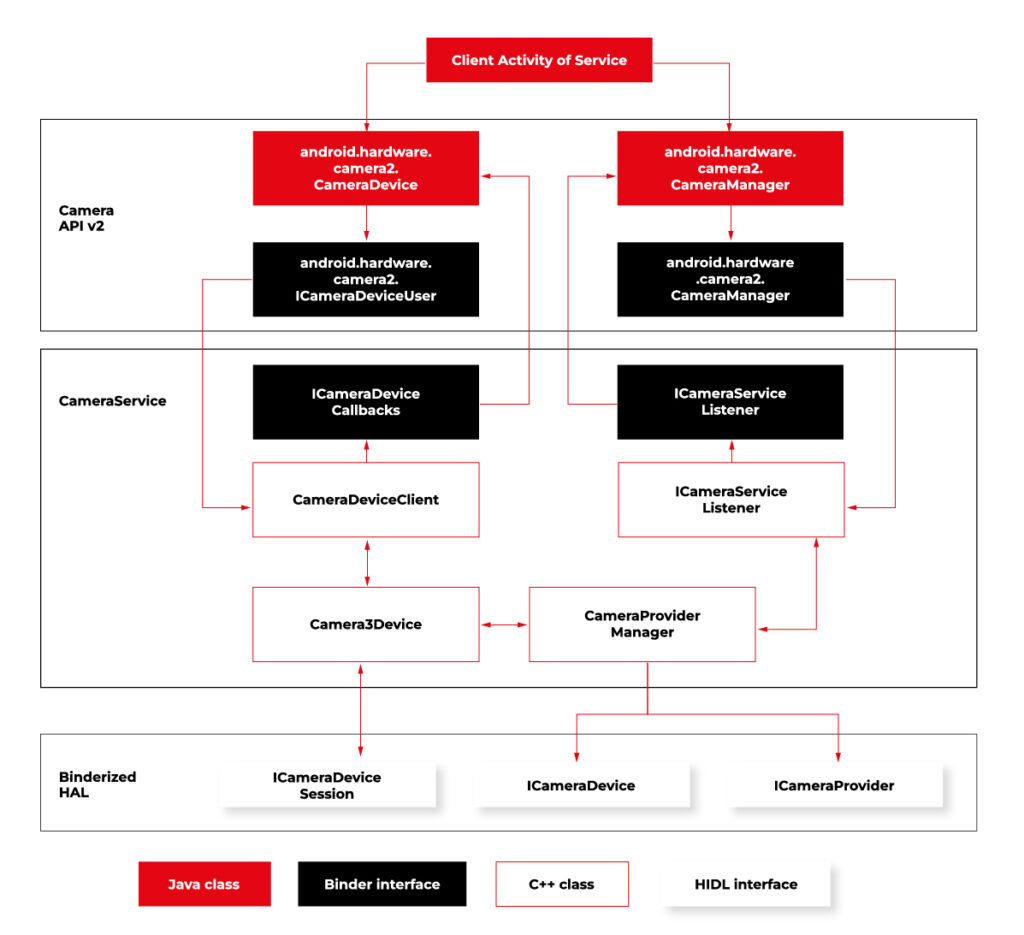
Source https://source.android.com/docs/core/camera
Low-level Camera access is implemented in CameraProvider. OEM can implement their own provider or a V4L2 camera driver can be used.
To get Camera2, you should enable it in the Car product make file. In
packages/services/Car/car_product/build/car_base.mk change config.disable_cameraservice to false.
PRODUCT_PROPERTY_OVERRIDES += config.disable_cameraservice=falseAfter that, rebuild Android:
make ramdisk systemimage vendorimagePut it in the SD card and boot RPi with it. You will be able to run the “Camera” application on the AAOS screen, see camera output from the connected webcam, and run and debug applications using Camera API.
Summary
Now you know how to run both AAOS camera APIs on the RPi4 board. You can use both APIs to develop automotive applications leveraging cameras and test them using a simple USB webcam, which you may have somewhere on the shelf. If you found this article useful, you can also look at our previous articles about AAOS – both from the application development perspective and the OS perspective. Happy coding!
Is it insightful?
Share the article!
Check related articles
Read our blog and stay informed about the industry's latest trends and solutions.
see all articles