How to build an Android companion app to control a car with AAOS via Wi-Fi
In this article, we will explore how to create an application that controls HVAC functions and retrieves images from cameras in a vehicle equipped with Android Automotive OS (AAOS) 14.
The phone must be connected to the car's Wi-Fi, and communication between the Head Unit and the phone is required. The Android companion app will utilize the HTTP protocol for this purpose.
In AAOS 14, the Vehicle Hardware Abstraction Layer (VHAL) will create an HTTP server to handle our commands. This functionality is discussed in detail in the article " Exploring the Architecture of Automotive Electronics: Domain vs. Zone ".
Creating the mobile application
To develop the mobile application, we'll use Android Studio. Start by selecting File -> New Project -> Phone and Tablet -> Empty Activity from the menu. This will create a basic Android project structure.
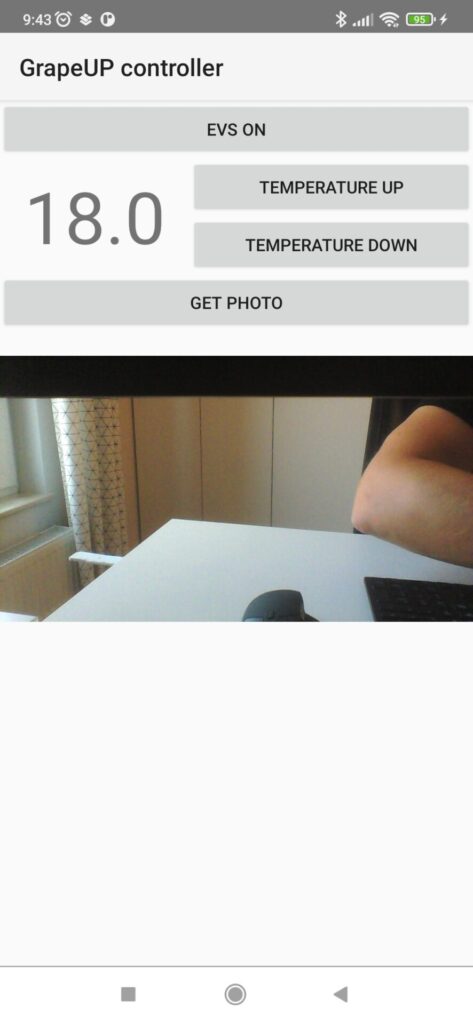
Next, you need to create the Android companion app layout, as shown in the provided screenshot.
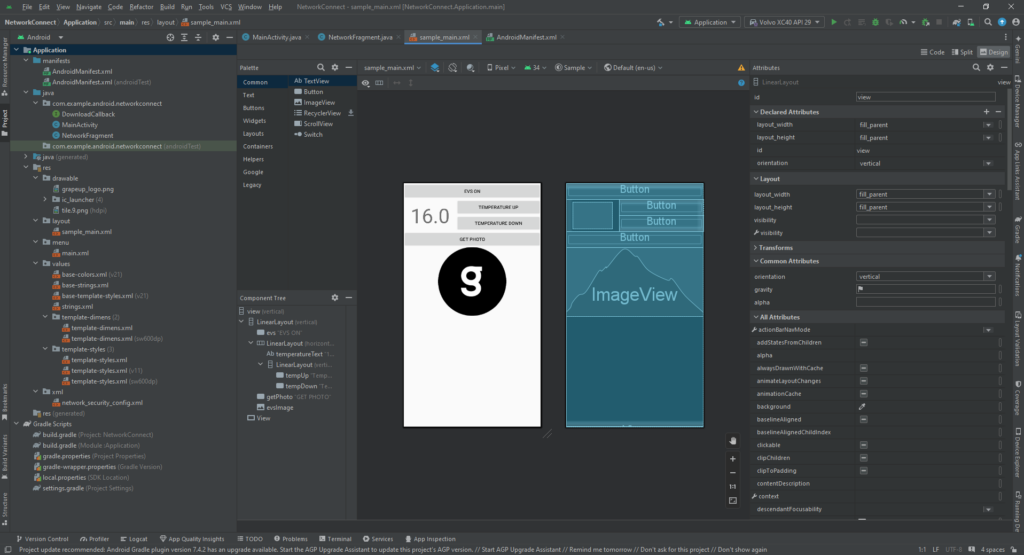
Below is the XML code for the example layout:
<?xml version="1.0" encoding="utf-8"?>

<!-- Copyright 2013 The Android Open Source Project -->
<LinearLayout xmlns:android="http://schemas.android.com/apk/res/android"
    xmlns:app="http://schemas.android.com/apk/res-auto"
    android:id="@+id/view"
    android:layout_width="fill_parent"
    android:layout_height="fill_parent"
    android:orientation="vertical">

    <LinearLayout
        android:layout_width="match_parent"
        android:layout_height="match_parent"
        android:layout_weight="1"
        android:orientation="vertical">

        <Button
            android:id="@+id/evs"
            android:layout_width="match_parent"
            android:layout_height="wrap_content"
            android:text="EVS ON" />

        <LinearLayout
            android:layout_width="match_parent"
            android:layout_height="wrap_content"
            android:orientation="horizontal">

            <TextView
                android:id="@+id/temperatureText"
                android:layout_width="wrap_content"
                android:layout_height="wrap_content"
                android:layout_marginStart="20dp"
                android:layout_marginTop="8dp"
                android:layout_marginEnd="20dp"
                android:text="16.0"
                android:textSize="60sp" />

            <LinearLayout
                android:layout_width="match_parent"
                android:layout_height="wrap_content"
                android:orientation="vertical">

                <Button
                    android:id="@+id/tempUp"
                    android:layout_width="match_parent"
                    android:layout_height="wrap_content"
                    android:text="Temperature UP" />

                <Button
                    android:id="@+id/tempDown"
                    android:layout_width="match_parent"
                    android:layout_height="wrap_content"
                    android:text="Temperature Down" />
            </LinearLayout>
        </LinearLayout>

        <Button
            android:id="@+id/getPhoto"
            android:layout_width="match_parent"
            android:layout_height="wrap_content"
            android:text="GET PHOTO" />

        <ImageView
            android:id="@+id/evsImage"
            android:layout_width="match_parent"
            android:layout_height="wrap_content"
            app:srcCompat="@drawable/grapeup_logo" />

    </LinearLayout>

    <View
        android:layout_width="fill_parent"
        android:layout_height="1dp"
        android:background="@android:color/darker_gray" />
</LinearLayout>
Adding functionality to the buttons
After setting up the layout, the next step is to connect actions to the buttons. Here's how you can do it in your MainActivity :
Button tempUpButton = findViewById(R.id.tempUp);
tempUpButton.setOnClickListener(new View.OnClickListener() {
@Override
public void onClick(View v) {
tempUpClicked();
}
});
Button tempDownButton = findViewById(R.id.tempDown);
tempDownButton.setOnClickListener(new View.OnClickListener() {
@Override
public void onClick(View v) {
tempDownClicked();
}
});
Button evsButton = findViewById(R.id.evs);
evsButton.setOnClickListener(new View.OnClickListener() {
@Override
public void onClick(View v) {
evsClicked();
}
});
Button getPhotoButton = findViewById(R.id.getPhoto);
getPhotoButton.setOnClickListener(new View.OnClickListener() {
@Override
public void onClick(View v) {
Log.w("GrapeUpController", "getPhotoButton clicked");
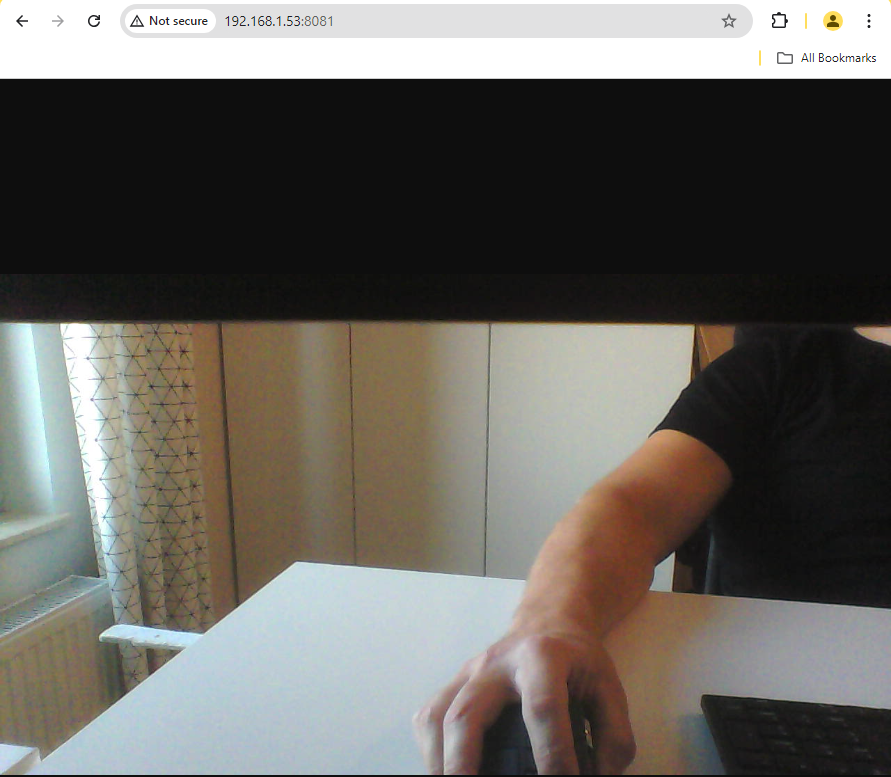
new DownloadImageTask((ImageView) findViewById(R.id.evsImage))
.execute("http://192.168.1.53:8081/");
}
});
Downloading and displaying an image
To retrieve an image from the car’s camera, we use the DownloadImageTask class, which downloads a JPEG image in the background and displays it:
private class DownloadImageTask extends AsyncTask<String, Void, Bitmap> {
    ImageView bmImage;

    public DownloadImageTask(ImageView bmImage) {
        this.bmImage = bmImage;
    }

    @Override
    protected Bitmap doInBackground(String... urls) {
        String urldisplay = urls[0];
        Bitmap mIcon11 = null;
        try {
            Log.w("GrapeUpController", "doInBackground: " + urldisplay);
            InputStream in = new java.net.URL(urldisplay).openStream();
            mIcon11 = BitmapFactory.decodeStream(in);
        } catch (Exception e) {
            Log.e("Error", e.getMessage());
            e.printStackTrace();
        }
        return mIcon11;
    }

    @Override
    protected void onPostExecute(Bitmap result) {
        bmImage.setImageBitmap(result);
    }
}
Adjusting the temperature
To change the car’s temperature, you can implement a function like this:
private void tempUpClicked() {
    mTemperature += 0.5f;

    new Thread(new Runnable() {
        @Override
        public void run() {
            doInBackground("http://192.168.1.53:8080/set_temp/" +
                String.format(Locale.US, "%.01f", mTemperature));
        }
    }).start();

    updateTemperature();
}
Endpoint overview
In the above examples, we used two endpoints: http://192.168.1.53:8080/ and http://192.168.1.53:8081/.
- The first endpoint corresponds to the AAOS 14 and the server implemented in the VHAL , which handles commands for controlling car functions.
- The second endpoint is the server implemented in the EVS Driver application. It retrieves images from the car’s camera and sends them as an HTTP response.
For more information on EVS setup in AAOS, you can refer to the articles " Android AAOS 14 - Surround View Parking Camera: How to Configure and Launch EVS (Exterior View System) " and " Android AAOS 14 - EVS network camera. "
EVS driver photo provider
In our example, the EVS Driver application is responsible for providing the photo from the car's camera. This application is located in the packages/services/Car/cpp/evs/sampleDriver/aidl/src directory. We will create a new thread within this application that runs an HTTP server. The server will handle requests for images using the v4l2 (Video4Linux2) interface.
Each HTTP request will initialize v4l2, set the image format to JPEG, and specify the resolution. After capturing the image, the data will be sent as a response, and the v4l2 stream will be stopped. Below is an example code snippet that demonstrates this process:
#include <errno.h>
#include <fcntl.h>
#include <linux/videodev2.h>
#include <stdint.h>
#include <stdio.h>
#include <string.h>
#include <sys/ioctl.h>
#include <sys/mman.h>
#include <unistd.h>
#include "cpp-httplib/httplib.h"

#include <utils/Log.h>
#include <android-base/logging.h>

uint8_t *buffer;
size_t bufferLength;
int fd;

static int xioctl(int fd, int request, void *arg)
{
    int r;
    do r = ioctl(fd, request, arg);
    while (-1 == r && EINTR == errno);

    if (r == -1) {
        ALOGE("xioctl error: %d, %s", errno, strerror(errno));
    }

    return r;
}

int print_caps(int fd)
{
    struct v4l2_capability caps = {};
    if (-1 == xioctl(fd, VIDIOC_QUERYCAP, &caps))
    {
        ALOGE("Querying Capabilities");
        return 1;
    }

    ALOGI("Driver Caps:\n"
          "  Driver: \"%s\"\n"
          "  Card: \"%s\"\n"
          "  Bus: \"%s\"\n"
          "  Version: %d.%d\n"
          "  Capabilities: %08x\n",
          caps.driver,
          caps.card,
          caps.bus_info,
          (caps.version >> 16) & 0xff,
          (caps.version >> 24) & 0xff,
          caps.capabilities);

    v4l2_format format;
    format.type = V4L2_BUF_TYPE_VIDEO_CAPTURE;
    format.fmt.pix.pixelformat = V4L2_PIX_FMT_MJPEG;
    format.fmt.pix.width = 1280;
    format.fmt.pix.height = 720;
    LOG(INFO) << __FILE__ << ":" << __LINE__ << " Requesting format: "
              << ((char*)&format.fmt.pix.pixelformat)[0]
              << ((char*)&format.fmt.pix.pixelformat)[1]
              << ((char*)&format.fmt.pix.pixelformat)[2]
              << ((char*)&format.fmt.pix.pixelformat)[3]
              << "(" << std::hex << std::setw(8)
              << format.fmt.pix.pixelformat << ")";

    if (ioctl(fd, VIDIOC_S_FMT, &format) < 0) {
        LOG(ERROR) << __FILE__ << ":" << __LINE__ << " VIDIOC_S_FMT failed " << strerror(errno);
    }

    format.type = V4L2_BUF_TYPE_VIDEO_CAPTURE;
    if (ioctl(fd, VIDIOC_G_FMT, &format) == 0) {
        LOG(INFO) << "Current output format:  "
                  << "fmt=0x" << std::hex << format.fmt.pix.pixelformat << ", " << std::dec
                  << format.fmt.pix.width << " x " << format.fmt.pix.height
                  << ", pitch=" << format.fmt.pix.bytesperline;

        if (format.fmt.pix.pixelformat == V4L2_PIX_FMT_MJPEG) {
            ALOGI("V4L2_PIX_FMT_MJPEG detected");
        }
        if (format.fmt.pix.pixelformat == V4L2_PIX_FMT_YUYV) {
            ALOGI("V4L2_PIX_FMT_YUYV detected");
        }
    } else {
        LOG(ERROR) << "VIDIOC_G_FMT failed";
    }

    return 0;
}

int init_mmap(int fd)
{
    struct v4l2_requestbuffers req{};
    req.count = 1;
    req.type = V4L2_BUF_TYPE_VIDEO_CAPTURE;
    req.memory = V4L2_MEMORY_MMAP;

    if (-1 == xioctl(fd, VIDIOC_REQBUFS, &req))
    {
        perror("Requesting Buffer");
        return 1;
    }

    struct v4l2_buffer buf{};
    buf.type = V4L2_BUF_TYPE_VIDEO_CAPTURE;
    buf.memory = V4L2_MEMORY_MMAP;
    buf.index = 0;
    if (-1 == xioctl(fd, VIDIOC_QUERYBUF, &buf))
    {
        perror("Querying Buffer");
        return 1;
    }

    buffer = (uint8_t *)mmap(NULL, buf.length, PROT_READ | PROT_WRITE, MAP_SHARED, fd, buf.m.offset);
    bufferLength = buf.length;
    ALOGI("Length: %d\nAddress: %p\n", buf.length, buffer);
    ALOGI("Image Length: %d\n", buf.bytesused);

    return 0;
}

size_t capture_image(int fd)
{
    struct v4l2_buffer buf{};
    buf.type = V4L2_BUF_TYPE_VIDEO_CAPTURE;
    buf.memory = V4L2_MEMORY_MMAP;
    buf.index = 0;
    if (-1 == xioctl(fd, VIDIOC_QBUF, &buf))
    {
        perror("Query Buffer");
        return 0;
    }

    if (-1 == xioctl(fd, VIDIOC_STREAMON, &buf.type))
    {
        perror("Start Capture");
        return 0;
    }

    fd_set fds;
    FD_ZERO(&fds);
    FD_SET(fd, &fds);
    struct timeval tv{};
    tv.tv_sec = 2;
    int r = select(fd + 1, &fds, NULL, NULL, &tv);
    if (-1 == r)
    {
        perror("Waiting for Frame");
        return 0;
    }

    if (-1 == xioctl(fd, VIDIOC_DQBUF, &buf))
    {
        perror("Retrieving Frame");
        return 0;
    }

    return buf.bytesused;
}

bool initGetPhoto()
{
    fd = open("/dev/video0", O_RDWR);
    if (fd == -1)
    {
        perror("Opening video device");
        return false;
    }

    if (print_caps(fd))
        return false;

    if (init_mmap(fd))
        return false;

    return true;
}

bool closeGetPhoto()
{
    int type = V4L2_BUF_TYPE_VIDEO_CAPTURE;
    if (ioctl(fd, VIDIOC_STREAMOFF, &type) == -1) {
        perror("VIDIOC_STREAMOFF");
    }

    // Tell the L4V2 driver to release our streaming buffers
    v4l2_requestbuffers bufrequest;
    bufrequest.type = V4L2_BUF_TYPE_VIDEO_CAPTURE;
    bufrequest.memory = V4L2_MEMORY_MMAP;
    bufrequest.count = 0;
    ioctl(fd, VIDIOC_REQBUFS, &bufrequest);

    close(fd);

    return true;
}

void getPhotoTask()
{
    ALOGI("getPhotoTask starting ");
    ALOGI("HTTPServer starting ");

    httplib::Server svr;

    svr.Get("/", [](const httplib::Request &, httplib::Response &res) {
        ALOGI("HTTPServer New request /");

        bool result = initGetPhoto();
        ALOGI("initGetPhoto %b", result);
        size_t imgSize = capture_image(fd);
        ALOGI("capture_image %zu", imgSize);

        closeGetPhoto();
        res.set_content((char *)buffer, imgSize, "image/jpeg");
    });

    ALOGI("HTTPServer listen");
    svr.listen("0.0.0.0", 8081);
}
How the code works
1. Initialization : The initGetPhoto() function opens the video device (/dev/video0) and sets up the necessary format and memory mappings for capturing images using the v4l2 interface.
2. Image Capture : The capture_image() function captures an image from the video stream. It uses select() to wait for the frame and then dequeues the buffer containing the image.
3. HTTP Server : The getPhotoTask() function starts an HTTP server using the cpp-httplib library. When a request is received, the server initializes the camera, captures an image, and sends it as a JPEG response.
4. Cleanup : After capturing the image and sending it, the closeGetPhoto() function stops the video stream, releases the buffers, and closes the video device.
This setup ensures that each image is captured on demand, allowing the application to control when the camera is active and minimizing unnecessary resource usage.
Conclusion
In this article, we walked through the process of creating an Android companion app that allows users to control HVAC functions and retrieve images from a car's camera system using a simple HTTP interface. The application was developed in Android Studio, where we designed a user-friendly interface and implemented functionality to adjust the vehicle's temperature and capture images remotely. On the server side, we extended the EVS Driver by incorporating a custom thread to handle HTTP requests and capture images using v4l2, providing a basic yet effective solution for remote vehicle interaction.
This project serves as a conceptual demonstration of integrating smartphone-based controls with automotive systems, but it’s important to recognize that there is significant potential for improvement and expansion. For instance, enhancing the data handling layer to provide more robust error checking, utilizing the HTTP/2 protocol for faster and more efficient communication, and creating a more seamless integration with the EVS Driver could greatly improve the performance and reliability of the system.
In its current form, this solution offers a foundational approach that could be expanded into a more sophisticated application, capable of supporting a wider range of automotive functions and delivering a more polished user experience. Future developments could also explore more advanced security features, improved data formats, and tighter integration with the broader ecosystem of Android Automotive OS to fully leverage the capabilities of modern vehicles.
Data powertrain in automotive: Complete end-to-end solution
We power your entire data journey, from signals to solutions
Check related articles
Read our blog and stay informed about the industry's latest trends and solutions.
Interested in our services?
Reach out for tailored solutions and expert guidance.