Distributed quality assurance: How to manage QA teams around the world to cooperate successfully on a single project

Ensuring distributed quality assurance and managing a QA team is not always as straightforward as one may think it is. There is no way to predict the exact number of bugs being introduced into the code and therefore, there is no way to calculate the precise time when those issues are going to be fixed. The planning process is very fluid and very often the development team requires QA team’s attention and help to reproduce the issue. Such challenges arise even in the most usual team setups when there’s just one team. Then what about a project that is so big, that there are three QA teams working together on ensuring the quality and writing automation tests?
Distributed Quality Assurance
Scaling the project by introducing more teams arise many different kinds of challenges. Sometimes the teams work in different, just slightly overlapping time zones. Sometimes it is a different culture and language. Sometimes, if said teams are hired by different vendors, the processes may differ. Rarely, this is a combination of all of those factors.
We are going to take a look at precisely that situation. The project included multiple teams writing automated Selenium tests for a single, large-scale web project simultaneously. Testers were working from Europe, Asia, and the US. Due to customer policy – all the source code for automation tests had to be pushed to a single Git repository.
Initially, there was no cooperation process defined as other teams joining the project organically when parts of the application they were responsible for, were integrated into the system. At this point, nobody anticipated an inevitable disaster.
The realization came in when suddenly a new pull request came in. After six months of work, thousands of lines of the code, and multiple developers contributing - it was impossible to review such a big change and its impact on all other code – especially to foresee a possibility of invisible conflicts.
At this point, we knew that we must create a common process for all teams. We can’t just discard 6 months of development, but at the same time, we can’t merge it without thorough verification. One of the ideas was to split the work into multiple groups of branches – each team having their own set of development/integration/master, etc., but this contradicted the very idea of cooperation between the teams.
First, we’ve asked to split the huge PR into feature branches – possibly, one branch per test or one branch per feature being tested - and then merge them one by one. Going forward, all new tests should be added the same way, as relatively small pull requests instead of large chunks of code that are impossible to digest during the code review process.
It was necessary to remind the teams that in such a setting, being synced with the latest changes saves everyone a ton of work. The process that we’ve introduced made it mandatory to pull the latest code from the development branch at least once a day to make sure there are no new conflicts.
Then we’ve created separate pipelines for the other teams to test their changes, as even with small worktime overlap, it was still a blocker.
Additionally, the process requires at least two approvers from different teams to merge the changes into the development branch – this way teams do not only keep an eye on code quality but also make sure changes from other teams do not impact their work.
It may sound just like a few small steps, but overall, the implementation of the new approach took almost two months. This includes various meetings, agreements, presentations, and writing down the processes. On top of that, teams had to take care of integrating all PRs, big and small, into a new “version zero” codebase, which then was used as a fresh starting point.
The process was written down on a Confluence page accessible for all team members in all teams. It does not just include the rules initially accepted by the teams, but also coding standards, style guide, and links to the agile delivery process used for that particular project. Afterward, the result was presented to all teams and agreed to use from then on. And together we’ve decided to have a weekly sync just for the QA teams.
Key takeaways
The resulting process is working very well for us. It is a scaled-up version of the process we have used internally in our team, so the implementation went smooth and swift. The velocity of the automation tests development also improved over time, as less time was spent on fixing conflicts and going through PRs.
Of course, this process is not a one-size-fits-all solution and does not answer all the questions you might have if you want to implement a similar solution into your QA automation development. Their project includes shared code, such as libraries, which someone is obliged to maintain and take responsibility for. The technical debt reduction also has to be agreed upon and split evenly between the teams. All in all, if the development is based on a solid foundation like the described process, it’s easier to agree on smaller things on the go.

Grape Up guides enterprises on their data-driven transformation journey
Ready to ship? Let's talk.
Check related articles
Read our blog and stay informed about the industry's latest trends and solutions.
Should UI testing and API testing go together?
If you have ever worked on writing UI automation tests, you probably came to the point when your test suite is so extensive that it takes a long time to run all the cases. And if the suite keeps on expanding, the situation won't look better. Applications are growing and the number of tests will constantly increase. Luckily, there is a solution to speed up test runs. In this article, we present the advantages of using some help in the form of API testing in the UI test suite, focusing on the aspect of test execution time.
How can API Requests help you?
- Tests will be easier to maintain - UI is constantly changing when API requests are persistent (for the most part)
- You will get immediate tests result from the business logic side
- You can find bugs and solve problems faster and in a more effective way
- You will see a significant improvement in the test execution time
If there are some unwanted issues in the application, we want to be able to discover them as fast as possible. That’s why test execution time is significant in the development cycle. Before we focus on the API requests, first let’s take a small step back and take a look at the test from the UI side only.
Customer path
UI testing is literally the path that the customer is taking through the app, and it is crucial to write automation tests for these workflows. Sometimes we need to repeat the same steps in many feature files (especially if we are taking care of data independence ) and it is not necessary to go over them again on UI side in each test.
Imagine that as a customer you can configure your car through the app. You can start with choosing a basic model and then add some extra equipment for your vehicle. Let’s take a look at this example written in Gherkin:
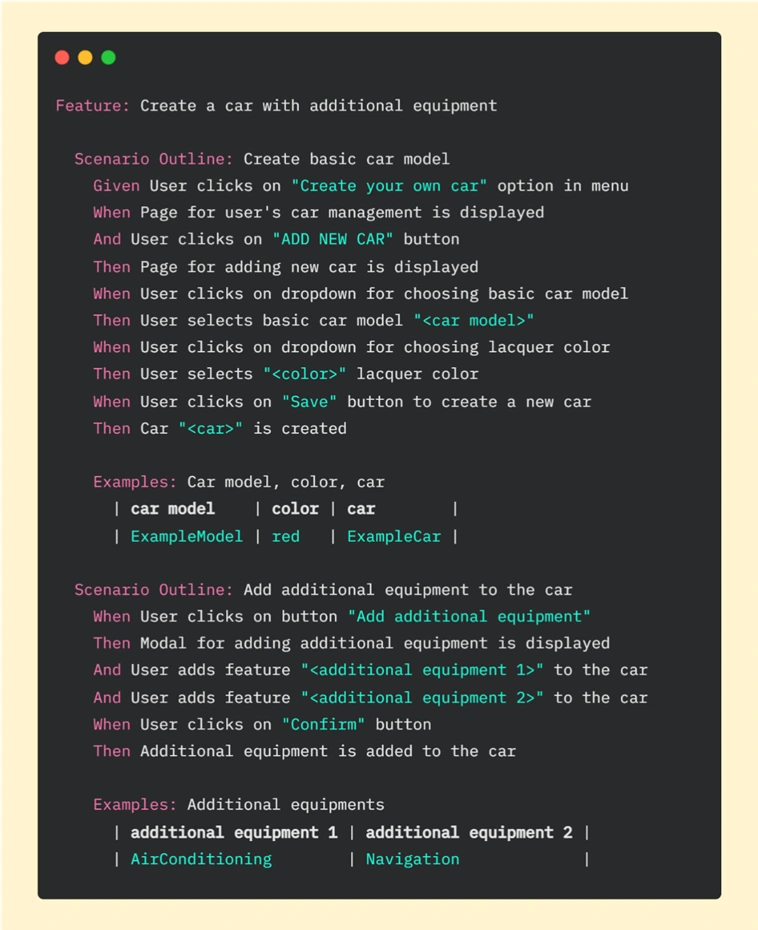
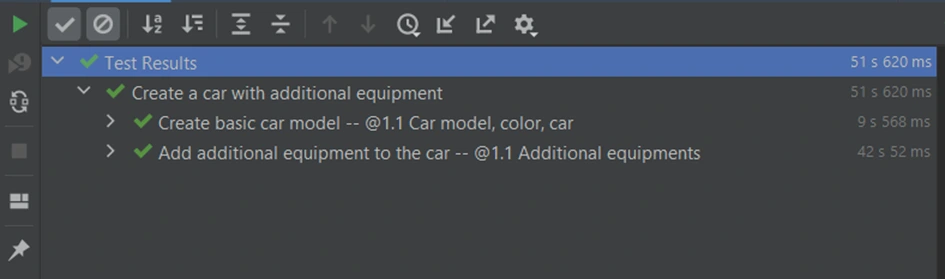
It is basic functionality, so we went through this workflow step by step on the UI side. In this test, we have many components that need to be fully loaded - pages, buttons, modals, and dropdowns. Every action takes some time - loading individual elements and clicking on them. It takes 51.63s. in total to run this scenario in PyCharm:
API enters the stage
Let’s now consider another case. What if customers change their minds about the color of the vehicle or they want to add or delete extra equipment? We need to be able to edit the order. Let's create an additional test for this workflow.
If we want to edit the vehicle, first we need to have one. We can start the Edit car test by creating a new vehicle using all the steps from the previous feature file, but we can also use API help here. Replacing repeatable steps with API requests will allow us to focus on the new functionality on the UI side. Let’s look at the Gherkin file for editing a car:

In the first scenario of this feature, we are creating a car (via API) and in the second one editing the vehicle (through UI). In scenario “Create test car via API” we created the same car as in the previous feature “Create a car with additional equipment” , where everything was done on the UI side. If we look at the result now, we can see that the whole test (creating and editing a car) took less than 17 seconds:

Part for creating a vehicle by API took 11.107 seconds. To run these steps on the UI side we needed more than 50 seconds. To be precise we’ve just saved 40.513 seconds in one test! Imagine that we have another 10 or more tests that need that functionality - it can be a big time saver.
A request for help
Key for benefit from API in UI test suite is to use popular Python library called Requests – it allows us to easily send HTTP requests. Basic POST requests can take the following form:
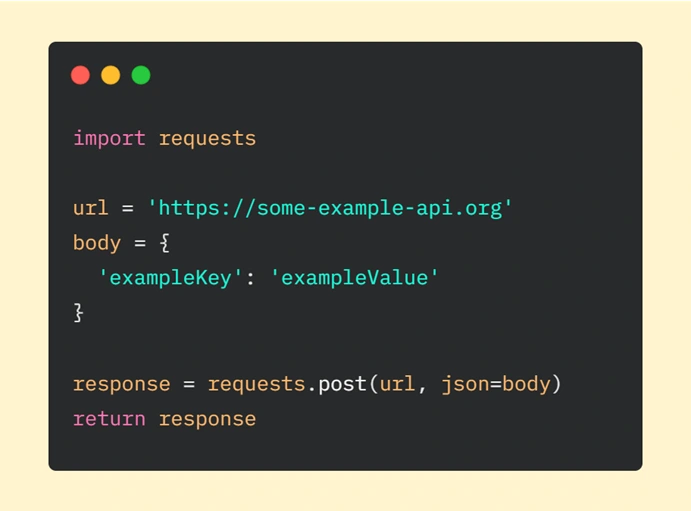
We have to start with importing the ‘requests’ module. Then we are declaring the URL of the request and data we want to send (provided as a dictionary). The next step is to make an HTTP request where we are passing our parameters (url is required, json – optional - it’s a JSON object which will be sent to the mentioned URL). In the end, we are returning the response from the server.
In our car application, this example will be a little expanded. What exactly is hidden behind lines of code responsible for creating a vehicle via API requests? I will focus on the first step of this scenario: 'Car “<car> from the model “<model>” and lacquer color “<color>” is created via API request’ . If we look deeper, we can see step implementation:
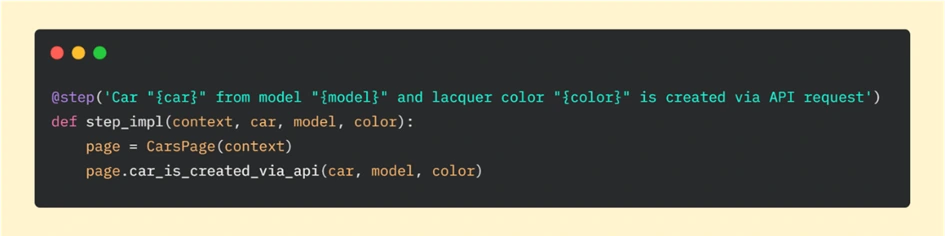
And then if we go further to the car_is_created_via_api function, we can analyze requests sent to API:
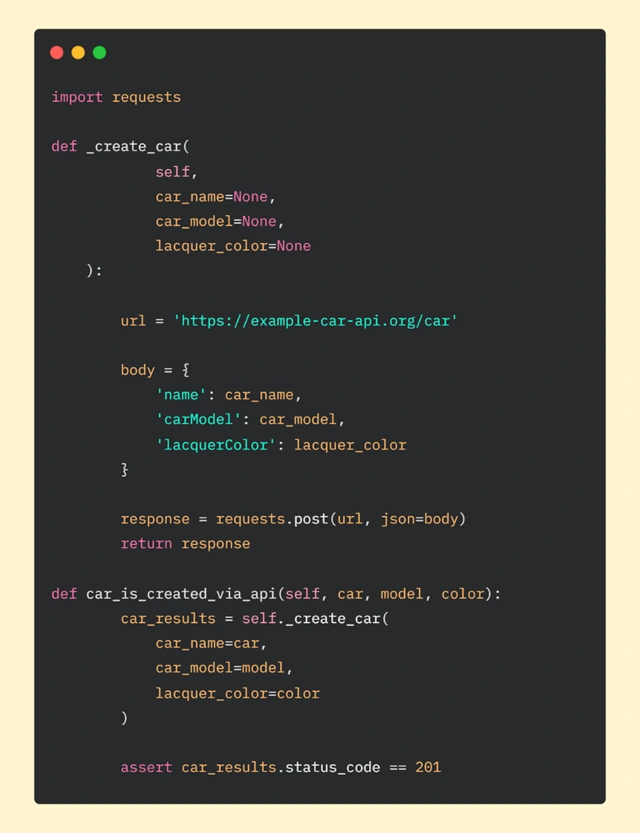
In car_is_created_via_api method, we are calling function _create_car which is responsible for requesting API. We are also passing parameters: car, model, and color. They will be used in the body of our request.
As in the basic example, in _create_car function we are declaring URL (our car API) and body. Then we are making a POST request and in the final step, we are returning the response.
After getting the response from the server, at the end of the car_is_created_function , we want to use assertion to check if we got the correct status code. Getting code 201 means that everything went as we hoped. Another result will tell us that something is wrong and we will be able to quickly (hopefully) find the gap in the code.
Good Team
We went together through the advantages of using API help in the UI automation tests suite and a comparison of two approaches to testing. We also focused on speeding up tests suite execution time using Python library Requests . We believe that after reading this article you can see that API requests can be great companions and you are encouraged to start using this concept in your test automation projects.
Automation testing: Making tests independent from existing data
Each test automation project is different. The apps are different, the approach is different, even though the tools and frameworks used might seem to be the same. Each project brings different challenges and requirements, resulting in a need to adapt to solutions being delivered - although all of it is covered by the term "software testing". This time we want to tackle the issue of test data being used in automation testing.
Setting up the automation testing project
Let's consider the following scenario: as usual, our project implements the Page Object Pattern approach with the use of Cucumber .). This part is no novelty - tidy project structure and test scenarios written in Gherkin, which is easily understandable by non-technical team members. However, the application being tested required total independence from data existing in the database, even in Development and QA environments.
The solution implemented by our team had to ensure that every Test Scenario - laid out in each Feature File, which contains steps for testing particular functionalities, was completely independent from data existing on the environment and did not interfere with other Test Cases. What was also important, the tests were also meant to run simultaneously on Selenium Grid. In a nutshell, Feature Files couldn't rely on any data (apart from login credentials) and had to create all of the test data each time they were run.
To simplify the example we are going to discuss, we will describe an approach where only one user will be used to log in to the app. Its credentials remain unchanged so there are two things to do here to meet the project criteria: the login credentials have to be passed to the login scenario and said scenario has to be triggered before each Feature File since they are run simultaneously by a runner.
Independent logging in
The first part is really straightforward; in your environment file you need to include a similar block of code:
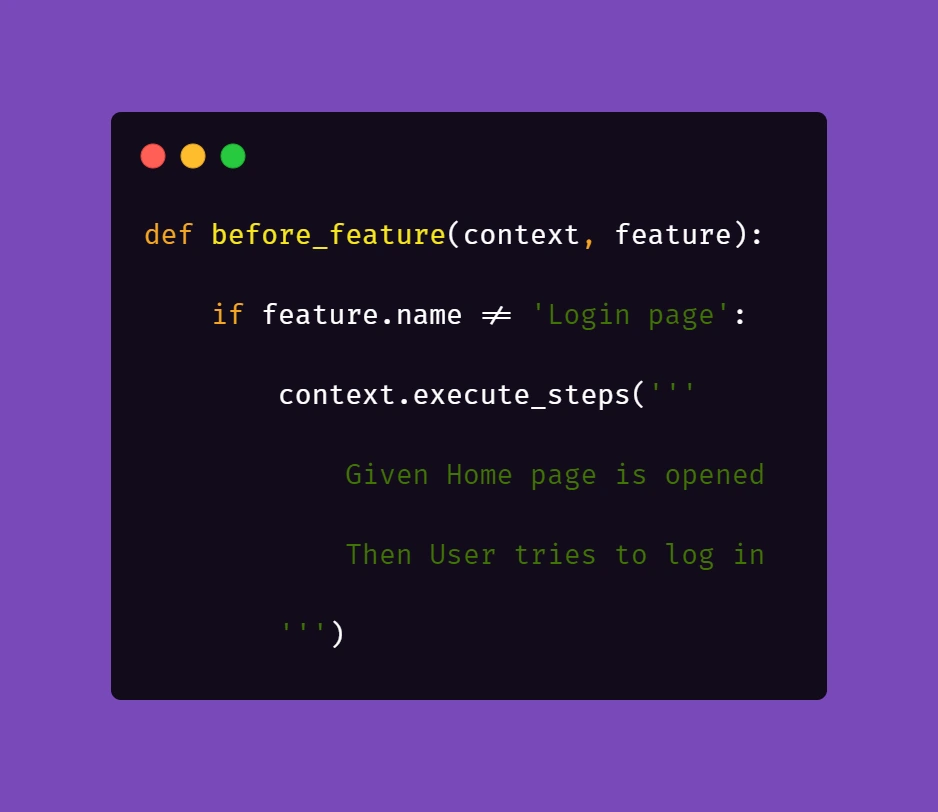
What this does is, before each feature file, which is not a Login scenario, Selenium will attempt to open the homepage of the project and attempt to log in.
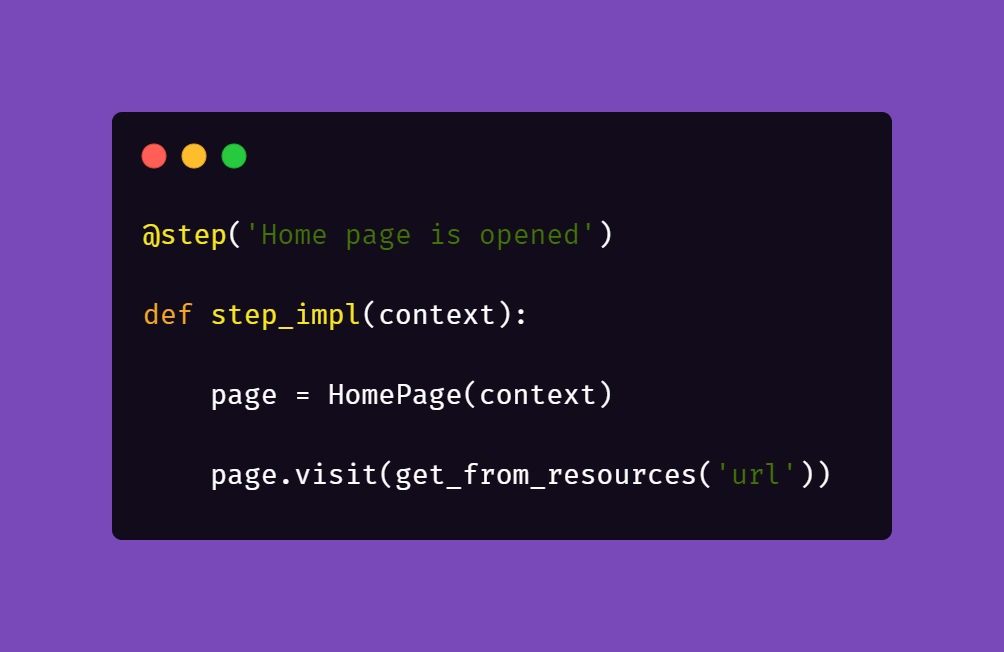
Then, we need to ensure that if a session is active, logging in should be skipped.

Therefore, in the second step 'User tries to log in' we verify if within the instance of running a particular feature file, the user's session is still active. In our case, when the homepage is opened and a logged user's session is active, the app's landing page is opened. Otherwise, the user is redirected to the login page. So in the above block of code we simply verify whether the login page is opened and if login_prompt_is_displayed method returns True , login steps are executed.
Once we dealt with logging in during simultaneous test runs, we need to handle the data being used during the tests. Again, let us simplify the example: let's assume that our hypothetical application allows its users - store staff - to add and review products the company has to offer. The system allows manipulating many data fields that affect other factors in workflows, e.g. product bundles, discounts, and suppliers. On top of that, the stock constantly grows and changes, thus even in test environments we shouldn't just run tests against migrated data to ensure consistency in test results.
As a result of that, our automation tests will have to cover the whole flow, adding all the necessary elements to the system to test against later on. In short: if we want to cover a scenario for editing certain data in a product, the tests will need to create that specific product, save it, search for it, manipulate the data, save changes and verify the results.
Create and manipulate
Below are the test steps to the above scenario laid out in Gherkin to illustrate what will it look like:

While the basic premise of the above scenarios may seem straightforward, the tricky part may be ensuring consistency during test runs. Of course, scripting a single scenario of adding an item in the app sounds simple, but what if we would have to do that a couple dozens of time during the regression suite run?
We want to have consistent, trackable test data while avoiding multiplying lines of code. To achieve that, we introduced another file to the project structure called 'globals' and placed it in the directory of feature files. Please note that in the above snippet, we extensively use "Examples" sections along with the "Scenario Outline" approach in Gherkin. We do that to pass parameters into test step definitions and methods that create and manipulate the actions we want to test in the application. That first stage of parametrization of a test scenario works in conjunction with the aforementioned 'globals' file. Let's consider the following contents of such file:
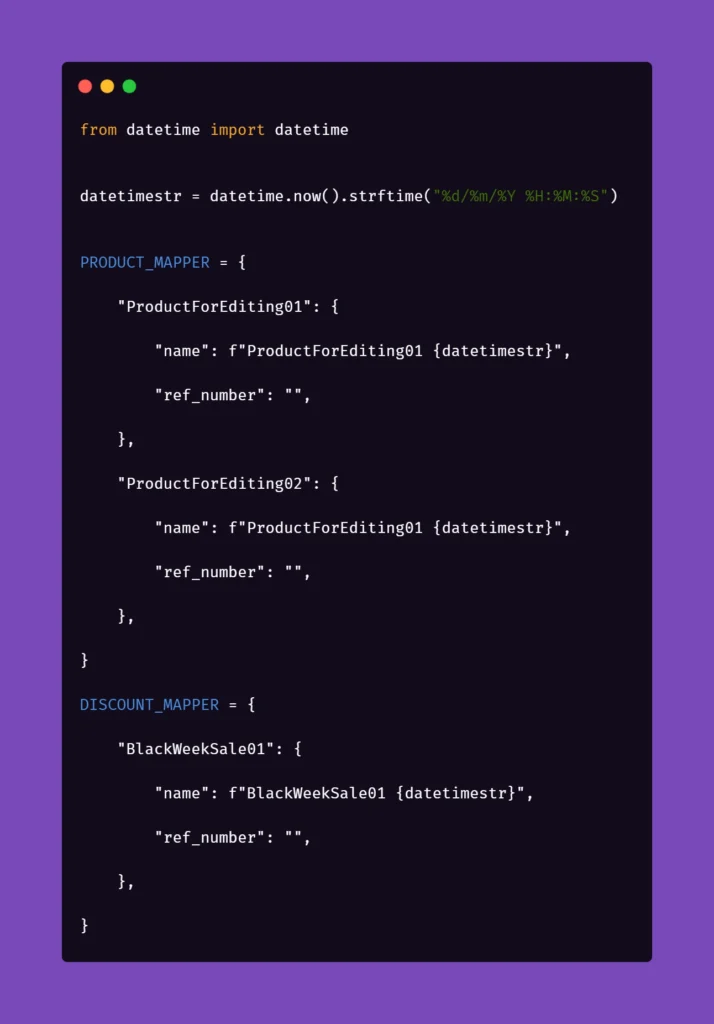
Inside the ‘globals’ file, you can find mappers for each type of object that the application can create and manipulate, for now including only a name and a reference number as an empty string. As you can see, each element will receive a datetime stamp right after its core name, each time the object in the mapper is called for. That will ensure the data created will always be unique. But what is the empty string for, you may ask?
The answer is as simple as its usage: we can store different parameters of objects inside the app that we test. For example, if a certain object can be found only by its reference number, which is unique and assigned by the system after creating, e.g., a product, we might want to store that in the mapper to use it later. But why stop there? The possibilities go pretty much as far as your imagination and patience go. You can use mappers to pass on various parameters to test steps if you need:

As you can see, the formula of mappers can really come in handy when your test suite needs to create somewhat repeatable, custom data for tests. The above snippet includes parameters for the creation of an item in the app which is a promotional campaign including certain types of products. Above that, you can see a mapping for a product that falls into one of the categories qualifying it for the promotional campaign. So hypothetically, if you want to test a scenario where enabling a promotional campaign will automatically discount certain products in the app, the mapping could help with that. But let's stick to basic examples to illustrate how to pass these parameters into the methods behind test steps.
Let us begin with the concept of creating products mentioned in the Gherkin snippet. Below is the excerpt from /steps file for step "User typed in "<product name>"":
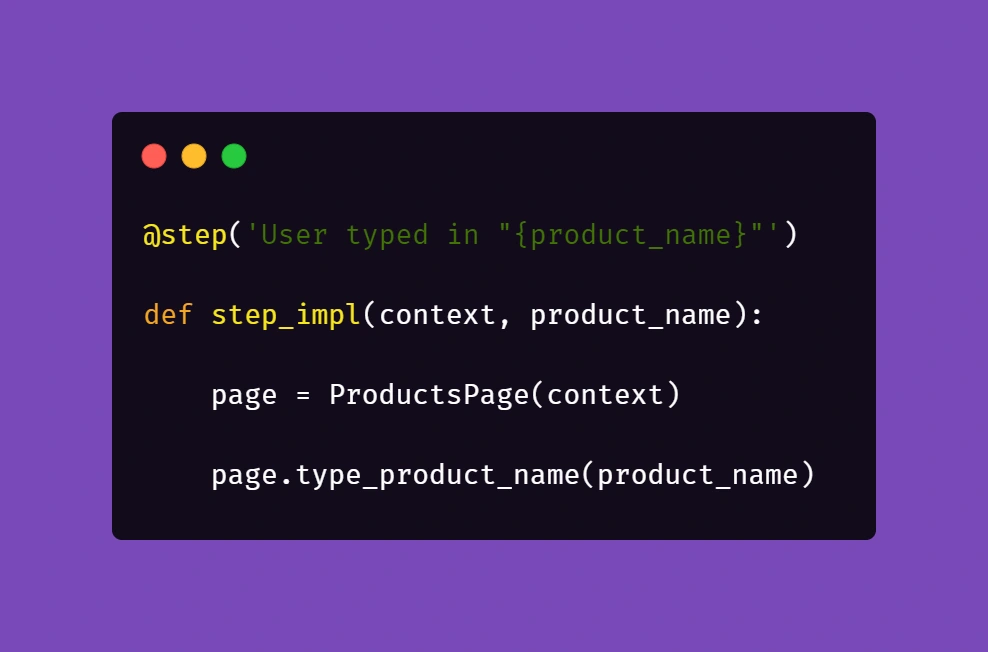
Above, we just simply pass the parameter from Gherkin to the method. Nothing fancy here. But it gets more interesting in /pages file:
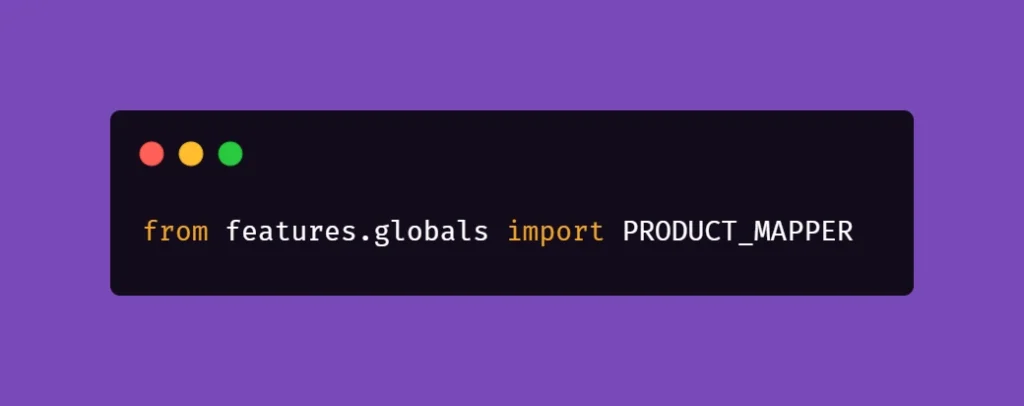
First, you'll need to import a globals file to get to the data mapped out there:
Next, we want to extract the data from mapper:
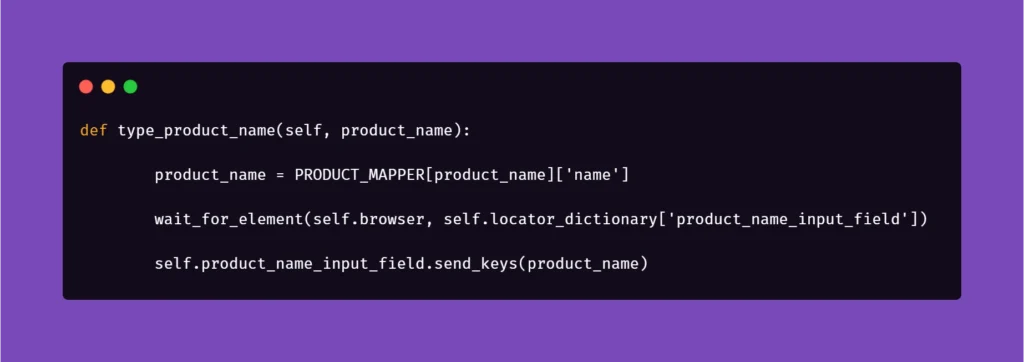
Basically, the name for the product inputted in the Examples section in Scenario Outline matches the name in PRODUCT_MAPPER . Used as a variable, it allows Selenium to input the same name with a timestamp each time the scenario asks for the creation of a certain object. This concept can be used quite extensively in the test code, parameterizing anything you need.
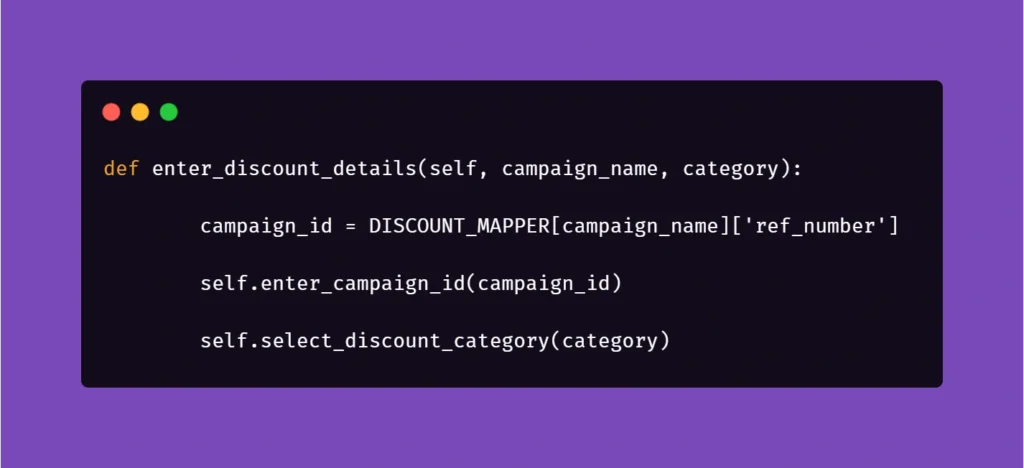
And another example:

Here, we get the data from mapper to create a specific locator to use in a specific context. This way, if the app supports it, test code can be reduced due to parametrization.
We hope that the concepts presented in this article will help you get on with your work on test automation suites. These ideas should help you automate tests faster, more clever, and much more efficiently, resulting in maximum consistency and stable results.
In-app purchases in iOS apps – a tester’s perspective
Year after year, Apple’s new releases of mobile devices gain a decent amount of traction in tech media coverage and keep attracting customers to obtain their quite pricey products. Promises of superior quality, straightforwardness of the integrated ecosystem, and inclusion of new, cutting edge technologies urge the company’s longtime fans and new customers alike to upgrade their devices to Californian designed phones, tablets and computers.
Resurgence
Focusing on the mobile market alone, it is impossible to neglect the significant raise in Apple’s iOS market share of mobile operating systems. Its major competitor, Google’s Android has noted 70.68% of mobile market share in April 2020 – which is around 6 percentage points less than in October 2019. On the other hand, iOS, which noted 22.09% of the market share around the same time, recently has risen to 28.79%. This trend surely pleases Apple’s board, along with anyone who strives to monetize their app ideas in App store.
Gaining revenue through in-app purchases sounds like a brilliant idea, but it requires plenty of planning, calculating risks, and evaluating funds for the project. Before publishing the software product, an idea has to be conceived, marketed, developed, and tested. Each step of this process of making an app aimed at providing paid content differs from the process of creating a custom-ordered software. And that also includes testing.
At what cost?
But wait! Testing usually includes lots of repetition. So that would mean testers have to go through many transactions. Doesn’t that entail spending lots of money? Well, not exactly. Apple provides development teams with their own in-app purchase testing tool, Sandbox. But using it doesn’t make testing all fun and games.
Sandbox allows for local development of in-app purchases without spending a dime on them. That happens by supplementing the ‘real’ Appstore account with the Sandbox one. Sounds fantastic, doesn’t it? But unfortunately, there are some inconveniences behind that.
If it ain’t broke...
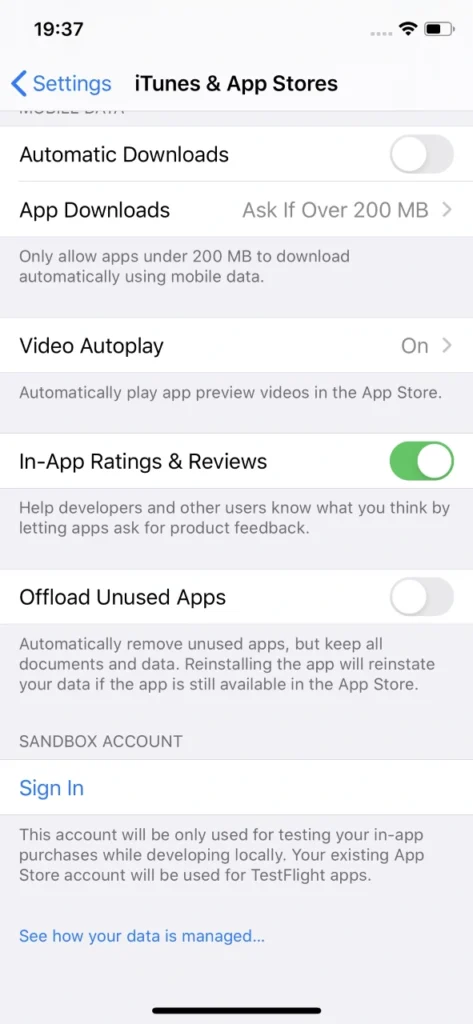
First of all, Sandbox accounts have to be created manually via iTunes Connect, which leaves much to be desired in terms of performance. These accounts require an email in a valid format. Testers will need plenty of Sandbox accounts because it is actually quite easy to ‘use them up’, especially when tested software has its own sign-in system (not related to Apple ID). If by design said app account is also associated with In-app purchase, each app account will require a new Sandbox account.

Unfortunately, Apple’s Sandbox accounts can get really tricky to log into. When you’re trying to sign in to another Sandbox account, which was probably named similarly as all previous one for convenience, you’d think your muscle memory will allow you to type in the password without looking at the screen. Nothing more wrong. Sometimes, when you type in the credentials which consist of an email and a password, check twice and hit Sign In button in Sandbox login popover, nothing happens.
User is not logged in, not even a sign in error is displayed. And you try again. Every character is exactly the same as before. And eventually, you manage to log in. It’s not really a big of a deal unless you lose your temper easily testing manually, but a simple message informing why Sandbox login failed would be much more user-friendly. In automated tests you could just write the code to try to log in until the email address used as login is displayed in the Sandbox account section in iOS settings, which means that the login was successful. It’s not something testers can’t live with, but addressing the issue by Apple would greatly improve the experience of working in iOS development.
Cryptic writings
Problems arise when notifications informing that a particular Sandbox user is subscribed to an auto-renewable subscription are not delivered by Apple. Therefore, many subscription purchase attempts have to be made to actually make sure whether the development of the app went the correct way and it’s just Apple’s own system’s error, not a bug inside the app.
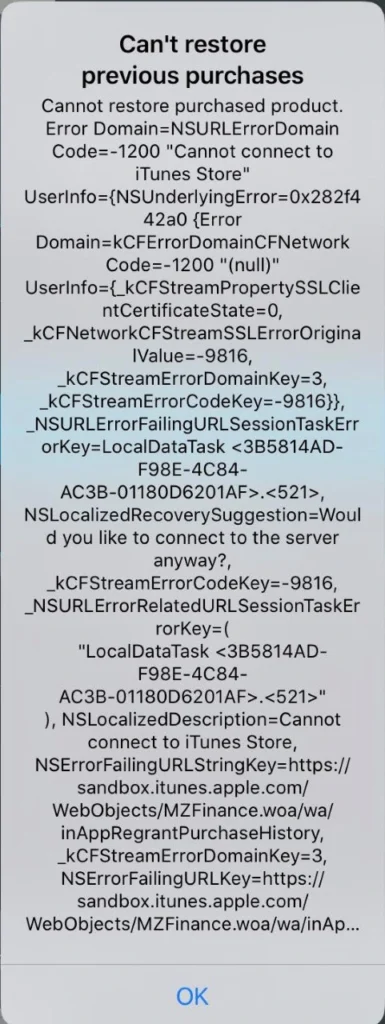
Speaking of errors – during testing of in-app purchase features, it can become really difficult to point out to developers what went wrong to help them debug the problem. Errors displayed are very cryptic and long; therefore, investigating the root cause of the problem can consume a substantial amount of time. There are two main reasons for that: there’s no error documentation created by Apple for those long error messages or the message displayed is very generic.
Combining this with problems which include performance drops in ‘prime time’, problems with receiving server notifications, e.g. for Autorenewing Subscriptions or simply inability to connect to iTunes store and a simple task of testing monthly subscription can turn into a major regression testing suite.
Hey, Siri...
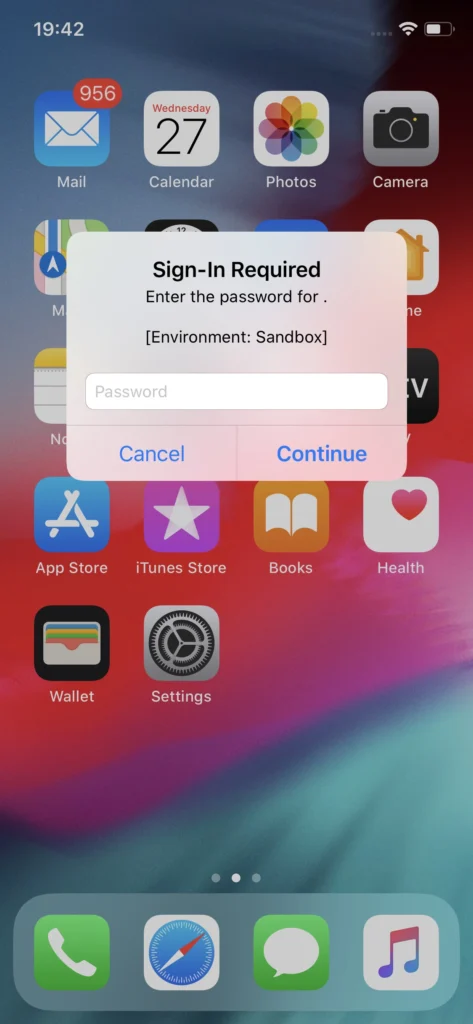
Another issue with Sandbox testing that is not so convenient to work with and not so obvious to workaround are the irritating Sandbox login prompts. These occur randomly for the eternity of your app’s development cycle if the In-app purchases feature in the app under test includes auto-renewable subscriptions. What is problematic is that these login prompts pop-up at any given time, not just when the app is used or dropped to the background. Well, if you’re patient you can learn to live with it and dismiss it when it shows up. But problems may occur when the device used for testing said app is also utilized as a real device in automated tests, e.g. in conjunction with Appium.
This can be addressed by setting up Appium properties in testing framework to automatically dismiss system popups. That could prove somewhat helpful if the test suite doesn’t include any other interactions with system popups. Deleting the application which includes auto-renewable subscriptions from the device gets rid of the random Sandbox login prompts on the device, but that’s not how testing works. Another workaround might be building the app with subscription part removed, which requires additional work on developers’ side. These login prompts are surely a major problem which Apple should address.
Send reinforcements
Despite all that, developers and testers alike can and eventually will get through the tedious process of developing and ensuring the quality of in-app purchases in Apple’s ecosystem . A good tactic for this in manual testing is to work out a solid testing routine, which will allow for quicker troubleshooting. Being cautious about each step in the testing scenario and monitoring the environment differences such as being logged in with proper Sandbox account instead of regular Apple ID, an appropriate combination of app account and the Sandbox account or the state of the app in relation to purchases made (whether an In-app purchase has been made within a particular installation or not) is key to understanding whether the application does what is expected and transactions are successful.
While Silicon Valley’s giant rises in the mobile market again, more and more ideas will be monetized in Appstore, making profits not only for the developers but also directly for Apple, which collects a hefty portion of the money spent on apps and paid extras. Let’s hope that sooner than later Apple will address the issues that have been annoying development teams for years now and make their jobs a bit easier.
Sources:
Interested in our services?
Reach out for tailored solutions and expert guidance.