Thinking out loud
Where we share the insights, questions, and observations that shape our approach.
Quarkus framework overview and comparison with Spring Boot
In this article, we’ll give an overview of the Quarkus framework and compare it with Spring Boot - the most popular Java backend framework.
Quarkus is an open-source Java framework for developing web applications. It is designed to build apps in a modern approach with microservices and cloud-native applications. Quarkus has built-in support for the two most popular package managers: Gradle and Maven. By default, a new starter project created using the official Quarkus CLI uses Maven, although it may be easily switched to generate a grade-based project instead.
Features comparison to Spring Boot framework
Let’s make an overview of the main features available in Quarkus and compare them to the equivalent ones from Spring Framework.
Application configuration
Quarkus uses an open-source SmallRye Config library for configuring applications. By default, it uses application.properties files for this purpose. However, there is an option to also use the yaml file. In order to enable yaml configuration, we need to add a quarkus-config-yaml dependency. Quarkus may also additionally read configuration using environment variables specified in the .env file. This is particularly useful for local development.
You may store some local settings in the .env file e.g., to enable retrieval of credentials from external sources for local builds and not commit the file, keeping it for local usage only. Spring does not support reading environment variables from an .env file, so developers have to either inject them by IDE or configure them directly using the application configuration file.
Similarly to Spring, Quarkus supports different profiles depending on the target environment. This may be achieved by adding a profile name to the application.properties file name, e.g.:
application.properties – base configuration
application-dev.properties – extended configuration for the dev environment. When the dev profile is active, it will add (or override) the configuration to the base profile.
There is also an ability to build a configuration hierarchy with an additional configuration layer to mention base and profile-specific configuration. We may specify the name of the parent profile using quarkus.config.profile.parent in application-<profile>.properties file. E.g., by specifying quarkus.config.profile.parent=common in the application-dev.properties file, we’ll get a three-level hierarchy:
application.properties – base configuration application-common.properties – overrides/extends base configuration
application-dev.properties – overrides/extends common profile configuration
Spring has similar setting called spring.config.import which allows to import properties from a specified file rather than creating a hierarchy.
Dependency injection
Quarkus uses Jakarta EE Contexts and Dependency Injection engine. Similarly to Spring, Quarkus uses the concept of a bean. A bean is an object managed by an application environment (container) which creation and behavior can be controlled by the developer in a declarative style using annotations. For injecting beans, same as in the Spring Boot, we may use field, setter, and constructor injections.
Beans can be created by annotating the bean class with a scoped annotation:
@ApplicationScopedpublic class DataService {
public void writeData() {
//...
}
}
Compare with similar bean in Spring Boot:
@Servicepublic class DataService {
public void writeData() {
//...
}
}
Another way to define beans is to use producer methods or fields. This is similar to @Configuration classes in Spring Boot.
Quarkus:
// Define beans@ApplicationScopedpublic class SettingsProducer {
@Produces
String appToken = "123abc";
@Produces
    Map<String, String> settings() {
        return Map.of(
            "setting 1", "value1",
            "setting 2", "value2"
        );
    }
@Produces
    MyBean myBean() {
        return new MyBean(); // custom class
    }

}

// Inject beans:@ApplicationScopedpublic class DataService {
@Inject
private String appToken;
@Inject
private Map<String, String> settings;
@Inject
private MyBean myBean;
//…
}
Equivalent Spring Boot code:
// Configuration:@Configuration
public class SettingsProducer {
@Bean
    String appToken() {
        return "123abc";
    }
@Bean
    Map<String, String> settings() {
        return Map.of(
            "setting 1", "value1",
            "setting 2", "value2"
        );
    }
@Bean
    MyBean myBean() {
        return new MyBean();
    }
}

// Injecting beans:@Beanpublic class DataService {
@Autowired
private String appToken;
@Autowired
@Qualifier("settings") // needed to explicitly tell spring that Map itself is a bean
private Map<String, String> settings;
@Autowired
    private MyBean myBean;

    //…
}
Quarkus also provides built-in mechanisms for interceptors, decorator, and event handling using Jakarta EE framework annotations and classes.
RESTful API
Building RESTful services with Quarkus is enabled by RESTEasy Reactive framework, which is an implementation of Jakarta REST specification. The example class to handle endpoint requests:
@Path("/api")
public class DataResource {
@GET
    @Path("resource")
    public String getData() {
        return "My resource";
    }
@POST
    @Path("add/{data}")
public String addData(String data, @RestQuery String type) {
return "Adding data: " + data + " of type: " + type;
}
}
Class annotation @Path defines the root path of the URL. Each method contains HTTP method annotation ( @GET, @POST ) and @Path annotation that becomes a subpath of the root part. That is, in the example above, getData() is called for GET /api/resource request. Method addData() is called for POST /api/add/some_text?type=text request. Path component some_text will be specified as a data parameter to the addData() method. Query parameter text will be passed as a type parameter.
In Spring Boot, the above endpoint implementation using Spring Web is very similar:
@RestController
@RequestMapping("/api")
public class TestController {
@GetMapping("resource")
    public String hello() {
        return "My resource";
    }
@PostMapping("add/{data}")
public String addData(@PathVariable String data, @RequestParam String type) {
return "Adding data: " + data + " of type: " + type;
}
}
Security
Quarkus has its own Security framework, similarly to Spring Boot. Quarkus Security has built-in authentication mechanisms (like Basic, Form-based etc) and provides an ability to use well-known external mechanisms, such as OpenID Connect or WebAuth. It also contains security annotations for role-based access control. On the other hand, Spring Security has more abilities and is more flexible than Quarkus Security. E.g., @Secured and @PreAuthorize Spring annotations are not provided natively by Quarkus. However, Quarkus can be integrated with Spring Security to use the functionality that is provided by Spring Security only.
Cloud integration
Quarkus supports building container images when creating an application. The following container technologies are supported:
- Docker. To generate a Dockerfile that allows the building of a docker image, the quarkus-container-image-docker extension is used.
- Jib. The Jib container images can be built by using the quarkus-container-image-jib extension. For Jib containerization, Quarkus provides caching of the app dependencies stored in a layer different from the application. This allows to rebuild the application fast. It also makes the application build smaller when pushing the container. Moreover, it gives the ability to build apps and containers without the need to have any client-side docker-related tool in case only push to the docker registry is needed.
- OpenShift. To build an OpenShift container, the quarkus-container-image-openshift is needed. The container is built by only uploading an artifact and its dependencies to the cluster, where they are merged into the container. Building OpenShift builds requires the creation of BuildConfig and two ImageStream resources. One resource is required for the builder image and one for the output image. The objects are created by the Quarkus Kubernetes extension.
- Buildpack. Quarkus extension quarkus-container-image-buildpack uses build packs to create container images. Internally, the Docker service is used.
Quarkus is positioned as a Kubernetes native. It provides a Quarkus Kubernetes extension that allows the deployment of apps to Kubernetes. This simplifies workflow and, in simple applications, allows one to deploy to Kubernetes in one step without deep knowledge of Kubernetes API itself. Using quarkus-kubernetes dependency provides auto-generated Kubernetes manifest in the target directory. The manifest is ready to be applied to the cluster using the following example command:
kubectl apply -f target/kubernetes/kubernetes.json
Quarkus also creates a dockerfile for the docker image for deployment. Application properties of the Quarkus app allow the configuration of container images to set their names, groups, etc. Kubernetes-related application properties allow the setup of a generated resource. E.g, quarkus.kubernetes.deployment-kind sets the resource kind to, e.g., Deployment, StatefulSet, or Job.
When it comes to Spring Boot it also has support of containerization and Kubernetes. However, such support is not out-of-the-box. The setup and deployment require much more configuration and technology-specific knowledge comparing to how it’s implemented in Quarkus. Quarkus reduces boilerplate code and setup since it has a native configuration for Kubernetes and containerization.
Production readiness and technical support
Quarkus is a relatively new framework comparing to Spring/Spring Boot. The initial Quarkus release took place on May 20, 2019. The first production Spring Framework release was on March 24, 2004, and Spring Boot was first released on April 1, 2014. Quarkus releases new versions a bit more frequently than Spring Boot, although the frequency is very good for both frameworks. There are 3-4 Quarkus releases per month and 5-6 releases of Spring Boot.
When it comes to bugs, there are 8289 total issues marked as bugs on github for Quarkus, and only 881 of them are in opened state. For Spring Boot, there are 3473 total issues that are marked as bugs, and only 66 of them are opened. The bugs are fixed faster for Spring Boot. The reason may be because it has a larger supporting community as Spring is much older.
Spring Boot has long-term support (LTS) versions that are maintained (updates/bug fixes) for a longer period of time without introducing major changes. Such an approach gives more stability and allows the use of the older version of your application that is getting all the critical fixes (e.g., fixes of known vulnerabilities). At the same time, you may work on the newer releases of your product to integrate and test the latest version of the framework. Spring Boot offers one year of regular support for each LTS edition and more than two years of commercial support.
Quarkus recently introduced LTS versions supported for one year. They plan to release a new LTS version every six months. Currently, Quarkus does not have commercial support for LTS versions.
Summary
In this article, we described key features of the Quarkus framework and compared them with the equivalent features in Spring Boot. Let’s summarize the main pros and cons of both frameworks in every area addressed.
- Application Configuration
Both Spring Boot and Quarkus have well-developed systems of configuration management. Even though Quarkus has the ability to build a simple three-level hierarchy of profiles, both frameworks can handle app configuration at a good level to satisfy app development needs.
- Dependency Injection
Both frameworks use a similar approach with beans injected at run time and use annotations to define bean types, assign bean information, and specify injection points.
- RESTful API
Spring Boot and Quarkus have very similar approach to writing RESTful API, with no major differences.
- Security
Quarkus provides the same authorization methods as Spring and has built-in integration with well-known authentication mechanisms. Spring Security offers more security-related annotations, although some of them can be used in Quarkus as it has the ability to integrate with the Spring Security framework.
- Cloud integration
Quarkus has native support for containerization and Kubernetes. It provides more abilities and is easier to use in cloud-native environments and tools compared to Spring Boot. This may be a key factor in choosing between Spring Boot and Quarkus for a development of a new app designed for a cloud-native environment.
- Production Readiness and Technical Support
Spring Boot is a much older framework. It has a larger support community and more users. It provides more robust LTS versions with the ability to extend tech support even more with LTS commercial support. Quarkus, on the other hand, has just recently introduced LTS versions with a shorter support period and doesn’t have commercial options. However, both frameworks are stable, bugs are continuously fixed, and new versions are released frequently.
For the most of its features, Quarkus implements Jakarta EE specifications, while Spring Boot includes its own solutions. Implementing the specification offers the advantage of creating a more consistent and robust API, as opposed to using non-standard methods. On the other hand, Spring Boot is quite an old and well-known framework and its features have proven to be stable and robust over time.

Android Automotive OS 11 Camera2 and EVS - Two different camera subsystems up and running
Android Automotive OS, AAOS in short, is a vehicle infotainment operating system that has gained a lot of traction recently, with most of the OEMs around the world openly announcing new versions of their infotainment based on Android. AAOS is based on the AOSP (Android Open Source Project) source code, which makes it fully compatible with Android, with additions that make it more useful in cars – different UI, integration with hardware layer, or vehicle-specific apps.
For OEMs and Tier1s, who are deeply accustomed to infotainment based on QNX/Autosar/Docker/Linux, and software developers working on AAOS apps, it’s sometimes difficult to quickly spin-up the development board or emulator supporting external hardware that has no out-of-the-box emulation built by Google. One of the common examples is camera access, which is missing in the official AAOS emulator these days, but the hardware itself is quite common in modern vehicles – which makes implementation of applications similar to Zoom or MS Teams for AAOS tempting to app developers.
In this article, I will explain how to build a simple test bench based on a cost-effective Raspberry Pi board and AAOS for developers to test their camera application. Examples will be based on AAOS 11 running on Raspberry Pi 4 and our Grape Up repository. Please check our previous article: " Build and Run Android Automotive OS on Raspberry Pi 4B " for a detailed description of how to run AAOS on this board.
Android Automotive OS has 2 different subsystems to access platform cameras: Camera2 and EVS. In this article, I will explain both how we can use it and how to get it running on Android Automotive OS 11.
Exterior View System (EVS)
EVS is a subsystem to display parking and maneuvering camera image. It supports multiple cameras' access and view. The main goal and advantage of that subsystem is that it boots quickly and should display a parking view before 2 seconds, which is required by law.
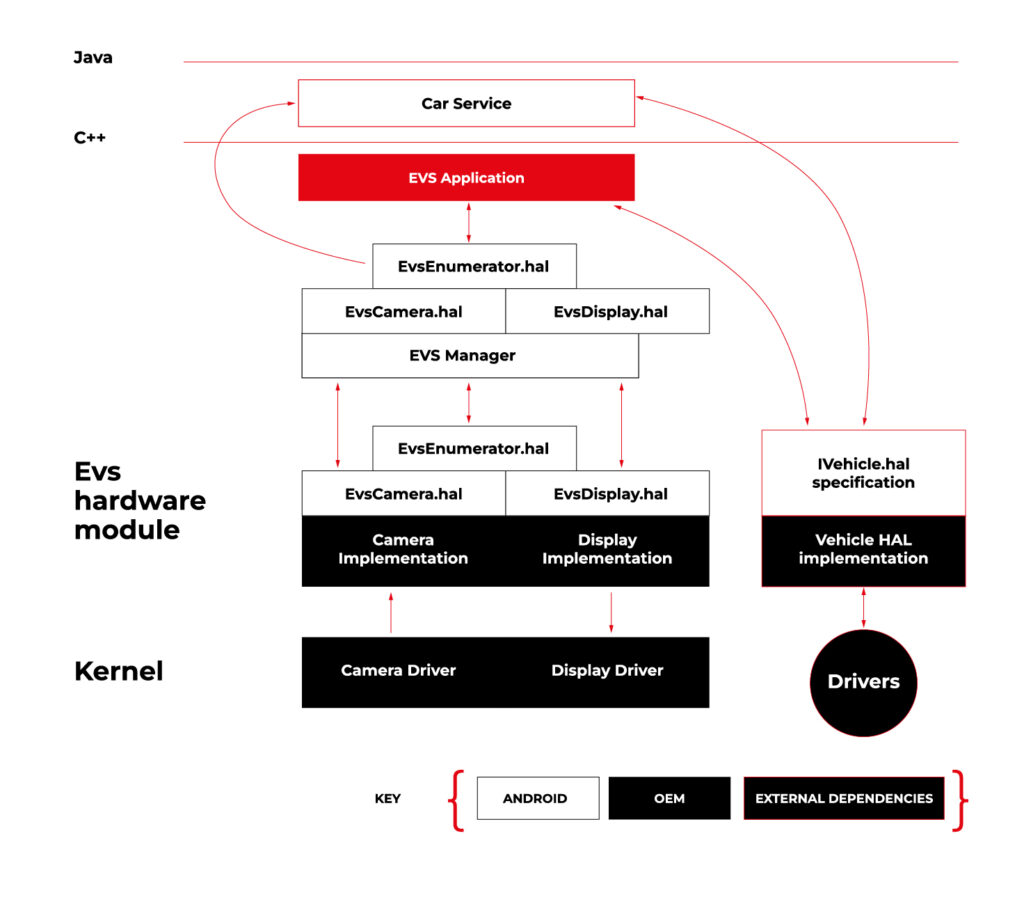
Source https://source.android.com/docs/automotive/camera-hal
As you can see on the attached diagram, low layers of EVS depend on OEM source code. OEM needs to deliver Camera and Display implementation. However, Android delivers a sample application (/hardware/interfaces/automotive/evs/1.0) , which uses Linux V4L2 and OpenGL to grab camera frames and display them. You can find more information about EVS at https://source.android.com/docs/automotive/camera-hal
In our example, we will use samples from Android. Additionally, I assume you build our Raspberry Pi image (see our article ), as it has multiple changes that allow AAOS to reliably run on RPi4 and support its hardware.
You should have a camera connected to your board via USB. Please check if your camera is detected by V4L2. There should be a device file:
/dev/video0
Then, type on the console:
su

setprop persist.automotive.evs.mode 1
This will start the EVS system.
To display camera views:
evs_app
Type Ctrl-C to exit the app and go back to the normal Android view.
Camera2
Camera2 is a subsystem intended for camera access by “normal” Android applications (smartphones, tablets, etc.). It is a common system for all Android applications, recently slowly being replaced by CameraX. The developer of an Android app uses Java camera API to gain access to the camera.
Camera2 has three main layers, which are shown in the diagram below:
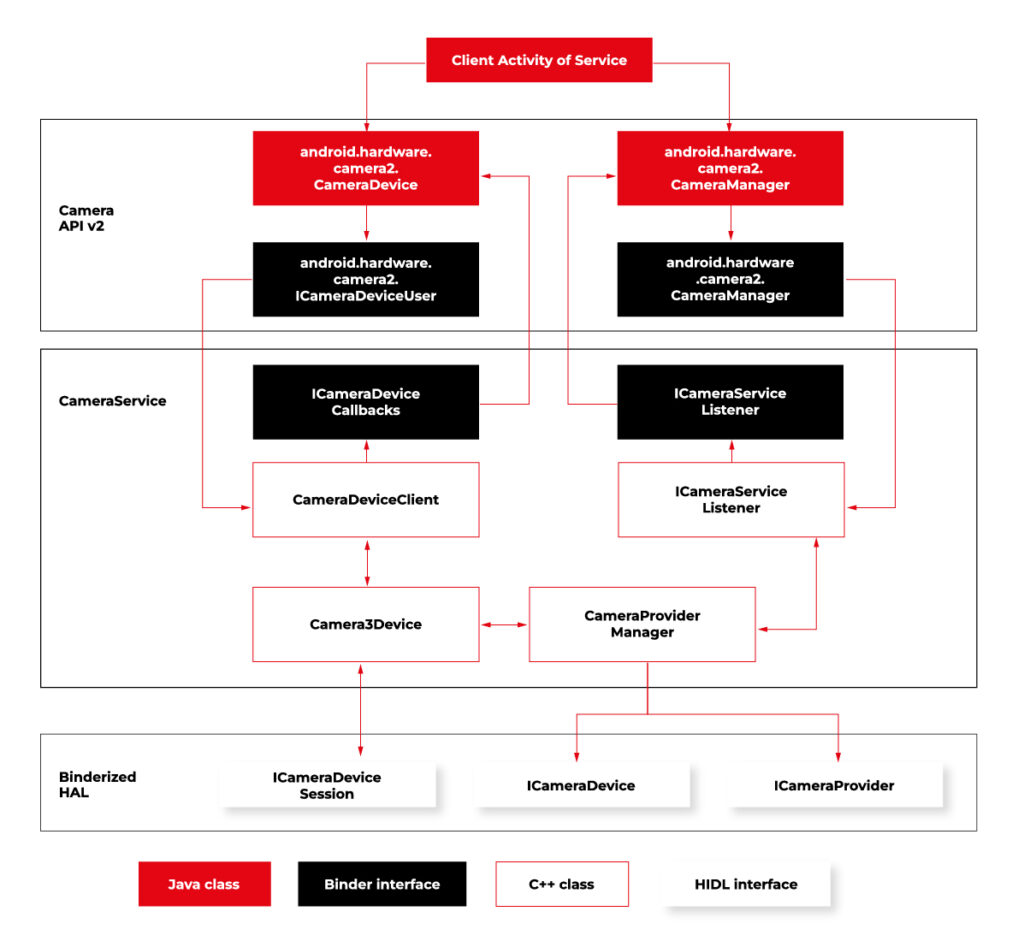
Source https://source.android.com/docs/core/camera
Low-level Camera access is implemented in CameraProvider. OEM can implement their own provider or a V4L2 camera driver can be used.
To get Camera2, you should enable it in the Car product make file. In
packages/services/Car/car_product/build/car_base.mk change config.disable_cameraservice to false.
PRODUCT_PROPERTY_OVERRIDES += config.disable_cameraservice=false
After that, rebuild Android:
make ramdisk systemimage vendorimage
Put it in the SD card and boot RPi with it. You will be able to run the “Camera” application on the AAOS screen, see camera output from the connected webcam, and run and debug applications using Camera API.
Summary
Now you know how to run both AAOS camera APIs on the RPi4 board. You can use both APIs to develop automotive applications leveraging cameras and test them using a simple USB webcam, which you may have somewhere on the shelf. If you found this article useful, you can also look at our previous articles about AAOS – both from the application development perspective and the OS perspective . Happy coding!

Unveiling the EU Data Act: Automotive industry implications
Fasten your seatbelts! The EU Data Act aims to drive a paradigm shift in the digital economy, and the automotive industry is about to experience a high-octane transformation. Get ready to explore the user-centric approach , new data-sharing mechanisms, and the roadmap for OEMs to adapt and thrive in the European data market. Are you prepared for this journey?
Key takeaways
- The EU Data Act grants users ownership and control of their data while introducing obligations for automotive OEMs to ensure fair competition.
- The Act facilitates data sharing between users, enterprises, and public sector bodies to promote innovation in the European automotive industry.
- Automotive OEMs must invest in resources and technologies to comply with the EU Data Act regulations for optimal growth opportunities.
The EU Data Act and its impact on the automotive industry
The EU Data Act applies to manufacturers, suppliers, and users of products or services placed on the market in the EU, as well as data holders and recipients based in the EU.
What is the EU Data Act regulation?
The EU Data Act is a proposed regulation that seeks to harmonize rules on fair access to and use of data in the European Union. The regulation sets out clear guidelines on who is obliged to surrender data, who can access it, how it can be used, and for what specific purposes it can be utilized.
In June 2023, the European Union took a significant step towards finalizing the Data Act, marking a pivotal moment in data governance. While the Act awaits formal adoption by the Council and Parliament following a legal-linguistic revision, the recent informal political agreement suggests its inevitability. This groundbreaking regulation will accelerate the monetization of industrial data while ensuring a harmonized playing field across the European Union.
User-centric approach
The European Data Act is revving up the engines of change in the automotive sector, putting users in the driver’s seat of their data and imposing specific obligations on OEMs. This means that connected products and related services must provide users with direct access to data generated in-vehicle, without any additional costs, and in a secure, structured, and machine-readable format.
Data handling by OEMs
A significant change is about to happen in data practices, particularly for OEMs operating in the automotive industry. Manufacturers and designers of smart products, such as smart cars, will be required to share data with users and authorized third parties. This shared data includes a wide range of information:
Included in the Sharing Obligation: The data collected during the user's interaction with the smart car that includes information about the car's operation and environment. This information is gathered from onboard applications such as GPS and sensor images, hardware status indications, as well as data generated during times of inaction by the user, such as when the car is on standby or switched off. Both raw and pre-processed data are collected and analyzed.
Excluded from the Sharing Obligation: Insights derived from raw data, any data produced when the user engages in activities like content recording or transmitting, and any data from products designed to be non-retrievable are not shared.
Sharing mechanisms and interactions
Data holders must make vehicle-generated data available (including associated metadata) promptly, without charge, and in a structured, commonly used, machine-readable format.
The legal basis for sharing personal data with connected vehicle users and legal entities or data recipients other than the user varies depending on the data subject and the sector-specific legislation to be presented.
Data access and third-party services
The Data Act identifies eligible entities for data sharing, encompassing both physical persons, such as individual vehicle owners or lessees, and legal persons, like organizations operating fleets of vehicles.
Requesting data sharing
Data can be accessed by users who are recipients either directly from the device's storage or from a remote server that captures the data. In cases where the data cannot be accessed directly, the manufacturers must promptly provide it.
The data must be free, straightforward, secure, and formatted for machine readability, and its quality should be maintained where necessary. There may be contracts that limit or deny access or further distribution of data if it breaches legal security requirements. This is a critical aspect for smart cars where sharing data might pose a risk to personal safety.
If the recipient of data is a third party , they cannot use the data to create competing products, only for maintenance. They cannot share the data unless it is for providing a user service and cannot prevent users who are consumers from sharing it with other parties.
Fair competition and trade secrets
The Data Act mandates that manufacturers share data, even when it is protected by trade secret laws. However, safeguards exist, allowing OEMs to impose confidentiality obligations and withhold data sharing in specific circumstances. These provisions ensure a balance between data access and trade secret protection. During the final negotiations on the Data Act, safeguarding trade secrets was a primary focus.
The Data Act now has provisions to prevent potential abusive behavior by data holders. It also includes an exception to data-sharing that permits manufacturers to reject certain data access requests if they can prove that such access would result in the disclosure of trade secrets, leading to severe and irreversible economic losses.
Connected vehicle data
Connected vehicle data takes the spotlight under the EU Data Act, empowering users with real-time access to their data and enabling data sharing with repair or service providers.
The implementation of the Data Act heavily involves connected cars. As per the Act, users, including companies, have the right to access the data collected by vehicles. However, manufacturers have the option to limit access under exceptional circumstances. This has a significant impact on data collection practices in the automotive sector.
Preparing for the EU Data Act: A guide for automotive OEMs
To stay ahead of the curve, OEMs must understand the business implications of the Data Act, adapt to new regulations, and invest in the necessary resources and technologies to ensure compliance.
As connected vehicles become the norm, OEMs that embrace the Data Act will be well-positioned to capitalize on new opportunities and drive growth in the European automotive sector.
Business implications
The EU Data Act imposes significant business implications on automotive OEMs, necessitating changes in their data handling practices and adherence to new obligations. As the industry embraces the user-centric approach to data handling, OEMs must design connected products and related services that provide users with access to their in-vehicle data.
To ensure a smooth transition and maintain a competitive edge, automotive OEMs must undertake a tailored and strategic preparation process.
Adapting to new regulations
Failure to comply with the Data Act could result in legal and financial repercussions for automotive OEMs. In order to avoid any possible problems, they should invest in the necessary resources and technologies to ensure compliance with the regulations of the Data Act.
They should also engage proactively with the requirements of the Data Act and implement compliance measures strategically.
By taking the following steps, automotive OEMs can navigate the regulatory landscape effectively and seize growth opportunities in the European automotive sector:
In-Depth Knowledge: Dive deep into the EU Data Act, with a special focus on its impact on the automotive industry. Recognize that the automotive sector is central to this regulation, requiring industry-specific understanding.
Data Segmentation: Perform a comprehensive analysis of your data, categorizing it into distinct groups. Identify which data types fall within the purview of the EU Data Act.
Compliance Framework Development:
- Internal Compliance: Audit and update policies to comply with the EU Data Act. Develop a data governance framework for access, sharing, and privacy.
- Data Access Protocols: Establish unambiguous protocols for data access and sharing, including procedures for obtaining user consent, data retrieval, and sharing modalities.
Data Privacy and Security:
- Data Safeguards: Enhance data privacy and security, including encryption and access controls.
Data Utilization: Develop plans for leveraging this data to generate new revenue streams while adhering to the EU Data Act's mandates.
User Engagement and Consent:
- Transparency: Forge clear and transparent channels of communication with users. Keep users informed about data collection, sharing, and usage practices, and obtain well-informed consent.
- Consent Management: Implement robust consent management systems to efficiently monitor and administer user consent. Ensure that users maintain control over their data.
Legal Advisors: Engage legal experts well-versed in data protection and privacy laws, particularly those relevant to the automotive sector. Seek guidance for interpreting and implementing the EU Data Act within your specific industry context.
Data Access Enhancement: Invest in technology infrastructure to facilitate data access and sharing as per the EU Data Act's stipulations. Ensure that data can be easily and securely provided in the required format.
Employee Education: Educate your workforce on the intricacies of the EU Data Act and its implications for daily operations. Ensure that employees possess a strong understanding of data protection principles.
Ongoing Compliance Oversight: Establish mechanisms for continuous compliance monitoring. Regularly assess data practices, consent management systems, and data security protocols to identify and address compliance gaps.
Collaboration with Peers: Collaborate closely with industry associations, fellow automotive OEMs, and stakeholders to share insights, best practices, and strategies for addressing the specific challenges posed by the EU Data Act in the automotive sector.
Future-Ready Solutions: Develop adaptable and scalable solutions that accommodate potential regulatory landscape shifts. Remain agile and prepared to adjust strategies as needed.
Boosting innovation capabilities
The Data Act may bring some challenges, but it also creates a favorable environment for innovation. By making industrial data more accessible, the Act offers a huge potential for data-driven businesses to explore innovative business models. Adapting to the Act can improve a company's ability to innovate, allowing it to use data as a strategic asset for growth and differentiation.
Summary
The EU Data Act is driving a paradigm shift in the automotive sector, putting users in control of their data and revolutionizing the way OEMs handle, share, and access vehicle-generated data.
By embracing the user-centric approach, ensuring compliance with data sharing and processing provisions, and investing in innovation capabilities, data holders can unlock new opportunities and drive growth in the European automotive market.
It's time for OEMs to take actionable steps to comply with the new regulation . Read this guide on building EU Data Act-compliant connected car software to learn what they are.
Get prepared to meet the EU Data Act deadlines
Ready to turn compliance into a competitive advantage? We’re here to assist you , whether you need expert guidance on regulatory changes or customized data-sharing solutions.


Predictive maintenance in automotive manufacturing
Our initial article on predictive maintenance covered the definition of such a system, its construction, and the key implementation challenges. In this part, we'll delve into how PdM technology is transforming different facets of the automotive industry and its advantages for OEMs, insurers, car rental companies, and vehicle owners.
Best predictive maintenance techniques and where you can use them
In the first part of the article, we discussed the importance of sensors in a PdM system. These sensors are responsible for collecting data from machines and vehicles, and they can measure various variables like temperature, vibration, pressure, or noise. Proper placement of these sensors on the machines and connecting them to IoT solutions, enables the transfer of data to the central repository of the system. After processing the data, we obtain information about specific machines or their parts that are prone to damage or downtime.
The automotive industry can benefit greatly from implementing these top predictive maintenance techniques.
Vibration analysis
How does it work?
Machinery used in the automotive industry and car components have a specific frequency of vibration. Deviations from this standard pattern can indicate "fatigue" of the material or interference from a third-party component that may affect the machine's operation. The PdM system enables you to detect these anomalies and alert the machine user before a failure occurs.
What can be detected?
The technique is mainly applied to high-speed rotating equipment. Vibration and oscillation analysis can detect issues such as bent shafts, loose mechanical components, engine problems, misalignment, and worn bearings or shafts.
Infrared thermography analysis
How does it work?
The technique involves using infrared cameras to detect thermal anomalies. This technology can identify malfunctioning electrical circuits, sensors or components that are emitting excessive heat due to overheating or operating at increased speeds. With this advanced technology, it's possible to anticipate and prevent such faults, and even create heat maps that can be used in predictive models and maintenance of heating systems.
What can be detected?
Infrared analysis is a versatile and non-invasive method that can be used on a wide scale. It is suitable for individual components, parts, and entire industrial facilities, and can detect rust, delamination, wear, or heat loss on various types of equipment.
Acoustic analysis monitoring
How does it work?
Machines produce sound waves while operating, and these waves can indicate equipment failure or an approaching critical point. The amplitude and character of these waves are specific to each machine. Even if the sound is too quiet for humans to hear in the initial phase of malfunction, sensors can detect abnormalities and predict when a failure is likely to occur.
What can be detected?
This PdM technology is relatively cheaper compared to others, but it does have some limitations in terms of usage. It is widely used in the Gas & Oil industry to detect gas and liquid leaks. In the automotive industry, it is commonly used for detecting vacuum leaks, unwanted friction, and stress on machine parts.
Motor circuit analysis
How does it work?
The technique works through electronic signature analysis (ESA). It involves measuring the supply voltage and operating current of an electronic engine. It allows locating and identifying problems related to the operation of electric engine components.
What can be detected?
Motor circuit analysis is a powerful tool that helps identify issues related to various components, such as bearings, rotor, clutch, stator winding, or system load irregularities. The main advantage of this technique is its short testing time and convenience for the operator, as it can be carried out in just two minutes while the machine is running.
PdM oil analysis
How does it work?
An effective method for Predictive Maintenance is to analyze oil samples from equipment without causing any damage. By analyzing the viscosity and size of the sample, along with detecting the presence or absence of third substances such as water, metals, acids or bases, we can obtain valuable information about mechanical damage, erosion or overheating of specific parts.
What can be detected?
Detecting anomalies early is crucial for hydraulic systems that consist of rotating and lubricating parts, such as pistons in a vehicle engine. By identifying issues promptly, effective solutions can be developed and potential damage to the equipment or a failure can be prevented.
Computer vision
How does it work?
Computer vision is revolutionizing the automotive industry by leveraging AI-based technology to enhance predictive maintenance processes. It achieves this by analyzing vast datasets, including real-time sensor data and historical performance records, to rapidly predict equipment wear and tear. By identifying patterns, detecting anomalies, and issuing early warnings for potential equipment issues, computer vision enables proactive maintenance scheduling.
What can be detected?
In the automotive industry, computer vision technology plays a crucial role in detecting equipment wear and tear patterns to predict maintenance requirements. It can also identify manufacturing defects such as scratches or flaws, welding defects in automotive components, part dimensions and volumes to ensure quality control, surface defects related to painting, tire patterns to match with wheels, and objects for robotic guidance and automation.
Who and how can benefit from predictive maintenance
Smart maintenance systems analyze multiple variables and provide a comprehensive overview, which can benefit several stakeholders in the automotive industry. These stakeholders range from vehicle manufacturing factories and the supply chain to service and dealerships, rental companies, insurance companies, and drivers.
Below, we have outlined the primary benefits that these stakeholders can enjoy. In the OEMs section, we have provided examples of specific implementations and case studies from the market.
Car rentals
Fleet health monitoring and better prediction of the service time
Managing service and repairs for a large number of vehicles can be costly and time-consuming for rental companies. When vehicles break down or are out of service while in the possession of customers, it can negatively impact the company’s revenue. To prevent this, car rental companies need constant insight into the condition of their vehicles and the ability to predict necessary maintenance. This allows them to manage their service plan more efficiently and minimize the risk of vehicle failure while on the road.
Car dealerships
Reducing breakdown scenarios
Car dealerships use predictive maintenance primarily to anticipate mechanical issues before they develop into serious problems. This approach helps in ensuring that vehicles sold or serviced by them are in optimal condition, which aids in preventing breakdowns or major faults for the customer down the line. By analyzing data from the vehicle's onboard sensors and historical maintenance records, dealerships can identify patterns that signify potential future failures. Predictive maintenance also benefits dealerships by allowing for proactive communication with vehicle owners, reducing breakdown scenarios, and enhancing customer satisfaction
Vehicle owners
Peace of mind
Periodic maintenance recommendations for vehicles are traditionally based on analyzing historical data from a large population of vehicle owners. However, each vehicle is used differently and could benefit from a tailored maintenance approach. Vehicles with high mileage or heavy usage should undergo more frequent oil changes than those that are used less frequently. By monitoring the actual vehicle condition and wear, owners can ensure that their vehicles are always at 100% and can better manage and plan for maintenance expenses.
Insurance companies
Risk & fraud
By using data from smart maintenance systems, insurance companies can enhance their risk modeling. The analysis of this data allows insurers to identify the assets that are at higher risk of requiring maintenance or replacement and adjust their premiums accordingly. In addition, smart maintenance systems can detect any instances of tampering with the equipment or negligence in maintenance. This can aid insurers in recognizing fraudulent claims.
OEMs successful development of PdM systems
BMW Group case study
The German brand implements various predictive maintenance tools and technologies, such as sensors, data analytics, and artificial intelligence, to prevent production downtime, promote sustainability, and ensure efficient resource utilization in its global manufacturing network. These innovative, cloud-based solutions are playing a vital role in enhancing their manufacturing processes and improving overall productivity.
The BMW Group's approach involves:
- Forecasting phenomena and anomalies using a cloud-based platform. Individual software modules within the platform can be easily switched on and off if necessary to instantly adapt to changing requirements. The high degree of standardization between individual components allows the system to be globally accessible. Moreover, it is highly scalable and allows new application scenarios to be easily implemented.
- Optimizing component replacements (this uses advanced real-time data analytics).
- Carrying out maintenance and service work in line with the requirements of the actual status of the system.
- Anomaly detection using advanced AI predictive algorithms.
Meanwhile, it should be taken into account that in BMW's body and paint shop alone, welding guns perform some 15,000 spot welds per day. At the BMW Group's plant in Regensburg, the conveyor systems' control units run 24/7. So any downtime is a huge loss.
→ SOURCE case study.
FORD case study
Predictive vehicle maintenance is one of the benefits offered to drivers and automotive service providers as part of Ford's partnerships with CARUSO and HIGH MOBILITY. In late 2020, Ford announced two new connected car agreements to potentially enable vehicle owners to benefit from a personalized third-party offer.
CARUSO and HIGH MOBILITY will function as an online data platform that is completely independent of Ford and allows third-party service providers secure and compliant access to vehicle-generated data. This access will, in turn, enable third-party providers to create personalized services for Ford vehicle owners. This will enable drivers to benefit from smarter insurance, technical maintenance and roadside recovery.
Sharing vehicle data (warning codes, GPS location, etc.) via an open platform is expected to be a way to maintain competitiveness in the connected mobility market.
→ SOURCE case study.
Predictive maintenance is the future of the automotive market
An effective PdM system means less time spent on equipment maintenance, saving on spare parts, eliminating unplanned downtime and improved management of company resources. And with that comes more efficient production and customers’ and employees’ satisfaction.
As the data shows, organizations that have implemented a PdM system report an average decrease of 55% in unplanned equipment failures. Another upside is that, compared to other connected car systems (such as infotainment systems), PdM is relatively easy to monetize. Data here can remain anonymous, and all parties involved in the production and operation of the vehicle reap the benefits.
Organizations have come to recognize the hefty returns on investment provided by predictive maintenance solutions and have thus adopted it on a global scale. According to Market Research Future, the global Predictive Maintenance market is projected to grow to 111.30 billion by 2030 , suggesting that further growth is possible in the future.
Android Automotive OS 14 is out – build your own emulator from scratch!
Android Automotive OS 14 has arrived, and it marks a significant evolution in the way users interact with their vehicle's system. This version brings enhanced user experience, improved Android API, and better OS-level security (as well as non-automotive Android 14). In this short article, we'll walk you through a tutorial on creating your own emulator from scratch, but first, here are some of the standout features and improvements introduced in Android Automotive OS 14 !
Android Automotive 14 noteworthy new features
- Enhanced UI: Now with an optional, improved home screen adaptation to the portrait mode for better vehicle compatibility.
- Multi-User Upgrades: Support parallel sessions with custom sound zones and multiple displays.
- Remote Access: Enables system wake-up, executes a task and then shutdown via external requests.
- Extended VHAL: More ADAS and non-ADAS properties included to represent activation status and the system state.
- App Quick Actions: A feature that allows applications to showcase quick actions.
- Infotainment Reference Design: The starting point for developers to create apps for Android Automotive OS.
- New Boot Animation: Well, as usual 😊
To learn about all new features provided in Android Automotive 14, follow this link: https://source.android.com/docs/automotive/start/releases/u_udc_release?hl=en
Steps to building an emulator
The best operating system for building an emulator in AAOs is Ubuntu 18.04 or higher. If you use a different operating system, you must follow some extra steps. For instance, you may need to install a repo from https://gerrit.googlesource.com/git-repo instead of using a package manager.
1) You need first to install the required dependencies
sudo apt install git-core gnupg flex bison build-essential zip curl zlib1g-dev libc6-dev-i386 libncurses5 x11proto-core-dev libx11-dev lib32z1-dev libgl1-mesa-dev libxml2-utils xsltproc unzip fontconfig repo
2) Then, configure Git, set your name and email address
git config --global user.name "Your name"
git config --global user.email your@email
3) After configuring Git, you can download source code from a Git repository
repo init -u https://android.googlesource.com/platform/manifest -b android-14.0.0_r54 --partial-clone --clone-filter=blob:limit=10M && repo sync
You can skip ‐‐ partial-clone and ‐‐ clone-filter. However, this will result in longer download times. It’s recommended to check for the latest android-14.0.0_rXX tag before downloading, which can be found on this page: https://android.googlesource.com/platform/manifest/+refs .
Keep in mind that downloading takes a lot of time because the sources take about 150GB even with partial clone and clone-filter enabled.
4) In the next step, set up environment variables using the script provided
. build/envsetup.sh
This method replaces your JAVA_HOME and modifies PATH, so be aware that your console may act differently now.
5) Select the system to build
lunch sdk_car_portrait_x86_64-eng
You can create a landscape build by removing "portrait". Also, change x86_64 to arm64 if you want to run the system on Mac. For more details on building on Mac, check out this article .
6) Create the system and the emulator image
m && m emu_img_zip
The first command will take hours to complete. Take a break: go running, biking, hiking, or whatever drives you. You can modify threat pool usage by the build system with -j parameter, like m -j 16 – the default one is the CPU count of your machine.
7) Copy the emulator image to Android Studio emulator directory
mkdir -p /mnt/c/Users/<user>/AppData/Local/Android/Sdk/system-images/android-34/custom_aaos_14/ && unzip -o out/target/product/emulator_x86_64/sdk-repo-Linux-system-images-eng.dape.zip -d /mnt/c/Users/<user>/AppData/Local/Android/Sdk/system-images/android-34/custom_aaos_14/
I assume you work on a Windows machine with WSL. Please adapt the above commands with your Android/SDK directory if you are working on native Linux.
Create a package.xml file in /mnt/c/Users/<user>/AppData/Local/Android/Sdk/system-images/android-34/custom_aaos_14/x86_64 directory with the this content . The file provided bases on existing package.xml files in other emulator images.
Adjust “tag”, “vendor”, and “display name” in the upper file if needed. Make sure to match <localPackage obsolete="false" path="system-images;android-34;custom_aaos_14;x86_64"> with the path you’d placed the emulator image.
8) Now it’s time to create a new emulator in Android Studio
Open "Device Manager" and select "Create Virtual Device". In the left-hand menu, choose "Automotive" and add a new hardware profile using the button in the lower-left corner of the panel.
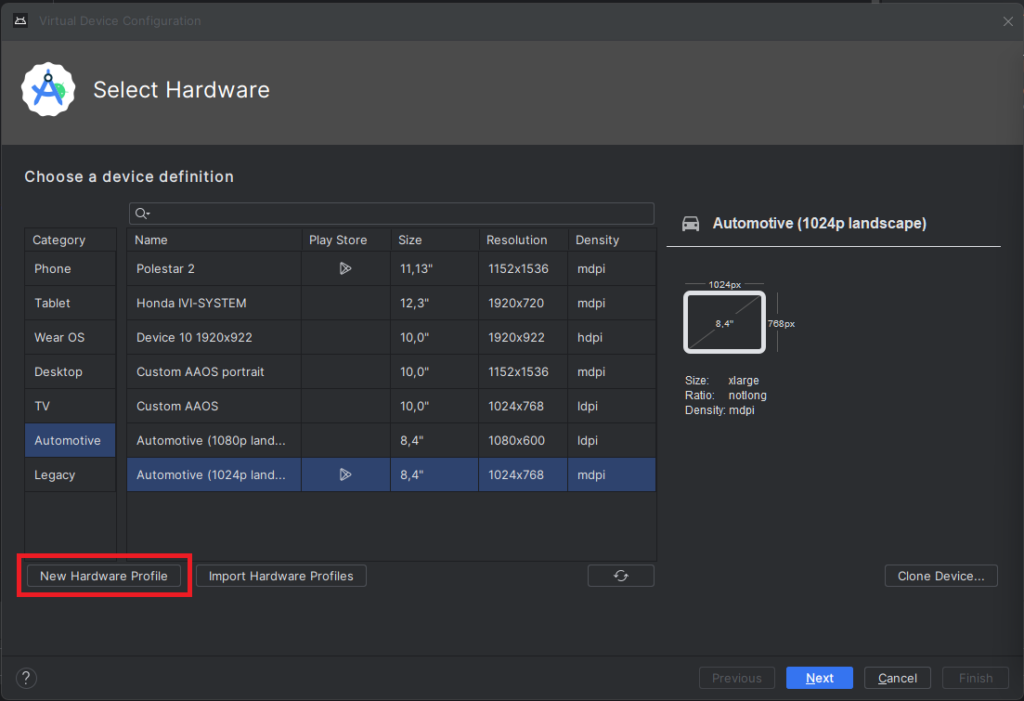
Select “Android Automotive” as a device type. Choose the correct resolution for your build. For example, I selected a resolution of 1152x1536 for a 10-inch device to create a portrait build. Next, allocate at least 1536 MB of RAM to your device. Then, choose only one supported device state - "Portrait" or "Landscape" - according to your build. Finally, disable any unnecessary sensors and skin for AAOS compatibility.
9) Accept and select your new hardware profile. Then, move on to the next step
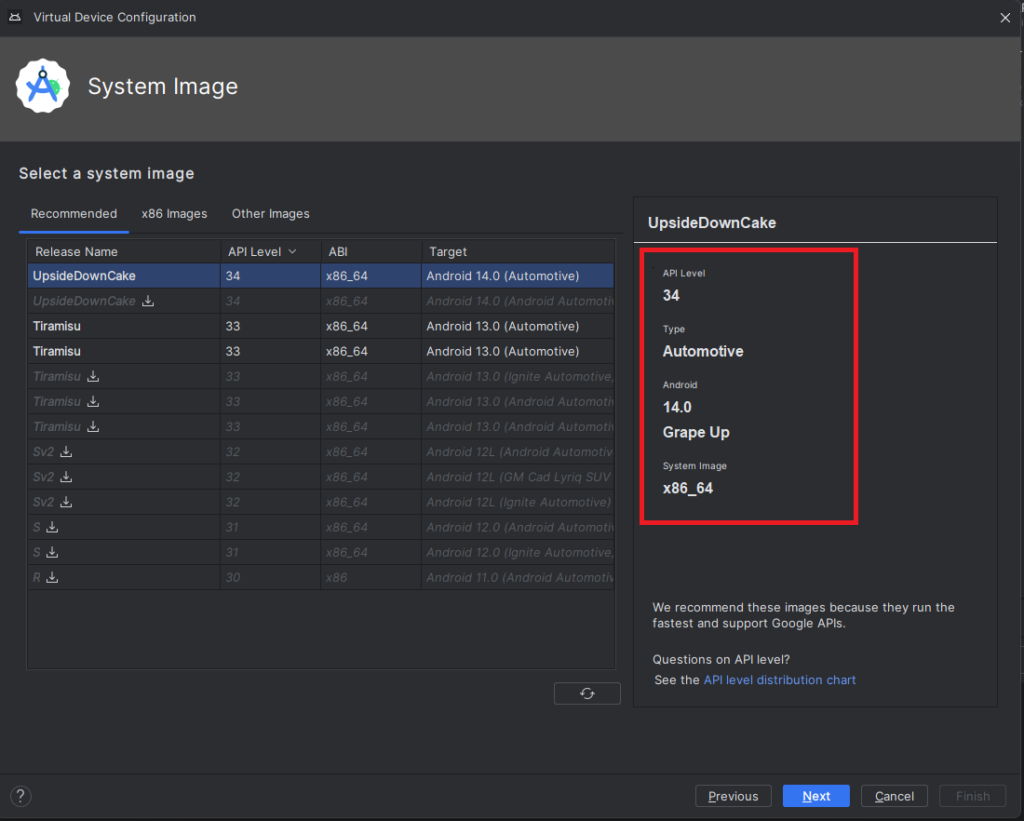
10) Pick your emulator image (you can find it using the tag and vendor configured in package.xml)
11) On the final screen, enter a name and complete the configuration process
12) To start the emulator, go to the "Device Manager" and launch it from there
13) You’re all set! Enjoy!

Get started on creating your very own Android Automotive OS 14 emulator by following the steps outlined in this article. Explore the possibilities of car technology and discover what the future has in store. You can find a AAOS “Hello World” example in our article How to Build Your First App for Android Automotive OS . Start building, try out the various features, and have fun with your new setup!

Unleashing the full potential of MongoDB in automotive applications
Welcome to the second part of our article series about MongoDB in automotive. In the previous installment , we explored the power of MongoDB as a versatile data management solution for the automotive industry, focusing on its flexible data model, scalability, querying capabilities, and optimization techniques.
In this continuation, we will delve into two advanced features of MongoDB that further enhance its capabilities in automotive applications: timeseries data management and change streams. By harnessing the power of timeseries and change streams, MongoDB opens up new possibilities for managing and analyzing real-time data in the automotive domain. Join us as we uncover the exciting potential of MongoDB's advanced features and their impact on driving success in automotive applications.
Time-series data management in MongoDB for automotive
Managing time-series data effectively is a critical aspect of many automotive applications. From sensor data to vehicle telemetry, capturing and analyzing time-stamped data is essential for monitoring performance, detecting anomalies, and making informed decisions. MongoDB offers robust features and capabilities for managing time-series data efficiently. This section will explore the key considerations and best practices for leveraging MongoDB's time-series collections.
Understanding time-series collections
Introduced in MongoDB version 5.0, time-series collections provide a specialized data organization scheme optimized for storing and retrieving time-series data. Time-series data consists of a sequence of data points collected at specific intervals, typically related to time. This could include information such as temperature readings, speed measurements, or fuel consumption over time.
MongoDB employs various optimizations in a time-series collection to enhance performance and storage efficiency. One of the notable features is the organization of data into buckets. Data points within a specific time range are grouped in these buckets. This time range, often referred to as granularity, determines the level of detail or resolution at which data points are stored within each bucket. This bucketing approach offers several advantages.
Firstly, it improves query performance by enabling efficient data retrieval within a particular time interval. With data organized into buckets, MongoDB can quickly identify and retrieve the relevant data points, reducing the time required for queries.
Secondly, bucketing allows for efficient storage and compression of data within each bucket. By grouping data points, MongoDB can apply compression techniques specific to each bucket, optimizing disk space utilization. This helps to minimize storage requirements, especially when dealing with large volumes of time-series data.
Choosing sharded or non-sharded collections
When working with time-series data, you have the option to choose between sharded and non-sharded collections. Sharded collections distribute data across multiple shards, enabling horizontal scalability and accommodating larger data volumes. However, it's essential to consider the trade-offs associated with sharding. While sharded collections offer increased storage capacity, they may introduce additional complexity and potentially impact performance compared to non-sharded collections.
In most cases, non-sharded collections are sufficient for managing time-series data, especially when proper indexing and data organization strategies are employed. Non-sharded collections provide simplicity and optimal performance for most time-series use cases, eliminating the need for managing a sharded environment.
Effective data compression for time-series collections
Given the potentially large volumes of data generated by time-series measurements, efficient data compression techniques are crucial for optimizing storage and query performance. MongoDB provides built-in compression options that reduce data size, minimizing storage requirements and facilitating faster data transfer. Using compression, MongoDB significantly reduces the disk space consumed by time-series data while maintaining fast query performance.
One of the key compression options available in MongoDB is the WiredTiger storage engine. WiredTiger offers advanced compression algorithms that efficiently compress and decompress data, reducing disk space utilization. This compression option is particularly beneficial for time-series collections where data points are stored over specific time intervals.
By leveraging WiredTiger compression, MongoDB achieves an optimal balance between storage efficiency and query performance for time-series collections. The compressed data takes up less space on disk, resulting in reduced storage costs and improved overall system scalability. Additionally, compressed data can be transferred more quickly across networks, improving data transfer speeds and reducing network bandwidth requirements.
Considerations for granularity and data retention
When designing a time-series data model in MongoDB, granularity and data retention policies are important factors to consider. Granularity refers to the level of detail or resolution at which data points are stored, while data retention policies determine how long the data is retained in the collection.
Choosing the appropriate granularity is crucial for striking a balance between data precision and performance. MongoDB provides different granularity options, such as "seconds," "minutes," and "hours," each covering a specific time span. Selecting the granularity depends on the time interval between consecutive data points that have the same unique value for a specific field, known as the meta field. You can optimize storage and query performance by aligning the granularity with the ingestion rate of data from a unique data source.
For example, if you collect temperature readings from weather sensors every five minutes, setting the granularity to "minutes" would be appropriate. This ensures that data points are grouped in buckets based on the specified time span, enabling efficient storage and retrieval of time-series data.
In addition to granularity, defining an effective data retention policy is essential for managing the size and relevance of the time-series collection over time. Consider factors such as the retention period for data points, the frequency of purging outdated data, and the impact on query performance.
MongoDB provides a Time to Live (TTL) mechanism that can automatically remove expired data points from a time-series collection based on a specified time interval. However, it's important to note that there is a known issue related to TTL for very old records in MongoDB at the time of writing this article. The issue is described in detail in the MongoDB Jira ticket SERVER-76560.
The TTL behavior in time series collections differs from regular collections. In a time series collection, TTL expiration occurs at the bucket level rather than on individual documents within the bucket. Once all documents within a bucket have expired, the entire bucket is removed during the next run of the background task that removes expired buckets.
This bucket-level expiration behavior means that TTL may not work in the exact same way as with normal collections, where individual documents are removed as soon as they expire. It's important to be aware of this distinction and consider it when designing your data retention strategy for time series collections.
When considering granularity and data retention policies, evaluate the specific requirements of your automotive application. Consider the level of precision needed for analysis, the data ingestion rate, and the desired storage and query performance. By carefully evaluating these factors and understanding the behavior of TTL in time series collections, you can design a time-series data model in MongoDB that optimizes both storage efficiency and query performance while meeting your application's needs.
Retrieving latest documents
In automotive applications, retrieving the latest documents for each unique meta key can be a common requirement. MongoDB provides an efficient approach to achieve this using the `DISTINCT_SCAN` stage in the aggregation pipeline. Let's explore how you can use this feature, along with an automotive example.
The `DISTINCT_SCAN` stage is designed to perform distinct scans on sorted data in an optimized manner. By leveraging the sorted nature of the data, it efficiently speeds up the process of identifying distinct values.
To illustrate its usage, let's consider a scenario where you have a time series collection of vehicle data that includes meta information and timestamps. You want to retrieve the latest document for each unique vehicle model. Here's an example code snippet demonstrating how to accomplish this:
```javascript
db.vehicleData.aggregate([
  { $sort: { metaField: 1, timestamp: -1 } },
  {
    $group: {
      _id: "$metaField",
      latestDocument: { $first: "$$ROOT" }
    }
  },
  { $replaceRoot: { newRoot: "$latestDocument" } }
])
```
In the above code, we first use the `$sort` stage to sort the documents based on the `metaField` field in ascending order and the `timestamp` field in descending order. This sorting ensures that the latest documents appear first within each group.
Next, we employ the `$group` stage to group the documents by the `metaField` field and select the first document using the `$first` operator. This operator retrieves the first document encountered in each group, corresponding to the latest document for each unique meta key.
Finally, we utilize the `$replaceRoot` stage to promote the `latestDocument` to the root level of the output, effectively removing the grouping and retaining only the latest documents.
By utilizing this approach, you can efficiently retrieve the latest documents per each meta key in an automotive dataset. The `DISTINCT_SCAN` stage optimizes the distinct scan operation, while the `$first` operator ensures accurate retrieval of the latest documents.
It's important to note that the `DISTINCT_SCAN` stage is an internal optimization technique of MongoDB's aggregation framework. It is automatically applied when the conditions are met, so you don't need to specify or enable it in your aggregation pipeline explicitly.
Time series collection limitations
While MongoDB Time Series brings valuable features for managing time-series data, it also has certain limitations to consider. Understanding these limitations can help developers make informed decisions when utilizing MongoDB for time-series data storage:
● Unsupported Features : Time series collections in MongoDB do not support certain features, including transactions and change streams. These features are not available when working specifically with time series data.
● A ggregation $out and $merge : The $out and $merge stages of the aggregation pipeline, commonly used for storing aggregation results in a separate collection or merging results with an existing collection, are not supported in time series collections. This limitation affects the ability to perform certain aggregation operations directly on time series collections.
● Updates and Deletes : Time series collections only support insert operations and read queries. This means that once data is inserted into a time series collection, it cannot be directly modified or deleted on a per-document basis. Any updates or manual delete operations will result in an error.
MongoDB change streams for real-time data monitoring
MongoDB Change Streams provide a powerful feature for real-time data monitoring in MongoDB. Change Streams allow you to capture and react to any changes happening in a MongoDB collection in a real-time manner. This is particularly useful in scenarios where you need to track updates, insertions, or deletions in your data and take immediate actions based on those changes.
Change Streams provide a unified and consistent way to subscribe to the database changes, making it easier to build reactive applications that respond to real-time data modifications.
```javascript
// MongoDB Change Streams for Real-Time Data Monitoring

const MongoClient = require('mongodb').MongoClient;

// Connection URL
const url = 'mongodb://localhost:27017';

// Database and collection names
const dbName = 'mydatabase';
const collectionName = 'mycollection';

// Create a change stream
MongoClient.connect(url, function(err, client) {
  if (err) throw err;

  const db = client.db(dbName);
  const collection = db.collection(collectionName);

  // Create a change stream cursor with filtering
  const changeStream = collection.watch([{ $match: { operationType: 'delete' } }]);

  // Set up event listeners for change events
  changeStream.on('change', function(change) {
    // Process the delete event
    console.log('Delete Event:', change);
    // Perform further actions based on the delete event
  });

  // Close the connection
  // client.close();
});
```
In this updated example, we use the `$match` stage in the change stream pipeline to filter for delete operations only. The `$match` stage is specified as an array in the `watch()` method. The `{ operationType: 'delete' }` filter ensures that only delete events will be captured by the change stream.
Now, when a delete operation occurs in the specified collection, the `'change'` event listener will be triggered, and the callback function will execute. Inside the callback, you can process the delete event and perform additional actions based on your application's requirements. It's important to note that the change stream will only provide the document ID for delete operations. The actual content of the document is no longer available. If you need the document content, you need to retrieve it before the delete operation or store it separately for reference.
One important aspect to consider is related to the inability to distinguish whether a document was removed manually or due to the Time to Live (TTL) mechanism. Change streams do not provide explicit information about the reason for document removal. This means that when a document is removed, the application cannot determine if it was deleted manually by a user or automatically expired through the TTL mechanism. Depending on the use case, it may be necessary to implement additional logic or mechanisms within the application to handle this distinction if it is critical for the business requirements.
Here are some key aspects and benefits of using MongoDB Change Streams for real-time data monitoring:
● Real-Time Event Capture : Change Streams allow you to capture changes as they occur, providing a real-time view of the database activity. This enables you to monitor data modifications instantly and react to them in real-time.
● Flexibility in Filtering : You can specify filters and criteria to define the changes you want to capture. This gives you the flexibility to focus on specific documents, fields, or operations and filter out irrelevant changes, optimizing your monitoring process.
● Data Integration and Pipelines : Change Streams can be easily integrated into your existing data processing pipelines or applications. You can consume the change events and perform further processing, transformation, or analysis based on your specific use case.
● Scalability and High Availability : Change Streams are designed to work seamlessly in distributed and sharded MongoDB environments. They leverage the underlying replica set architecture to ensure high availability and fault tolerance, making them suitable for demanding and scalable applications.
● Event-Driven Architecture : Using Change Streams, you can adopt an event-driven architecture for your MongoDB applications. Instead of continuously polling the database for changes, you can subscribe to the change events and respond immediately, reducing unnecessary resource consumption.
MongoDB Change Streams provide a powerful mechanism for real-time data monitoring, enabling you to build reactive, event-driven applications and workflows. By capturing and processing database changes in real-time, you can enhance the responsiveness and agility of your applications, leading to improved user experiences and efficient data processing.
Another consideration is that low-frequency events may lead to an invalid resume token. Change streams rely on a resume token to keep track of the last processed change. In cases where there are long periods of inactivity or low-frequency events, the resume token may become invalid or expired. Therefore, the application must handle this situation gracefully and take appropriate action when encountering an invalid resume token. This may involve reestablishing the change stream or handling the situation in a way that ensures data integrity and consistency.
It's important to note that while Change Streams offer real-time monitoring capabilities, they should be used judiciously, considering the potential impact on system resources. Monitoring a large number of collections or frequently changing data can introduce additional load on the database, so it's essential to carefully design and optimize your Change Streams implementation to meet your specific requirements.
Conclusion
By harnessing the capabilities of MongoDB, developers can unlock a world of possibilities in modern application development. From its NoSQL model to efficient time-series data management, batch writes, data retrieval, and real-time monitoring with Change Streams, MongoDB provides a powerful toolkit. By following best practices and understanding its limitations, developers can maximize the potential of MongoDB, resulting in scalable, performant, and data-rich applications.
MongoDB can be likened to a Swiss Army Knife in the world of database systems, offering a versatile set of features and capabilities. However, it is important to note that MongoDB is not a one-size-fits-all solution for every use case. This article series aim to showcase the capabilities and potential use cases of MongoDB.
While MongoDB provides powerful features like time-series data management and change streams for real-time data monitoring, it is essential to consider alternative solutions as well. Depending on factors such as team skills, the company-adopted tools, and specific project requirements, exploring other options like leveraging IaaS provider-native solutions such as DynamoDB for specific use cases within the automotive domain may be worthwhile.
Furthermore, it is important to highlight that both articles focused on using MongoDB in automotive primarily for hot storage, while the aspect of cold storage for automotive applications is not covered.
When starting a new project, it is crucial to conduct thorough research, consider the specific requirements, and evaluate the available options in the market. While MongoDB may provide robust features for certain scenarios, dedicated time-series databases like InfluxDB may offer a more tailored and specialized solution for specific time-series data needs. Choosing the right tool for the job requires careful consideration and an understanding of the trade-offs and strengths of each option available.

Driving success in delivering innovation for automotive: Exploring various partnership models
The automotive sector has rapidly evolved, recognizing that cutting-edge software is now the primary factor differentiating car brands and models. Automotive leaders are reshaping the industry by creating innovative software-defined vehicles that seamlessly integrate advanced features, providing drivers with a genuinely captivating experience.
While some automotive manufacturers have begun building in-house expertise, others are turning to third-party software development companies for assistance. However, such partnerships can take on different forms depending on factors like the vendor’s size and specialization, which can sometimes lead to challenges in cooperation.
Still, success is possible if both parties adopt the right approach despite any problems that may arise. To ensure optimal collaboration, we recommend implementing the Value-Aligned Partnership concept.
By adopting this approach, vendors accept full accountability for delivery, match their contributions to the client's business goals, and use their experience to guarantee success. We use this strategy at Grape Up to ensure our clients receive the best possible results.
This article explores the advantages and challenges of working with service vendors of various sizes and specializations. It also highlights the Value-Aligned Partnership model as a way to overcome these challenges and maximize the benefits of client-vendor cooperation.
Large vendors and system integrators
Working with multi-client software vendors can pose unique challenges for automotive companies, as these companies typically operate on a body leasing model , providing temporary skilled personnel for development services.
Furthermore, these companies may lack specialized expertise , which is particularly true for large organizations with high turnover rates in their development teams. Despite having impressive case studies, the team assigned to a specific project doesn't always possess the necessary experience due to frequent personnel changes within the company.
Moreover, big vendors usually have numerous clients and projects to manage simultaneously. This may lead to limited personalized attention and cause potential delays in delivery. Outsourcing services to countries with different time zones, quality assurance procedures, and cultural norms can further complicate the situation.
However, despite these challenges, such partnerships have significant advantages, which should be considered in the decision-making process.
Advantages of partnering with large vendors and system integrators
- Access to diverse expertise : A wide array of specialists is available for various project aspects.
- Scalability advantage : Project resource requirements are met without bottlenecks.
- Accelerated time-to-market : Development speed is increased with skilled, available teams.
- Cost-efficiency : It's a cost-effective alternative via vendor teams, reducing overhead.
- Risk management : Turnover risks are handled by vendors to ensure continuity.
- Cross-industry insights application : Diverse sector practices are applied to automotive projects.
- Agile adaptation : They are efficiently adjusting to changing project needs.
- Enhanced global collaboration: Creativity is boosted by leveraging time zones and diverse perspectives from vendors.
Working with smaller vendors
Your other option is to work with smaller software companies, but you should be aware of the potential challenges of such collaboration, as well. For example, while they are exceptionally well-versed in a particular field or technology, they might lack the breadth of knowledge necessary to meet the needs of the industry. Additionally, limited resources or difficulties in scaling could hinder their ability to keep pace with the growing demands of the sector.
Furthermore, although these vendors excel in specific technical areas , they may struggle to provide comprehensive end-to-end solutions, leaving gaps in the development process.
Adding to these challenges, smaller companies often have a more restricted perspective due to their limited engagement in partnerships , infrequent conference attendance, and a narrower appeal that doesn't span a global audience. This can result in a lack of exposure to diverse ideas and practices, hindering their ability to innovate and adapt.
Benefits of working with smaller vendors
- Tailored excellence: Small vendors often craft industry-specific, innovative solutions without unnecessary features.
- Personal priority: They prioritize each client, ensuring dedicated attention and satisfaction.
- Flexible negotiation: Smaller companies offer negotiable terms and pricing, unlike larger counterparts.
- Bespoke solutions: They customize offerings based on your unique needs, unlike a generic approach.
- Agile responsiveness: Quick release cycles, technical agility, and transparent interactions are their strengths.
- Meaningful connections: They deeply care about your success, fostering personal relationships.
- Accountable quality: They take responsibility for their products, as development and support are integrated.
Niche specialization companies
Collaborating with a company specializing in the automotive sector offers distinct advantages, addressing challenges some large and small vendors face. Their in-depth knowledge of the automotive industry ensures tailored solutions that meet specific requirements efficiently.
As opposed to vendors who work in several industries, they are quick to adjust to shifts in the market, allowing software development projects to be successful and meet the ever-changing needs of the automobile sector.
It is important, however, to consider the potential drawbacks when entering partnerships that rely heavily on a narrow area of expertise. Niche solutions may not be versatile , and specialization can lead to higher costs and resistance to innovation . Additionally, overreliance on a single source could lead to dependency concerns and a limited perspective on the market. It is important to weigh these risks against the benefits and ensure that partnerships are balanced to avoid stagnation and limited options.
When working with software vendors, no matter their size or specialization level, it is essential to adopt the right approach to cooperation to mitigate risks and challenges.
Value-aligned partnership model explained
This cooperation model prioritizes shared values, expertise, and cultural compatibility. It's important to note, in this context, that a company's size doesn't limit its abilities to become a successful partner. Both large and small vendors can be just as driven and invested in professional development.
What matters most is a company's mindset and commitment to continuous improvement. Small and large businesses can excel by prioritizing a robust organizational culture, regular training sessions, knowledge sharing among employees, and partnerships that leverage the strengths of both parties.
Thus, the Value-Aligned Partnership is a model that brings together the benefits of working with different types of companies. It combines the diverse expertise of large vendors with the agility and tailored solutions of small companies while incorporating vast industry-specific knowledge.
In a value-aligned partnership model, the vendor goes beyond simply providing software development services. They actively engage in the journey towards success by fully immersing themselves in the client's vision . By thoroughly comprehending the customer's values and goals, a partner ensures that every contribution they make aligns seamlessly with the overall direction of the business and can even foster innovation within the client's company.
Building a strong partnership based on shared values takes time and effort, but it's worth it for the exceptional outcomes that result. Open communication, collaboration, and mutual understanding are key factors in creating a foundation for long-term cooperation and shared success between the two parties.
In the fast-paced and ever-changing automotive industry, having expertise specific to the domain is crucial. A value-aligned partner recognizes the importance of retaining in-house knowledge and skills related to the sector. As a company that prioritizes this approach, Grape Up invests in measures to minimize turnover , provide ongoing training and education, and ensure that our team possesses deep domain expertise . This commitment to automotive know-how strengthens the partnership's reliability and establishes us as a trusted, long-term ally for the automotive company.
Conclusion
The automotive industry is transforming remarkably with the rise of software-defined vehicles. OEMs realize they can't tackle this revolution alone and seek the perfect collaborators to join them on this exciting journey. These partners bring a wealth of expertise in software development, cloud technologies, artificial intelligence, and more. With their finger on the pulse of the automotive industry, they understand the ever-changing trends and challenges. They take the time to comprehend the OEM's vision, objectives, and market positioning, enabling them to provide tailored solutions that address specific needs.
How to manage an M5Stack Core2 for AWS. Part 3 – best of Micropython and C meld together
In the first part of the article , we’ve covered Micropython usage with UiFlow and VS Code environments. In the second one , we use C/C++ with more granular device control. This time, we’ll try to run Micropython with an external library added.
Micropython with interactive console
There are two projects that enable Micropython for ESP32 to run external libraries. The first one is M5Stack-official https://github.com/m5stack/Core2forAWS-MicroPython , and the second one is unofficial https://github.com/mocleiri/tensorflow-micropython-examples . The common part is – you can run an interactive Micropython console on the controller using the serial port. Unfortunately, this is the only way to go. There is no IDE and you can’t upload a complex, multi-file application.
To open the console, you can simply use Putty and connect to the proper COM port (COM3, in my case) with 115200 speed.
To run the first project, the best way is to follow the official README documentation, but there is a bug in the code here:
https://github.com/m5stack/Core2forAWS-MicroPython/blob/master/ports/esp32/makelfs2.py#L20 .
One file is opened in ‘w’ (write) mode and another in ‘rb’ (read bytes). You need to change ‘w’ to ‘wb’ to run any example from the readme. It’s a good codebase because it’s small and M5Stack official. It contains upip, so you can include more official libraries after connecting to the Internet. You can also extend the codebase with more libraries before the build (some extra libraries are available in another official repository https://github.com/m5stack/micropython-lib ). However, TensorFlow is a complex library with multiple dependencies, so using the unofficial project is easier.
The Tensorflow Micropython Examples project offers pre-built images to download directly from GitHub. For our controller, you need the ESP32 version (no ESP32 S3) for 16MB memory.
Just open the GitHub Actions page https://github.com/mocleiri/tensorflow-micropython-examples/actions/workflows/build_esp32.yml , pick the newest green build and download the latest version.
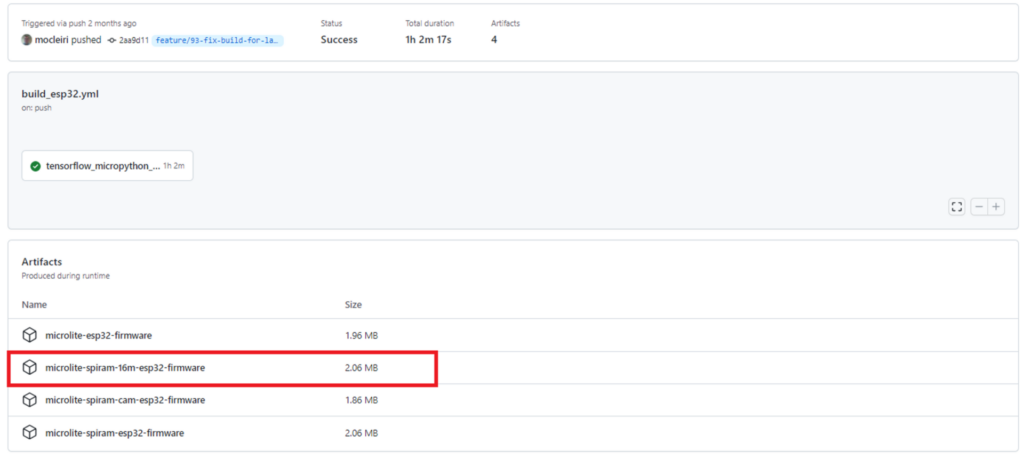
Then extract the zip package and burn it using command ‘esptool.py -p /dev/ttyUSB0 -b 460800 –before default_reset –after hard_reset –chip esp32 write_flash –flash_mode dio –flash_size detect –flash_freq 40m 0x1000 bootloader/bootloader.bin 0x8000 partition_table/partition-table.bin 0x10000 micropython.bin’ . Ensure you have passed the USB port to WSL using usbip and allowed all users to use it with chmod (see the first part for details).
With this project, you can import the microlite library, which is exactly the one you need - TensorFlow Lite for Microcontrollers. If you want to extend this project with your own libraries, you can add those to the cloned source code and build it with the following commands:
git submodule init

git submodule update --recursive

cd micropython

git submodule update --init lib/axtls

git submodule update --init lib/berkeley-db-1.xx

cd ..

source ./micropython/tools/ci.sh && ci_esp32_setup_helper v4.3.1

source ./esp-idf/export.sh #as you can see, esp-idf is already included

pip3 install Pillow

pip3 install Wave

rm -rf ./micropython-modules/microlite/tflm

cd ./tensorflow

../micropython-modules/microlite/prepare-tflm-esp.sh

cd ../micropython

make -C mpy-cross V=1 clean all

cd ../boards/esp32/MICROLITE_SPIRAM_16M

rm -rf build

idf.py clean build
Your binaries are located under the boards/esp32/MICROLITE_SPIRAM_16M/build directory.
This way, you can add more libraries or your own program to the image, but you still need to use the interactive console to run it.
Summary
This three-part workshop aimed to utilize M5Stack Core2 for AWS controller with AWS IoT connection and ML included. Let’s try to sum up all possible ways to do that.
Language Management method Pros Cons Micropython UiFlow Python Low learning curve/easy UI OTA updates No Tensorflow available Not adequate for complex use cases VS Code with vscode-m5stack-mpi plugin Python Full IDE (Visual Studio Code) No Tensorflow available Tensorflow Micropython Examples Micropython with TensorFlow Lite for Microcontrollers Capability to build the project with more libraries or custom code included Necessity to run the code from interactive Python console. C/C++ VS Code with PlatformIO and FreeRTOS All libraries available Complex code (C/C++) Complex configuration Arduino IDE All libraries available Easy and powerful enough IDE Arduino control loop limitation ESP-IDF Small solution, without even a dedicated IDE (plugins for CS Code or Eclipse available) Complex dependency Management
As you can see, we’ve tried various approaches and discovered their advantages and disadvantages. Now, you can decide if you wish to have complete control and use pure C/C++, or maybe you prefer much more friendly Python. You can choose which IDE or at least plugin you’d like to use, and whether you want to utilize OTA to update an entire firmware or only to transfer data between your devices and the cloud.
How predictive maintenance changes the automotive industry
Ever since Henry Ford implemented the first production line and launched mass production of the Ford Model T, the automotive industry has been on the constant lookout for ways to boost performance. This aspect has become even more relevant today, given the constant market and social unrest. Coming to rescue supply chain management and product lifecycle optimization is predictive maintenance. Not only OEMs, but the entire automotive industry: insurers, car rental companies and vehicle owners are benefiting from the implementation of this technology.
Predictive maintenance explained
Predictive maintenance is an advanced maintenance approach that utilizes data science and predictive analytics to anticipate when equipment or machinery requires maintenance before it faces a breakdown.
The primary aim is to schedule maintenance at optimal times, considering convenience and cost-effectiveness while maximizing the equipment's longevity. By identifying potential issues before they become critical, predictive maintenance significantly reduces the likelihood of equipment breakdowns.
Various types of maintenance strategies are employed in different industries:
- Reactive Maintenance: Also known as "run-to-failure," this method involves waiting for equipment to fail before conducting maintenance. Therefore, unscheduled downtime and higher repair costs may occur.
- Periodic Maintenance : This approach entails performing maintenance tasks at regular intervals, regardless of the equipment's condition. It helps prevent unexpected breakdowns but may lead to unnecessary maintenance if done too frequently.
- Smart Maintenance : Smart maintenance utilizes advanced technologies like IoT devices and sensors to monitor equipment in real-time and identify anomalies or potential failures.
- Condition-Based Maintenance : This strategy relies on monitoring the equipment's condition while it is in operation. Maintenance is only carried out when data indicates a decline in performance or a deviation from normal parameters, optimizing maintenance schedules and reducing unnecessary work.
- Predictive Maintenance : The most advanced type of maintenance uses real-time operational data and predictive analytics to forecast when maintenance is required. It aims to schedule maintenance before equipment failure occurs based on data-driven predictions, thus minimizing downtime, reducing costs, and prolonging equipment lifespan.
Predictive maintenance employs various techniques, such as vibration analysis, acoustic monitoring, infrared technology, oil analysis, and motor circuit analysis. These methods enable continuous equipment condition monitoring and early detection of potential failures, facilitating timely maintenance interventions.
Differentiation between predictive maintenance and preventive maintenance
Predictive maintenance hinges on the real-time condition of assets and is implemented only when the need arises. Its purpose is to anticipate potential failures by monitoring assets while they are actively operational. Unlike preventive maintenance , this approach is rooted in the current operational state of an asset rather than statistical analysis and predetermined schedules.
Essential steps in creating a predictive maintenance solution
Predictive maintenance solutions utilize a combination of sensors, artificial intelligence, and data science to optimize equipment maintenance.
The development of such solutions varies depending on equipment, environment, process, and organization, leading to diverse perspectives and technologies guiding their creation. However, there are steps common to every project: data collection and analysis, model development and deployment, as well as continuous improvement.
Here is a step-by-step process of how solutions are developed in the automotive industry :
- Data Collection : Relevant data is collected from sensors, equipment logs, vehicle diagnostics, telemetry, and other sources. This data includes information about the performance, condition, and behavior of the vehicles, such as engine temperature, fuel consumption, mileage, and more. Telematics systems can provide real-time data on vehicle location, speed, and usage patterns, while maintenance logs record historical maintenance activities, repairs, and part replacements.
- Data Preprocessing : The collected data is organized, and prepared for analysis. Data preprocessing involves cleaning the data by removing outliers or erroneous values, handling missing values through imputation or interpolation, and converting the data into a suitable format for analysis.
- Feature Engineering : Important features or variables that can provide insights into the health and performance of the vehicles are selected from the collected data. These features can include engine vibration, temperature, fuel consumption, mileage, and more. Feature selection step involves identifying the most relevant features that have a strong correlation with the target variable (e.g., equipment failure). It helps to reduce the dimensionality of the data and improve the model's efficiency and interpretability. Later, selected features are transformed to make them more suitable for modelling. The process may include techniques such as logarithmic or exponential transformations, scaling, or encoding categorical variables.
- Model Development : Machine learning algorithms are applied to the selected features to develop predictive models. These models learn from historical data and identify patterns and relationships between various factors and equipment failures. The algorithms used can include regression, decision trees, random forests, neural networks, and more.
- Model Training and Validation : The developed models are trained using historical data and validated to ensure their accuracy and performance. This involves splitting the data into training and testing sets, evaluating the model's performance metrics, and fine-tuning the model if necessary.
- Deployment and Monitoring : The trained models are deployed into the predictive maintenance system, which continuously monitors real-time data from sensors and other sources. Telematics systems are used to collect GPS and vehicle-specific data, which it transmits through different methods (cellular network, satellite communication, 4G mobile data, GPRS) to the central server. The system detects anomalies, recognizes patterns, and provides insights into the health of the vehicles. It can alert maintenance teams when potential issues are detected.
- Continuous Improvement : The predictive maintenance solution is continuously improved by collecting feedback, monitoring its performance, and updating the models and algorithms as new data becomes available.
Most common problems in deploying predictive maintenance solutions
Implementing predictive maintenance solutions in a fleet of vehicles or in a vehicle factory is a process that requires time, consistency and prior testing. Among the main challenges of rolling out this technology, the following aspects in particular are noteworthy.
Data integration
Integrating data from many sources is a significant barrier to implementing predictive maintenance solutions. To accomplish this with a minimum delay and maximum security, it is necessary to streamline the transfer of data from machines to ERP systems. To collect, store, and analyze data from many sources, businesses must have the proper infrastructure in place.
Insufficient data
Lack of data is a major hindrance to implementing predictive maintenance systems. Large amounts of information are needed to develop reliable models for predictive maintenance. Inadequate information might result in inaccurate models, which in turn can cause costly consequences like premature equipment breakdowns or maintenance.
To get over this difficulty, businesses should collect plenty of data for use in developing reliable models. They should also check that the data is relevant to the monitored machinery and of high quality. Businesses can utilize digital twins, or digital representations of physical assets, to mimic the operation of machinery and collect data for use in predictive maintenance systems.
Process complexity
Transitioning from preventive to predictive maintenance is complex and time-intensive. It requires comprehensive steps beyond technology, including assembling a skilled team and managing upfront costs. Without qualified experts versed in software and process intricacies, project success is doubtful.
High costs
The implementation of predictive maintenance programs comes with substantial costs. These upfront expenses pose challenges, including the need to invest in specialized sensors for data collection, procure effective data analysis tools capable of managing complexity, and possibly hire or train personnel with technical expertise.
To address these hurdles, collaboration with specialized vendors and the utilization of cloud-based solutions can prove cost-effective. Additionally, digital twin technology offers a way to simulate equipment behavior and minimize reliance on physical sensors, potentially reducing overall expenses.
Privacy and security issues
The implementation of predictive maintenance involves extensive data collection and analysis, which can give rise to privacy concerns. Companies must adhere to applicable data protection laws and regulations, and establish proper protocols to safeguard the privacy of both customers and employees. Even though predictive maintenance data may be anonymized and not directly linked to specific individuals, it still necessitates robust security measures, since preventing data breaches and unauthorized access to vital company information is crucial for overall success.
What Are the Benefits of Predictive Maintenance?
Life cycle optimization, stock management, or even recycling management - in each of these fields predictive maintenance can bring substantial benefits. And this is not only for OEMs but also for fleet operators, transportation or logistics companies. And even for the end user.
Below we list the key benefits of implementing predictive maintenance in an automotive-related company:
- Extended lifespan: Predictive maintenance technology detects early signs of wear and potential malfunctions in-vehicle components such as engines, transmissions, and brakes. By addressing these issues proactively, vehicles experience fewer major breakdowns and continue to operate efficiently over a longer period.
- Cost savings: By addressing issues at an early stage, automotive companies can avoid expensive breakdowns and prevent further damage. This proactive approach not only reduces the need for costly replacement parts but also minimizes the labor and operational costs associated with major repairs, resulting in significant long-term cost savings.
- Minimized downtime : Through continuous monitoring and analysis, predictive maintenance predicts when maintenance or repairs are needed and schedules them during planned downtime. This minimizes the likelihood of unexpected breakdowns that can disrupt operations and lead to extended periods of vehicle inactivity. By strategically timing maintenance activities, vehicles spend more time on the road.
- Increased efficiency : Any iissues are detected early, enabling timely corrective actions. This proactive approach leads to improved fuel economy, reduced emissions, and overall enhanced efficiency. Vehicles operate at their peak performance, contributing to a more sustainable and environmentally friendly fleet.
- Enhanced security: Constant monitoring for abnormal vibrations, temperature variations, and fluid leaks ensures that potential issues compromising vehicle safety and security are detected promptly. By addressing these concerns before they escalate, predictive maintenance contributes to ensuring the security of both the vehicle and its occupants. This feature is particularly valuable in critical applications where reliable vehicle performance is paramount, such as emergency response scenarios.
- Avoiding over-maintenance : If you over-maintain corporate resources, it can have the same negative consequences as when failing to maintain them on time. With predictive maintenance, you can focus on maintaining crucial resources at the best possible time and with the best possible results.
- Compliance with required standards and regulations : Laws and regulations related to vehicle production are constantly evolving and pushing OEMs to make numerous production changes (e.g. the legislation related to EV production). Predictive maintenance allows you to better suit the new expectations of legislators and monitor the points of production that are most dependent on the legal context.
- Easier management of parts and materials : As connected cars diagnostic systems become more sophisticated, drivers have the option to make small repairs sooner and keep their vehicles in a better condition. All this means that OEMs and licensed repair shops need fewer parts and can better manage supply chains.
Predictive maintenance clearly is not a one-size-fits-all solution for all sectors. Notably, it will work well for high production volumes and short lead times and anywhere you need to ensure reliability, security and convenience.
The automotive industry is a perfect fit for this model. As shown in the examples featured in the second part of the article, the top players in the market are tapping into this technology.
According to Techsci Research , “ The global predictive maintenance market was valued at USD 4.270 billion in 2020 and is projected to grow around USD 22.429 billion by 2026”.
Collaboration between OEMs and cloud service providers: Driving future innovations
Collaboration between Cloud Service Providers (CSPs) and Automotive Original Equipment Manufacturers (OEMs) lies at the heart of driving innovation and progress in the automotive industry.
The partnerships bring together the respective strengths and resources of both parties to fuel advancements in software-defined vehicles and cutting-edge technologies.
This article will delve into the transformative collaborations between Automotive Original Equipment Manufacturers (OEMs) and Cloud Service Providers (CSPs) in the automotive industry, representing a critical junction facilitating the convergence of automotive engineering and cloud computing technologies.
Why OEMs and Cloud Service Providers cooperate
CSPs are crucial in supporting the automotive industry by providing the necessary cloud infrastructure and services . This includes computing power, storage capacity, and networking capabilities to process and compute resources generated by software-defined vehicles.
On the other hand, OEMs are responsible for designing and manufacturing vehicles, which heavily rely on sophisticated software systems to control various functions, ranging from safety and infotainment to navigation and autonomous driving capabilities. To seamlessly integrate software systems into the vehicles , OEMs collaborate with CSPs, leveraging the power of cloud technologies .
Collaboration between CSPs and automotive companies spans several key areas to elevate vehicle functionality and performance. These areas include:
- designing and deploying cloud infrastructure to support the requirements of connected and autonomous vehicles
- handling and analyzing the vast amounts of vehicle-generated data
- facilitating seamless communication among vehicles and with other devices and systems
- ensuring data security and privacy
- delivering over-the-air (OTA) updates swiftly and efficiently for vehicle software
- testing autonomous vehicle technology through cloud computing
Benefits of collaboration
The benefits of such collaboration are significant, offering continuous software innovation, improved data analysis, but also reduced time-to-market, cost savings, product differentiation, and a competitive edge for new entrants in the automotive industry.
Cloud services enable automotive companies to unlock new possibilities, enhance vehicle performance, and deliver a seamless driving experience for customers . Moreover, the partnership between CSPs and automotive OEMs has the potential to revolutionize transportation , as it facilitates efficient and seamless interactions between vehicles, enhancing road safety and overall convenience for drivers and passengers.
In terms of collaboration strategies, automotive OEMs have various options, such as utilizing public cloud platforms, deploying private clouds for increased data security, or adopting hybrid approaches that combine the advantages of both public and private clouds. The choice of strategy depends on each company's specific data storage and security requirements.
Real-life examples of cooperation between Cloud Service Providers and automotive OEMs
Several real-life examples demonstrate the successful collaboration between cloud service providers and automotive OEMs. It's important to note that some automotive companies collaborate with more than one cloud service provider , showcasing the industry's willingness to explore multiple partnerships and leverage different technological capabilities.
In the automotive sector, adopting a multi-cloud strategy is common but complicated due to diverse cloud usage. Carmakers employ general-purpose SaaS enterprise applications and cloud infrastructure, along with big data tools for autonomous vehicles and cloud-based resources for car design and manufacturing. They also seek to control software systems in cars, relying on cloud infrastructure for updates and data processing. Let’s have a look at how different partnerships with cloud service providers are formed depending on the various business needs.
Microsoft
Mercedes-Benz and Microsoft have joined forces to enhance efficiency, resilience, and sustainability in car production. Their collaboration involves linking Mercedes-Benz plants worldwide to the Microsoft Cloud through the MO360 Data Platform. This integration improves supply chain management and resource prioritization for electric and high-end vehicles.
Additionally, Mercedes-Benz and Microsoft are teaming up to test an in-car artificial intelligence system. This advanced AI will be available in over 900,000 vehicles in the U.S., enhancing the Hey Mercedes voice assistant for seamless audio requests. The ChatGPT-based system can interact with other applications to handle things like making restaurant reservations or purchasing movie tickets, and it will make voice commands more fluid and natural.
Renault, Nissan, and Mitsubishi have partnered with Microsoft to develop the Alliance Intelligent Cloud, a platform that connects vehicles globally, shares digital features and innovations, and provides enhanced services such as remote assistance and over-the-air updates. The Alliance Intelligent Cloud also connects cars to "smart cities" infrastructure, enabling integration with urban systems and services.
Volkswagen and Microsoft are building the Volkswagen Automotive Cloud together, powering the automaker's future digital services and mobility products, and establishing a cloud-based Automated Driving Platform (ADP) using Microsoft's Azure cloud computing platform to accelerate the introduction of fully automated vehicles.
Volkswagen Group's vehicles can share data with the cloud via Azure Edge services. Additionally, the Volkswagen Automotive Cloud will enable the updating of vehicle software.
BMW and Microsoft : BMW has joined forces with Microsoft Azure to elevate its ConnectedDrive platform, striving to deliver an interconnected and smooth driving experience for BMW customers. This collaboration capitalizes on the cloud capabilities of Microsoft Azure, empowering the ConnectedDrive platform with various services, including real-time traffic updates, remote vehicle monitoring, and engaging infotainment features.
In 2019, BMW and Microsoft announced that they were working on a project to create an open-source platform for intelligent, multimodal voice interaction.
Hyundai-Kia and Microsoft joined forces to create advanced in-car infotainment systems. The collaboration began in 2008 when they partnered to develop the next-gen in-car infotainment. Subsequently, in 2010, Kia introduced the UVO voice-controlled system, a result of their joint effort, utilizing Windows Embedded Auto software.
The UVO system incorporated speech recognition to maintain the driver's focus on the road and offered compatibility with various devices. In 2012, Kia enhanced the UVO system by adding a telematics suite with navigation capabilities. Throughout their partnership, their primary goal was to deliver cutting-edge technology to customers and prepare for the future.
In 2018, Hyundai-Kia and Microsoft announced an extended long-term partnership to continue developing the next generation of in-car infotainment systems.
Amazon
The Volkswagen Group has transformed its operations with the Volkswagen Industrial Cloud on AWS. This cloud-based platform uses AWS IoT services to connect data from machines, plants, and systems across over 120 factory sites. The goal is to revolutionize automotive manufacturing and logistics, aiming for a 30% increase in productivity, a 30% decrease in factory costs, and €1 billion in supply chain savings.
Additionally, the partnership with AWS allows the Volkswagen Group to expand into ridesharing services, connected vehicles, and immersive virtual car-shopping experiences, shaping the future of mobility.
The BMW Group has built a data lake on AWS, processing 10 TB of data daily and deriving real-time insights from the vehicle and customer telemetry data. The BMW Group utilizes its Cloud Data Hub (CDH) to consolidate and process anonymous data from vehicle sensors and various enterprise sources. This centralized system enables internal teams to access the data to develop customer-facing and internal applications effortlessly.
Rivian, an electric vehicle manufacturer , runs powerful simulations on AWS to reduce the need for expensive physical prototypes. By leveraging the speed and scalability of AWS, Rivian can iterate and optimize its vehicle designs more efficiently.
Moreover, AWS allows Rivian to scale its capacity as needed. This is crucial for handling the large amounts of data generated by Rivian's Electric Adventure Vehicles (EAVs) and for running data insights and machine learning algorithms to improve vehicle health and performance.
Toyota Connected , a subsidiary of Toyota, uses AWS for its core infrastructure on the Toyota Mobility Services Platform. AWS enables Toyota Connected to handle large datasets, scale to more vehicles and fleets, and improve safety, convenience, and mobility for individuals and fleets worldwide. Using AWS services, Toyota Connected managed to increase its traffic volume by a remarkable 18-fold.
Back in April 2019, Ford Motor Company , Autonomic , and Amazon Web Services (AWS) joined forces to enhance vehicle connectivity and mobility experiences. The collaboration aimed to revolutionize connected vehicle cloud services, opening up new opportunities for automakers, public transit operators, and large-scale fleet operators.
During the same period, Ford collaborated with Amazon to enable members of Amazon's loyalty club, Prime, to receive package deliveries in their cars, providing a secure and convenient option for Amazon customers.
Honda and Amazon have collaborated in various ways. One significant collaboration is the development of the Honda Connected Platform, which was built on Amazon Web Services (AWS) using Amazon Elastic Compute Cloud (Amazon EC2) in 2014. This platform serves as a data connection and storage system for Honda vehicles.
Another collaboration involves Honda migrating its content delivery network to Amazon CloudFront, an AWS service. This move has resulted in cost optimization and performance improvements.
Stellantis and Amazon have announced a partnership to introduce customer-centric connected experiences across many vehicles. Working together, Stellantis and Amazon will integrate Amazon's cutting-edge technology and software know-how throughout Stellantis' organization. This will encompass various aspects, including vehicle development and the creation of connected in-vehicle experiences.
Furthermore, the collaboration will place a significant emphasis on the digital cabin platform known as STLA SmartCockpit. The joint effort will deliver innovative software solutions tailored to this platform, and the planned implementation will begin in 2024.
Kia has engaged in two collaborative efforts with Amazon . Firstly, they have integrated Amazon's AI technology, specifically Amazon Rekognition, into their vehicles to enable advanced image and video analysis. This integration facilitates personalized driver-assistance features, such as customized mirror and seat positioning for different drivers, by analyzing real-time image and video data of the driver and the surrounding environment within Kia's in-car system.
Secondly, Kia has joined forces with Amazon to offer electric vehicle charging solutions. This partnership enables Kia customers to conveniently purchase and install electric car charging stations through Amazon's wide-ranging products and services, making the process hassle-free.
Even Tesla, the electric vehicle manufacturer, had collaborated with AWS to utilize its cloud infrastructure for various purposes, including over-the-air software updates, data storage, and data analysis, until the company’s cloud account was hacked and used to mine cryptocurrency,
By partnering with Google Cloud, Renault Group aims to achieve cost reduction, enhanced efficiency, flexibility, and accelerated vehicle development. Additionally, they intend to deliver greater value to their customers by continuously innovating software.
Leveraging Google Cloud technology, Renault Group will focus on developing platforms and services for the future of Software Defined Vehicles (SDVs). These efforts encompass in-vehicle software for the "Software Defined Vehicle" Platform and cloud software for a Digital Twin.
The Google Maps platform, Cloud, and YouTube will be integrated into future Mercedes-Benz vehicles equipped with their next-generation operating system, MB.OS. This partnership will allow Mercedes-Benz to access to Google's geospatial offering, providing detailed information about places, real-time and predictive traffic data, and automatic rerouting. The collaboration aims to create a driving experience that combines Google Maps' reliable information with Mercedes-Benz's unique luxury brand and ambience.
Volvo has partnered with Google to develop a new generation of in-car entertainment and services. Volvo will use Google's cloud computing technology to power its digital infrastructure. With this partnership, Volvo's goal is to offer hands-free assistance within their cars, enabling drivers to communicate with Google through their Volvo vehicles for navigation, entertainment, and staying connected with acquaintances.
Ford and Google have partnered to transform the connected vehicle experience, integrating Google's Android operating system into Ford and Lincoln vehicles and utilizing Google's AI technology for vehicle development and operations. Google plans to give drivers access to Google Maps, Google Assistant, and other Google services.
Furthermore, Google will assist Ford in various areas, such as in-car infotainment systems, over-the-air updates, and the utilization of artificial intelligence technology.
Toyota and Google Cloud are collaborating to bring Speech On-Device, a new AI product, to future Toyota and Lexus vehicles, providing AI-based speech recognition and synthesis without relying on internet connectivity.
Toyota intends to utilize the vehicle-native Speech On-Device in its upcoming multimedia system. By incorporating it as a key element of the next-generation Toyota Voice Assistant, a collaborative effort between Toyota Motor North America Connected Technologies and Toyota Connected organizations, the system will benefit from the advanced technology Google Cloud provides.
In 2015, Honda and Google embarked on a collaborative effort to introduce the Android platform to cars. Through this partnership, Honda integrated Google's in-vehicle-connected services into their upcoming models, with the initial vehicles equipped with built-in Google features hitting the market in 2022.
As an example, the 2023 Honda Accord midsize sedan has been revamped to include Google Maps, Google Assistant, and access to the Google Play store through the integrated Google interface.
Conclusion
The collaboration between cloud service providers and industries, such as automotive, has revolutionized the way businesses operate and leverage data. Organizations can enhance efficiency, accelerate technological advancements, and unlock valuable insights by harnessing the power of scalable cloud platforms. As cloud technologies continue to evolve, the potential for innovation and growth across industries remains limitless, promising a future of improved operations, cost savings, and enhanced decision-making processes.
Driving success in automotive applications: Data management with MongoDB
MongoDB, a widely used NoSQL document-oriented database, offers developers a powerful solution for modern application development. With its flexible data model, scalability, high performance, and comprehensive tooling, MongoDB enables developers to unlock the full potential of their projects. By leveraging MongoDB's JSON-like document storage and robust querying capabilities, developers can efficiently store and retrieve data, making it an ideal choice for contemporary applications. Read the article to learn about data management with MongoDB.
Flexible data model for adaptability
One of the primary advantages of MongoDB's NoSQL model is its flexible data model, which allows developers to adapt swiftly to changing requirements and evolving data structures. Unlike traditional relational databases that rely on predefined schemas, MongoDB's schema-less approach enables developers to store documents in a JSON-like format. This flexibility allows for easy modifications to data structures without the need for expensive and time-consuming schema migrations.Consider an automotive application that needs to store vehicle data. With MongoDB, you can store a vehicle document that captures various attributes and information about a specific car. Here's an example of a vehicle document in MongoDB:[code language="javascript"]{"_id": ObjectId("617482e5e7c927001dd6dbbe"),"make": "Ford","model": "Mustang","year": 2022,"engine": {"type": "V8","displacement": 5.0},"features": ["Bluetooth", "Backup Camera", "Leather Seats"],"owners": [{"name": "John Smith", "purchaseDate": ISODate("2022-01-15T00:00:00Z")},{"name": "Jane Doe","purchaseDate": ISODate("2023-03-10T00:00:00Z")}]}[/code]In the above example, each document represents a vehicle and includes attributes such as make, model, year, engine details, features, and a sub-document for owners with their respective names and purchase dates. This flexibility allows for easy storage and retrieval of diverse vehicle data without the constraints of a fixed schema.
Scalability for growing demands
Another key aspect of MongoDB's NoSQL model is its ability to scale effortlessly to meet the demands of modern automotive applications. MongoDB offers horizontal scalability through its built-in sharding capabilities, allowing data to be distributed across multiple servers or clusters. This ensures that MongoDB can handle the increased load as the volume of vehicle data grows by seamlessly distributing it across the available resources.For instance, imagine an automotive application collecting data from a connected car fleet. As the fleet expands and generates a substantial amount of telemetry data, MongoDB's sharding feature can be employed to distribute the data across multiple shards based on a chosen shard key, such as the vehicle's unique identifier. This allows for parallel data processing across the shards, resulting in improved performance and scalability.[code language="javascript"]// Enable sharding on a collectionsh.enableSharding("automotive_db");// Define the shard key as the vehicle's unique identifiersh.shardCollection("automotive_db.vehicles", { "_id": "hashed" });[/code]In the above example, we enable sharding on the „automotive_db” database and shard the „vehicles” collection using the vehicle’s unique identifier („_id”) as the shard key. This ensures that vehicle data is evenly distributed across multiple shards, allowing for efficient data storage and retrieval as the number of vehicles increases.
Leveraging MongoDB's querying capabilities for automotive data
MongoDB provides a powerful and expressive querying language that allows developers to retrieve and manipulate data easily. MongoDB offers a rich set of query operators and aggregation pipelines to meet your needs, whether you need to find vehicles of a specific make, filter maintenance records by a particular date range, or perform complex aggregations on vehicle data.Let's explore some examples of MongoDB queries in the context of an automotive application:[code language="javascript"]// Find all vehicles of a specific makedb.vehicles.find({ make: "Ford" });// Find vehicles with maintenance records performed by a specific mechanicdb.vehicles.find({ "maintenanceRecords.mechanic": "John Smith" });// Retrieve maintenance records within a specific date rangedb.vehicles.aggregate([{$unwind: "$maintenanceRecords"},{$match: {"maintenanceRecords.date": {$gte: ISODate("2022-01-01T00:00:00Z"),$lt: ISODate("2022-12-31T23:59:59Z")}}}]);[/code]In the above examples, we use the `find` method to query vehicles based on specific criteria such as make or mechanic. We also utilize the `aggregate` method with aggregation stages like `$unwind` and `$match` to retrieve maintenance records within a particular date range. These queries demonstrate the flexibility and power of MongoDB's querying capabilities for handling various scenarios in the automotive domain.
Optimizing data management with MongoDB
Efficient data management is crucial for maximizing the performance and effectiveness of automotive applications. MongoDB provides various features and best practices to optimize data management and enhance overall system efficiency. This section will explore practical tips and techniques for optimizing data management with MongoDB.
Data compression for large result sets
When dealing with queries that return large result sets, enabling data compression can significantly reduce the time required for data transfer and improve overall performance. MongoDB supports data compression at the wire protocol level, allowing for efficient compression and decompression of data during transmission.You can include the `compressors` option with the desired compression algorithm to enable data compression using the MongoDB URI connection string.[code language="javascript"]mongodb+srv://<username>:<password>@<cluster>/<database>?compressors=snappy[/code]In the above example, the `compressors` option is set to `snappy,` indicating that data compression using the Snappy algorithm should be enabled. This configuration ensures that data is compressed before being sent over the network, reducing the amount of data transmitted and improving query response times.The technology-independent nature of MongoDB is exemplified by its ability to configure data compression directly within the URI connection string. Whether you are using the MongoDB Node.js driver, Python driver, or any other programming language, the consistent URI syntax enables seamless utilization of data compression across different MongoDB driver implementations. By employing data compression through the URI connection string, automotive applications can optimize the data transfer, reduce network latency, and achieve faster query execution and improved system performance, regardless of the programming language or driver in use.
Optimizing read preferences
When it comes to optimizing read preferences in MongoDB for automotive applications, it is crucial to choose wisely based on the specific use case and the trade-offs dictated by the CAP (Consistency, Availability, Partition tolerance) theorem. The CAP theorem states that in a distributed system, achieving all three properties simultaneously is impossible.In scenarios where data consistency is of utmost importance, opting for the `primary` read preference is recommended. With the `primary` preference, all reads are served exclusively from the primary replica, ensuring strong consistency guarantees. This is particularly valuable in applications where data integrity and real-time synchronization are critical.However, it's important to recognize that prioritizing strong consistency might come at the cost of availability and partition tolerance. In certain automotive use cases, where read availability and scalability are paramount, it may be acceptable to sacrifice some level of consistency. This is where the `secondaryPreferred` read preference can be advantageous.By configuring `secondaryPreferred,` MongoDB allows reads to be distributed across secondary replicas in addition to the primary replica, enhancing availability and load balancing. Nevertheless, it's essential to be aware that there might be a trade-off in terms of data consistency. The secondary replicas might experience replication delays, resulting in potentially reading slightly stale data.In summary, when optimizing read preferences for automotive applications, it's crucial to consider the implications of the CAP theorem. Select the appropriate read preference based on the specific requirements of your use case, carefully balancing consistency, availability, and partition tolerance. Prioritize strong consistency with the `primary` preference when real-time data synchronization is vital and consider the `secondaryPreferred` preference when reading availability and scalability are paramount, acknowledging the possibility of eventual consistency.
Utilizing appropriate clients for complex queries
While MongoDB Atlas provides a web-based UI with an aggregation pipeline for executing complex queries, it is important to note that there are cases where the web UI may not work on the full data set and can return partial data. This limitation can arise due to factors such as query complexity, data size, or network constraints.To overcome this limitation and ensure accurate and comprehensive query results, it is recommended to utilize appropriate clients such as `mongosh` or desktop clients. These clients offer a more interactive and flexible environment for executing complex queries and provide direct access to MongoDB's features and functionalities.Using `mongosh,` for example, allows you to connect to your MongoDB Atlas cluster and execute sophisticated queries directly from the command-line interface. This approach ensures that you have complete control over the execution of your queries and enables you to work with large data sets without encountering limitations imposed by the web-based UI.Here is an example of using `mongosh` to execute a complex aggregation query:[code language="javascript"]// Execute a complex aggregation queryconst pipeline = [{$match: {make: "Tesla"}},{$group: {_id: "$model",count: { $sum: 1 }}},{$sort: {count: -1}}];db.vehicles.aggregate(pipeline);[/code]Additionally, desktop clients provide a graphical user interface that allows for visualizing query results, exploring data structures, and analyzing query performance. These clients often offer advanced query-building tools, query profiling capabilities, and result visualization options, empowering developers to optimize their queries and gain valuable insights from their automotive data.
Handling large data loads
In automotive applications, dealing with large data loads is common, especially when collecting time-series data from multiple sensors or sources simultaneously. MongoDB provides several features and best practices to handle these scenarios efficiently.
- Bulk Write Operations : MongoDB offers bulk write operations, which allow you to perform multiple insert, update, or delete operations in a single request. This can significantly improve the performance of data ingestion by reducing network round trips and server-side processing overhead. By batching your write operations, you can efficiently handle large data loads and optimize the insertion of time-series data into the collection.
- Indexing Strategies : Efficient indexing is crucial for handling large data loads and enabling fast queries in MongoDB. When designing indexes for your automotive application, consider the specific queries you'll perform, such as retrieving data based on vehicle models, sensor readings, or other relevant fields. Properly chosen indexes can significantly improve query performance and reduce the time required to process large data loads.
- Parallel Processing : In scenarios where you need to handle massive data loads, parallel processing can be beneficial. MongoDB allows you to distribute data ingestion tasks across multiple threads or processes, enabling concurrent data insertion into the collections. By leveraging parallel processing techniques, you can take advantage of the available computing resources and speed up the data ingestion process.
- Connection Pooling : Establishing a connection to the MongoDB server for each data load operation can introduce overhead and impact performance. To mitigate this, MongoDB provides connection pooling, which maintains a pool of open connections to the server. Connection pooling allows efficient reuse of connections, eliminating the need to establish a new connection for every operation. This can significantly improve the performance of large data loads by reducing connection setup overhead.
Conclusion
MongoDB, a leading NoSQL document-oriented database, is providing a versatile data management solution for the automotive industry. Its flexible data model allows developers to adapt swiftly to changing requirements and evolving data structures without the need for expensive schema migrations. With scalable sharding capabilities, MongoDB effortlessly handles the growing demands of modern automotive applications, ensuring efficient data storage and retrieval as the volume of vehicle data increases. Leveraging MongoDB's powerful querying language, developers can easily retrieve and manipulate automotive data with rich query operators and aggregation pipelines. By optimizing data management techniques such as data compression, read preferences, appropriate client usage, and efficient handling of large data loads, MongoDB empowers automotive applications with enhanced performance and scalability.But our exploration doesn't stop here. In the next part of this article, we will delve into MongoDB's time-series and change stream features, uncovering how they further enhance the capabilities of automotive applications. Stay tuned for the second installment, where we will discover even more ways to drive success in automotive applications with MongoDB. Together, we will unlock the full potential of MongoDB's advanced features and continue shaping the future of data management in the automotive industry.
How to manage an M5Stack Core2 for AWS. Part 2 – C/C++
The first article discussed M5Stack management based on the Micropython language. Now, we need to dive much deeper into a rabbit hole. Let's try to use C and C++ only. The most important advantage of using C is the possibility of full, low-lever control of all controller aspects. The most important disadvantage of using C is the necessity of full, low-lever control of all controller aspects. Well… with great power comes great responsibility.
FreeRTOS
AWS FreeRTOS is a real-time operating system dedicated to AWS cloud and resource-constrained devices.There is a lot of code to write this time, so we'll use an example directly from AWS. There is no need to burn any firmware with the burning tool; however, we still need to pass the USB port to the WSL environment using usbip, as we've done in the "Micropython" sectionof the first chapter.You can download the code we're going to use from https://github.com/m5stack/Core2-for-AWS-IoT-EduKit.git. The only subdirectory we need is Blinky-Hello-World, but the repository is really small, so using a sparse checkout is pointless, and you can simply clone the entire repo.Open VSCode and install a plugin called PlatformIO. There is a bug in PlatformIO, so you can't see any files from your WSL environment using the PlatformIO browser ( Windows WSL: I can't open any files(projects) in the PIO open browser. · Issue #2316 · platformio/platformio-home · GitHub). To fix it, close VSCode, edit ~/.platformio/packages/contrib-piohome/main.*.min.jsfile in Windows, replace "\\": "/"with "/": "/", and open VSCode again.To verify the connection between PlatformIO and your controller, open PlatformIO from the very left menu and then pick "Devices" from the main left menu. You should see /dev/ttyUSB0in the center part of the screen. Please remember to pass the USB device to WSL using usbipand to allow all users to use the port with chmod.If everything looks good so far, you can open the Blinky-Hello-World directory (not the entire cloned repository) as a project from the PlatformIO home screen. Now you can follow the essential elements of the official instruction provided below.You need to have AWS CLI v2 installed on your machine. If you don't, you can install it using the official manual: Installing or updating the latest version of the AWS CLI - AWS Command Line Interface (amazon.com)Now ensure you have a valid token, and you can interact with your AWS account using CLI (I propose listing some resources as the verification, e.g., aws s3 ls).We will use the built-in script to create a Thing in AWS IoT. Just open a terminal using PlatformIO (standard bash terminal won't work, so you need to open it from Miscellaneous -> New Terminal from the main PlatformIO menu in VSC), make sure you're in Blinky-Hello-World directory, and run pio run -e core2foraws-device_reg -t register thing. The script will create the Thing and download the necessary certificate/key files. You can do it manually if you don't trust such scripts; however, this one is created by the AWS team, so I believe it's trustworthy.In the AWS IoT console, go to Manage -> All devices -> Things and see the new Thing created by the script. The Thing name is autogenerated. In my case, it's 0123FAA32AD40D8501.OK, the next step is to allow the device to connect to the Internet. There is another script to help you with this task. Call pio run ‐‐environment core2foraws ‐‐target menuconfig. You'll see a simple menu. Navigate to AWS IoT EduKit Configuration and set up WiFi SSID abd WiFi Password. Be aware that your network's SSID and password will be stored as plaintext in a few files in your code now.Let's build the application. Just call pio run ‐‐environment core2forawsfrom the PlatformIO terminal and then pio run ‐‐environment core2foraws ‐‐target upload ‐‐target monitorto run it on your device and monitor logs.Now you can use the MQTT test client from the AWS IoT console to send anything to <<thing name>>/blinktopic. In my case, it's 0123FAA32AD40D8501/blink. The message payload doesn't matter for this example. Just send something to start blinking and send anything again to stop it.As you can see, we have done a lot just to communicate between AWS Cloud and the controller. It was much simpler with Micropython and even more with UiFlow. However, C is much more powerful, and what's most important here, we can extend it with libraries.
TensorFlow Lite for Microcontrollers
TensorFlow is an end-to-end open-source platform for machine learning. TensorFlow Lite is a library for deploying models on mobile, microcontrollers, and other edge devices.TensorFlow Lite for Microcontrollers is just a lightweight version of TensorFlow Lite designed to run machine learning models on microcontrollers and other devices with only a few kilobytes of memory. The core runtime fits in 16 KB on an Arm Cortex M3 and can run many basic models. It doesn't require operating system support, any standard C or C++ libraries, or dynamic memory allocation.TensorFlow Lite is not designed to work on ESP32 processors, so the only one available for M5Stack is TensorFlow Lite for Microcontrollers. It has some limitations – it supports just a limited subset of TensorFlow operations and devices, it requires manual memory management in Low-level C++ API, and it doesn't support on-device training. Therefore, to build a "learning at the edge" solution, you need a more powerful IoT Edge device, e.g. Raspberry Pi.But you can still run ML models on the M5Stack controller.Now, let's try to modify our Blinky-Hello-World to add the TensorFlow Lite for the Microcontrollers library.
TensorFlow Lite for Microcontrollers in FreeRTOS
The first issue to solve is where to get the TensorFlow source code from. In the main TensorFlow repository, you can find information that it's moved to a standalone one ( https://github.com/tensorflow/tensorflow/tree/master/tensorflow/lite/micro) even if most of the documentation and examples still point there. The standalone repository used to contain a makefile for ESP32, but it seems to be deleted when moving examples to yet another repository ( https://github.com/tensorflow/tflite-micro/commit/66cfa623cbe1c1ae3fcc8a4903e9fed1a345548a). Today, the best source seems to be this repository: https://github.com/espressif/tflite-micro-esp-examples/tree/master/components.We'll need tfline-lib, but it doesn't work without esp-nn, so you should copy both to the components directory in your Blinky-Hello-World project.Let's modify our code, starting from including tensorflow headers at the beginning of the main.c file.[code]#include "tensorflow/lite/micro/all_ops_resolver.h"#include "tensorflow/lite/micro/micro_error_reporter.h"#include "tensorflow/lite/micro/micro_interpreter.h"#include "tensorflow/lite/schema/schema_generated.h"[/code]Now we can try to use it. For example, just before the void app_main()function, let's declare TF error reporter and use it in the function.[code]tflite::MicroErrorReporter micro_error_reporter;tflite::ErrorReporter* error_reporter = &micro_error_reporter;void app_main(){Core2ForAWS_Init();Core2ForAWS_Display_SetBrightness(80);ui_init();TF_LITE_REPORT_ERROR(error_reporter,"Hello TensorFlow""This is just a test message/n");initialise_wifi();xTaskCreatePinnedToCore(&aws_iot_task, "aws_iot_task", 4096 * 2, NULL, 5, NULL, 1);xTaskCreatePinnedToCore(&blink_task, "blink_task", 4096 * 1, NULL, 2, &xBlink, 1);}}[/code]Obviously, it's not an actual usage of TensorFlow, but it proves the library is linked and can be used whatever you need.In the main directory, you must also add new libraries tflite-liband esp-nnto the required components in CMakeLists.txt[code] set(COMPONENT_REQUIRES "nvs_flash" "esp-aws-iot" "esp-cryptoauthlib" "core2forAWS" "tflite-lib" "esp-nn") [/code] It looks good, but it won't work yet. During compilation using pio run --environment core2foraws, you'll find out that the entire Blinky-Hello-World is made in pure C, and TensorFlow Lite for Microcontrollers library requires C++. The easiest way to convert it is as follows:
- Rename main.c to main.cc
- Change main.c to main.cc in the first line of main/CMakeList.txt
- Create extern "C" {} section for the entire main file code except for tensorflow imports.
It should look somehow like that:[code]#include "tensorflow/lite/micro/all_ops_resolver.h"#include "tensorflow/lite/micro/micro_error_reporter.h"#include "tensorflow/lite/micro/micro_interpreter.h"#include "tensorflow/lite/schema/schema_generated.h"extern "C" {######original main.c content goes here######tflite::MicroErrorReporter micro_error_reporter;tflite::ErrorReporter* error_reporter = &micro_error_reporter;void app_main(){#the main function code from the listing above}}[/code]
- In main.cc , delete TaskHandle_t xBlink ; declaration because it's already declared in another file
- In platform.ini , in [env:core2foraws] section add build_flags = -fpermissive to change permissive compilation errors into warnings
Now you can build the project again. When running it with the target --monitor, you'll see the "Hello TensorFlow" message in logs, which means the TensorFlow library is included and working correctly.Now, you can do whatever you want with an out-of-the-box machine learning library and AWS integration.
Arduino
As you can see, C is much more powerful but requires much more work. Let's try to connect the same blocks (tensorflow, AWS IoT, and M5Stack library) but using a more user-friendly environment.Arduino is an open-source electronic prototyping platform enabling users to create interactive electronic objects. Let's try to combine the official M5Stack Core 2 for AWS with the Arduino IDE manual ( https://docs.m5stack.com/en/quick_start/core2_for_aws/arduino) with TensorFlow Lite for Microcontrollers ( https://github.com/tanakamasayuki/Arduino_TensorFlowLite_ESP32).
Hello world!
Firstly, install Arduino IDE from the official page https://www.arduino.cc/en/software. I assume you already have the CP210x driver installed, and the USB mode selected on your device.Open the IDE, go to File -> Preferences, and add the boards' management URL: https://m5stack.oss-cn-shenzhen.aliyuncs.com/resource/arduino/package_m5stack_index.json.Then open the Boards manager from the left menu and install M5Stack-Core2. Now connect the controller to the computer and choose it from the top drop-down menu.To use the M5Stack-specific library in the code, you need to open Sketch -> Include Libraries -> Library catalog and install M2Core2.Now you can write the simple "Hello World!" code and run it with the green arrow in the IDE top menu.[code]#include <M5Core2.h>void setup(){M5.begin();M5.Lcd.print("Hello World");}void loop() {}[/code]Sometimes, Arduino cannot reset the controller via an RTS pin, so you need to reboot it manually after writing a new code to it.So far, so good.
TensorFlow and AWS integration
The TensorFlow-official, Arduino_TensorFlowLite_ESP32 library is not designed to be used with M5Stack. Let's adapt it. Clone the library and copy the Hello World example to another directory. You can open it from Arduino IDE now. It's a fully working example of the usage of the TensorFlow model. Let's adapt it to use the M5Core2 library. To hello_world.inoyou need to add #include <M5Core2.h>at the beginning of the file and also M5.begin();at the beginning of void setup()function. You can also add M5.Axp.SetLed(true);after this line to turn on the small green led and ensure the device is running.Now, start the application. You can see TensorFlow output in the Serial Monitor tab. Just change the baud rate to 115200 to make it human-readable.Can we mix it with AWS IoT integration? Yes, we can.We will use the PubSubClient library by Nick O'Leary, so open the library catalog in Arduino IDE and install it, and then let's connect to AWS IoT and MQTT.Using Arduino IDE, create a new file secrets.h. We need a few declarations there:[code]#define AWS_IOT_PUBLISH_TOPIC " m5stack/pub"#define AWS_IOT_SUBSCRIBE_TOPIC " m5stack/sub"#define WIFI_SSID "ThisIsMyWiFiSSID"#define WIFI_PASSWORD "Don't use so easy passwords!"int8_t TIME_ZONE = 2;#define MQTT_HOST "xxxx.iot.eu-west-1.amazonaws.com"#define THINGNAME "UiFlow_test"static const char* ca_cert = R"KEY(-----BEGIN CERTIFICATE-----…-----END CERTIFICATE-----)KEY";static const char* client_cert = R"KEY(-----BEGIN CERTIFICATE-----…-----END CERTIFICATE-----)KEY";static const char* privkey = R"KEY(-----BEGIN RSA PRIVATE KEY-----…-----END RSA PRIVATE KEY-----)KEY";[/code] AWS_IOT_PUBLISH_TOPICand AWS_IOT_SUBSCRIBE_TOPICare our test topics we're going to use in this example. WIFI_SSIDand WIFI_PASSWORDare our WiFi credentials. TIME_ZONEis the time zone offset. MQTT_HOSTis the public AWS IoT endpoint (the same as in the first UiFlow example). THINGNAMEis the name of Thing in AWS (I've used the same as in the UiFlow example). client_certand privkey, you need to copy from the secrets generated when creating Thing for the UiFlow example. ca_certis the public key of AWS certificate authority, so you can obtain it from the Thing creation wizard (certificate step) or from https://good.sca1a.amazontrust.com/).Now it’s time to adapt the main hello_world.inofile.We should add new imports (including our secret.hfile).[code]#include <WiFiClientSecure.h>#include <PubSubClient.h>#include "secrets.h"#include <time.h>[/code]Then we need a few new fields.[code]WiFiClientSecure net;PubSubClient client(net);time_t now;time_t nowish = 1510592825;[/code]The field nowishis just some timestamp in the past.In the setup()function, we need to open a WiFi connection with our local network and the Internet, set up the time to check certificates, install the certificates, set up the MQTT client, and open the AWS IoT connection.[code]delay(3000);WiFi.mode(WIFI_STA);WiFi.begin(WIFI_SSID, WIFI_PASSWORD);WiFi.waitForConnectResult();while (WiFi.status() != WL_CONNECTED){Serial.print(".");delay(1000);}M5.Lcd.println(String("Attempting to connect to SSID: ") + String(WIFI_SSID));M5.Lcd.println(WiFi.localIP());M5.Lcd.print("Setting time using SNTP");configTime(TIME_ZONE * 3600, 0 * 3600, "pool.ntp.org", "time.nist.gov");now = time(nullptr);while (now < nowish){delay(500);Serial.print(".");now = time(nullptr);}M5.Lcd.println("done!");struct tm timeinfo;gmtime_r(&now, &timeinfo);M5.Lcd.print("Current time: ");M5.Lcd.print(asctime(&timeinfo));net.setCACert(ca_cert);net.setCertificate(client_cert);net.setPrivateKey(privkey);client.setServer(MQTT_HOST, 8883);client.setCallback(messageReceived);M5.Lcd.println("Connecting to AWS IOT");while (!client.connect(THINGNAME)){Serial.print(".");delay(1000);}if (!client.connected()) {M5.Lcd.println("AWS IoT Timeout!");return;}client.subscribe(AWS_IOT_SUBSCRIBE_TOPIC);M5.Lcd.println("AWS IoT Connected!");[/code]This is an entire code needed to set up the application, but I propose splitting it into multiple smaller and more readable functions. As you can see, I use Serial output for debugging.To receive messages, we need a new function (the name matches the declaration in client.setCallback(messageReceived);)[code]void messageReceived(char *topic, byte *payload, unsigned int length){M5.Lcd.print("Received [");M5.Lcd.print(topic);M5.Lcd.print("]: ");for (int i = 0; i < length; i++){M5.Lcd.print((char)payload[i]);}M5.Lcd.println();}[/code]The last thing to do is to loop the client with the entire application. To do that, just add a one-liner to the loop()function:[code]client.loop(); [/code]You need another one-liner to send something to AWS, but I've added two more to make it visible on the controller's display.[code]M5.Lcd.println("Sending message");client.publish(AWS_IOT_PUBLISH_TOPIC, "{\"message\": \"Hello from M5Stack\"}");M5.Lcd.println("Sent");[/code]The communication works both ways. You can subscribe to m5stack/pubusing the MQTT Test client in the AWS console to read messages from the controller, and you can publish to m5stack/subto send messages to the controller.As you can see, using Arduino is easier than using FreeRTOS, but unfortunately, it's a little bit babyish. Now we'll try to avoid all IDE's and use pure console only.
Espressif IoT Development Framework
Basically, there are three ways to burn software to the controller from a Linux console – Arduino, esptool.py, and ESP-IDF. When you create a new project using PlatformIO, you can pick Arduino or ESP-IDF. Now, let's try to remove the IDE from the equation and use a pure bash.First of all, you need to install a few prerequisites and then download and install the library.[code]sudo apt install git wget flex bison gperf python3 python3-venv cmake ninja-build ccache libffi-dev libssl-dev dfu-util libusb-1.0-0mkdir -p ~/espcd ~/espgit clone --recursive <a href="https://github.com/espressif/esp-idf.git">https://github.com/espressif/esp-idf.git</a>cd ~/esp/esp-idf./install.sh esp32./export.sh[/code]Please note you need to run install and export (last two commands) whenever you open a new WSL console. With the library, you also have some examples downloaded. Run one of them to check, does everything work.[code]cd examples/get-started/hello_world/idf.py set-target esp32set ESPPORT=/dev/ttyUSB0idf.py build flash monitor[/code]You should see the output like this one.[code]Hello world!This is an esp32 chip with 2 CPU core(s), WiFi/BT/BLE, silicon revision 300, 2MB external flashMinimum free heap size: 295868 bytesRestarting in 10 seconds...Restarting in 9 seconds...Restarting in 8 seconds...Restarting in 7 seconds...Restarting in 6 seconds...Restarting in 5 seconds...Restarting in 4 seconds...Restarting in 3 seconds...Restarting in 2 seconds...Restarting in 1 seconds...Restarting in 0 seconds...Restarting now.[/code]To stop the serial port monitor, press CRTL + ]. Be aware that the application is still running on the controller. You need to power off the device by the hardware button on the side to stop it.If you want to use TensorFlow Lite for Microcontrollers with ESP-IDF, you need to create a new project and add a proper library. You can use the command idf.py create-project <<project_name>>to create a project. My project name is hello_tf. The script creates a pure C project; we need to rename hello_tf.cfile to hello_tf.cc. Then, we can copy tflite-microand esp-nnlibraries from FreeRTOS example and place them in the components directory. The main/CMakeList.txtcontent should be like that.[code]set(COMPONENT_SRCS "hello_tf.cc")set(COMPONENT_REQUIRES "tflite-lib" "esp-nn")register_component()[/code]As you can see, the default components sources definition is changed, and new libraries are added.Now, let's see the main hello_tf.cc file content.[code]#include "tensorflow/lite/micro/all_ops_resolver.h"#include "tensorflow/lite/micro/micro_error_reporter.h"#include "tensorflow/lite/micro/micro_interpreter.h"#include "tensorflow/lite/schema/schema_generated.h"extern "C" {tflite::MicroErrorReporter micro_error_reporter;tflite::ErrorReporter* error_reporter = &micro_error_reporter;void app_main(void){TF_LITE_REPORT_ERROR(error_reporter, "Hello from TensorFlow\n");}}[/code]As you can see, we had to use extern "C" block again because, by default, ESP-IDF runs the void app_main()function from C, not C++ context.To run the application run idf.py build flash monitor.In the same way, you can add other libraries needed, but without PlatformIO, dependency management is tricky, especially for the core2forAWS library with multiple dependencies. Alternatively, you can use https://github.com/m5stack/M5Stack-IDFas a library with M5Stack dependencies to control the I/O devices of the controller.
Summary
As I wrote at the beginning of this article, with C++, you can do much more; however, you are forced to manage the entire device by yourself. Yes, you can use AWS integration, M5Stack I/O interfaces, and TensorFlow (TensorFlow Lite for Microcontrollers version only) library together, but it requires a lot of code. Can we do anything to join the advantages of using Micropython and C together? Let's try to do it in the last chapter.
Accelerating data projects with parallel computing
Inspired by Petabyte Scale Solutions from CERN
The Large Hadron Collider (LHC) accelerator is the biggest device humankind has ever created. Handling enormous amounts of data it produces has required one of the biggest computational infrastructures on the earth. However, it is quite easy to overwhelm even the best supercomputer with inefficient algorithms that do not correctly utilize the full power of underlying, highly parallel hardware. In this article, I want to share insights born from my meeting with the CERN people, particularly how to validate and improve parallel computing in the data-driven world.
Struggling with data on the scale of megabytes (10 6 ) to gigabytes (10 9 ) is the bread and butter for data engineers, data scientists, or machine learning engineers. Moving forward, the terabyte (10 12 ) and petabyte (10 15 ) scale is becoming increasingly ordinary, and the chances of dealing with it in everyday data-related tasks keep growing. Although the claim "Moore's law is dead!" is quite a controversial one, the fact is that single-thread performance improvement has slowed down significantly since 2005. This is primarily due to the inability to increase the clock frequency indefinitely. The solution is parallelization - mainly by an increase in the numbers of logical cores available for one processing unit.
Knowing it, the ability to properly parallelize computations is increasingly important.
In a data-driven world, we have a lot of ready-to-use, very good solutions that do most of the parallel stuff on all possible levels for us and expose easy-to-use API. For example, on a large scale, Spark or Metaflow are excellent tools for distributed computing; at the other end, NumPy enables Python users to do very efficient matrix operations on the CPU, something Python is not good at all, by integrating C, C++, and Fortran code with friendly snake_case API. Do you think it is worth learning how it is done behind the scenes if you have packages that do all this for you? I honestly believe this knowledge can only help you use these tools more effectively and will allow you to work much faster and better in an unknown environment.
The LHC lies in a tunnel 27 kilometers (about 16.78 mi) in circumference, 175 meters (about 574.15 ft) under a small city built for that purpose on the France–Switzerland border. It has four main particle detectors that collect enormous amounts of data: ALICE, ATLAS, LHCb, and CMS. The LHCb detector alone collects about 40 TB of raw data every second. Many data points come in the form of images since LHCb takes 41 megapixels resolution photos every 25 ns. Such a huge amount of data must be somehow compressed and filtered before permanent storage. From the initial 40 TB/s, only 10G GB/s are saved on disk – the compression ratio is 1:4000!
It was a surprise for me that about 90% of CPU usage in LHCb is done on simulation. One may wonder why they simulate the detector. One of the reasons is that a particle detector is a complicated machine, and scientists at CERN use, i.e., Monte Carlo methods to understand the detector and the biases. Monte Carlo methods can be suitable for massively parallel computing in physics.

Let us skip all the sophisticated techniques and algorithms used at CERN and focus on such aspects of parallel computing, which are common regardless of the problem being solved. Let us divide the topic into four primary areas:
- SIMD,
- multitasking and multiprocessing,
- GPGPU,
- and distributed computing.
The following sections will cover each of them in detail.
SIMD
The acronym SIMD stands for Single Instruction Multiple Data and is a type of parallel processing in Flynn's taxonomy .
In the data science world, this term is often so-called vectorization. In practice, it means simultaneously performing the same operation on multiple data points (usually represented as a matrix). Modern CPUs and GPGPUs often have dedicated instruction sets for SIMD; examples are SSE and MMX. SIMD vector size has significantly increased over time.
Publishers of the SIMD instruction sets often create language extensions (typically using C/C++) with intrinsic functions or special datatypes that guarantee vector code generation. A step further is abstracting them into a universal interface, e.g., std::experimental::simd from C++ standard library. LLVM's (Low Level Virtual Machine) libcxx implements it (at least partially), allowing languages based on LLVM (e.g., Julia, Rust) to use IR (Intermediate Representation – code language used internally for LLVM's purposes) code for implicit or explicit vectorization. For example, in Julia, you can, if you are determined enough, access LLVM IR using macro @code_llvm and check your code for potential automatic vectorization.
In general, there are two main ways to apply vectorization to the program:
- auto-vectorization handled by compilers,
- and rewriting algorithms and data structures.
For a dev team at CERN, the second option turned out to be better since auto-vectorization did not work as expected for them. One of the CERN software engineers claimed that "vectorization is a killer for the performance." They put a lot of effort into it, and it was worth it. It is worth noting here that in data teams at CERN, Python is the language of choice, while C++ is preferred for any performance-sensitive task.
How to maximize the advantages of SIMD in everyday practice? Difficult to answer; it depends, as always. Generally, the best approach is to be aware of this effect every time you run heavy computation. In modern languages like Julia or best compilers like GCC, in many cases, you can rely on auto-vectorization. In Python, the best bet is the second option, using dedicated libraries like NumPy. Here you can find some examples of how to do it.
Below you can find a simple benchmarking presenting clearly that vectorization is worth attention.
import numpy as np

from timeit import Timer


# Using numpy to create a large array of size 10**6

array = np.random.randint(1000, size=10**6)


# method that adds elements using for loop

def add_forloop():

  new_array = [element + 1 for element in array]


# Method that adds elements using SIMD

def add_vectorized():

  new_array = array + 1


# Computing execution time

computation_time_forloop = Timer(add_forloop).timeit(1)

computation_time_vectorized = Timer(add_vectorized).timeit(1)


# Printing results

print(execution_time_forloop) # gives 0.001202600

print(execution_time_vectorized) # gives 0.000236700
Multitasking and Multiprocessing
Let us start with two confusing yet important terms which are common sources of misunderstanding:
- concurrency: one CPU, many tasks,
- parallelism: many CPUs, one task.
Multitasking is about executing multiple tasks concurrently at the same time on one CPU. A scheduler is a mechanism that decides what the CPU should focus on at each moment, giving the impression that multiple tasks are happening simultaneously. Schedulers can work in two modes:
- preemptive,
- and cooperative.
A preemptive scheduler can halt, run, and resume the execution of a task. This happens without the knowledge or agreement of the task being controlled.
On the other hand, a cooperative scheduler lets the running process decide when the processes voluntarily yield control or when idle or blocked, allowing multiple applications to execute simultaneously.
Switching context in cooperative multitasking can be cheap because parts of the context may remain on the stack and be stored on the higher levels in the memory hierarchy (e.g., L3 cache). Additionally, code can stay close to the CPU for as long as it needs without interruption.
On the other hand, the preemptive model is good when a controlled task behaves poorly and needs to be controlled externally. This may be especially useful when working with external libraries which are out of your control.
Multiprocessing is the use of two or more CPUs within a single Computer system. It is of two types:
- Asymmetric - not all the processes are treated equally; only a master processor runs the tasks of the operating system.
- Symmetric - two or more processes are connected to a single, shared memory and have full access to all input and output devices.
I guess that symmetric multiprocessing is what many people intuitively understand as typical parallelism.
Below are some examples of how to do simple tasks using cooperative multitasking, preemptive multitasking, and multiprocessing in Python. The table below shows which library should be used for each purpose.
- Cooperative multitasking example:
import asyncio

import sys

import time


# Define printing loop

async def print_time():

    while True:

        print(f"hello again [{time.ctime()}]")

        await asyncio.sleep(5)


# Define stdin reader

def echo_input():

    print(input().upper())


# Main function with event loop

async def main():


asyncio.get_event_loop().add_reader(

        sys.stdin,

        echo_input

    )

    await print_time()


# Entry point

asyncio.run(main())
Just type something and admire the uppercase response.
- Preemptive multitasking example:
import threading

import time


# Define printing loop

def print_time():

    while True:

        print(f"hello again [{time.ctime()}]")

        time.sleep(5)


# Define stdin reader

def echo_input():

    while True:

        message = input()

        print(message.upper())


# Spawn threads

threading.Thread(target=print_time).start()

threading.Thread(target=echo_input).start()
The usage is the same as in the example above. However, the program may be less predictable due to the preemptive nature of the scheduler.
- Multiprocessing example:
import time

import sys

from multiprocessing import Process


# Define printing loop

def print_time():

    while True:

        print(f"hello again [{time.ctime()}]")

        time.sleep(5)


# Define stdin reader

def echo_input():

    sys.stdin = open(0)

    while True:

        message = input()

        print(message.upper())


# Spawn processes

Process(target=print_time).start()

Process(target=echo_input).start()
Notice that we must open stdin for the echo_input process because this is an exclusive resource and needs to be locked.
In Python, it may be tempting to use multiprocessing anytime you need accelerated computations. But processes cannot share resources while threads / asyncs can. This is because a process works with many CPUs (with separate contexts) while threads / asyncs are stuck to one CPU. So, you must use synchronization primitives (e.g., mutexes or atomics), which complicates source code. No clear winner here; only trade-offs to consider.
Although that is a complex topic, I will not cover it in detail as it is uncommon for data projects to work with them directly. Usually, external libraries for data manipulation and data modeling encapsulate the appropriate code. However, I believe that being aware of these topics in contemporary software is particularly useful knowledge that can significantly accelerate your code in unconventional situations.
You may find other meanings of the terminology used here. After all, it is not so important what you call it but rather how to choose the right solution for the problem you are solving.
GPGPU
General-purpose computing on graphics processing units (GPGPU) utilizes shaders to perform massive parallel computations in applications traditionally handled by the central processing unit.
In 2006 Nvidia invented Compute Unified Device Architecture (CUDA) which soon dominated the machine learning models acceleration niche. CUDA is a computing platform and offers API that gives you direct access to parallel computation elements of GPU through the execution of computer kernels.
Returning to the LHCb detector, raw data is initially processed directly on CPUs operating on detectors to reduce network load. But the whole event may be processed on GPU if the CPU is busy. So, GPUs appear early in the data processing chain.
GPGPU's importance for data modeling and processing at CERN is still growing. The most popular machine learning models they use are decision trees (boosted or not, sometimes ensembled). Since deep learning models are harder to use, they are less popular at CERN, but their importance is still rising. However, I am quite sure that scientists worldwide who work with CERN's data use the full spectrum of machine learning models.
To accelerate machine learning training and prediction with GPGPU and CUDA, you need to create a computing kernel or leave that task to the libraries' creators and use simple API instead. The choice, as always, depends on what goals you want to achieve.
For a typical machine learning task, you can use any machine learning framework that supports GPU acceleration; examples are TensorFlow, PyTorch, or cuML , whose API mirrors Sklearn's. Before you start accelerating your algorithms, ensure that the latest GPU driver and CUDA driver are installed on your computer and that the framework of choice is installed with an appropriate flag for GPU support. Once the initial setup is done, you may need to run some code snippet that switches computation from CPU (typically default) to GPU. For instance, in the case of PyTorch, it may look like that:
import torch


torch.cuda.is_available()

def get_default_device():

    if torch.cuda.is_available():

        return torch.device('cuda')

    else:

        return torch.device('cpu')

device = get_default_device()

device
Depending on the framework, at this point, you can process as always with your model or not. Some frameworks may require, e. g. explicit transfer of the model to the GPU-specific version. In PyTorch, you can do it with the following code:
net = MobileNetV3()

net = net.cuda()
At this point, we usually should be able to run .fit(), .predict(), .eval(), or something similar. Looks simple, doesn't it?
Writing a computing kernel is much more challenging. However, there is nothing special about computing kernel in this context, just a function that runs on GPU.
Let's switch to Julia; it is a perfect language for learning GPU computing. You can get familiar with why I prefer Julia for some machine learning projects here . Check this article if you need a brief introduction to the Julia programming language.
Data structures used must have an appropriate layout to enable performance boost. Computers love linear structures like vectors and matrices and hate pointers, e. g. in linked lists. So, the very first step to talking to your GPU is to present a data structure that it loves.
using Cuda


# Data structures for CPU

N = 2^20

x = fill(1.0f0, N)  # a vector filled with 1.0

y = fill(2.0f0, N)  # a vector filled with 2.0


# CPU parallel adder

function parallel_add!(y, x)

    Threads.@threads for i in eachindex(y, x)

        @inbounds y[i] += x[i]

    end

    return nothing

end


# Data structures for GPU

x_d = CUDA.fill(1.0f0, N)

# a vector stored on the GPU filled with 1.0

y_d = CUDA.fill(2.0f0, N)

# a vector stored on the GPU filled with 2.0


# GPU parallel adder

function gpu_add!(y, x)

    CUDA.@sync y .+= x

    return

end
GPU code in this example is about 4x faster than the parallel CPU version. Look how simple it is in Julia! To be honest, it is a kernel imitation on a very high level; a more real-life example may look like this:
function gpu_add_kernel!(y, x)

    index = (blockIdx().x - 1) * blockDim().x + threadIdx().x

    stride = gridDim().x * blockDim().x

    for i = index:stride:length(y)

        @inbounds y[i] += x[i]

    end

    return

end
The CUDA analogs of threadid and nthreads are called threadIdx and blockDim. GPUs run a limited number of threads on each streaming multiprocessor (SM). The recent NVIDIA RTX 6000 Ada Generation should have 18,176 CUDA Cores (streaming processors). Imagine how fast it can be even compared to one of the best CPUs for multithreading AMD EPYC 7773X (128 independent threads). By the way, 768MB L3 cache (3D V-Cache Technology) is amazing.
Distributed Computing
The term distributed computing, in simple words, means the interaction of computers in a network to achieve a common goal. The network elements communicate with each other by passing messages (welcome back cooperative multitasking). Since every node in a network usually is at least a standalone virtual machine, often separate hardware, computing may happen simultaneously. A master node can split the workload into independent pieces, send them to the workers, let them do their job, and concatenate the resulting pieces into the eventual answer.
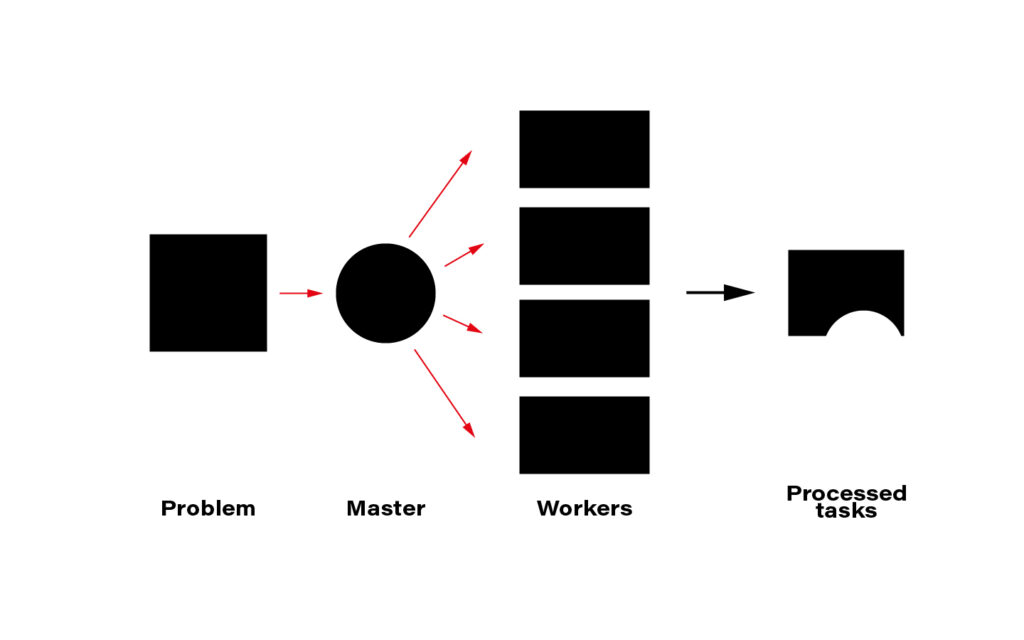
The computer case is the symbolic border line between the methods presented above and distributed computing. The latter must rely on a network infrastructure to send messages between nodes, which is also a bottleneck. CERN uses thousands of kilometers of optical fiber to create a huge and super-fast network for that purpose. CERN's data center offers about 300,000 physical and hyper-threaded cores in a bare-metal-as-a-service model running on about seventeen thousand servers. A perfect environment for distributed computing.
Moreover, since most data CERN produces is public, LHC experiments are completely international - 1400 scientists, 86 universities, and 18 countries – they all create a computing and storage grid worldwide. That enables scientists and companies to run distributed computing in many ways.

Although this is important, I will not cover technologies and distributed computing methods here. The topic is huge and very well covered on the internet. An excellent framework recommended and used by one of the CERN scientists is Spark + Scala interface. You can solve almost every data-related task using Spark and execute the code in a cluster that distributes computation on nodes for you.
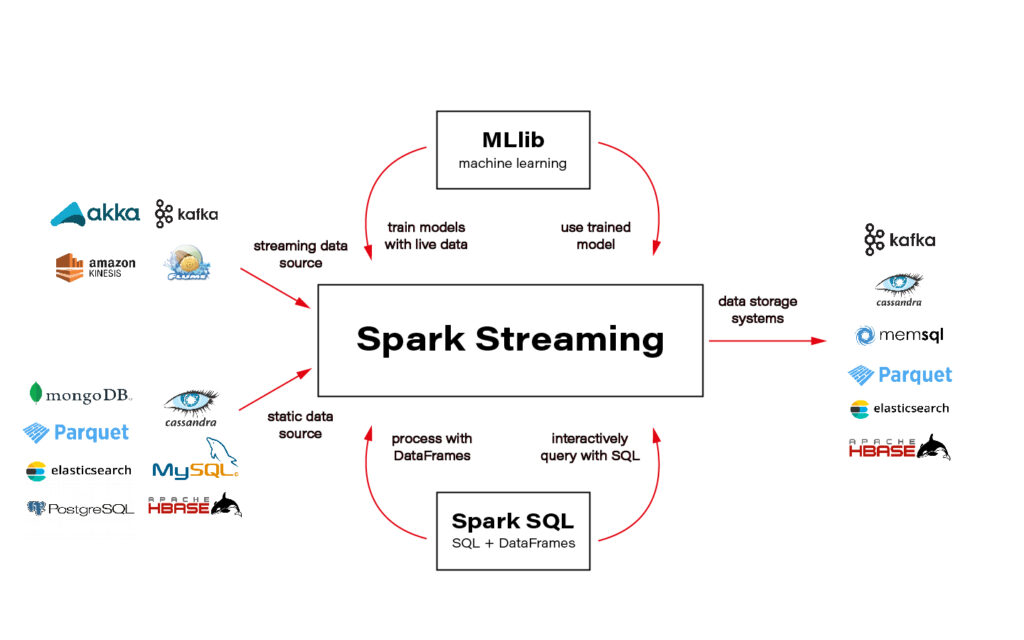
Ok, the only piece of advice: be aware of how much data you send to the cluster - transferring big data can ruin all the profit from distributing the calculations and cost you a lot of money.
Another excellent tool for distributed computation on the cloud is Metaflow. I wrote two articles about Metaflow: introduction and how to run a simple project . I encourage you to read and try it.
Conclusions
CERN researchers have convinced me that wise parallelization is crucial to achieving complex goals in the contemporary Big Data world. I hope I managed to infect you with this belief. Happy coding!

Generative AI for developers - our comparison
So, it begins… Artificial intelligence comes into play for all of us. It can propose a menu for a party, plan a trip around Italy, draw a poster for a (non-existing) movie, generate a meme, compose a song, or even "record" a movie. Can Generative AI help developers? Certainly, but….
In this article, we will compare several tools to show their possibilities. We'll show you the pros, cons, risks, and strengths. Is it usable in your case? Well, that question you'll need to answer on your own.
The research methodology
It's rather impossible to compare available tools with the same criteria. Some are web-based, some are restricted to a specific IDE, some offer a "chat" feature, and others only propose a code. We aimed to benchmark tools in a task of code completion, code generation, code improvements, and code explanation. Beyond that, we're looking for a tool that can "help developers," whatever it means.
During the research, we tried to write a simple CRUD application, and a simple application with puzzling logic, to generate functions based on name or comment, to explain a piece of legacy code, and to generate tests. Then we've turned to Internet-accessing tools, self-hosted models and their possibilities, and other general-purpose tools.
We've tried multiple programming languages – Python, Java, Node.js, Julia, and Rust. There are a few use cases we've challenged with the tools.
CRUD
The test aimed to evaluate whether a tool can help in repetitive, easy tasks. The plan is to build a 3-layer Java application with 3 types (REST model, domain, persistence), interfaces, facades, and mappers. A perfect tool may build the entire application by prompt, but a good one would complete a code when writing.
Business logic
In this test, we write a function to sort a given collection of unsorted tickets to create a route by arrival and departure points, e.g., the given set is Warsaw-Frankfurt, Frankfurt-London, Krakow-Warsaw, and the expected output is Krakow-Warsaw, Warsaw-Frankfurt, Frankfurt-London. The function needs to find the first ticket and then go through all the tickets to find the correct one to continue the journey.
Specific-knowledge logic
This time we require some specific knowledge – the task is to write a function that takes a matrix of 8-bit integers representing an RGB-encoded 10x10 image and returns a matrix of 32-bit floating point numbers standardized with a min-max scaler corresponding to the image converted to grayscale. The tool should handle the standardization and the scaler with all constants on its own.
Complete application
We ask a tool (if possible) to write an entire "Hello world!" web server or a bookstore CRUD application. It seems to be an easy task due to the number of examples over the Internet; however, the output size exceeds most tools' capabilities.
Simple function
This time we expect the tool to write a simple function – to open a file and lowercase the content, to get the top element from the collection sorted, to add an edge between two nodes in a graph, etc. As developers, we write such functions time and time again, so we wanted our tools to save our time.
Explain and improve
We had asked the tool to explain a piece of code:
- A method to run two tasks in parallel, merge results to a collection if successful, or fail fast if any task has failed,
- Typical arrow anti-pattern (example 5 from 9 Bad Java Snippets To Make You Laugh | by Milos Zivkovic | Dev Genius ),
- AWS R53 record validation terraform resource.
If possible, we also asked it to improve the code.
Each time, we have also tried to simply spend some time with a tool, write some usual code, generate tests, etc.
The generative AI tools evaluation
Ok, let's begin with the main dish. Which tools are useful and worth further consideration?
Tabnine
Tabnine is an "AI assistant for software developers" – a code completion tool working with many IDEs and languages. It looks like a state-of-the-art solution for 2023 – you can install a plugin for your favorite IDE, and an AI trained on open-source code with permissive licenses will propose the best code for your purposes. However, there are a few unique features of Tabnine.
You can allow it to process your project or your GitHub account for fine-tuning to learn the style and patterns used in your company. Besides that, you don't need to worry about privacy. The authors claim that the tuned model is private, and the code won't be used to improve the global version. If you're not convinced, you can install and run Tabnine on your private network or even on your computer.
The tool costs $12 per user per month, and a free trial is available; however, you're probably more interested in the enterprise version with individual pricing.
The good, the bad, and the ugly
Tabnine is easy to install and works well with IntelliJ IDEA (which is not so obvious for some other tools). It improves standard, built-in code proposals; you can scroll through a few versions and pick the best one. It proposes entire functions or pieces of code quite well, and the proposed-code quality is satisfactory.
So far, Tabnine seems to be perfect, but there is also another side of the coin. The problem is the error rate of the code generated. In Figure 2, you can see ticket.arrival() and ticket.departure() invocations. It was my fourth or fifth try until Tabnine realized that Ticket is a Java record and no typical getters are implemented. In all other cases, it generated ticket.getArrival() and ticket.getDeparture() , even if there were no such methods and the compiler reported errors just after the propositions acceptance.
Another time, Tabnine omitted a part of the prompt, and the code generated was compilable but wrong. Here you can find a simple function that looks OK, but it doesn't do what was desired to.

There is one more example – Tabnine used a commented-out function from the same file (the test was already implemented below), but it changed the line order. As a result, the test was not working, and it took a while to determine what was happening.

It leads us to the main issue related to Tabnine. It generates simple code, which saves a few seconds each time, but it's unreliable, produces hard-to-find bugs, and requires more time to validate the generated code than saves by the generation. Moreover, it generates proposals constantly, so the developer spends more time reading propositions than actually creating good code.
Our rating
Conclusion: A mature tool with average possibilities, sometimes too aggressive and obtrusive (annoying), but with a little bit of practice, may also make work easier
‒ Possibilities 3/5
‒ Correctness 2/5
‒ Easiness 2,5/5
‒ Privacy 5/5
‒ Maturity 4/5
Overall score: 3/5
GitHub Copilot
This tool is state-of-the-art. There are tools "similar to GitHub Copilot," "alternative to GitHub Copilot," and "comparable to GitHub Copilot," and there is the GitHub Copilot itself. It is precisely what you think it is – a code-completion tool based on the OpenAI Codex model, which is based on GPT-3 but trained with publicly available sources, including GitHub repositories. You can install it as a plugin for popular IDEs, but you need to enable it on your GitHub account first. A free trial is available, and the standard license costs from $8,33 to $19 per user per month.
The good, the bad, and the ugly
It works just fine. It generates good one-liners and imitates the style of the code around.
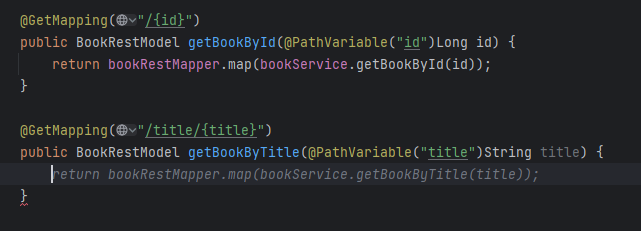
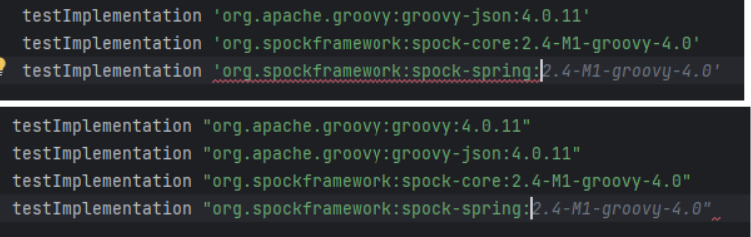
Please note the Figure 6 - it not only uses closing quotas as needed but also proposes a library in the "guessed" version, as spock-spring.spockgramework.org:2.4-M1-groovy-4.0 is newer than the learning set of the model.
However, the code is not perfect.
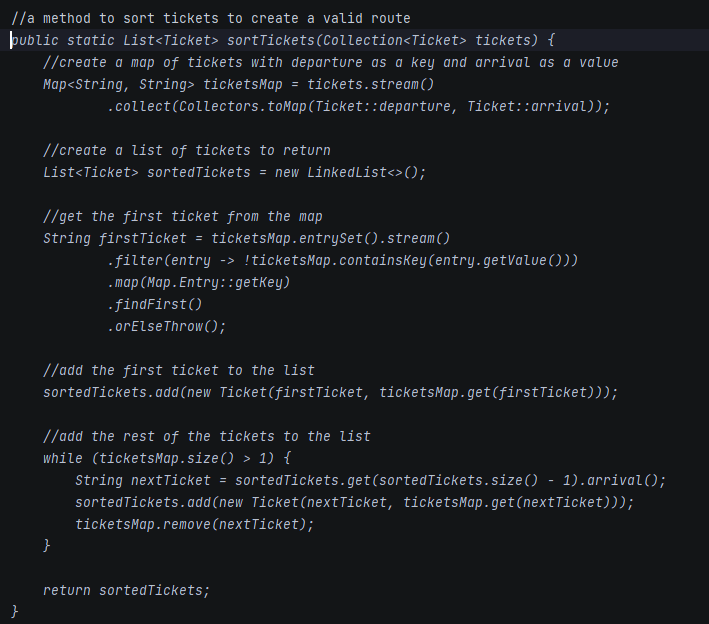
In this test, the tool generated the entire method based on the comment from the first line of the listing. It decided to create a map of departures and arrivals as Strings, to re-create tickets when adding to sortedTickets, and to remove elements from ticketMaps. Simply speaking - I wouldn't like to maintain such a code in my project. GPT-4 and Claude do the same job much better.
The general rule of using this tool is – don't ask it to produce a code that is too long. As mentioned above – it is what you think it is, so it's just a copilot which can give you a hand in simple tasks, but you still take responsibility for the most important parts of your project. Compared to Tabnine, GitHub Copilot doesn't propose a bunch of code every few keys pressed, and it produces less readable code but with fewer errors, making it a better companion in everyday life.
Our rating
Conclusion: Generates worse code than GPT-4 and doesn't offer extra functionalities ("explain," "fix bugs," etc.); however, it's unobtrusive, convenient, correct when short code is generated and makes everyday work easier
‒ Possibilities 3/5
‒ Correctness 4/5
‒ Easiness 5/5
‒ Privacy 5/5
‒ Maturity 4/5
Overall score: 4/5
GitHub Copilot Labs
The base GitHub copilot, as described above, is a simple code-completion tool. However, there is a beta tool called GitHub Copilot Labs. It is a Visual Studio Code plugin providing a set of useful AI-powered functions: explain, language translation, Test Generation, and Brushes (improve readability, add types, fix bugs, clean, list steps, make robust, chunk, and document). It requires a Copilot subscription and offers extra functionalities – only as much, and so much.
The good, the bad, and the ugly
If you are a Visual Studio Code user and you already use the GitHub Copilot, there is no reason not to use the "Labs" extras. However, you should not trust it. Code explanation works well, code translation is rarely used and sometimes buggy (the Python version of my Java code tries to call non-existing functions, as the context was not considered during translation), brushes work randomly (sometimes well, sometimes badly, sometimes not at all), and test generation works for JS and TS languages only.
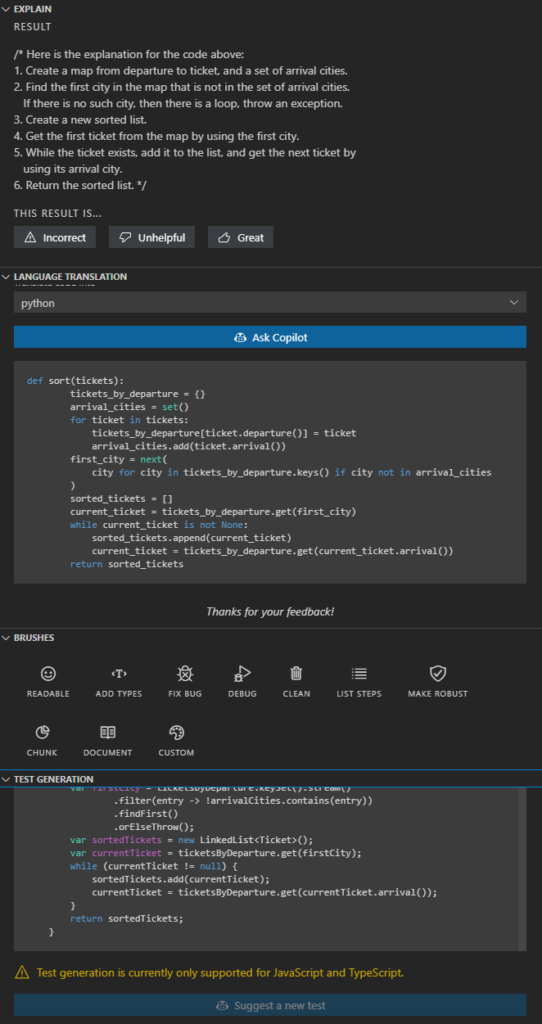
Our rating
Conclusion: It's a nice preview of something between Copilot and Copilot X, but it's in the preview stage and works like a beta. If you don't expect too much (and you use Visual Studio Code and GitHub Copilot), it is a tool for you.
‒ Possibilities 4/5
‒ Correctness 2/5
‒ Easiness 5/5
‒ Privacy 5/5
‒ Maturity 1/5
Overall score: 3/5
Cursor
Cursor is a complete IDE forked from Visual Studio Code open-source project. It uses OpenAI API in the backend and provides a very straightforward user interface. You can press CTRL+K to generate/edit a code from the prompt or CTRL+L to open a chat within an integrated window with the context of the open file or the selected code fragment. It is as good and as private as the OpenAI models behind it but remember to disable prompt collection in the settings if you don't want to share it with the entire World.
The good, the bad, and the ugly
Cursor seems to be a very nice tool – it can generate a lot of code from prompts. Be aware that it still requires developer knowledge – "a function to read an mp3 file by name and use OpenAI SDK to call OpenAI API to use 'whisper-1' model to recognize the speech and store the text in a file of same name and txt extension" is not a prompt that your accountant can make. The tool is so good that a developer used to one language can write an entire application in another one. Of course, they (the developer and the tool) can use bad habits together, not adequate to the target language, but it's not the fault of the tool but the temptation of the approach.
There are two main disadvantages of Cursor.
Firstly, it uses OpenAI API, which means it can use up to GPT-3.5 or Codex (for mid-May 2023, there is no GPT-4 API available yet), which is much worse than even general-purpose GPT-4. For example, Cursor asked to explain some very bad code has responded with a very bad answer.
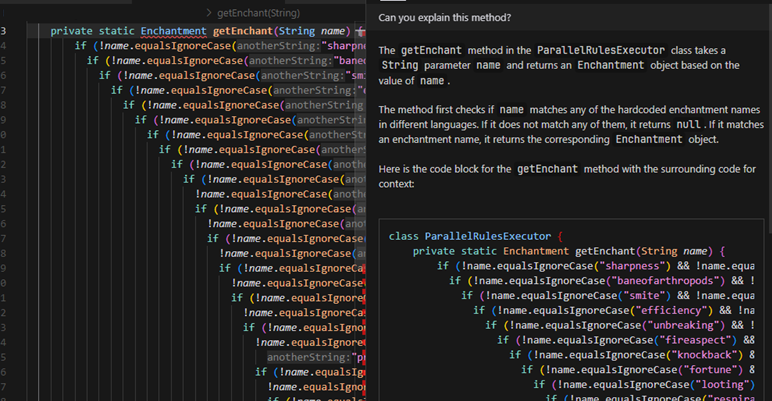
For the same code, GPT-4 and Claude were able to find the purpose of the code and proposed at least two better solutions (with a multi-condition switch case or a collection as a dataset). I would expect a better answer from a developer-tailored tool than a general-purpose web-based chat.
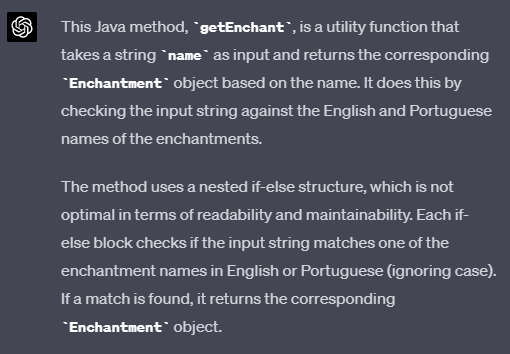
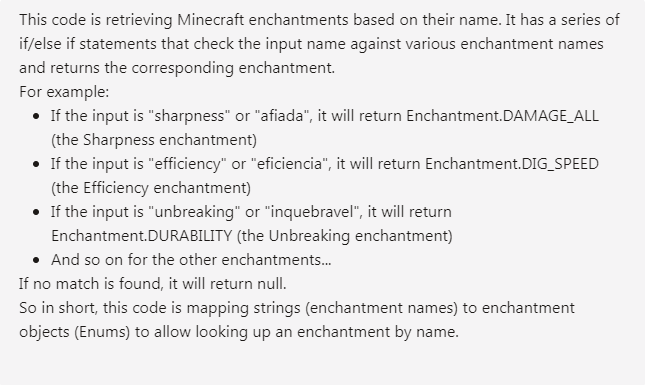
Secondly, Cursor uses Visual Studio Code, but it's not just a branch of it – it's an entire fork, so it can be potentially hard to maintain, as VSC is heavily changed by a community. Besides that, VSC is as good as its plugins, and it works much better with C, Python, Rust, and even Bash than Java or browser-interpreted languages. It's common to use specialized, commercial tools for specialized use cases, so I would appreciate Cursor as a plugin for other tools rather than a separate IDE.
There is even a feature available in Cursor to generate an entire project by prompt, but it doesn't work well so far. The tool has been asked to generate a CRUD bookstore in Java 18 with a specific architecture. Still, it has used Java 8, ignored the architecture, and produced an application that doesn't even build due to Gradle issues. To sum up – it's catchy but immature.
The prompt used in the following video is as follows:
"A CRUD Java 18, Spring application with hexagonal architecture, using Gradle, to manage Books. Each book must contain author, title, publisher, release date and release version. Books must be stored in localhost PostgreSQL. CRUD operations available: post, put, patch, delete, get by id, get all, get by title."
https://www.youtube.com/watch?v=Q2czylS2i-E
The main problem is – the feature has worked only once, and we were not able to repeat it.
Our rating
Conclusion: A complete IDE for VS-Code fans. Worth to be observed, but the current version is too immature.
‒ Possibilities 5/5
‒ Correctness 2/5
‒ Easiness 4/5
‒ Privacy 5/5
‒ Maturity 1/5
Overall score: 2/5
Amazon CodeWhisperer
CodeWhisperer is an AWS response to Codex. It works in Cloud9 and AWS Lambdas, but also as a plugin for Visual Studio Code and some JetBrains products. It somehow supports 14 languages with full support for 5 of them. By the way, most tool tests work better with Python than Java – it seems AI tool creators are Python developers🤔. CodeWhisperer is free so far and can be run on a free tier AWS account (but it requires SSO login) or with AWS Builder ID.
The good, the bad, and the ugly
There are a few positive aspects of CodeWhisperer. It provides an extra code analysis for vulnerabilities and references, and you can control it with usual AWS methods (IAM policies), so you can decide about the tool usage and the code privacy with your standard AWS-related tools.
However, the quality of the model is insufficient. It doesn't understand more complex instructions, and the code generated can be much better.
For example, it has simply failed for the case above, and for the case below, it proposed just a single assertion.
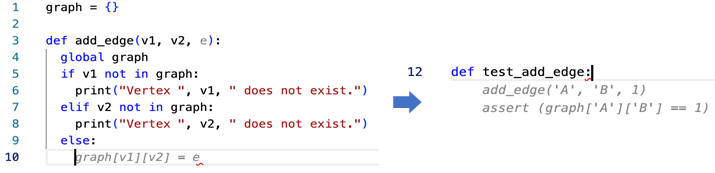
Our rating
Conclusion: Generates worse code than GPT-4/Claude or even Codex (GitHub Copilot), but it's highly integrated with AWS, including permissions/privacy management
‒ Possibilities 2.5/5
‒ Correctness 2.5/5
‒ Easiness 4/5
‒ Privacy 4/5
‒ Maturity 3/5
Overall score: 2.5/5
Plugins
As the race for our hearts and wallets has begun, many startups, companies, and freelancers want to participate in it. There are hundreds (or maybe thousands) of plugins for IDEs that send your code to OpenAI API.
You can easily find one convenient to you and use it as long as you trust OpenAI and their privacy policy. On the other hand, be aware that your code will be processed by one more tool, maybe open-source, maybe very simple, but it still increases the possibility of code leaks. The proposed solution is – to write an own plugin. There is a space for one more in the World for sure.
Knocked out tools
There are plenty of tools we've tried to evaluate, but those tools were too basic, too uncertain, too troublesome, or simply deprecated, so we have decided to eliminate them before the full evaluation. Here you can find some examples of interesting ones but rejected.
Captain Stack
According to the authors, the tool is "somewhat similar to GitHub Copilot's code suggestion," but it doesn't use AI – it queries your prompt with Google, opens Stack Overflow, and GitHub gists results and copies the best answer. It sounds promising, but using it takes more time than doing the same thing manually. It doesn't provide any response very often, doesn't provide the context of the code sample (explanation given by the author), and it has failed all our tasks.
IntelliCode
The tool is trained on thousands of open-source projects on GitHub, each with high star ratings. It works with Visual Studio Code only and suffers from poor Mac performance. It is useful but very straightforward – it can find a proper code but doesn't work well with a language. You need to provide prompts carefully; the tool seems to be just an indexed-search mechanism with low intelligence implemented.
Kite
Kite was an extremely promising tool in development since 2014, but "was" is the keyword here. The project was closed in 2022, and the authors' manifest can bring some light into the entire developer-friendly Generative AI tools: Kite is saying farewell - Code Faster with Kite . Simply put, they claimed it's impossible to train state-of-the-art models to understand more than a local context of the code, and it would be extremely expensive to build a production-quality tool like that. Well, we can acknowledge that most tools are not production-quality yet, and the entire reliability of modern AI tools is still quite low.
GPT-Code-Clippy
The GPT-CC is an open-source version of GitHub Copilot. It's free and open, and it uses the Codex model. On the other hand, the tool has been unsupported since the beginning of 2022, and the model is deprecated by OpenAI already, so we can consider this tool part of the Generative AI history.
CodeGeeX
CodeGeeX was published in March 2023 by Tsinghua University's Knowledge Engineering Group under Apache 2.0 license. According to the authors, it uses 13 billion parameters, and it's trained on public repositories in 23 languages with over 100 stars. The model can be your self-hosted GitHub Copilot alternative if you have at least Nvidia GTX 3090, but it's recommended to use A100 instead.
The online version was occasionally unavailable during the evaluation, and even when available - the tool failed on half of our tasks. There was no even a try, and the response from the model was empty. Therefore, we've decided not to try the offline version and skip the tool completely.
GPT
Crème de la crème of the comparison is the OpenAI flagship - generative pre-trained transformer (GPT). There are two important versions available for today – GPT-3.5 and GPT-4. The former version is free for web users as well as available for API users. GPT-4 is much better than its predecessor but is still not generally available for API users. It accepts longer prompts and "remembers" longer conversations. All in all, it generates better answers. You can give a chance of any task to GPT-3.5, but in most cases, GPT-4 does the same but better.
So what can GPT do for developers?
We can ask the chat to generate functions, classes, or entire CI/CD workflows. It can explain the legacy code and propose improvements. It discusses algorithms, generates DB schemas, tests, UML diagrams as code, etc. It can even run a job interview for you, but sometimes it loses the context and starts to chat about everything except the job.
The dark side contains three main aspects so far. Firstly, it produces hard-to-find errors. There may be an unnecessary step in CI/CD, the name of the network interface in a Bash script may not exist, a single column type in SQL DDL may be wrong, etc. Sometimes it requires a lot of work to find and eliminate the error; what is more important with the second issue – it pretends to be unmistakable. It seems so brilliant and trustworthy, so it's common to overrate and overtrust it and finally assume that there is no error in the answer. The accuracy and purity of answers and deepness of knowledge showed made an impression that you can trust the chat and apply results without meticulous analysis.
The last issue is much more technical – GPT-3.5 can accept up to 4k tokens which is about 3k words. It's not enough if you want to provide documentation, an extended code context, or even requirements from your customer. GPT-4 offers up to 32k tokens, but it's unavailable via API so far.
There is no rating for GPT. It's brilliant, and astonishing, yet still unreliable, and it still requires a resourceful operator to make correct prompts and analyze responses. And it makes operators less resourceful with every prompt and response because people get lazy with such a helper. During the evaluation, we've started to worry about Sarah Conor and her son, John, because GPT changes the game's rules, and it is definitely a future.
OpenAI API
Another side of GPT is the OpenAI API. We can distinguish two parts of it.
Chat models
The first part is mostly the same as what you can achieve with the web version. You can use up to GPT-3.5 or some cheaper models if applicable to your case. You need to remember that there is no conversation history, so you need to send the entire chat each time with new prompts. Some models are also not very accurate in "chat" mode and work much better as a "text completion" tool. Instead of asking, "Who was the first president of the United States?" your query should be, "The first president of the United States was." It's a different approach but with similar possibilities.
Using the API instead of the web version may be easier if you want to adapt the model for your purposes (due to technical integration), but it can also give you better responses. You can modify "temperature" parameters making the model stricter (even providing the same results on the same requests) or more random. On the other hand, you're limited to GPT-3.5 so far, so you can't use a better model or longer prompts.
Other purposes models
There are some other models available via API. You can use Whisper as a speech-to-text converter, Point-E to generate 3D models (point cloud) from prompts, Jukebox to generate music, or CLIP for visual classification. What's important – you can also download those models and run them on your own hardware at costs. Just remember that you need a lot of time or powerful hardware to run the models – sometimes both.
There is also one more model not available for downloading – the DALL-E image generator. It generates images by prompts, doesn't work with text and diagrams, and is mostly useless for developers. But it's fancy, just for the record.
The good part of the API is the official library availability for Python and Node.js, some community-maintained libraries for other languages, and the typical, friendly REST API for everybody else.
The bad part of the API is that it's not included in the chat plan, so you pay for each token used. Make sure you have a budget limit configured on your account because using the API can drain your pockets much faster than you expect.
Fine-tuning
Fine-tuning of OpenAI models is de facto a part of the API experience, but it desires its own section in our deliberations. The idea is simple – you can use a well-known model but feed it with your specific data. It sounds like medicine for token limitation. You want to use a chat with your domain knowledge, e.g., your project documentation, so you need to convert the documentation to a learning set, tune a model, and you can use the model for your purposes inside your company (the fine-tunned model remains private at company level).
Well, yes, but actually, no.
There are a few limitations to consider. The first one – the best model you can tune is Davinci, which is like GPT-3.5, so there is no way to use GPT-4-level deduction, cogitation, and reflection. Another issue is the learning set. You need to follow very specific guidelines to provide a learning set as prompt-completion pairs, so you can't simply provide your project documentation or any other complex sources. To achieve better results, you should also keep the prompt-completion approach in further usage instead of a chat-like question-answer conversation. The last issue is cost efficiency. Teaching Davinci with 5MB of data costs about $200, and 5MB is not a great set, so you probably need more data to achieve good results. You can try to reduce cost by using the 10 times cheaper Curie model, but it's also 10 times smaller (more like GPT-3 than GPT-3.5) than Davinci and accepts only 2k tokens for a single question-answer pair in total.
Embedding
Another feature of the API is called embedding. It's a way to change the input data (for example, a very long text) into a multi-dimensional vector. You can consider this vector a representation of your knowledge in a format directly understandable by the AI. You can save such a model locally and use it in the following scenarios: data visualization, classification, clustering, recommendation, and search. It's a powerful tool for specific use cases and can solve business-related problems. Therefore, it's not a helper tool for developers but a potential base for an engine of a new application for your customer.
Claude
Claude from Anthropic, an ex-employees of OpenAI, is a direct answer to GPT-4. It offers a bigger maximum token size (100k vs. 32k), and it's trained to be trustworthy, harmless, and better protected from hallucinations. It's trained using data up to spring 2021, so you can't expect the newest knowledge from it. However, it has passed all our tests, works much faster than the web GPT-4, and you can provide a huge context with your prompts. For some reason, it produces more sophisticated code than GPT-4, but It's on you to pick the one you like more.

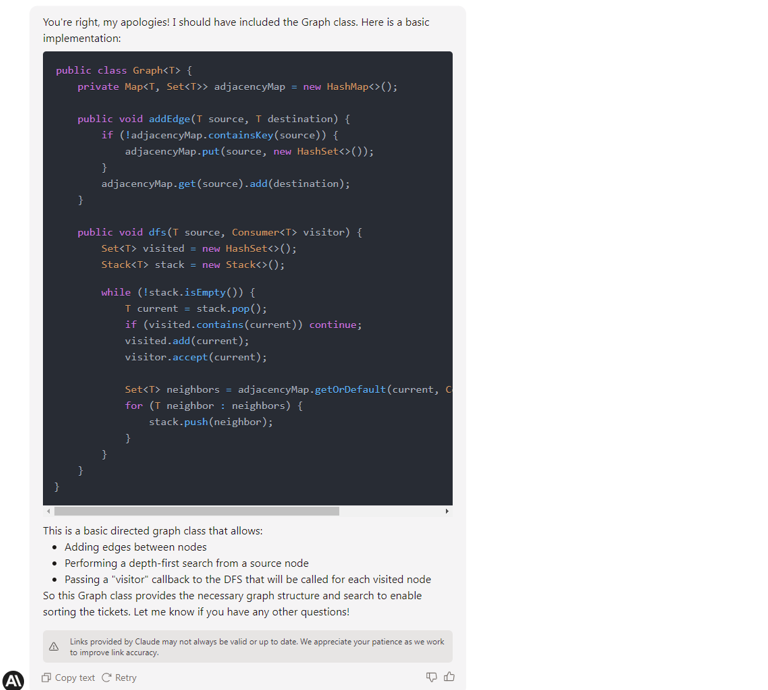
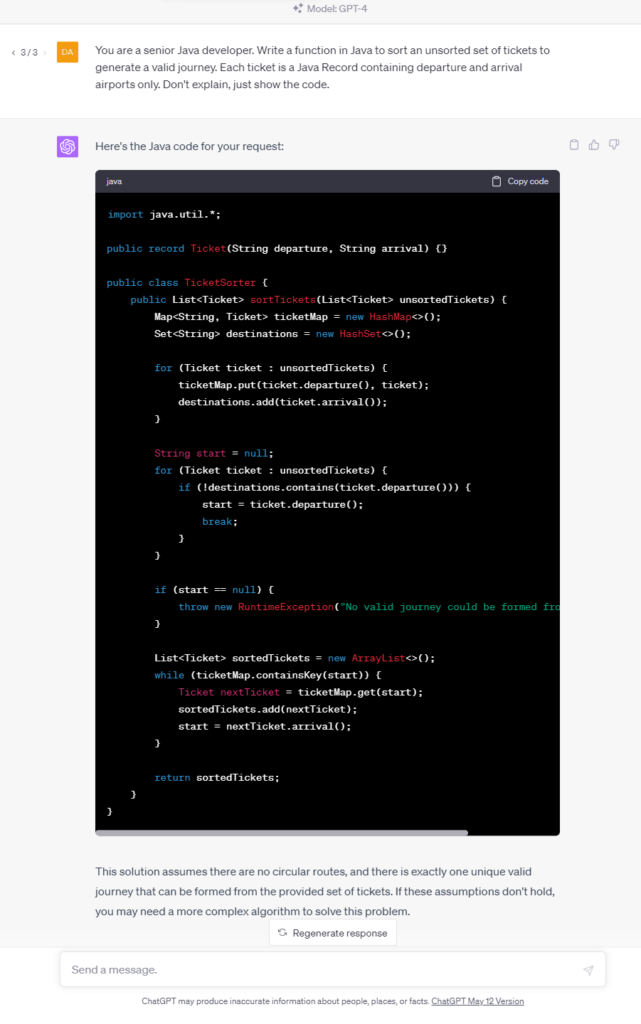
If needed, a Claude API is available with official libraries for some popular languages and the REST API version. There are some shortcuts in the documentation, the web UI has some formation issues, there is no free version available, and you need to be manually approved to get access to the tool, but we assume all of those are just childhood problems.
Claude is so new, so it's really hard to say if it is better or worse than GPT-4 in a job of a developer helper, but it's definitely comparable, and you should probably give it a shot.
Unfortunately, the privacy policy of Anthropic is quite confusing, so we don't recommend posting confidential information to the chat yet.
Internet-accessing generative AI tools
The main disadvantage of ChatGPT, raised since it has generally been available, is no knowledge about recent events, news, and modern history. It's already partially fixed, so you can feed a context of the prompt with Internet search results. There are three tools worth considering for such usage.
Microsoft Bing
Microsoft Bing was the first AI-powered Internet search engine. It uses GPT to analyze prompts and to extract information from web pages; however, it works significantly worst than pure GPT. It has failed in almost all our programming evaluations, and it falls into an infinitive loop of the same answers if the problem is concealed. On the other hand, it provides references to the sources of its knowledge, can read transcripts from YouTube videos, and can aggregate the newest Internet content.
Chat-GPT with Internet access
The new mode of Chat-GPT (rolling out for premium users in mid-May 2023) can browse the Internet and scrape web pages looking for answers. It provides references and shows visited pages. It seems to work better than Bing, probably because it's GPT-4 powered compared to GPT-3.5. It also uses the model first and calls the Internet only if it can't provide a good answer to the question-based trained data solitary.
It usually provides better answers than Bing and may provide better answers than the offline GPT-4 model. It works well with questions you can answer by yourself with an old-fashion search engine (Google, Bing, whatever) within one minute, but it usually fails with more complex tasks. It's quite slow, but you can track the query's progress on UI.
Importantly, and you should keep this in mind, Chat-GPT sometimes provides better responses with offline hallucinations than with Internet access.
For all those reasons, we don't recommend using Microsoft Bing and Chat-GPT with Internet access for everyday information-finding tasks. You should only take those tools as a curiosity and query Google by yourself.
Perplexity
At first glance, Perplexity works in the same way as both tools mentioned – it uses Bing API and OpenAI API to search the Internet with the power of the GPT model. On the other hand, it offers search area limitations (academic resources only, Wikipedia, Reddit, etc.), and it deals with the issue of hallucinations by strongly emphasizing citations and references. Therefore, you can expect more strict answers and more reliable references, which can help you when looking for something online. You can use a public version of the tool, which uses GPT-3.5, or you can sign up and use the enhanced GPT-4-based version.
We found Perplexity better than Bing and Chat-GPT with Internet Access in our evaluation tasks. It's as good as the model behind it (GPT-3.5 or GPT-4), but filtering references and emphasizing them does the job regarding the tool's reliability.
For mid-May 2023 the tool is still free.
Google Bard
It's a pity, but when writing this text, Google's answer for GPT-powered Bing and GPT itself is still not available in Poland, so we can't evaluate it without hacky solutions (VPN).
Using Internet access in general
If you want to use a generative AI model with Internet access, we recommend using Perplexity. However, you need to keep in mind that all those tools are based on Internet search engines which base on complex and expensive page positioning systems. Therefore, the answer "given by the AI" is, in fact, a result of marketing actions that brings some pages above others in search results. In other words, the answer may suffer from lower-quality data sources published by big players instead of better-quality ones from independent creators. Moreover, page scrapping mechanisms are not perfect yet, so you can expect a lot of errors during the usage of the tools, causing unreliable answers or no answers at all.
Offline models
If you don't trust legal assurance and you are still concerned about the privacy and security of all the tools mentioned above, so you want to be technically insured that all prompts and responses belong to you only, you can consider self-hosting a generative AI model on your hardware. We've already mentioned 4 models from OpenAI (Whisper, Point-E, Jukebox, and CLIP), Tabnine, and CodeGeeX, but there are also a few general-purpose models worth consideration. All of them are claimed to be best-in-class and similar to OpenAI's GPT, but it's not all true.
Only free commercial usage models are listed below. We’ve focused on pre-trained models, but you can train or just fine-tune them if needed. Just remember the training may be even 100 times more resource consuming than usage.
Flan-UL2 and Flan-T5-XXL
Flan models are made by Google and released under Apache 2.0 license. There are more versions available, but you need to pick a compromise between your hardware resources and the model size. Flan-UL2 and Flan-T5-XXL use 20 billion and 11 billion parameters and require 4x Nvidia T4 or 1x Nvidia A6000 accordingly. As you can see on the diagrams, it's comparable to GPT-3, so it's far behind the GPT-4 level.
BLOOM
BigScience Large Open-Science Open-Access Multilingual Language Model is a common work of over 1000 scientists. It uses 176 billion parameters and requires at least 8x Nvidia A100 cards. Even if it's much bigger than Flan, it's still comparable to OpenAI's GPT-3 in tests. Actually, it's the best model you can self-host for free that we've found so far.

GLM-130B
General Language Model with 130 billion parameters, published by CodeGeeX authors. It requires similar computing power to BLOOM and can overperform it in some MMLU benchmarks. It's smaller and faster because it's bilingual (English and Chinese) only, but it may be enough for your use cases.
Summary
When we approached the research, we were worried about the future of developers. There are a lot of click-bite articles over the Internet showing Generative AI creating entire applications from prompts within seconds. Now we know that at least our near future is secured.
We need to remember that code is the best product specification possible, and the creation of good code is possible only with a good requirement specification. As business requirements are never as precise as they should be, replacing developers with machines is impossible. Yet.
However, some tools may be really advantageous and make our work faster. Using GitHub Copilot may increase the productivity of the main part of our job – code writing. Using Perplexity, GPT-4, or Claude may help us solve problems. There are some models and tools (for developers and general purposes) available to work with full discreteness, even technically enforced. The near future is bright – we expect GitHub Copilot X to be much better than its predecessor, we expect the general purposes language model to be more precise and helpful, including better usage of the Internet resources, and we expect more and more tools to show up in next years, making the AI race more compelling.
On the other hand, we need to remember that each helper (a human or machine one) takes some of our independence, making us dull and idle. It can change the entire human race in the foreseeable future. Besides that, the usage of Generative AI tools consumes a lot of energy by rare metal-based hardware, so it can drain our pockets now and impact our planet soon.
This article has been 100% written by humans up to this point, but you can definitely expect less of that in the future.

Tips on mastering the art of learning new technologies and transitioning between them
Learning new technologies is always challenging, but it is also crucial for self-development and broadening professional skills in today's rapidly developing IT world.
The process may be split into two phases: learning the basics and increasing our expertise in areas where we already have the basic knowledge . The first phase is more challenging and demanding. It often involves some mind-shifting and requires us to build a new knowledge system on which we don't have any information. On the other hand, the second phase, often called "upskilling," is the most important as it gives us the ability to develop real-world projects.
To learn effectively, it's important to organize the process of acquiring knowledge properly. There are several key things to consider when planning day-to-day learning. Let's define the basic principles and key points of how to apprehend new programming technologies. First, we'll describe the structure of the learning process.
Structure of the process of learning new technologies
Set a global but concrete goal
A good goal helps you stay driven. It's important to keep motivation high, especially in the learning basics phase, where we acquire new knowledge, which is often tedious. The goal should be concrete, e.g., "Learn AWS to build more efficient infrastructure," "Learn Spring Boot to develop more robust web apps," or "Learn Kubernetes to work on modern and more interesting projects." Focusing on such goals gives us the feeling that we know precisely why we keep progressing. This approach is especially helpful when we work on a project while learning at the same time, and it helps keep us motivated.
Set a technical task
Practical skills are the whole point of learning new technologies. Training in a new programming language or theoretical framework is only a tool that lays the foundation for practical application.
The best way to learn new technology is by practicing it. For this purpose, it’s helpful to set up test projects. Imagine which real-world task fits the framework or language you’re learning and try to write test projects for such a task. It should be a simplified version of an actual hypothetical project.
Focus on a small specific area that is currently being studied. Use it in the project, simplifying the rest of the setup or code. E.g., if you learn some new database framework, you should design entities, the code that does queries, etc, precisely and with attention to detail. At the same time, do only the minimum for the rest of the app. E.g., application configuration may be a basic or out-of-the-box solution provided by the framework.
Use a local or in-memory database. Don't spend too much time on setup or writing complicated business logic code for the service or controller layer. This will allow you to focus on learning the subject you’re interested in. If possible, it's also a good idea to keep developing the test app by adding another functionality that utilizes new knowledge as you walk through the learning path (rather than writing another new test project from scratch for each topic).
Theoretical knowledge learning
Theoretical knowledge is the background for practical work with a framework or programming language. This means we should not neglect it. Some core theoretical knowledge is always required to use technology. This is especially important when we learn something completely new. We should first understand how to think in terms of the paradigms or rules of the technology we're learning. Do some mind-shifting to understand the technology and its key concepts.
You need to develop your understanding of the basis on which the technology is built to such a level that you will be able to associate new knowledge with that base and understand how it works in relation to it. For example, functional programming would be a completely different and unknown concept for someone who previously worked only using OOP. To start using functional programming, it's not enough to know what a function is; we have to understand main concepts like lambda calculus, pure functions, high-level functions, etc., at least at a basic level.
Create a detailed plan for learning new technologies
Since we learn step by step, we need to define how to decompose our learning path for technology into smaller chunks. Breaking down the topics into smaller pieces can make it easier to learn. Rather than "learn Spring Boot" or "learn DB access with Spring," we should follow more granular steps like "learn Spring IoC," "learn Spring AOP," and "learn JPA."
A more detailed plan can make the learning process easier. While it may be clear that the initial steps should cover the basics and become more advanced with each topic, determining the order in which to learn each topic can be tricky. A properly made learning plan guarantees that our knowledge will be well-structured, and all the important information will be covered. Having such a plan also helps track progress.
When planning, it is beneficial to utilize modern tools that can help visualize the structure of the learning path. Tools such as Trello, which organizes work into boards, task lists, and workspaces, can be especially helpful. These tools enable us to visualize learning paths and track progress as we learn.
Revisit previous topics
When learning about technologies, topics can often have complex dependencies, sometimes even cyclical. This means that to learn one topic, we may need to have some understanding of another. It sounds complicated, but don’t let it worry you – our brain can deal with way more complex things.
When we learn, we initially understand the first topic on a basic level, which allows us to move on to the next topics. However, as we continue to learn and acquire further knowledge, our understanding of the initial topic becomes deeper. Revisiting previous topics can help us achieve a deeper and better understanding of the technology.
Tips on learning strategies
Now, let's explore some helpful tips for learning new technologies. These suggestions are more general and aimed at making the learning process more efficient.
Overcome reluctance
Extending our thinking or adding new concepts to what we know requires much effort. So, it's natural for our brain to resist. When we learn something new, we may feel uncomfortable because we don't understand the whole technology, even in general, and we see how much knowledge there is to be acquired within it.
Here are some tips that may be useful to make the learning process easier and less tiring.
1) Don't try to learn as much as possible. Focus on the basics within each topic first. Then, learn the key things required to its practical application. As you study more advanced topics, revisit some of the previous ones. This allows you to get a better and deeper understanding of the material.
2) Try to find some interesting topic that you enjoy exploring at the moment. If you have multiple options, pick the one you like the most. Learning is much more efficient if we study something that interests us. While working on some feature or task in the current or past project, you were probably curious about how certain things worked. Or you just like the architectural approach or pattern to the specific task. Finding a similar topic or concept in your learning plan is the best way to utilize such curiosity. Even if it's a bit more advanced, your brain will show more enthusiasm for such material than for something that is simpler but seems dull.
3) Split the task into intermediate, smaller goals. Learning small steps rather than deep diving into large topics is easier. The feeling of having accomplished intermediate goals helps to retain motivation and move forward.
4) Track the progress. It's not just a formality. It helps to ensure your velocity and keep track of the timing. If some steps take more time, tracking progress will allow you to adjust the learning plan accordingly. Moreover, observing the progress provides a feeling of satisfaction about the intermediate achievements.
5) Ask questions, even about the basics. When you learn, there is no such thing as a stupid question. If you feel stuck with some step of the learning plan, searching for help from others will speed up the process.
Learn new technologies systematically and frequently
Learning new technologies frequently with smaller portions is often more effective. Timing is crucial when acquiring new knowledge, and it may not be efficient to learn immediately after a long, intensive workday as our brains may feel exhausted. If we are working on projects in parallel with learning, we could set aside time in the morning to focus on learning. Alternatively, we could learn after work hours, but only after resting and if the tasks during our workday do not require too much concentration or mental effort.
Frequency is also important. E.g., an all-day learning session only one day per week is not as effective as spending 1-2 hours each day on acquiring knowledge. But it's just an example. Everyone should determine the optimal learning time-to-frequency ratio on their own, as it varies from person to person.
Experiment with new technology
A great way to learn is by exploring new technology. Trying to do the same task with different approaches gives a better understanding of how we may use the framework or programming language. Experimentation can improve our understanding of technology in a similar way to gaining experience on real projects. We can improve our knowledge and understanding of the technology by solving similar tasks while working on different projects or features.
Explain it to others
Explaining to someone else helps us structure and organize our own knowledge. Even if we don't fully understand the topic, explaining it may help us connect the dots. The trick here is that when we describe something to someone, we repeat and rethink our knowledge. In such a way, we consolidate some parts that we know but don't fully understand, or that simply aren't connected.
Summary
This article described the key points of organizing how to learn new technologies. We described the main approaches to structuring learning and provided some steps to take. A properly structured and well-organized learning process makes gaining new technical knowledge efficient and easy.