Building an easy to maintain, reusable user interface on macOS

The value of the user interface
What you see inside an app is called the user interface (UI). Undoubtedly, it is an important part of every software, and it’s no piece of cake to wrap the business logic with a fancy, (self-explanatory) and efficient visual representation.
How many times in your life have you heard not to judge the book by its cover? Probably quite a few. And how many times have you left an application and never came back just because you didn’t like the design at first sight? Probably more than just a few times.
At Grape Up, we achieve a successful UI through close cooperation between our software engineers (SE) and designers. And this article is about the software engineer’s part – programming UI for the macOS platform .
Programming user interface in Cocoa
Cocoa, an original name given to the Application Programming Interface (API) used for building Mac apps. It is fully responsible for the appearance of apps, their distinctive feel and responsiveness to user actions. The tool automates and simplifies many aspects of UI programming to comply with Apple's human interface guidelines (AHIG). It provides software engineers with several tools for UI development:
- Storyboards
- XIBs
- Custom code
Each of them gives the possibility to implement not only a fully functional, but also an incredibly useful and captivating UI. Having used all three of them at Grape Up, we could give you a comparative analysis of each tool, but we will not be discussing it here.
Why is it better to use XIBs and Storyboards?
Of course, it would be wrong to state that XIBs or Storyboards are simply better than the Custom code. Like always, there is no “silver bullet” – no universal approach or solution for every software development problem. On some occasions the Interface Builder (IB) won’t be helpful to achieve the desired appearance. However, years of hands-on experience backed up by numerous projects have allowed us to draw the following conclusions as to why it’s better to use the Interface Builder on a regular basis:
It’s easy to understand and update
Let’s say that the software engineer needs to deliver an update to an already existing container view with a number of subviews. In what case will he spend less time getting familiar with the existing solution and applying the update? When using XIB with visualized UI elements and layout constraints or when the UI is scripted in several hundred lines of code?
Another example, let’s imagine a set of very similar but still different views. The software engineer needs to extend this set with another view. In what case will he not duplicate the already existing solution and reuse it instead? These are a few examples of regular SE tasks.
In practice, most of the times you would expect the UI to be available in XIB/Storyboard, and not in the code. We can consider XIBs/Storyboards as a public high-level API which encapsulates all the details underneath. IB design will provide a better general overview as well as decrease the chance of missing something.
One of the biggest arguments against XIBs are merge conflicts. Usually, they are caused by not paying enough attention to decomposing tasks during the project. Which is exactly why we practice task decomposition, a project technique that breaks down the workload and tasks into smaller ones before the actual creation of the entire work structure. Thanks to this, we are able to save a lot of time in the long run. By using IB, you can create as much granular UI elements as you want. Moreover, this a proper way of targeting a reusable and easy to update User Interface.
It helps avoid mistakes and saves time
Another great advantage of the Interface Builder is the fact that software engineers can get away with plenty of the so called “dirty work”, such as objects initialization, configuration, basic constraints management, etc. The UI can be implemented faster and with less code. By using IB, the engineer simply follows the rule – “Less code produces less bugs”.
It generates warnings and errors
The warnings and errors generated by the Interface Builder when working with an Auto Layout engine: unsatisfiable layouts, ambiguous layouts, logical errors. Raised issues are quite descriptive and self-explanatory. In many cases, the IB even suggests a solution. Thanks to the mentioned issues it is a lot easier to prepare a proper and functional UI before even building the application. Which would rather be impossible to achieve when programming UI in code. With that said we can say that the IB is a great tool for both creating and testing the UI.
It accelerates the development cycle
The next useful feature that is available in IB is Previews. Thanks to it, the application interface can be previewed using the assistant editor, which displays a secondary editor side-by-side with the main one. It gives the possibility to check the designed Auto Layout on the fly and also significantly reduces development cycle time. Such feature is especially helpful when supporting multiple localizations.
It helps educate new team members
As we all know, during the project life time engineers leave and join the team. To make the onboarding process smooth and effective, we introduce new team members to a UI which is organized in XIB files or in Storyboards. As a result, they are given a complete overview of the application’s functionalities. After all, we all know how the saying goes– “Human brains prefer a visual content over the textual one”.
XIBs and Storyboards extended use cases
Is there a better way of organizing your User Interface designs than just keeping them in your Resources folder? Of course. Why not organize them in a library or a framework? Having a UI framework with all the custom views (XIBs) along with controllers to manage them can be quite convenient. After all, having UI elements in visual representation and keeping them atomic enough guarantees extensibility, manageability and reusability. For those that work on big, stretched over time projects it might be really useful.
Conclusion - providing an easy to maintain user interface
The modern world is all about information and the ways of transferring, processing as well as selling it. Why bother yourself with some boring symbols if there already are more fascinating ways of dealing with it right around the corner? The Interface Builder delivers a quick, convenient and reliable way for programming your UI. So, let’s save us some time for a mutual discussion.

Grape Up guides enterprises on their data-driven transformation journey
Ready to ship? Let's talk.
Check related articles
Read our blog and stay informed about the industry's latest trends and solutions.
Using Azure DevOps Platform for configurable builds of a multicomponent iOS application
In this article, we share our experience with building CI/CD for a multicomponent multi-language project. The article describes the structure of the pipeline set up and focuses on two important features needed in our project’s automation workflow: pipeline chaining and build variants.
The CI/CD usage is a standard in any application development process . Mobile apps are no exception here.
In our project, we have several iOS applications and libraries. Each application uses several components (frameworks) written in different languages. The components structure is as in the picture below:
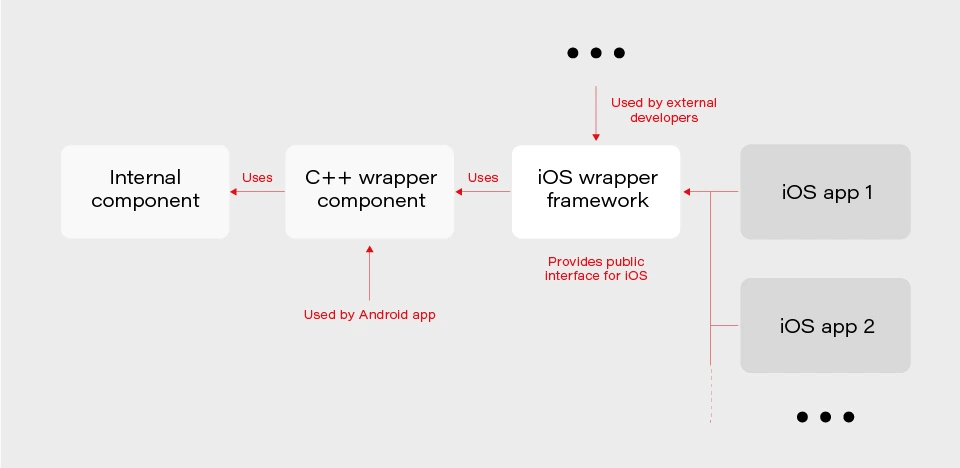
The internal component contains all the core (domain) logic that apps use. The first two components are C/C++ based and are compiled as frameworks. The wrapper framework provides an Objective-C/Swift layer that is necessary for using it in an iOS application. There are several iOS applications that are using the wrapper framework. Additionally, this framework is also used by external developers in their own applications.
The wrapper framework should be built for both x86_64 and arm64 architecture to be used on both a simulator and a real iOS device. Also, we need a debug and release version for each architecture. When it comes to applications each of them may be built for AppStore, internal testing (Ad-Hoc) or TestFlight beta testing.
Without an automated CI/CD system, it would be extremely inefficient to build the whole chain of components manually. As well as to track the status of merges/pull requests for each component. That is to control if the component is still building after the merge. Let’s see how our pipelines are organized.
Using Azure DevOps pipelines
For building CI/CD, we’ve chosen Azure DevOps. We use Azure Pipelines for building our components and Azure Artifacts to host the built components, as well as several external 3rd party libraries.
To check the integrity and track the build status of each component, we have special integration pipelines that are integrated with GitHub. That is, each pull request that is going to be merged to the development branch of a particular component triggers this special integration pipeline.
For regular builds, we have pipelines based on the purpose of each branch type: experimental, feature, bugfix, development, and master.
Since each component depends on another component built on Azure, we should somehow organize the dependency management. That is versioning of the dependent components and their download. Let’s take a look at our approach to dependency management.
Dependency management
Azure provides basic CLI tools to manipulate pipelines. We may use it to download dependencies (inform of Azure artifacts) required to build a particular component. At a minimum, we need to know the version, configuration (debug or release) and architecture (x86_64 or arm64) of a particular dependency. Let’s take a look at the options that Azure CLI gives us:
az artifacts universal download \
--organization "${Organization}" \
--feed "${Feed}" \
--name "${Name}" \
--version "${Version}" \
--path "${DownloadPath}"
The highlighted parameters are the most important for us. The CLI does not provide explicit support of build configuration or architecture. For this purpose, we simply use the name (specified as --name parameter) that has a predefined format:
<component name>-<configuration>-<architecture>
This makes it possible to have components of the same version with different architecture and build configurations.
The other aspect is how to store info about version, configuration, etc., for each dependency. We’ve decided to use the git config format to store this info. It’s pretty easy to parse using git config and does not require any additional parsing tool. So, each component has its own dependencies.config file. Below is the example file for component dependent on two frameworks:
[framework1]
architecture = "arm64"
configuration = "release"
version = "1.2.3.123"[framework2]
architecture = "arm64"
configuration = "release"
version = "3.2.1.654"
To make it possible to download dependencies as part of the build process, we have a special script that manages dependencies. The script is run as a build phase of the Xcode project of each component. Below are the basic steps the script does.
1. Parse dependencies.config file to get version, architecture, and configuration. The important thing here is that if some info is omitted (e.g. we may not specify build configuration in dependencies.config file) script will use the one the dependent component is being built with. That is, when we build the current component for the simulator script will download dependencies of simulator architecture.
2. Form artifact’s name and version and forward them to az artifacts universal download command .
There are two key features of our build infrastructure: pipeline chaining and build variants support. They cover two important cases in our project. Let’s describe how we implemented them.
Chaining pipelines
When a low-level core component is updated, we want to test these changes in the application. For this purpose, we should build the framework dependent on the core component and build the app using this framework. Automation here is extremely useful. Here’s how it looks like with our pipelines.
1. When a low-level component (let’s call it component1 ) is changed on a specific branch (e.g., integration), a special integration pipeline is triggered. When a component is built and an artifact is published, the pipeline starts another pipeline that will build the next dependent component. For this purpose, az pipelines build queue command is used as follows:
az pipelines build queue \
--project "component2" \
--branch "integration" \
--organization "${Organization}" \
--definition-name "${BuildDefinition}" \
--variables \
"config.pipeline.component1Version=${BUILD_BUILDNUMBER}" \
“config.pipeline.component1Architecture=${CurrentArchitecture}" \
"config.pipeline.component1Configuration=${CurrentConfiguration}"
This command starts the pipeline for building component2 (the one dependent on component1 ).
The key part is passing the variables config.pipeline.component1 Version, config.pipeline.component1Architecture and config.pipeline.component1Configuration to the pipeline. These variables define the version, build configuration, and architecture of component1 (the one being built by the current pipeline) that should be used to build component2 . The command overrides the corresponding values from dependencies.config file of component2 . This means that the resulting component2 will use newly built component1 dependency instead of the one defined by dependencies.config file.
2. When component2 is built, it uses the same approach to launch the next pipeline for building a subsequent component.
3. When all the components in the chain required by the app are ready, the integration pipeline building the app is launched. As a part of its build process, the app is sent to TestFlight.
So, simply pushing changes of the lowest level component to the integration branch gives you a ready-to-test app on TestFlight.
Build variants
Some external developers that use the wrapper iOS framework may need additional features that should not be available in regular public API intended for other developers. This brings us to the need of having different variants of the same component. Such variants may be distinct in different features, or in behavior of the same features.
Additional methods or classes may be provided as a specific or experimental API in a wrapper framework for iOS. The other use case is to have behavior different than the default one for regular (official) public API in the wrapper framework. For instance, a method that writes an image file to a specified directory in some cases may be required to also write additional files along with the image (e.g., file with image processing settings or metadata).
Going further, an implementation may be changed not only in the iOS framework itself but also in its dependencies. As described previously, core logic is implemented in a separate component and iOS framework is dependent on. So, when some code behavior change is required by a particular build variant, most likely it will also be done in the internal component.
Let’s see how to better implement build variants. The proper understanding of use cases and potential extension capabilities are crucial for choosing the correct solution.
The first important thing is that in our project different build variants have few changes in API compared to each other. Usually, a build variant contains a couple of additional methods or classes. Most part of the code is the same for all variants. Inside implementation, there also may be some distinctions based on the concrete variant we’re building. So, it would be enough to have some preprocessor definition (active compilation conditions for Swift) indicating which build variant is being built.
The second thing is that the number of build variants is often changed. Some may be removed, (e.g., when an experimental API becomes generally accessible.) On the other hand, when an external developer requests another specific functionality, we need to create a new variant by slightly modifying the standard implementation or exposing some experimental/internal API. This means that we should be able to add or remove build variants fast.
Let’s now describe our implementation based on the specifics given above. There are two parts of the implementation. The first one is at the pipeline level.
Since we may often add/remove our build variants, creating a pipeline for each build variant is obviously not a good idea. Instead, we add a special variable config.pipeline.buildVariant in the pipeline’s Variables to each pipeline that is supposed to be used for building different variants. The variable should be added to pipelines of all the components the resulting iOS framework depends on because a specific feature often requires code changes, not only in the iOS framework itself but also in its dependencies. Pipeline implementation then will use this variable e.g., for downloading specific dependencies required by a particular variant, tagging build to indicate the variant, and, of course, providing the corresponding build setting to Xcode build command.
The second part is a usage of the build variant setting provided by the pipeline inside the Xcode project. Using Xcode build settings we’re adding a compile-time constant (preprocessor definition for Objective C/C++ code and compilation conditions for Swift) that reflect the selected build variant. It is used to control which functionality to compile. This build settings may also be used to choose to build variant-specific resources to be embedded into the framework.
When chaining pipelines we just pass the variable to next pipeline:
az pipelines build queue \
--project "component2" \
--branch "integration" \
--organization "${Organization}" \
--definition-name "${BuildDefinition}" \
--variables \
"config.pipeline.component1Version=${BUILD_BUILDNUMBER}" \
"config.pipeline.component1Architecture=${CurrentArchitecture}" \
"config.pipeline.component1Configuration=${CurrentConfiguration}" \
“config.pipeline.buildVariant=${CONFIG_PIPELINE_BUILDVARIANT}"
Summary
In this article, we’ve described our approach to multi-component app CI/CD infrastructure based on Azure . We’ve focused on two important features of our build infrastructure: chaining component builds and building different variants of the same component. It’s worth mentioning that the described solution is not the only correct one. It's rather the most optimal that fits our needs. You may experiment and try different approaches utilizing a flexible developed pipeline system that Azure provides.
Interested in our services?
Reach out for tailored solutions and expert guidance.