Continuous deployment of iOS apps with Fastlane

Automation helps with all the mundane and error-prone tasks that developers need to do on a daily basis. It also saves a lot of time. For automating iOS beta deployment, a very popular tool is Fastlane. The tools automate entire iOS CI/CD pipelines and allow us to keep an iOS infrastructure as code. Today I will share my observations and tips regarding setting up fastlane for iOS project.
Setting up Jenkins
Jenkins is an open-source automation server, but you can use fastlane on your local machine too. However, a separate build server can certainly help you create a more streamlined process.
The Jenkins installation process is pretty straightforward, so I will not be going into details here. But there are some quirks that we should take into consideration.
To elevate the problem with detached HEAD, we should provide Branch Specifier with „origin” e.g. „origin/master” and choose the option Check out to specific local branch with branch name including ** . For more details, see the Jenkins' help.
All the tool commands should be put in the Execute shell phase.
Setting up Fastlane
Fastlane is used to simplify deployment of iOS and Android apps. It is well documented and its community always tries to help in case of any bugs etc. We can install it using Homebrew or RubyGems and I personally recommend using the latter. I stumbled upon some problems during installation of fastlane plugins after using `brew` to install fastlane.
To integrate the tool with our project, we should open its directory in terminal and type:
fastlane init
It will start a very intuitive creator that guides us through the process of setting up fastlane for our project. After this process is finished, we have configured it. Now we can customize and create new lanes.
Fastlane lanes are written in Ruby. Even if you are unfamiliar with this programming language, learning the basics that are needed to configure it shouldn't take too long. There is also a version of fastlane that supports Swift. However, it is still in beta.
Fastlane tips
The tool provides a few ways of handling code signing e.g. „cert” and „sigh” or „match”. However, if you plan to use fastlane mainly on CI/CD server you can rely on automatic code by signing in Xcode and installing the certificates manually on that machine. In that case you don't need to use any of those actions in your lanes.
If you prefer to move your Fastfile (fastlane configuration file) to a different directory than the project's directory, you will have to provide manually paths to the actions. In that case it is better to use absolutes paths since when you just use ../ prefix you may end up in a different directory that you would expect.
Error block error do |lane, exception| is very useful for error notifications. For example, you can post message to Slack when lane executed by the CI server failed.

Grape Up guides enterprises on their data-driven transformation journey
Ready to ship? Let's talk.
Check related articles
Read our blog and stay informed about the industry's latest trends and solutions.
5 concourse CI tips: How to speed up your builds and pipeline development
With ever-growing IT projects, automation is nowadays a must-have. From building source code and testing to versioning and deploying, CI/CD tools were always the anonymous team member, who did the job no developer was eager to do. Today, we will take a look at some tips regarding one of the newest tools - Concourse CI. First, we will speed up our Concourse jobs, then we’ll ease the development of the new pipelines for our projects.
Aggregate your steps
By default, Concourse tasks in a job are executed separately. This is perfectly fine for small Concourse jobs that last a minute or two. It also works well at the beginning of the project, as we just want to get the process running. But at some point, it would be nice to optimize our builds.
The simplest way to save time is to start using the aggregate keyword. It runs all the steps declared inside of it in parallel. This leads to time-savings in both - script logic execution and in the overhead that occurs when starting the next task.
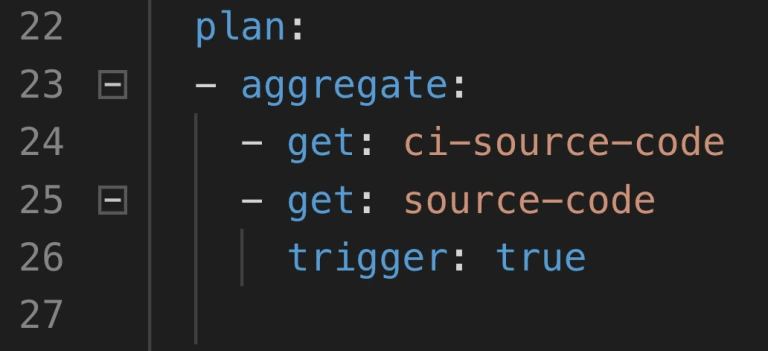
Neat, so where can we use it? There are 2 main parts of a job where the aggregation is useful:
1. Resource download and upload.
2. Tests execution.
Get and put statements are ideal targets because download and upload of resources are usually completely independent. Integration tests, contract tests, dependency vulnerabilities tests, and alike are also likely candidates if they don’t interfere with one another. Project build tasks? Probably not, because those are usually sequential and we require their output to proceed.
How much time can aggregating save? Of course, it depends. Assuming we can’t aggregate steps that build and test our code, we do get the advantage of simultaneous upload and download of our resources as well as we get less visible step-to-step overhead. We usually save up to two, maybe even three minutes. The largest saving we got was from over half an hour to below ten minutes. Most of the saved time came from running test-related tasks in parallel.
Use docker images with built-in tools
This improvement is trickier to implement but yields a noticeable build time gains. Each task runs in a container, and the image for that container has a certain set of tools available. At some point in the project comes a time where no available image has the tool required. First thing developers do is they download that tool manually or install it using a package manager as a part of the task execution. This means that the tool is fetched every time the task runs. On top of that, the console output is flooded with tool installation logs.
The solution is to prepare a custom container image that already has everything needed for a task to complete. This requires some knowledge not directly related to Concourse, but for example to Docker. With a short dockerfile and a couple of terminal commands, we get an image with the tools we need.
1. Create dockerfile.
2. Inside of the file, install or copy your tools using RUN or COPY commands.
3. Build the image using docker build.
4. Tag and push the image to the registry.
5. Change image_resource part in your Concourse task to use the new image.
That’s it, no more waiting for tools to install each time! We could even create a pipeline to build and push the image for us.
Create pipelines from a template
Moving from time-saving measures to developer convenience tips, here’s one for bigger projects. Those usually have a certain set of similar build pipelines with the only differences being credentials, service names, etc. - parameters that are not hardcoded in the pipeline script and are injected at execution time from a source like CredHub. This is typical for Cloud Foundry and Kubernetes web projects with microservices. With a little bit of creativity, we could get a bash or python script to generate those pipelines from a single template file.
First, we need to have a template file. Take one of your existing pipeline specifications and substitute parameter names with their pipeline agnostic version. Our script needs to loop over a pipeline names list, substitute generic parameter names with proper pipeline related ones that are available in Credhub and then set the pipeline in Concourse with the fly CLI.
The second part of the equation here is a Concourse job that watches for changes in the template file in a Git repository and starts the pipeline generation script. With this solution, we have to change only one file to get all pipelines updated, and on top of that, a commit to pipeline repository is sufficient to trigger the update.
Log into a task container to debug issues
When debugging Concourse task failures, the main source of information on failure is the console. A quick glance at the output is enough to solve most of the problems. Other issues may require a quick peek into the environment of an unsuccessful task. We can do that with fly intercept command.
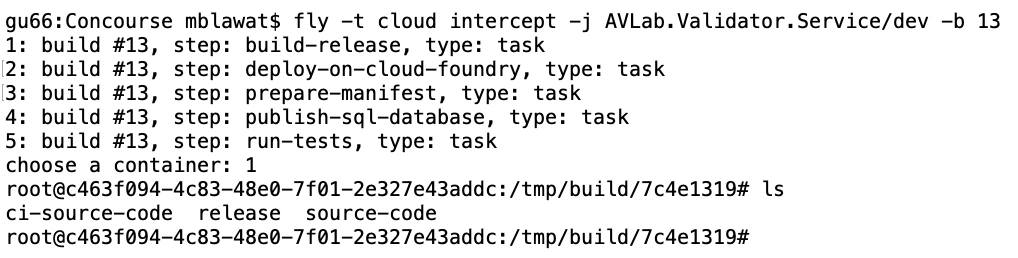
Fly intercept allows us to log into a container that executed a specific task in a specific job run. Inside we can see the state of the container when task finished and can try to find the root of failure. There may be an empty environment variable - we forgot to set the proper param in a yml file. The resource has a different structure inside of it - we need to change the task script or the resource structure. When the work is done, don’t forget to log out of the container. Oh, and don’t wait too long! Those containers can be disposed of by Concourse at any time.
Use Visual Studio Code Concourse add-on
The last thing I want to talk about is the Concourse CI Pipeline Editor for Visual Studio Code. It’s a plugin that offers suggestions, documentation popups, and error checking for Concourse yml files. If you use the pipeline template and generation task from the previous tip, then any syntax error in your template will be discovered as late as the update task updating the pipelines from the template. That’s because you won’t run fly set-pipeline yourself. Fixing such issue requires a new commit in the pipeline repository.
With the plugin, any unused resource or a typo in property name will be detected immediately. Add-on will also help you write new pieces of automation code by suggesting keywords and showing available values for Concourse commands. The only action required is to update the files.associations section in the settings. We use separate directories for pipelines and tasks, so we have set it up as follows:

Conclusion
And that’s it! We hope you have found at least one tip useful and will use it in your project. Aggregate is an easy one to implement, and it’s good to have a habit of aggregating steps from the start. Custom images and pipeline templates are beneficial in bigger projects where they help keep CI less clunky. Finally, fly intercept and the VSC add-on are just extra tools to save time during the pipeline development.
ASP.NET core CI/CD on Azure Pipelines with Kubernetes and Helm
Due to the high entry threshold, it is not that easy to start a journey with Cloud Native. Developing apps focused on reliability and performance, and meeting high SLAs can be challenging. Fortunately, there are tools like Istio which simplify our lives. In this article, we guide you through the steps needed to create CI/CD with Azure Pipelines for deploying microservices using Helm Charts to Kubernetes. This example is a good starting point for preparing your development process. After this tutorial, you should have some basic ideas about how Cloud Native apps should be developed and deployed .
Technology stack
- .NET Core 3.0 (preview)
- Kubernetes
- Helm
- Istio
- Docker
- Azure DevOps
Prerequisites
You need a Kubernetes cluster, free Azure DevOps account, and a docker registry. Also, it would be useful to have kubectl and gcloud CLI installed on your machine. Regarding the Kubernetes cluster, we will be using Google Kubernetes Engine from Google Cloud Platform, but you can use a different cloud provider based on your preferences. On GCP you can create a free account and create a Kubernetes cluster with Istio enabled ( Enable Istio checkbox). We suggest using a machine with 3 standard nodes.
Connecting the cluster with Azure Pipelines
Once we have the cluster ready, we have to use kubectl to prepare service account which is needed for Azure Pipelines to authenticate. First, authenticate yourself by including necessary settings in kubeconfig. All cloud providers will guide you through this step. Then following commands should be run:
kubectl create serviceaccount azure-pipelines-deploy
kubectl create clusterrolebinding azure-pipelines-deploy --clusterrole=cluster-admin --serviceaccount=default:azure-pipelines-deploy
kubectl get secret $(kubectl get secrets -o custom-columns=":metadata.name" | grep azure-pipelines-deploy-token) -o yaml
We are creating a service account, to which a cluster role is assigned. The cluster-admin role will allow us to use Helm without restrictions. If you are interested, you can read more about RBAC on Kubernetes website . The last command is supposed to retrieve secret yaml , which is needed to define connection - save that output yaml somewhere.
Now, in Azure DevOps, go to Project Settings -> Service Connections and add a new Kubernetes service connection. Choose service account for authentication and paste the yaml copied from command executed in the previous step.
One more thing we need in here is the cluster IP. It should be available at cluster settings page, or it can be retrieved via command line. In the example, for GCP command should be similar to this:
gcloud container clusters describe --format=value(endpoint) --zone
Another service connection we have to define is for docker registry. For the sake of simplicity, we will use the Docker hub, where all you need is just to create an account (if you don’t have one). Then just supply whatever is needed in the form, and we can carry on with the application part.
Preparing an application
One of the things we should take into account while implementing apps in the Cloud is the Twelve-Factor methodology. We are not going to describe them one by one since they are explained good enough here but few of them will be mentioned throughout the article.
For tutorial purposes, we’ve prepared a sample ASP.NET Core Web Application containing a single controller and database context. It also contains simple dockerfile and helm charts. You can clone/fork sample project from here . Firstly, push it to a git repository (we will use Azure DevOps), because we will need it for CI. You can now add a new pipeline, choosing any of the available YAML definitions. In here we will define our build pipeline (CI) which looks like that:
trigger:
- master
pool:
vmImage: 'ubuntu-latest'
variables:
buildConfiguration: 'Release'
steps:
- task: Docker@2
inputs:
containerRegistry: 'dockerRegistry'
repository: '$(dockerRegistry)/$(name)'
command: 'buildAndPush'
Dockerfile: '**/Dockerfile'
- task: PublishBuildArtifacts@1
inputs:
PathtoPublish: '$(Build.SourcesDirectory)/charts'
ArtifactName: 'charts'
publishLocation: 'Container'
Such definition is building a docker image and publishing it into predefined docker registry. There are two custom variables used, which are dockerRegistry (for docker hub replace with your username) and name which is just an image name (exampleApp is our case). The second task is used for publishing artifact with helm chart. These two (docker image & helm chart) will be used for the deployment pipeline.
Helm charts
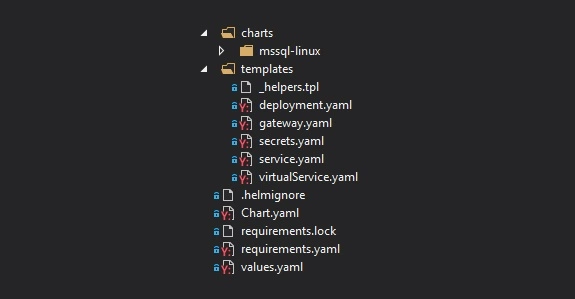
Firstly, take a look at the file structure for our chart. In the main folder, we have Chart.yaml which keeps chart metadata, requirements.yaml with which we can specify dependencies or values.yaml which serves default configuration values. In the templates folder, we can find all Kubernetes objects that will be created along with chart deployment. Then we have nested charts folder, which is a collection of charts added as a dependency in requirements.yaml. All of them will have the same file structure.
Let’s start with a focus on the deployment.yaml - a definition of Deployment controller, which provides declarative updates for Pods and Replica Sets. It is parameterized with helm templates, so you will see a lot of {{ template [...] }} in there. Definition of this Deployment itself is quite default, but we are adding a reference for the secret of SQL Server database password. We are hardcoding ‘-mssql-linux-secret’ part cause at the time of writing this article, helm doesn’t provide a straightforward way to access sub-charts properties.
env:
- name: sa_password
valueFrom:
secretKeyRef:
name: {{ template "exampleapp.name" $root }}-mssql-linux-secret
key: sapassword
As we mentioned previously, we do have SQL Server chart added as a dependency. Definition of that is pretty simple. We have to define the name of the dependency, which will match the folder name in charts subfolder and the version we want to use.
dependencies:
- name: mssql-linux
repository: https://kubernetes-charts.storage.googleapis.com
version: 0.8.0
[...]
For the mssql chart, there is one change that has to be applied in the secret.yaml . Normally, this secret will be created on each deployment ( helm upgrade ), it will generate a new sapassword - which is not what we want. The simplest way to adjust that is by modifying metadata and adding a hook on pre-install. This will guarantee that this secret will be created just once on installing the release.
metadata:
annotations:
"helm.sh/hook": "pre-install"
A deployment pipeline
Let’s focus on deployment now. We will be using Helm to install and upgrade everything that will be needed in Kubernetes. Go to the Releases pipelines on the Azure DevOps, where we will configure continuous delivery. You have to add two artifacts, one for docker image and second for charts artifact. It should look like on the image below.
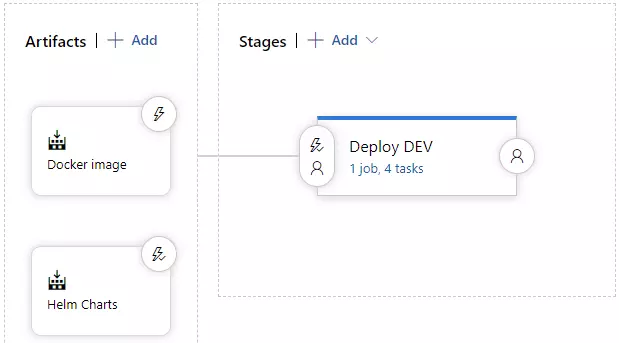
On the stages part, we could add a few more environments, which would get deployed in a similar manner, but to a different cluster. As you can see, this approach guarantees Deploy DEV stage is simply responsible for running a helm upgrade command. Before that, we need to install helm, kubectl and run helm init command.
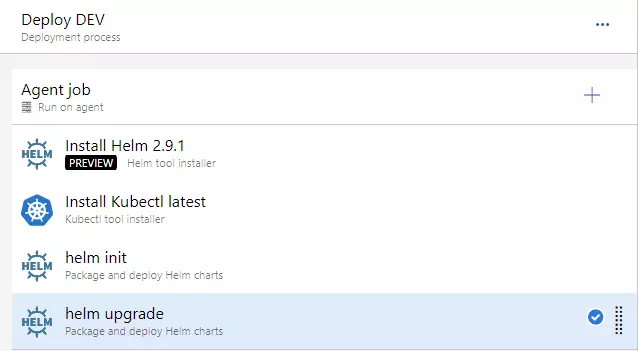
For the helm upgrade task, we need to adjust a few things.
- set Chart Path, where you can browse into Helm charts artifact (should look like: “$(System.DefaultWorkingDirectory)/Helm charts/charts”)
- paste that “image.tag=$(Build.BuildNumber)” into Set Values
- and check to Install if release not present or add --install ar argument. This will behave as helm install if release won’t exist (i.e. on a clean cluster)
At this point, we should be able to run the deployment application - you can create a release and run deployment. You should see a green output at this point :).
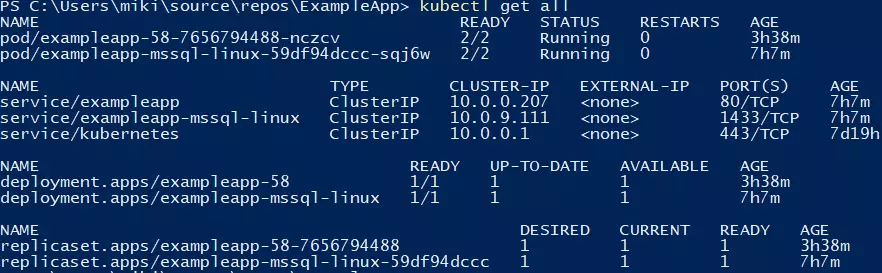
You can verify if the deployment went fine by running a kubectl get all command.
Making use of basic Istio components
Istio is a great tool, which simplifies services management. It is responsible for handling things like load balancing, traffic behavior, metric & logs, and security. Istio is leveraging Kubernetes sidecar containers, which are added to pods of our applications. You will have to enable this feature by applying an appropriate label on the namespace.
kubectl label namespace default istio-injection=enabled
All pods which will be created now will have an additional container, which is called a sidecar container in Kubernetes terms. That’s a useful feature, cause we don’t have to modify our application.
Two objects that we are using from Istio, which are part of the helm chart, are Gateway and VirtualService . For the first one, we will bring Istio definition, because it’s simple and accurate: “Gateway describes a load balancer operating at the edge of the mesh receiving incoming or outgoing HTTP/TCP connections”. That object is attached to the LoadBalancer object - we will use the one created by Istio by default. After the application is deployed, you will be able to access it using LoadBalancer external IP, which you can retrieve with such command:
kubectl get service/istio-ingressgateway -n istio-system
You can retrieve external IP from the output and verify if http://api/examples url works fine.
Summary
In this article, we have created a basic CI/CD which deploys single service into Kubernetes cluster with the help of Helm. Further adjustments can include different types of deployment, publishing tests coverage from CI or adding more services to mesh and leveraging additional Istio features. We hope you were able to complete the tutorial without any issues. Follow our blog for more in-depth articles around these topics that will be posted in the future.
Interested in our services?
Reach out for tailored solutions and expert guidance.