Kafka transactions - integrating with legacy systems

The article covers setting up and using Kafka transactions, specifically in the context of legacy systems that run on JPA/JMS frameworks. We look at various issues that may occur from using different TransactionManagers and how to properly use these different transactions to achieve desired results. Finally, we analyze how Kafka transactions can be integrated with JTA.
Many legacy applications were built on JMS consumers with the JPA database, relying on transactions to ensure exactly-once delivery. These systems rely on the stability and surety of transactional protocols so that errors are avoided. The problem comes when we try to integrate such systems with newer systems built upon non-JMS/JPA solutions – things like Kafka, MongoDB, etc.
Some of these systems, like MongoDB , actively work to make the integration with legacy JMS/JPA easier. Others, like Kafka, introduce their own solutions to such problems. We will look more deeply into Kafka and the ways we can integrate it with our legacy system.
If you want some introduction to Kafka fundamentals, start with this article covering the basics .
Classic JMS/JPA setup
First, let us do a quick review of the most common setups for legacy systems. They often use JMS to exchange messages between different applications, be it IBM MQ, RabbitMQ, ActiveMQ, Artemis, or other JMS providers – these are used with transactions to ensure exactly-once delivery. Messages are then processed in the application, oftentimes saving states in a database via JPA API using Hibernate/Spring Data to do so. Sometimes additional frameworks are used to make the processing easier to write and manage, but in general, the processing may look similar to this example:
@JmsListener(destination = "message.queue")
@Transactional(propagation = Propagation.REQUIRED)
public void processMessage(String message) {
exampleService.processMessage(message);
MessageEntity entity = MessageEntity.builder().content(message).build();
messageDao.save(entity);
exampleService.postProcessMessage(entity);
messageDao.save(entity);
jmsProducer.sendMessage(exampleService.createResponse(entity));
}
Messages are read, processed, saved to the database, processed further, updated in the database, and the response is sent to a further JMS queue. It is all done in a transactional context in one of two possible ways:
1) Using a separate JMS and JPA transaction during processing, committing a JPA transaction right before committing JMS.
2) Using JTA to merge JMS and JPA transactions so that both are committed or aborted at the same time.
Both solutions have their upsides and pitfalls; neither of them fully guarantees a lack of duplicates, though JTA definitely gives better guarantees than separate transactions. JTA also does not run into the problem of idempotent consumers, it does, however, come with an overhead. In either case, we may run into problems if we try to integrate this with Kafka.
What are Kafka transactions?
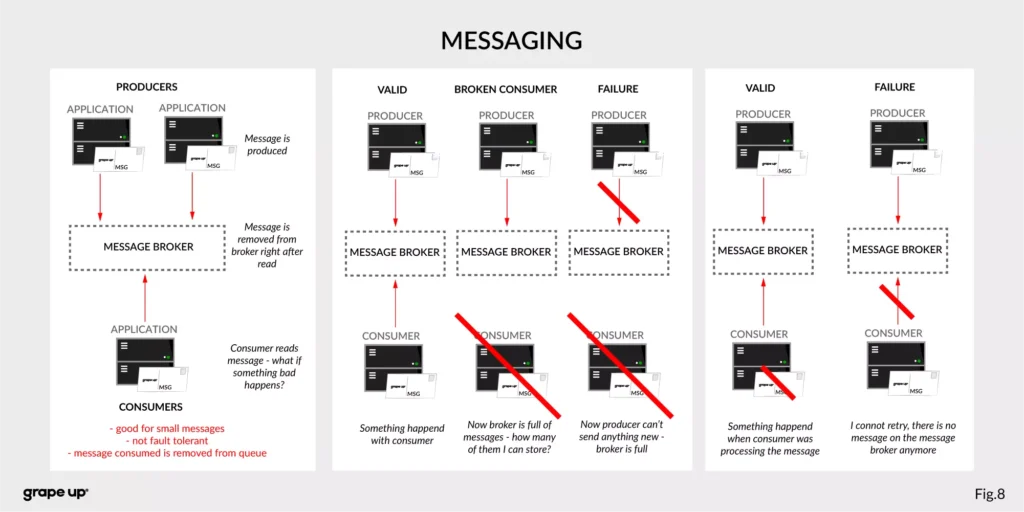
Kafka broker is fast and scalable, but the default mode in which it runs does not hold to exactly-once message delivery guarantee. We may see duplicates, or we may see some messages lost depending on circumstances, something that old legacy systems based on transactions cannot accept. As such, we need to switch Kafka to transactional mode, enabling exactly-once guarantee.
Transactions in Kafka are designed so that they are mainly handled on the producer/message broker side, rather than the consumer side. The consumer is effectively an idempotent reader, while the producer/coordinator handle the transaction.
This reduces performance overload on the consumer side, though at the cost of the broker side. The flow looks roughly like this:
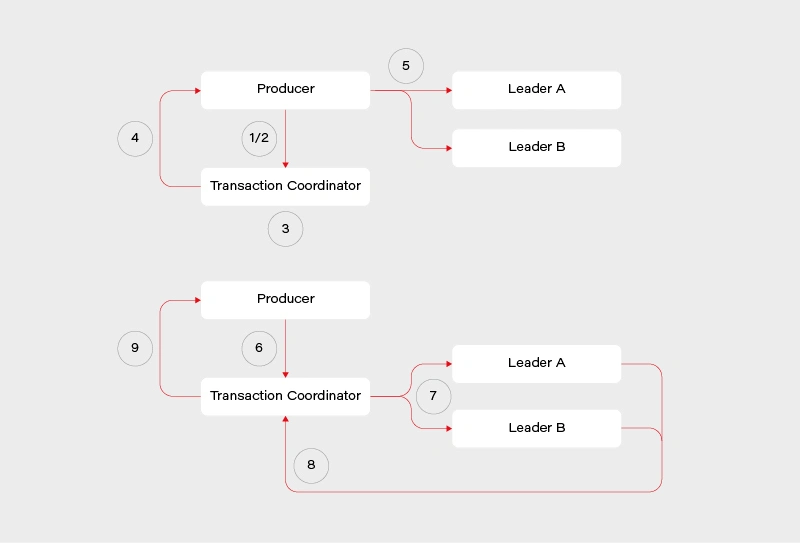
1) Determine which broker is the coordinator in the group
2) Producer sends beginTransaction() request to the coordinator
3) The coordinator generates transaction-id
4) Producer receives a response from the coordinator with transaction-id
5) Producer sends its messages to the leading brokers of data partitions together with transaction-id
6) Producer sends commitTransaction() request to the coordinator and awaits the response
7) Coordinator sends commitTransaction() request to every leader broker and awaits their responses
8) Leader brokers set the transaction status to committed for the written records and send the response to the coordinator
9) Coordinator sends transaction result to the producer
This does not contain all the details, explaining everything is beyond the scope of this article and many sources can be found on this. It does however give us a clear view on the transaction process – the main player responsible is the transaction coordinator. It notifies leaders about the state of the transaction and is responsible for propagating the commit. There is some locking involved in the producer/coordinator side that may affect performance negatively depending on the length of our transactions.
Readers, meanwhile, simply operate in read-committed mode, so they will be unable to read messages from transactions that have not been committed.
Kafka transactions - setup and pitfalls
We will look at a practical example of setting up and using Kafka transactions, together with potential pitfalls on the consumer and producer side, also looking at specific ways Kafka transactions work as we go through examples. We will use Spring to set up our Kafka consumer/producer. To do this, we first have to import Kafka into our pom.xml :
<!-- Kafka -->
<dependency>
<groupId>org.springframework.kafka</groupId>
<artifactId>spring-kafka</artifactId>
</dependency>
To enable transactional processing for the producer, we need to tell Kafka to explicitly enable idempotence, as well as give it transaction-id :
producer:
bootstrap-servers: localhost:9092
transaction-id-prefix: tx-
properties:
enable.idempotence: true
transactional.id: tran-id-1
Each producer needs its own, unique transaction-id , otherwise, we will encounter errors if more than one producer attempts to perform a transaction at the same time. It is crucial to make sure that each instance of an application in a cloud environment has its own unique prefix/transaction-id . Additional setup must also be done for the consumer:
consumer:
bootstrap-servers: localhost:9092
group-id: group_id
auto-offset-reset: earliest
enable-auto-commit: false
isolation-level: read_committed
The properties that interest us set enable-auto-commit to false so that Kafka does not periodically commit transactions on its own. Additionally, we set isolation-level to read committed, so that we will only consume messages when the producer fully commits them. Now both the consumer and the producer are set to exactly-once delivery with transactions.
We can run our consumer and see what happens if an exception is thrown after writing to the queue but before the transaction is fully committed. For this purpose, we will create a very simple REST mapping so that we write several messages to the Kafka topic before throwing an exception:
@PostMapping(value = "/required")
@Transactional(propagation = Propagation.REQUIRED)
public void sendMessageRequired() {
producer.sendMessageRequired("Test 1");
producer.sendMessageRequired("Test 2");
throw new RuntimeException("This is a test exception");
}
The result is exactly as expected – the messages are written to the queue but not committed when an exception is thrown. As such the entire transaction is aborted and each batch is aborted as well. This can be seen in the logs:
2021-01-20 19:44:29.776 INFO 11032 --- [io-9001-exec-10] c.g.k.kafka.KafkaProducer : Producing message "Test 1"
2021-01-20 19:44:29.793 INFO 11032 --- [io-9001-exec-10] c.g.k.kafka.KafkaProducer : Producing message "Test 2"
2021-01-20 19:44:29.808 ERROR 11032 --- [producer-tx-1-0] o.s.k.support.LoggingProducerListener : Exception thrown when sending a message with key='key-1-Test 1' and payload='1) Test 1' to topic messages_2:
org.apache.kafka.common.KafkaException: Failing batch since transaction was aborted
at org.apache.kafka.clients.producer.internals.Sender.maybeSendAndPollTransactionalRequest(Sender.java:422) ~[kafka-clients-2.5.1.jar:na]
at org.apache.kafka.clients.producer.internals.Sender.runOnce(Sender.java:312) ~[kafka-clients-2.5.1.jar:na]
at org.apache.kafka.clients.producer.internals.Sender.run(Sender.java:239) ~[kafka-clients-2.5.1.jar:na]
at java.base/java.lang.Thread.run(Thread.java:834) ~[na:na]
2021-01-20 19:44:29.808 ERROR 11032 --- [producer-tx-1-0] o.s.k.support.LoggingProducerListener : Exception thrown when sending a message with key='key-1-Test 2' and payload='1) Test 2' to topic messages_2:
org.apache.kafka.common.KafkaException: Failing batch since transaction was aborted
at org.apache.kafka.clients.producer.internals.Sender.maybeSendAndPollTransactionalRequest(Sender.java:422) ~[kafka-clients-2.5.1.jar:na]
at org.apache.kafka.clients.producer.internals.Sender.runOnce(Sender.java:312) ~[kafka-clients-2.5.1.jar:na]
at org.apache.kafka.clients.producer.internals.Sender.run(Sender.java:239) ~[kafka-clients-2.5.1.jar:na]
at java.base/java.lang.Thread.run(Thread.java:834) ~[na:na]
The LoggingProducerListener exception contains the key and contents of the message that failed to be sent. The exception tells us that the batch has been failed because the transaction was aborted. Exactly as expected, the entire transaction is atomic so failing it at the end will cause messages successfully written beforehand to not be processed.
We can do the same test for the consumer, the expectation is that the transaction will be rolled back if a message processing error occurs. For that, we will create a simple consumer that will log something and then throw it.
@KafkaListener(topics = "messages_2", groupId = "group_id")
public void consumePartitioned(String message) {
log.info(String.format("Consumed partitioned message \"%s\"", message));
throw new RuntimeException("This is a test exception");
}
We can now use our REST endpoints to send some messages to the consumer. Sure enough, we see the exact behavior we expect – the message is read, the log happens, and then rollback occurs.
2021-01-20 19:48:33.420 INFO 14840 --- [ntainer#0-0-C-1] c.g.k.kafka.KafkaConsumer : Consumed partitioned message "1) Test 1"
2021-01-20 19:48:33.425 ERROR 14840 --- [ntainer#0-0-C-1] essageListenerContainer$ListenerConsumer : Transaction rolled back
org.springframework.kafka.listener.ListenerExecutionFailedException: Listener method 'public void com.grapeup.kafkatransactions.kafka.KafkaConsumer.consumePartitioned(java.lang.String)' threw exception; nested exception is java.lang.RuntimeException: This is a test exception
at org.springframework.kafka.listener.adapter.MessagingMessageListenerAdapter.invokeHandler(MessagingMessageListenerAdapter.java:350) ~[spring-kafka-2.5.7.RELEASE.jar:2.5.7.RELEASE]
Of course, because of the rollback, the message goes back on the topic. This results in the consumer reading it again, throwing and rolling back, creating an infinite loop that will lock other messages out for this partition. This is a potential issue that we must keep in mind when using Kafka transactions messaging, the same way as we would with JMS. The message will persist if we restart the application or the broker so mindful handling of the exception is required – we need to identify exceptions that require a rollback and those that do not. This is a very-application-specific problem so there is no way to give a clear-cut solution in this article simply because such a solution does not exist.
Last but not least, it is worth noting that propagation works as expected with Spring and Kafka transactions. If we start a new transaction via @Transactional annotation with REQUIRES_NEW propagation, then Kafka will start a new transaction that commits separately from the original one and whose commit/abort result has no effect on the parent one.
There are a few more things we have to keep in mind when working with Kafka transactions, some of them to be expected, others not as much. The first thing is the fact that producer transactions lock down the topic partition that it writes. This can be seen if we run 2 servers and make one transaction delayed. In our case, we started a transaction on server 1 that wrote messages to a topic and then waited 10 seconds to commit the transaction. Server 2 in the meantime wrote its own messages and committed immediately while Server 1 was waiting. The result can be seen in the logs:
Server 1:
2021-01-20 21:38:27.560 INFO 15812 --- [nio-9001-exec-1] c.g.k.kafka.KafkaProducer : Producing message "Test 1"
2021-01-20 21:38:27.578 INFO 15812 --- [nio-9001-exec-1] c.g.k.kafka.KafkaProducer : Producing message "Test 2"
Server 2:
2021-01-20 21:38:35.296 INFO 14864 --- [ntainer#0-0-C-1] c.g.k.kafka.KafkaConsumer : Consumed message "1) Test 1 Sleep"
2021-01-20 21:38:35.308 INFO 14864 --- [p_id.messages.0] o.a.k.c.p.internals.TransactionManager : [Producer clientId=producer-tx-2-group_id.messages.0, transactionalId=tx-2-group_id.messages.0] Discovered group coordinator gu17.ad.grapeup.com:9092 (id: 0 rack: null)
2021-01-20 21:38:35.428 INFO 14864 --- [ntainer#0-0-C-1] c.g.k.kafka.KafkaConsumer : Consumed message "1) Test 2 Sleep"
2021-01-20 21:38:35.549 INFO 14864 --- [ntainer#0-0-C-1] c.g.k.kafka.KafkaConsumer : Consumed message "1) Test 1"
2021-01-20 21:38:35.676 INFO 14864 --- [ntainer#0-0-C-1] c.g.k.kafka.KafkaConsumer : Consumed message "1) Test 2"
Messages were consumed by Server 2 after Server 1 has committed its long-running transaction. Only a partition is locked, not the entire topic – as such, depending on the partitions that producers send messages to, we may encounter full, partial, or no locking at all. The lock is held until the end of the transaction, be it via commit or abort.
Another interesting thing is the order of messages – messages from Server 1 appear before messages from Server 2, even though Server 2 committed its transaction first. This is in contrast to what we would expect from JMS – the messages committed to JMS first would appear first, unlike our example. It should not be a major problem but it is something we must, once again, keep in mind while designing our applications.
Putting it all together
Now that we have Kafka transactions running, we can try and add JMS/JPA configuration to it. We can once again utilize the Spring setup to quickly integrate these. For the sake of the demo, we use an in-memory H2 database and ActiveMQ:
<!-- JPA setup -->
<dependency>
<groupId>org.springframework.boot</groupId>
<artifactId>spring-boot-starter-data-jpa</artifactId>
</dependency>
<dependency>
<groupId>com.h2database</groupId>
<artifactId>h2</artifactId>
<scope>runtime</scope>
</dependency><!-- Active MQ -->
<dependency>
<groupId>org.springframework.boot</groupId>
<artifactId>spring-boot-starter-activemq</artifactId>
</dependency>
<dependency>
<groupId>org.apache.activemq</groupId>
<artifactId>activemq-broker</artifactId>
</dependency>
<dependency>
<groupId>com.google.code.gson</groupId>
<artifactId>gson</artifactId>
</dependency>
We can set up a simple JMS listener, which reads a message in a transaction, saves something to the database via JPA, and then publishes a further Kafka message. This reflects a common way to try and integrate JMS/JPA with Kafka:
@JmsListener(destination = "message.queue")
@Transactional(propagation = Propagation.REQUIRED)
public void processMessage(String message) {
log.info("Received JMS message: {}", message);
messageDao.save(MessageEntity.builder().content(message).build());
kafkaProducer.sendMessageRequired(message);
}
Now if we try running this code, we will run into issues – Spring will protest that it got 2 beans of TransacionManager class. This is because JPA/JMS uses the base TransactionManager and Kafka uses its own KafkaTransactionManager . To properly run this code we have to specify which transaction manager is to be used in which @Transactional annotation. These transaction managers are completely separate and the transactions they start or commit do not affect each other. As such, one can be committed and one aborted if we throw an exception at a correct time. Let’s amend our listener for further analysis:
@JmsListener(destination = "message.queue")
@Transactional(transactionManager = "transactionManager", propagation = Propagation.REQUIRED)
public void processMessage(String message) {
log.info("Received JMS message: {}", message);
messageDao.save(MessageEntity.builder().content(message).build());
kafkaProducer.sendMessageRequired(message);
exampleService.processMessage(message);
}
In this example, we correctly mark @Transactional annotation to use a bean named transactionManager , which is the JMS/JPA bean. In a similar way, @Transactional annotation in KafkaProducer is marked to use kafkaTransactionManager , so that Kafka transaction is started and committed within that function. The issue with this code example is the situation, in which ExampleService throws in its processMessage function at line 10.
If such a thing occurs, then the JMS transaction is committed and the message is permanently removed from the queue. The JPA transaction is rolled back, and nothing is actually written to the database despite line 6. The Kafka transaction is committed because no exception was thrown in its scope. We are left with a very peculiar state that would probably need manual fixing.
To minimize such situations we should be very careful about when to start which transaction. Optimally, we would start Kafka transactions right after starting JMS and JPA transactions and commit it right before we commit JPA and JMS. This way we minimize the chance of such a situation occurring (though still cannot fully get rid of it) – the only thing that could cause one transaction to break and not the other is connection failure between commits.
Similar care should be done on the consumer side. If we start a Kafka transaction, do some processing, save to database, send a JMS message, and send a Kafka response in a naive way:
@KafkaListener(topics = "messages_2", groupId = "group_id")
@Transactional(transactionManager = "kafkaTransactionManager", propagation = Propagation.REQUIRED)
public void processMessage(String message) {
exampleService.processMessage(message);
MessageEntity entity = MessageEntity.builder().content(message).build();
messageDao.save(entity);
exampleService.postProcessMessage(entity);
messageDao.save(entity);
jmsProducer.sendMessage(message);
kafkaProducer.sendMessageRequired(exampleService.createResponse(entity));
}
Assuming MessageDAO/JmsProducer start their own transaction in their function, what we will end up with if line 12 throws is a duplicate entry in the database and a duplicate JMS message. The Kafka transaction will be properly rolled back, but the JMS and JPA transactions were already committed, and we will now have to handle the duplicate. What we should do in our case, is to start all transactions immediately and do all of our logic within their scope. One of the solutions to do so, is to create a helper bean that accepts a function to perform within a @Transactional call:
@Service
public class TransactionalHelper {
@Transactional(transactionManager = "transactionManager",
propagation = Propagation.REQUIRED)
public void executeInTransaction(Function f) {
f.perform();
}
@Transactional(transactionManager = "kafkaTransactionManager",
propagation = Propagation.REQUIRED)
public void executeInKafkaTransaction(Function f) {
f.perform();
}
public interface Function {
void perform();
}
}
This way, our call looks like this:
@KafkaListener(topics = "messages_2", groupId = "group_id")
@Transactional(transactionManager = "kafkaTransactionManager", propagation = Propagation.REQUIRED)
public void processMessage(String message) {
transactionalHelper.executeInTransaction(() -> {
exampleService.processMessage(message);
MessageEntity entity = MessageEntity.builder().content(message).build();
messageDao.save(entity);
exampleService.postProcessMessage(entity);
messageDao.save(entity);
jmsProducer.sendMessage(message);
kafkaProducer.sendMessageRequired(exampleService.createResponse(entity));
});
}
Now we start the processing within the Kafka transaction and end it right before the Kafka transaction is committed. This is of course assuming no REQUIRES_NEW propagation is used throughout the inner functions. Once again, in an actual application, we would need to carefully consider transactions in each subsequent function call to make sure that no separate transactions are running without our explicit knowledge and consent.
We will run into a problem, however – the way Spring works, JPA transactions will behave exactly as expected. JMS transaction will be started in JmsProducer anyway and committed on its own. The impact of this could be minimized by moving ExampleService call from line 13 to before line 12, but it’s still an issue we need to keep an eye on. It becomes especially important if we have to write to several different JMS queues as we process our message.
There is no easy way to force Spring to merge JPA/JMS transactions, we would need to use JTA for that.
What can and cannot be done with JTA
JTA has been designed to merge several different transactions, effectively treating them as one. When the JTA transaction ends, each participant votes whether to commit or abort it, with the result of the voting being broadcasted so that participants commit/abort at once. It is not 100% foolproof, we may encounter a connection death during the voting process, which may cause one or more of the participants to perform a different action. The risk, however, is minimal due to the way transactions are handled.
The main benefit of JTA is that we can effectively treat several different transactions as one – this is most often used with JMS and JPA transactions. So the question arises, can we merge Kafka transactions into JTA and treat them all as one? Well, the answer to that is sadly no – the Kafka transactions do not follow JTA API and do not define XA connection factories. We can, however, use JTA to fix the issue we encountered previously between JMS and JPA transactions.
To set up JTA in our application, we do need a provider; however, base Java does not provide an implementation of JTA, only the API itself. There are various providers for this, sometimes coming with the server, Websphere, and its UOP Transaction Manager being a good example. Other times, like with Tomcat, nothing is provided out of the box and we have to use our own. An example of a library that does this is Atomikos – it does have a paid version but for the use of simple JTA, we are good enough with the free one.
Spring made importing Atomikos easy with a starter dependency:
<!-- JTA setup -->
<dependency>
<groupId>org.springframework.boot</groupId>
<artifactId>spring-boot-starter-jta-atomikos</artifactId>
</dependency>
Spring configures our JPA connection to use JTA on its own; to add JMS to it, however, we have to do some configuration. In one of our @Configuration classes, we should add the following beans:
@Configuration
public class JmsConfig {
@Bean
public ActiveMQXAConnectionFactory connectionFactory() {
ActiveMQXAConnectionFactory connectionFactory = new ActiveMQXAConnectionFactory();
connectionFactory.setBrokerURL("tcp://localhost:61616");
connectionFactory.setPassword("admin");
connectionFactory.setUserName("admin");
connectionFactory.setMaxThreadPoolSize(10);
return connectionFactory;
}
@Bean(initMethod = "init", destroyMethod = "close")
public AtomikosConnectionFactoryBean atomikosConnectionFactory() {
AtomikosConnectionFactoryBean atomikosConnectionFactory = new AtomikosConnectionFactoryBean();
atomikosConnectionFactory.setUniqueResourceName("XA_JMS_ConnectionFactory");
atomikosConnectionFactory.setXaConnectionFactory(connectionFactory());
atomikosConnectionFactory.setMaxPoolSize(10);
return atomikosConnectionFactory;
}
@Bean
public JmsTemplate jmsTemplate() {
JmsTemplate template = new JmsTemplate();
template.setConnectionFactory(atomikosConnectionFactory());
return template;
}
@Bean
public DefaultJmsListenerContainerFactory jmsListenerContainerFactory(PlatformTransactionManager transactionManager) {
DefaultJmsListenerContainerFactory factory = new DefaultJmsListenerContainerFactory();
factory.setConnectionFactory(atomikosConnectionFactory());
factory.setConcurrency("1-1");
factory.setTransactionManager(transactionManager);
return factory;
}
}
We define an ActiveMQXAConnectionFactory , which implements XAConnectionFactory from JTA API. We then define a separate AtomikosConnectionFactory , which uses ActiveMQ one. For all intents and purposes, everything else uses Atomikos connection factory – we set it for JmsTemplate and DefaultJmsListenerContainerFactory . We also set the transaction manager, which will now become the JTA transaction manager.
Having all of that set, we can run our application again and see if we still encounter issues with transactions not behaving as we want them to. Let’s set up a JMS listener with additional logs for clarity:
@JmsListener(destination = "message.queue")
@Transactional(transactionManager = "transactionManager", propagation = Propagation.REQUIRED)
public void processMessage(final String message) {
transactionalHelper.executeInKafkaTransaction(() -> {
MessageEntity entity = MessageEntity.builder().content(message).build();
messageDao.save(entity);
log.info("Saved database entity");
kafkaProducer.sendMessageRequired(message);
log.info("Sent kafka message");
jmsProducer.sendMessage("response.queue", "Response: " + message);
log.info("Sent JMS response");
throw new RuntimeException("This is a test exception");
});
}
We expect that JTA and Kafka transactions will both roll back, nothing will be written to the database, nothing will be written to response.queue , nothing will be written to Kafka topic, and that the message will not be consumed. When we run this, we get the following logs:
2021-01-20 21:56:00.904 INFO 9780 --- [enerContainer-1] c.g.kafkatransactions.jms.JmsConsumer : Saved database entity
2021-01-20 21:56:00.906 INFO 9780 --- [enerContainer-1] c.g.k.kafka.KafkaProducer : Producing message "This is a test message"
2021-01-20 21:56:00.917 INFO 9780 --- [enerContainer-1] c.g.kafkatransactions.jms.JmsConsumer : Sent kafka message
2021-01-20 21:56:00.918 INFO 9780 --- [enerContainer-1] c.g.kafkatransactions.jms.JmsProducer : Sending JMS message: Response: This is a test message
2021-01-20 21:56:00.922 INFO 9780 --- [enerContainer-1] c.g.kafkatransactions.jms.JmsConsumer : Sent JMS response
2021-01-20 21:56:00.935 WARN 9780 --- [enerContainer-1] o.s.j.l.DefaultMessageListenerContainer : Execution of JMS message listener failed, and no ErrorHandler has been set.
org.springframework.jms.listener.adapter.ListenerExecutionFailedException: Listener method 'public void com.grapeup.kafkatransactions.jms.JmsConsumer.processMessage(java.lang.String)' threw exception; nested exception is java.lang.RuntimeException: This is a test exception
at org.springframework.jms.listener.adapter.MessagingMessageListenerAdapter.invokeHandler(MessagingMessageListenerAdapter.java:122) ~[spring-jms-5.2.10.RELEASE.jar:5.2.10.RELEASE]
The exception thrown is followed by several errors about rolled back transactions. After checking our H2 database and looking at Kafka/JMS queues, we can indeed see that everything we expected has been fulfilled. The original JMS message was not consumed either, starting an endless loop which, once again, we would have to take care of in a running application. The key part though is that transactions behaved exactly as we intended them to.
Is JTA worth it for that little bit of surety? Depends on the requirements – do we have to write to several JMS queues simultaneously while writing to the database and Kafka? We will have to use JTA. Can we get away with a single write at the end of the transaction? We might not need to. There is sadly no clear-cut answer, we must use the right tools for the right job.
Summary
We managed to successfully launch Kafka in transactional mode, enabling exactly-once delivery mechanics. This can be integrated with JMS/JPA transactions, although we may encounter problems in our listeners/consumers depending on circumstances. If needed, we may introduce JTA to allow us an easier control of different transactions and whether they are committed or aborted. We used ActiveMQ/H2/Atomikos for this purpose, but this works with any JMS/JPA/JTA providers.
If you're looking for help in mastering cloud technologies , learn how our team works with innovative companies.

Grape Up guides enterprises on their data-driven transformation journey
Ready to ship? Let's talk.
Check related articles
Read our blog and stay informed about the industry's latest trends and solutions.
Apache Kafka fundamentals
Nowadays, we have plenty of unique architectural solutions. But all of them have one thing in common – every single decision should be done after a solid understanding of the business case as well as the communication structure in a company. It is strictly connected with famous Conway’s Law:
“Any organization that designs a system (defined broadly) will produce a design whose structure is a copy of the organization's communication structure.”
In this article, we go deeper into the Event-Driven style, and we discover when we should implement such solutions. This is when Kafka comes to play.
The basic definition taken from the Apache Kafka site states that this is an open-source distributed event streaming platform . But what exactly does it mean? We explain the basic concepts of Apache Kafka, how to use the platform, and when we may need it.
Apache Kafka is all about events
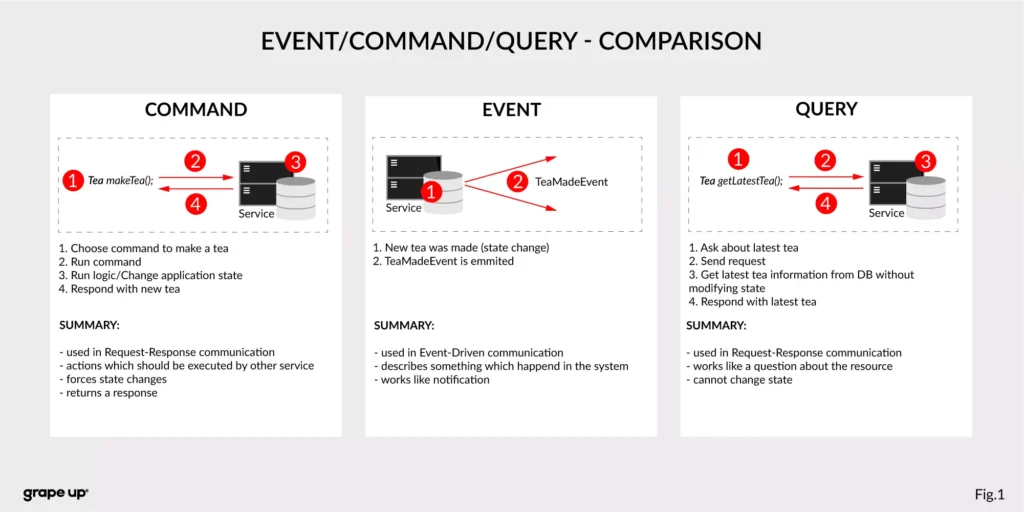
To understand what the event streaming platform is, we need to have a prior understanding of an event itself. There are different ways of how the services can interact with each other – they can use Commands, Events, or Queries. So, what is the difference between them?
- Command – we can call it a message in which we expect something to be done - like in the army when the commander gives an order to soldiers. In computer science, we are making requests to other services to perform some action, which causes a system state change. The crucial part is that they are synchronous, and we expect that something will happen in the future. It is the most common and natural method for communication between services. On the other hand, you do not really know if your expectation will be fulfilled by the service. Sometimes we create commands, and we do not expect any response (it is not needed for the caller.)
- Event – the best definition of an event is a fact. It is a representation of the change which happened in the service (domain). It is essential that there is no expectation of any future action. We can treat an event as a notification of state change. Events are immutable. In other words - it is everything necessary for the business. This is also a single source of truth, so events need to precisely describe what happened in the system.
- Query – in comparison to the others, the query is only returning a response without any modifications in the system state. A good example of how it works can be an SQL query.
Below there is a small summary which compares all the above-mentioned ways of interaction:
Now we know what the event is in comparison to other interaction styles. But what is the advantage of using events? To understand why event-driven solutions are better than synchronous request-response calls, we have to learn a bit about software architecture history.
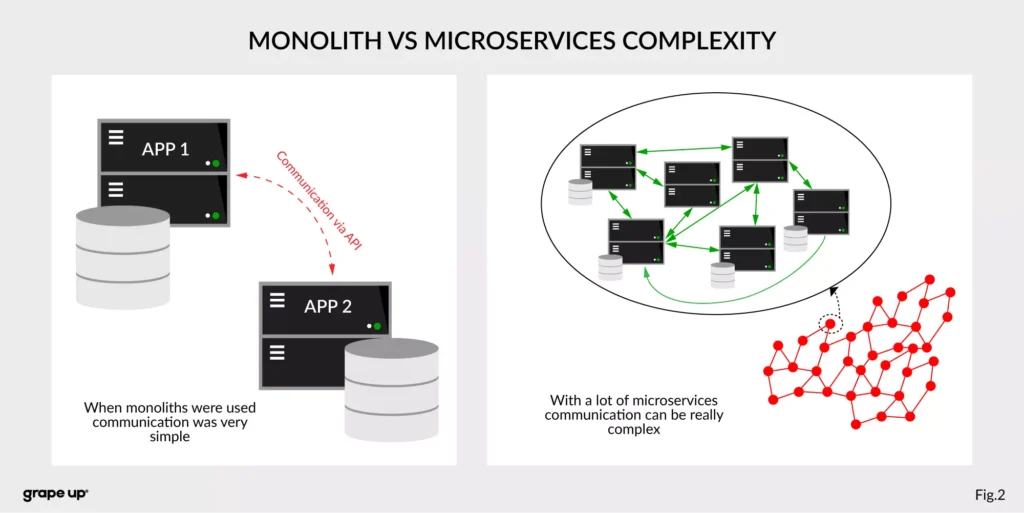
The figure describes a difference between a system that has old monolith architecture and a system with new modern microservice architecture.
The left side of the figure presents an API communication between two monoliths. In this case, communication is straightforward and easy. There is a different problem though such monolith solutions are very complex and hard to maintain.
The question is, what happens if we want to use, instead of two big services, a few thousands of small microservices . How complex will it be? The directed graph on the right side is showing how quickly the number of calls in the system can grow, and with it, the number of shared resources. We can have a situation when we need to use data from one microservice in many places. That produces new challenges regarding communication.
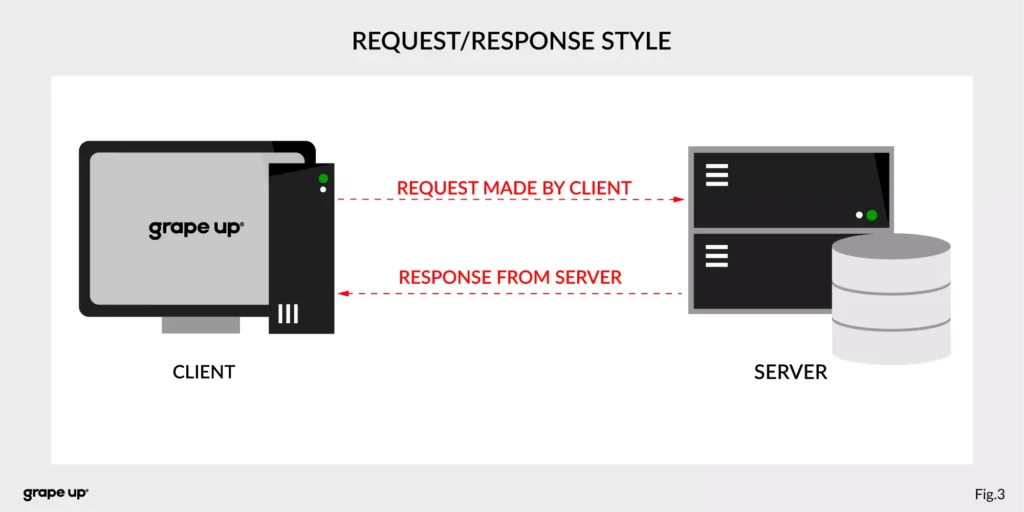
What about communication style?
In both cases, we are using a request-response style of communication (figure below), and we need to know how to use API provided by the server from the caller perspective. There must be some kind of protocol to exchange messages between services.
So how to reduce the complexity and make an integration between services easier? To answer this – look at the figure below.
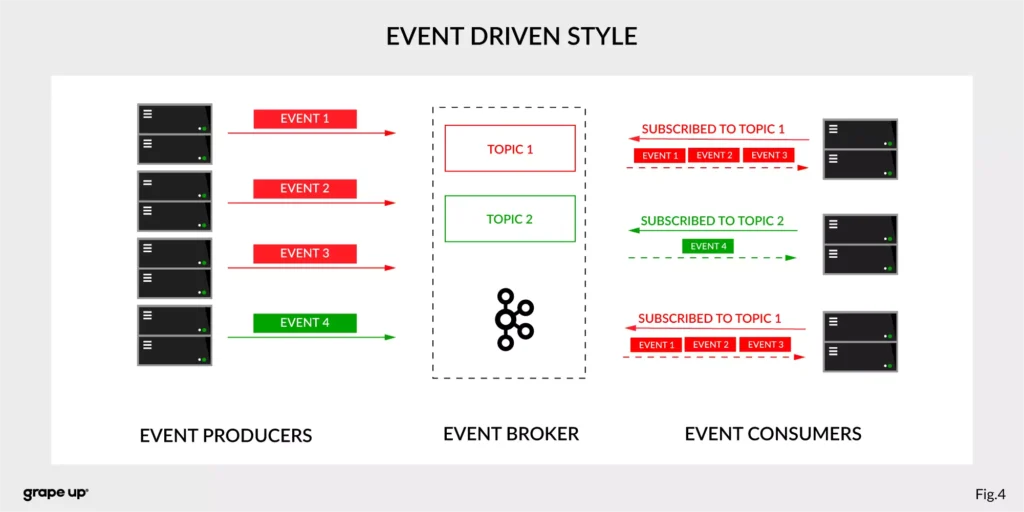
In this case, interactions between event producers and consumers are driven by events only. This pattern supports loose coupling between services, and what is more important for us, the event producer does not need to be aware of the event consumer state. It is the essence of the pattern. From the producer's perspective, we do not need to know who or how to use data from the topic.
Of course, as usual, everything is relative. It is not like the event-driven style is always the best. It depends on the use case. For instance, when operations should be done synchronously, then it is natural to use the request-response style. In situations like user authentication, reporting AB tests, or integration with third-party services, it is better to use a synchronous style. When the loose coupling is a need, then it is better to go with an event-driven approach. In larger systems, we are mixing styles to achieve a business goal.
The name of Kafka has its origins in the word Kafkaesque which means according to the Cambridge dictionary something extremely unpleasant, frightening, and confusing, and similar to situations described in the novels of Franz Kafka.
The communication mess in the modern enterprise was a factor to invent such a tool. To understand why - we need to take a closer look at modern enterprise systems.
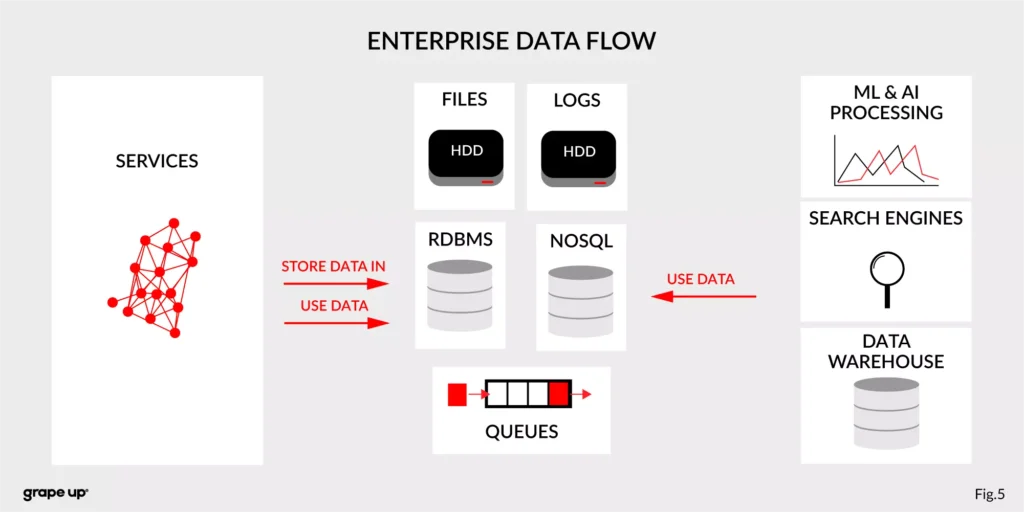
The modern enterprise systems contain more than just services. They usually have a data warehouse, AI and ML analytics, search engines, and much more. The format of data and the place where data is stored are various – sometimes a part of the data is stored in RDBMS, a part in NoSQL, and other in file bucket or transferred via a queue. They can have different formats and extensions like XML, JSON, and so on. Data management is the key to every successful enterprise. That is why we should care about it. Tim O’Reilly once said:
„We are entering a new world in which data may be more important than software.”
In this case, having a good solution for processing crucial data streams across an enterprise is a must to be successful in business. But as we all know, it is not always so easy.
How to tame the beast?
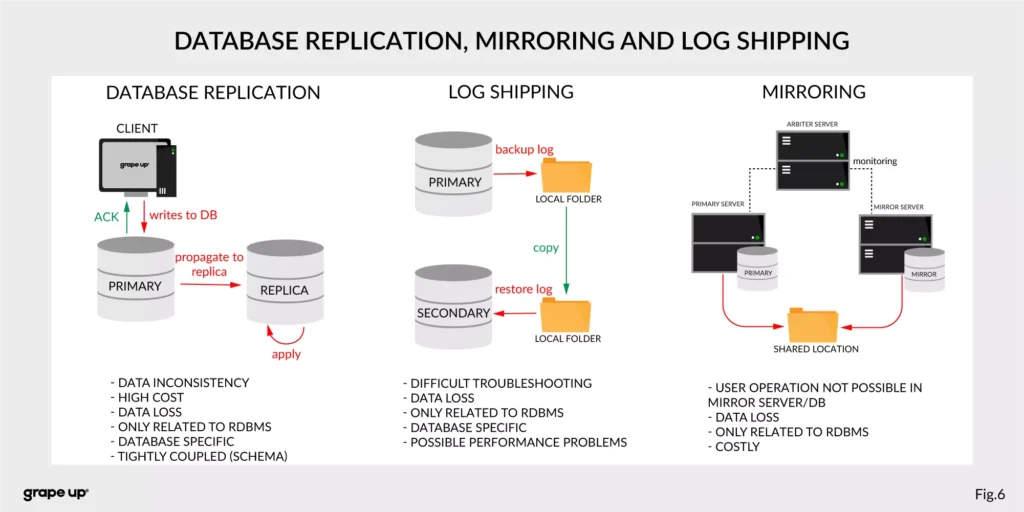
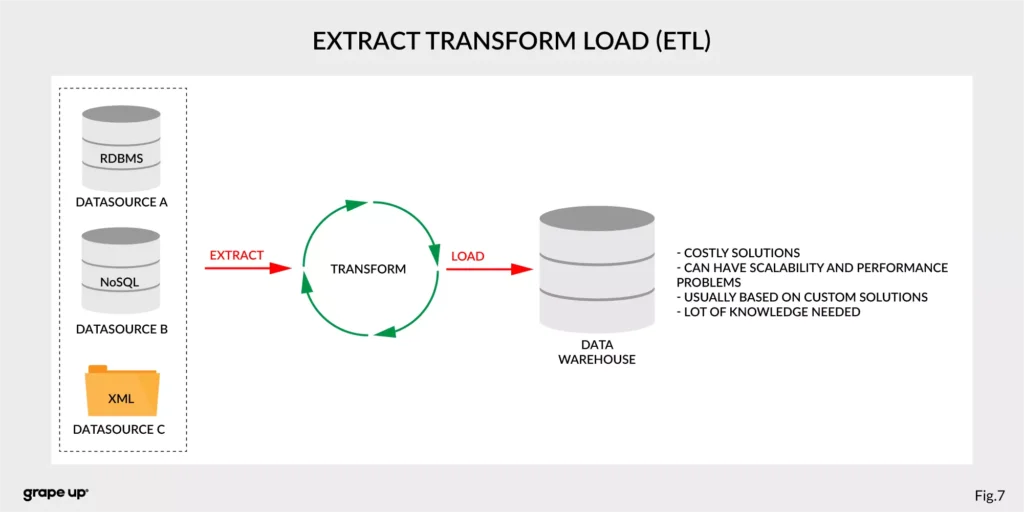
For this complex enterprise data flow scenario, people invented many tools/methods. All to make this enterprise data distribution possible. Unfortunately, as usual, to use them, we have to make some tradeoffs. Here we have a list of them:
- Database replication, Mirroring, and Log Shipping - used to increase the performance of an application (scaling) and backup/recovery.
- ETL – Extract, Transform, Load - used to copy data from different sources for analytics/reports.
- Messaging systems - provide asynchronous communication between systems.
As you can see, we have a lot of problems that we need to take care of to provide correct data flow across an enterprise organization. That is why Apache Kafka was invented. One more time we have to go to the definition of Apache Kafka. It is called a distributed event streaming platform. Now we know what the event is and how event-driven style looks like. So as you probably can guess, event streaming, in our case, means capturing, storing, manipulating, processing, reacting, and routing event streams in real-time. It is based on three main capabilities – publishing/subscribing, storing, and processing. These three capabilities make this tool very successful.
- Publishing/Subscribing provides an ability to read/write to streams of events and even more – you can continuously import/export data from different sources/systems.
- Storing is also very important here. It solves the abovementioned problems in messaging. You can store streams of events for as long as you want without being afraid that something will be gone.
- Processing allows us to process streams in real-time or use history to process them.
But wait! There is one more word to explain – distributed. Kafka system internally consists of servers and clients. It uses a high-performance TCP Protocol to provide reliable communication between them. Kafka runs as a cluster on one or multiple servers which can be easily deployed in the cloud or on-prem in single or multiple regions. There are also Kafka Connect servers used for integration with other data sources and other Kafka Clusters. Clients that can be implemented in many programming languages have a special role to read/write and process event streams. The whole ecosystem of Kafka is distributed and of course like every distributed system has a lot of challenges regarding node failures, data loss, and coordination.
What are the basic elements of Apache Kafka?
To understand how Apache Kafka works let first explain the basic elements of the Kafka ecosystem.
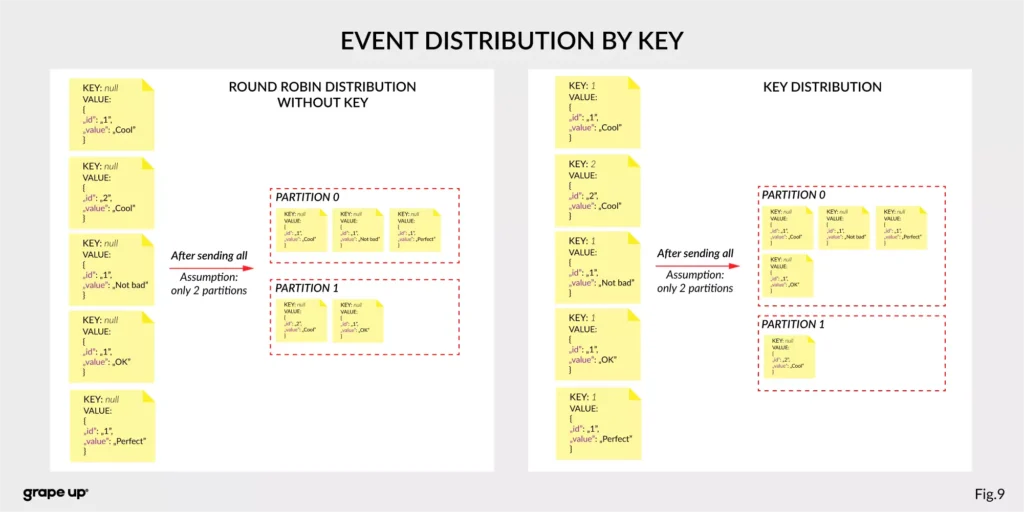
Firstly, we should take a look at the event. It has a key, value, timestamp, and optional metadata headers. A key is used not only for identification, but it is used also for routing and aggregation operations for events with the same key.
As you can see in the figure below - if the message has no key attached, then data is sent using a round-robin algorithm. The situation is different when the event has a key attached. Then the events always go to the partition which holds this key. It makes sense from the performance perspective. We usually use ids to get information about objects, and in that case, it is faster to get it from the same broker than to look for it on many brokers.
The value, as you can guess, stores the essence of the event. It contains information about the business change that happened in the system.
There are different types of events:
- Unkeyed Event – event in which there is no need to use a key. It describes a single fact of what happened in the system. It could be used for metric purposes.
- Entity Event – the most important one. It describes the state of the business object at a given point in time. It must have a unique key, which usually is related to the id of the business object. They are playing the main role in event-driven architectures.
- Keyed Event – an event with a key but not related to any business entity. The key is used for aggregation and partitioning.
Topics –storage for events. The analogy to a folder in a filesystem, where the topic is like a folder that organizes what is inside. An example name of the topic, which keeps all orders events in the e-commerce system can be “ orders” . Unlike in other messaging systems, the events stay on the topic after reading. It makes it very powerful and fault-tolerant. It also solves a problem when the consumer will process something with an error and would like to process it again. Topics can always have zero, single, and multiple producers and subscribers.
They are divided into smaller parts called partitions. A partition can be described as a “commit log”. Messages can be appended to the log and can be read only in the order from the beginning to the end. Partitions are designed to provide redundancy and scalability. The most important fact is that partitions can be hosted on different servers (brokers), and that gives a very powerful way to scale topics horizontally.
Producer – client application responsible for the creation of new events on Kafka Topic. The producer is responsible for choosing the topic partition. By default, as we mentioned earlier round-robin is used when we do not provide any key. There is also a way of creating custom business mapping rules to assign a partition to the message.
Consumer – client application responsible for reading and processing events from Kafka. All events are being read by a consumer in the order in which they were produced. Each consumer also can subscribe to more than one topic. Each message on the partition has a unique integer identifier ( offset ) generated by Apache Kafka which is increased when a new message arrives. It is used by the consumer to know from where to start reading new messages. To sum up the topic, partition and offset are used to precisely localize the message in the Apache Kafka system. Managing an offset is the main responsibility for each consumer.
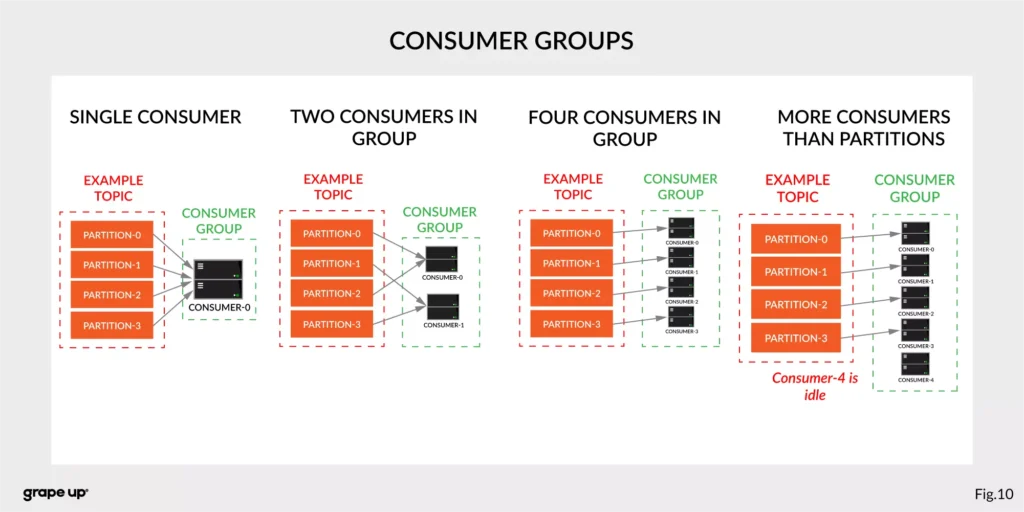
The concept of consumers is easy. But what about the scaling? What if we have many consumers, but we would like to read the message only once? That is why the concept of consumer group was designed. The idea here is when consumer belongs to the same group, it will have some subset of partitions assigned to read a message. That helps to avoid the situation of duplicated reads. In the figure below, there is an example of how we can scale data consumption from the topic. When a consumer is making time-consuming operations, we can connect other consumers to the group, which helps to process faster all new events on the consumer level. We have to be careful though when we have a too-small number of partitions, we would not be able to scale it up. It means if we have more consumers than partitions, they are idle.
But you can ask – what will happen when we add a new consumer to the existing and running group? The process of switching ownership from one consumer to another is called “rebalance.” It is a small break from receiving messages for the whole group. The idea of choosing which partition goes to which consumer is based on the coordinator election problem.
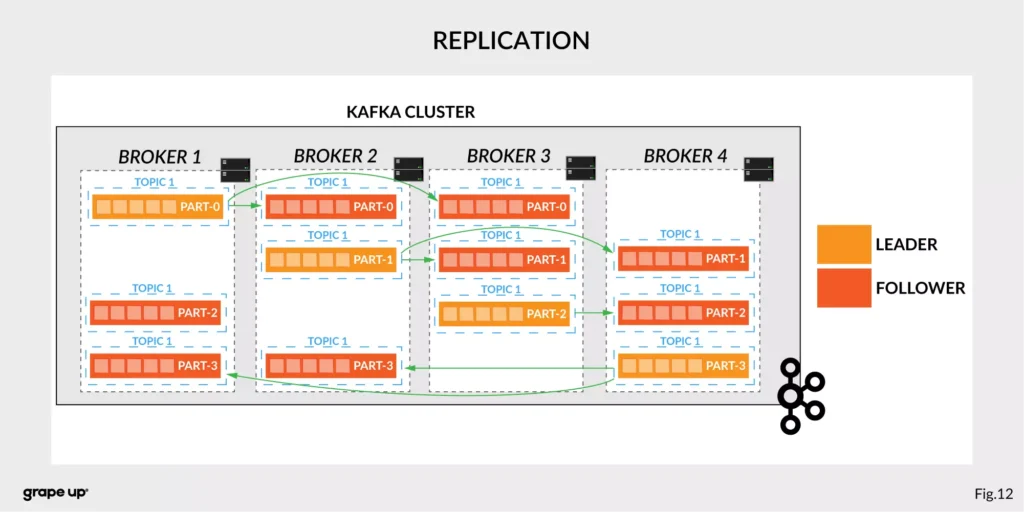
Broker – is responsible for receiving and storing produced events on disk, and it allows consumers to fetch messages by a topic, partition, and offset. Brokers are usually located in many places and joined in a cluster . See the figure below.
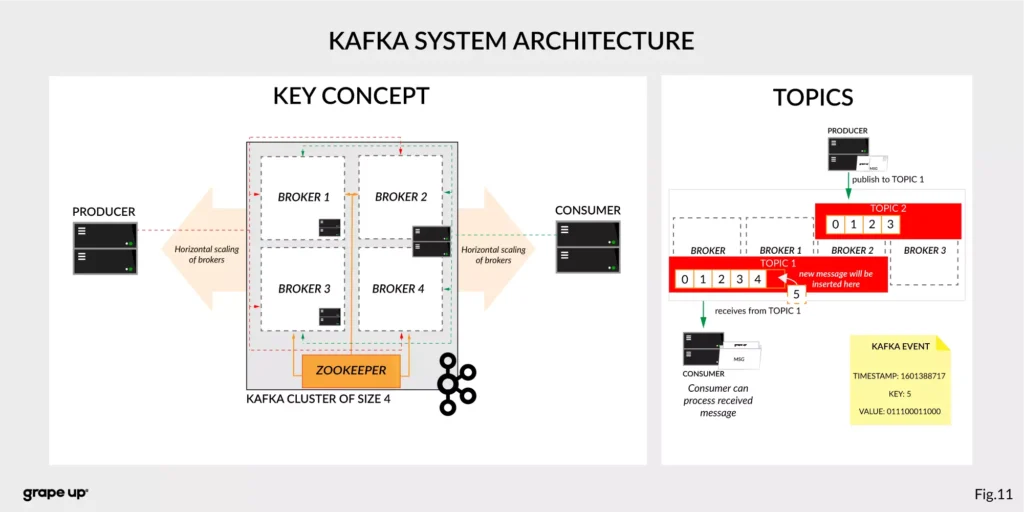
Like in every distributed system, when we use brokers we need to have some coordination. Brokers, as you can see, can be run on different servers (also it is possible to run many on a single server). It provides additional complexity. Each broker contains information about partitions that it owns. To be secure, Apache Kafka introduced a dedicated replication for partitions in case of failures or maintenance. The information about how many replicas do we need for a topic can be set for every topic separately. It gives a lot of flexibility. In the figure below, the basic configuration of replication is shown. The replication is based on the leader-follower approach.
Everything is great! We have found all advantages of using Kafka in comparison to more traditional approaches. Now it is time to say something when to use it.
When to use Apache Kafka?
Apache Kafka provides a lot of use cases. It is widely used in many companies, like Uber, Netflix, Activision, Spotify, Slack, Pinterest, Coursera, LinkedIn, etc. We can use it as a:
- Messaging system – it can be a good alternative to the existing messaging systems. It has a lot of flexibility in configuration, better throughput, and low end-to-end latency.
- Website Activity tracking – it was the original use case for Kafka. Activity tracking on the website generates a high volume of data that we have to process. Kafka provides real-time processing for event-streams, which can be sometimes crucial for the business.
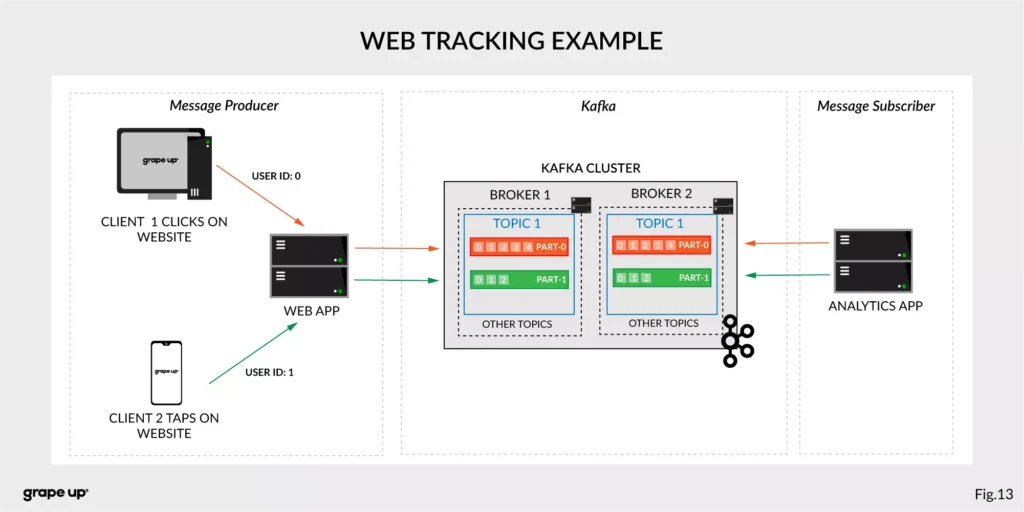
Figure 13 presents a simple use case for web tracking. The web application has a button that generates an event after each click. It is used for real-time analytics. Clients' events that are gathered on TOPIC 1. Partitioning is using user-id so client 1 events (user-id = 0) are stored in partition 0 and client 2 (user-id = 1) are stored in partition 1. The record is appended and offset is incremented on a topic. Now, a subscriber can read a message, and present new data on a dashboard or even use older offset to show some statistics.
- Log aggregation – it can be used as an alternative to existing log aggregation solutions. It gives a cleaner way of organizing logs in form of the event streams and what is more, gives a very easy and flexible way to gather logs from many different sources. Comparing to other tools is very fast, durable, and has low end-to-end latency.
- Stream processing – is a very flexible way of processing data using data pipelines. Many users are aggregating, enriching, and transforming data into new topics. It is a very quick and convenient way to process all data in real-time.
- Event sourcing – is a system design in which immutable events are stored as a single source of truth about the system. A typical use case for event sourcing can be found in bank systems when we are loading the history of transactions. The transaction is represented by an immutable event which contains all data describing what exactly happened in our account.
- Commit log – it can be used as an external commit-log for distributed systems. It has a lot of mechanisms that are useful in this use case (like log-compaction, replication, etc.)
Summary
Apache Kafka is a powerful tool used by leading tech enterprises. It offers a lot of use cases, so if we want to use a reliable and durable tool for our data, we should consider Kafka. It provides a loose coupling between producers and subscribers, making our enterprise architecture clean and open to changes. We hope you enjoyed this basic introduction to Apache Kafka and you will try to dig deeper into how it works after this article.
Looking for guidance on implementing Kafka or other event-driven solutions?
Get in touch with us to discuss how we can help.
Sources:
- kafka.apache.org/intro
- confluent.io/blog/journey-to-event-driven-part-1-why-event-first-thinking-changes-everything/
- hackernoon.com/by-2020-50-of-managed-apis-projected-to-be-event-driven-88f7041ea6d8
- ably.io/blog/the-realtime-api-family/
- confluent.io/blog/changing-face-etl/
- infoq.com/articles/democratizing-stream-processing-kafka-ksql-part2/
- cqrs.nu/Faq
- medium.com/analytics-vidhya/apache-kafka-use-cases-e2e52b892fe1
- confluent.io/blog/transactions-apache-kafka/
- martinfowler.com/articles/201701-event-driven.html
- pluralsight.com/courses/apache-kafka-getting-started#
- jaceklaskowski.gitbooks.io/apache-kafka/content/kafka-brokers.html
Bellemare, Adam. Building event-driven microservices: leveraging distributed large-scale data . O'Reilly Media, 2020.
Narkhede, Neha, et al. Kafka: the Definitive Guide: Real-Time Data and Stream Processing at Scale . O'Reilly Media, 2017.
Stopford, Ben. Designing Event-Driven Systems, Concepts and Patterns for Streaming Services with Apache Kafka , O'Reilly Media, 2018.
How to build hypermedia API with Spring HATEOAS
Have you ever considered the quality of your REST API? Do you know that there are several levels of REST API? Have you ever heard the term HATEOAS? Or maybe you wonder how to implement it in Java? In this article, we answer these questions with the main emphasis on the HATEOAS concept and the implementation of that concept with the Spring HATEOAS project.
Learn more about services provided by Grape Up
You are at Grape Up blog, where our experts share their expertise gathered in projects delivered for top enterprises. See how we work.
Enabling the automotive industry to build software-defined vehicles
Empowering insurers to create insurance telematics platforms
Providing AI & advanced analytics consulting
What is HATEOAS?
H ypermedia A s T he E ngine O f A pplication S tate - is one of the constraints of the REST architecture. Neither REST nor HATEOAS is any requirement or specification. How you implement it depends only on you. At this point, you may ask yourself - how RESTful your API is without using HATEOAS? This question is answered by the REST maturity model presented by Leonard Richardson. This model consists of four levels, as set out below:
- Level 0
The API implementation uses the HTTP protocol but does not utilize its full capabilities. Additionally, unique addresses for resources are not provided. - Level 1
We have a unique identifier for the resource, but each action on the resource has its own URL. - Level 2
We use HTTP methods instead of verbs describing actions, e.g., DELETE method instead of URL .../delete - Level 3
The term HATEOAS has been introduced. Simply speaking, it introduces hypermedia to resources. That allows you to place links in the response informing about possible actions, thereby adding the possibility to navigate through API.
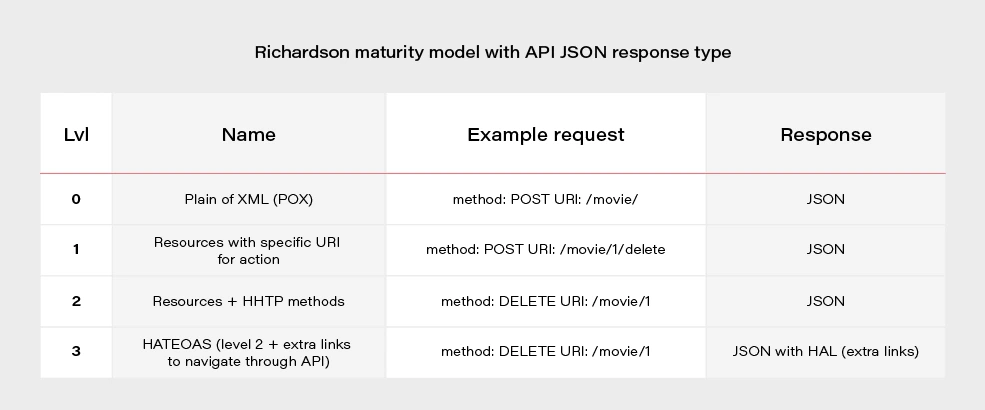
Most projects these days are written using level 2. If we would like to go for the perfect RESTful API, we should consider HATEOAS.
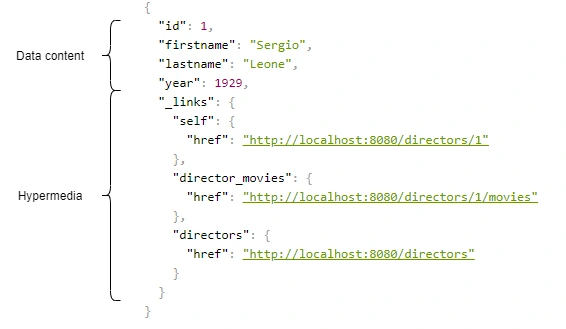
Above, we have an example of a response from the server in the form of JSON+HAL. Such a resource consists of two parts: our data and links to actions that are possible to be performed on a given resource.
Spring HATEOAS 1.x.x
You may be asking yourself how to implement HATEOAS in Java? You can write your solution, but why reinvent the wheel? The right tool for this seems to be the Spring Hateoas project. It is a long-standing solution on the market because its origins date back to 2012, but in 2019 we had a version 1.0 release. Of course, this version introduced a few changes compared to 0.x. They will be discussed at the end of the article after presenting some examples of using this library so that you better understand what the differences between the two versions are. Let’s discuss the possibilities of the library based on a simple API that returns us a list of movies and related directors. Our domain looks like this:
@Entity
public class Movie {
@Id
@GeneratedValue
private Long id;
private String title;
private int year;
private Rating rating;
@ManyToOne
private Director director;
}
@Entity
public class Director {
@Id
@GeneratedValue
@Getter
private Long id;
@Getter
private String firstname;
@Getter
private String lastname;
@Getter
private int year;
@OneToMany(mappedBy = "director")
private Set<Movie> movies;
}
We can approach the implementation of HATEOAS in several ways. Three methods represented here are ranked from least to most recommended.
But first, we need to add some dependencies to our Spring Boot project:
<dependency>
<groupId>org.springframework.boot</groupId>
<artifactId>spring-boot-starter-hateoas</artifactId>
</dependency>
Ok, now we can consider implementation options.
Entity extends RepresentationModel with links directly in Controller class
Firstly, extend our entity models with RepresentationModel.
public class Movie extends RepresentationModel<Movie>
public class Director extends RepresentationModel<Director>
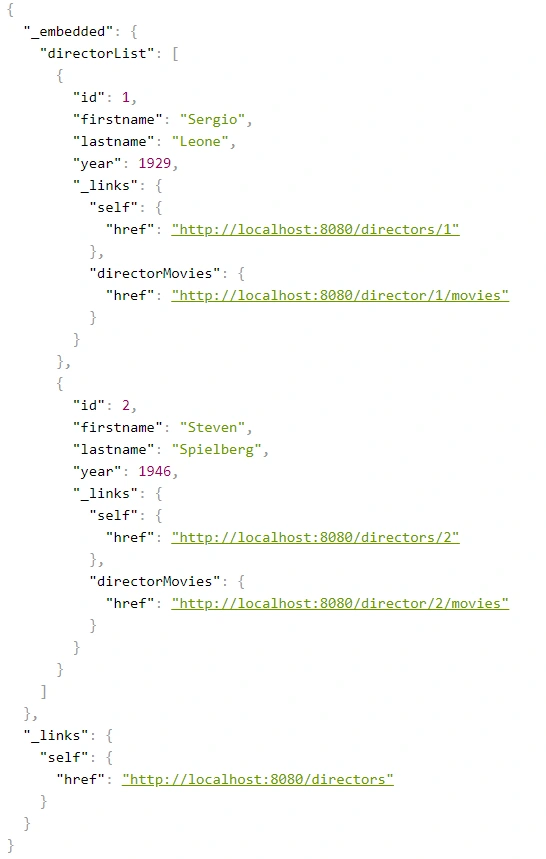
Then, add links to RepresentationModel within each controller. The example below returns all directors from the system. By adding two links to each director - to himself and to the entire collection. A link is also added to the collection. The key elements of this code are two methods with static imports:
-
linkTo() -
methodOn()
@GetMapping("/directors")
public ResponseEntity<CollectionModel<Director>> getAllDirectors() {
List<Director> directors = directorService.getAllDirectors();
directors.forEach(director -> {
director.add(linkTo(methodOn(DirectorController.class).getDirectorById(director.getId())).withSelfRel());
director.add(linkTo(methodOn(DirectorController.class).getDirectorMovies(director.getId())).withRel("directorMovies"));
});
Link allDirectorsLink = linkTo(methodOn(DirectorController.class).getAllDirectors()).withSelfRel());
return ResponseEntity.ok(CollectionModel.of(directors, allDirectorsLink));
}
This is the response we get after invoking such controller:
We can get a similar result when requesting a specific resource.
@GetMapping("/directors/{id}")
public ResponseEntity<Director> getDirector(@PathVariable("id") Long id) {
return directorService.getDirectorById(id)
.map(director -> {
director.add(linkTo(methodOn(DirectorController.class).getDirectorById(id)).withSelfRel());
director.add(linkTo(methodOn(DirectorController.class).getDirectorMovies(id)).withRel("directorMovies"));
director.add(linkTo(methodOn((DirectorController.class)).getAllDirectors()).withRel("directors"));
return ResponseEntity.ok(director);
})
.orElse(ResponseEntity.notFound().build());
}
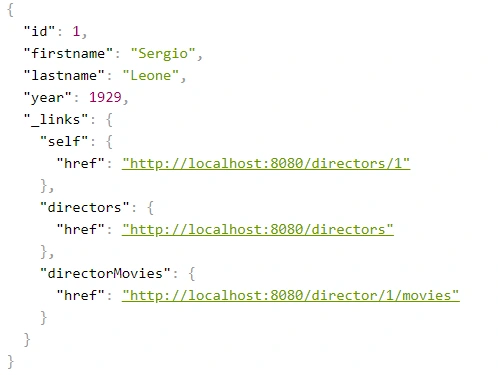
The main advantage of this implementation is simplicity. But making our entity dependent on an external library is not a very good idea. Plus, the code repetition for adding links for a specific resource is immediately noticeable. You can, of course, bring it to some private method, but there is a better way.
Use Assemblers - SimpleRepresentationModelAssembler
And it’s not about assembly language, but about a special kind of class that converts our resource to RepresentationModel.
One of such assemblers is SimpleRepresentationModelAssembler. Its implementation goes as follows:
@Component
public class DirectorAssembler implements SimpleRepresentationModelAssembler<Director> {
@Override
public void addLinks(EntityModel<Director> resource) {
Long directorId = resource.getContent().getId();
resource.add(linkTo(methodOn(DirectorController.class).getDirectorById(directorId)).withSelfRel());
resource.add(linkTo(methodOn(DirectorController.class).getDirectorMovies(directorId)).withRel("directorMovies"));
}
@Override
public void addLinks(CollectionModel<EntityModel<Director>> resources) {
resources.add(linkTo(methodOn(DirectorController.class).getAllDirectors()).withSelfRel());
}
}
In this case, our entity will be wrapped in an EnityModel (this class extends RepresentationModel ) to which the links specified by us in the addLinks() will be added. Here we overwrite two addLinks() methods - one for entire data collections and the other for single resources. Then, as part of the controller, it is enough to call the toModel() or toCollectionModel() method ( addLinks() are template methods here), depending on whether we return a collection or a single representation.
@GetMapping
public ResponseEntity<CollectionModel<EntityModel<Director>>> getAllDirectors() {
return ResponseEntity.ok(directorAssembler.toCollectionModel(directorService.getAllDirectors()));
}
@GetMapping(value = "directors/{id}")
public ResponseEntity<EntityModel<Director>> getDirectorById(@PathVariable("id") Long id) {
return directorService.getDirectorById(id)
.map(director -> {
EntityModel<Director> directorRepresentation = directorAssembler.toModel(director)
.add(linkTo(methodOn(DirectorController.class).getAllDirectors()).withRel("directors"));
return ResponseEntity.ok(directorRepresentation);
})
.orElse(ResponseEntity.notFound().build());
}
The main benefit of using the SimpleRepresentationModelAssembler is the separation of our entity from the RepresentationModel , as well as the separation of the adding link logic from the controller.
The problem arises when we want to add hypermedia to the nested elements of an object. Obtaining the effect, as in the example below, is impossible in a current way.
{
"id": "M0002",
"title": "Once Upon a Time in America",
"year": 1984,
"rating": "R",
"directors": [
{
"id": "D0001",
"firstname": "Sergio",
"lastname": "Leone",
"year": 1929,
"_links": {
"self": {
"href": "http://localhost:8080/directors/D0001"
}
}
}
],
"_links": {
"self": {
"href": "http://localhost:8080/movies/M0002"
}
}
}
Create DTO class with RepresentationModelAssembler
The solution to this problem is to combine the two previous methods, modifying them slightly. In our opinion, RepresentationModelAssembler offers the most possibilities. It removes the restrictions that arose in the case of nested elements for SimpleRepresentationModelAssembler . But it also requires more code from us because we need to prepare DTOs, which are often done anyway. This is the implementation based on RepresentationModelAssembler :
@Component
public class DirectorRepresentationAssembler implements RepresentationModelAssembler<Director, DirectorRepresentation> {
@Override
public DirectorRepresentation toModel(Director entity) {
DirectorRepresentation directorRepresentation = DirectorRepresentation.builder()
.id(entity.getId())
.firstname(entity.getFirstname())
.lastname(entity.getLastname())
.year(entity.getYear())
.build();
directorRepresentation.add(linkTo(methodOn(DirectorController.class).getDirectorById(directorRepresentation.getId())).withSelfRel());
directorRepresentation.add(linkTo(methodOn(DirectorController.class).getDirectorMovies(directorRepresentation.getId())).withRel("directorMovies"));
return directorRepresentation;
}
@Override
public CollectionModel<DirectorRepresentation> toCollectionModel(Iterable<? extends Director> entities) {
CollectionModel<DirectorRepresentation> directorRepresentations = RepresentationModelAssembler.super.toCollectionModel(entities);
directorRepresentations.add(linkTo(methodOn(DirectorController.class).getAllDirectors()).withSelfRel());
return directorRepresentations;
}
}
When it comes to controller methods, they look the same as for SimpleRepresentationModelAssembler , the only difference is that in the ResponseEntity the return type is DTO - DirectorRepresentation .
@GetMapping
public ResponseEntity<CollectionModel<DirectorRepresentation>> getAllDirectors() {
return ResponseEntity.ok(directorRepresentationAssembler.toCollectionModel(directorService.getAllDirectors()));
}
@GetMapping(value = "/{id}")
public ResponseEntity<DirectorRepresentation> getDirectorById(@PathVariable("id") String id) {
return directorService.getDirectorById(id)
.map(director -> {
DirectorRepresentation directorRepresentation = directorRepresentationAssembler.toModel(director)
.add(linkTo(methodOn(DirectorController.class).getAllDirectors()).withRel("directors"));
return ResponseEntity.ok(directorRepresentation);
})
.orElse(ResponseEntity.notFound().build());
}
Here is our DTO model:
@Builder
@Getter
@EqualsAndHashCode(callSuper = false)
@Relation(itemRelation = "director", collectionRelation = "directors")
public class DirectorRepresentation extends RepresentationModel<DirectorRepresentation> {
private final String id;
private final String firstname;
private final String lastname;
private final int year;
}
The @Relation annotation allows you to configure the relationship names to be used in the HAL representation. Without it, the relationship names match the class name and a suffix List for the collection.
By default, JSON+HAL looks like this:
{
"_embedded": {
"directorRepresentationList": [
…
]
},
"_links": {
…
}
}
However, annotation @Relation can change the name of directors :
{
"_embedded": {
"directors": [
…
]
},
"_links": {
…
}
}
Summarizing the HATEOAS concept, it consists of a few pros and cons.
Pros:
- If the client uses it, we can change the API address for our resources without breaking the client.
- Creates good self-documentation, and table of contents of API to the person who has the first contact with our API.
- Can simplify building some conditions on the frontend, e.g., whether the button should be disabled / enabled based on whether the link to corresponding the action exists.
- Less coupling between frontend and backend.
- Just like writing tests imposes on us to stick to the SRP principle in class construction, HATEOAS can keep us in check when designing API.
Cons:
- Additional work needed on implementing non-business functionality.
- Additional network overhead. The size of the transferred data is larger.
- Adding links to some resources can be sometimes complicated and can introduce mess in controllers.
Changes in Spring HATEOAS 1.0
Spring HATEOAS has been available since 2012, but the first release of version 1.0 was in 2019.
The main changes concerned the changes to the package paths and names of some classes, e.g.
Old New ResourceSupport RepresentationModel Resource EntityModel Resources CollectionModel PagedResources PagedModel ResourceAssembler RepresentationModelAssembler
It is worth paying attention to a certain naming convention - the replacement of the word Resource in class names with the word Representation . It occurred because these types do not represent resources but representations, which can be enriched with hypermedia. It is also more in the spirit of REST. We are returning the resource representations, not the resources themselves. In the new version, there is a tendency to move away from constructors in favor of static construction methods - .of() .
It is also worth mentioning that the old version has no equivalent for SimpleRepresentationModelAssembler . On the other hand, the ResourceAssembler interface has only the toResource() method (equivalent - toModel() ) and no equivalent for toCollectionModel() . Such a method is found in RepresentationModelAssembler and is the toModelCollection() method.
The creators of the library have also included a script that migrates old package paths and old class names to the new version. You can check it here .
8 tips for an agile debugging of a web application
Building a complex web application, you've probably encountered the fact that something didn’t work as planned. You’ve spent hours and hours looking for a bug in your code and then on the internet searching for help with fixing the problem. To make it easier for you, in this article we explain some effective techniques of debugging a web application that significantly reduce the pain of debugging and shorten the time of detecting issues.
Console.log
First, a commonly used javascript method console.log. You can insert a method in your code with the given variable. During code execution, the application will return the value of the variables specified inside the method in the console. This is the easiest way to check if the program returns the expected value.
Unfortunately, this is not a very effective method of debugging. Such an approach t does not allow us to see the progress of code execution (unless we insert console.log every few lines, but then the amount of data thrown in the console will be unreadable and we will only make a mess in the code.) Furthermore, it returns only the passed variable, provided that the application does not throw an error while executing the code.
Tip no. 1
If you have many console.logs put the name in a string and the next variable, e.g., console.log(‘variable’, variable).
Chrome DevTools (Source Tab)
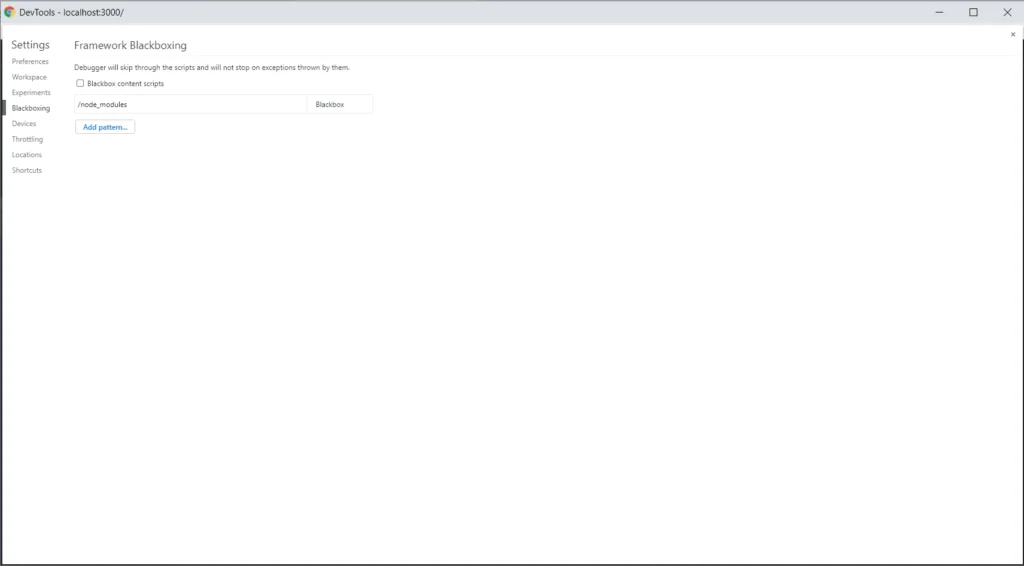
A more efficient method for debugging a web application is to use Chrome DevTools and Source Tab. Before we start debugging in the source tab, we need to add node_modules to black boxing. We add this rule so that when going through breakpoints it does not show us files from external packages, which makes debugging difficult. We need to open settings in Chrome → Blackboxing → Add patterns and then write there /node_modules .
When you add node_modules to black boxing we can go to the Source Tab. Let’s assume you want to follow in real time the process of your function, and check the outputs. Press Ctrl + O in the source tab, and enter a source file name. Then put the breakpoints on the lines of code that interest, you and you can start executing the process in your browser. When the lines you selected start processing, the browser will stop executing the code. See the screenshot below.
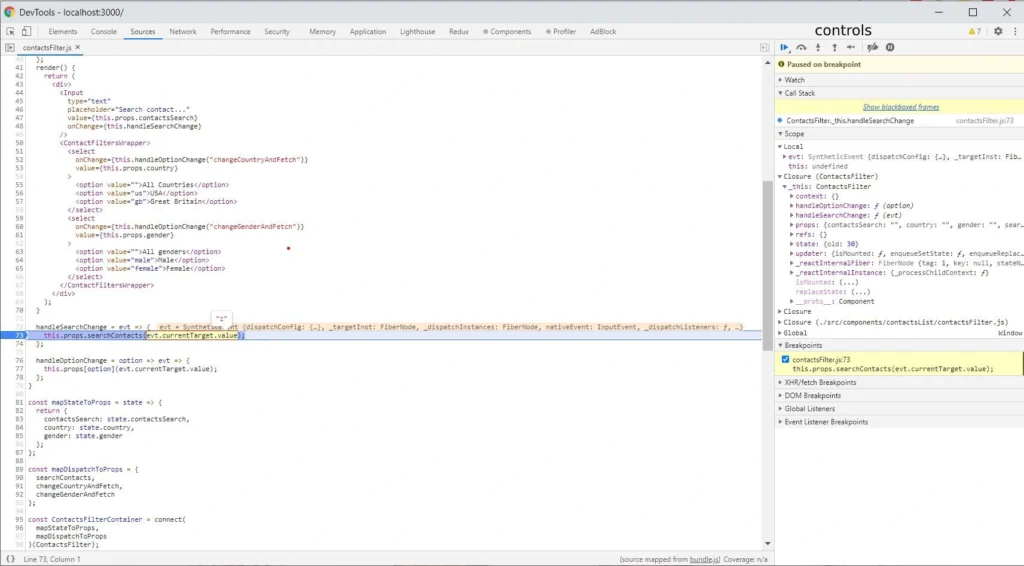
As you can see, the current line of code where the browser has stopped has a blue background. On the right side, there is a bar where our command center is located. Here is our brief introduction.
Controls
At the top of the bar, you have the controls section. Let's focus on the crucial elements. The first Resume control takes us to the next marked breakpoint within the scope of the code being executed. The second control Step over next function call takes us to the next line of the code being executed. The last Deactive breakpoints control deactivates the selected breakpoints. It’s a useful control when we have many breakpoints selected, and we want to go back to clicking through the application for a while without pausing at every breakpoint.
Scopes
We have a scopes section below. We have several types of scopes: local (the currently performed function), and closures depending on the scope in which we are (for example, the parent of the currently performed function or a component). In each of these scopes, the browser shows us all variables occurring in them.
Breakpoints
The last section discussed is breakpoints. It shows what breakpoints and in what files are marked. Using checkboxes, we can easily deactivate and reactivate them.
Tips no. 2-5
- If you use immutable.js in your project, install the Immutable.js Object Formatter plugin and activate it in browser settings. This will significantly simplify the debugging of immutable objects.
- If you do not use immutable.js in your project and you use Visual Studio Code as IDE, We strongly recommend installing and configuring Debugger for Chrome (VSC does not have an immutable.js formatting plugin). It simplifies debugging even further and allows for faster code changes.
- If the source tab doesn’t show your local files check the source map in your project.
- When the browser stops on a breakpoint you have access to variables also in the console.
React Developer Tools
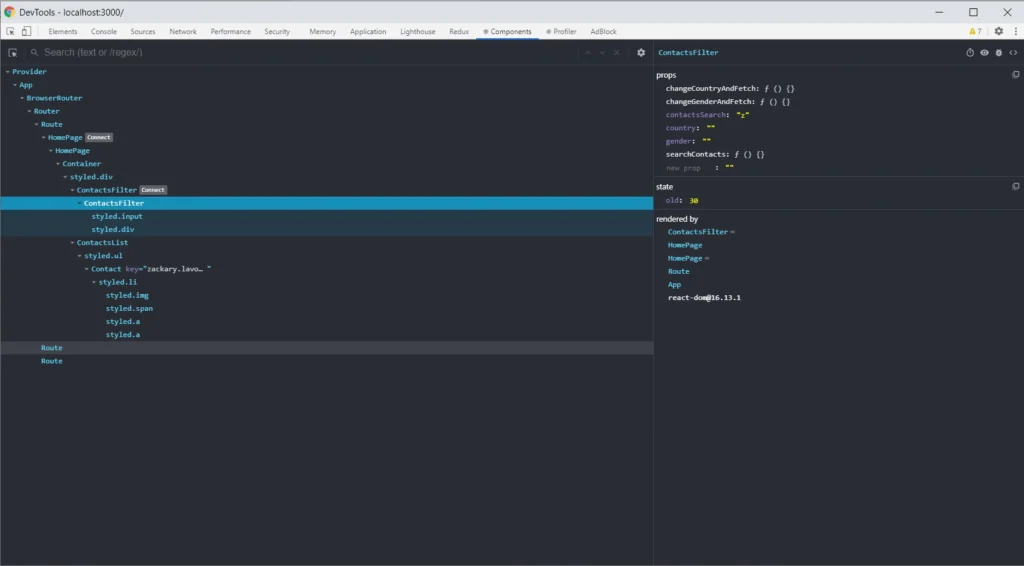
React Developer Tools are also helpful solutions. Such tools allow you to easily view the React tree structure in your project, the states, and props in the component. The Select an element in the page to inspect it function is powerful, especially when you don't know the whole project. It helps you find the component you need to update.
Tip no. 6
If you use Vue.js, you can use Vue.js devtools. The extension has similar functions and access to Vuex (the redux equivalent in react).
Redux DevTools
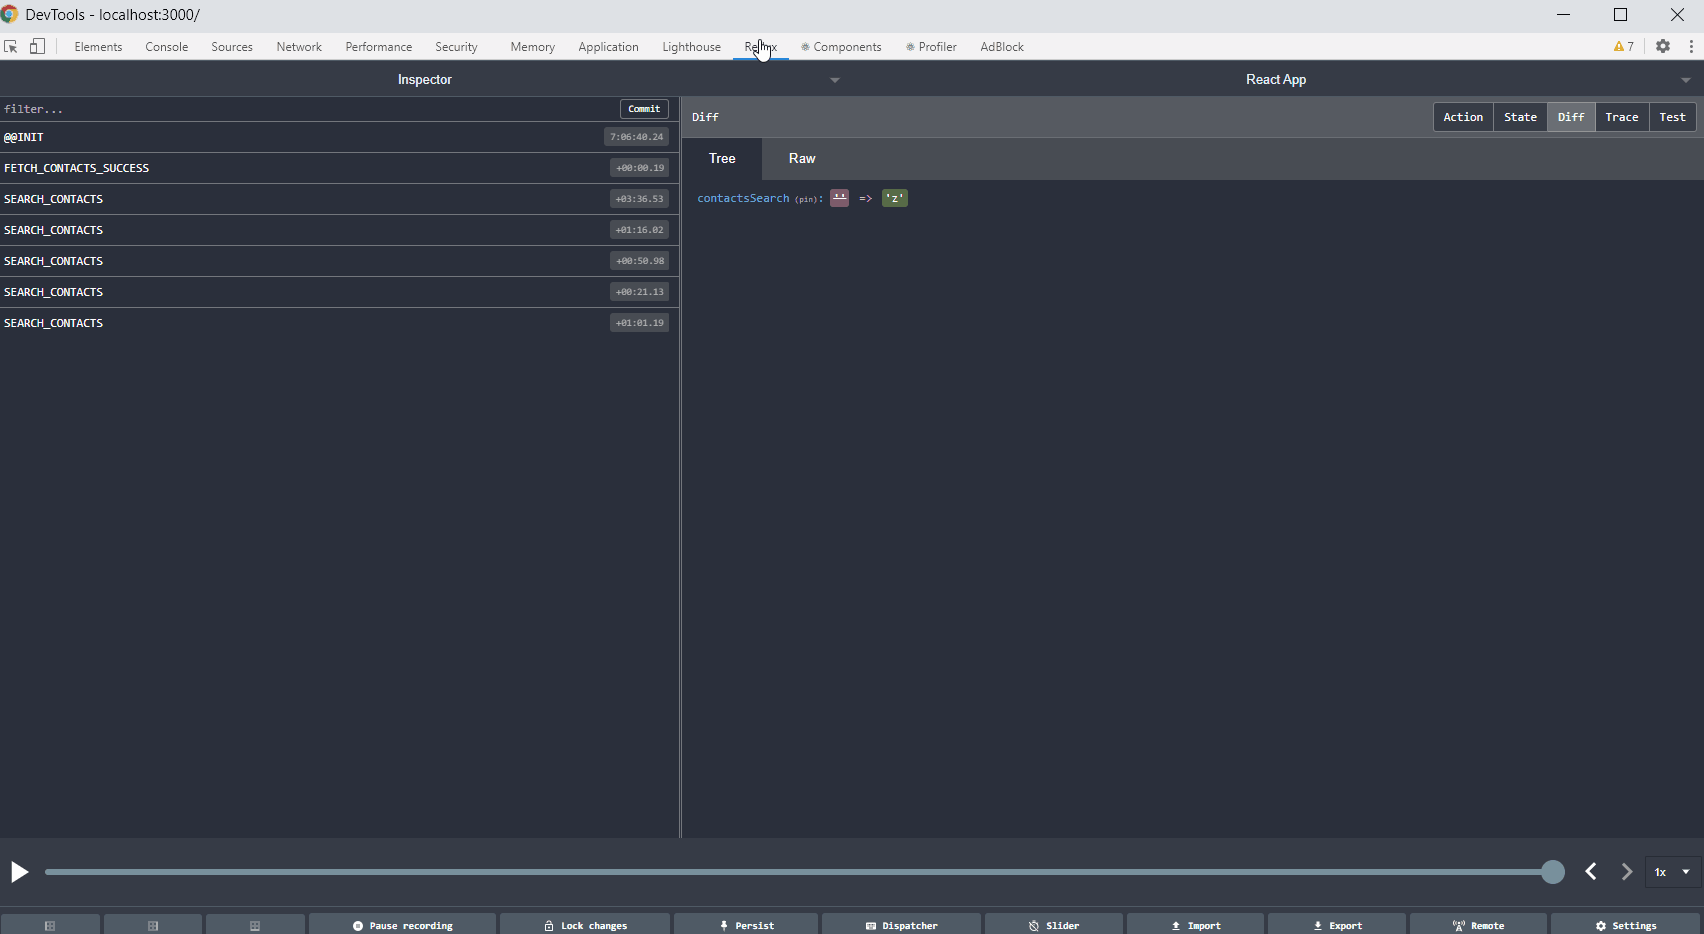
If you use Redux in your project, Redux DevTools is a must-have. Such a solution allows you to track the full flow of actions, status changes, payload, and view the current store after each action performed. If something does not work as we assume, and everything seems fine in the code, it is worth considering what actions are dispatching, with what payload. Sometimes there are simple mistakes like copying the constant from the above action, renaming without changing the value, and then calling something completely different. Below is a gif showing the most important Redux DevTools functions.
Tip no. 7
If your application runs a large number of actions, the extension may not function properly due to insufficient memory to process that many actions. You can try to configure it in the extension options (in this case, the maxAge option.)
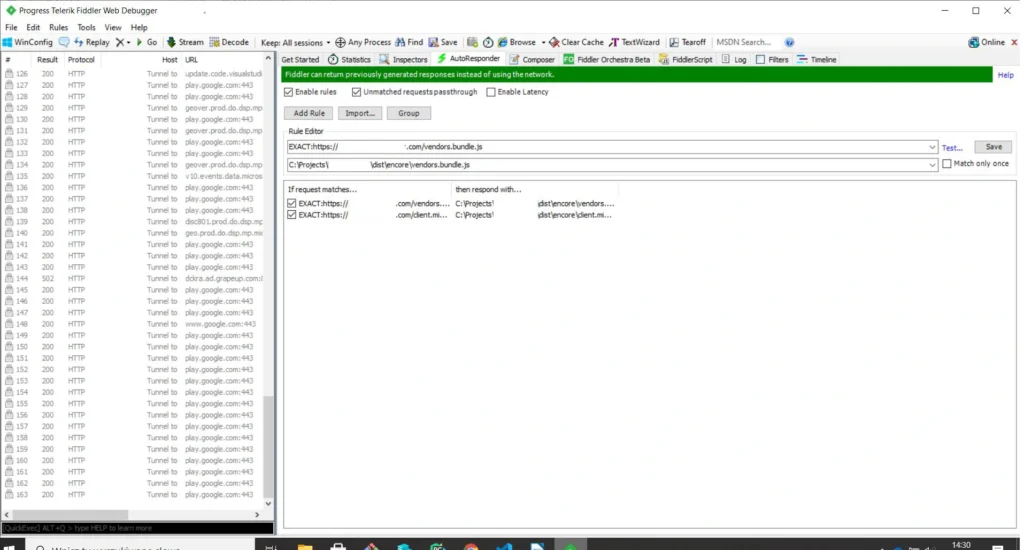
Fiddler
The last tool we would like to introduce is Fiddler . The tool was created to manage network traffic. It is extremely useful when we have some production bugs and we cannot copy the production data to a lower environment to debug locally. In such a situation, to have access to production data in the local environment, we set the traffic in the AutoResponder tab. When you open the page, instead of downloading the js file from the server, Fidler connects our locally built production file. Further debugging is done in the chrome dev tools source tab. Below is a screenshot with the setting to redirect traffic to the local file. The program also allows for mock endpoints.
Tip no. 8
If you want to create mocks of endpoints in an easy and fast way, you can use a mock moon program.
Summary of an agile debugging of a web application
For many of us, the process of debugging a web application is associated with a headache and long hours spent in front of the computer. However, this process can be shortened and made more pleasant if you have the right tools and know-how to use them. Often they are at your fingertips and for free. We shared with you the most important and useful tools that we use daily .
Interested in our services?
Reach out for tailored solutions and expert guidance.