About us
Our services

Capabilities

Legacy Modernization
Data Platforms
AI & Advanced Analytics

Industries

Automotive
Finance
Manufacturing

Solutions

Databoostr

Data Sharing & Monetization Platform

Cloudboostr

Multicloud Enterprise Kubernetes

Looking for something else?

Contact us for tailored solutions and expert guidance.

Contact
Case studies
Resources

Resources

Blog

Read our blog and stay informed about the industry’s latest trends and technology.

Ready to find your breaking point?

Stay updated with our newsletter.

Subscribe

Insights

Ebooks

Explore our resources and learn about building modern software solutions from experts and practitioners.

Read more
Careers
Contact
Blog
Automotive
Software development

Controlling HVAC module in cars using Android: A dive into SOME/IP integration

Michał Jaskurzyński
Lead Embedded Software Engineer
May 22, 2024
•
5 min read

Table of contents

Heading 2
Heading 3
Heading 4
Heading 5
Heading 6

Schedule a consultation with software experts

Contact us

In modern automotive design, controlling various components of a vehicle via mobile devices has become a significant trend, enhancing user experience and convenience. One such component is the HVAC (Heating, Ventilation, and Air Conditioning) system, which plays a crucial role in ensuring passenger comfort. In this article, we'll explore how to control the HVAC module in a car using an  Android device , leveraging the power of the SOME/IP protocol.

Understanding HVAC

HVAC stands for Heating, Ventilation, and Air Conditioning. In the context of automotive engineering, the HVAC system regulates the temperature, humidity, and air quality within the vehicle cabin. It includes components such as heaters, air conditioners, fans, and air filters. Controlling the HVAC system efficiently contributes to passenger comfort and safety during the journey.

Introduction to SOME/IP

In the SOME/IP paradigm, communication is structured around services, which encapsulate specific functionalities or data exchanges. There are two main roles within the service-oriented model:

 Provider: The provider is responsible for offering services to other ECUs within the network. In the automotive context, a provider ECU might control physical actuators, read sensor data, or perform other tasks related to vehicle operation. For example, in our case, the provider would be an application running on a domain controller within the vehicle.

The provider offers services by exposing interfaces that define the methods or data structures available for interaction. These interfaces can include operations to control actuators (e.g., HVAC settings) or methods to read sensor data (e.g., temperature, humidity).

 Consumer: The consumer, on the other hand, is an ECU that utilizes services provided by other ECUs within the network. Consumers can subscribe to specific services offered by providers to receive updates or invoke methods as needed. In the automotive context, a consumer might be responsible for interpreting sensor data, sending control commands, or performing other tasks based on received information.

Consumers subscribe to services they are interested in and receive updates whenever there is new data available. They can also invoke methods provided by the service provider to trigger actions or control functionalities. In our scenario, the consumer would be an application running on the Android VHAL (Vehicle Hardware Abstraction Layer), responsible for interacting with the vehicle's network and controlling HVAC settings.

SOME/IP communication flow

The communication flow in SOME/IP follows a publish-subscribe pattern, where providers publish data or services, and consumers subscribe to them to receive updates or invoke methods. This asynchronous communication model allows for efficient and flexible interaction between ECUs within the network.

diagram communication flow in IP

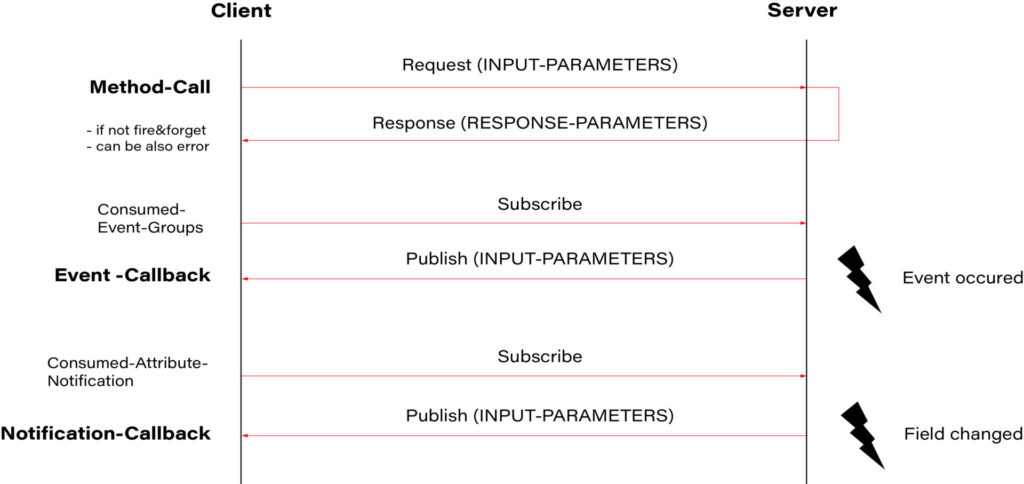
 Source: https://github.com/COVESA/vsomeip/wiki/vsomeip-in-10-minutes

In our case, the application running on the domain controller (provider) would publish sensor data such as temperature, humidity, and HVAC status. Subscribed consumers, such as the VHAL application on Android, would receive these updates and could send control commands back to the domain controller to adjust HVAC settings based on user input.

Leveraging VHAL in Android for vehicle networking

To communicate with the vehicle's network, Android provides the Vehicle Hardware Abstraction Layer (VHAL). VHAL acts as a bridge between the Android operating system and the  vehicle's onboard systems , enabling seamless integration of Android devices with the car's functionalities. VHAL abstracts the complexities of vehicle networking protocols, allowing developers to focus on implementing features such as HVAC control without worrying about low-level communication details.

diagram HVAC architecture

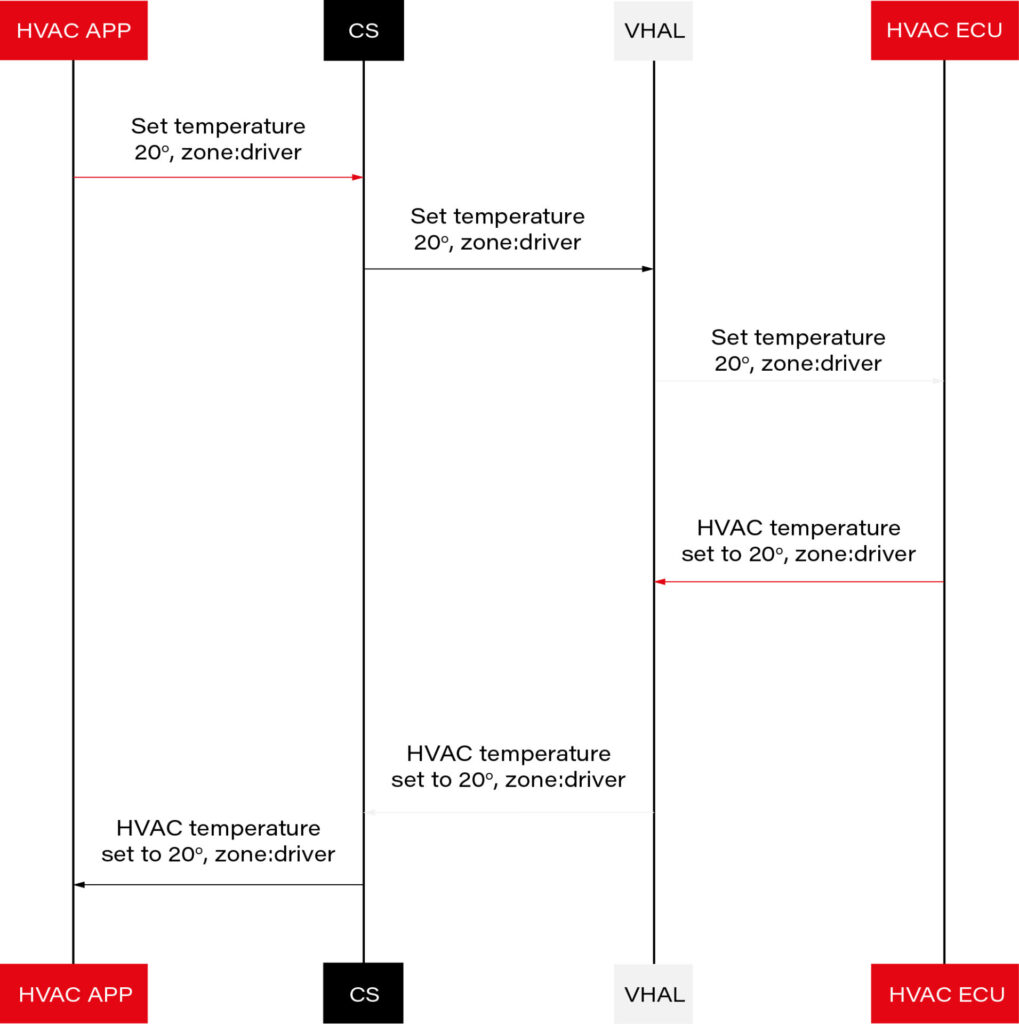
 Source: https://source.android.com/docs/automotive/vhal/previous/properties

Implementing SOMEIP Consumer in VHAL

To integrate a SOMEIP consumer into VHAL on Android 14, we will use the vsomeip library. Below are the steps required to implement this solution:

 Cloning the vsomeip Repository

Go to the main directory of your Android project and create a new directory named external/sdv:

mkdir -p external/sdv
cd external/sdv
git clone https://android.googlesource.com/platform/external/sdv/vsomeip

 Implementing SOMEIP Consumer in VHAL

In the  hardware/interfaces/automotive/vehicle/2.0/default directory, you can find the VHAL application code. In the  VehicleService.cpp file, you will find the default VHAL implementation.

int main(int /* argc */, char* /* argv */ []) {
   auto store = std::make_unique<VehiclePropertyStore>();
   auto connector = std::make_unique<DefaultVehicleConnector>();
   auto hal = std::make_unique<DefaultVehicleHal>(store.get(), connector.get());
   auto service = android::sp<VehicleHalManager>::make(hal.get());
   connector->setValuePool(hal->getValuePool());
   android::hardware::configureRpcThreadpool(4, true /* callerWillJoin */);
   ALOGI("Registering as service...");
   android::status_t status = service->registerAsService();
   if (status != android::OK) {
       ALOGE("Unable to register vehicle service (%d)", status);
       return 1;
   }
   ALOGI("Ready");
   android::hardware::joinRpcThreadpool();
   return 0;
}

The default implementation of VHAL is provided in  DefaultVehicleHal which we need to replace in  VehicleService.cpp .

From:

auto hal = std::make_unique<DefaultVehicleHal>(store.get(), connector.get());

To:

auto hal = std::make_unique<VendorVehicleHal>(store.get(), connector.get());

For our implementation, we will create a class called  VendorVehicleHal and inherit from the  DefaultVehicleHal class. We will override the set and get functions.

class VendorVehicleHal : public DefaultVehicleHal {
public:
   VendorVehicleHal(VehiclePropertyStore* propStore, VehicleHalClient* client);

   VehiclePropValuePtr get(const VehiclePropValue& requestedPropValue,
                           StatusCode* outStatus) override;
   StatusCode set(const VehiclePropValue& propValue) override;
};

The get function is invoked when the Android system requests information from VHAL, and set when it wants to set it. Data is transmitted in a VehiclePropValue object defined in hardware/interfaces/automotive/vehicle/2.0/types.hal.

It contains a variable, prop, which is the identifier of our property. The list of all properties can be found in the types.hal file.

We will filter out only the values of interest and redirect the rest to the default implementation.

StatusCode VendorVehicleHal::set(const VehiclePropValue& propValue) {
   ALOGD("VendorVehicleHal::set  propId: 0x%x areaID: 0x%x", propValue.prop, propValue.areaId);

   switch(propValue.prop)
   {
       case (int)VehicleProperty::HVAC_FAN_SPEED :
       break;

       case (int)VehicleProperty::HVAC_FAN_DIRECTION :
       break;

       case (int)VehicleProperty::HVAC_TEMPERATURE_CURRENT :
       break;

       case (int)VehicleProperty::HVAC_TEMPERATURE_SET:
       break;

       case (int)VehicleProperty::HVAC_DEFROSTER :
       break;
   
       case (int)VehicleProperty::HVAC_AC_ON :
       break;
       
       case (int)VehicleProperty::HVAC_MAX_AC_ON :
       break;

       case (int)VehicleProperty::HVAC_MAX_DEFROST_ON :
       break;

       case (int)VehicleProperty::EVS_SERVICE_REQUEST :
       break;

       case (int)VehicleProperty::HVAC_TEMPERATURE_DISPLAY_UNITS  :
       break;
   }

   return DefaultVehicleHal::set(propValue);
}

Now we need to create a SOME/IP service consumer. If you're not familiar with the SOME/IP protocol or the vsomeip library, I recommend reading the guide  "vsomeip in 10 minutes" .

It provides a step-by-step description of how to create a provider and consumer for SOME/IP.

In our example, we'll create a class called ZoneHVACService and define SOME/IP service, instance, method, and event IDs:

#define ZONE_HVAC_SERVICE_ID       0x4002
#define ZONE_HVAC_INSTANCE_ID       0x0001

#define ZONE_HVAC_SET_TEMPERATURE_ID     0x1011
#define ZONE_HVAC_SET_FANSPEED_ID     0x1012
#define ZONE_HVAC_SET_AIR_DISTRIBUTION_ID     0x1013

#define ZONE_HVAC_TEMPERATURE_EVENT_ID         0x2011
#define ZONE_HVAC_FANSPEED_EVENT_ID     0x2012
#define ZONE_HVAC_AIR_DISTRIBUTION_EVENT_ID     0x2013

#define ZONE_HVAC_EVENT_GROUP_ID         0x3011

class ZoneHVACService {
public:
   ZoneHVACService(bool _use_tcp) :
           app_(vsomeip::runtime::get()->create_application(vsomeipAppName)), use_tcp_(
           _use_tcp) {
   }

   bool init() {
       if (!app_->init()) {
           LOG(ERROR) << "[SOMEIP] " << __func__ << "Couldn't initialize application";
           return false;
       }

       app_->register_state_handler(
               std::bind(&ZoneHVACService::on_state, this,
                         std::placeholders::_1));
 
       app_->register_message_handler(
               ZONE_HVAC_SERVICE_ID, ZONE_HVAC_INSTANCE_ID, vsomeip::ANY_METHOD,
               std::bind(&ZoneHVACService::on_message, this,
                         std::placeholders::_1));


       app_->register_availability_handler(ZONE_HVAC_SERVICE_ID, ZONE_HVAC_INSTANCE_ID,
                                           std::bind(&ZoneHVACService::on_availability,
                                                     this,
                                                     std::placeholders::_1, std::placeholders::_2, std::placeholders::_3));

       std::set<vsomeip::eventgroup_t> its_groups;
       its_groups.insert(ZONE_HVAC_EVENT_GROUP_ID);
       app_->request_event(
               ZONE_HVAC_SERVICE_ID,
               ZONE_HVAC_INSTANCE_ID,
               ZONE_HVAC_TEMPERATURE_EVENT_ID,
               its_groups,
               vsomeip::event_type_e::ET_FIELD);
       app_->request_event(
               ZONE_HVAC_SERVICE_ID,
               ZONE_HVAC_INSTANCE_ID,
               ZONE_HVAC_FANSPEED_EVENT_ID,
               its_groups,
               vsomeip::event_type_e::ET_FIELD);
       app_->request_event(
               ZONE_HVAC_SERVICE_ID,
               ZONE_HVAC_INSTANCE_ID,
               ZONE_HVAC_AIR_DISTRIBUTION_EVENT_ID,
               its_groups,
               vsomeip::event_type_e::ET_FIELD);
       app_->subscribe(ZONE_HVAC_SERVICE_ID, ZONE_HVAC_INSTANCE_ID, ZONE_HVAC_EVENT_GROUP_ID);

       return true;
   }

   void send_temp(std::string temp)
   {
       LOG(INFO) << "[SOMEIP] " << __func__ <<  " temp: " << temp;
       std::shared_ptr< vsomeip::message > request;
       request = vsomeip::runtime::get()->create_request();
       request->set_service(ZONE_HVAC_SERVICE_ID);
       request->set_instance(ZONE_HVAC_INSTANCE_ID);
       request->set_method(ZONE_HVAC_SET_TEMPERATURE_ID);

       std::shared_ptr< vsomeip::payload > its_payload = vsomeip::runtime::get()->create_payload();
       its_payload->set_data((const vsomeip_v3::byte_t *)temp.data(), temp.size());
       request->set_payload(its_payload);
       app_->send(request);
   }

   void send_fanspeed(uint8_t speed)
   {
       LOG(INFO) << "[SOMEIP] " << __func__ <<  " speed: " << (int)speed;
       std::shared_ptr< vsomeip::message > request;
       request = vsomeip::runtime::get()->create_request();
       request->set_service(ZONE_HVAC_SERVICE_ID);
       request->set_instance(ZONE_HVAC_INSTANCE_ID);
       request->set_method(ZONE_HVAC_SET_FANSPEED_ID);

       std::shared_ptr< vsomeip::payload > its_payload = vsomeip::runtime::get()->create_payload();
       its_payload->set_data(&speed, 1U);
       request->set_payload(its_payload);
       app_->send(request);
   }
 
   void start() {
       app_->start();
   }

   void on_state(vsomeip::state_type_e _state) {
       if (_state == vsomeip::state_type_e::ST_REGISTERED) {
           app_->request_service(ZONE_HVAC_SERVICE_ID, ZONE_HVAC_INSTANCE_ID);
       }
   }

   void on_availability(vsomeip::service_t _service, vsomeip::instance_t _instance, bool _is_available) {
       LOG(INFO) << "[SOMEIP] " << __func__ <<  "Service ["
                 << std::setw(4) << std::setfill('0') << std::hex << _service << "." << _instance
                 << "] is "
                 << (_is_available ? "available." : "NOT available.");
   }

   void on_temperature_message(const std::shared_ptr<vsomeip::message> & message)
   {
       auto payload = message->get_payload();
       temperature_.resize(payload->get_length());
       temperature_.assign((char*)payload->get_data(), payload->get_length());
       LOG(INFO) << "[SOMEIP] " << __func__ <<  " temp: " << temperature_;

       if(tempChanged_)
       {
           tempChanged_(temperature_);
       }
   }

   void on_fanspeed_message(const std::shared_ptr<vsomeip::message> & message)
   {
       auto payload = message->get_payload();
       fan_speed_ = *payload->get_data();
       LOG(INFO) << "[SOMEIP] " << __func__ <<  " speed: " << (int)fan_speed_;

       if(fanspeedChanged_)
       {
           fanspeedChanged_(fan_speed_);
       }
   }

   void on_message(const std::shared_ptr<vsomeip::message> & message) {
       if(message->get_method() == ZONE_HVAC_TEMPERATURE_EVENT_ID)
       {
           LOG(INFO) << "[SOMEIP] " << __func__ << "TEMPERATURE_EVENT_ID received";
           on_temperature_message(message);
       }
      else  if(message->get_method() == ZONE_HVAC_FANSPEED_EVENT_ID)
       {
           LOG(INFO) << "[SOMEIP] " << __func__ << "ZONE_HVAC_FANSPEED_EVENT_ID received";
           on_fanspeed_message(message);
       }
   }


   std::function<void(std::string temp)> tempChanged_;
   std::function<void(uint8_t)> fanspeedChanged_;

private:
   std::shared_ptr< vsomeip::application > app_;
   bool use_tcp_;

   std::string temperature_;
   uint8_t fan_speed_;
   uint8_t air_distribution_t;
};

In our example, we will connect ZoneHVACService and VendorVehicleHal using callbacks.

hal->fandirectionChanged_ = [&](uint8_t direction) {
ALOGI("HAL fandirectionChanged_ callback direction: %u", direction);
hvacService->send_fandirection(direction);
};hal->fanspeedChanged_ = [&](uint8_t speed) {
ALOGI("HAL fanspeedChanged_ callback speed: %u", speed);
hvacService->send_fanspeed(speed);
};

The last thing left for us to do is to create a configuration for the vsomeip library. It's best to utilize a sample file from the library:  https://github.com/COVESA/vsomeip/blob/master/config/vsomeip-local.json

In this file, you'll need to change the address:

 "unicast" : "10.0.2.15",

to the address of our Android device.

Additionally, you need to set:

 "routing" : "service-sample",

to the name of our application.

The vsomeip stack reads the application address and the path to the configuration file from environment variables. The easiest way to do this in Android is to set it up before creating the ZoneHVACService object.

setenv("VSOMEIP_CONFIGURATION","/vendor/etc/vsomeip-local-hvac.json",1);
setenv("VSOMEIP_APPLICATION_NAME," "hvac-service",1);

That’s it. Now, we shoudl replace  vendor/bin/hw/android.hardware.automotive.vehicle@2.0-default-service with our new build and reboot Android.

If everything was configured correctly, we should see such logs, and the provider should get our requests.


04-25 06:52:12.989  3981  3981 I automotive.vehicle@2.0-default-service: Starting automotive.vehicle@2.0-default-service ...
04-25 06:52:13.005  3981  3981 I automotive.vehicle@2.0-default-service: Registering as service...
04-25 06:52:13.077  3981  3981 I automotive.vehicle@2.0-default-service: Ready
04-25 06:52:13.081  3981  4011 I automotive.vehicle@2.0-default-service: Starting UDP receiver
04-25 06:52:13.081  3981  4011 I automotive.vehicle@2.0-default-service: Socket created
04-25 06:52:13.082  3981  4010 I automotive.vehicle@2.0-default-service: HTTPServer starting
04-25 06:52:13.082  3981  4010 I automotive.vehicle@2.0-default-service: HTTPServer listen
04-25 06:52:13.091  3981  4012 I automotive.vehicle@2.0-default-service: Initializing SomeIP service ...
04-25 06:52:13.091  3981  4012 I automotive.vehicle@2.0-default-service: [SOMEIP] initInitialize app
04-25 06:52:13.209  3981  4012 I automotive.vehicle@2.0-default-service: [SOMEIP] initApp initialized
04-25 06:52:13.209  3981  4012 I automotive.vehicle@2.0-default-service: [SOMEIP] initClient settings [protocol=UDP]
04-25 06:52:13.210  3981  4012 I automotive.vehicle@2.0-default-service: [SOMEIP] Initialized SomeIP service result:1
04-25 06:52:13.214  3981  4028 I automotive.vehicle@2.0-default-service: [SOMEIP] on_availabilityService [4002.1] is NOT available.
04-25 06:54:35.654  3981  4028 I automotive.vehicle@2.0-default-service: [SOMEIP] on_availabilityService [4002.1] is available.
04-25 06:54:35.774  3981  4028 I automotive.vehicle@2.0-default-service: [SOMEIP] on_message Message received: [4002.0001.2012] to Client/Session [0000/0002]
04-25 06:54:35.774  3981  4028 I automotive.vehicle@2.0-default-service: [SOMEIP] on_messageZONE_HVAC_FANSPEED_EVENT_ID received
04-25 06:54:35.774  3981  4028 I automotive.vehicle@2.0-default-service: [SOMEIP] on_fanspeed_message speed: 1
04-25 06:54:35.775  3981  4028 I automotive.vehicle@2.0-default-service: SOMEIP fanspeedChanged_ speed: 1
04-25 06:54:36.602  3981  4028 I automotive.vehicle@2.0-default-service: [SOMEIP] on_message Message received: [4002.0001.2012] to Client/Session [0000/0003]
04-25 06:54:36.602  3981  4028 I automotive.vehicle@2.0-default-service: [SOMEIP] on_messageZONE_HVAC_FANSPEED_EVENT_ID received
04-25 06:54:36.603  3981  4028 I automotive.vehicle@2.0-default-service: [SOMEIP] on_fanspeed_message speed: 2
04-25 06:54:36.603  3981  4028 I automotive.vehicle@2.0-default-service: SOMEIP fanspeedChanged_ speed: 2
04-25 06:54:37.605  3981  4028 I automotive.vehicle@2.0-default-service: [SOMEIP] on_message Message received: [4002.0001.2012] to Client/Session [0000/0004]
04-25 06:54:37.606  3981  4028 I automotive.vehicle@2.0-default-service: [SOMEIP] on_messageZONE_HVAC_FANSPEED_EVENT_ID received
04-25 06:54:37.606  3981  4028 I automotive.vehicle@2.0-default-service: [SOMEIP] on_fanspeed_message speed: 3
04-25 06:54:37.606  3981  4028 I automotive.vehicle@2.0-default-service: SOMEIP fanspeedChanged_ speed: 3

Summary

In conclusion, the integration of Android devices with Vehicle Hardware Abstraction Layer (VHAL) for controlling HVAC systems opens up a new realm of possibilities for automotive technology. By leveraging the power of SOME/IP communication protocol and the vsomeip library, developers can create robust solutions for managing vehicle HVAC functionalities.

By following the steps outlined in this article, developers can create custom VHAL implementations tailored to their specific needs. From defining service interfaces to handling communication callbacks, every aspect of the integration process has been carefully explained to facilitate smooth development.

As automotive technology continues to evolve, the convergence of Android devices and vehicle systems represents a significant milestone in the journey towards smarter, more connected vehicles. The integration of HVAC control functionalities through VHAL and SOME/IP not only demonstrates the potential of modern automotive technology but also paves the way for future innovations in the field.

Grape Up guides enterprises on their data-driven transformation journey

Ready to ship? Let's talk.

Check our offer
Blog

Check related articles

Read our blog and stay informed about the industry's latest trends and solutions.

Automotive
Software development

Integrating HVAC control in Android with DDS

As modern vehicles become more connected and feature-rich, the need for efficient and reliable communication protocols has grown. One of the critical aspects of automotive systems is the  HVAC (Heating, Ventilation, and Air Conditioning) system , which enhances passenger comfort. This article explores how to integrate HVAC control in Android with the DDS (Data Distribution Service) protocol, enabling robust and scalable communication within automotive systems.

This article builds upon the concepts discussed in our previous article,  "Controlling HVAC Module in Cars Using Android: A Dive into SOME/IP Integration." It is recommended to read that article first, as it covers the integration of HVAC with SOME/IP, providing foundational knowledge that will be beneficial for understanding the DDS integration described here.

What is HVAC?

HVAC systems in vehicles are responsible for maintaining a comfortable cabin environment. These systems regulate temperature, airflow, and air quality within the vehicle. Key components include:

  •     Heaters    : Warm the cabin using heat from the engine or an electric heater.
  •     Air Conditioners    : Cool the cabin by compressing and expanding refrigerant.
  •     Ventilation    : Ensures fresh air circulation within the vehicle.
  •     Air Filters    : Remove dust and pollutants from incoming air.

Effective HVAC control is crucial for passenger comfort, and integrating this control with an Android device allows for a more intuitive user experience.

Detailed overview of the DDS protocol

Introduction to DDS

Data Distribution Service (DDS) is a middleware protocol and API standard for  data-centric connectivity . It enables scalable, real-time, dependable, high-performance, and interoperable data exchanges between publishers and subscribers. DDS is especially popular in mission-critical applications like aerospace, defense, automotive, telecommunications, and healthcare due to its robustness and flexibility.

Key functionalities of DDS

  •     Data-Centric Publish-Subscribe (DCPS)    : DDS operates on the publish-subscribe model where data producers (publishers) and data consumers (subscribers) communicate through topics. This model decouples the communication participants in both time and space, enhancing scalability and flexibility.
  •     Quality of Service (QoS)    : DDS provides extensive QoS policies that can be configured to meet specific application requirements. These policies control various aspects of data delivery, such as reliability, durability, latency, and resource usage.
  •     Automatic Discovery    : DDS includes built-in mechanisms for the automatic discovery of participants, topics, and data readers/writers. This feature simplifies the setup and maintenance of communication systems, as entities can join and leave the network dynamically without manual configuration.
  •     Real-Time Capabilities    : DDS is designed for real-time applications, offering low latency and high throughput. It supports real-time data distribution, ensuring timely delivery and processing of information.
  •     Interoperability and Portability    : DDS is standardized by the Object Management Group (OMG), which ensures interoperability between different DDS implementations and portability across various platforms.

Structure of DDS

 Domain Participant : The central entity in a DDS system is the domain participant. It acts as the container for publishers, subscribers, topics, and QoS settings. A participant joins a domain identified by a unique ID, allowing different sets of participants to communicate within isolated domains.

 Publisher and Subscriber :

  •     Publisher    : A publisher manages data writers and handles the dissemination of data to subscribers.
  •     Subscriber    : A subscriber manages data readers and processes incoming data from publishers.

 Topic : Topics are named entities representing a data type and the QoS settings. They are the points of connection between publishers and subscribers. Topics define the structure and semantics of the data exchanged.

 Data Writer and Data Reader :

  •     Data Writer    : Data writers are responsible for publishing data on a topic.
  •     Data Reader    : Data readers subscribe to a topic and receive data from corresponding data writers.

 Quality of Service (QoS) Policies : QoS policies define the contract between data writers and data readers. They include settings such as:

  •     Reliability    : Controls whether data is delivered reliably (with acknowledgment) or best-effort.
  •     Durability    : Determines how long data should be retained by the middleware.
  •     Deadline    : Specifies the maximum time allowed between consecutive data samples.
  •     Latency Budget    : Sets the acceptable delay from data writing to reading.

Ensuring communication correctness

DDS ensures correct communication through various mechanisms:

  •     Reliable Communication    : Using QoS policies, DDS can guarantee reliable data delivery. For example, the Reliability QoS can be set to "RELIABLE," ensuring that the subscriber acknowledges all data samples.
  •     Data Consistency    : DDS maintains data consistency using mechanisms like coherent access, which ensures that a group of data changes is applied atomically.
  •     Deadline and Liveliness    : These QoS policies ensure that data is delivered within specified time constraints. The Deadline policy ensures that data is updated at expected intervals, while the Liveliness policy verifies that participants are still active.
  •     Durability    : DDS supports various durability levels to ensure data persistence. This ensures that late-joining subscribers can still access historical data.
  •     Ownership Strength    : In scenarios where multiple publishers can publish on the same topic, the Ownership Strength QoS policy determines which publisher's data should be used when conflicts occur.

Building the CycloneDDS Library for Android

To integrate HVAC control in Android with the DDS protocol, we will use the CycloneDDS library. CycloneDDS is an open-source implementation of the DDS protocol, providing robust and efficient data distribution. The source code for CycloneDDS is available at  Eclipse CycloneDDS GitHub , and the instructions for building it for Android are detailed at  CycloneDDS Android Port .

Prerequisites

Before starting the build process, ensure you have the following prerequisites installed:

  •  Android NDK: Download and install the latest version from the     Android NDK website    .
  •  CMake: Download and install CMake from the CMake website.
  •  A suitable build environment (e.g., Linux or macOS).

Step-by-step build instructions

1.  Clone the CycloneDDS Repository : First, clone the CycloneDDS repository to your local machine:

git clone https://github.com/eclipse-cyclonedds/cyclonedds.git
cd cyclonedds

2.  Set Up the Android NDK : Ensure that the Android NDK is properly installed and its path is added to your environment variables.

export ANDROID_NDK_HOME=/path/to/your/android-ndk
export PATH=$ANDROID_NDK_HOME/toolchains/llvm/prebuilt/linux-x86_64/bin:$PATH

3.  Create a Build Directory : Create a separate build directory to keep the build files organized:

mkdir build-android
cd build-android

4.  Configure the Build with CMake : Use CMake to configure the build for the Android platform. Adjust the  ANDROID_ABI parameter based on your target architecture (e.g.,  armeabi-v7a ,  arm64-v8a ,  x86 ,  x86_64 ):

cmake -DCMAKE_TOOLCHAIN_FILE=$ANDROID_NDK_HOME/build/cmake/android.toolchain.cmake \
     -DANDROID_ABI=arm64-v8a \
     -DANDROID_PLATFORM=android-21 \
     -DCMAKE_BUILD_TYPE=Release \
     -DBUILD_SHARED_LIBS=OFF \
     -DCYCLONEDDS_ENABLE_SSL=NO \
     ..

5.  Build the CycloneDDS Library : Run the build process using CMake. This step compiles the CycloneDDS library for the specified Android architecture:

cmake --build .

Integrating CycloneDDS with VHAL

After building the CycloneDDS library, the next step is to integrate it with the VHAL (Vehicle Hardware Abstraction Layer) application.

1.  Copy the Built Library : Copy the  libddsc.a file from the build output to the VHAL application directory:

cp path/to/build-android/libddsc.a path/to/your/android/source/hardware/interfaces/automotive/vehicle/2.0/default/

2.  Modify the Android.bp File : Add the CycloneDDS library to the  Android.bp file located in the  hardware/interfaces/automotive/vehicle/2.0/default/ directory:

cc_prebuilt_library_static {
   name: "libdds",
   vendor: true,
   srcs: ["libddsc.a"],
   strip: {
       none: true,
   },
}

3.  Update the VHAL Service Target : In the same  Android.bp file, add the  libdds library to the  static_libs section of the  android.hardware.automotive.vehicle@2.0-default-service target:

cc_binary {
   name: "android.hardware.automotive.vehicle@2.0-default-service",
   srcs: ["VehicleService.cpp"],
   shared_libs: [
       "liblog",
       "libutils",
       "libbinder",
       "libhidlbase",
       "libhidltransport",
       "android.hardware.automotive.vehicle@2.0-manager-lib",
   ],
   static_libs: [
       "android.hardware.automotive.vehicle@2.0-manager-lib",
       "android.hardware.automotive.vehicle@2.0-libproto-native",
       "android.hardware.automotive.vehicle@2.0-default-impl-lib",
       "libdds",
   ],
   vendor: true,
}

Defining the Data Model with IDL

To enable DDS-based communication for HVAC control in our Android application, we need to define a data model using the Interface Definition Language (IDL). In this example, we will create a simple IDL file named  hvacDriver.idl that describes the structures used for HVAC control, such as fan speed, temperature, and air distribution.

hvacDriver.idl

Create a file named  hvacDriver.idl with the following content:

module HVACDriver
{
   struct FanSpeed
   {
       octet value;
   };

   struct Temperature
   {
       float value;
   };

   struct AirDistribution
   {
       octet value;
   };
};

Generating C Code from IDL

Once the IDL file is created, we can use the  idlc (IDL compiler) tool provided by CycloneDDS to generate the corresponding C code. The generated files will include  hvacDriver.h and  hvacDriver.c , which contain the data structures and serialization/deserialization code needed for DDS communication.

Run the following command to generate the C code:

idlc hvacDriver.idl

This command will produce two files:

  •     hvacDriver.h  
  •     hvacDriver.c  

Integrating the generated code with VHAL

After generating the C code, the next step is to integrate these files into the VHAL (Vehicle Hardware Abstraction Layer) application.

 Copy the Generated Files : Copy the generated  hvacDriver.h and  hvacDriver.c files to the VHAL application directory:

cp hvacDriver.h path/to/your/android/source/hardware/interfaces/automotive/vehicle/2.0/default/
cp hvacDriver.c path/to/your/android/source/hardware/interfaces/automotive/vehicle/2.0/default/

 Include the Generated Header : In the VHAL source files where you intend to use the HVAC data structures, include the generated header file. For instance, in  VehicleService.cpp , you might add:

 #include "hvacDriver.h"

 Modify the Android.bp File : Update the  Android.bp file in the  hardware/interfaces/automotive/vehicle/2.0/default/ directory to compile the generated C files and link them with your application:

cc_library_static {
   name: "hvacDriver",
   vendor: true,
   srcs: ["hvacDriver.c"],
}

cc_binary {
   name: "android.hardware.automotive.vehicle@2.0-default-service",
   srcs: ["VehicleService.cpp"],
   shared_libs: [
       "liblog",
       "libutils",
       "libbinder",
       "libhidlbase",
       "libhidltransport",
       "android.hardware.automotive.vehicle@2.0-manager-lib",
   ],
   static_libs: [
       "android.hardware.automotive.vehicle@2.0-manager-lib",
       "android.hardware.automotive.vehicle@2.0-libproto-native",
       "android.hardware.automotive.vehicle@2.0-default-impl-lib",
       "libdds",
       
"hvacDriver",
   ],
   vendor: true,
}

Implementing DDS in the VHAL Application

To enable DDS-based communication within the VHAL (Vehicle Hardware Abstraction Layer) application, we need to implement a service that handles DDS operations. This service will be encapsulated in the  HVACDDSService class, which will include methods for initialization and running the service.

Step-by-step implementation

1.  Create the HVACDDSService Class : First, we will define the  HVACDDSService class with methods for initializing the DDS entities and running the service to handle communication.

2.  Initialization : The  init method will create a DDS participant, and for each structure (FanSpeed, Temperature, AirDistribution), it will create a topic, reader, and writer.

3.  Running the Service : The  run method will continuously read messages from the DDS readers and trigger a callback function to handle data changes.

void HVACDDSService::init()
{

   /* Create a Participant. */
   participant = dds_create_participant (DDS_DOMAIN_DEFAULT, NULL, NULL);
   if(participant < 0)
   {
       LOG(ERROR) << "[DDS] " << __func__ << " dds_create_participant: " << dds_strretcode(-participant);
   }
   
   /* Create a Topic. */
   qos = dds_create_qos();
   dds_qset_reliability(qos, DDS_RELIABILITY_RELIABLE, DDS_SECS(10));
   dds_qset_durability(qos, DDS_DURABILITY_TRANSIENT_LOCAL);


   topic_temperature = dds_create_topic(participant, &Driver_Temperature_desc, "HVACDriver_Temperature", qos, NULL);
   if(topic_temperature < 0)
   {
       LOG(ERROR) << "[DDS] " << __func__ << " dds_create_topic(temperature): "<< dds_strretcode(-topic_temperature);
   }

   reader_temperature = dds_create_reader(participant, topic_temperature, NULL, NULL);
   if(reader_temperature < 0)
   {
       LOG(ERROR) << "[DDS] " << __func__ << " dds_create_reader(temperature): " << dds_strretcode(-reader_temperature);
   }
   
   writer_temperature = dds_create_writer(participant, topic_temperature, NULL, NULL);
   if(writer_temperature < 0)
   {
       LOG(ERROR) << "[DDS] " << __func__ << " dds_create_writer(temperature): " << dds_strretcode(-writer_temperature);
   }

   .....
}

void HVACDDSService::run()
{
   samples_temperature[0] = Driver_Temperature__alloc();
   samples_fanspeed[0] = Driver_FanSpeed__alloc();
   samples_airdistribution[0] = Driver_AirDistribution__alloc();
 
 
   while (true)
   {
       bool no_data = true;
       
       rc = dds_take(reader_temperature, samples_temperature, infos, MAX_SAMPLES, MAX_SAMPLES);
       if (rc < 0)  
       {
           LOG(ERROR) << "[DDS] " << __func__ << " temperature dds_take: " << dds_strretcode(-rc);
       }

       /* Check if we read some data and it is valid. */
       if ((rc > 0) && (infos[0].valid_data))
       {
           no_data = false;

           Driver_Temperature *msg = (Driver_Temperature *) samples_temperature[0];
           LOG(INFO) << "[DDS] " << __func__ << " === [Subscriber] Message temperature(" << (float)msg->value << ")";
           if (tempChanged_)
           {
               std::stringstream ss;
               ss << std::fixed << std::setprecision(2) << msg->value;
               tempChanged_(ss.str());
           }
       }
   

       ......


       if(no_data)
       {
           /* Polling sleep. */
           dds_sleepfor (DDS_MSECS (20));
       }
   }    
}    

Building and deploying the application

After implementing the  HVACDDSService class and integrating it into your VHAL application, the next steps involve building the application and deploying it to your Android device.

Building the application

1.  Build the VHAL Application : Ensure that your Android build environment is set up correctly and that all necessary dependencies are in place. Then, navigate to the root of your Android source tree and run the build command:

source build/envsetup.sh
lunch <target>
m -j android.hardware.automotive.vehicle@2.0-service

2.  Verify the Build : Check that the build completes successfully and that the binary for your VHAL service is created. The output binary should be located in the  out/target/product/<device>/system/vendor/bin/ directory.

Deploying the application

1.  Push the Binary to the Device : Connect your Android device to your development machine via USB, and use  adb to push the built binary to the device:

adb push out/target/product/<device>/system/vendor/bin/android.hardware.automotive.vehicle@2.0-service /vendor/bin/

2.  Restart device

Conclusion

In this article, we have covered the steps to integrate DDS (Data Distribution Service) communication for HVAC control in an Android Automotive environment using the CycloneDDS library. Here's a summary of the key points:

1.  CycloneDDS Library Setup :

  •     Cloned and built CycloneDDS for Android.  
  •  Integrated the built library into the VHAL application.

2.  Data Model Definition :

  •     Defined a simple data model for HVAC control using IDL.  
  •  Generated the necessary C code from the IDL definitions.

3.  HVACDDSService Implementation :

  •     Created the       HVACDDSService       class to manage DDS operations    .
  •     Implemented methods for initialization (       init       ) and runtime processing (       run       ).  
  •     Set up DDS entities such as participants, topics, readers, and writers.  
  •  Integrated DDS service into the VHAL application's main loop.

4.  Building and Deploying the Application

  •     Built the VHAL application and deployed it to the Android device.  
  •  Ensured correct permissions and successfully started the VHAL service.

By following these steps, you can leverage DDS for efficient, scalable, and reliable communication in automotive systems, enhancing HVAC systems' control and monitoring capabilities in Android Automotive environments. This integration showcases the potential of DDS in automotive applications, providing a robust framework for data exchange across different components and services.

Read more
View all
Connect

Interested in our services?

Reach out for tailored solutions and expert guidance.

Stay updated with our newsletter

Subscribe for fresh insights and industry analysis.

About UsCase studiesContactCareers
Capabilities:
Legacy ModernizationData PlatformsArtificial Intelligence
Industries:
AutomotiveFinanceManufacturing
Solutions:
DataboostrCloudboostr
Resources
BlogInsights
© Grape Up 2025
Cookies PolicyPrivacy PolicyTerms of use
Grape Up uses cookies

This website uses cookies to improve its user experience and provide personalized content for you. We use cookies for web analytics and advertising. You can accept these cookies by clicking "OK" or go to Details in order to manage your cookies preferences more precisely. To learn more, check out our Privacy and Cookies Policy

Accept allDetails
Grape Up uses cookies

Essential website cookies are necessary to provide you with services available through the website, autosave your settings and preferences, and to enhance the performance and security of the website - you have the right not to accept them through your web browser's settings, but your access to some functionality and areas of our website may be restricted.

Analytics cookies: (our own and third-party : Google, HotJar) – you can accept these cookies below:

Marketing cookies (third-party cookies: Hubspot, Facebook, LinkedIn) – you can accept these cookies below:

Ok