
Expert Software Engineer at Grape Up. His main area of expertise is the design and development of distributed software systems based on the cloud-native approach and microservices. Has experience in iOS mobile and macOS development. He also provides full support to clients at all stages of the solution design process, as well as development and deployment. In his free time, he likes to travel, he’s into photography and reading.
Read articles
Spring AI Alternatives for Java Applications
In today's world, as AI-driven applications grow in popularity and the demand for AI-related frameworks is increasing, Java software engineers have multiple options for integrating AI functionality into their applications.
This article is a second part of our series exploring java-based AI frameworks. In the previous article we described main features of the Spring AI framework. Now we'll focus on its alternatives and analyze their advantages and limitations compared to Spring AI.
Supported Features
Let's compare two popular open-source frameworks alternative to Spring AI. Both offer general-purpose AI models integration features and AI-related services and technologies.
LangChain4j - a Java framework that is a native implementation of a widely used in AI-driven applications LangChain Python library.
Semantic Kernel - a framework written by Microsoft that enables integration of AI Model into applications written in various languages, including Java.
LangChain4j
LangChain4j has two levels of abstraction.
High-level API, such as AI Services, prompt templates, tools, etc. This API allows developers to reduce boilerplate code and focus on business logic.
Low-level primitives: ChatModel, AiMessage, EmbeddingStore etc. This level gives developers more fine-grained control on the components behavior or LLM interaction although it requires writing of more glue code.
Models
LangChain4j supports text, audio and image processing using LLMs similarly to Spring AI. It defines a separate model classes for different types of content:
- ChatModel for chat and multimodal LLMs
- ImageModel for image generation.
Framework integrates with over 20 major LLM providers like OpenAI, Google Gemini, Anthropic Claude etc. Developers can also integrate custom models from HuggingFace platform using a dedicated HuggingFaceInferenceApiChatModel interface. Full list of supported model providers and model features can be found here: https://docs.langchain4j.dev/integrations/language-models
Embeddings and Vector Databases
When it comes to embeddings, LangChain4j is very similar to Spring AI. We have EmbeddingModel to create vectorized data for further storing it in vector store represented by EmbeddingStore class.
ETL Pipelines
Building ETL pipelines in LangChain4j requires more manual code. Unlike Spring AI, it does not have a dedicated set of classes or class hierarchies for ETL pipelines. Available components that may be used in ETL:
- TokenTextSegmenter, which provides functionality similar to TokenTextSplitter in Spring AI.
- Document class representing an abstract text content and its metadata.
- EmbeddingStore to store the data.
There are no built-in equivalents to Spring AI's KeywordMetadataEnricher or SummaryMetadataEnricher. To get a similar functionality developers need to implement custom classes.
Function Calling
LangChain4j supports calling code of the application from LLM by using @Tool annotation. The annotation should be applied to method that is intended to be called by AI model. The annotated method might also capture the original prompt from user.
Semantic Kernel for Java
Semantic Kernel for Java uses a different conceptual model of building AI related code compared to Spring AI or LangChain4j. The central component is Kernel, which acts as an orchestrator for all the models, plugins, tools and memory stores.
Below is an example of code that uses AI model combined with plugins for function calling and a memory store for vector database. All the components are integrated into a kernel:
public class MathPlugin implements SKPlugin {
    @DefineSKFunction(description = "Adds two numbers")
    public int add(int a, int b) {
        return a + b;
    }
}
...
OpenAIChatCompletion chatService = OpenAIChatCompletion.builder()
    .withModelId("gpt-4.1")
    .withApiKey(System.getenv("OPENAI_API_KEY"))
    .build();
KernelPlugin plugin = KernelPluginFactory.createFromObject(new MyPlugin(), "MyPlugin");
Store memoryStore = new AzureAISearchMemoryStore(...);
// Creating kernel object
Kernel kernel = Kernel.builder()
    .withAIService(OpenAIChatCompletion.class, chatService)
    .withPlugin(plugin)
    .withMemoryStorage(memoryStore)
    .build();
KernelFunction<String> prompt = KernelFunction.fromPrompt("Some prompt...").build();
FunctionResult<String> result = prompt.invokeAsync(kernel)
    .withToolCallBehavior(ToolCallBehavior.allowAllKernelFunctions(true))
    .withMemorySearch("search tokens", 1, 0.8) // Use memory collection
    .block();
Models
When it comes to available Models Semantic Kernel is more focused on chat-related functions such as text completion and text generation. It contains a set of classes implementing AIService interface to communicate with different LLM providers, e.g. OpenAIChatCompletion, GeminiTextGenerationService etc. It does not have Java implementation for Text Embeddings, Text to Image/Image to Text, Text to Audio/Audio to Text services, although there are experimental implementations in C# and Python for them.
Embeddings and Vector Databases
For Vector Store Semantic Kernel offers the following components: VolatileVectorStore for in-memory storage, AzureAISearchVectorStore that integrates with Azure Cognitive Search and SQLVectorStore/JDBCVectorStore for an abstraction of SQL database vector stores.
ETL Pipelines
Semantic Kernel for Java does not provide an abstraction for building ETL pipelines. It doesn't have dedicated classes for extracting data or transforming it like Spring AI. So, developers would need to write custom code or use third party libraries for data processing for extraction and transformation parts of the pipeline. After these phases the transformed data might be stored in one of the available Vector Stores.
Azure-centric Specifics
The framework is focused on Azure related services such as Azure Cognitive Search or Azure OpenAI and offers a smooth integration with them. It provides a functionality for smooth integration requiring minimal configuration with:
- Azure Cognitive Search
- Azure OpenAI
- Azure Active Directory (authentication and authorization)
Because of these integrations, developers need to write little or no glue code when using Azure ecosystem.
Ease of Integration in a Spring Application
LangChain4j
LangChain4j is framework-agnostic and designed to work with plain Java. It requires a little more effort to integrate into Spring Boot app. For basic LLM interaction the framework provides a set of libraries for popular LLMs. For example, langchain4j-open-ai-spring-boot-starter that allows smooth integration with Spring Boot. The integration of components that do not have a dedicated starter package requires a little effort that often comes down to creating of bean objects in configuration or building object manually inside of the Spring service classes.
Semantic Kernel for Java
Semantic Kernel, on the other hand, doesn't have a dedicated starter packages for spring boot auto config, so the integration involves more manual steps. Developers need to create spring beans, write a spring boot configuration, define kernels objects and plugin methods so they integrate properly with Spring ecosystem. So, such integration needs more boilerplate code compared to LangChain4j or Spring AI.
It's worth mentioning that Semantic Kernel uses publishers from Project Reactor concept, such as Mono<T> type to asynchronously execute Kernel code, including LLM prompts, tools etc. This introduces an additional complexity to an application code, especially if the application is not written in a reactive approach and does not use publisher/subscriber pattern.
Performance and Overhead
LangChain4j
LangChain4j is distributed as a single library. This means that even if we use only certain functionality the whole library still needs to be included into the application build. This slightly increases the size of application build, though it's not a big downside for the most of Spring Boot enterprise-level applications.
When it comes to memory consumption, both LangChain4j and Spring AI have a layer of abstraction, which adds some insignificant performance and memory overhead, quite a standard for high-level java frameworks.
Semantic Kernel for Java
Semantic Kernel for Java is distributed as a set of libraries. It consists of a core API, and of various connectors each designed for a specific AI services like OpenAI, Azure OpenAI. This approach is similar to Spring AI (and Spring related libraries in general) as we only pull in those libraries that are needed in the application. This makes dependency management more flexible and reduces application size.
Similarly to LangChain4j and Spring AI, Semantic Kernel brings some of the overhead with its abstractions like Kernel, Plugin and SemanticFunction. In addition, because its implementation relies on Project Reactor, the framework adds some cpu overhead related to publisher/subscriber pattern implementation. This might be noticeable for applications that at the same time require fast response time and perform large amount of LLM calls and callable functions interactions.
Stability and Production Readiness
LangChain4j
The first preview of LangChain4j 1.0.0 version has been released on December 2024. This is similar to Spring AI, whose preview of 1.0.0-M1 version was published on December same year. Framework contributor's community is large (around 300 contributors) and is comparable to the one of Spring AI.
However, the observability feature in LangChain4j is still experimental, is in development phase and requires manual adjustments. Spring AI, on the other hand, offers integrated observability with micrometer and Spring Actuator which is consistent with other Spring projects.
Semantic Kernel for Java
Semantic Kernel for Java is a newer framework than LangChain4j or Spring AI. The project started in early 2024. Its first stable version was published back in 2024 too. Its contributor community is significantly smaller (around 30 contributors) comparing to Spring AI or LangChain4j. So, some features and fixes might be developed and delivered slower.
When it comes to functionality Semantic Kernel for Java has less abilities than Spring AI or LangChain4j especially those related to LLM models integration or ETL. Some of the features are experimental. Other features, like Image to Text are available only in .NET or Python.
On the other hand, it allows smooth and feature-rich integration with Azure AI services, benefiting from being a product developed by Microsoft.
Choosing Framework
For developers already familiar with LangChain framework and its concepts who want to use Java in their application, the LangChain4j is the easiest and more natural option. It has same or very similar concepts that are well-known from LangChain.
Since LangChain4j provides both low-level and high-level APIs it becomes a good option when we need to fine tune the application functionality, plug in custom code, customize model behavior or have more control on serialization, streaming etc.
It's worth mentioning that LangChain4j is an official framework for AI interaction in Quarkus framework. So, if the application is going to be written in Quarkus instead of Spring, the LangChain4j is a go-to technology here.
On the other hand, Semantic Kernel for Java is a better fit for applications that rely on Microsoft Azure AI services, integrate with Microsoft-provided infrastructure or primarily focus on chat-based functionality.
If the application relies on structured orchestration and needs to combine multiple AI models in a centralized consistent manner, the kernel concept of Semantic Kernel becomes especially valuable. It helps to simplify management of complex AI workflows. Applications written in reactive style will also benefit from Semantic Kernel's design.
Links
https://learn.microsoft.com/en-us/azure/app-service/tutorial-ai-agent-web-app-semantic-kernel-java
https://gist.github.com/Lukas-Krickl/50f1daebebaa72c7e944b7c319e3c073
https://javapro.io/2025/04/23/build-ai-apps-and-agents-in-java-hands-on-with-langchain4j
Variable key names for Codable objects: How to make Swift Codable protocol even more useful?
It’s hard to imagine modern Swift iOS application that doesn’t work with multiple data sources like servers, local cache DB, etc, or doesn’t parse/convert data between different formats. While Swift Codable protocol is a great solution for this purpose it also has some important drawbacks when developing a complex app that deals with multiple data formats. From this article, you will know how to improve the Swift Codable mechanism and why it’s important.
Swift has a great feature for encoding/decoding data in key-value formats called Coding protocol. That is, you may choose to store data in e.g. JSON format or plist by at minimum just defining names of the keys for which the corresponding values should be stored.
Advantages and disadvantages of Swift Codable protocol
Here are the advantages of Codable protocol:
1) Type safety . You don't need typecasting or parsing the strings read from the file. Swift does for you all the low-level reading and parsing only returning you a ready to use object of a concrete type.
2) The Simplicity of usage . At a minimum, you may just declare that your type that needs to be encodable or decodable confirms to the corresponding protocol (either Codable or it's parts Decodable or Encodable). The compiler will match the keys from your data (e.g., JSON) automatically based on the names of your type's properties. In case you need advanced matching of keys' names with your type's properties (and in most real life cases you need it), you may define an enum CodingKeys that will do the mapping.
3) Extensibility . When you need some advanced parsing, you may implement initialization and encoding methods to parse/encode the data. This, for example, allows you to decode several fields of JSON combining them into a single value or make some advanced transformation before assigning value to your codable object's property.
Despite its flexibility, the Codable approach has a serious limitation. For real-life tasks, it's often needed to store the same data in several data formats at the same time. For example, data coming from a server may be stored locally as a cache. Info about user account coming from the server is often stored locally to keep user sign in. At first glance, the Swift Codable protocol can be perfectly used in this case. However, the problem is that, as soon as one data source changes names of the keys for the stored values, the data won't be readable anymore by Codable object.
As an example let's imagine a situation when an application gets user info for a user account from the server and stores it locally to be used when the app is relaunched. In this case, the proper solution for parsing JSON data from the server into a model object is to use Codable protocol. The simplest way to store the object locally would be to just use Codable to encode the object (e.g. in plist format) and to store it locally. But codable object will use a certain set of keys that is defined by server JSON field names in our example. So if the server changes names of the JSON fields it returns, we'll have to change Codable implementation to match the new fields' names. So Codable implementation will use new keys to encode/decode data. And since the same implementation is used for local data, as well the user info that was previously saved locally will become unreadable.
To generalize, if we have multiple data sources for the same keyed data, the Codable implementation will stop working as soon as one of the data sources changes the names of the keys.
Approach with multiple entities
Let's see how to improve the Swift Codable protocol to properly handle such a situation. We need a way to encode/decode from each data source without restriction to have the same key names. To do it, we may write a model object type for each data source.
Back to our example with server and local data, we’ll have the following code:
// Server user info
struct ServerUserInfo: Codable {
let user_name: String
let email_address: String
let user_age: Int
}
// Local user info to store in User Defaults
struct LocalUserInfo: Codable {
let USER_NAME: String
let EMAIL: String
let AGE: Int
}
So we have two different structures: one to encode/decode user info from server and the other to encode/decode data for local usage in User Defaults. But semantically, this is the same entity. So code that works with such object should be able to use any of the structures above interchangeably. For this purpose, we may declare the following protocol:
protocol UserInfo {
var userName: String { get }
var email: String { get }
var age: Int { get }
}
Each user info structure will then conform to the protocol:
extension LocalUserInfo: UserInfo {
var userName: String {
return USER_NAME
}
var email: String {
return EMAIL
}
var age: Int {
return AGE
}
}
extension ServerUserInfo: UserInfo {
var userName: String {
return user_name
}
var email: String {
return email_address
}
var age: Int {
return user_age
}
}
So, code that requires user info will use it via UserInfo protocol.
Such solution is a very straightforward and easy to read. However, it requires much code. That is, we have to define a separate structure for each format a particular entity can be encoded/decoded from. Additionally, we need to define a protocol describing the entity and make all the structures conform to that protocol.
Approach with variational keys
Let’s find another approach that will make it possible to use a single structure to do the encoding/decoding from different key sets for different formats. Let’s also make this approach maintain simplicity in its usage. Obviously, we cannot have Coding keys bound to properties’ names as in the previous approach. This means we’ll need to override init(from:) and encode(to:) methods from Codable protocol. Below is a UserInfo structure defined for coding in JSON format from our example.
extension UserInfo: Codable {
private enum Keys: String, CodingKey {
case userName = "user_name"
case email = "email_address"
case age = "user_age"
}
init(from decoder: Decoder) throws {
let container = try decoder.container(keyedBy: Keys.self)
self.userName = try container.decode(String.self, forKey: .userName)
self.email = try container.decode(String.self, forKey: .email)
self.age = try container.decode(Int.self, forKey: .age)
}
func encode(to encoder: Encoder) throws {
var container = encoder.container(keyedBy: Keys.self)
try container.encode(userName, forKey: .userName)
try container.encode(email, forKey: .email)
try container.encode(age, forKey: .age)
}
}
In fact, to make the code above decode and encode another data format we only need to change the keys themselves. That is, we’ve used simple enum conforming to the CodingKey protocol to define the keys. However, we may implement arbitrary type conforming to the CodingKey protocol. For example, we may choose a structure. So, a particular instance of a structure will represent the coding key used in calls to container.decode() or container.encode() . While implementation will provide info about the keys of a particular data format. The code of such structure is provided below:
struct StringKey: CodingKey {
let stringValue: String
let intValue: Int?
init?(stringValue: String) {
self.intValue = nil
self.stringValue = stringValue
}
init?(intValue: Int) {
self.intValue = intValue
self.stringValue = "\(intValue)"
}
}
So, the StringKey just wraps a concrete key for a particular data format. For example, to decode userName from JSON, we’ll create the corresponding StringKey instances specifying JSON user_name field into init?(stringValue:) method.
Now we need to find a way to define key sets for each data type. To each property from UserInfo , we need somehow assign keys that can be used to encode/decode the property’s value. E.g. for property userName corresponds to user_name key for JSON and USER_NAME key for plist format. To represent each property, we may use Swift’s KeyPath type. Also, we would like to store information about which data format each key is used for. Translating the above into code we’ll have the following:
enum CodingType {
case local
case remote
}
extension UserInfo {
static let keySet: [CodingType: [PartialKeyPath<UserInfo>: String]] = [
// for .plist stored locally
.local: [
\Self.userName: "USER_NAME",
\Self.email: "EMAIL",
\Self.age: "AGE"
],
// for JSON received from server
.remote: [
\Self.userName: "user_name",
\Self.email: "email_address",
\Self.age: "user_age"
]
]
}
To let the code inside init(from:) and encode(to:) methods aware of the decode/encode data format we may use user info from Decoder/Encoder objects:
extension CodingUserInfoKey {
static var codingTypeKey = CodingUserInfoKey(rawValue: "CodingType")
}
...
let providedType = <either .local or .remote from CodingType enum>
let decoder = JSONDecoder()
if let typeKey = CodingUserInfoKey.codingTypeKey {
decoder.userInfo[typeKey] = providedType
}
When decoding/encoding, we’ll just read the value from user info for CodingUserInfoKey.codingTypeKey key and pick the corresponding set of coding keys.
Let’s bring all the above together and see how our code will look like:
enum CodingError: Error {
case keyNotFound
case keySetNotFound
}
extension UserInfo: Codable {
static func codingKey(for keyPath: PartialKeyPath<Self>,
in keySet: [PartialKeyPath<Self>: String]) throws -> StringKey {
guard let value = keySet[keyPath],
let codingKey = StringKey(stringValue: value) else {
throw CodingError.keyNotFound
}
return codingKey
}
static func keySet(from userInfo: [CodingUserInfoKey: Any]) throws -> [PartialKeyPath<Self>: String] {
guard let typeKey = CodingUserInfoKey.codingTypeKey,
let type = userInfo[typeKey] as? CodingType,
let keySet = Self.keySets[type] else {
throw CodingError.keySetNotFound
}
return keySet
}
init(from decoder: Decoder) throws {
let keySet = try Self.keySet(from: decoder.userInfo)
let container = try decoder.container(keyedBy: StringKey.self)
self.userName = try container.decode(String.self, forKey: try Self.codingKey(for: \Self.userName,
in: keySet))
self.email = try container.decode(String.self, forKey: try Self.codingKey(for: \Self.email,
in: keySet))
self.age = try container.decode(Int.self, forKey: try Self.codingKey(for: \Self.age,
in: keySet))
}
func encode(to encoder: Encoder) throws {
let keySet = try Self.keySet(from: encoder.userInfo)
var container = encoder.container(keyedBy: StringKey.self)
try container.encode(userName, forKey: try Self.codingKey(for: \Self.userName,
in: keySet))
try container.encode(email, forKey: try Self.codingKey(for: \Self.email,
in: keySet))
try container.encode(age, forKey: try Self.codingKey(for:
\Self.age,
in: keySet))
}
}
Note we’ve added two helper static methods: codingKey(for keyPath , in keySet) and keySet(from userInfo) . Their usage makes code of init(from:) and encode(to:) more clear and straightforward.
Generalizing the solution
Let’s improve the solution with coding key sets we’ve developed to make it easier and faster to apply. The solution has some boilerplate code for transforming KeyPath of the type into a coding key and choosing the particular key set. Also, encoding/ decoding code has a repeating call to codingKey(for keyPath, in keySet) that complicates the init(from:) and encode(to:) implementation and can be reduced.
First, we’ll extract helping code into helper objects. It will be enough to just use structures for this purpose:
private protocol CodingKeyContainable {
associatedtype Coding
var keySet: [PartialKeyPath<Coding>: String] { get }
}
private extension CodingKeyContainable {
func codingKey(for keyPath: PartialKeyPath<Coding>) throws -> StringKey {
guard let value = keySet[keyPath], let codingKey = StringKey(stringValue: value) else {
throw CodingError.keyNotFound
}
return codingKey
}
}
struct DecodingContainer<CodingType>: CodingKeyContainable {
fileprivate let keySet: [PartialKeyPath<CodingType>: String]
fileprivate let container: KeyedDecodingContainer<StringKey>
func decodeValue<PropertyType: Decodable>(for keyPath: KeyPath<CodingType, PropertyType>) throws -> PropertyType {
try container.decode(PropertyType.self, forKey: try codingKey(for: keyPath as PartialKeyPath<CodingType>))
}
}
struct EncodingContainer<CodingType>: CodingKeyContainable {
fileprivate let keySet: [PartialKeyPath<CodingType>: String]
fileprivate var container: KeyedEncodingContainer<StringKey>
mutating func encodeValue<PropertyType: Encodable>(_ value: PropertyType, for keyPath: KeyPath<CodingType, PropertyType>) throws {
try container.encode(value, forKey: try codingKey(for: keyPath as PartialKeyPath<CodingType>))
}
}
Protocol CodingKeyContainable just helps us to reuse key set retrieving code in both structures.
Now let’s define our own Decodable/Encodable-like protocols. This will allow us to hide all the boilerplate code for getting the proper key set and creating a decoder/encoder object inside of the default implementation of init(from:) and encode(to:) methods. On the other hand, it will allow us to simplify decoding/encoding the concrete values by using DecodingContainer and EncodingContainer structures we’ve defined above. Another important thing is that by using the protocols, we’ll also add the requirement of implementing:
static let keySet: [CodingType: [PartialKeyPath<UserInfo>: String]] by codable types for which we want to use the approach with variational keys.
Here are our protocols:
// MARK: - Key Sets
protocol VariableCodingKeys {
static var keySets: [CodingType: [PartialKeyPath<Self>: String]] { get }
}
private extension VariableCodingKeys {
static func keySet(from userInfo: [CodingUserInfoKey: Any]) throws -> [PartialKeyPath<Self>: String] {
guard let typeKey = CodingUserInfoKey.codingTypeKey,
let type = userInfo[typeKey] as? CodingType,
let keySet = Self.keySets[type] else {
throw CodingError.keySetNotFound
}
return keySet
}
}
// MARK: - VariablyDecodable
protocol VariablyDecodable: VariableCodingKeys, Decodable {
init(from decodingContainer: DecodingContainer<Self>) throws
}
extension VariablyDecodable {
init(from decoder: Decoder) throws {
let keySet = try Self.keySet(from: decoder.userInfo)
let container = try decoder.container(keyedBy: StringKey.self)
let decodingContainer = DecodingContainer<Self>(keySet: keySet, container: container)
try self.init(from: decodingContainer)
}
}
// MARK: - VariablyEncodable
protocol VariablyEncodable: VariableCodingKeys, Encodable {
func encode(to encodingContainer: inout EncodingContainer<Self>) throws
}
extension VariablyEncodable {
func encode(to encoder: Encoder) throws {
let keySet = try Self.keySet(from: encoder.userInfo)
let container = encoder.container(keyedBy: StringKey.self)
var encodingContainer = EncodingContainer<Self>(keySet: keySet, container: container)
try self.encode(to: &encodingContainer)
}
}
typealias VariablyCodable = VariablyDecodable & VariablyEncodable
Let’s now rewrite our UserInfo structure to make it conform to newly defined VariablyCodable protocol:
extension UserInfo: VariablyCodable {
static let keySets: [CodingType: [PartialKeyPath<UserInfo>: String]] = [
// for .plist stored locally
.local: [
\Self.userName: "USER_NAME",
\Self.email: "EMAIL",
\Self.age: "AGE"
],
// for JSON received from server
.remote: [
\Self.userName: "user_name",
\Self.email: "email_address",
\Self.age: "user_age"
]
]
init(from decodingContainer: DecodingContainer<UserInfo>) throws {
self.userName = try decodingContainer.decodeValue(for: \.userName)
self.email = try decodingContainer.decodeValue(for: \.email)
self.age = try decodingContainer.decodeValue(for: \.age)
}
func encode(to encodingContainer: inout EncodingContainer<UserInfo>) throws {
try encodingContainer.encodeValue(userName, for: \.userName)
try encodingContainer.encodeValue(email, for: \.email)
try encodingContainer.encodeValue(age, for: \.age)
}
}
This is where a true power of protocols comes. By conforming to VariablyCodable our type automatically becomes Codable. Moreover, without any boilerplate code, we now have the ability to use different sets of coding keys.
Going back to the advantages of the Codable protocol we outlined at the beginning of the article, let’s check which ones VariablyCodable has.
1) Type safety . Nothing changed here comparing to the Codable protocol. VariablyCodable protocol still uses concrete types without involving any dynamic type casting.
2) The simplicity of usage . Here we don’t have declarative style option with enum describing keys and values. We always have to implement init(from:) and encode(to:) methods. However, since the minimum implementation of the methods is so simple and straightforward (each line just decodes/encodes single property) that it is comparable to defining CodingKeys enum for the Codable protocol.
3) Extensibility . Here we have more abilities comparing to the Codable protocol. Additionally to the flexibility that can be achieved by implementing init(from:) and encode(to:) methods, we have also keySets map that provides an additional layer of abstraction of coding keys.
Summary
We defined two approaches to extend the behavior of the Codable protocol in Swift to be able to use a different set of keys for different data formats. The first approach implying separate types for each data format works well for simple cases when having two data formats and a single data flow direction (e.g. decoding only). However, if your app has multiple data sources and encodes/decodes arbitrarily between those formats you may stick to approach with VariablyCodable protocol. While it needs more code to be written at the beginning, once implemented, you will gain great flexibility and extensibility in coding/decoding data for any type you need .
Using Azure DevOps Platform for configurable builds of a multicomponent iOS application
In this article, we share our experience with building CI/CD for a multicomponent multi-language project. The article describes the structure of the pipeline set up and focuses on two important features needed in our project’s automation workflow: pipeline chaining and build variants.
The CI/CD usage is a standard in any application development process . Mobile apps are no exception here.
In our project, we have several iOS applications and libraries. Each application uses several components (frameworks) written in different languages. The components structure is as in the picture below:
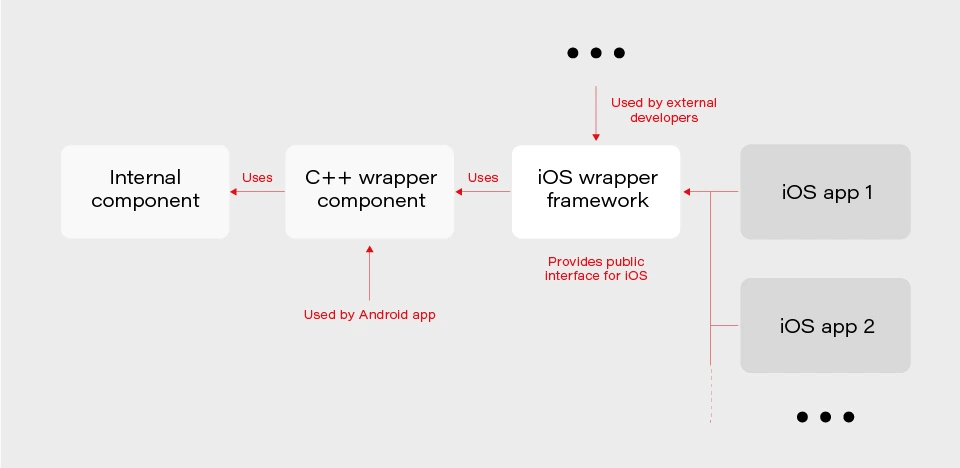
The internal component contains all the core (domain) logic that apps use. The first two components are C/C++ based and are compiled as frameworks. The wrapper framework provides an Objective-C/Swift layer that is necessary for using it in an iOS application. There are several iOS applications that are using the wrapper framework. Additionally, this framework is also used by external developers in their own applications.
The wrapper framework should be built for both x86_64 and arm64 architecture to be used on both a simulator and a real iOS device. Also, we need a debug and release version for each architecture. When it comes to applications each of them may be built for AppStore, internal testing (Ad-Hoc) or TestFlight beta testing.
Without an automated CI/CD system, it would be extremely inefficient to build the whole chain of components manually. As well as to track the status of merges/pull requests for each component. That is to control if the component is still building after the merge. Let’s see how our pipelines are organized.
Using Azure DevOps pipelines
For building CI/CD, we’ve chosen Azure DevOps. We use Azure Pipelines for building our components and Azure Artifacts to host the built components, as well as several external 3rd party libraries.
To check the integrity and track the build status of each component, we have special integration pipelines that are integrated with GitHub. That is, each pull request that is going to be merged to the development branch of a particular component triggers this special integration pipeline.
For regular builds, we have pipelines based on the purpose of each branch type: experimental, feature, bugfix, development, and master.
Since each component depends on another component built on Azure, we should somehow organize the dependency management. That is versioning of the dependent components and their download. Let’s take a look at our approach to dependency management.
Dependency management
Azure provides basic CLI tools to manipulate pipelines. We may use it to download dependencies (inform of Azure artifacts) required to build a particular component. At a minimum, we need to know the version, configuration (debug or release) and architecture (x86_64 or arm64) of a particular dependency. Let’s take a look at the options that Azure CLI gives us:
az artifacts universal download \
--organization "${Organization}" \
--feed "${Feed}" \
--name "${Name}" \
--version "${Version}" \
--path "${DownloadPath}"
The highlighted parameters are the most important for us. The CLI does not provide explicit support of build configuration or architecture. For this purpose, we simply use the name (specified as --name parameter) that has a predefined format:
<component name>-<configuration>-<architecture>
This makes it possible to have components of the same version with different architecture and build configurations.
The other aspect is how to store info about version, configuration, etc., for each dependency. We’ve decided to use the git config format to store this info. It’s pretty easy to parse using git config and does not require any additional parsing tool. So, each component has its own dependencies.config file. Below is the example file for component dependent on two frameworks:
[framework1]
architecture = "arm64"
configuration = "release"
version = "1.2.3.123"[framework2]
architecture = "arm64"
configuration = "release"
version = "3.2.1.654"
To make it possible to download dependencies as part of the build process, we have a special script that manages dependencies. The script is run as a build phase of the Xcode project of each component. Below are the basic steps the script does.
1. Parse dependencies.config file to get version, architecture, and configuration. The important thing here is that if some info is omitted (e.g. we may not specify build configuration in dependencies.config file) script will use the one the dependent component is being built with. That is, when we build the current component for the simulator script will download dependencies of simulator architecture.
2. Form artifact’s name and version and forward them to az artifacts universal download command .
There are two key features of our build infrastructure: pipeline chaining and build variants support. They cover two important cases in our project. Let’s describe how we implemented them.
Chaining pipelines
When a low-level core component is updated, we want to test these changes in the application. For this purpose, we should build the framework dependent on the core component and build the app using this framework. Automation here is extremely useful. Here’s how it looks like with our pipelines.
1. When a low-level component (let’s call it component1 ) is changed on a specific branch (e.g., integration), a special integration pipeline is triggered. When a component is built and an artifact is published, the pipeline starts another pipeline that will build the next dependent component. For this purpose, az pipelines build queue command is used as follows:
az pipelines build queue \
--project "component2" \
--branch "integration" \
--organization "${Organization}" \
--definition-name "${BuildDefinition}" \
--variables \
"config.pipeline.component1Version=${BUILD_BUILDNUMBER}" \
“config.pipeline.component1Architecture=${CurrentArchitecture}" \
"config.pipeline.component1Configuration=${CurrentConfiguration}"
This command starts the pipeline for building component2 (the one dependent on component1 ).
The key part is passing the variables config.pipeline.component1 Version, config.pipeline.component1Architecture and config.pipeline.component1Configuration to the pipeline. These variables define the version, build configuration, and architecture of component1 (the one being built by the current pipeline) that should be used to build component2 . The command overrides the corresponding values from dependencies.config file of component2 . This means that the resulting component2 will use newly built component1 dependency instead of the one defined by dependencies.config file.
2. When component2 is built, it uses the same approach to launch the next pipeline for building a subsequent component.
3. When all the components in the chain required by the app are ready, the integration pipeline building the app is launched. As a part of its build process, the app is sent to TestFlight.
So, simply pushing changes of the lowest level component to the integration branch gives you a ready-to-test app on TestFlight.
Build variants
Some external developers that use the wrapper iOS framework may need additional features that should not be available in regular public API intended for other developers. This brings us to the need of having different variants of the same component. Such variants may be distinct in different features, or in behavior of the same features.
Additional methods or classes may be provided as a specific or experimental API in a wrapper framework for iOS. The other use case is to have behavior different than the default one for regular (official) public API in the wrapper framework. For instance, a method that writes an image file to a specified directory in some cases may be required to also write additional files along with the image (e.g., file with image processing settings or metadata).
Going further, an implementation may be changed not only in the iOS framework itself but also in its dependencies. As described previously, core logic is implemented in a separate component and iOS framework is dependent on. So, when some code behavior change is required by a particular build variant, most likely it will also be done in the internal component.
Let’s see how to better implement build variants. The proper understanding of use cases and potential extension capabilities are crucial for choosing the correct solution.
The first important thing is that in our project different build variants have few changes in API compared to each other. Usually, a build variant contains a couple of additional methods or classes. Most part of the code is the same for all variants. Inside implementation, there also may be some distinctions based on the concrete variant we’re building. So, it would be enough to have some preprocessor definition (active compilation conditions for Swift) indicating which build variant is being built.
The second thing is that the number of build variants is often changed. Some may be removed, (e.g., when an experimental API becomes generally accessible.) On the other hand, when an external developer requests another specific functionality, we need to create a new variant by slightly modifying the standard implementation or exposing some experimental/internal API. This means that we should be able to add or remove build variants fast.
Let’s now describe our implementation based on the specifics given above. There are two parts of the implementation. The first one is at the pipeline level.
Since we may often add/remove our build variants, creating a pipeline for each build variant is obviously not a good idea. Instead, we add a special variable config.pipeline.buildVariant in the pipeline’s Variables to each pipeline that is supposed to be used for building different variants. The variable should be added to pipelines of all the components the resulting iOS framework depends on because a specific feature often requires code changes, not only in the iOS framework itself but also in its dependencies. Pipeline implementation then will use this variable e.g., for downloading specific dependencies required by a particular variant, tagging build to indicate the variant, and, of course, providing the corresponding build setting to Xcode build command.
The second part is a usage of the build variant setting provided by the pipeline inside the Xcode project. Using Xcode build settings we’re adding a compile-time constant (preprocessor definition for Objective C/C++ code and compilation conditions for Swift) that reflect the selected build variant. It is used to control which functionality to compile. This build settings may also be used to choose to build variant-specific resources to be embedded into the framework.
When chaining pipelines we just pass the variable to next pipeline:
az pipelines build queue \
--project "component2" \
--branch "integration" \
--organization "${Organization}" \
--definition-name "${BuildDefinition}" \
--variables \
"config.pipeline.component1Version=${BUILD_BUILDNUMBER}" \
"config.pipeline.component1Architecture=${CurrentArchitecture}" \
"config.pipeline.component1Configuration=${CurrentConfiguration}" \
“config.pipeline.buildVariant=${CONFIG_PIPELINE_BUILDVARIANT}"
Summary
In this article, we’ve described our approach to multi-component app CI/CD infrastructure based on Azure . We’ve focused on two important features of our build infrastructure: chaining component builds and building different variants of the same component. It’s worth mentioning that the described solution is not the only correct one. It's rather the most optimal that fits our needs. You may experiment and try different approaches utilizing a flexible developed pipeline system that Azure provides.