

Albert is experienced in designing, creating, and developing software using a variety of technologies, especially Java. He also possesses extensive experience in front-end javascript technologies. During his career, he was mainly connected with product lifecycle management and the medical sector. He is interested in best coding practices, clean code, and new changes in the Java language.
Read articles
AI Development Workflow with Claude Code: Lessons from a 3-Month Project
For about three months, our team built the front end of a web application with an AI development workflow built on Claude Code. Claude co-authored most of our commits, and wrote between about two thirds and over 90 percent of the added lines, depending on how you count. Roughly 22 to 27 user stories went through that workflow.
Key numbers
Project: the front end of a web application, built over about three months
Scope: 22 to 27 user stories through the workflow
AI share: Claude co-authored most commits and wrote two thirds to over 90% of the added lines
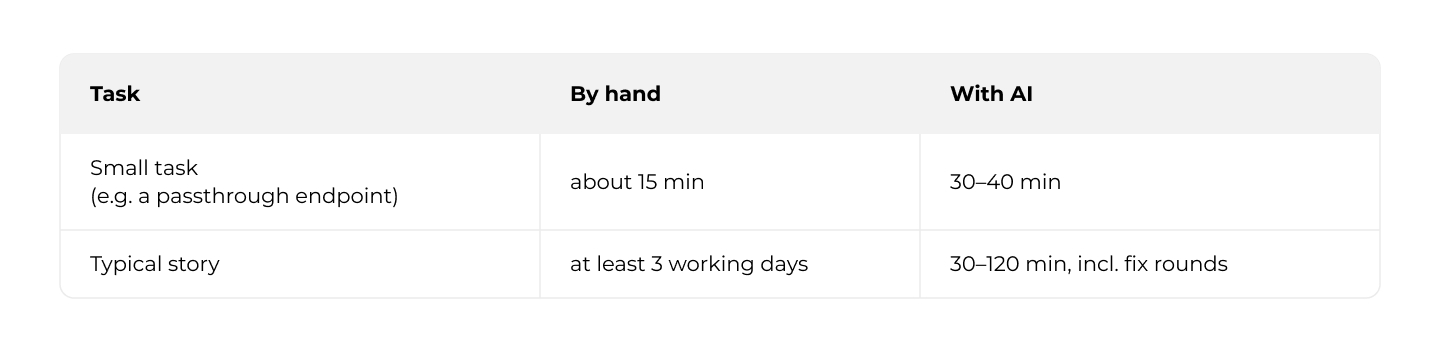
Typical story: 30 to 60 minutes with AI (up to 2 hours with fix rounds) vs. at least 3 working days by hand
Small task: 30 to 40 minutes with AI vs. about 15 minutes by hand
Workflow: 11 steps, 2 human approval gates
All figures are our estimates, not measurements.
A typical story in that project looked like this: one page with a few tables, styling, responsive layout, tests (unit, integration and end-to-end) and backend integration. The agent implemented such a story in about 30 to 60 minutes, and with fix rounds it could take up to two hours. By hand we would have needed at least three working days. Both numbers are our estimates, not measurements, and a frontend specialist may well be faster by hand.
On the other hand, not everything was faster with AI. A small task, like a passthrough endpoint, was faster to write ourselves. We think it was because the workflow is built of many steps, and every story pays for all of them: research, spec, plan, two approvals, tests, review and a browser check. On a big story that overhead disappears into the savings. On a small one it added a lot of time and could take longer than the change itself. We ran every task through the same process on purpose, to see how it behaves, and even a passthrough endpoint needs to be tested properly.
The rest of this article covers how the workflow is set up, what working with it was like, what went wrong, and what we would change. If you have heard of spec-driven development, this is what it looked like for us in practice: every story started with a written spec and plan that a human approved before any code was written.
1. How our Claude Code workflow is set up
We used Claude Code to execute an AI workflow for us: every story went through the same steps, two of them were human decisions, and nothing was built or merged without a human approving it.
CLAUDE.md: the project's onboarding document
The setup has two layers. CLAUDE.md is the project's onboarding document. It describes the project and its stack, how to build, test and run it, the team's conventions and safety rules, and where to find everything else. It also points to the UI designs. They lived in a separate git repository, as a simple Angular project with the concept screens already built, so for most stories a matching view already existed there. CLAUDE.md told the agent to treat that project as the source of truth for layout, components and styling, and to carry styling, texts and behavior over instead of inventing them.
Claude Code skills: where the process lives
The process itself lives in skills, and they matter most. A skill is a written procedure for one kind of job, and we had one for each recurring task: running the application, reviewing code, checking a story in a browser, recording an end-to-end demo, writing tickets, syncing the client's translations and auditing accessibility. The most important one is the development skill: give it a ticket, and it carries the story all the way to a pull request.
Given a ticket, the development skill works through these steps:
1. Read the ticket and linked requirements, read-only.
2. Research and analysis, in parallel: one agent maps the codebase and finds the closest existing feature to copy, the other turns the requirements into numbered scenarios.
3. Spec and plan: it writes a spec, then an implementation plan.
4. Gate 1: a human approves the spec and the plan.
5. Build: Claude creates a branch in its own git worktree and implements the story.
6. Quality gate: lint, tests and build must pass.
7. Review: a review skill checks the diff against our coding rules.
8. Browser check: another skill walks every spec scenario in a live browser.
9. End-to-end demo: a demo skill writes an end-to-end test of the golden path and captures screenshots.
10. Gate 2: a human reviews the end-to-end test results and screenshots, tests manually, and then approves.
11. Pull request: an agent drafts it.
The diagram below shows the development skill as a whole.
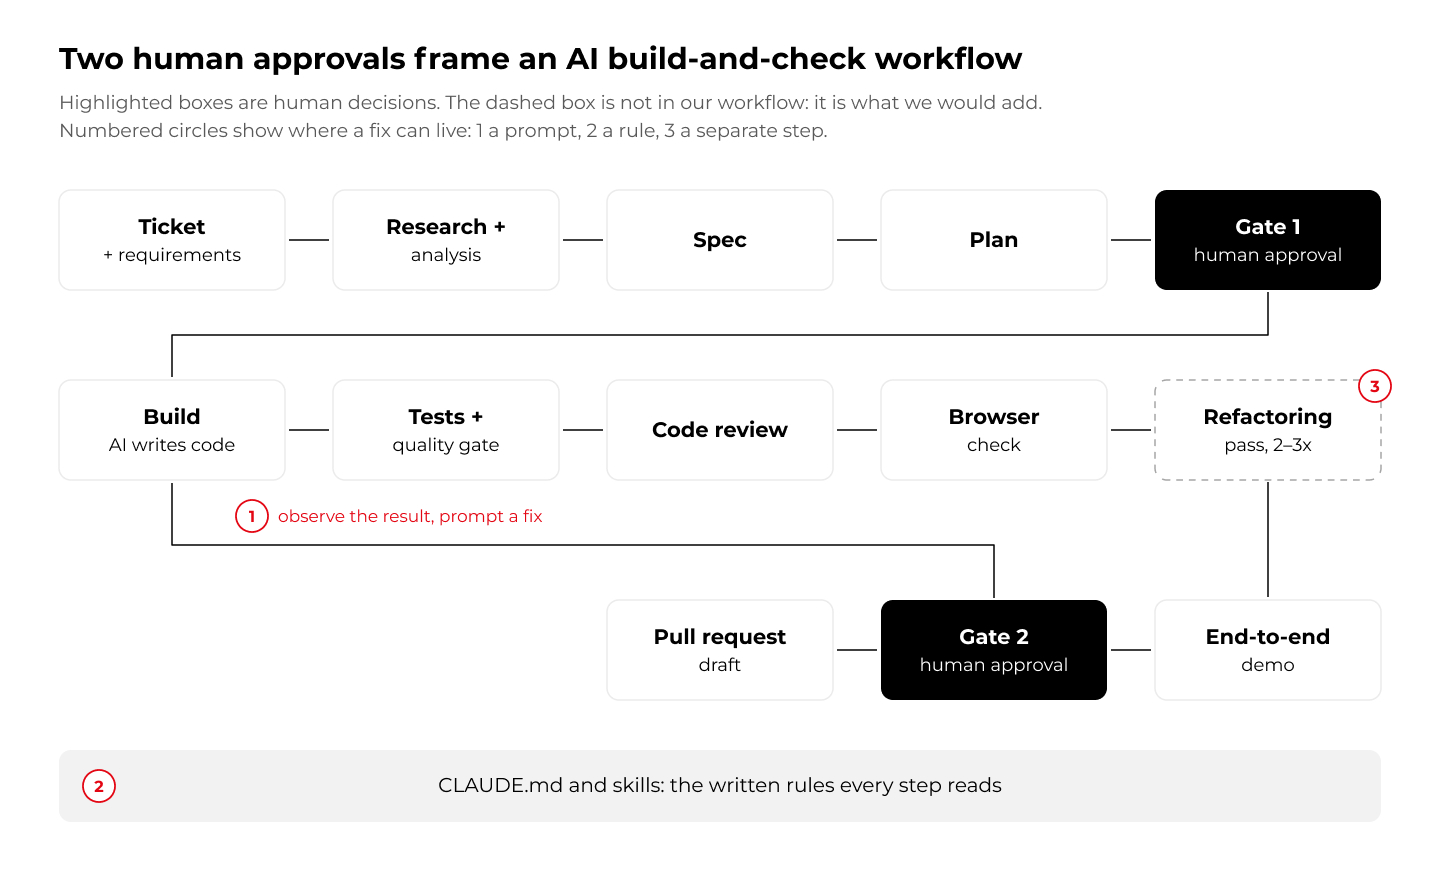
Highlighted boxes are where a person decides. Everything else is the AI working inside rules we wrote down. The numbered circles and the dashed box come back in chapter 3.
From one repository to a shared Claude Code plugin
We did not build this setup in one go, and the structure changed along the way. At the beginning, every skill lived in the frontend repository itself: the development skill, code review, browser check, demo and run, all written for Angular. They worked, but they were tied to this one project.
Within the first three weeks we moved the core of the workflow into a plugin. A plugin is a package of skills, agents and hooks that a repository switches on in its settings. Ours is a shared development-workflow plugin that drives the same process in our frontend, backend and infrastructure repositories. We needed one workflow in three repositories, and copying Angular-specific skills into each would have meant maintaining three versions. What differs between the repositories lives in a small config file in each one: which checks must pass, how a story is verified, which review profile applies (Angular, Java or Terraform) and which safety rules apply. The local development skill was later deleted, and the plugin version became the only one. Treat the workflow as something you grow.
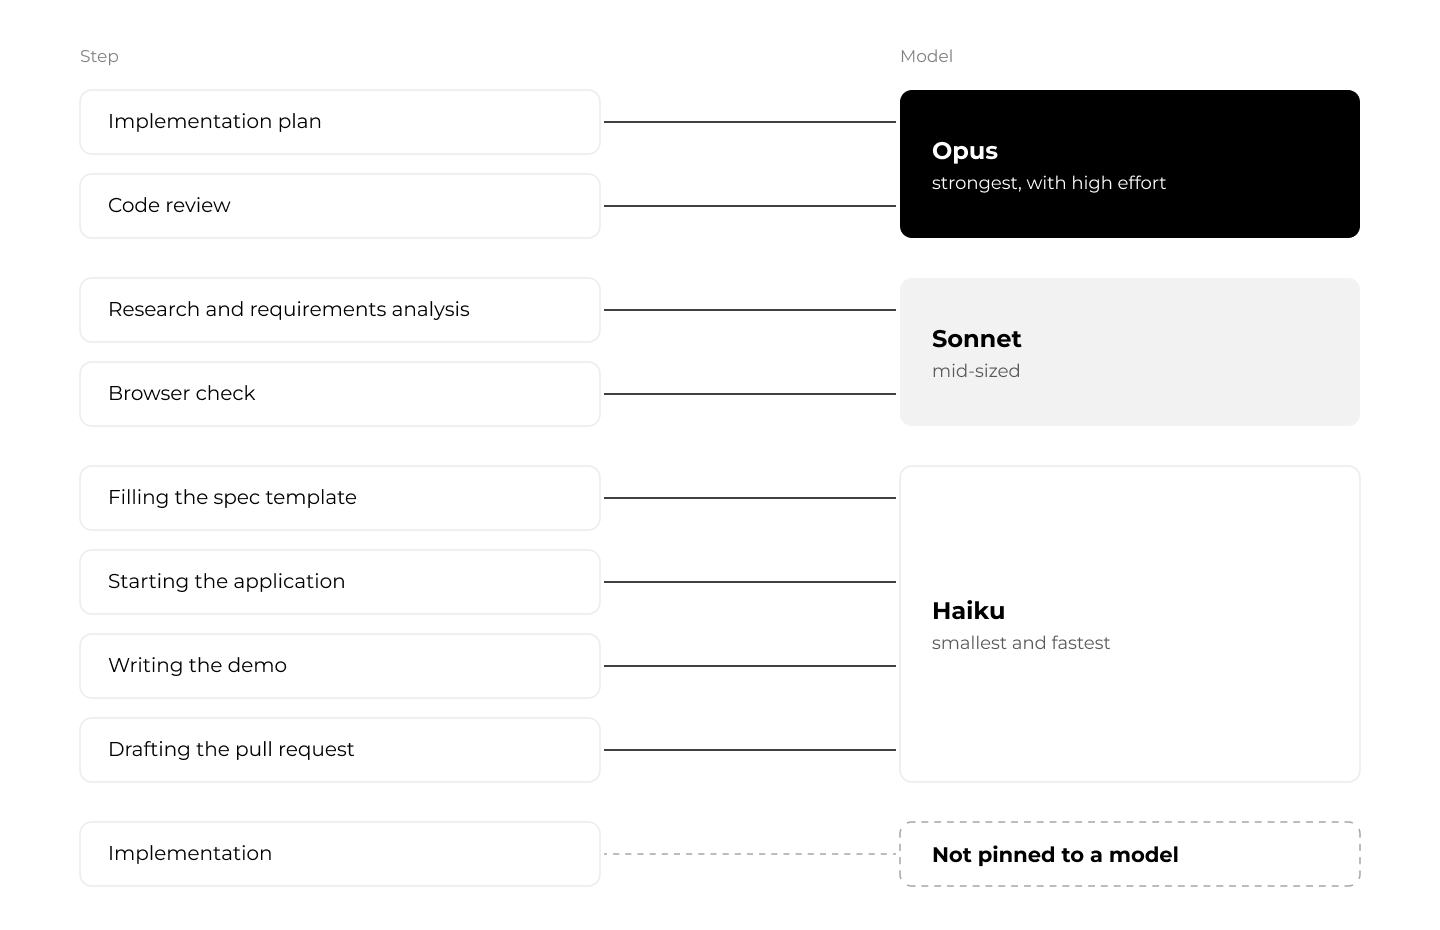
A different model for each step
The plugin is also where each step's model is set. We did not use one model for everything: each step of the workflow runs on the model that suits it.
2. The developer's new role: from writing code to reviewing it
Our work moved from writing code to approving specs and plans, running the workflow, checking results in a browser and prompting fixes. It moved the risk from writing to reviewing.
A round looks like this: run the skill on a ticket, approve the spec and plan, then wait. When it finishes, we look at the result. Whatever is wrong, we describe in a prompt and the agent fixes it.
A developer's typical day nowadays consists of a few things: meetings, talking with people, gathering requirements, running AI to do the task for you, validating the AI's output, and talking with the agent to get fixes done or do something differently.
That whole transformation reminds us a bit of a similar situation we had with the invention of big frameworks like Spring. Everyone back then had concerns that you would lose control over your code, because you wouldn't know exactly how everything works. Another similar thing is cloud computing and the use of services from big cloud providers: you don't need to know how every AWS service works under the hood either. But nowadays everyone uses both.
The same goes for AI and source code creation: you no longer need to touch every part of the code yourself. This is why supervision matters: the risk comes from using AI without it. Our approval gates, coding rules and reviews were how we supervised whatever the AI generated.
We concentrated our review on the specifications Claude produced, on the end-to-end test results and screenshots, and on manual testing, with less line-by-line reading of the code. That put more weight on the quality of the specs and the automated checks.
Keeping translations in sync with the client
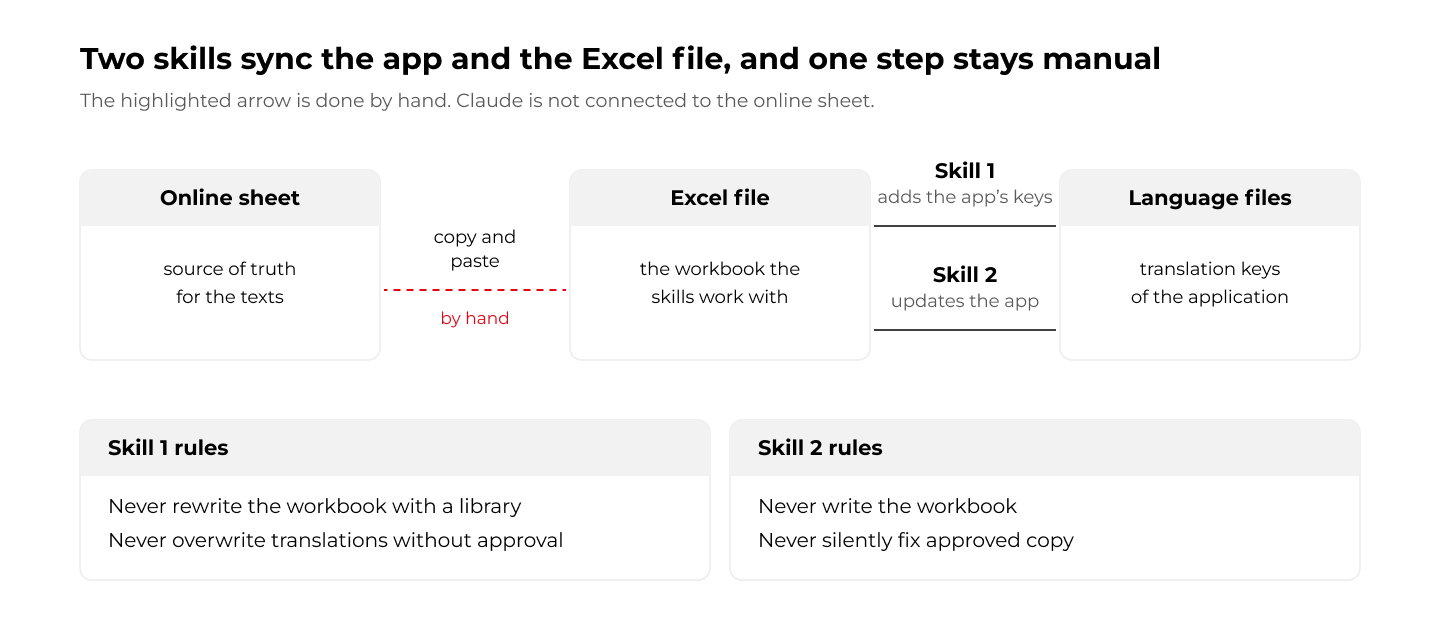
Not everything in a project is code. Working with the client on translations needed a lot of manual work. The source of truth for the texts was an Excel sheet, because that was the format the client's managers preferred, so next to the stories we had to keep the application and that sheet in sync.
We built two skills for it, one for each direction: one adds the app's translation keys to the Excel file, and the other updates the app's language files from the approved copy in it. Both carry strict rules.
The one thing we did not automate was the connection. We did not want to connect Claude to the online version of the workbook, so the content moved between the file and the workflow by copy and paste.
3. What kept going wrong with the AI agent
On paper, the workflow looked complete. We had written the rules down, pointed the agent at them from the first week, and added review and verification steps on top. And it delivered: stories came out far faster than we could have built them by hand. Still, the same kinds of mistakes kept finding their way through. A screen ignored the designs we had pointed to. A component was built again instead of reused. A merge conflict was answered by rebuilding the whole story. None of it was surprising once we saw it, and a written rule alone did not stop any of it. We usually noticed late, when we looked at the finished result, and the fix was another prompt. Looking back, the interesting question is not what went wrong, but where each fix should have lived.
UI: the agent skipped the design prototype
We told the agent that the UI designs already existed as concept screens in a separate prototype repository. CLAUDE.md had that rule from the first week. Still, in some cases the agent did not use them, and we had to repeat it in a fix round. Our view is that the rule was not specific enough and the model sometimes skipped the example. The fix we would add now is a mostly visual check against the prototype, not only a rule.
Component reuse: new code instead of shared components
New stories created new component text and mechanisms instead of reusing what already existed, even though the rules said to prefer the shared components and the research step had to name the closest existing feature. It showed up late in the project, so we corrected it with prompts instead of changing the workflow. Now we would add a reuse instruction to the workflow, plus two or three refactoring sessions after the browser check and before the end-to-end tests.
Git conflicts: when parallel changes collide
Our plan was iterative, and sometimes two developers worked on a similar area of the system, which produced parallel changes and non-obvious conflicts. Once, three changes touched the same area. The first merged cleanly, the second took Claude about two hours to resolve, and on the third Claude gave up and rebuilt the whole story from scratch.
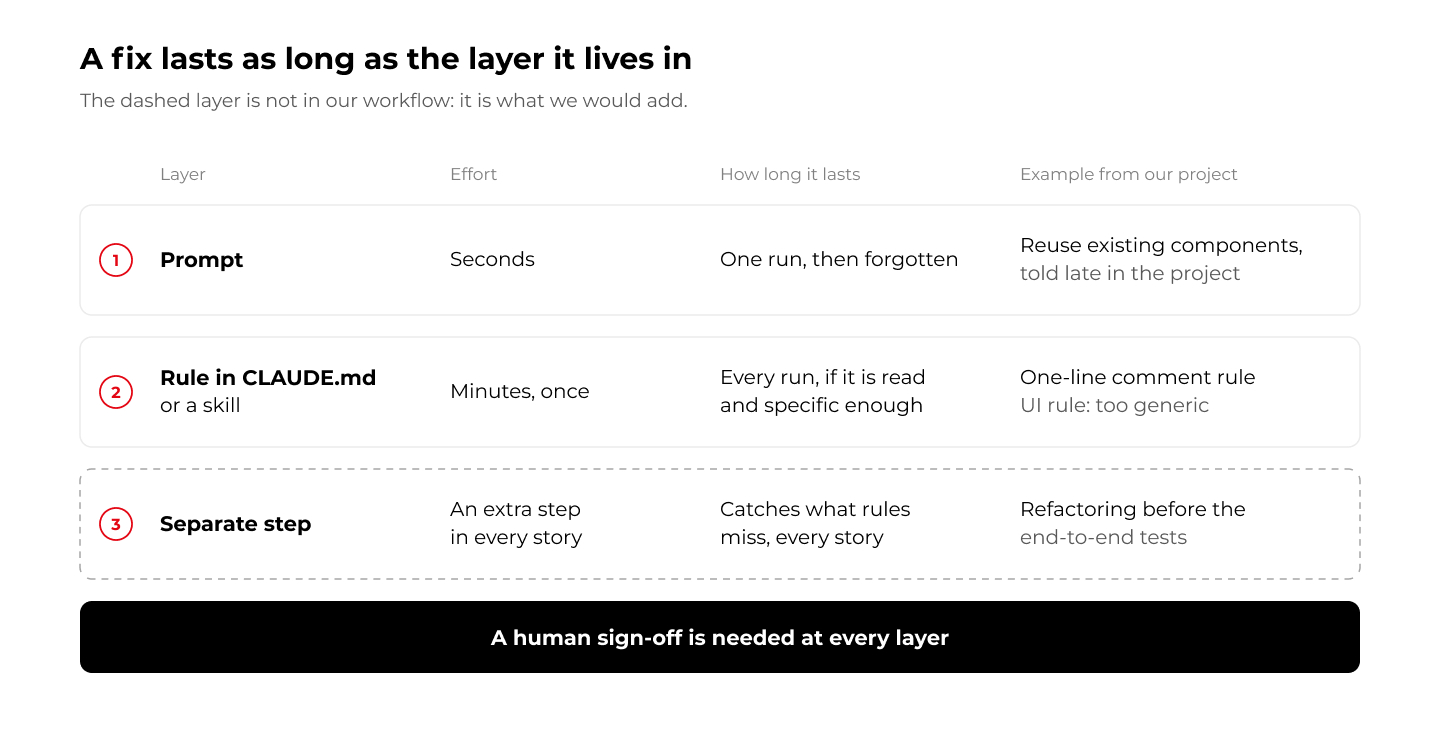
Where the fix lives
Every correction is a choice about where it goes, and the figure below shows the three options. Our workflow had the first two.
4. When AI-assisted development pays off, and when it doesn't
AI paid off on normal-sized stories, but not on tiny tasks. Below a certain size, writing the prompt, waiting and reviewing costs more than doing the work yourself. The chart below compares a small task with a typical story.
Speed was only part of the change. The workflow also changed how we think about planning and review. Our plan was iterative, which meant parallel changes and conflicts the agent struggled with, and the project took about three months. With a well-defined scope, we think the UI work could have taken three to four weeks. Part of our CI was not ours to manage, which limited the automated checks we could add.
5. Lessons learned: what we would do differently
If we started the same project again tomorrow, we would change three things.
First, we would add a refactoring step. Two or three refactoring sessions after the browser check and before the end-to-end tests would clean up duplicated or inconsistent code while it still works, and they would keep the slowest tests from running on code that is about to change.
Second, we would put the reuse instruction into the workflow itself, so the agent looks through the existing modules for components it can reuse before it creates new ones, instead of us repeating it in prompts.
Third, we would add automatic code review to the pipeline. It would run independently of the agent's session, and because these models are not deterministic, it is a good idea to let AI review the code more than once. We use Jenkins but do not manage it, so that was hard for us to set up.
6. Frequently asked questions
What is an AI development workflow?
A fixed sequence of steps an AI coding agent follows to take a ticket to a pull request, with the rules written down and human approval points along the way. In our project, Claude Code ran research, spec, plan, build, tests, review and a browser check, and a human approved twice: the spec and plan before building, and the result before the pull request.
Is this spec-driven development?
In practice, yes. Every story started with a spec and an implementation plan that a human approved before any code was written, and later steps (the browser check and the end-to-end demo) verified the result against the spec's scenarios.
How long does a user story take with Claude Code?
In our project, a typical story (one page with a few tables, styling, responsive layout, tests and backend integration) took about 30 to 60 minutes, and up to two hours with fix rounds. By hand, we estimate at least three working days. These are our estimates, not measurements.
Is AI faster for small coding tasks?
Not in our experience. To be more precise it’s not faster when you use the whole workflow with analysis, tests etc. A small task such as a passthrough endpoint took about 15 minutes by hand and 30 to 40 minutes through the workflow, because every story pays for all of its steps.
What are Claude Code skills and plugins?
A skill is a written procedure for one kind of job, such as reviewing code or checking a story in a browser. A plugin packages skills, agents and hooks so that several repositories can switch on the same workflow. We used one plugin across our frontend, backend and infrastructure repositories.
How do you supervise AI-generated code?
With two human approval gates, written coding rules, an automated review step, a browser check against the spec, end-to-end test results with screenshots, and manual testing, with less line-by-line reading of the code.
How to build hypermedia API with Spring HATEOAS
Have you ever considered the quality of your REST API? Do you know that there are several levels of REST API? Have you ever heard the term HATEOAS? Or maybe you wonder how to implement it in Java? In this article, we answer these questions with the main emphasis on the HATEOAS concept and the implementation of that concept with the Spring HATEOAS project.
Learn more about services provided by Grape Up
You are at Grape Up blog, where our experts share their expertise gathered in projects delivered for top enterprises. See how we work.
Enabling the automotive industry to build software-defined vehicles
Empowering insurers to create insurance telematics platforms
Providing AI & advanced analytics consulting
What is HATEOAS?
H ypermedia A s T he E ngine O f A pplication S tate - is one of the constraints of the REST architecture. Neither REST nor HATEOAS is any requirement or specification. How you implement it depends only on you. At this point, you may ask yourself - how RESTful your API is without using HATEOAS? This question is answered by the REST maturity model presented by Leonard Richardson. This model consists of four levels, as set out below:
- Level 0
The API implementation uses the HTTP protocol but does not utilize its full capabilities. Additionally, unique addresses for resources are not provided. - Level 1
We have a unique identifier for the resource, but each action on the resource has its own URL. - Level 2
We use HTTP methods instead of verbs describing actions, e.g., DELETE method instead of URL .../delete - Level 3
The term HATEOAS has been introduced. Simply speaking, it introduces hypermedia to resources. That allows you to place links in the response informing about possible actions, thereby adding the possibility to navigate through API.
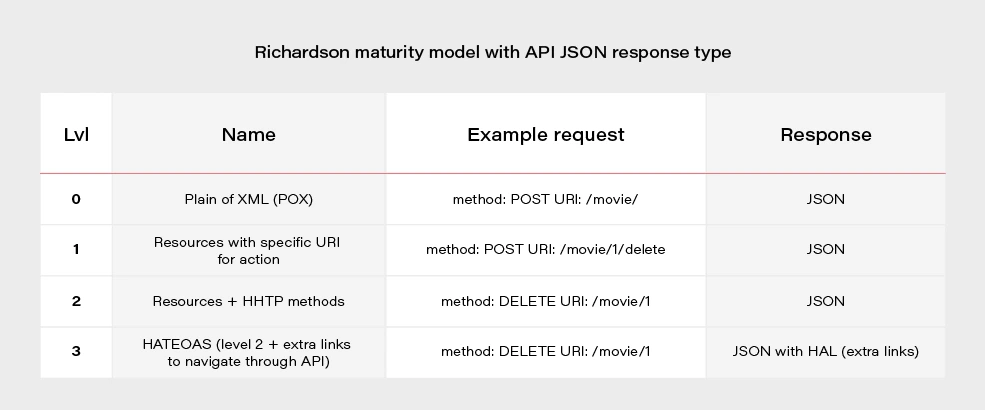
Most projects these days are written using level 2. If we would like to go for the perfect RESTful API, we should consider HATEOAS.
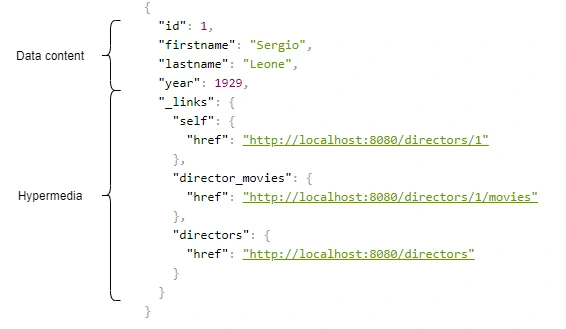
Above, we have an example of a response from the server in the form of JSON+HAL. Such a resource consists of two parts: our data and links to actions that are possible to be performed on a given resource.
Spring HATEOAS 1.x.x
You may be asking yourself how to implement HATEOAS in Java? You can write your solution, but why reinvent the wheel? The right tool for this seems to be the Spring Hateoas project. It is a long-standing solution on the market because its origins date back to 2012, but in 2019 we had a version 1.0 release. Of course, this version introduced a few changes compared to 0.x. They will be discussed at the end of the article after presenting some examples of using this library so that you better understand what the differences between the two versions are. Let’s discuss the possibilities of the library based on a simple API that returns us a list of movies and related directors. Our domain looks like this:
@Entity
public class Movie {
@Id
@GeneratedValue
private Long id;
private String title;
private int year;
private Rating rating;
@ManyToOne
private Director director;
}
@Entity
public class Director {
@Id
@GeneratedValue
@Getter
private Long id;
@Getter
private String firstname;
@Getter
private String lastname;
@Getter
private int year;
@OneToMany(mappedBy = "director")
private Set<Movie> movies;
}
We can approach the implementation of HATEOAS in several ways. Three methods represented here are ranked from least to most recommended.
But first, we need to add some dependencies to our Spring Boot project:
<dependency>
<groupId>org.springframework.boot</groupId>
<artifactId>spring-boot-starter-hateoas</artifactId>
</dependency>
Ok, now we can consider implementation options.
Entity extends RepresentationModel with links directly in Controller class
Firstly, extend our entity models with RepresentationModel.
public class Movie extends RepresentationModel<Movie>
public class Director extends RepresentationModel<Director>
Then, add links to RepresentationModel within each controller. The example below returns all directors from the system. By adding two links to each director - to himself and to the entire collection. A link is also added to the collection. The key elements of this code are two methods with static imports:
-
linkTo() -
methodOn()
@GetMapping("/directors")
public ResponseEntity<CollectionModel<Director>> getAllDirectors() {
List<Director> directors = directorService.getAllDirectors();
directors.forEach(director -> {
director.add(linkTo(methodOn(DirectorController.class).getDirectorById(director.getId())).withSelfRel());
director.add(linkTo(methodOn(DirectorController.class).getDirectorMovies(director.getId())).withRel("directorMovies"));
});
Link allDirectorsLink = linkTo(methodOn(DirectorController.class).getAllDirectors()).withSelfRel());
return ResponseEntity.ok(CollectionModel.of(directors, allDirectorsLink));
}
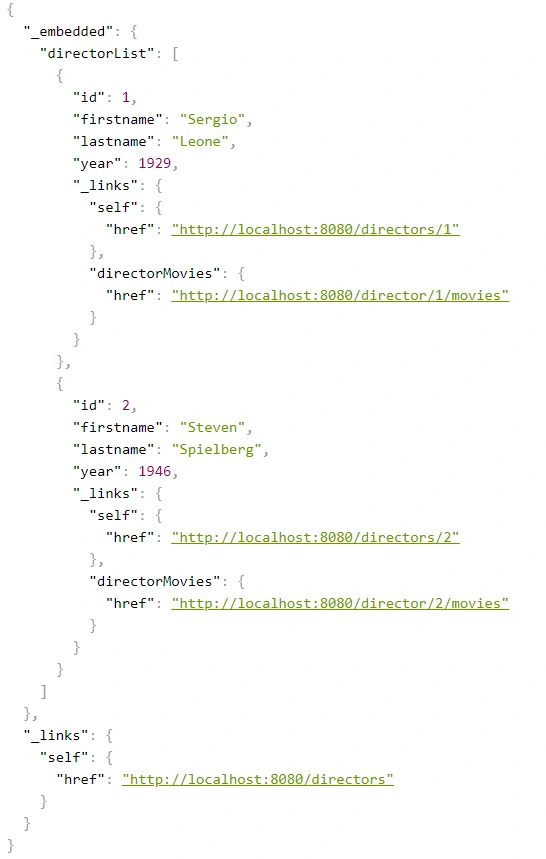
This is the response we get after invoking such controller:
We can get a similar result when requesting a specific resource.
@GetMapping("/directors/{id}")
public ResponseEntity<Director> getDirector(@PathVariable("id") Long id) {
return directorService.getDirectorById(id)
.map(director -> {
director.add(linkTo(methodOn(DirectorController.class).getDirectorById(id)).withSelfRel());
director.add(linkTo(methodOn(DirectorController.class).getDirectorMovies(id)).withRel("directorMovies"));
director.add(linkTo(methodOn((DirectorController.class)).getAllDirectors()).withRel("directors"));
return ResponseEntity.ok(director);
})
.orElse(ResponseEntity.notFound().build());
}
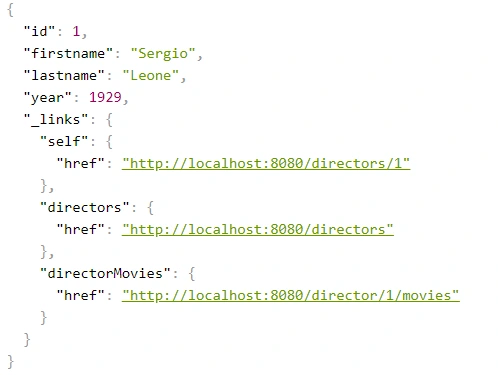
The main advantage of this implementation is simplicity. But making our entity dependent on an external library is not a very good idea. Plus, the code repetition for adding links for a specific resource is immediately noticeable. You can, of course, bring it to some private method, but there is a better way.
Use Assemblers - SimpleRepresentationModelAssembler
And it’s not about assembly language, but about a special kind of class that converts our resource to RepresentationModel.
One of such assemblers is SimpleRepresentationModelAssembler. Its implementation goes as follows:
@Component
public class DirectorAssembler implements SimpleRepresentationModelAssembler<Director> {
@Override
public void addLinks(EntityModel<Director> resource) {
Long directorId = resource.getContent().getId();
resource.add(linkTo(methodOn(DirectorController.class).getDirectorById(directorId)).withSelfRel());
resource.add(linkTo(methodOn(DirectorController.class).getDirectorMovies(directorId)).withRel("directorMovies"));
}
@Override
public void addLinks(CollectionModel<EntityModel<Director>> resources) {
resources.add(linkTo(methodOn(DirectorController.class).getAllDirectors()).withSelfRel());
}
}
In this case, our entity will be wrapped in an EnityModel (this class extends RepresentationModel ) to which the links specified by us in the addLinks() will be added. Here we overwrite two addLinks() methods - one for entire data collections and the other for single resources. Then, as part of the controller, it is enough to call the toModel() or toCollectionModel() method ( addLinks() are template methods here), depending on whether we return a collection or a single representation.
@GetMapping
public ResponseEntity<CollectionModel<EntityModel<Director>>> getAllDirectors() {
return ResponseEntity.ok(directorAssembler.toCollectionModel(directorService.getAllDirectors()));
}
@GetMapping(value = "directors/{id}")
public ResponseEntity<EntityModel<Director>> getDirectorById(@PathVariable("id") Long id) {
return directorService.getDirectorById(id)
.map(director -> {
EntityModel<Director> directorRepresentation = directorAssembler.toModel(director)
.add(linkTo(methodOn(DirectorController.class).getAllDirectors()).withRel("directors"));
return ResponseEntity.ok(directorRepresentation);
})
.orElse(ResponseEntity.notFound().build());
}
The main benefit of using the SimpleRepresentationModelAssembler is the separation of our entity from the RepresentationModel , as well as the separation of the adding link logic from the controller.
The problem arises when we want to add hypermedia to the nested elements of an object. Obtaining the effect, as in the example below, is impossible in a current way.
{
"id": "M0002",
"title": "Once Upon a Time in America",
"year": 1984,
"rating": "R",
"directors": [
{
"id": "D0001",
"firstname": "Sergio",
"lastname": "Leone",
"year": 1929,
"_links": {
"self": {
"href": "http://localhost:8080/directors/D0001"
}
}
}
],
"_links": {
"self": {
"href": "http://localhost:8080/movies/M0002"
}
}
}
Create DTO class with RepresentationModelAssembler
The solution to this problem is to combine the two previous methods, modifying them slightly. In our opinion, RepresentationModelAssembler offers the most possibilities. It removes the restrictions that arose in the case of nested elements for SimpleRepresentationModelAssembler . But it also requires more code from us because we need to prepare DTOs, which are often done anyway. This is the implementation based on RepresentationModelAssembler :
@Component
public class DirectorRepresentationAssembler implements RepresentationModelAssembler<Director, DirectorRepresentation> {
@Override
public DirectorRepresentation toModel(Director entity) {
DirectorRepresentation directorRepresentation = DirectorRepresentation.builder()
.id(entity.getId())
.firstname(entity.getFirstname())
.lastname(entity.getLastname())
.year(entity.getYear())
.build();
directorRepresentation.add(linkTo(methodOn(DirectorController.class).getDirectorById(directorRepresentation.getId())).withSelfRel());
directorRepresentation.add(linkTo(methodOn(DirectorController.class).getDirectorMovies(directorRepresentation.getId())).withRel("directorMovies"));
return directorRepresentation;
}
@Override
public CollectionModel<DirectorRepresentation> toCollectionModel(Iterable<? extends Director> entities) {
CollectionModel<DirectorRepresentation> directorRepresentations = RepresentationModelAssembler.super.toCollectionModel(entities);
directorRepresentations.add(linkTo(methodOn(DirectorController.class).getAllDirectors()).withSelfRel());
return directorRepresentations;
}
}
When it comes to controller methods, they look the same as for SimpleRepresentationModelAssembler , the only difference is that in the ResponseEntity the return type is DTO - DirectorRepresentation .
@GetMapping
public ResponseEntity<CollectionModel<DirectorRepresentation>> getAllDirectors() {
return ResponseEntity.ok(directorRepresentationAssembler.toCollectionModel(directorService.getAllDirectors()));
}
@GetMapping(value = "/{id}")
public ResponseEntity<DirectorRepresentation> getDirectorById(@PathVariable("id") String id) {
return directorService.getDirectorById(id)
.map(director -> {
DirectorRepresentation directorRepresentation = directorRepresentationAssembler.toModel(director)
.add(linkTo(methodOn(DirectorController.class).getAllDirectors()).withRel("directors"));
return ResponseEntity.ok(directorRepresentation);
})
.orElse(ResponseEntity.notFound().build());
}
Here is our DTO model:
@Builder
@Getter
@EqualsAndHashCode(callSuper = false)
@Relation(itemRelation = "director", collectionRelation = "directors")
public class DirectorRepresentation extends RepresentationModel<DirectorRepresentation> {
private final String id;
private final String firstname;
private final String lastname;
private final int year;
}
The @Relation annotation allows you to configure the relationship names to be used in the HAL representation. Without it, the relationship names match the class name and a suffix List for the collection.
By default, JSON+HAL looks like this:
{
"_embedded": {
"directorRepresentationList": [
…
]
},
"_links": {
…
}
}
However, annotation @Relation can change the name of directors :
{
"_embedded": {
"directors": [
…
]
},
"_links": {
…
}
}
Summarizing the HATEOAS concept, it consists of a few pros and cons.
Pros:
- If the client uses it, we can change the API address for our resources without breaking the client.
- Creates good self-documentation, and table of contents of API to the person who has the first contact with our API.
- Can simplify building some conditions on the frontend, e.g., whether the button should be disabled / enabled based on whether the link to corresponding the action exists.
- Less coupling between frontend and backend.
- Just like writing tests imposes on us to stick to the SRP principle in class construction, HATEOAS can keep us in check when designing API.
Cons:
- Additional work needed on implementing non-business functionality.
- Additional network overhead. The size of the transferred data is larger.
- Adding links to some resources can be sometimes complicated and can introduce mess in controllers.
Changes in Spring HATEOAS 1.0
Spring HATEOAS has been available since 2012, but the first release of version 1.0 was in 2019.
The main changes concerned the changes to the package paths and names of some classes, e.g.
Old New ResourceSupport RepresentationModel Resource EntityModel Resources CollectionModel PagedResources PagedModel ResourceAssembler RepresentationModelAssembler
It is worth paying attention to a certain naming convention - the replacement of the word Resource in class names with the word Representation . It occurred because these types do not represent resources but representations, which can be enriched with hypermedia. It is also more in the spirit of REST. We are returning the resource representations, not the resources themselves. In the new version, there is a tendency to move away from constructors in favor of static construction methods - .of() .
It is also worth mentioning that the old version has no equivalent for SimpleRepresentationModelAssembler . On the other hand, the ResourceAssembler interface has only the toResource() method (equivalent - toModel() ) and no equivalent for toCollectionModel() . Such a method is found in RepresentationModelAssembler and is the toModelCollection() method.
The creators of the library have also included a script that migrates old package paths and old class names to the new version. You can check it here .