Native app vs. hybrid app: How to choose a solution that meets your business needs

Every time we start a new project, we organize brainstorming sessions about architecture and how to manage the project. Regarding mobile apps, we have one additional question – should we choose a hybrid or native app?
Let's start from the absolute beginning. What is a native app?
A native app is a software or program developed to carry out a specific task within a platform or environment. Native apps are built using software development tools (SDK) for particular software frameworks, hardware platforms, or operating systems. Native apps are built for use on a particular device, such as Apple iPhone or Google Android. To create an iOS application, we use Swift, which replaced Objective-C a few years ago. If we want our app to be available on Android phones, we can choose Kotlin (more popular) or Java (replaced by Kotlin a few years ago, however, we can still use it). Let's start by discussing the pros and cons of native apps.
PROS
First – native apps are stable and reliable. That's especially worthwhile cause if you work on large projects, you want to focus on implementing new features, not fight with platform limitations. While working on a native app, you can be sure you will find well-prepared documentation for each part of the SDK – it does not matter if it's a camera, Bluetooth, or design principles.
If you want to use a specific part of SDK or hardware that is specific to a platform, such as Bluetooth, a camera native app also would be a better choice. Even if you decide to go hybrid, these components need to be handled by native code, so you would need a library or plugins. It doesn't make sense to use native frameworks in hybrid apps.
If we are planning a big battery driller app with a beautiful, complicated, animated UI, we should choose a native app. Performance and responsiveness are much better than hybrid can offer. Same thing if we're talking about UX; better UX equals digital customer engagement.
All these points are essential, but what matters the most is security. You should know that native apps are much safer, more stable, and less vulnerable to security risks.
CONS
Of course, native apps are not perfect, and we can easily find examples of ideas when a hybrid app would be a better choice.
Native apps, of course, have a separate codebase for Android and iOS. This means we have (at least) two teams to manage one project. This also reflects bug fixing – it's much easier and takes less time to find and fix bugs if we have one code base.
You should also consider the time you have to create an app. Developing on multiple platforms means a more extended development schedule and, as a result, higher development costs. Therefore, native app development quickly eats up resources.
Go hybrid?
You always have a choice 😊 Native app is a clever idea, but is it always the best one, and what is it - a hybrid app? A (hybrid app) is a software application that combines elements of both native apps and web applications. Simply – it is the technology where we share the codebase between platforms – Android and iOS. The most popular frameworks are:
- React Native
- Flutter
- Xamarin
- KMM (soon 😉)
Let's discuss the pros and cons of hybrid apps.
PROS
Of course, the most significant advantage of hybrid apps is that they can be used across platforms and devices – they share one code base. Cool, isn't it? This means more accessible updates, bug fixes, and maintenance. Also, Development is much simpler and quicker by not having to build from the ground up for each platform.
A crucial thing is the deployment process. Hybrid apps can be deployed much faster than native apps, which can be extremely helpful, especially in big, complicated projects.
Regarding performance, reduced time frames equate to reduced resource drain. We should keep that in mind.
Finally - Hybrid apps can take advantage of dynamic web content. If you plan to create a big social platform – mobile app, web page, and so on – you should consider a hybrid app.
CONS
Looks interesting, right? Well, it is not an ideal solution. Like everything else – it has some limitations.
As we mentioned, there are components that 100% rely on device-specific components or hardware – like cameras, Bluetooth, etc. To use that feature in hybrid applications, we need to implement plugins or parts – or create them ourselves. That can be time assuming but also can present security risks.
The second important thing is user experience - it can suffer as hybrid apps cannot take advantage of the platform's UI.
The last thing - being unable to take full advantage of the hardware sometimes impacts the performance of our applications by making them poor and insecure.
There is one proposition that eliminates most of our cons – KMM, Kotlin Multiplatform Mobile. Its significant advantage is that we share the whole business logic between platforms – Android and iOS using Kotlin language. We create separate native layouts and UI layers for each platform. But of course – there is a problem 😊 KMM is still in the alpha phase, and, in my opinion, it is not production ready yet. But we should keep an eye on that as it might be a revolution.
Summary
It is not an easy task to choose the best technology. We should consider many varied factors that can impact our app. Here are key takeaways for both solutions – native and hybrid.
Native apps: Key takeaways
Native apps provide the best stability and security. They will tend to perform faster and be able to handle the most demanding tasks. This kind of application is best placed to use specific devices' hardware functionality. The user experience is smooth and featureful.
Hybrid apps: Key takeaways
Hybrid apps are easy to get onto iOS and Android. By utilizing a single codebase, you can reduce budget and time costs.

Grape Up guides enterprises on their data-driven transformation journey
Ready to ship? Let's talk.
Check related articles
Read our blog and stay informed about the industry's latest trends and solutions.
AAOS Hello World: How to build your first app for Android Automotive OS
Android Automotive OS is getting more recognition as automotive companies are looking to provide their customers with a more tailored experience. Here we share our guide to building the first app for AAOS.
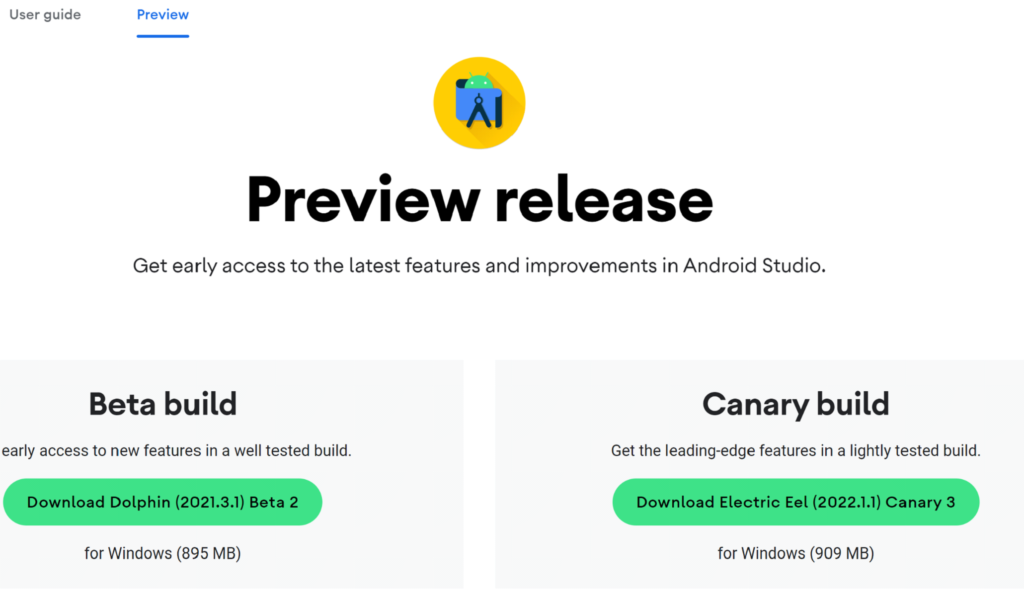
Before you start, read our first article about AAOS and get to know our review to be aware of what to expect. Let’s try making a simple Hello World app for android automotive. To get an IDE, go to Android Studio Preview | Android Developers and get a canary build:
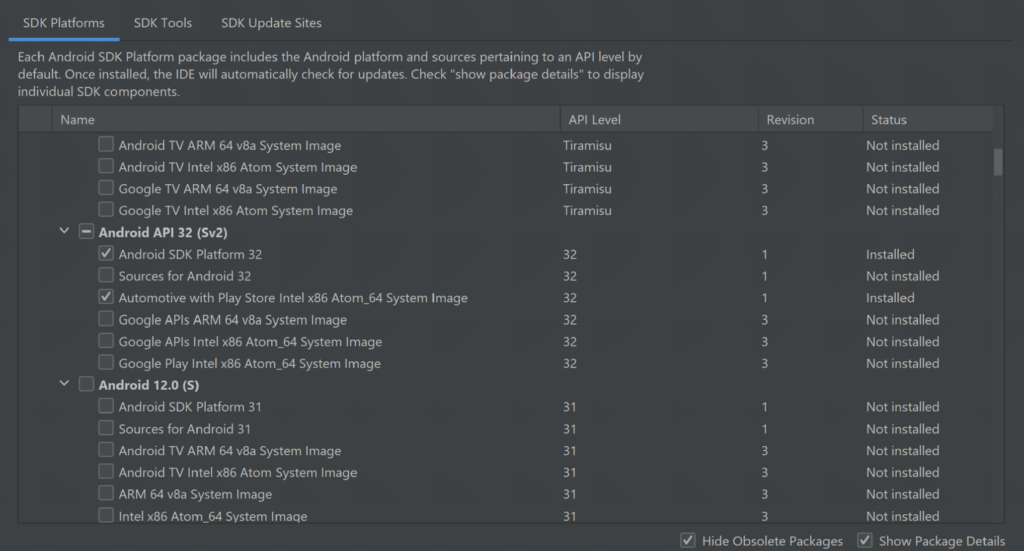
In the next step, prepare SDK, check and download the Automotive system image in SDK manager. You can get any from api32, Android 9, or Android 10, but I do not recommend the newest one as it is very laggy and crashes a lot right now. There are also Volvo and Polestar images.
For those you need to add links to SDK Update Sites:
https://developer.volvocars.com/sdk/volvo-sys-img.xml
https://developer.polestar.com/sdk/polestar2-sys-img.xml
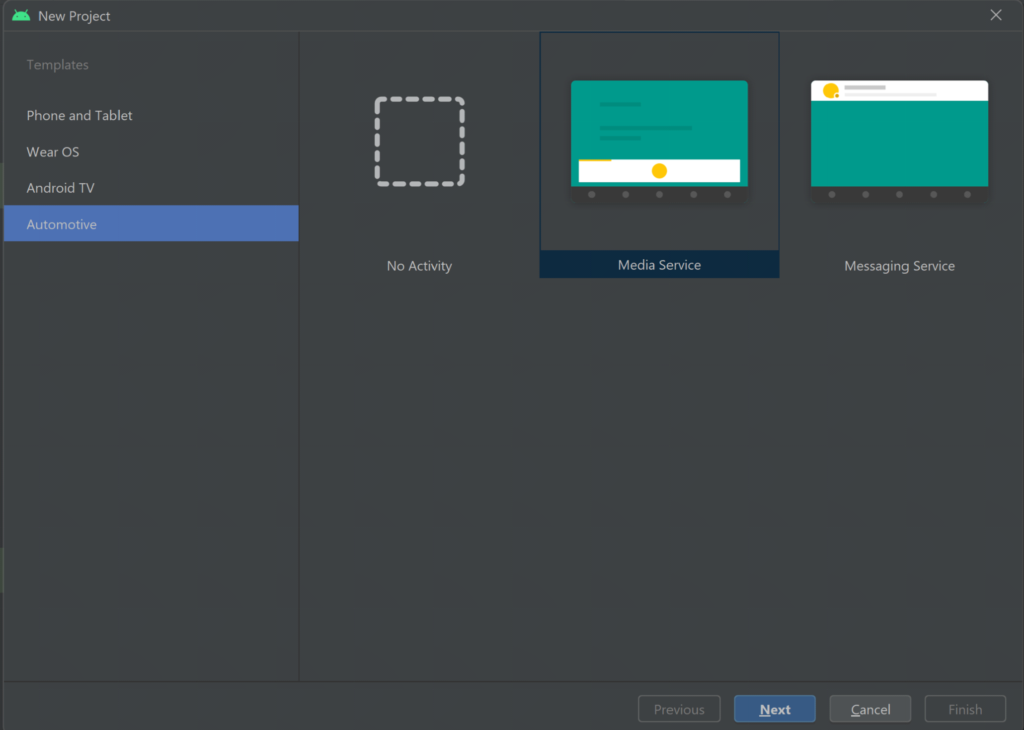
Start a new project, go to File> New Project and choose automotive with no activity
A nice and clean project should be created, without any classes: Go to build.gradle and add the car app library into dependencies, refresh the project to make it get
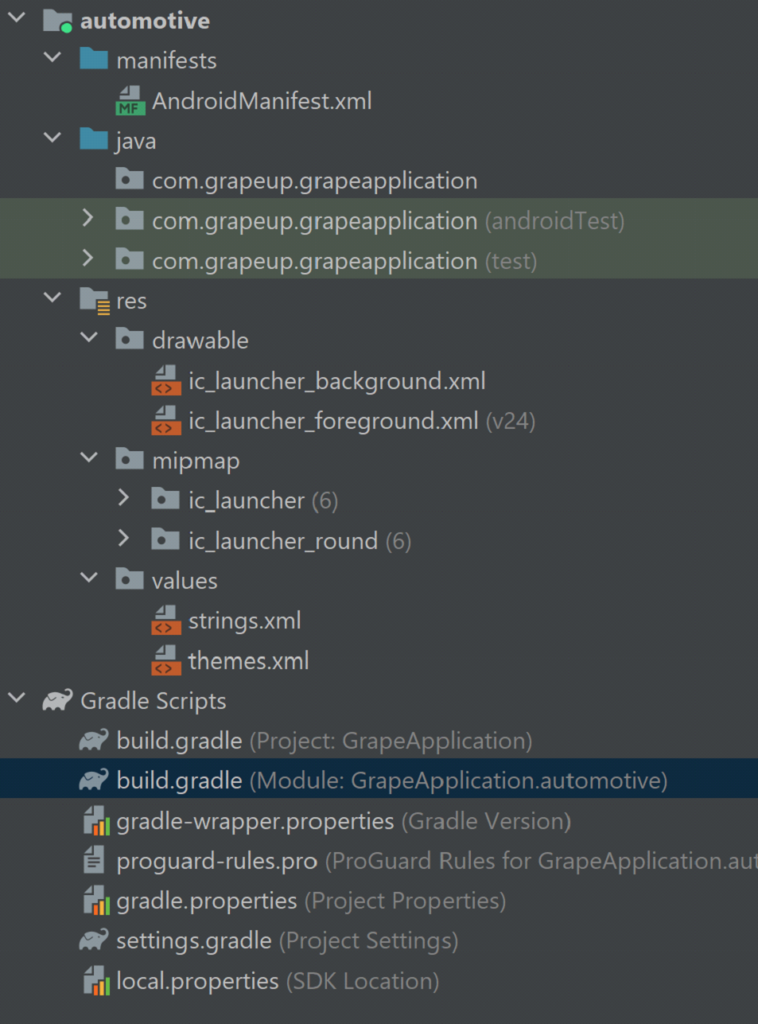
our new dependency:
implementation "androidx.car.app:app-automotive:1.2.0-rc01"
Let's write some code, first our screen class. Name it as you want and make it extend Screen class from android.car.app package and make it implement required methods:
public class GrapeAppScreen extends Screen {
public GrapeAppScreen(@NonNull CarContext carContext) {
super(carContext);
}
@NonNull
@Override
public Template onGetTemplate() {
Row row = new Row.Builder()
.setTitle("Thats our Grape App!").build();
return new PaneTemplate.Builder(
new Pane.Builder()
.addRow(row)
.build()
).setHeaderAction(Action.APP_ICON).build();
}
}
That should create a simple screen with our icon and title, now create another class extending CarAppService from the same package and as well make it implement the required methods. From createHostValidator() method return a static one that allows all hostnames for the purpose of this tutorial and return brand new session with our screen in onCreateSession() , pass CarContext using Session class getCarContext() method:
public class GrapeAppService extends CarAppService {
public GrapeAppService() {}
@NonNull
@Override
public HostValidator createHostValidator() {
return HostValidator.ALLOW_ALL_HOSTS_VALIDATOR;
}
@NonNull
@Override
public Session onCreateSession() {
return new Session() {
@Override
@NonNull
public Screen onCreateScreen(@Nullable Intent intent) {
return new GrapeAppScreen(getCarContext());
}
};
}
}
Next, move to AndroidManifest and add various features inside the main manifest tag:
<uses-feature
android:name="android.hardware.type.automotive"
android:required="true" />
<uses-feature
android:name="android.software.car.templates_host"
android:required="true" />
<uses-feature
android:name="android.hardware.wifi"
android:required="false" />
<uses-feature
android:name="android.hardware.screen.portrait"
android:required="false" />
<uses-feature
android:name="android.hardware.screen.landscape"
android:required="false" />
Inside the Application tag add our service and activity, don’t forget minCarApiLevel as lack of this will throw an exception on app start:
<application
android:allowBackup="true"
android:appCategory="audio"
android:icon="@mipmap/ic_launcher"
android:label="@string/app_name"
android:roundIcon="@mipmap/ic_launcher_round"
android:supportsRtl="true"
android:theme="@style/Theme.GrapeApplication">
<meta-data android:name="androidx.car.app.minCarApiLevel"
android:value="1"
/>
<service
android:name="com.grapeup.grapeapplication.GrapeAppService"
android:exported="true">
<intent-filter>
<action android:name="androidx.car.app.CarAppService" />
</intent-filter>
</service>
<activity
android:name="androidx.car.app.activity.CarAppActivity"
android:exported="true"
android:label="GrapeApp Starter"
android:launchMode="singleTask"
android:theme="@android:style/Theme.DeviceDefault.NoActionBar">
<intent-filter>
<action android:name="android.intent.action.MAIN" />
<category android:name="android.intent.category.LAUNCHER" />
</intent-filter>
<meta-data
android:name="distractionOptimized"
android:value="true" />
</activity>
</application>
Now we can upload our application to the device, verify that you have an automotive emulator created, use automotive configuration, and hit run. The app is run in Google Automotive App Host, so if it is your first application on this device, it may require you to get to the play store and get it.

That’s how it looks:
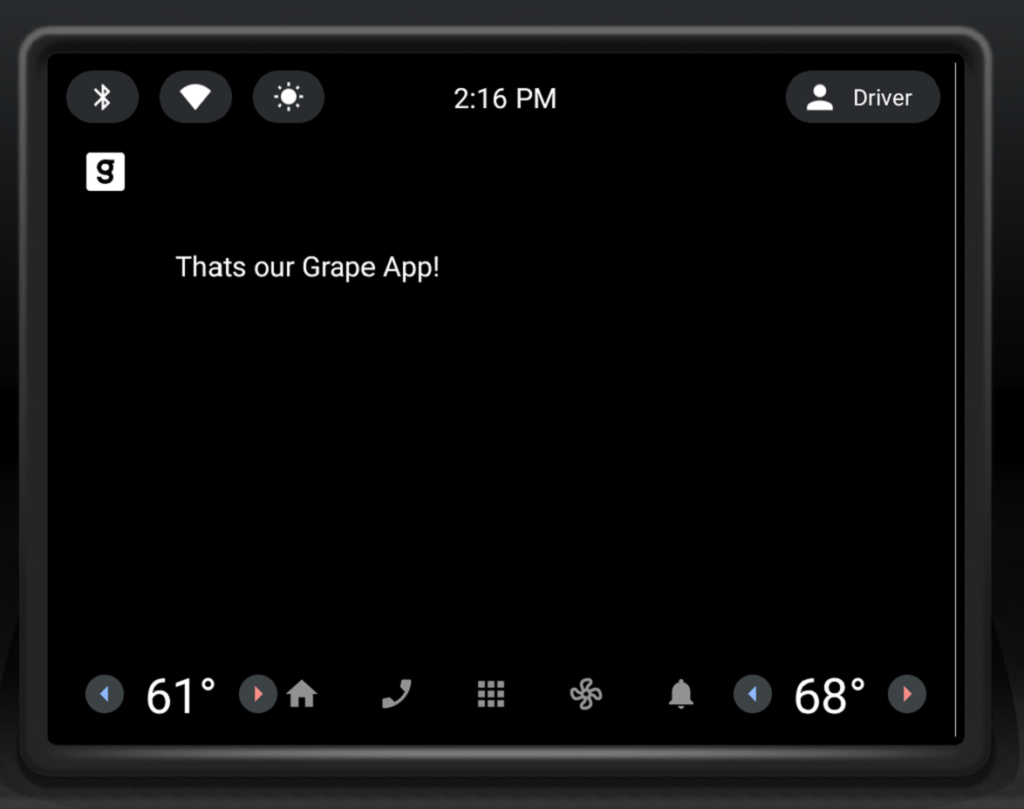
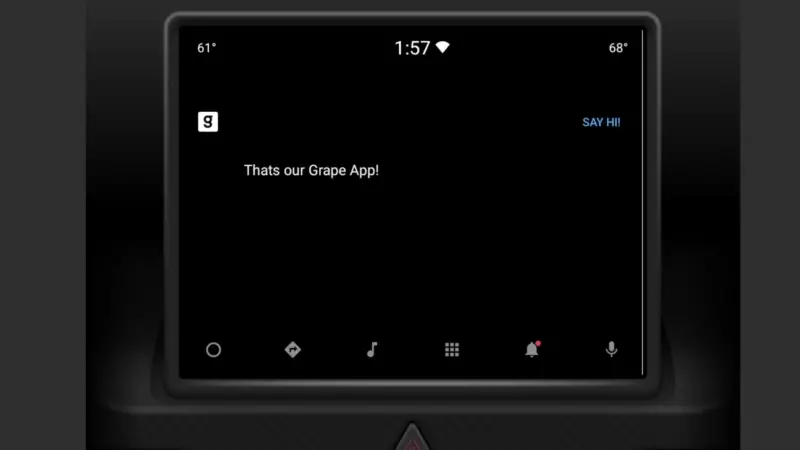
The last thing, we’ll add a navigation button that will pop a Toast . Modify onGetTemplate() in Screen class, add Action and ActionStrip :
Action action = new Action.Builder()
.setOnClickListener(
() -> CarToast.makeText(getCarContext(), "Hello!", CarToast.LENGTH_SHORT).show())
.setTitle("Say hi!")
.build();
ActionStrip actionStrip = new
Add it to PaneTemplate:
return new PaneTemplate.Builder(
new Pane.Builder()
.addRow(row)
.build()
) .setActionStrip(actionStrip)
.setHeaderAction(Action.APP_ICON)
.build();
That’s our HelloWorld app:
Now you have the HelloWorld example app up and running using Car App Library. It takes care of displaying and arranging everything on the screen for us. The only responsibility is to add screens and actions we would like to have(and a bit of configuration). Check the Car app library to explore more of what can be done with it, play around with creating your app, and definitely check our blog soon for more AAOS app creation content.
Interested in our services?
Reach out for tailored solutions and expert guidance.