AAOS Hello World: How to build your first app for Android Automotive OS

Android Automotive OS is getting more recognition as automotive companies are looking to provide their customers with a more tailored experience. Here we share our guide to building the first app for AAOS.
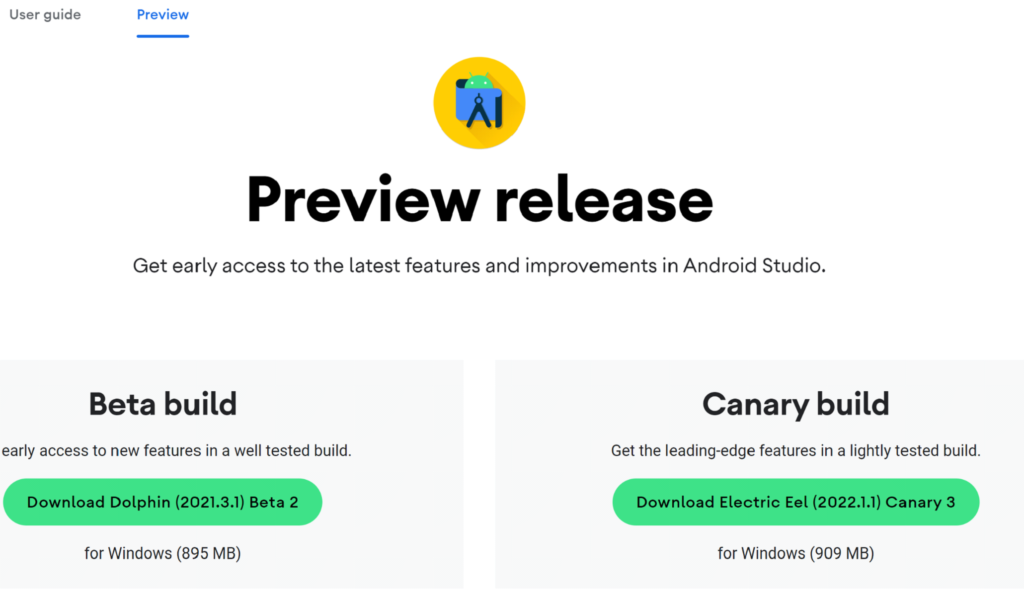
Before you start, read our first article about AAOS and get to know our review to be aware of what to expect. Let’s try making a simple Hello World app for android automotive. To get an IDE, go to Android Studio Preview | Android Developers and get a canary build:
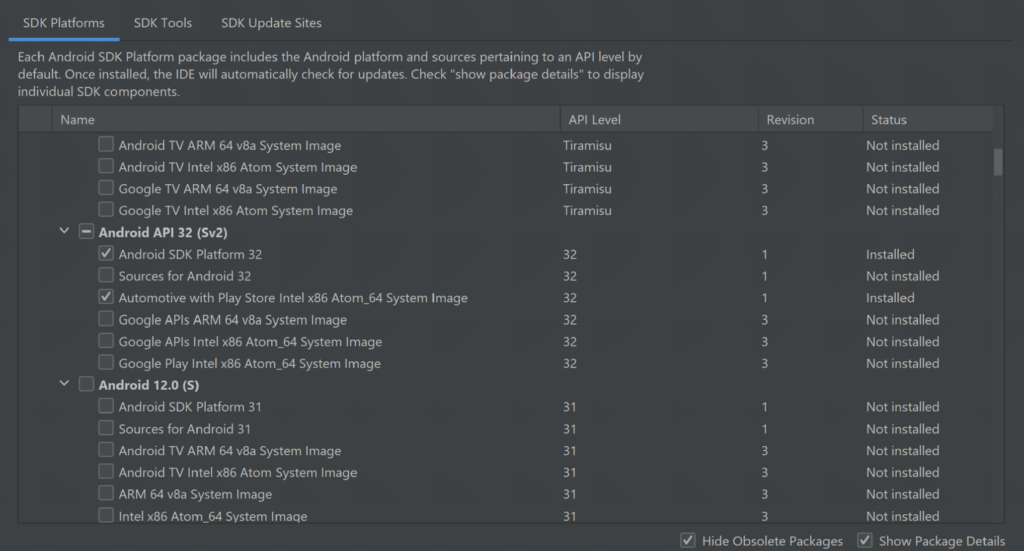
In the next step, prepare SDK, check and download the Automotive system image in SDK manager. You can get any from api32, Android 9, or Android 10, but I do not recommend the newest one as it is very laggy and crashes a lot right now. There are also Volvo and Polestar images.
For those you need to add links to SDK Update Sites:
https://developer.volvocars.com/sdk/volvo-sys-img.xml
https://developer.polestar.com/sdk/polestar2-sys-img.xml
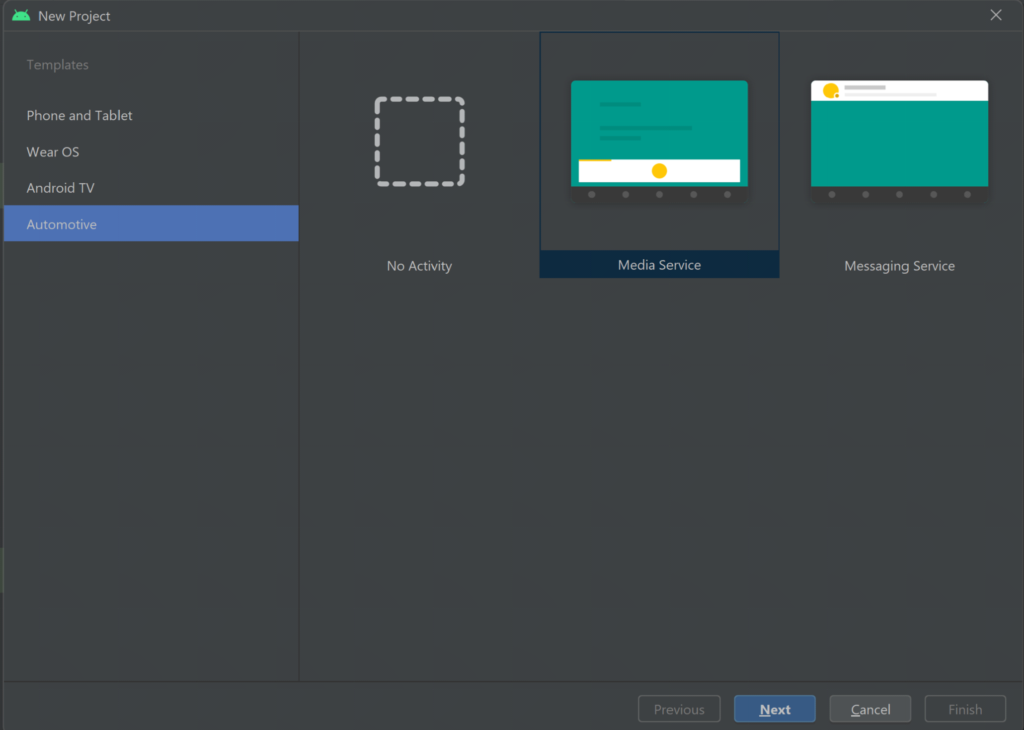
Start a new project, go to File> New Project and choose automotive with no activity
A nice and clean project should be created, without any classes: Go to build.gradle and add the car app library into dependencies, refresh the project to make it get
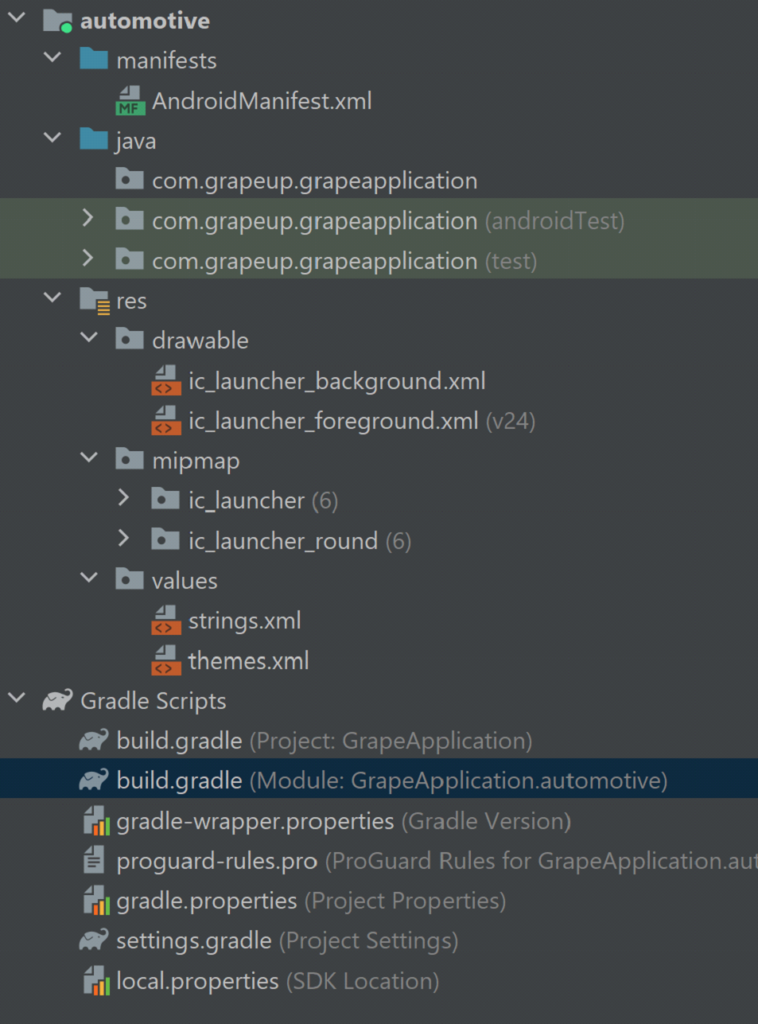
our new dependency:
implementation "androidx.car.app:app-automotive:1.2.0-rc01"
Let's write some code, first our screen class. Name it as you want and make it extend Screen class from android.car.app package and make it implement required methods:
public class GrapeAppScreen extends Screen {
public GrapeAppScreen(@NonNull CarContext carContext) {
super(carContext);
}
@NonNull
@Override
public Template onGetTemplate() {
Row row = new Row.Builder()
.setTitle("Thats our Grape App!").build();
return new PaneTemplate.Builder(
new Pane.Builder()
.addRow(row)
.build()
).setHeaderAction(Action.APP_ICON).build();
}
}
That should create a simple screen with our icon and title, now create another class extending CarAppService from the same package and as well make it implement the required methods. From createHostValidator() method return a static one that allows all hostnames for the purpose of this tutorial and return brand new session with our screen in onCreateSession() , pass CarContext using Session class getCarContext() method:
public class GrapeAppService extends CarAppService {
public GrapeAppService() {}
@NonNull
@Override
public HostValidator createHostValidator() {
return HostValidator.ALLOW_ALL_HOSTS_VALIDATOR;
}
@NonNull
@Override
public Session onCreateSession() {
return new Session() {
@Override
@NonNull
public Screen onCreateScreen(@Nullable Intent intent) {
return new GrapeAppScreen(getCarContext());
}
};
}
}
Next, move to AndroidManifest and add various features inside the main manifest tag:
<uses-feature
android:name="android.hardware.type.automotive"
android:required="true" />
<uses-feature
android:name="android.software.car.templates_host"
android:required="true" />
<uses-feature
android:name="android.hardware.wifi"
android:required="false" />
<uses-feature
android:name="android.hardware.screen.portrait"
android:required="false" />
<uses-feature
android:name="android.hardware.screen.landscape"
android:required="false" />
Inside the Application tag add our service and activity, don’t forget minCarApiLevel as lack of this will throw an exception on app start:
<application
android:allowBackup="true"
android:appCategory="audio"
android:icon="@mipmap/ic_launcher"
android:label="@string/app_name"
android:roundIcon="@mipmap/ic_launcher_round"
android:supportsRtl="true"
android:theme="@style/Theme.GrapeApplication">
<meta-data android:name="androidx.car.app.minCarApiLevel"
android:value="1"
/>
<service
android:name="com.grapeup.grapeapplication.GrapeAppService"
android:exported="true">
<intent-filter>
<action android:name="androidx.car.app.CarAppService" />
</intent-filter>
</service>
<activity
android:name="androidx.car.app.activity.CarAppActivity"
android:exported="true"
android:label="GrapeApp Starter"
android:launchMode="singleTask"
android:theme="@android:style/Theme.DeviceDefault.NoActionBar">
<intent-filter>
<action android:name="android.intent.action.MAIN" />
<category android:name="android.intent.category.LAUNCHER" />
</intent-filter>
<meta-data
android:name="distractionOptimized"
android:value="true" />
</activity>
</application>
Now we can upload our application to the device, verify that you have an automotive emulator created, use automotive configuration, and hit run. The app is run in Google Automotive App Host, so if it is your first application on this device, it may require you to get to the play store and get it.

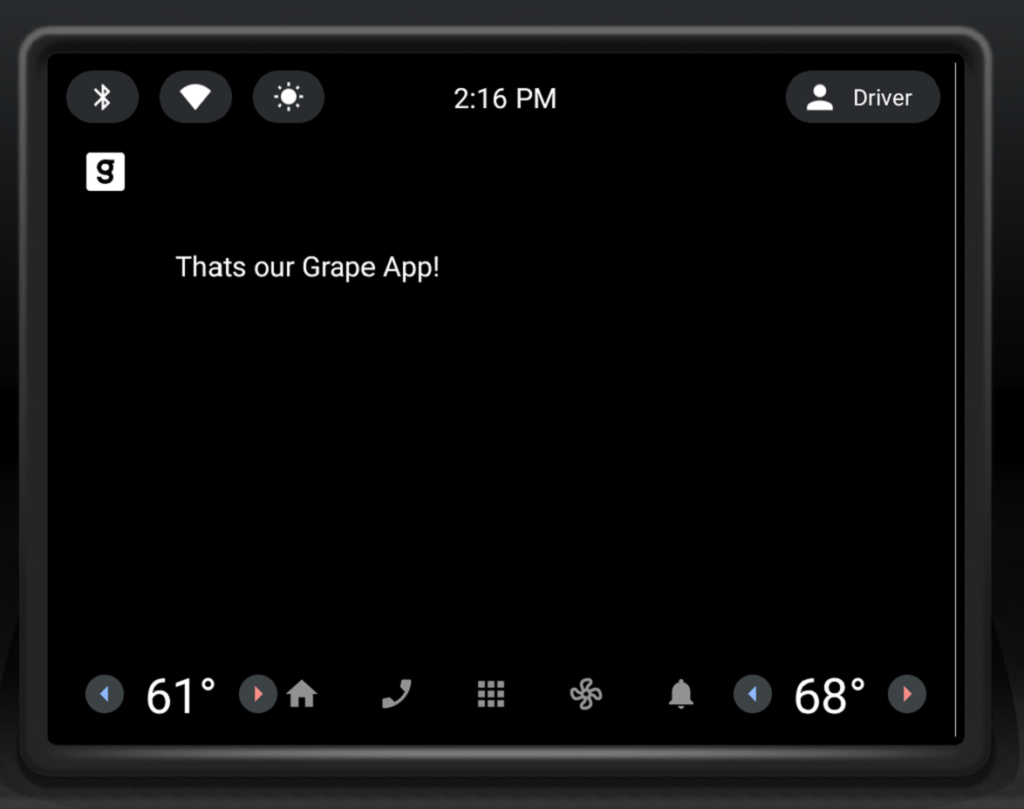
That’s how it looks:
The last thing, we’ll add a navigation button that will pop a Toast . Modify onGetTemplate() in Screen class, add Action and ActionStrip :
Action action = new Action.Builder()
.setOnClickListener(
() -> CarToast.makeText(getCarContext(), "Hello!", CarToast.LENGTH_SHORT).show())
.setTitle("Say hi!")
.build();
ActionStrip actionStrip = new
Add it to PaneTemplate:
return new PaneTemplate.Builder(
new Pane.Builder()
.addRow(row)
.build()
) .setActionStrip(actionStrip)
.setHeaderAction(Action.APP_ICON)
.build();
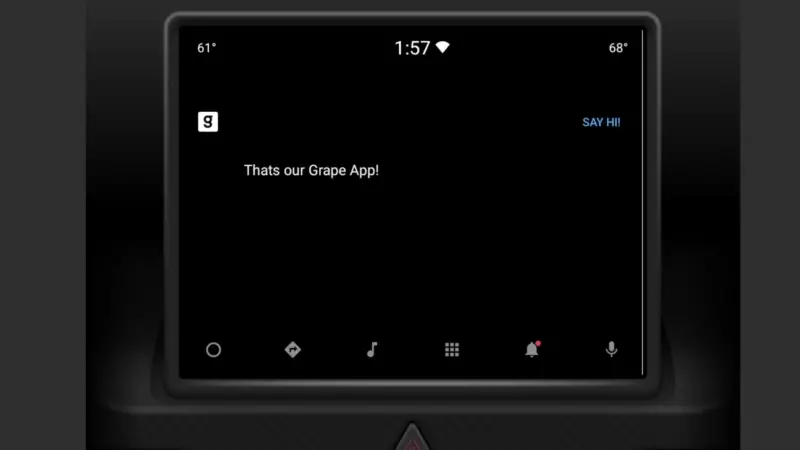
That’s our HelloWorld app:
Now you have the HelloWorld example app up and running using Car App Library. It takes care of displaying and arranging everything on the screen for us. The only responsibility is to add screens and actions we would like to have(and a bit of configuration). Check the Car app library to explore more of what can be done with it, play around with creating your app, and definitely check our blog soon for more AAOS app creation content.

Grape Up guides enterprises on their data-driven transformation journey
Ready to ship? Let's talk.
Check related articles
Read our blog and stay informed about the industry's latest trends and solutions.
Android Automotive OS 14 is out – build your own emulator from scratch!
Android Automotive OS 14 has arrived, and it marks a significant evolution in the way users interact with their vehicle's system. This version brings enhanced user experience, improved Android API, and better OS-level security (as well as non-automotive Android 14). In this short article, we'll walk you through a tutorial on creating your own emulator from scratch, but first, here are some of the standout features and improvements introduced in Android Automotive OS 14 !
Android Automotive 14 noteworthy new features
- Enhanced UI: Now with an optional, improved home screen adaptation to the portrait mode for better vehicle compatibility.
- Multi-User Upgrades: Support parallel sessions with custom sound zones and multiple displays.
- Remote Access: Enables system wake-up, executes a task and then shutdown via external requests.
- Extended VHAL: More ADAS and non-ADAS properties included to represent activation status and the system state.
- App Quick Actions: A feature that allows applications to showcase quick actions.
- Infotainment Reference Design: The starting point for developers to create apps for Android Automotive OS.
- New Boot Animation: Well, as usual 😊
To learn about all new features provided in Android Automotive 14, follow this link: https://source.android.com/docs/automotive/start/releases/u_udc_release?hl=en
Steps to building an emulator
The best operating system for building an emulator in AAOs is Ubuntu 18.04 or higher. If you use a different operating system, you must follow some extra steps. For instance, you may need to install a repo from https://gerrit.googlesource.com/git-repo instead of using a package manager.
1) You need first to install the required dependencies
sudo apt install git-core gnupg flex bison build-essential zip curl zlib1g-dev libc6-dev-i386 libncurses5 x11proto-core-dev libx11-dev lib32z1-dev libgl1-mesa-dev libxml2-utils xsltproc unzip fontconfig repo
2) Then, configure Git, set your name and email address
git config --global user.name "Your name"
git config --global user.email your@email
3) After configuring Git, you can download source code from a Git repository
repo init -u https://android.googlesource.com/platform/manifest -b android-14.0.0_r54 --partial-clone --clone-filter=blob:limit=10M && repo sync
You can skip ‐‐ partial-clone and ‐‐ clone-filter. However, this will result in longer download times. It’s recommended to check for the latest android-14.0.0_rXX tag before downloading, which can be found on this page: https://android.googlesource.com/platform/manifest/+refs .
Keep in mind that downloading takes a lot of time because the sources take about 150GB even with partial clone and clone-filter enabled.
4) In the next step, set up environment variables using the script provided
. build/envsetup.sh
This method replaces your JAVA_HOME and modifies PATH, so be aware that your console may act differently now.
5) Select the system to build
lunch sdk_car_portrait_x86_64-eng
You can create a landscape build by removing "portrait". Also, change x86_64 to arm64 if you want to run the system on Mac. For more details on building on Mac, check out this article .
6) Create the system and the emulator image
m && m emu_img_zip
The first command will take hours to complete. Take a break: go running, biking, hiking, or whatever drives you. You can modify threat pool usage by the build system with -j parameter, like m -j 16 – the default one is the CPU count of your machine.
7) Copy the emulator image to Android Studio emulator directory
mkdir -p /mnt/c/Users/<user>/AppData/Local/Android/Sdk/system-images/android-34/custom_aaos_14/ && unzip -o out/target/product/emulator_x86_64/sdk-repo-Linux-system-images-eng.dape.zip -d /mnt/c/Users/<user>/AppData/Local/Android/Sdk/system-images/android-34/custom_aaos_14/
I assume you work on a Windows machine with WSL. Please adapt the above commands with your Android/SDK directory if you are working on native Linux.
Create a package.xml file in /mnt/c/Users/<user>/AppData/Local/Android/Sdk/system-images/android-34/custom_aaos_14/x86_64 directory with the this content . The file provided bases on existing package.xml files in other emulator images.
Adjust “tag”, “vendor”, and “display name” in the upper file if needed. Make sure to match <localPackage obsolete="false" path="system-images;android-34;custom_aaos_14;x86_64"> with the path you’d placed the emulator image.
8) Now it’s time to create a new emulator in Android Studio
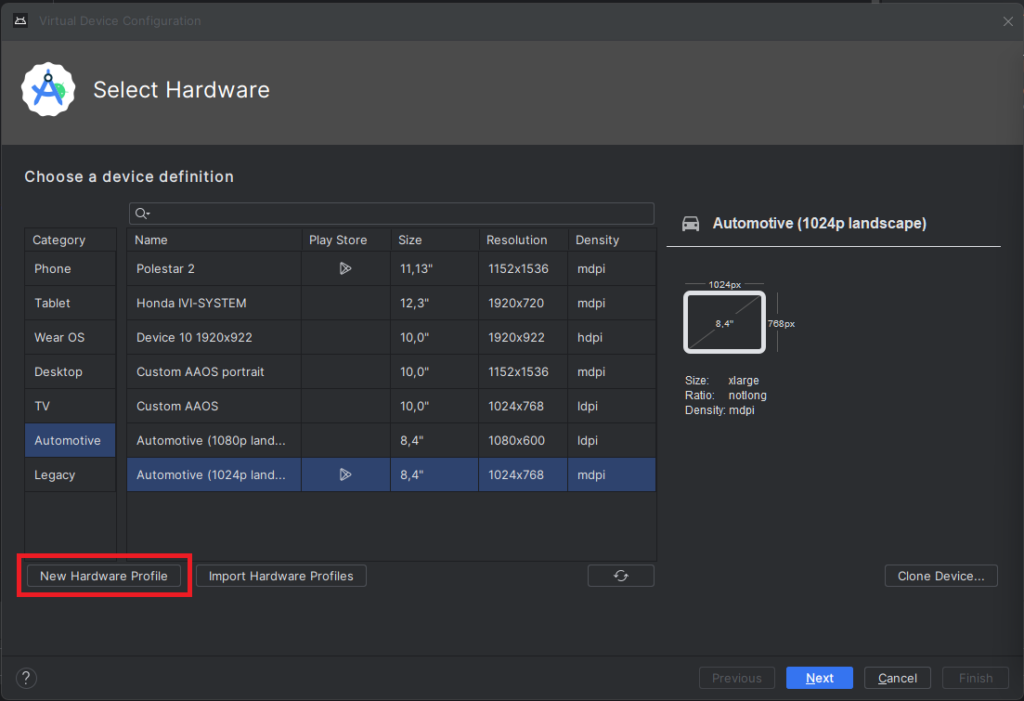
Open "Device Manager" and select "Create Virtual Device". In the left-hand menu, choose "Automotive" and add a new hardware profile using the button in the lower-left corner of the panel.
Select “Android Automotive” as a device type. Choose the correct resolution for your build. For example, I selected a resolution of 1152x1536 for a 10-inch device to create a portrait build. Next, allocate at least 1536 MB of RAM to your device. Then, choose only one supported device state - "Portrait" or "Landscape" - according to your build. Finally, disable any unnecessary sensors and skin for AAOS compatibility.
9) Accept and select your new hardware profile. Then, move on to the next step
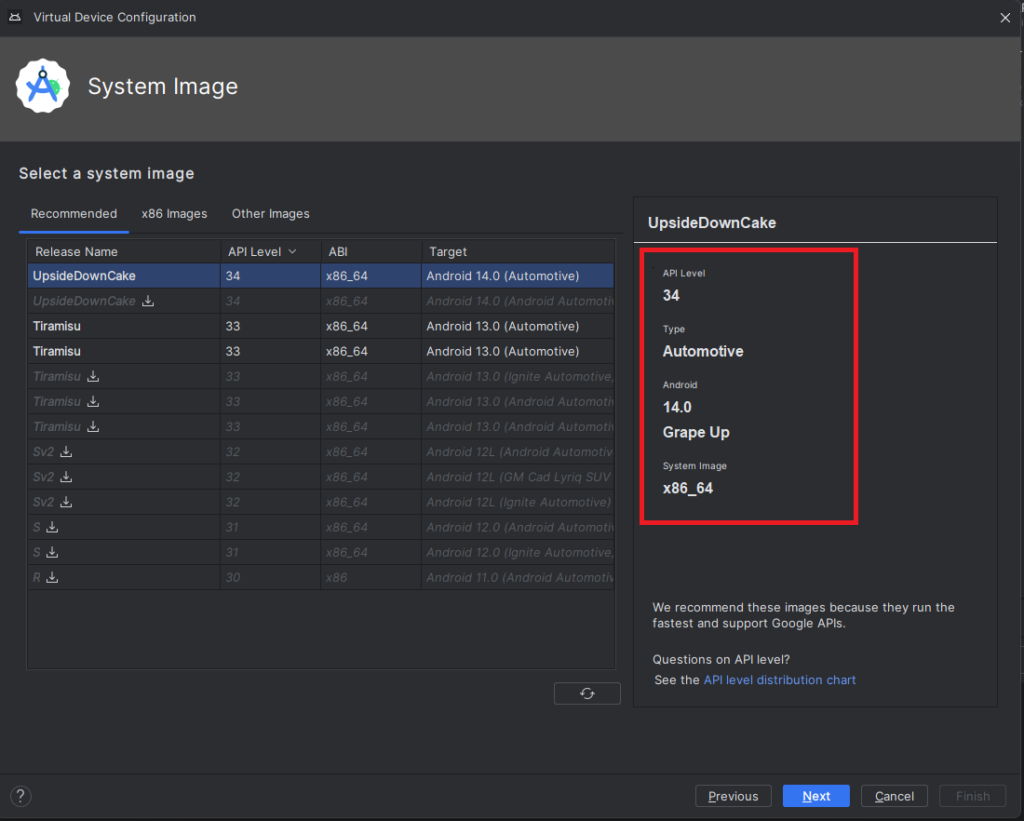
10) Pick your emulator image (you can find it using the tag and vendor configured in package.xml)
11) On the final screen, enter a name and complete the configuration process
12) To start the emulator, go to the "Device Manager" and launch it from there
13) You’re all set! Enjoy!
Get started on creating your very own Android Automotive OS 14 emulator by following the steps outlined in this article. Explore the possibilities of car technology and discover what the future has in store. You can find a AAOS “Hello World” example in our article How to Build Your First App for Android Automotive OS . Start building, try out the various features, and have fun with your new setup!
How to build an Android companion app to control a car with AAOS via Wi-Fi
In this article, we will explore how to create an application that controls HVAC functions and retrieves images from cameras in a vehicle equipped with Android Automotive OS (AAOS) 14.
The phone must be connected to the car's Wi-Fi, and communication between the Head Unit and the phone is required. The Android companion app will utilize the HTTP protocol for this purpose.
In AAOS 14, the Vehicle Hardware Abstraction Layer (VHAL) will create an HTTP server to handle our commands. This functionality is discussed in detail in the article " Exploring the Architecture of Automotive Electronics: Domain vs. Zone ".
Creating the mobile application
To develop the mobile application, we'll use Android Studio. Start by selecting File -> New Project -> Phone and Tablet -> Empty Activity from the menu. This will create a basic Android project structure.
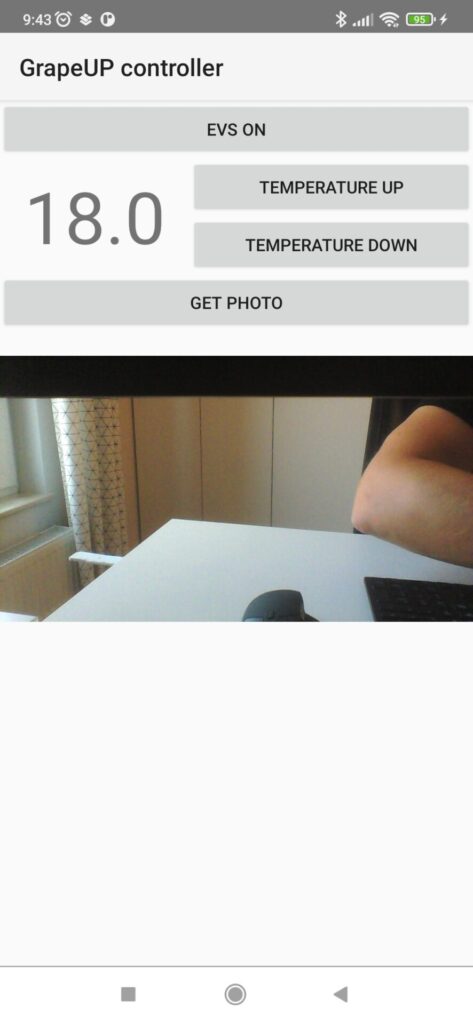
Next, you need to create the Android companion app layout, as shown in the provided screenshot.
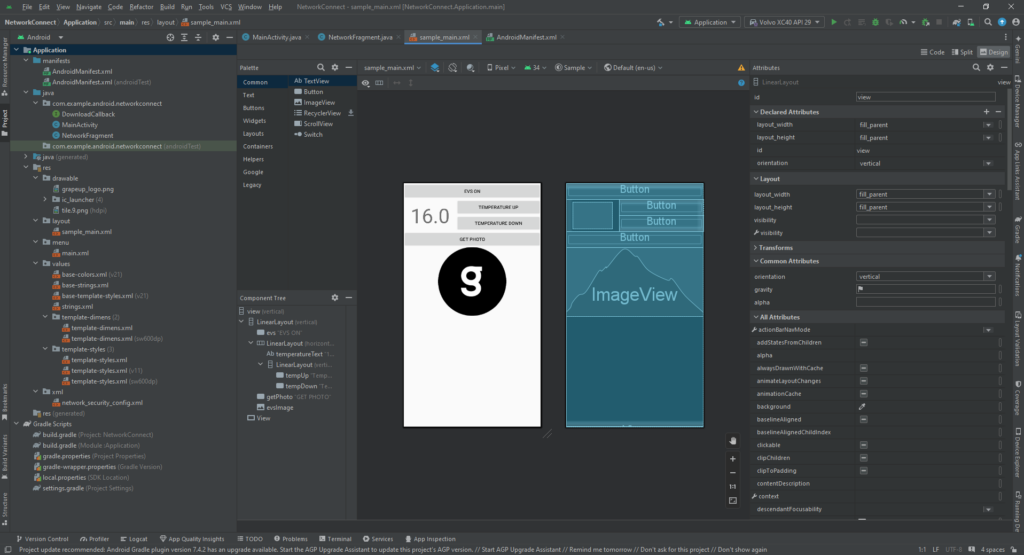
Below is the XML code for the example layout:
<?xml version="1.0" encoding="utf-8"?>

<!-- Copyright 2013 The Android Open Source Project -->
<LinearLayout xmlns:android="http://schemas.android.com/apk/res/android"
    xmlns:app="http://schemas.android.com/apk/res-auto"
    android:id="@+id/view"
    android:layout_width="fill_parent"
    android:layout_height="fill_parent"
    android:orientation="vertical">

    <LinearLayout
        android:layout_width="match_parent"
        android:layout_height="match_parent"
        android:layout_weight="1"
        android:orientation="vertical">

        <Button
            android:id="@+id/evs"
            android:layout_width="match_parent"
            android:layout_height="wrap_content"
            android:text="EVS ON" />

        <LinearLayout
            android:layout_width="match_parent"
            android:layout_height="wrap_content"
            android:orientation="horizontal">

            <TextView
                android:id="@+id/temperatureText"
                android:layout_width="wrap_content"
                android:layout_height="wrap_content"
                android:layout_marginStart="20dp"
                android:layout_marginTop="8dp"
                android:layout_marginEnd="20dp"
                android:text="16.0"
                android:textSize="60sp" />

            <LinearLayout
                android:layout_width="match_parent"
                android:layout_height="wrap_content"
                android:orientation="vertical">

                <Button
                    android:id="@+id/tempUp"
                    android:layout_width="match_parent"
                    android:layout_height="wrap_content"
                    android:text="Temperature UP" />

                <Button
                    android:id="@+id/tempDown"
                    android:layout_width="match_parent"
                    android:layout_height="wrap_content"
                    android:text="Temperature Down" />
            </LinearLayout>
        </LinearLayout>

        <Button
            android:id="@+id/getPhoto"
            android:layout_width="match_parent"
            android:layout_height="wrap_content"
            android:text="GET PHOTO" />

        <ImageView
            android:id="@+id/evsImage"
            android:layout_width="match_parent"
            android:layout_height="wrap_content"
            app:srcCompat="@drawable/grapeup_logo" />

    </LinearLayout>

    <View
        android:layout_width="fill_parent"
        android:layout_height="1dp"
        android:background="@android:color/darker_gray" />
</LinearLayout>
Adding functionality to the buttons
After setting up the layout, the next step is to connect actions to the buttons. Here's how you can do it in your MainActivity :
Button tempUpButton = findViewById(R.id.tempUp);
tempUpButton.setOnClickListener(new View.OnClickListener() {
    @Override
    public void onClick(View v) {
        tempUpClicked();
    }
});

Button tempDownButton = findViewById(R.id.tempDown);
tempDownButton.setOnClickListener(new View.OnClickListener() {
    @Override
    public void onClick(View v) {
        tempDownClicked();
    }
});

Button evsButton = findViewById(R.id.evs);
evsButton.setOnClickListener(new View.OnClickListener() {
    @Override
    public void onClick(View v) {
        evsClicked();
    }
});

Button getPhotoButton = findViewById(R.id.getPhoto);
getPhotoButton.setOnClickListener(new View.OnClickListener() {
    @Override
    public void onClick(View v) {
        Log.w("GrapeUpController", "getPhotoButton clicked");
        new DownloadImageTask((ImageView) findViewById(R.id.evsImage))
            .execute("http://192.168.1.53:8081/");
    }
});
Downloading and displaying an image
To retrieve an image from the car’s camera, we use the DownloadImageTask class, which downloads a JPEG image in the background and displays it:
private class DownloadImageTask extends AsyncTask<String, Void, Bitmap> {
    ImageView bmImage;

    public DownloadImageTask(ImageView bmImage) {
        this.bmImage = bmImage;
    }

    @Override
    protected Bitmap doInBackground(String... urls) {
        String urldisplay = urls[0];
        Bitmap mIcon11 = null;
        try {
            Log.w("GrapeUpController", "doInBackground: " + urldisplay);
            InputStream in = new java.net.URL(urldisplay).openStream();
            mIcon11 = BitmapFactory.decodeStream(in);
        } catch (Exception e) {
            Log.e("Error", e.getMessage());
            e.printStackTrace();
        }
        return mIcon11;
    }

    @Override
    protected void onPostExecute(Bitmap result) {
        bmImage.setImageBitmap(result);
    }
}
Adjusting the temperature
To change the car’s temperature, you can implement a function like this:
private void tempUpClicked() {
    mTemperature += 0.5f;

    new Thread(new Runnable() {
        @Override
        public void run() {
            doInBackground("http://192.168.1.53:8080/set_temp/" +
                String.format(Locale.US, "%.01f", mTemperature));
        }
    }).start();

    updateTemperature();
}
Endpoint overview
In the above examples, we used two endpoints: http://192.168.1.53:8080/ and http://192.168.1.53:8081/.
- The first endpoint corresponds to the AAOS 14 and the server implemented in the VHAL , which handles commands for controlling car functions.
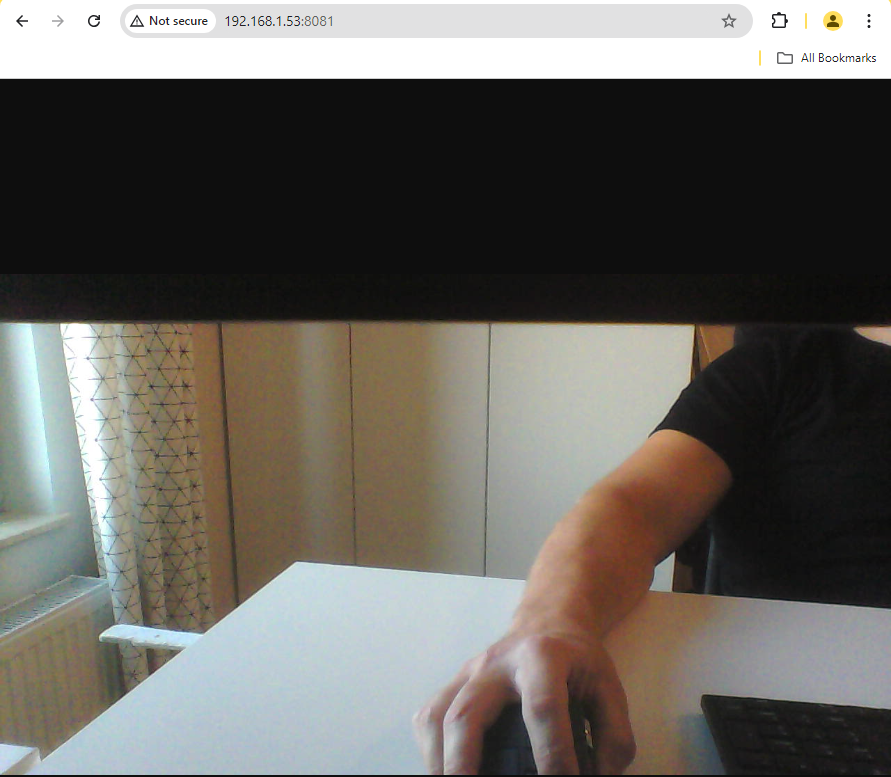
- The second endpoint is the server implemented in the EVS Driver application. It retrieves images from the car’s camera and sends them as an HTTP response.
For more information on EVS setup in AAOS, you can refer to the articles " Android AAOS 14 - Surround View Parking Camera: How to Configure and Launch EVS (Exterior View System) " and " Android AAOS 14 - EVS network camera. "
EVS driver photo provider
In our example, the EVS Driver application is responsible for providing the photo from the car's camera. This application is located in the packages/services/Car/cpp/evs/sampleDriver/aidl/src directory. We will create a new thread within this application that runs an HTTP server. The server will handle requests for images using the v4l2 (Video4Linux2) interface.
Each HTTP request will initialize v4l2, set the image format to JPEG, and specify the resolution. After capturing the image, the data will be sent as a response, and the v4l2 stream will be stopped. Below is an example code snippet that demonstrates this process:
#include <errno.h>
#include <fcntl.h>
#include <linux/videodev2.h>
#include <stdint.h>
#include <stdio.h>
#include <string.h>
#include <sys/ioctl.h>
#include <sys/mman.h>
#include <unistd.h>
#include "cpp-httplib/httplib.h"

#include <utils/Log.h>
#include <android-base/logging.h>

uint8_t *buffer;
size_t bufferLength;
int fd;

static int xioctl(int fd, int request, void *arg)
{
    int r;
    do r = ioctl(fd, request, arg);
    while (-1 == r && EINTR == errno);

    if (r == -1) {
        ALOGE("xioctl error: %d, %s", errno, strerror(errno));
    }

    return r;
}

int print_caps(int fd)
{
    struct v4l2_capability caps = {};
    if (-1 == xioctl(fd, VIDIOC_QUERYCAP, &caps))
    {
        ALOGE("Querying Capabilities");
        return 1;
    }

    ALOGI("Driver Caps:\n"
          "  Driver: \"%s\"\n"
          "  Card: \"%s\"\n"
          "  Bus: \"%s\"\n"
          "  Version: %d.%d\n"
          "  Capabilities: %08x\n",
          caps.driver,
          caps.card,
          caps.bus_info,
          (caps.version >> 16) & 0xff,
          (caps.version >> 24) & 0xff,
          caps.capabilities);

    v4l2_format format;
    format.type = V4L2_BUF_TYPE_VIDEO_CAPTURE;
    format.fmt.pix.pixelformat = V4L2_PIX_FMT_MJPEG;
    format.fmt.pix.width = 1280;
    format.fmt.pix.height = 720;
    LOG(INFO) << __FILE__ << ":" << __LINE__ << " Requesting format: "
              << ((char*)&format.fmt.pix.pixelformat)[0]
              << ((char*)&format.fmt.pix.pixelformat)[1]
              << ((char*)&format.fmt.pix.pixelformat)[2]
              << ((char*)&format.fmt.pix.pixelformat)[3]
              << "(" << std::hex << std::setw(8)
              << format.fmt.pix.pixelformat << ")";

    if (ioctl(fd, VIDIOC_S_FMT, &format) < 0) {
        LOG(ERROR) << __FILE__ << ":" << __LINE__ << " VIDIOC_S_FMT failed " << strerror(errno);
    }

    format.type = V4L2_BUF_TYPE_VIDEO_CAPTURE;
    if (ioctl(fd, VIDIOC_G_FMT, &format) == 0) {
        LOG(INFO) << "Current output format:  "
                  << "fmt=0x" << std::hex << format.fmt.pix.pixelformat << ", " << std::dec
                  << format.fmt.pix.width << " x " << format.fmt.pix.height
                  << ", pitch=" << format.fmt.pix.bytesperline;

        if (format.fmt.pix.pixelformat == V4L2_PIX_FMT_MJPEG) {
            ALOGI("V4L2_PIX_FMT_MJPEG detected");
        }
        if (format.fmt.pix.pixelformat == V4L2_PIX_FMT_YUYV) {
            ALOGI("V4L2_PIX_FMT_YUYV detected");
        }
    } else {
        LOG(ERROR) << "VIDIOC_G_FMT failed";
    }

    return 0;
}

int init_mmap(int fd)
{
    struct v4l2_requestbuffers req{};
    req.count = 1;
    req.type = V4L2_BUF_TYPE_VIDEO_CAPTURE;
    req.memory = V4L2_MEMORY_MMAP;

    if (-1 == xioctl(fd, VIDIOC_REQBUFS, &req))
    {
        perror("Requesting Buffer");
        return 1;
    }

    struct v4l2_buffer buf{};
    buf.type = V4L2_BUF_TYPE_VIDEO_CAPTURE;
    buf.memory = V4L2_MEMORY_MMAP;
    buf.index = 0;
    if (-1 == xioctl(fd, VIDIOC_QUERYBUF, &buf))
    {
        perror("Querying Buffer");
        return 1;
    }

    buffer = (uint8_t *)mmap(NULL, buf.length, PROT_READ | PROT_WRITE, MAP_SHARED, fd, buf.m.offset);
    bufferLength = buf.length;
    ALOGI("Length: %d\nAddress: %p\n", buf.length, buffer);
    ALOGI("Image Length: %d\n", buf.bytesused);

    return 0;
}

size_t capture_image(int fd)
{
    struct v4l2_buffer buf{};
    buf.type = V4L2_BUF_TYPE_VIDEO_CAPTURE;
    buf.memory = V4L2_MEMORY_MMAP;
    buf.index = 0;
    if (-1 == xioctl(fd, VIDIOC_QBUF, &buf))
    {
        perror("Query Buffer");
        return 0;
    }

    if (-1 == xioctl(fd, VIDIOC_STREAMON, &buf.type))
    {
        perror("Start Capture");
        return 0;
    }

    fd_set fds;
    FD_ZERO(&fds);
    FD_SET(fd, &fds);
    struct timeval tv{};
    tv.tv_sec = 2;
    int r = select(fd + 1, &fds, NULL, NULL, &tv);
    if (-1 == r)
    {
        perror("Waiting for Frame");
        return 0;
    }

    if (-1 == xioctl(fd, VIDIOC_DQBUF, &buf))
    {
        perror("Retrieving Frame");
        return 0;
    }

    return buf.bytesused;
}

bool initGetPhoto()
{
    fd = open("/dev/video0", O_RDWR);
    if (fd == -1)
    {
        perror("Opening video device");
        return false;
    }

    if (print_caps(fd))
        return false;

    if (init_mmap(fd))
        return false;

    return true;
}

bool closeGetPhoto()
{
    int type = V4L2_BUF_TYPE_VIDEO_CAPTURE;
    if (ioctl(fd, VIDIOC_STREAMOFF, &type) == -1) {
        perror("VIDIOC_STREAMOFF");
    }

    // Tell the L4V2 driver to release our streaming buffers
    v4l2_requestbuffers bufrequest;
    bufrequest.type = V4L2_BUF_TYPE_VIDEO_CAPTURE;
    bufrequest.memory = V4L2_MEMORY_MMAP;
    bufrequest.count = 0;
    ioctl(fd, VIDIOC_REQBUFS, &bufrequest);

    close(fd);

    return true;
}

void getPhotoTask()
{
    ALOGI("getPhotoTask starting ");
    ALOGI("HTTPServer starting ");

    httplib::Server svr;

    svr.Get("/", [](const httplib::Request &, httplib::Response &res) {
        ALOGI("HTTPServer New request /");

        bool result = initGetPhoto();
        ALOGI("initGetPhoto %b", result);
        size_t imgSize = capture_image(fd);
        ALOGI("capture_image %zu", imgSize);

        closeGetPhoto();
        res.set_content((char *)buffer, imgSize, "image/jpeg");
    });

    ALOGI("HTTPServer listen");
    svr.listen("0.0.0.0", 8081);
}
How the code works
1. Initialization : The initGetPhoto() function opens the video device (/dev/video0) and sets up the necessary format and memory mappings for capturing images using the v4l2 interface.
2. Image Capture : The capture_image() function captures an image from the video stream. It uses select() to wait for the frame and then dequeues the buffer containing the image.
3. HTTP Server : The getPhotoTask() function starts an HTTP server using the cpp-httplib library. When a request is received, the server initializes the camera, captures an image, and sends it as a JPEG response.
4. Cleanup : After capturing the image and sending it, the closeGetPhoto() function stops the video stream, releases the buffers, and closes the video device.
This setup ensures that each image is captured on demand, allowing the application to control when the camera is active and minimizing unnecessary resource usage.
Conclusion
In this article, we walked through the process of creating an Android companion app that allows users to control HVAC functions and retrieve images from a car's camera system using a simple HTTP interface. The application was developed in Android Studio, where we designed a user-friendly interface and implemented functionality to adjust the vehicle's temperature and capture images remotely. On the server side, we extended the EVS Driver by incorporating a custom thread to handle HTTP requests and capture images using v4l2, providing a basic yet effective solution for remote vehicle interaction.
This project serves as a conceptual demonstration of integrating smartphone-based controls with automotive systems, but it’s important to recognize that there is significant potential for improvement and expansion. For instance, enhancing the data handling layer to provide more robust error checking, utilizing the HTTP/2 protocol for faster and more efficient communication, and creating a more seamless integration with the EVS Driver could greatly improve the performance and reliability of the system.
In its current form, this solution offers a foundational approach that could be expanded into a more sophisticated application, capable of supporting a wider range of automotive functions and delivering a more polished user experience. Future developments could also explore more advanced security features, improved data formats, and tighter integration with the broader ecosystem of Android Automotive OS to fully leverage the capabilities of modern vehicles.
Interested in our services?
Reach out for tailored solutions and expert guidance.