How to Set Up Kafka Integration Test


Do you consider unit testing as not enough solution for keeping the application’s reliability and stability? Are you afraid that somehow or somewhere there is a potential bug hiding in the assumption that unit tests should cover all cases? And also is mocking Kafka not enough for project requirements? If even one answer is ‘yes’, then welcome to a nice and easy guide on how to set up Integration Tests for Kafka using TestContainers and Embedded Kafka for Spring!
What is TestContainers?
TestContainers is an open-source Java library specialized in providing all needed solutions for the integration and testing of external sources. It means that we are able to mimic an actual database, web server, or even an event bus environment and treat that as a reliable place to test app functionality. All these fancy features are hooked into docker images, defined as containers. Do we need to test the database layer with actual MongoDB? No worries, we have a test container for that. We can not also forget about UI tests – Selenium Container will do anything that we actually need.
In our case, we will focus on Kafka Testcontainer.
What is Embedded Kafka?
As the name suggests, we are going to deal with an in-memory Kafka instance, ready to be used as a normal broker with full functionality. It allows us to work with producers and consumers, as usual, making our integration tests lightweight.
Before we start
The concept for our test is simple – I would like to test Kafka consumer and producer using two different approaches and check how we can utilize them in actual cases.
Kafka Messages are serialized using Avro schemas.
Embedded Kafka – Producer Test
The concept is easy – let’s create a simple project with the controller, which invokes a service method to push a Kafka Avro serialized message.
Dependencies:
dependencies {
implementation "org.apache.avro:avro:1.10.1"
implementation("io.confluent:kafka-avro-serializer:6.1.0")
implementation 'org.springframework.boot:spring-boot-starter-validation'
implementation 'org.springframework.kafka:spring-kafka'
implementation('org.springframework.cloud:spring-cloud-stream:3.1.1')
implementation('org.springframework.cloud:spring-cloud-stream-binder-kafka:3.1.1')

implementation('org.springframework.boot:spring-boot-starter-web:2.4.3')
implementation 'org.projectlombok:lombok:1.18.16'

compileOnly 'org.projectlombok:lombok'
annotationProcessor 'org.projectlombok:lombok'
testImplementation('org.springframework.cloud:spring-cloud-stream-test-support:3.1.1')
testImplementation 'org.springframework.boot:spring-boot-starter-test'
testImplementation 'org.springframework.kafka:spring-kafka-test'
}
Also worth mentioning fantastic plugin for Avro. Here plugins section:
plugins {
	id 'org.springframework.boot' version '2.6.8'
	id 'io.spring.dependency-management' version '1.0.11.RELEASE'
	id 'java'
	id "com.github.davidmc24.gradle.plugin.avro" version "1.3.0"
}
Avro Plugin supports schema auto-generating. This is a must-have.
Link to plugin: https://github.com/davidmc24/gradle-avro-plugin
Now let’s define the Avro schema:
{
  "namespace": "com.grapeup.myawesome.myawesomeproducer",
  "type": "record",
  "name": "RegisterRequest",
  "fields": [
    {"name": "id", "type": "long"},
    {"name": "address", "type": "string", "avro.java.string": "String"
    }

  ]
}
Our ProducerService will be focused only on sending messages to Kafka using a template, nothing exciting about that part. Main functionality can be done just using this line:
ListenableFuture<SendResult<String, RegisterRequest>> future = this.kafkaTemplate.send("register-request", kafkaMessage);
We can’t forget about test properties:
spring:
  main:
    allow-bean-definition-overriding: true
  kafka:
    consumer:
      group-id: group_id
      auto-offset-reset: earliest
      key-deserializer: org.apache.kafka.common.serialization.StringDeserializer
      value-deserializer: com.grapeup.myawesome.myawesomeconsumer.common.CustomKafkaAvroDeserializer
    producer:
      auto.register.schemas: true
      key-serializer: org.apache.kafka.common.serialization.StringSerializer
      value-serializer: com.grapeup.myawesome.myawesomeconsumer.common.CustomKafkaAvroSerializer
    properties:
      specific.avro.reader: true
As we see in the mentioned test properties, we declare a custom deserializer/serializer for KafkaMessages. It is highly recommended to use Kafka with Avro – don’t let JSONs maintain object structure, let’s use civilized mapper and object definition like Avro.
Serializer:
public class CustomKafkaAvroSerializer extends KafkaAvroSerializer {
    public CustomKafkaAvroSerializer() {
        super();
        super.schemaRegistry = new MockSchemaRegistryClient();
    }

    public CustomKafkaAvroSerializer(SchemaRegistryClient client) {
        super(new MockSchemaRegistryClient());
    }

    public CustomKafkaAvroSerializer(SchemaRegistryClient client, Map<String, ?> props) {
        super(new MockSchemaRegistryClient(), props);
    }
}
Deserializer:
public class CustomKafkaAvroSerializer extends KafkaAvroSerializer {
    public CustomKafkaAvroSerializer() {
        super();
        super.schemaRegistry = new MockSchemaRegistryClient();
    }

    public CustomKafkaAvroSerializer(SchemaRegistryClient client) {
        super(new MockSchemaRegistryClient());
    }

    public CustomKafkaAvroSerializer(SchemaRegistryClient client, Map<String, ?> props) {
        super(new MockSchemaRegistryClient(), props);
    }
}
And we have everything to start writing our test.
@ExtendWith(SpringExtension.class)
@SpringBootTest
@AutoConfigureMockMvc
@TestInstance(TestInstance.Lifecycle.PER_CLASS)
@ActiveProfiles("test")
@EmbeddedKafka(partitions = 1, topics = {"register-request"})
class ProducerControllerTest {
All we need to do is add @EmbeddedKafka annotation with listed topics and partitions. Application Context will boot Kafka Broker with provided configuration just like that. Keep in mind that @TestInstance should be used with special consideration. Lifecycle.PER_CLASS will avoid creating the same objects/context for each test method. Worth checking if tests are too time-consuming.
Consumer<String, RegisterRequest> consumerServiceTest;
@BeforeEach
void setUp() {
DefaultKafkaConsumerFactory<String, RegisterRequest> consumer = new DefaultKafkaConsumerFactory<>(kafkaProperties.buildConsumerProperties();

consumerServiceTest = consumer.createConsumer();
consumerServiceTest.subscribe(Collections.singletonList(TOPIC_NAME));
}
Here we can declare the test consumer, based on the Avro schema return type. All Kafka properties are already provided in the .yml file. That consumer will be used as a check if the producer actually pushed a message.
Here is the actual test method:
@Test
void whenValidInput_therReturns200() throws Exception {
        RegisterRequestDto request = RegisterRequestDto.builder()
                .id(12)
                .address("tempAddress")
                .build();

        mockMvc.perform(
                post("/register-request")
                      .contentType("application/json")
                      .content(objectMapper.writeValueAsBytes(request)))
                .andExpect(status().isOk());

      ConsumerRecord<String, RegisterRequest> consumedRegisterRequest =  KafkaTestUtils.getSingleRecord(consumerServiceTest, TOPIC_NAME);

        RegisterRequest valueReceived = consumedRegisterRequest.value();

        assertEquals(12, valueReceived.getId());
        assertEquals("tempAddress", valueReceived.getAddress());
    }
First of all, we use MockMvc to perform an action on our endpoint. That endpoint uses ProducerService to push messages to Kafka. KafkaConsumer is used to verify if the producer worked as expected. And that’s it – we have a fully working test with embedded Kafka.
Test Containers – Consumer Test
TestContainers are nothing else like independent docker images ready for being dockerized. The following test scenario will be enhanced by a MongoDB image. Why not keep our data in the database right after anything happened in Kafka flow?
Dependencies are not much different than in the previous example. The following steps are needed for test containers:
testImplementation 'org.testcontainers:junit-jupiter'
	testImplementation 'org.testcontainers:kafka'
	testImplementation 'org.testcontainers:mongodb'

ext {
	set('testcontainersVersion', "1.17.1")
}

dependencyManagement {
	imports {
		mavenBom "org.testcontainers:testcontainers-bom:${testcontainersVersion}"
	}
}
Let’s focus now on the Consumer part. The test case will be simple – one consumer service will be responsible for getting the Kafka message and storing the parsed payload in the MongoDB collection. All that we need to know about KafkaListeners, for now, is that annotation:
@KafkaListener(topics = "register-request")
By the functionality of the annotation processor, KafkaListenerContainerFactory will be responsible to create a listener on our method. From this moment our method will react to any upcoming Kafka message with the mentioned topic.
Avro serializer and deserializer configs are the same as in the previous test.
Regarding TestContainer, we should start with the following annotations:
@SpringBootTest
@ActiveProfiles("test")
@Testcontainers
public class AbstractIntegrationTest {
During startup, all configured TestContainers modules will be activated. It means that we will get access to the full operating environment of the selected source. As example:
@Autowired
private KafkaListenerEndpointRegistry kafkaListenerEndpointRegistry;

@Container
public static KafkaContainer kafkaContainer = new KafkaContainer(DockerImageName.parse("confluentinc/cp-kafka:6.2.1"));

@Container
static MongoDBContainer mongoDBContainer = new MongoDBContainer("mongo:4.4.2").withExposedPorts(27017);
As a result of booting the test, we can expect two docker containers to start with the provided configuration.
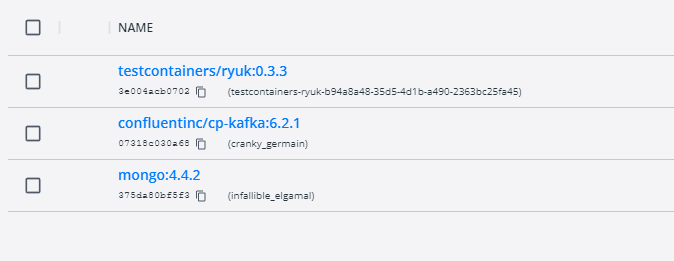
What is really important for the mongo container – it gives us full access to the database using just a simple connection uri. With such a feature, we are able to take a look what is the current state in our collections, even during debug mode and prepared breakpoints.
Take a look also at the Ryuk container – it works like overwatch and checks if our containers have started correctly.
And here is the last part of the configuration:
@DynamicPropertySource
static void dataSourceProperties(DynamicPropertyRegistry registry) {
   registry.add("spring.kafka.bootstrap-servers", kafkaContainer::getBootstrapServers);
   registry.add("spring.kafka.consumer.bootstrap-servers", kafkaContainer::getBootstrapServers);
   registry.add("spring.kafka.producer.bootstrap-servers", kafkaContainer::getBootstrapServers);
   registry.add("spring.data.mongodb.uri", mongoDBContainer::getReplicaSetUrl);
}

static {
   kafkaContainer.start();
   mongoDBContainer.start();

   mongoDBContainer.waitingFor(Wait.forListeningPort()
           .withStartupTimeout(Duration.ofSeconds(180L)));
}

@BeforeTestClass
public void beforeTest() {

   kafkaListenerEndpointRegistry.getListenerContainers().forEach(
           messageListenerContainer -> {
               ContainerTestUtils
                       .waitForAssignment(messageListenerContainer, 1);

           }
   );
}

@AfterAll
static void tearDown() {
   kafkaContainer.stop();
   mongoDBContainer.stop();
}
DynamicPropertySource gives us the option to set all needed environment variables during the test lifecycle. Strongly needed for any config purposes for TestContainers. Also, beforeTestClass kafkaListenerEndpointRegistry waits for each listener to get expected partitions during container startup.
And the last part of the Kafka test containers journey – the main body of the test:
@Test
public void containerStartsAndPublicPortIsAvailable() throws Exception {
   writeToTopic("register-request", RegisterRequest.newBuilder().setId(123).setAddress("dummyAddress").build());

   //Wait for KafkaListener
   TimeUnit.SECONDS.sleep(5);
   Assertions.assertEquals(1, taxiRepository.findAll().size());

}

private KafkaProducer<String, RegisterRequest> createProducer() {
   return new KafkaProducer<>(kafkaProperties.buildProducerProperties());
}

private void writeToTopic(String topicName, RegisterRequest... registerRequests) {

   try (KafkaProducer<String, RegisterRequest> producer = createProducer()) {
       Arrays.stream(registerRequests)
               .forEach(registerRequest -> {
                           ProducerRecord<String, RegisterRequest> record = new ProducerRecord<>(topicName, registerRequest);
                           producer.send(record);
                       }
               );
   }
}
The custom producer is responsible for writing our message to KafkaBroker. Also, it is recommended to give some time for consumers to handle messages properly. As we see, the message was not just consumed by the listener, but also stored in the MongoDB collection.
Conclusions
As we can see, current solutions for integration tests are quite easy to implement and maintain in projects. There is no point in keeping just unit tests and counting on all lines covered as a sign of code/logic quality. Now the question is, should we use an Embedded solution or TestContainers? I suggest first of all focusing on the word “Embedded”. As a perfect integration test, we want to get an almost ideal copy of the production environment with all properties/features included. In-memory solutions are good, but mostly, not enough for large business projects. Definitely, the advantage of Embedded services is the easy way to implement such tests and maintain configuration, just when anything happens in memory.
TestContainers at the first sight might look like overkill, but they give us the most important feature, which is a separate environment. We don’t have to even rely on existing docker images – if we want we can use custom ones. This is a huge improvement for potential test scenarios.
What about Jenkins? There is no reason to be afraid also to use TestContainers in Jenkins. I firmly recommend checking TestContainers documentation on how easily we can set up the configuration for Jenkins agents.
To sum up – if there is no blocker or any unwanted condition for using TestContainers, then don’t hesitate. It is always good to keep all services managed and secured with integration test contracts.
Is it insightful?
Share the article!
Check related articles
Read our blog and stay informed about the industry's latest trends and solutions.
see all articles