How to run Selenium BDD tests in parallel with AWS Lambda - Lambda handlers

In our first article about Selenium BDD Tests in Parallel with AWS Lambda, we introduce parallelization in the Cloud and give you some insights into automating testing to accelerate your software development process. By getting familiar with the basics of Lambda Layers architecture and designing test sets, you are now ready to learn more about the Lambda handlers.
Lambda handlers
Now’s the time to run our tests on AWS. We need to create two Lambda handlers. The first one will find all scenarios from the test layer and run the second lambda in parallel for each scenario. In the end, it will generate one test report and upload it to the AWS S3 bucket.
Let’s start with the middle part. In order to connect to AWS, we need to use the boto3 library - AWS SDK for Python. It enables us to create, configure, and manage AWS services. We also import here behave __main__ function , which will be called to run behave tests from the code, not from the command line.
lambda/handler.py
import json
import logging
import os
from datetime import datetime
from subprocess import call
import boto3
from behave.__main__ import main as behave_main
REPORTS_BUCKET = 'aws-selenium-test-reports'
DATETIME_FORMAT = '%H:%M:%S'
logger = logging.getLogger()
logger.setLevel(logging.INFO)
def get_run_args(event, results_location):
test_location = f'/opt/{event["tc_name"]}'
run_args = [test_location]
if 'tags' in event.keys():
tags = event['tags'].split(' ')
for tag in tags:
run_args.append(f'-t {tag}')
run_args.append('-k')
run_args.append('-f allure_behave.formatter:AllureFormatter')
run_args.append('-o')
run_args.append(results_location)
run_args.append('-v')
run_args.append('--no-capture')
run_args.append('--logging-level')
run_args.append('DEBUG')
return run_args
What we also have above is setting arguments for our tests e.g., tags or feature file locations. But let's get to the point. Here is our Lambda handler code:
lambda/handler.py
def lambda_runner(event, context):
suffix = datetime.now().strftime(DATETIME_FORMAT)
results_location = f'/tmp/result_{suffix}'
run_args = get_run_args(event, results_location)
print(f'Running with args: {run_args}')
# behave -t @smoke -t ~@login -k -f allure_behave.formatter:AllureFormatter -o output --no-capture
try:
return_code = behave_main(run_args)
test_result = False if return_code == 1 else True
except Exception as e:
print(e)
test_result = False
response = {'test_result': test_result}
s3 = boto3.resource('s3')
for file in os.listdir(results_location):
if file.endswith('.json'):
s3.Bucket(REPORTS_BUCKET).upload_file(f'{results_location}/{file}', f'tmp_reports/{file}')
call(f'rm -rf {results_location}', shell=True)
return {
'statusCode': 200,
'body': json.dumps(response)
}
The lambda_runner method is executed with tags that are passed in the event. It will handle a feature file having a name from the event and at least one of those tags. At the end of a single test, we need to upload our results to the S3 bucket. The last thing is to return a Lambda result with a status code and a response from tests.
There’s a serverless file with a definition of max memory size, lambda timeout, used layers, and also some policies that allow us to upload the files into S3 or save the logs in CloudWatch.
lambda/serverless.yml
service: lambda-test-runner
app: lambda-test-runner
provider:
name: aws
runtime: python3.6
region: eu-central-1
memorySize: 512
timeout: 900
iamManagedPolicies:
- "arn:aws:iam::aws:policy/CloudWatchLogsFullAccess"
- "arn:aws:iam::aws:policy/AmazonS3FullAccess"
functions:
lambda_runner:
handler: handler.lambda_runner
events:
- http:
path: lambda_runner
method: get
layers:
- ${cf:lambda-selenium-layer-dev.SeleniumLayerExport}
- ${cf:lambda-selenium-layer-dev.ChromedriverLayerExport}
- ${cf:lambda-selenium-layer-dev.ChromeLayerExport}
- ${cf:lambda-tests-layer-dev.FeaturesLayerExport}
Now let’s go back to the first lambda function. There will be a little more here, so we'll go through it in batches. Firstly, imports and global variables. REPORTS_BUCKET should have the same value as it’s in the environment.py file (tests layer).
test_list/handler.py
import json
import logging
import os
import shutil
import subprocess
from concurrent.futures import ThreadPoolExecutor as PoolExecutor
from datetime import date, datetime
import boto3
from botocore.client import ClientError, Config
REPORTS_BUCKET = 'aws-selenium-test-reports'
SCREENSHOTS_FOLDER = 'failed_scenarios_screenshots/'
CURRENT_DATE = str(date.today())
REPORTS_FOLDER = 'tmp_reports/'
HISTORY_FOLDER = 'history/'
TMP_REPORTS_FOLDER = f'/tmp/{REPORTS_FOLDER}'
TMP_REPORTS_ALLURE_FOLDER = f'{TMP_REPORTS_FOLDER}Allure/'
TMP_REPORTS_ALLURE_HISTORY_FOLDER = f'{TMP_REPORTS_ALLURE_FOLDER}{HISTORY_FOLDER}'
REGION = 'eu-central-1'
logger = logging.getLogger()
logger.setLevel(logging.INFO)
There are some useful functions to avoid duplication and make the code more readable. The first one will find and return all .feature files which exist on the tests layer. Then we have a few functions that let us create a new AWS bucket or folder, remove it, upload reports, or download some files.
test_list/handler.py
def get_test_cases_list() -> list:
return [file for file in os.listdir('/opt') if file.endswith('.feature')]
def get_s3_resource():
return boto3.resource('s3')
def get_s3_client():
return boto3.client('s3', config=Config(read_timeout=900, connect_timeout=900, max_pool_connections=500))
def remove_s3_folder(folder_name: str):
s3 = get_s3_resource()
bucket = s3.Bucket(REPORTS_BUCKET)
bucket.objects.filter(Prefix=folder_name).delete()
def create_bucket(bucket_name: str):
client = get_s3_client()
try:
client.head_bucket(Bucket=bucket_name)
except ClientError:
location = {'LocationConstraint': REGION}
client.create_bucket(Bucket=bucket_name, CreateBucketConfiguration=location)
def create_folder(bucket_name: str, folder_name: str):
client = get_s3_client()
client.put_object(
Bucket=bucket_name,
Body='',
Key=folder_name
)
def create_sub_folder(bucket_name: str, folder_name: str, sub_folder_name: str):
client = get_s3_client()
client.put_object(
Bucket=bucket_name,
Body='',
Key=f'{folder_name}{sub_folder_name}'
)
def upload_html_report_to_s3(report_path: str):
s3 = get_s3_resource()
current_path = os.getcwd()
os.chdir('/tmp')
shutil.make_archive('report', 'zip', report_path)
s3.Bucket(REPORTS_BUCKET).upload_file('report.zip', f'report_{str(datetime.now())}.zip')
os.chdir(current_path)
def upload_report_history_to_s3():
s3 = get_s3_resource()
current_path = os.getcwd()
os.chdir(TMP_REPORTS_ALLURE_HISTORY_FOLDER)
for file in os.listdir(TMP_REPORTS_ALLURE_HISTORY_FOLDER):
if file.endswith('.json'):
s3.Bucket(REPORTS_BUCKET).upload_file(file, f'{HISTORY_FOLDER}{file}')
os.chdir(current_path)
def download_folder_from_bucket(bucket, dist, local='/tmp'):
s3 = get_s3_resource()
paginator = s3.meta.client.get_paginator('list_objects')
for result in paginator.paginate(Bucket=bucket, Delimiter='/', Prefix=dist):
if result.get('CommonPrefixes') is not None:
for subdir in result.get('CommonPrefixes'):
download_folder_from_bucket(subdir.get('Prefix'), bucket, local)
for file in result.get('Contents', []):
destination_pathname = os.path.join(local, file.get('Key'))
if not os.path.exists(os.path.dirname(destination_pathname)):
os.makedirs(os.path.dirname(destination_pathname))
if not file.get('Key').endswith('/'):
s3.meta.client.download_file(bucket, file.get('Key'), destination_pathname)
For that handler, we also need a serverless file. There’s one additional policy AWSLambdaExecute and some actions that are required to invoke another lambda.
test_list/serverless.yml
service: lambda-test-list
app: lambda-test-list
provider:
name: aws
runtime: python3.6
region: eu-central-1
memorySize: 512
timeout: 900
iamManagedPolicies:
- "arn:aws:iam::aws:policy/CloudWatchLogsFullAccess"
- "arn:aws:iam::aws:policy/AmazonS3FullAccess"
- "arn:aws:iam::aws:policy/AWSLambdaExecute"
iamRoleStatements:
- Effect: Allow
Action:
- lambda:InvokeAsync
- lambda:InvokeFunction
Resource:
- arn:aws:lambda:eu-central-1:*:*
functions:
lambda_test_list:
handler: handler.lambda_test_list
events:
- http:
path: lambda_test_list
method: get
layers:
- ${cf:lambda-tests-layer-dev.FeaturesLayerExport}
- ${cf:lambda-selenium-layer-dev.AllureLayerExport}
And the last part of this lambda - the handler. In the beginning, we need to get a list of all test cases. Then if the action is run_tests , we get the tags from the event. In order to save reports or screenshots, we must have a bucket and folders created. The invoke_test function will be executed concurrently by the PoolExecutor. This function invokes a lambda, which runs a test with a given feature name. Then it checks the result and adds it to the statistics so that we know how many tests failed and which ones.
In the end, we want to generate one Allure report. In order to do that, we need to download all .json reports, which were uploaded to the S3 bucket after each test. If we care about trends, we can also download data from the history folder. With the allure generate command and proper parameters, we are able to create a really good looking HTML report. But we can’t see it at this point. We’ll upload that report into the S3 bucket with a newly created history folder so that in the next test execution, we can compare the results. If there are no errors, our lambda will return some statistics and links after the process will end.
test_list/handler.py
def lambda_test_list(event, context):
test_cases = get_test_cases_list()
if event['action'] == 'run_tests':
tags = event['tags']
create_bucket(bucket_name=REPORTS_BUCKET)
create_folder(bucket_name=REPORTS_BUCKET, folder_name=SCREENSHOTS_FOLDER)
create_sub_folder(
bucket_name=REPORTS_BUCKET, folder_name=SCREENSHOTS_FOLDER, sub_folder_name=f'{CURRENT_DATE}/'
)
remove_s3_folder(folder_name=REPORTS_FOLDER)
create_folder(bucket_name=REPORTS_BUCKET, folder_name=REPORTS_FOLDER)
client = boto3.client(
'lambda',
region_name=REGION,
config=Config(read_timeout=900, connect_timeout=900, max_pool_connections=500)
)
stats = {'passed': 0, 'failed': 0, 'passed_tc': [], 'failed_tc': []}
def invoke_test(tc_name):
response = client.invoke(
FunctionName='lambda-test-runner-dev-lambda_runner',
InvocationType='RequestResponse',
LogType='Tail',
Payload=f'{{"tc_name": "{tc_name}", "tags": "{tags}"}}'
)
result_payload = json.loads(response['Payload'].read())
result_body = json.loads(result_payload['body'])
test_passed = bool(result_body['test_result'])
if test_passed:
stats['passed'] += 1
stats['passed_tc'].append(tc_name)
else:
stats['failed'] += 1
stats['failed_tc'].append(tc_name)
with PoolExecutor(max_workers=500) as executor:
for _ in executor.map(invoke_test, test_cases):
pass
try:
download_folder_from_bucket(bucket=REPORTS_BUCKET, dist=REPORTS_FOLDER)
download_folder_from_bucket(bucket=REPORTS_BUCKET, dist=HISTORY_FOLDER, local=TMP_REPORTS_FOLDER)
command_generate_allure_report = [
f'/opt/allure-2.10.0/bin/allure generate --clean {TMP_REPORTS_FOLDER} -o {TMP_REPORTS_ALLURE_FOLDER}'
]
subprocess.call(command_generate_allure_report, shell=True)
upload_html_report_to_s3(report_path=TMP_REPORTS_ALLURE_FOLDER)
upload_report_history_to_s3()
remove_s3_folder(REPORTS_FOLDER)
subprocess.call('rm -rf /tmp/*', shell=True)
except Exception as e:
print(f'Error when generating report: {e}')
return {
'Passed': stats['passed'],
'Failed': stats['failed'],
'Passed TC': stats['passed_tc'],
'Failed TC': stats['failed_tc'],
'Screenshots': f'https://s3.console.aws.amazon.com/s3/buckets/{REPORTS_BUCKET}/'
f'{SCREENSHOTS_FOLDER}{CURRENT_DATE}/',
'Reports': f'https://s3.console.aws.amazon.com/s3/buckets/{REPORTS_BUCKET}/'
}
else:
return test_cases
Once we have it all set, we need to deploy our code. This shouldn’t be difficult. Let’s open a command prompt in the selenium_layer directory and execute the serverless deploy command. When it’s finished, do the same thing in the ‘tests’ directory, lambda directory, and finally in the test_list directory. The order of deployment is important because they are dependent on each other.
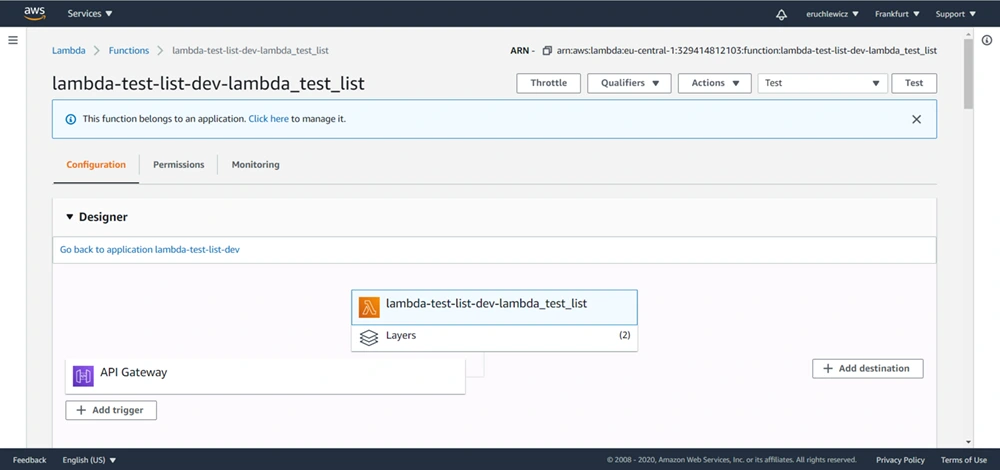
When everything is set, let’s navigate to our test-list-lambda in the AWS console.
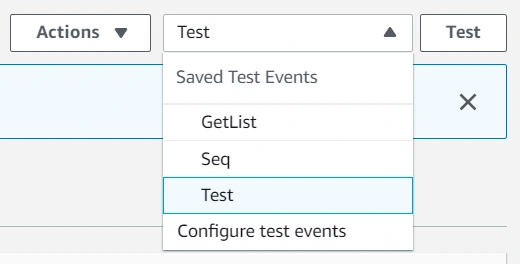
We need to create a new event. I already have three, the Test one is what we’re looking for. Click on the Configure test events option.
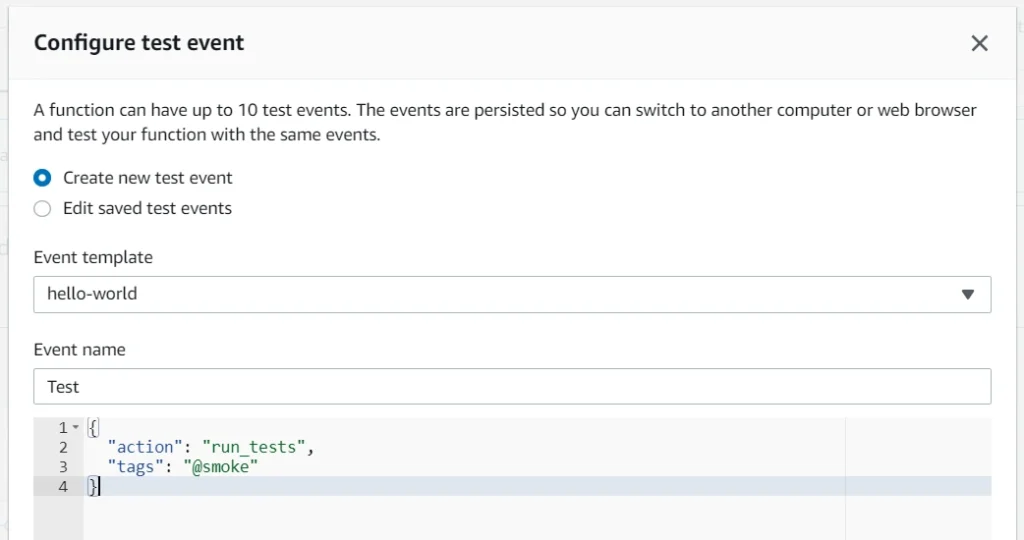
Then select an event template, an event name, and fill JSON. In the future, you can add more tags separated with a single space. Click Create to save that event.
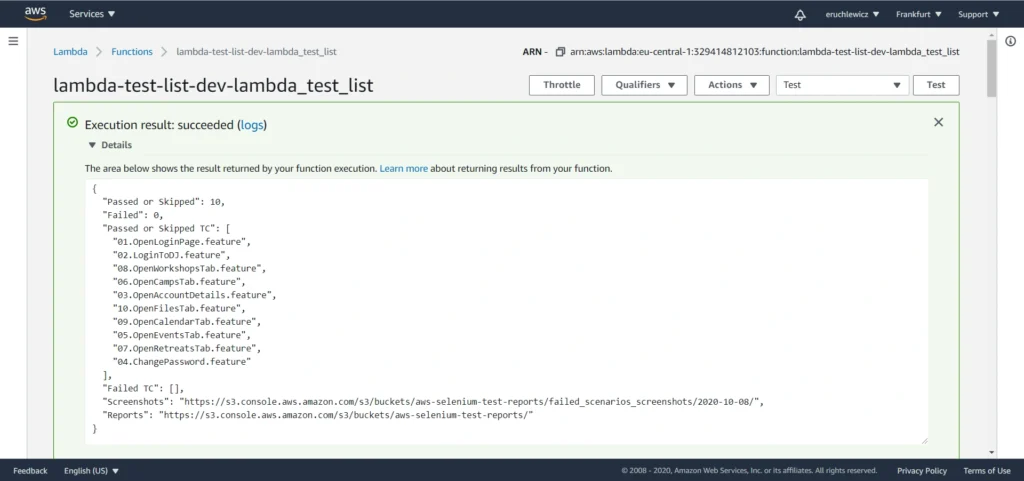
The last step is to click the Test button and wait for the results. In our case, it took almost one minute. The longest part of our solution is generating the Allure report when all tests are finished.
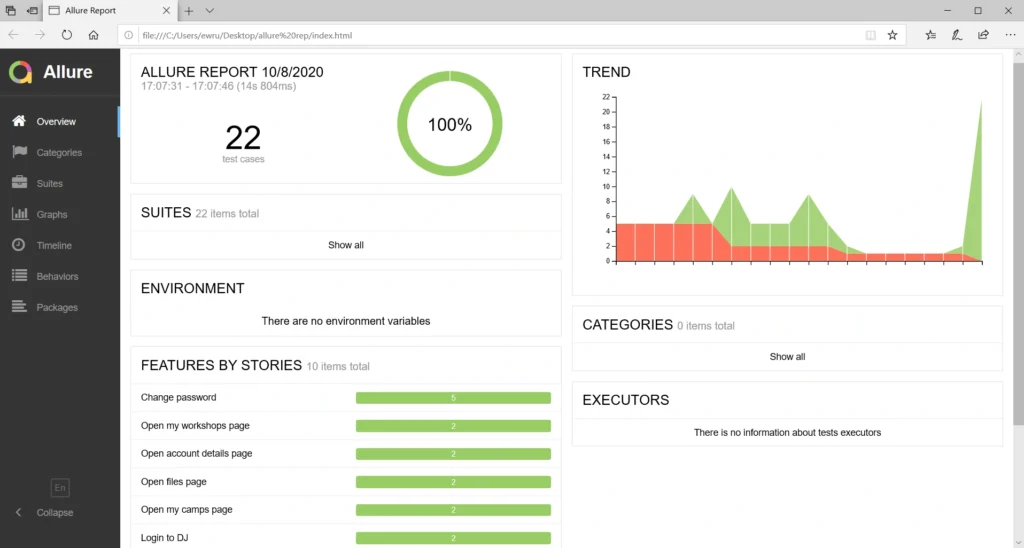
When you navigate to the reports bucket and download the latest one, you need to unpack the .zip file locally and open the index.html file in the browser. Unfortunately, most of the browsers won’t handle it that easily. If you have Allure installed, you can use the allure serve <path> command. It creates a local Jetty server instance, serves the generated report, and opens it in the default browser. But there’s also a workaround - Microsoft Edge. Just right-click on the index.html file and open it with that browser. It works!
Statistics
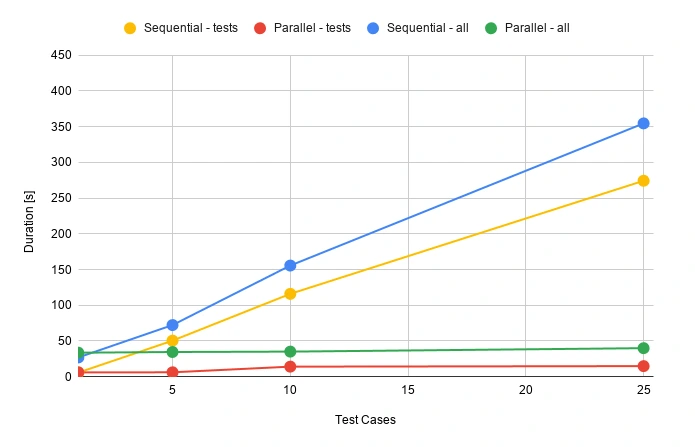
Everybody knows that time is money. Let’s check how much we can save. Here we have a division into the duration of the tests themselves and the entire process.
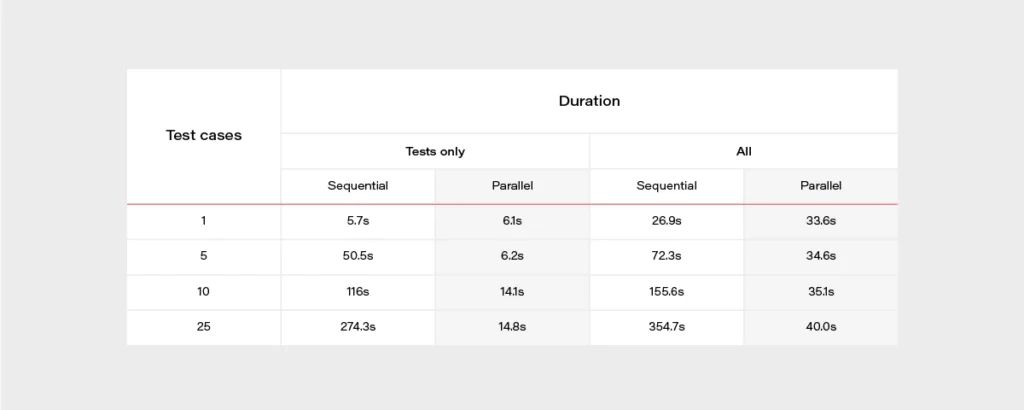
It’s really easy to find out that parallel tests are much faster. When having a set of 500 test cases, the difference is huge. It can take about 2 hours when running in a sequential approach or 2 minutes in parallel. The chart below may give a better overview.
During the release, there’s usually not that much time for doing regression tests. Same with running tests that take several hours to complete. Parallel testing may speed up the whole release process.
Well, but what is the price for that convenience? Actually not that high.

Let’s assume that we have 100 feature files, and it takes 30 seconds for each one to execute. We can set a 512MB memory size for our lambda function. Tests will be executed daily in the development environment and occasionally before releases. We can assume 50 executions of each test monthly.
Total compute (seconds) = 100 * 50 * (30s) = 150,000 seconds
Total compute (GB-s) = 150,000 * 512MB/1024 = 75,000 GB-s
Monthly compute charges = 75,000 * $0.00001667 = $1.25
Monthly request charges = 100 * 50 * $0.2/M = $0.01
Total = $1.26
It looks very promising. If you have more tests or they last longer, you can double this price. It’s still extremely low!
AWS Lambda handlers - summary
We went through quite an extended Selenium test configuration with Behave and Allure and made it work in the parallel process using AWS Lambda to achieve the shortest time waiting for results. Everything is ready to be used with your own app, just add some tests! Of course, there is still room for improvement - reports are now available in the AWS S3 bucket but could be attached to emails or served so that anybody can display them in a browser with a URL. You can also think of CI/CD practices. It's good to have continuous testing in the continuous integration process, e.g., when pushing some new changes to the main or release branch in your GIT repository in order to find all bugs as soon as possible. Hopefully, this article will help you with creating your custom testing process and speed up your work.
Sources

Grape Up guides enterprises on their data-driven transformation journey
Ready to ship? Let's talk.
Check related articles
Read our blog and stay informed about the industry's latest trends and solutions.
How to run Selenium BDD tests in parallel with AWS Lambda
Have you ever felt annoyed because of the long waiting time for receiving test results? Maybe after a few hours, you’ve figured out that there had been a network connection issue in the middle of testing, and half of the results can go to the trash? That may happen when your tests are dependent on each other or when you have plenty of them and execution lasts forever. It's quite a common issue. But there’s actually a solution that can not only save your time but also your money - parallelization in the Cloud.
How it started
Developing UI tests for a few months, starting from scratch, and maintaining existing tests, I found out that it has become something huge that will be difficult to take care of very soon. An increasing number of test scenarios made every day led to bottlenecks. One day when I got to the office, it turned out that the nightly tests were not over yet. Since then, I have tried to find a way to avoid such situations.
A breakthrough was the presentation of Tomasz Konieczny during the Testwarez conference in 2019. He proved that it’s possible to run Selenium tests in parallel using AWS Lambda. There’s actually one blog that helped me with basic Selenium and Headless Chrome configuration on AWS. The Headless Chrome is a light-weighted browser that has no user interface. I went a step forward and created a solution that allows designing tests in the Behavior-Driven Development process and using the Page Object Model pattern approach, run them in parallel, and finally - build a summary report.
Setting up the project
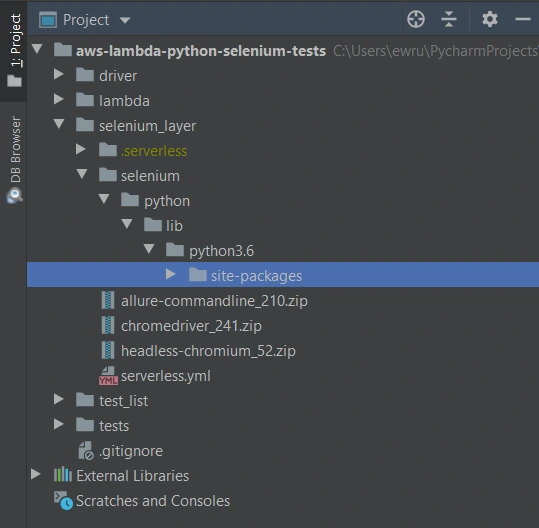
The first thing we need to do is signing up for Amazon Web Services. Once we have an account and set proper values in credentials and config files (.aws directory), we can create a new project in PyCharm, Visual Studio Code, or in any other IDE supporting Python. We’ll need at least four directories here. We called them ‘lambda’, ‘selenium_layer’, ‘test_list’, ‘tests’ and there’s also one additional - ‘driver’, where we keep a chromedriver file, which is used when running tests locally in a sequential way.
In the beginning, we’re going to install the required libraries. Those versions work fine on AWS, but you can check newer if you want.
requirements.txt
allure_behave==2.8.6
behave==1.2.6
boto3==1.10.23
botocore==1.13.23
selenium==2.37.0
What’s important, we should install them in the proper directory - ‘site-packages’.
We’ll need also some additional packages:
Allure Commandline ( download )
Chromedriver ( download )
Headless Chromium ( download )
All those things will be deployed to AWS using Serverless Framework, which you need to install following the docs . The Serverless Framework was designed to provision the AWS Lambda Functions, Events, and infrastructure Resources safely and quickly. It translates all syntax in serverless.yml to a single AWS CloudFormation template which is used for deployments.
Architecture - Lambda Layers
Now we can create a serverless.yml file in the ‘selenium-layer’ directory and define Lambda Layers we want to create. Make sure that your .zip files have the same names as in this file. Here we can also set the AWS region in which we want to create our Lambda functions and layers.
serverless.yml
service: lambda-selenium-layer
provider:
name: aws
runtime: python3.6
region: eu-central-1
timeout: 30
layers:
selenium:
path: selenium
CompatibleRuntimes: [
"python3.6"
]
chromedriver:
package:
artifact: chromedriver_241.zip
chrome:
package:
artifact: headless-chromium_52.zip
allure:
package:
artifact: allure-commandline_210.zip
resources:
Outputs:
SeleniumLayerExport:
Value:
Ref: SeleniumLambdaLayer
Export:
Name: SeleniumLambdaLayer
ChromedriverLayerExport:
Value:
Ref: ChromedriverLambdaLayer
Export:
Name: ChromedriverLambdaLayer
ChromeLayerExport:
Value:
Ref: ChromeLambdaLayer
Export:
Name: ChromeLambdaLayer
AllureLayerExport:
Value:
Ref: AllureLambdaLayer
Export:
Name: AllureLambdaLayer
Within this file, we’re going to deploy a service consisting of four layers. Each of them plays an important role in the whole testing process.
Creating test set
What would the tests be without the scenarios? Our main assumption is to create test files running independently. This means we can run any test without others and it works. If you're following clean code, you'll probably like using the Gherkin syntax and the POM approach. Behave Framework supports both.
What gives us Gherkin? For sure, better readability and understanding. Even if you haven't had the opportunity to write tests before, you will understand the purpose of this scenario.
01.OpenLoginPage.feature
@smoke
@login
Feature: Login to service
Scenario: Login
Given Home page is opened
And User opens Login page
When User enters credentials
And User clicks Login button
Then User account page is opened
Scenario: Logout
When User clicks Logout button
Then Home page is opened
And User is not authenticated
In the beginning, we have two tags. We add them in order to run only chosen tests in different situations. For example, you can name a tag @smoke and run it as a smoke test, so that you can test very fundamental app functions. You may want to test only a part of the system like end-to-end order placing in the online store - just add the same tag for several tests.
Then we have the feature name and two scenarios. Those are quite obvious, but sometimes it’s good to name them with more details. Following steps starting with Given, When, Then and And can be reused many times. That’s the Behavior-Driven Development in practice. We’ll come back to this topic later.
Meantime, let’s check the proper configuration of the Behave project.

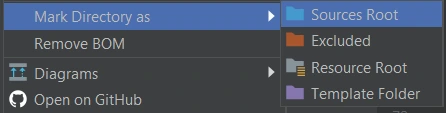
We definitely need a ‘feature’ directory with ‘pages’ and ‘steps’. Make the ‘feature’ folder as Sources Root. Just right-click on it and select the proper option. This is the place for our test scenario files with .feature extension.
It’s good to have some constant values in a separate file so that it will change only here when needed. Let’s call it config.json and put the URL of the tested web application.
config.json
{
"url": "http://drabinajakuba.atthost24.pl/"
}
One more thing we need is a file where we set webdriver options.
Those are required imports and some global values like, e.g. a name of AWS S3 bucket in which we want to have screenshots or local directory to store them in. As far as we know, bucket names should be unique in whole AWS S3, so you should probably change them but keep the meaning.
environment.py
import os
import platform
from datetime import date, datetime
import json
import boto3
from selenium import webdriver
from selenium.webdriver.chrome.options import Options
REPORTS_BUCKET = 'aws-selenium-test-reports'
SCREENSHOTS_FOLDER = 'failed_scenarios_screenshots/'
CURRENT_DATE = str(date.today())
DATETIME_FORMAT = '%H_%M_%S'
Then we have a function for getting given value from our config.json file. The path of this file depends on the system platform - Windows or Darwin (Mac) would be local, Linux in this case is in AWS. If you need to run these tests locally on Linux, you should probably add some environment variables and check them here.
def get_from_config(what):
if 'Linux' in platform.system():
with open('/opt/config.json') as json_file:
data = json.load(json_file)
return data[what]
elif 'Darwin' in platform.system():
with open(os.getcwd() + '/features/config.json') as json_file:
data = json.load(json_file)
return data[what]
else:
with open(os.getcwd() + '\\features\\config.json') as json_file:
data = json.load(json_file)
return data[what]
Now we can finally specify paths to chromedriver and set browser options which also depend on the system platform. There’re a few more options required on AWS.
def set_linux_driver(context):
"""
Run on AWS
"""
print("Running on AWS (Linux)")
options = Options()
options.binary_location = '/opt/headless-chromium'
options.add_argument('--allow-running-insecure-content')
options.add_argument('--ignore-certificate-errors')
options.add_argument('--disable-gpu')
options.add_argument('--headless')
options.add_argument('--window-size=1280,1000')
options.add_argument('--single-process')
options.add_argument('--no-sandbox')
options.add_argument('--disable-dev-shm-usage')
capabilities = webdriver.DesiredCapabilities().CHROME
capabilities['acceptSslCerts'] = True
capabilities['acceptInsecureCerts'] = True
context.browser = webdriver.Chrome(
'/opt/chromedriver', chrome_options=options, desired_capabilities=capabilities
)
def set_windows_driver(context):
"""
Run locally on Windows
"""
print('Running on Windows')
options = Options()
options.add_argument('--no-sandbox')
options.add_argument('--window-size=1280,1000')
options.add_argument('--headless')
context.browser = webdriver.Chrome(
os.path.dirname(os.getcwd()) + '\\driver\\chromedriver.exe', chrome_options=options
)
def set_mac_driver(context):
"""
Run locally on Mac
"""
print("Running on Mac")
options = Options()
options.add_argument('--no-sandbox')
options.add_argument('--window-size=1280,1000')
options.add_argument('--headless')
context.browser = webdriver.Chrome(
os.path.dirname(os.getcwd()) + '/driver/chromedriver', chrome_options=options
)
def set_driver(context):
if 'Linux' in platform.system():
set_linux_driver(context)
elif 'Darwin' in platform.system():
set_mac_driver(context)
else:
set_windows_driver(context)
Webdriver needs to be set before all tests, and in the end, our browser should be closed.
def before_all(context):
set_driver(context)
def after_all(context):
context.browser.quit()
Last but not least, taking screenshots of test failure. Local storage differs from the AWS bucket, so this needs to be set correctly.
def after_scenario(context, scenario):
if scenario.status == 'failed':
print('Scenario failed!')
current_time = datetime.now().strftime(DATETIME_FORMAT)
file_name = f'{scenario.name.replace(" ", "_")}-{current_time}.png'
if 'Linux' in platform.system():
context.browser.save_screenshot(f'/tmp/{file_name}')
boto3.resource('s3').Bucket(REPORTS_BUCKET).upload_file(
f'/tmp/{file_name}', f'{SCREENSHOTS_FOLDER}{CURRENT_DATE}/{file_name}'
)
else:
if not os.path.exists(SCREENSHOTS_FOLDER):
os.makedirs(SCREENSHOTS_FOLDER)
context.browser.save_screenshot(f'{SCREENSHOTS_FOLDER}/{file_name}')
Once we have almost everything set, let’s dive into single test creation. Page Object Model pattern is about what exactly hides behind Gherkin’s steps. In this approach, we treat each application view as a separate page and define its elements we want to test. First, we need a base page implementation. Those methods will be inherited by all specific pages. You should put this file in the ‘pages’ directory.
base_page_object.py
from selenium.webdriver.common.action_chains import ActionChains
from selenium.webdriver.support.ui import WebDriverWait
from selenium.webdriver.support import expected_conditions as EC
from selenium.common.exceptions import *
import traceback
import time
from environment import get_from_config
class BasePage(object):
def __init__(self, browser, base_url=get_from_config('url')):
self.base_url = base_url
self.browser = browser
self.timeout = 10
def find_element(self, *loc):
try:
WebDriverWait(self.browser, self.timeout).until(EC.presence_of_element_located(loc))
except Exception as e:
print("Element not found", e)
return self.browser.find_element(*loc)
def find_elements(self, *loc):
try:
WebDriverWait(self.browser, self.timeout).until(EC.presence_of_element_located(loc))
except Exception as e:
print("Element not found", e)
return self.browser.find_elements(*loc)
def visit(self, url):
self.browser.get(url)
def hover(self, element):
ActionChains(self.browser).move_to_element(element).perform()
time.sleep(5)
def __getattr__(self, what):
try:
if what in self.locator_dictionary.keys():
try:
WebDriverWait(self.browser, self.timeout).until(
EC.presence_of_element_located(self.locator_dictionary[what])
)
except(TimeoutException, StaleElementReferenceException):
traceback.print_exc()
return self.find_element(*self.locator_dictionary[what])
except AttributeError:
super(BasePage, self).__getattribute__("method_missing")(what)
def method_missing(self, what):
print("No %s here!", what)
That’s a simple login page class. There’re some web elements defined in locator_dictionary and methods using those elements to e.g., enter text in the input, click a button, or read current values. Put this file in the ‘pages’ directory.
login.py
from selenium.webdriver.common.by import By
from .base_page_object import *
class LoginPage(BasePage):
def __init__(self, context):
BasePage.__init__(
self,
context.browser,
base_url=get_from_config('url'))
locator_dictionary = {
'username_input': (By.XPATH, '//input[@name="username"]'),
'password_input': (By.XPATH, '//input[@name="password"]'),
'login_button': (By.ID, 'login_btn'),
}
def enter_username(self, username):
self.username_input.send_keys(username)
def enter_password(self, password):
self.password_input.send_keys(password)
def click_login_button(self):
self.login_button.click()
What we need now is a glue that will connect page methods with Gherkin steps. In each step, we use a particular page that handles the functionality we want to simulate. Put this file in the ‘steps’ directory.
login.py
from behave import step
from environment import get_from_config
from pages import LoginPage, HomePage, NavigationPage
@step('User enters credentials')
def step_impl(context):
page = LoginPage(context)
page.enter_username('test_user')
page.enter_password('test_password')
@step('User clicks Login button')
def step_impl(context):
page = LoginPage(context)
page.click_login_button()
It seems that we have all we need to run tests locally. Of course, not every step implementation was shown above, but it should be easy to add missing ones.
If you want to read more about BDD and POM, take a look at Adrian’s article
All files in the ‘features’ directory will also be on a separate Lambda Layer. You can create a serverless.yml file with the content presented below.
serverless.yml
service: lambda-tests-layer
provider:
name: aws
runtime: python3.6
region: eu-central-1
timeout: 30
layers:
features:
path: features
CompatibleRuntimes: [
"python3.6"
]
resources:
Outputs:
FeaturesLayerExport:
Value:
Ref: FeaturesLambdaLayer
Export:
Name: FeaturesLambdaLayer
This is the first part of the series covering running Parallel Selenium tests on AWS Lambda. More here !
The path towards enterprise level AWS infrastructure – architecture scaffolding
This article is the first one of the mini-series which will walk you through the process of creating an enterprise-level AWS infrastructure. By the end of this series, we will have created an infrastructure comprising a VPC with four subnets in two different availability zones with a client application, backend server, and a database deployed inside. Our architecture will be able to provide scalability and availability required by modern cloud systems. Along the way, we will explain the basic concepts and components of the Amazon Web Services platform. In this article, we will talk about the scaffolding of our architecture to be specific a Virtual Private Cloud (VPC), Subnets, Elastic IP Addresses, NAT gateways, and route tables. The whole series comprises of:
- Part 1 - Architecture Scaffolding (VPC, Subnets, Elastic IP, NAT)
- Part 2 - The Path Towards Enterprise Level AWS Infrastructure – EC2, AMI, Bastion Host, RDS
- Part 3 - Load Balancing and Application Deployment (Elastic Load Balancer)
The cloud, as once explained in the Silicon Valley tv-series, is “this tiny little area which is becoming super important and in many ways is the future of computing.” This would be accurate, except for the fact that it is not so tiny and the future is now. So let’s delve into the universe of cloud computing and learn how to build highly available, secure and fault-tolerant cloud systems, how to utilize the AWS platform for that, what are its key components and how to deploy your applications on AWS.
Cloud computing
Over the last years, the IT industry underwent a major transformation in which most of the global enterprises moved away from their traditional IT infrastructures towards the cloud. The main reason behind that is the flexibility and scalability which comes with cloud computing, understood as provisioning of computing services such as servers, storage, databases, networking, analytic services, etc. over the Internet ( the cloud ). In this model organizations only pay for the cloud resources they are actually using and do not need to manage the physical infrastructure behind it. There are many cloud platform providers on the market with the major players being Amazon Web Services (AWS), Microsoft Azure and Google Cloud. This article focuses on services available on AWS, but bear in mind that most of the concepts explained here will have their equivalents on the other platforms.
Infrastructure overview
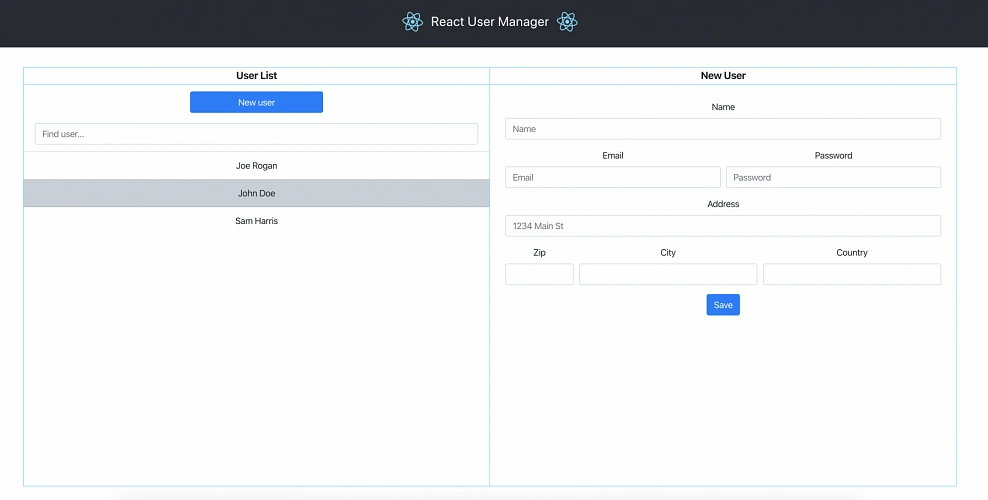
Let’s start with what we will build throughout this series. The goal is to create a real-life, enterprise-level AWS infrastructure that will be able to host a user management system consisting of a React.js web application, Java Spring Boot server and a relational database.
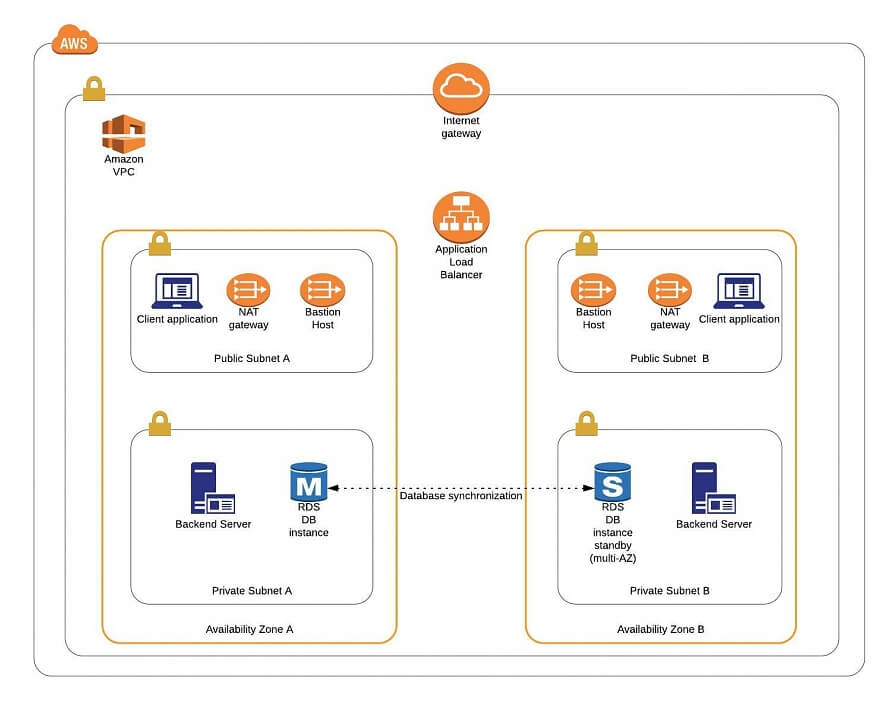
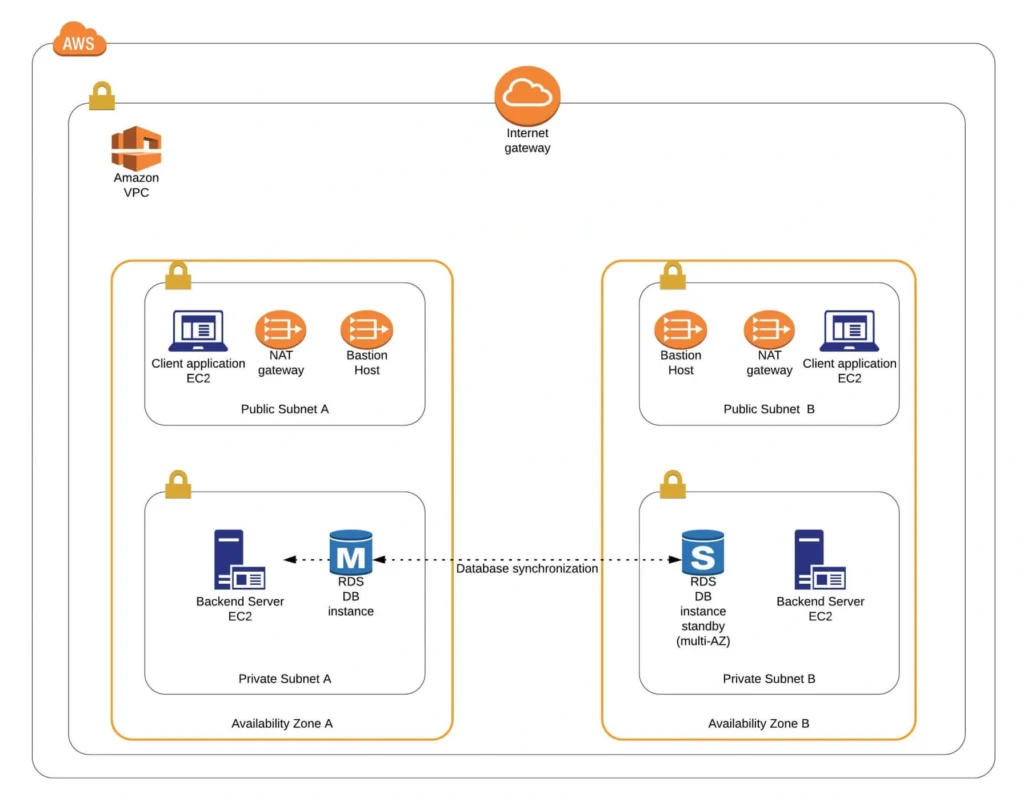
The architecture diagram is shown in figure 1. It comprises a VPC with four subnets (2 public and 2 private) distributed across two different availability zones. In public subnets are hosted a client application, a NAT gateway and a Bastion Host (more on that later), while our private subnets contain backend server and database instances. The infrastructure also includes Internet Gateway to enable access to the Internet from our VPC and a Load Balancer. The reasoning behind placing the backend server and database in private subnets is to protect those instances from being directly exposed to the Internet as they may contain sensitive data. Instead, they will only have private IP addresses and be behind a NAT gateway and a public-facing Elastic Load Balancer. Presented infrastructure provides a high level of scalability and availability through the introduction of redundancy with instances deployed in two different availability zones and the use of auto-scaling groups which provide automatic scaling and health management of the system.
Figure 2 presents the view of the user management web application system we will host on AWS:
The applications can be found on GitHub.
In this part of the article series, we will focus on the scaffolding of the infrastructure, namely allocating elastic IP addresses, setting up the VPC, creating the subnets, configuring NAT gateways and route tables.
AWS Free Tier Note
AWS provides its new users with a 12-month free tier, which gives customers the ability to use their services up to specified limits free of charge. Those limits include 750 hours per month of t2.micro size EC2 instances, 5GB of Amazon S3 storage, 750 hours of Amazon RDS per month, and much more. In the AWS Management Console, Amazon usually provides indicators in which resource choices are part of the free tier, and throughout this series, we will stick to those. If you want to be sure you will not exceed the free tier limits, remember to stop your EC2 and RDS instances whenever you finish working on AWS. You can also set up a billing alert that will notify you if you exceed the specified limit.
AWS theory
1. VPC
The first step of our journey into the wide world of the AWS infrastructure is getting to know Amazon Virtual Private Cloud (VPC). VPC allows developers to create a virtual network in which they can launch resources and have them logically isolated from other VPCs and the outside world. Within the VPC your resources have private IP addresses with which they can communicate with one another. You can control the access to all those resources inside the VPC and route outgoing traffic as you like.
Access to the VPC is configured with the use of several key structures:
Security groups - They basically work like mini firewalls defining allowed incoming and outgoing IP addresses and ports. They can be attached at the instance level, be shared among many instances and provide the possibility to allow access from other security groups instead of IPs.
Routing tables - Routing tables are responsible for determining where the network traffic from a subnet or gateway should be directed. There is a main route table associated with your VPC, and you can define custom routing tables for your subnets and gateways.
Network Access Control List (Network ACL) - It acts as an IP filtering table for incoming and outgoing traffic and can be used as an additional security layer on top of security groups. Network ACLs act similarly to the security groups, but instead of applying rules on the instance level, they apply them to the entire VPC or subnet.
2. Subnets
Instances cannot be launched directly into a VPC. They need to live inside subnets. A Subnet is an additional isolated area that has its own CIDR block, routing table, and Network Access Control List. Subnets allow you to create different behaviors in the same VPC. For instance, you can create a public subnet that can be accessed and have access to the public internet and a private subnet that is not accessible through the Internet and must go through a NAT (Network Address Translation) gateway in order to access the outside world.
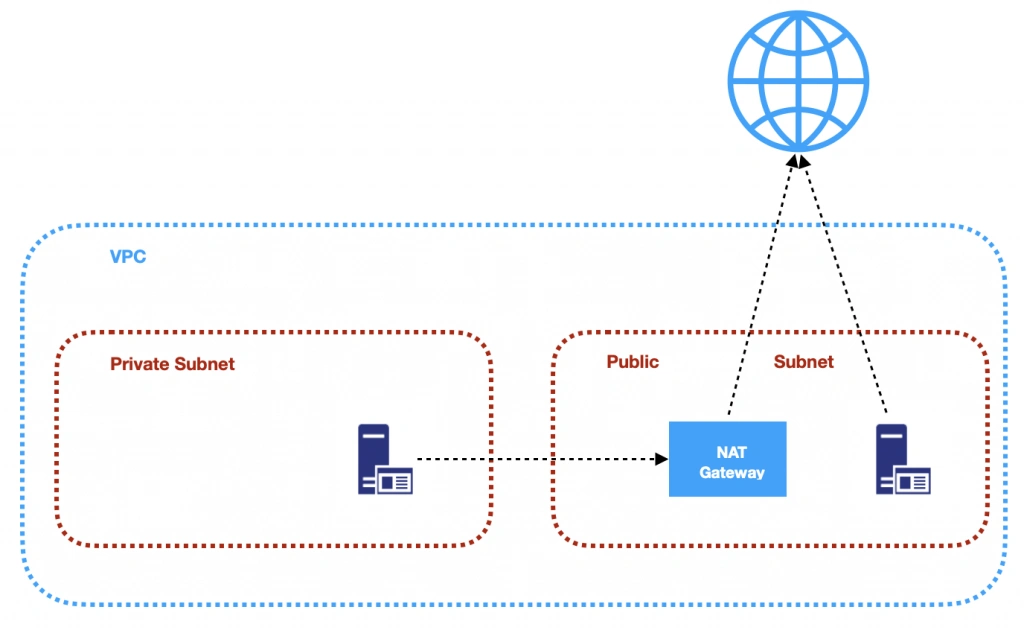
3. NAT (Network Address Transfer) gateway
NAT Gateways are used in order to enable instances located in private subnets to connect to the Internet or other AWS services, while still preventing direct connections from the Internet to those instances. NAT may be useful for example when you need to install or upgrade software or OS on EC2 instances running in private subnets. AWS provides a NAT gateway managed service which requires very little administrative effort. We will use it while setting up our infrastructure.
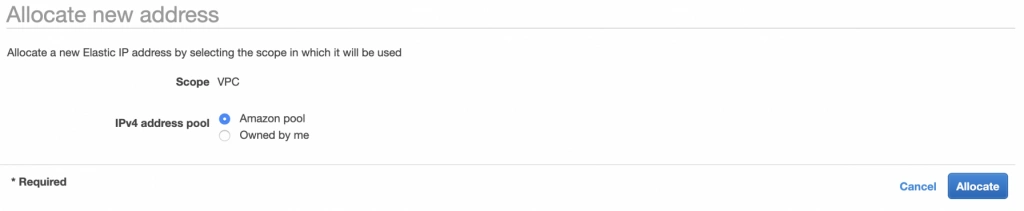
4. Elastic IP
AWS provides a concept of Elastic IP Address which is used to facilitate the management of dynamic cloud computing. Elastic IP Address is a public, static IP Address that is associated with your AWS account and can be easily allocated to one of your EC2 instances. The idea behind it is that the address is not strongly associated with your instance but instead elasticity of the address allows in a case of any failure in the system to swiftly remap the address to another healthy instance in your account.
5. AWS Region
AWS Regions are geographical areas in which AWS has data centers. Regions are divided into Availability Zones (AZ) which are independent data centers placed relatively close to each other. Availability Zones are used to provide redundancy and data replication. The choice of AWS region for your infrastructure should be determined to take into account factors such as:
- Proximity - you would usually want your application to be deployed close to your region of operation for latency or regulatory reasons.
- Cost - different regions come with different pricing.
- Feature selection - not all services are available in all regions, this is especially the case for newly introduced features.
- Several availability zones - all regions have at least 2 AZ, but some of them have more. Depending on your needs, this may be a key factor.
Practice
AWS Region
Let’s commence with a selection of the AWS region to operate in. In the top right corner of the AWS Management Console, you can choose a region. At this point, it does not really matter which region you choose (as discussed earlier, it may for your organization). However, it is important to note that you will always only view resources launched in the currently selected region.
Elastic IP
The next step is the allocation of an elastic IP address. For that purpose, go into the AWS Management console, and find the VPC service. In the left menu bar, under the Virtual Private Cloud section, you should see the Elastic IPs link. There you can allocate a new address owned by yourself or from the pool of Amazon’s available addresses.
Availability Zone A configuration
Next, let’s create our VPC and subnets. For now, we are going to set up only Availability Zone A and we will work on High Availability after the creation of the VPC. So go again into the VPC service dashboard and click the Launch VPC Wizard button. You will be taken to the screen where you can choose what kind of a VPC configuration you want Amazon to set you up with. In order to match our target architecture as closely as possible, we are going to choose VPC with Public and Private Subnets .
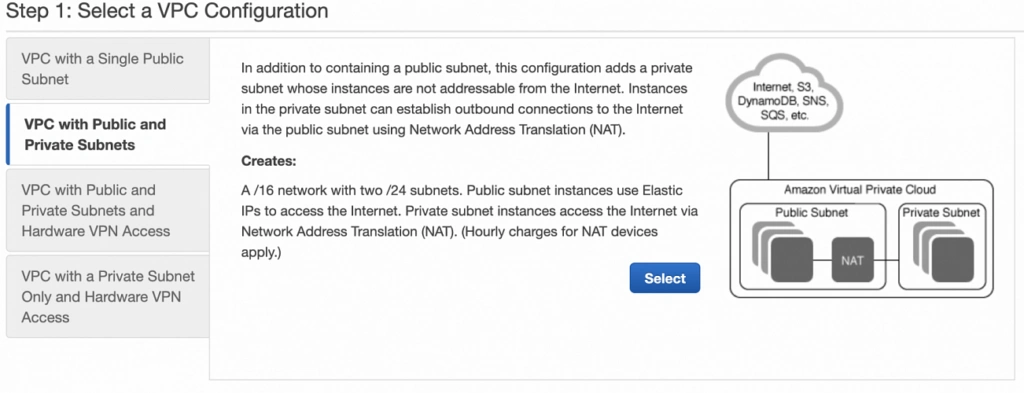
The next screen allows you to set up your VPC configuration details such as:
- name,
- CIDR block,
- details of the subnets:
- name,
- IP address range - a subset of the VPC CIDR range,
- availability zone,
As shown in the architecture diagram (fig. 1), we need 4 subnets in 2 different availability zones. So let’s set our VPC CIDR to 10.0.0.0/22, and have our subnets as follows:
- public-subnet-a: 10.0.0.0/24 (zone A)
- private-subnet-a: 10.0.1.0/24 (zone A)
- public-subnet-b: 10.0.2.0/24 (zone B)
- private-subnet-b: 10.0.3.0/24 (zone B)
Set everything up as shown in figure 7. The important aspects to note here are the choice of the same availability zone for public and private subnets, and the fact that Amazon will automatically set us up with a NAT gateway for which we just need to specify our previously allocated Elastic IP Address. Now, click the Create VPC button, and Amazon will configure your VPC.

NAT gateway
When the creation of the VPC is over, go to the NAT Gateways section, and you should see the gateway created for you by AWS. To make it more recognizable, let us edit its Name tag to nat-a .

Route tables
Amazon also configured Route Tables for your VPC. Go to the Route Tables section, and you should have there two route tables associated with your VPC. One of them is the main route table of your VPC, and the second one is currently associated with your public-subnet-a. We will modify that setting a bit.
First, select the main route table, go to the routes tab and click Edit routes . There are currently two entries. The first one means Any IP address referencing local VPC CIDR should resolve locally and we shouldn’t modify it. The second one is pointing to the NAT gateway, but we will change it to configure the Internet Gateway of our VPC in order to let outgoing traffic reach the outside world.

Next, go to the Subnet Associations tab and associate the main route table with public-subnet-a. You can also edit its Name tag to main-rt . Then, select the second route table associated with your VPC, edit its routes to route every outgoing Internet request to the nat-a gateway as shown in figure 10. Associate this route table with private-subnet-a and edit its Name tag to private-a-rt .

Availability Zone B Configuration
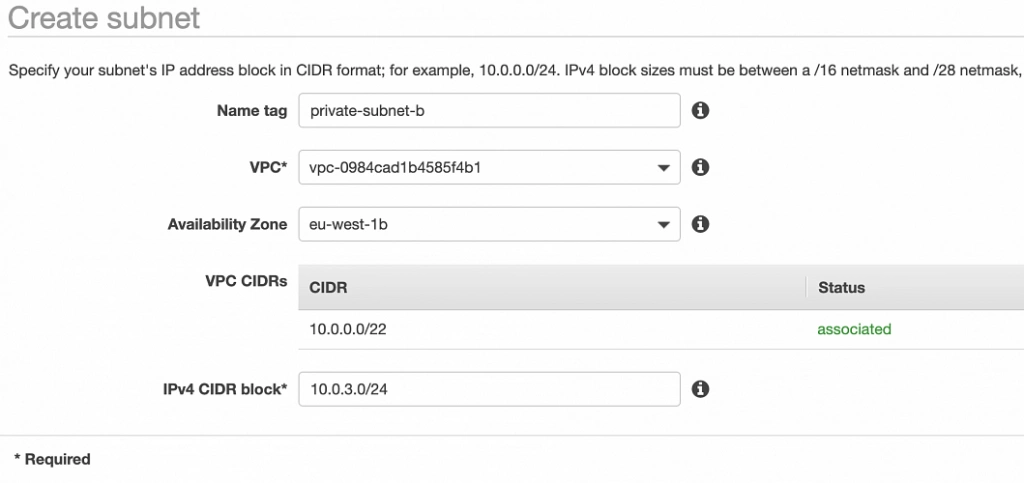
Well done, availability zone A is configured. In order to provide High Availability, we need to set everything up in the second availability zone as well. The first step is the creation of the subnets. Go again to a VPC dashboard in the AWS management console and in the left menu bar find the Subnets section. Now, click the Create subnet button and configure everything as shown in figures 11 and 12.
public-subnet-b

private-subnet-b
NAT gateway
For availability zone B we need to create the NAT gateway manually. For that, find the NAT Gateways section in the left menu bar of the VPC dashboard, and click Create NAT Gateway . Select public-subnet-b , allocate EIP and add a Name tag with value nat-b .
Route tables
The last step is the configuration of the route tables for the subnets in availability zone B. For that, go to the Route Tables section again. Our public-subnet-b is going to have the same routing rules as the public-subnet-a, so let’s add a new association to our main-rt table for public-subnet-b. Then, click the Create route table button, name it private-b-rt , choose our VPC and click create . Next, select the newly created table go to the Routes tab and Edit routes by analogy with the private-a-rt table, but instead of directing every outside going request to nat-a gateway route it to nat-b (fig. 13).

In the end, you should have three route tables associated with your VPC as shown in figure 14.

Summary
That’s it, the scaffolding of our VPC is ready. The diagram shown in fig.15 presents a view of the created infrastructure. It is now ready for the creation of required EC2 instances, Bastion Hosts, configuration of an RDS database and deployment of our applications, which we will do in the next part of the series .

Sources:
- https://azure.microsoft.com/en-us/overview/what-is-cloud-computing/
- https://aws.amazon.com/what-is-aws/
- https://docs.aws.amazon.com/AWSEC2/latest/UserGuide/elastic-ip-addresses-eip.html
- https://docs.aws.amazon.com/vpc/latest/userguide/VPC_Route_Tables.html
- https://docs.aws.amazon.com/vpc/latest/userguide/VPC_SecurityGroups.html#DefaultSecurityGroup
- https://docs.aws.amazon.com/vpc/latest/userguide/vpc-network-acls.html
- https://medium.com/@datapath_io/elastic-ip-static-ip-public-ip-whats-the-difference-8e36ac92b8e7
- https://cloudacademy.com/blog/aws-bastion-host-nat-instances-vpc-peering-security/
- https://aws.amazon.com/blogs/aws/internal-elastic-load-balancers/
- https://aws.amazon.com/quickstart/architecture/linux-bastion/
- https://aws.amazon.com/blogs/security/securely-connect-to-linux-instances-running-in-a-private-amazon-vpc/
- http://thebluenode.com/exposing-private-ec2-instances-behind-public-elastic-load-balancer-elb-aws
- https://app.pluralsight.com/library/courses/aws-developer-getting-started/table-of-contents
- https://app.pluralsight.com/library/courses/aws-developer-designing-developing/table-of-contents
- https://app.pluralsight.com/library/courses/aws-networking-deep-dive-vpc/table-of-contents
- https://datanextsolutions.com/blog/using-nat-gateways-in-aws/
- https://docs.aws.amazon.com/vpc/latest/userguide/vpc-nat-gateway.html
The path towards enterprise level AWS infrastructure – EC2, AMI, Bastion Host, RDS
Let’s pick up the thread of our journey into the AWS Cloud, and keep discovering the intrinsics of the cloud computing universe while building a highly available, secure and fault-tolerant cloud system on the AWS platform. This article is the second one of the mini-series which walks you through the process of creating an enterprise-level AWS infrastructure and explains concepts and components of the Amazon Web Services platform. In the previous part, we scaffolded our infrastructure; specifically, we created the VPC, subnets, NAT gateways, and configured network routing. If you have missed that, we strongly encourage you to read it first. In this article, we will build on top of the work we have done in the previous part, and this time we focus on the configuration of EC2 instances, the creation of AMI images, setting up Bastion Hosts, and RDS database.
The whole series comprises of:
- Part 1 - Architecture Scaffolding (VPC, Subnets, Elastic IP, NAT).
- Part 2 - The Path Towards Enterprise Level AWS Infrastructure – EC2, AMI, Bastion Host, RDS.
- Part 3 - Load Balancing and Application Deployment (Elastic Load Balancer)
Infrastructure overview
The diagram below presents our designed infrastructure. If you would like to learn more about design choices behind it, please read Part 1 - Architecture Scaffolding (VPC, Subnets, Elastic IP, NAT) . We have already created a VPC, subnets, NAT Gateways, and configured network routing. In this part of the series, we focus on the configuration of required EC2 instances, the creation of AMI images, setting up Bastion Hosts, and the RDS database.

AWS theory
1. Elastic cloud compute cloud (EC2)
Elastic Cloud Compute Cloud (EC2) is an Amazon service that allows you to manage your virtual computing environments, known as EC2 instances, on AWS. An EC2 instance is simply a virtual machine provisioned with a certain amount of resources such as CPU, memory, storage, and network capacity launched in a selected AWS region and availability zone. The elasticity of EC2 means that you can scale up or down resources easily, depending on your needs and requirements. The network security of your instances can be managed with the use of security groups by the configuration of protocols, ports, and IP addresses that your instances can communicate with.
There are five basic types of EC2 instances, which you can use based on your system requirements.
- General Purpose,
- Compute Optimized,
- Memory Optimized,
- Accelerated Computing,
- Storage Optimized.
In our infrastructure, we will use only general-purpose instances, but if you would like to learn more about different features of instance types, see the AWS documentation.
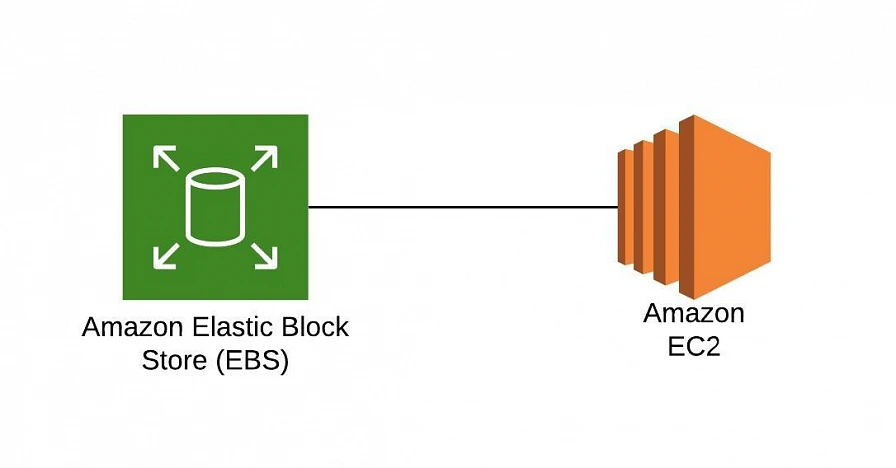
All EC2 instances come with instance store volumes for temporary data that is deleted whenever the instance is stopped or terminated, as well as with Elastic Block Store (EBS) , which is a persistent storage volume working independently of the EC2 instance itself.
2. Amazon Machine Images (AMI)
Amazon utilizes templates of software configurations, known as Amazon Machine Images (AMI) , in order to facilitate the creation of custom EC2 instances. AMIs are image templates that contain software such as operating systems, runtime environments, and actual applications that are used to launch EC2 instances. This allows us to preconfigure our AMIs and dynamically launch new instances on the go using this image instead of always setting up VM environments from scratch. Amazon provides some ready to use AMIs on the AWS Marketplace, which you can extend, customize, and save as your own (which we will do soon).
3. Key pair
Amazon provides a secure EC2 login mechanism with the use of public-key cryptography. During the instance boot time, the public key is put in an entry within ~/.ssh/authorized_keys , and then you can securely access your instance through SSH using a private key instead of a password. The public and private keys are known as a key pair.
4. IAM role
IAM means Identity and Access Management and it defines authentication and authorization rules for your system. IAM roles are IAM identities which comprise a set of permissions that control access to AWS services and can be attached to AWS resources such as users, applications, or services. As an example, if your application needs access to a specific AWS service such as an S3 Bucket, its EC2 instance needs to have a role with appropriate permission assigned.
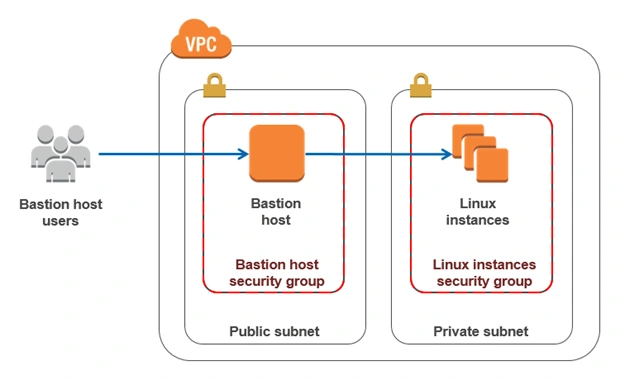
5. Bastion Host
Bastion Host is a special purpose instance placed in a public subnet, which is used to allow access to instances located in private subnets while providing an increased level of security. It acts as a bridge between users and private instances, and due to its exposure to potential attacks, it is configured to withstand any penetration attempts. The private instances only expose their SSH ports to a bastion host, not allowing any direct connection. What is more, bastion hosts may be configured to log any activity providing additional security auditing.
6. Amazon Relational Database Service (RDS)
6.1. RDS
RDS is an Amazon service for the management of relational databases in the cloud. As of now (23.04.2020), it supports six database engines specifically Amazon Aurora, PostgreSQL, MySQL, MariaDB, Oracle Database, and SQL Server. It is easy to configure, scale and it provides high availability and reliability with the use of Read Replicas and Multi-AZ Deployment features.
6.2. Read replicas
RDS Read Replicas are asynchronous, read-only instances that are replicas of a primary “master” db instance. They can be used for handling queries that do not require any data change, thus reliving the workload from the master node.
6.3. Multi-AZ deployment
AWS Multi-AZ Deployment is an option to allow RDS to create a secondary, standby instance in a different AZ, and replicate it synchronously with the data from the master node. Both master and standby instances run on their own physically independent infrastructures, and only the primary instance can be accessed directly. The standby replica is used as a failover in case of any master’s failure, without changing the endpoint of your DB.
This reduces downtime of your system and makes it easier to perform version upgrades or create backup snapshots, as they can be done on the spare instance. Multi-AZ is usually used only on the master instance. However, it is also possible to create read replicas with Multi-AZ deployment, which results in a resilient disaster recovery infrastructure.
Practice
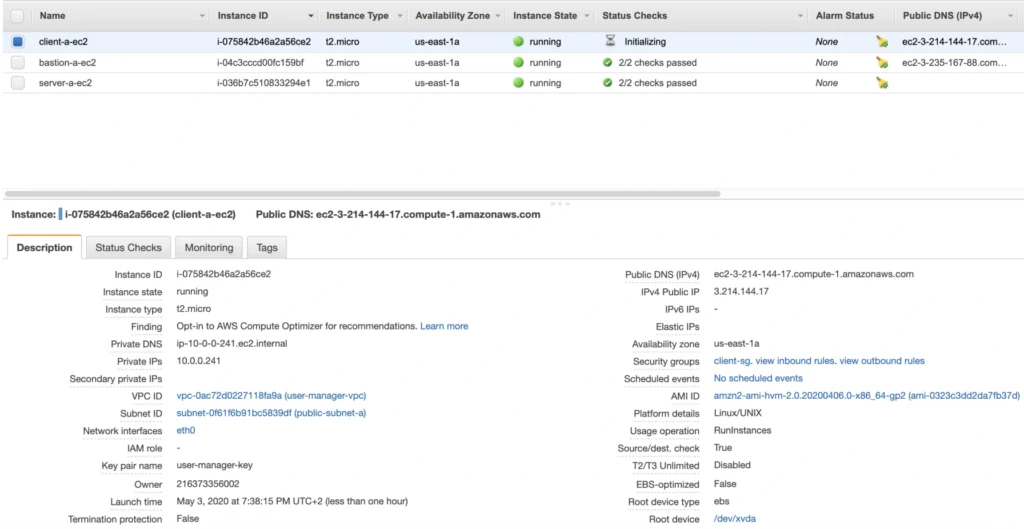
We have two applications that we would like to run on our AWS infrastructure. One is a Java 11 Spring Boot application, so the EC2 which will host it is required to have Java 11 installed. The second one is a React.js frontend application, which requires a virtual machine with a Node.js environment. Therefore, as the first step, we are going to set up a Bastion Host, which will allow us to ssh our instances. Then, we will launch and configure those two EC2 instances manually in the first availability zone. Later on, we will create AMIs based on those instances and use them for the creation of EC2s in the second availability zone.
1. Availability Zone A
1.1. Bastion Host
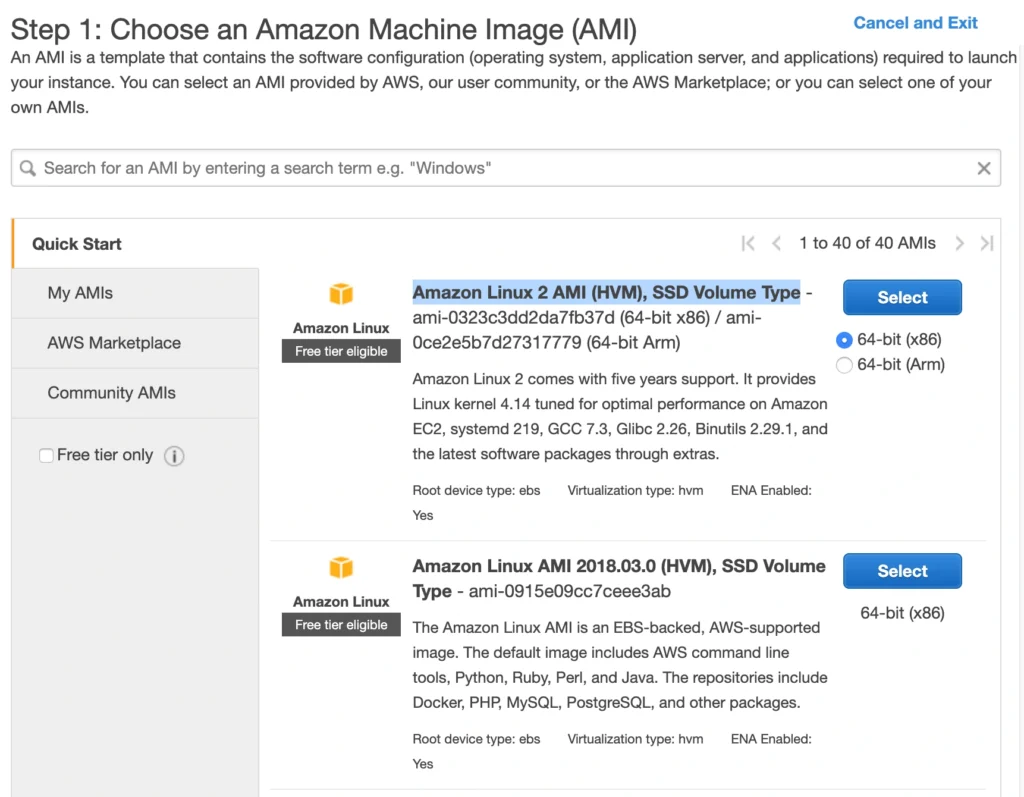
A Bastion Host is nothing more than a special-purpose EC2 instance. Hence, in order to create a Bastion Host, go into the AWS Management Console, and search for EC2 service. Then click the Launch Instance button, and you will be shown with an EC2 launch wizard. The first step is the selection of an AMI image for your instance. You can filter AMIs and select one based on your preferences. In this article, we will use the Amazon Linux 2 AMI (HVM), SSD Volume Type image.
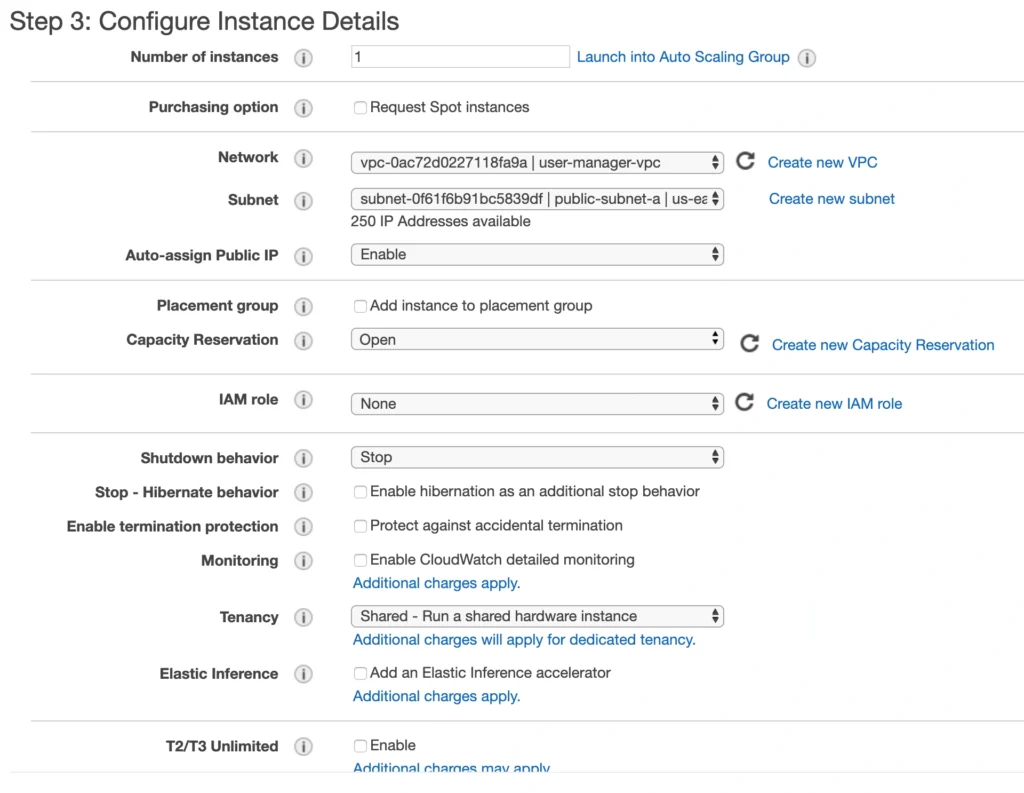
On the next screen, we need to choose an instance type for our image. Here, I am sticking with the AWS free tier program, so I will go with the general-purpose t2.micro type. Click Next: Configure instance Details . Here, we can define the number of instances, network settings, IAM configuration, etc. For now, let’s start with 1 instance, we will work on the scalability of our infrastructure later. In the Network section, choose your previously created VPC and public-subnet-a and enable Public IP auto-assignment. We do not need to specify any IAM role as we are not going to use any of the AWS services.
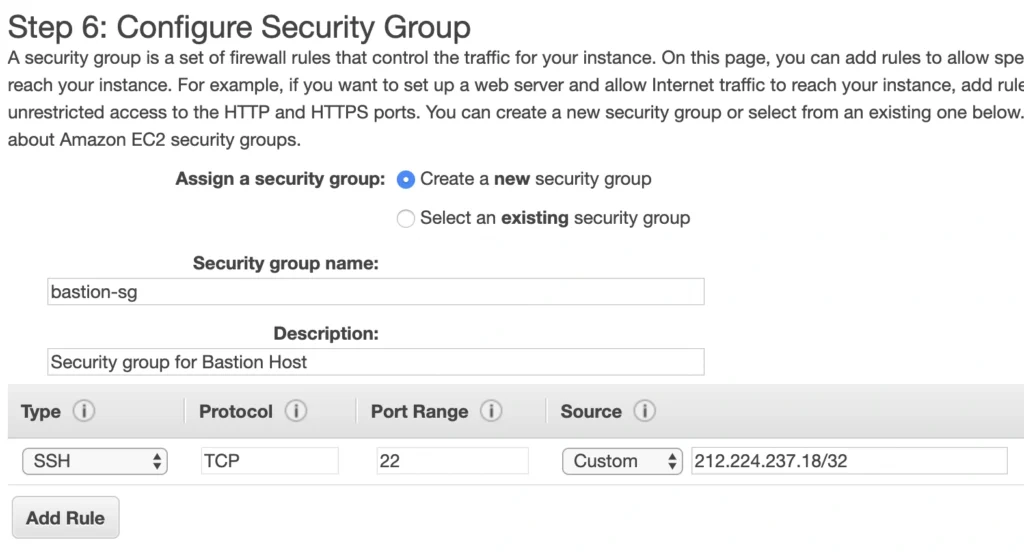
Click Next . Here you can see that the wizard automatically configures your instance with an 8GB EBS storage, which is enough for us. Click Next again. Now, we can add tags to improve the recognizability of our instance. Let’s add a Name tag bastion-a-ec2 . On the next screen, we can configure a security group for our instance. Create a new security group, name it bastion-sg .
You can see that there is already one predefined rule exposing our instance for SSH sessions from 0.0.0.0/0 (anywhere). You should change it here to allow only connections from your IP address. The important thing to note here is that in the production environment you would never expose your instances to the whole world, instead, you would whitelist the IP addresses of employees allowed to connect to your instance.
In the next step, you can review your EC2 configuration and launch it. The last action is the creation of a key pair. This is important because we need this key pair to ssh to our instance. Name the key pair e.g. user-manager-key-pair , download the private key, and store it locally on your machine. This is it, Amazon will take some time, but in the end, your EC2 instance will be launched.
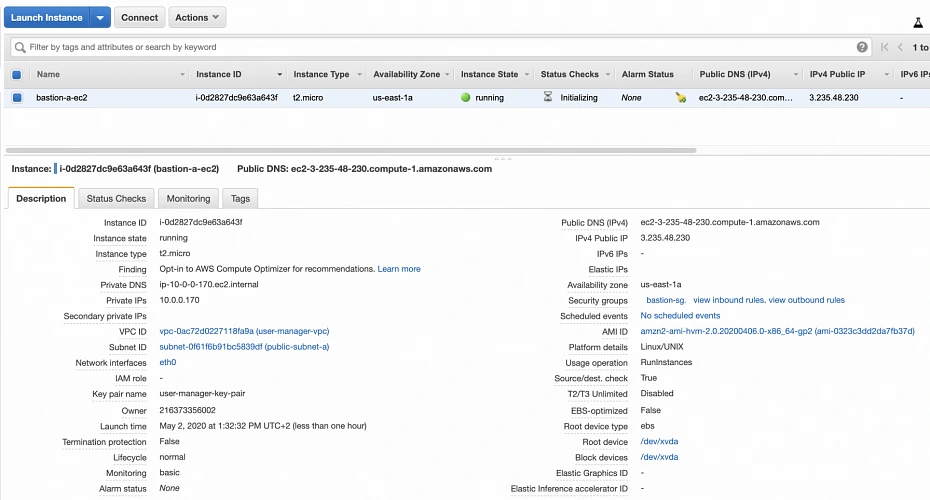
In the instance description section, you can find the public IP address of your instance. We can use it to ssh to the EC2. That is where we will need previously generated and hopefully locally saved private key (*.pem file). That’s it, our instance is ready for now. However, in production, it would be a good idea to harden the security of the Bastion Host even more. If you would like to learn more about that, we recommend this article .
1.2. Backend server EC2
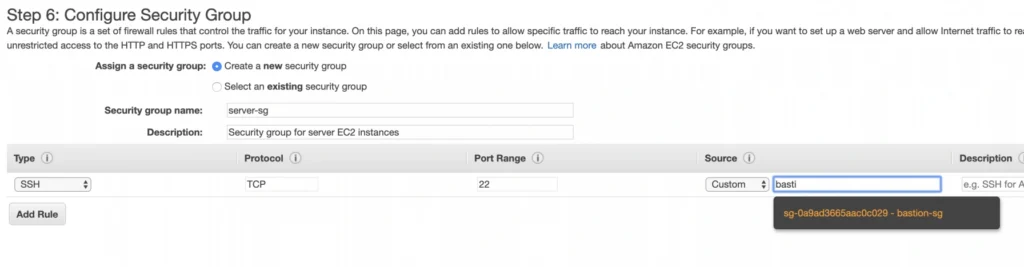
Now, let’s create an instance for the backend server. Click Launch instance again, choose the same AMI image as before, place it in your user-manager-vpc, private-subnet-a, and do not enable public IP auto-assignment this time. Move through the next steps as before, add a server-a-ec2 name tag. In the security group configuration, create a new security group, and modify its settings to allow SSH incoming communication only from the bastion-sg .
Launch the instance. You can create a new key pair or use the previously created one (for simplicity I recommend using the same key pair for all instances). In the end, you should have your second instance up and running.

You can see that server-a-ec2 does not have any public IP address. However, we can access it through the bastion host. First, we need to add our key to a keychain and then we can ssh to our bastion host instance adding -A flag to the ssh command. This flag enables agent-forwarding, which will let you ssh into your private instance without explicitly specifying private key again. This is a recommended way, which lets you avoid storage of the private key on the bastion host instance which could lead to a security breach.
ssh-add -k
ssh -A -i path-to-your-pem-file ec2-user@bastion-a-ec2-instance-public-ip
Then, inside your bastion host execute the command:
ssh ec2-user@server-a-ec2-instance-private-ip
Now, you should be inside your server-a-ec2 private instance. Let’s install the required software on the machine by executing those commands:
sudo yum update -y &&
sudo amazon-linux-extras enable corretto8 &&
sudo yum clean metadata &&
sudo yum install java-11-amazon-corretto &&
java --version
As a result, you should have java 11 installed on your server-a-ec2 instance. You can go back to the local command prompt by executing the exit command twice.
AMI
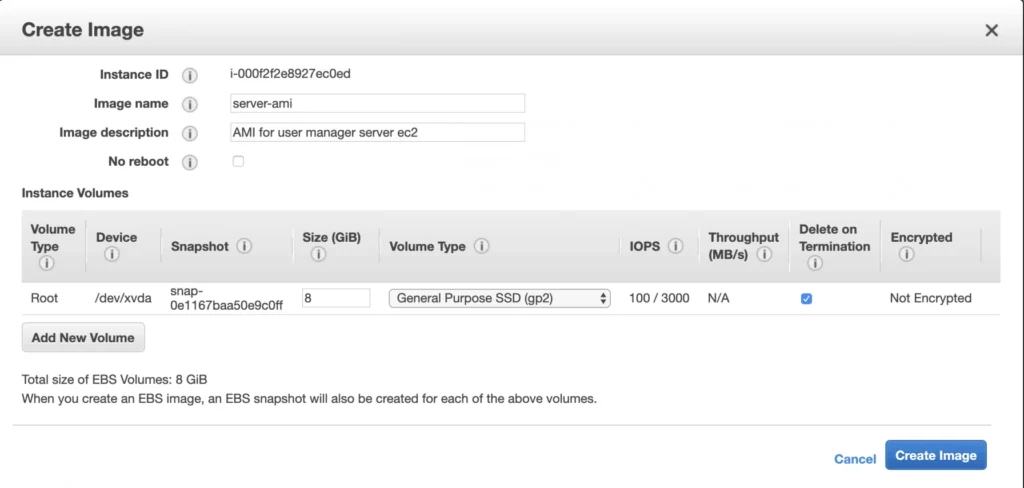
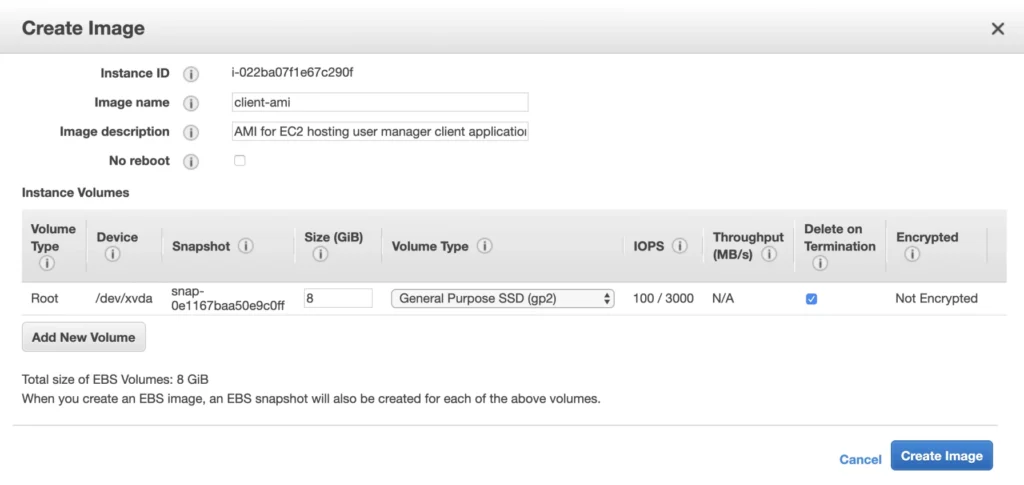
The ec2 instance for the backend server is ready for the deployment. In the second availability zone, we could follow exactly the same steps. However, there is an easier way. We can create an AMI image based on our pre-configured instance and use it later for the creation of the corresponding instance in availability zone b. In order to do that, go again into the Instances menu, select your instance, click Actions -> Image -> Create image . Your AMI image will be created and you will be able to find it in the Images/AMIs section.
1.3. Client application EC2
The last EC2 instance we need in the Availability Zone A will host the client application. So, let’s go once again through the process of EC2 creation. Launch instance, select the same base AMI as before, select your VPC, place the instance in the public-subnet-a , and enable public IP assignment. Then, add a client-a-ec2 Name tag, and create a new security group client-sg allowing SSH incoming connection from the bastion-sg security group. That’s it, launch it.
Now, SSH to the instance through the bastion host, and install the required software.
ssh -A -i path-to-your-pem-file ec2-user@bastion-a-ec2-instance-public-ip
Then, inside your bastion host execute the command:
ssh -A -i path-to-your-pem-file ec2-user@bastion-a-ec2-instance-public-ip
Inside client-a-ec2 command prompt, execute :
sudo yum update &&
curl -sL https://rpm.nodesource.com/setup_12.x | sudo bash - &&
sudo yum install -y nodejs &&
node -v &&
npm -v
Exit the EC2 command prompt and create a new AMI image based on it.
2. Availability Zone B
2.1. Bastion Host
Create the second bastion host instance following the same steps as for availability zone a, but this time place it in public-subnet-b , add Name tag bastion-b-ec2 , and assign to it previously created bastion-sg security group.
2.2. Backend server EC2
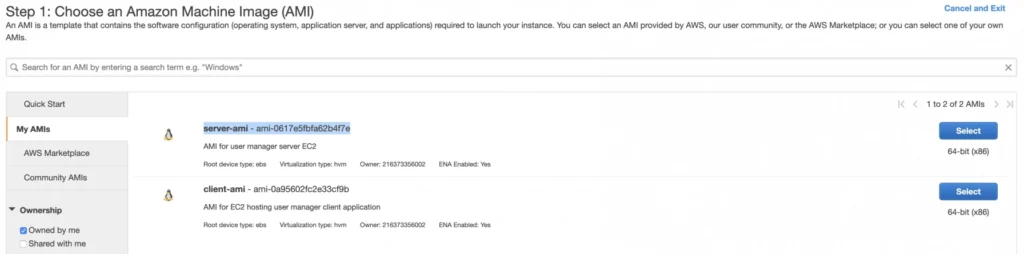
For the backend server EC2, go again to the Launch Instance menu, and this time instead of using Amazon’s AMI switch to My AMI’s tab and select the previously created server-ami image. Place the instance in the private-subnet-b , add a name tag server-b-ec2 , and assign to it the server-sg security group.
2.3. Client application EC2
Just as for the backend server instance, launch the client-b-ec2 using your custom AMI image. This time select the client-ami image, place EC2 in the public-subnet-b , enable automatic IP assignment, and choose the client-sg security group.
3. RDS
We have all our EC2 instances ready. The last part which we will cover in this article is the configuration of RDS. For that, go into the RDS service in the AWS Management Console and click Create database. In the database configuration window, follow the standard configuration path. Select MySQL db engine, and select Free tier template. Set your db name as user-manager-db , specify master username and password, select your user-manager-vpc , availability zone a, and make the database publicly not accessible. Create also a new user-manager-db-sg security group.
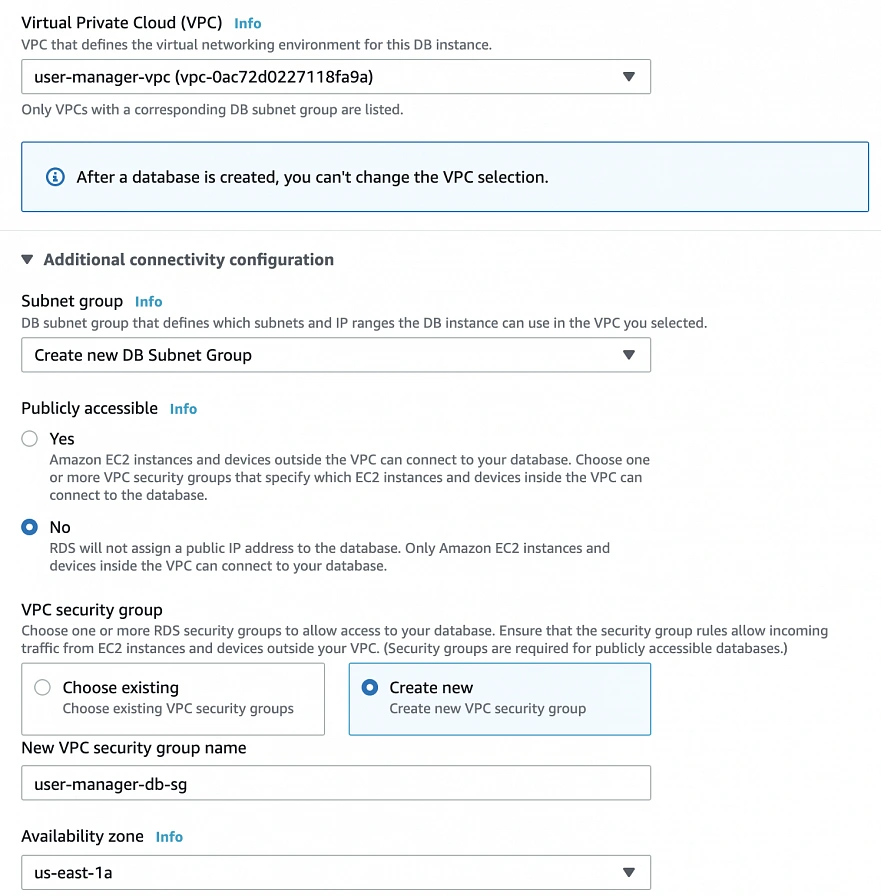
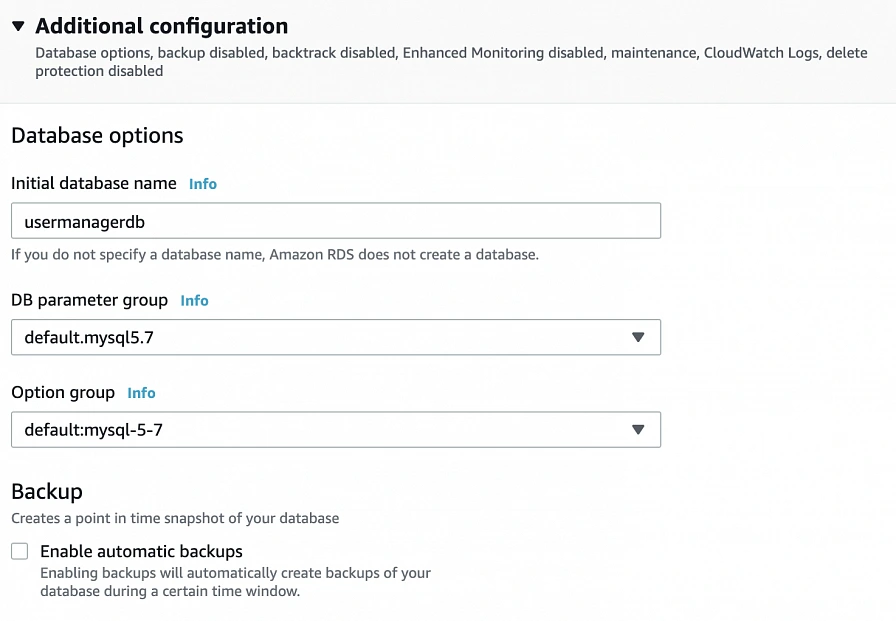
In the Additional configuration section, specify the initial db name, and finally create a database.
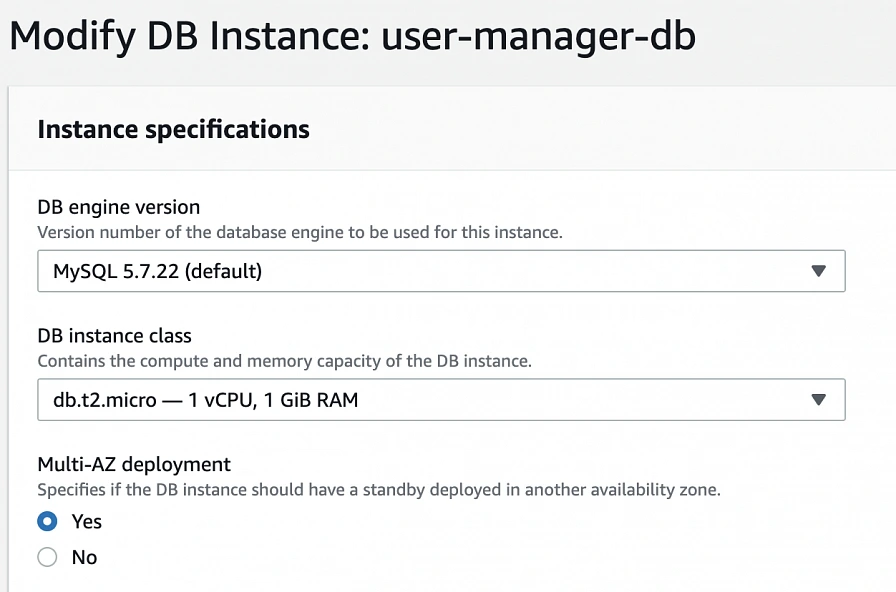
After AWS finishes the creation process, you will be able to get the database endpoint, which we will use to connect to the database from our application later on. Now, in order to provide high availability of the database, click the Modify button on the created database screen, and enable Multi-AZ deployment. Please, bear in mind that Multi-AZ deployment is not included in the free tier program, so if you would like to avoid any charges, skip this point.
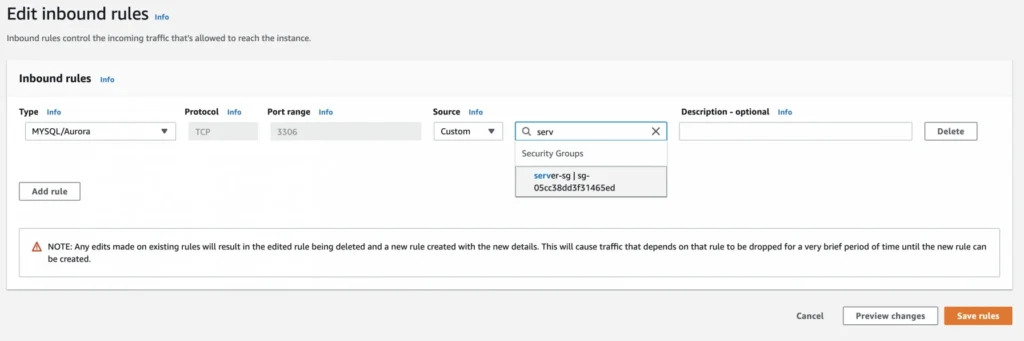
As the last step, we need to add a rule to the user-manager-db-sg to allow incoming connections from our server-sg on port 3306 in order to allow communication between our server and the database.
EC2, AMI, Bastion Host, RDS - Summary
Congratulations, our infrastructure is almost ready for deployment. As you can see in our final diagram, the only thing which is missing is the load balancer. In the next part of the series, we will take care of that, and deploy our applications to have a fully functioning system running on AWS infrastructure!
Sources:
- https://cloudacademy.com/blog/aws-bastion-host-nat-instances-vpc-peering-security/
- https://aws.amazon.com/quickstart/architecture/linux-bastion/
- https://aws.amazon.com/blogs/security/securely-connect-to-linux-instances-running-in-a-private-amazon-vpc/
- https://app.pluralsight.com/library/courses/aws-developer-getting-started/table-of-contents
- https://app.pluralsight.com/library/courses/aws-developer-designing-developing/table-of-contents
- https://app.pluralsight.com/library/courses/aws-networking-deep-dive-vpc/table-of-contents
- https://www.techradar.com/news/what-is-amazon-rds
- https://medium.com/kaodim-engineering/hardening-ssh-using-aws-bastion-and-mfa-45d491288872
- https://cloudacademy.com/blog/aws-bastion-host-nat-instances-vpc-peering-security/
- https://docs.aws.amazon.com/IAM/latest/UserGuide/id_roles.html
- https://docs.aws.amazon.com/AWSEC2/latest/UserGuide/ec2-key-pairs.html
- https://aws.amazon.com/ec2/instance-types/
- https://docs.aws.amazon.com/AWSEC2/latest/UserGuide/concepts.html
Interested in our services?
Reach out for tailored solutions and expert guidance.