
Senior Software Engineer at GrapeUp. Mainly focused on cloud approach in developing applications and microservices in Java/Python. Besides work I have other passions - travelling, reading books, playing board games.
Read articles
How to get effective computing services: AWS Lambda
In the modern world, we are constantly faced with the need not only to develop applications but also to provide and maintain an environment for them. Writing scalable, fault-tolerant, and responsive programs is hard, and on top of that, you’re expected to know exactly how many servers, CPUs, and how much memory your code will need to run – especially when running in the Cloud. Also, developing cloud native applications and microservice architectures make our infrastructure more and more complicated every time.
So, how not worry about underlying infrastructure while deploying applications? How do get easy-to-use and manage computing services? The answer is in serverless applications and AWS Lambda in particular.
What you will find in this article:
- What is Serverless and what we can use that for?
- Introduction to AWS Lambda
- Role of AWS Lambda in Serverless applications
- Coding and managing AWS Lambda function
- Some tips about working with AWS Lambda function
What is serverless?
Serverless computing is a cloud computing execution model in which the cloud provider allocates machine resources on-demand, taking care of the servers on behalf of their customers. Despite the name, it does not involve running code without servers, because code has to be executed somewhere eventually. The name “serverless computing” is used because the business or person that owns the system does not have to purchase, rent, or provision servers or virtual machines for the back-end code to run on. But with provided infrastructure and management you can focus on only writing code that serves your customers.
Software Engineers will not have to take care of operating system (OS) access control, OS patching, provisioning, right-sizing, scaling, and availability. By building your application on a serverless platform, the platform manages these responsibilities for you.
The main advantages of AWS Serverless tools are :
- No server management – You don’t have to provision or maintain any servers. There is no software or runtime to install or maintain.
- Flexible scaling – You can scale your application automatically.
- High availability – Serverless applications have built-in availability and fault tolerance.
- No idle capacity – You don't have to pay for idle capacity.
- Major languages are supported out of the box - AWS Serverless tools can be used to run Java, Node.js, Python, C#, Go, and even PowerShell.
- Out of the box security support
- Easy orchestration - applications can be built and updated quickly.
- Easy monitoring - you can write logs in your application and then import them to Log Management Tool.
Of course, using Serverless may also bring some drawbacks:
- Vendor lock-in - Your application is completely dependent on a third-party provider. You do not have full control of your application. Most likely, you cannot change your platform or provider without making significant changes to your application.
- Serverless (and microservice) architectures introduce additional overhead for function/microservice calls - There are no “local” operations; you cannot assume that two communicating functions are located on the same server.
- Debugging is more difficult - Debugging serverless functions is possible, but it's not a simple task, and it can eat up lots of time and resources.
Despite all the shortcomings, the serverless approach is constantly growing and becoming capable of more and more tasks. AWS takes care of more and more development and distribution of serverless services and applications. For example, AWS now provides not only Lambda functions(computing service), but also API Gateway(Proxy), SNS(messaging service), SQS(queue service), EventBridge(event bus service), and DynamoDB(NoSql database).
Moreover, AWS provides Serverless Framework which makes it easy to build computing applications using AWS Lambda. It scaffolds the project structure and takes care of deploying functions, so you can get started with your Lambda extremely quickly.
Also, AWS provides the specific framework to build complex serverless applications - Serverless Application Model (SAM). It is an abstraction to support and combine different types of AWS tools - Lambda, DynamoDB API Gateway, etc.
The biggest difference is that Serverless is written to deploy AWS Lambda functions to different providers. SAM on the other hand is an abstraction layer specifically for AWS using not only Lambda but also DynamoDB for storage and API Gateway for creating a serverless HTTP endpoint. Another difference is that SAM Local allows you to run some services, including Lambda functions, locally.
AWS Lambda concept
AWS Lambda is a Function-as-a-Service(FaaS) service from Amazon Web Services. It runs your code on a high-availability compute infrastructure and performs all of the administration of the compute resources, including server and operating system maintenance, capacity provisioning and automatic scaling, code monitoring, and logging.
AWS Lambda has the following conceptual elements:
- Function - A function is a resource that you can invoke to run your code in Lambda. A function has code to process the events that you pass into the function or that other AWS services send to the function. Also, you can add a qualifier to the function to specify a version or alias.
- Execution Environment - Lambda invokes your function in an execution environment, which provides a secure and isolated runtime environment. The execution environment manages the resources required to run your function. The execution environment also provides lifecycle support for the function's runtime. At a high level, each execution environment contains a dedicated copy of function code, Lambda layers selected for your function, the function runtime, and minimal Linux userland based on Amazon Linux.
- Deployment Package - You deploy your Lambda function code using a deployment package. AWS Lambda currently supports either a zip archive as a deployment package or a container image that is compatible with the Open Container Initiative (OCI) specification.
- Layer - A Lambda layer is a .zip file archive that contains libraries, a custom runtime, or other dependencies. You can use a layer to distribute a dependency to multiple functions. With Lambda Layers, you can configure your Lambda function to import additional code without including it in your deployment package. It is especially useful if you have several AWS Lambda functions that use the same set of functions or libraries. For example, in a layer, you can put some common code about logging, exception handling, and security check. A Lambda function that needs the code in there, should be configured to use the layer. When a Lambda function runs, the contents of the layer are extracted into the /opt folder in the Lambda runtime environment. The layer need not be restricted to the language of the Lambda function. Layers also have some limitations: each Lambda function may have only up to 5 layers configured and layer size is not allowed to be bigger than 250MB.
- Runtime - The runtime provides a language-specific environment that runs in an execution environment. The runtime relays invocation events, context information, and responses between Lambda and the function. AWS offers an increasing number of Lambda runtimes, which allow you to write your code in different versions of several programming languages. At the moment of this writing, AWS Lambda natively supports Java, Go, PowerShell, Node.js, C#, Python, and Ruby. You can use runtimes that Lambda provides, or build your own.
- Extension - Lambda extensions enable you to augment your functions. For example, you can use extensions to integrate your functions with your preferred monitoring, observability, security, and governance tools.
- Event - An event is a JSON-formatted document that contains data for a Lambda function to process. The runtime converts the event to an object and passes it to your function code.
- Trigger - A trigger is a resource or configuration that invokes a Lambda function. This includes AWS services that you can configure to invoke a function, applications that you develop, or some event source.
So, what exactly is behind AWS Lambda?
From an infrastructure standpoint, every AWS Lambda is part of a container running Amazon Linux (referenced as Function Container). The code files and assets you create for your AWS Lambda are called Function Code Package and are stored on an S3 bucket managed by AWS. Whenever a Lambda function is triggered, the Function Code Package is downloaded from the S3 bucket to the Function container and installed on its Lambda runtime environment. This process can be easily scaled, and multiple calls for a specific Lambda function can be performed without any trouble by the AWS infrastructure.
The Lambda service is divided into two control planes. The control plane is a master component responsible for making global decisions about provisioning, maintaining, and distributing a workload. A second plane is a data plane that controls the Invoke API that runs Lambda functions. When a Lambda function is invoked, the data plane allocates an execution environment to that function, chooses an existing execution environment that has already been set up for that function, then runs the function code in that environment.
Each function runs in one or more dedicated execution environments that are used for the lifetime of the function and then destroyed. Each execution environment hosts one concurrent invocation but is reused in place across multiple serial invocations of the same function. Execution environments run on hardware virtualized virtual machines (microVMs). A micro VM is dedicated to an AWS account but can be reused by execution environments across functions within an account. MicroVMs are packed onto an AWS-owned and managed hardware platform (Lambda Workers). Execution environments are never shared across functions and microVMs are never shared across AWS accounts.
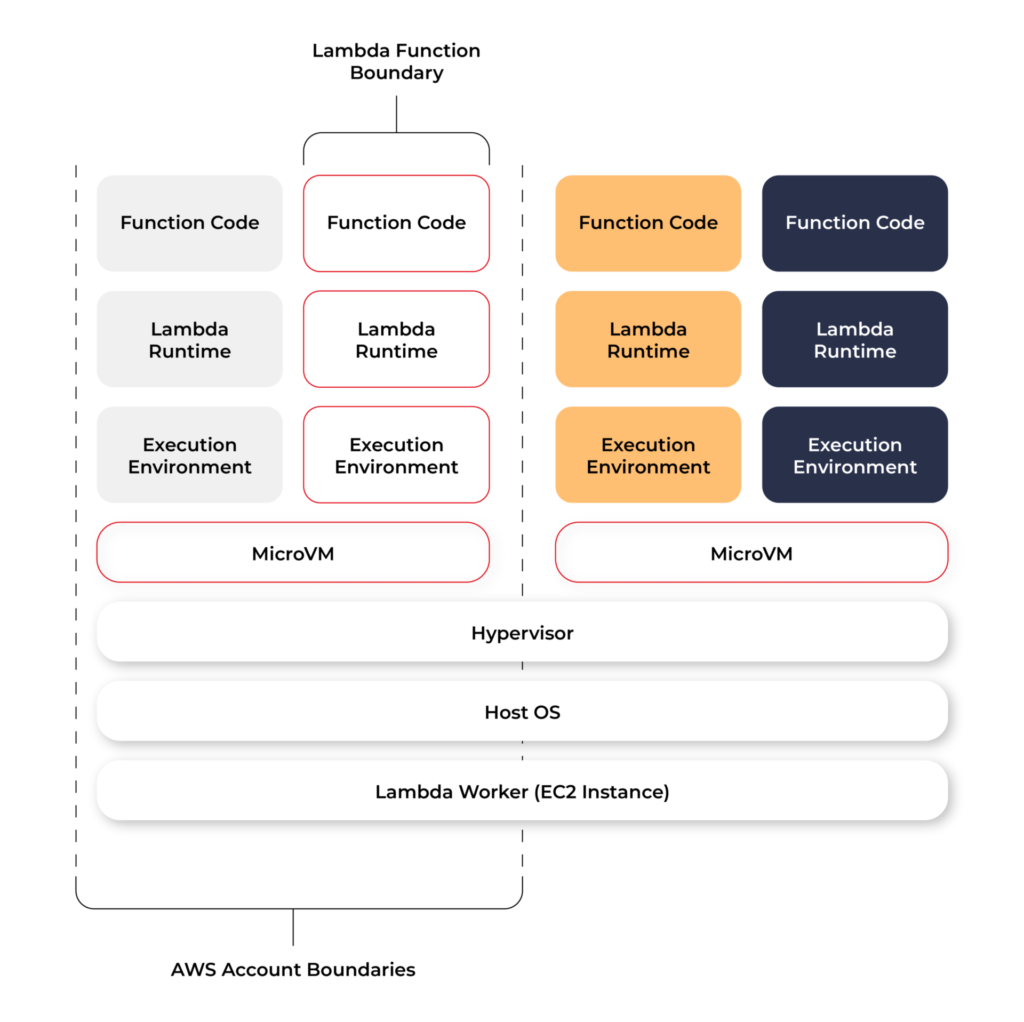
Even though Lambda execution environments are never reused across functions, a single execution environment can be reused for invoking the same function, potentially existing for hours before it is destroyed.
Each Lambda execution environment also includes a writeable file system, available at /tmp . This storage is not accessible to other execution environments. As with the process state, files are written to /tmp remain for the lifetime of the execution environment.
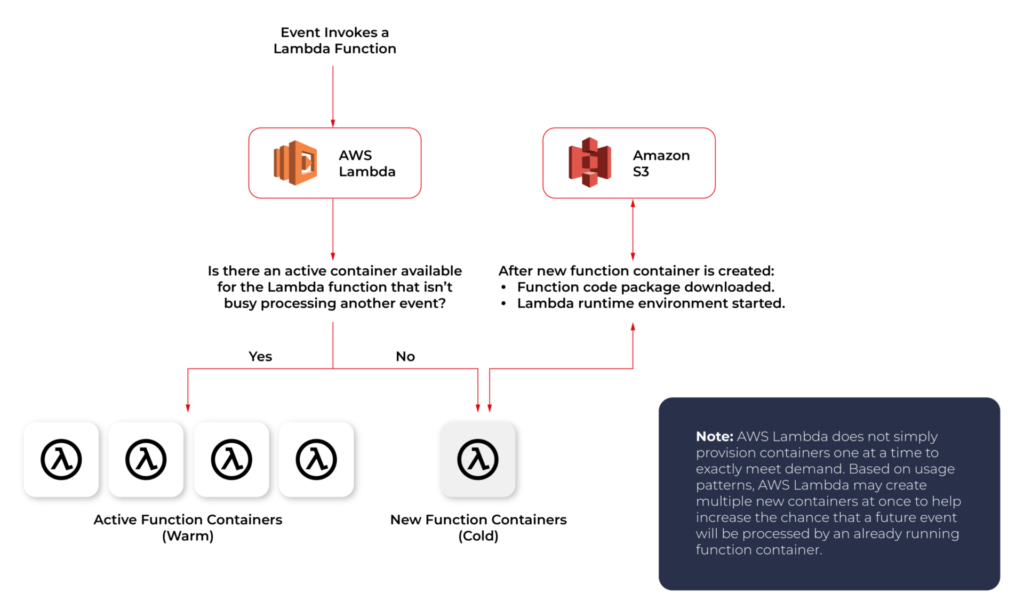
Cold start VS Warm start
When you call a Lambda Function, it follows the steps described above and executes the code. After finishing the execution, the Lambda Container stays available for a few minutes, before being terminated. This is called a Cold Start.
If you call the same function and the Lambda Container is still available (haven’t been terminated yet), AWS uses this container to execute your new call. This process of using active function containers is called Warm Container and it increases the response speed of your Lambda.
Role of AWS Lambda in serverless applications
There are a lot of use cases you can use AWS Lambda for, but there are killer cases for which Lambda is best suited:
- Operating serverless back-end
The web frontend can send requests to Lambda functions via API Gateway HTTPS endpoints. Lambda can handle the application logic and persist data to a fully-managed database service (RDS for relational, or DynamoDB for a non-relational database).
- Working with external services
If your application needs to request services from an external provider, there's generally no reason why the code for the site or the main application needs to handle the details of the request and the response. In fact, waiting for a response from an external source is one of the main causes of slowdowns in web-based services. If you hand requests for such things as credit authorization or inventory checks to an application running on AWS Lambda, your main program can continue with other elements of the transaction while it waits for a response from the Lambda function. This means that in many cases, a slow response from the provider will be hidden from your customers, since they will see the transaction proceeding, with the required data arriving and being processed before it closes.
- Near-realtime notifications
Any type of notifications, but particularly real-time, will find a use case with serverless Lambda. Once you create an SNS, you can set triggers that fire under certain policies. You can easily build a Lambda function to check log files from Cloudtrail or Cloudwatch. Lambda can search in the logs looking for specific events or log entries as they occur and send out notifications via SNS. You can also easily implement custom notification hooks to Slack or another system by calling its API endpoint within Lambda.
- Scheduled tasks and automated backups
Scheduled Lambda events are great for housekeeping within AWS accounts. Creating backups, checking for idle resources, generating reports, and other tasks which frequently occur can be implemented using AWS Lambda.
- Bulk real-time data processing
There are some cases when your application may need to handle large volumes of streaming input data, and moving that data to temporary storage for later processing may not be an adequate solution.If you send the data stream to an AWS Lambda application designed to quickly pull and process the required information, you can handle the necessary real-time tasks.
- Processing uploaded S3 objects
By using S3 object event notifications, you can immediately start processing your files by Lambda, once they land in S3 buckets. Image thumbnail generation with AWS Lambda is a great example for this use case, the solution will be cost-effective and you don’t need to worry about scaling up - Lambda will handle any load.
AWS Lambda limitations
AWS Lambda is not a silver bullet for every use case. For example, it should not be used for anything that you need to control or manage at the infrastructure level, nor should it be used for a large monolithic application or suite of applications.
Lambda comes with a number of “limitations”, which is good to keep in mind when architecting a solution.
There are some “hard limitations” for the runtime environment: the disk space is limited to 500MB, memory can vary from 128MB to 3GB and the execution timeout for a function is 15 minutes. Package constraints like the size of the deployment package (250MB) and the number of file descriptors (1024) are also defined as hard limits.
Similarly, there are “limitations” for the requests served by Lambda: request and response body synchronous event payload can be a maximum of 6 MB while an asynchronous invocation payload can be up to 256KB. At the moment, the only soft “limitation”, which you can request to be increased, is the number of concurrent executions, which is a safety feature to prevent any accidental recursive or infinite loops from going wild in the code. This would throttle the number of parallel executions.
All these limitations come from defined architectural principles for the Lambda service:
- If your Lambda function is running for hours, it should be moved to EC2 rather than Lambda.
- If the deployment package jar is greater than 50 MB in size, it should be broken down into multiple packages and functions.
- If the request payloads exceed the limits, you should break them up into multiple request endpoints.
It all comes down to preventing deploying monolithic applications as Lambda functions and designing stateless microservices as a collection of functions instead. Having this mindset, the “limitations” make complete sense.
AWS Lambda examples
Let’s now take a look at some AWS Lambda examples. We will start with a dummy Java application and how to create, deploy and trigger AWS Lambda. We will use AWS Command Line Interface(AWS CLI) to manage functions and other AWS Lambda resources.
Basic application
Let’s get started by creating the Lambda function and needed roles for Lambda execution.

This trust policy allows Lambda to use the role's permissions by giving the service principal lambda.amazonaws.com permission to call the AWS Security Token Service AssumeRole action. The content of trust-policy.json is the following:

Then let’s attach some permissions to the created role. To add permissions to the role, use the attach-policy-to-role command. Start by adding the AWSLambdaBasicExecutionRole managed policy.

Function code
As an example, we will create Java 11 application using Maven.
For Java AWS Lambda provides the following libraries:
- com.amazonaws:aws-lambda-java-core – Defines handler method interfaces and the context object that the runtime passes to the handler. This is a required library.
- com.amazonaws:aws-lambda-java-events – Different input types for events from services that invoke Lambda functions.
- com.amazonaws:aws-lambda-java-log4j2 – An appender library for Apache Log4j 2 that you can use to add the request ID for the current invocation to your function logs.
Let’s add Java core library to Maven application:

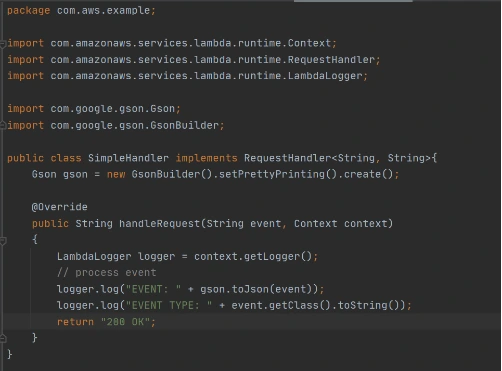
Then we need to add a Handler class which will be an entry point for our function. For Java function this Handler class should implement com.amazonaws.services.lambda.runtime.RequestHandler interface. It’s also possible to set generic input and output types.
Now let’s create a deployment package from the source code. For Lambda deployment package should be either .zip or .jar. To build a jar file with all dependencies let’s use maven-shade-plugin .
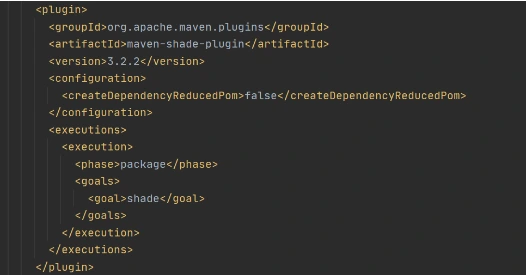
After running mvn package command, the resulting jar will be placed into target folder. You can take this jar file and zip it.
Now let’s create Lambda function from the generated deployment package.

Once Lambda function is deployed we can test it. For that let’s use invoke-command.

out.json means the filename where the content will be saved. After invoking Lambda you should be able to see a similar result in your out.json :

More complicated example
Now let’s take a look at a more complicated application that will show the integration between several AWS services. Also, we will show how Lambda Layers can be used in function code. Let’s create an application with API Gateway as a proxy, two Lambda functions as some back-end logic, and DynamoDB as data storage. One Lambda will be intended to save a new record into the database. The second Lambda will be used to retrieve an object from the database by its identifier.
Let’s start by creating a table in DynamoDB. For simplicity, we’ll add just a couple of fields to that table.

Now let’s create a Java module where some logic with database operations will be put. Dependencies to AWS DynamoDB SDK should be added to the module.

Now let’s add common classes and models to work with the database. This code will be reused in both lambdas.
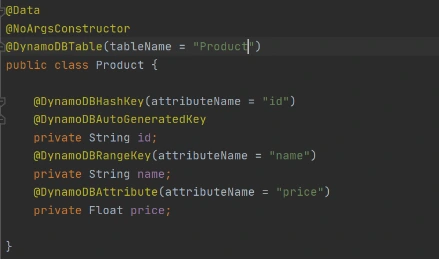
Model entity object:
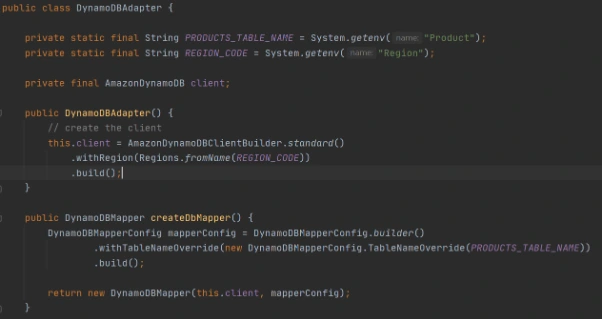
Adapter class to DynamoDB client.
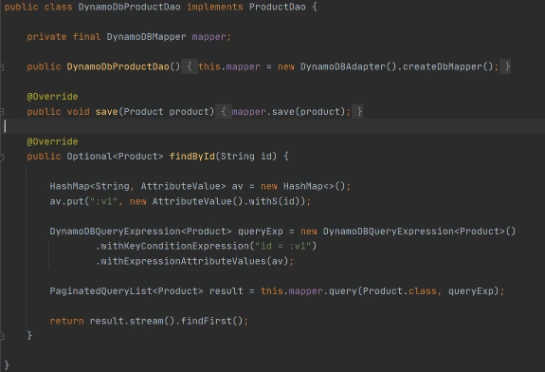
Implementation of DAO interface to provide needed persistent operations.
Now let’s build this module and package it into a jar with dependencies. From that jar, a reusable Lambda Layer will be created. Compress fat jar file as a zip archive and publish it to S3. After doing that we will be able to create a Lambda Layer.

Layer usage permissions are managed on the resource. To configure a Lambda function with a layer, you need permission to call GetLayerVersion on the layer version. For functions in your account, you can get this permission from your user policy or from the function's resource-based policy. To use a layer in another account, you need permission on your user policy, and the owner of the other account must grant your account permission with a resource-based policy.
Function code
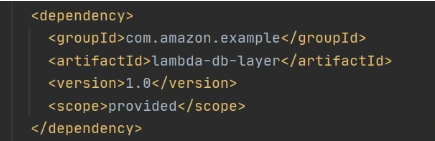
Now let’s add this shared dependency to both Lambda functions. To do that we need to define a provided dependency in pom.xml.
After that, we can write Lambda handlers. The first one will be used to persist new objects into the database:
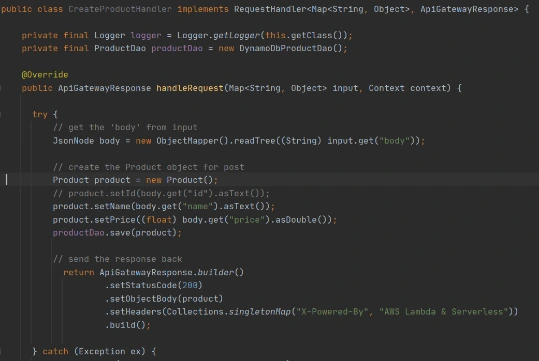
NOTE : in case of subsequent calls AWS may reuse the old Lambda instance instead of creating a new one. This offers some performance advantages to both parties: Lambda gets to skip the container and language initialization, and you get to skip initialization in your code. That’s why it’s recommended not to put the creation and initialization of potentially reusable objects into the handler body, but to move it to some code blocks which will be executed once - on the initialization step only.
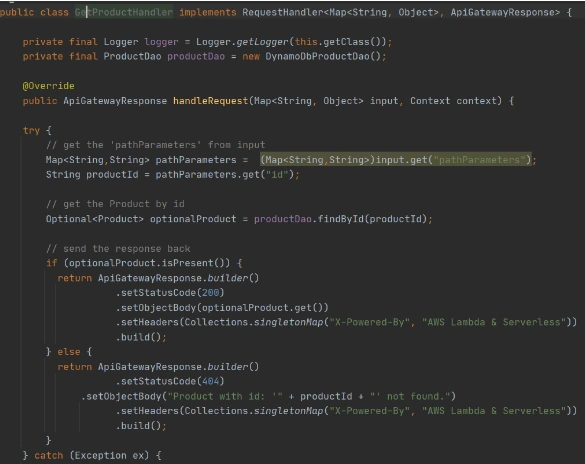
In the second Lambda function we will extract object identifiers from request parameters and fetch records from the database by id:
Now create Lambda functions as it was shown in the previous example. Then we need to configure layer usage for functions. To add layers to your function, use the update-function-configuration command.

You must specify the version of each layer to use by providing the full Amazon Resource Name (ARN) of the layer version. While your function is running, it can access the content of the layer in the /opt directory. Layers are applied in the order that's specified, merging any folders with the same name. If the same file appears in multiple layers, the version in the last applied layer is used.
After attaching the layer to Lambda we can deploy and run it.
Now let’s create and configure API Gateway as a proxy to Lambda functions.

This operation will return json with the identifier of created API. Save the API ID for use in further commands. You also need the ID of the API root resource. To get the ID, run the get-resources command.

Now we need to create a resource that will be associated with Lambda to provide integration with functions.


Parameter --integration-http-method is the method that API Gateway uses to communicate with AWS Lambda. Parameter --uri is a unique identifier for the endpoint to which Amazon API Gateway can send requests.
Now let’s make similar operations for the second lambda( get-by-id-function ) and deploy an API.

Note. Before testing API Gateway, you need to add permissions so that Amazon API Gateway can invoke your Lambda function when you send HTTP requests.

Now let’s test our API. First of all, we’ll try to add a new product record:

The result of this call will be like this:

Now we can retrieve created object by its identifier:

And you will get a similar result as after POST request. The same object will be returned in this example.
AWS Lambda tips
Debugging Lambda locally
You can use AWS SAM console with a number of AWS toolkits to test and debug your serverless applications locally. For example, you can perform step-through debugging of your Lambda functions. The commands sam local invoke and sam local start-api both support local step-through debugging of your Lambda functions. To run AWS SAM locally with step-through debugging support enabled, specify --debug-port or -d on the command line. For example:

Also for debugging purposes, you can use AWS toolkits which are plugins that provide you with the ability to perform many common debugging tasks, like setting breakpoints, executing code line by line, and inspecting the values of variables. Toolkits make it easier for you to develop, debug, and deploy serverless applications that are built using AWS.
Configure CloudWatch monitoring and alerts
Lambda automatically monitors Lambda functions on your behalf and reports metrics through Amazon CloudWatch. To help you monitor your code when it runs, Lambda automatically tracks the number of requests, the invocation duration per request, and the number of requests that result in an error. Lambda also publishes the associated CloudWatch metrics. You can leverage these metrics to set CloudWatch custom alarms. The Lambda console provides a built-in monitoring dashboard for each of your functions and applications. Each time your function is invoked, Lambda records metrics for the request, the function's response, and the overall state of the function. You can use metrics to set alarms that are triggered when function performance degrades, or when you are close to hitting concurrency limits in the current AWS Region.
Beware of concurrency limits
For those functions whose usage scales along with your application traffic, it’s important to note that AWS Lambda functions are subject to concurrency limits. When functions reach 1,000 concurrent executions, they are subject to AWS throttling rules. Future calls will be delayed until your concurrent execution averages are back below the threshold. This means that as your applications scale, your high-traffic functions are likely to see drastic reductions in throughput during the time you need them most. To work around this limit, simply request that AWS raise your concurrency limits for the functions that you expect to scale.
Also, there are some widespread issues you may face working with Lambda:
Limitations while working with database
If you have a lot of reading/writing operations during one Lambda execution, you may probably face some failures due to Lambda limitations. Often the case is a timeout on Lambda execution. To investigate the problem you can temporarily increase the timeout limit on the function, but a common and highly recommended solution is to use batch operations while working with the database.
Timeout issues on external calls
This case may occur if you call a remote API from Lambda that takes too long to respond or that is unreachable. Network issues can also cause retries and duplicated API requests. To prepare for these occurrences, your Lambda function must always be idempotent. If you make an API call using an AWS SDK and the call fails, the SDK automatically retries the call. How long and how many times the SDK retries is determined by settings that vary among each SDK. To fix the retry and timeout issues, review the logs of the API call to find the problem. Then, change the retry count and timeout settings of the SDK as needed for each use case. To allow enough time for a response to the API call, you can even add time to the Lambda function timeout setting.
VPC connection issues
Lambda functions always operate from an AWS-owned VPC. By default, your function has full ability to make network requests to any public internet address — this includes access to any of the public AWS APIs. You should configure your functions for VPC access when you need to interact with a private resource located in a private subnet. When you connect a function to a VPC, all outbound requests go through your VPC. To connect to the internet, configure your VPC to send outbound traffic from the function's subnet to a NAT gateway in a public subnet.
How to build software architecture for new mobility services - connected vehicle remote control
Remote control over a vehicle is not a new idea; it has become a trend in the modern world. The idea of vehicle remote control is highly connected with vehicle telematics , which is used to gather data using GPS technology, sensors, and onboard diagnostics codes. Managed data can include vehicle location, driver behavior, vehicle activity, and real-time engine diagnostics. Further, the technology is managed on software platforms that help fleet owners manage their assets remotely.
The data collected often includes vehicle location, fuel consumption, speeding, and maintenance information. But what if a car got stolen? It would be helpful not only to have the current location but also to send a command to a vehicle to turn the engine off or enable signalization. A huge problem in this case is to have a platform that will be independent of the Original Equipment Manufacturer (OEM). The best option here is to move the solution to the Cloud and introduce a single point of work with vehicles and integration with different OEMs.
Such telematics remote control gives a powerful opportunity to car-rental or car-sharing services like CityBee or SnapCar. They now can track their cars and also offer customers a no-human way to reserve a car using just a mobile application and know the current vehicle state when it is in use.
Vehicle connection
To establish connection to a car it’s necessary to equip the vehicle with an Internet-connected telemetry device. Some companies provide such a device as part of machine installation, but third-party tools like Geotab can be used for custom installation as well. It is important to have a device intended for two-way connection with a vehicle, as some solutions were created only for tracking purposes. Remote vehicle controllers like Mobokey offer the following commands on a vehicle:
- Lock/Unlock
- Turn engines on/off
- Klaxon sound
- Turn flash-lights on/off
- Wake up/sleep
- Connect/Disconnect the vehicle
Some manufacturers require their cars to be woken up explicitly before executing actual commands. It is intended to prevent the continuous connection or in case of low battery level.
Software solution
Once the two-way connection with a vehicle is established, we need a solution to track the actual status of a car and send commands. To do that, it is required:
- To make sure integration with a vehicle is completed successfully
- That the connection is secure
- That the command can be sent by us – it may differ depending on the manufacturer and model
and that we prepared:
- Dashboard to send commands
- Response handling - to be aware if command execution was successful
The damage caused by a successful attack on a vehicular telematics system because of an unsecured connection may range from mild to disastrous - to the extent of serious casualties and property losses. To enforce the security objectives for deployed and developing vehicular monitoring systems, embodiments of the disclosed technology include a stack of security approaches, both on physical and software levels.
As vehicle commands are sent over the Internet, it is important to have a network and infrastructure security built. The software solution stack must be enclosed in a Virtual Private Cloud (VPC). Apart from that, it is highly recommended to apply some best practices such as Static Application Security Testing (SAST), Interactive Application Security Testing (IAST), and Software Composition Analysis (SCA) to find vulnerabilities.
Another challenge in software solutions relates to the need for integration with different OEMs . Each OEM provides an API to integrate with and different ways of communication with vehicles - it may be a synchronous way, for example, HTTP request to REST API, or an asynchronous way, for instance, using queue-based protocols like MQTT.
Another issue is handling command execution responses or callbacks . The easiest way to implement this is when the OEM API synchronously responds with a command execution result, but in most cases, the OEM system may notify us about the execution result eventually in some time.
In this case, it is necessary to find a way to map a command request to a vehicle via OEM API and an execution response as it is used for retry policy, error handling, and troubleshooting.
Software architecture

This connected vehicle solution uses the IoT platform, which authenticates messages from connected vehicles and processes data according to business rules. It leverages a set of main services, including Vehicle Services to connect vehicles and store vehicle-related data, a Telemetry stack to collect a delivery stream of input events and write them into Database, Command Services to send commands to the car and combine execution responses; and a queue-based topic which is intended for inter-communication between different parts of the system.
The solution also includes integration with OEM APIs. When IoT receives a message, it authenticates and authorizes the message, and the Command Platform executes the appropriate rule on the message, which routes the message to the appropriate OEM integration.
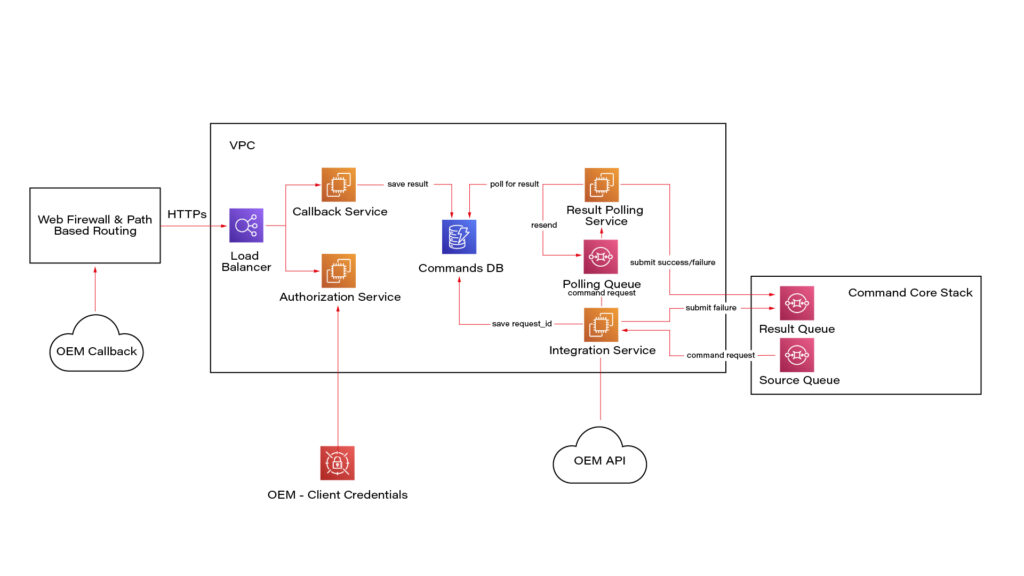
Here we see a potential OEM integration with the IoT Platform. It has authorization integration to allow us to send request OEM API securely; Callback integration to keep OEM response data regarding command execution; Database to keep mapping and consistent result - command request vs response; retry mechanism implementation using polling results from the database.
Once the system is authenticated, requests can be submitted to the connected vehicle solution’s OEM APIs. Based on the request identification data, the system eventually waits for the command result using a callback mechanism.
Conclusion
As highly-equipped connected vehicles increasingly rely on data exchanged with the infrastructure, it is required to have sustainable infrastructure, well-built cyber-security, privacy, and safety taken into account. The proposed solution also pays respect to the need to enroll in this process vehicle from different manufacturers.
This solution with remote vehicle control may be extremely useful for car-sharing systems, and apart from that, it can cover a solution for such use cases as autonomous and semi-autonomous vehicle driving, usage-based insurance, and customized in-vehicle experience . The solution also includes two-way communication.
Modernizing legacy applications with generative AI: Lessons from R&D Projects
As digital transformation accelerates, modernizing legacy applications has become essential for businesses to stay competitive. The application modernization market size, valued at USD 21.32 billion in 2023 , is projected to reach USD 74.63 billion by 2031 (1), reflecting the growing importance of updating outdated systems.
With 94% of business executives viewing AI as key to future success and 76% increasing their investments in Generative AI due to its proven value (2), it's clear that AI is becoming a critical driver of innovation. One key area where AI is making a significant impact is application modernization - an essential step for businesses aiming to improve scalability, performance, and efficiency.
Based on two projects conducted by our R&D team , we've seen firsthand how Generative AI can streamline the process of rewriting legacy systems.
Let’s start by discussing the importance of rewriting legacy systems and how GenAI-driven solutions are transforming this process.
Why re-write applications?
In the rapidly evolving software development landscape, keeping applications up-to-date with the latest programming languages and technologies is crucial. Rewriting applications to new languages and frameworks can significantly enhance performance, security, and maintainability. However, this process is often labor-intensive and prone to human error.
Generative AI offers a transformative approach to code translation by:
- leveraging advanced machine learning models to automate the rewriting process
- ensuring consistency and efficiency
- accelerating modernization of legacy systems
- facilitating cross-platform development and code refactoring
As businesses strive to stay competitive, adopting Generative AI for code translation becomes increasingly important. It enables them to harness the full potential of modern technologies while minimizing risks associated with manual rewrites.
Legacy systems, often built on outdated technologies, pose significant challenges in terms of maintenance and scalability. Modernizing legacy applications with Generative AI provides a viable solution for rewriting these systems into modern programming languages, thereby extending their lifespan and improving their integration with contemporary software ecosystems.
This automated approach not only preserves core functionality but also enhances performance and security, making it easier for organizations to adapt to changing technological landscapes without the need for extensive manual intervention.
Why Generative AI?
Generative AI offers a powerful solution for rewriting applications, providing several key benefits that streamline the modernization process.
Modernizing legacy applications with Generative AI proves especially beneficial in this context for the following reasons:
- Identifying relationships and business rules: Generative AI can analyze legacy code to uncover complex dependencies and embedded business rules, ensuring critical functionalities are preserved and enhanced in the new system.
- Enhanced accuracy: Automating tasks like code analysis and documentation, Generative AI reduces human errors and ensures precise translation of legacy functionalities, resulting in a more reliable application.
- Reduced development time and cost: Automation significantly cuts down the time and resources needed for rewriting systems. Faster development cycles and fewer human hours required for coding and testing lower the overall project cost.
- Improved security: Generative AI aids in implementing advanced security measures in the new system, reducing the risk of threats and identifying vulnerabilities, which is crucial for modern applications.
- Performance optimization: Generative AI enables the creation of optimized code from the start, integrating advanced algorithms that improve efficiency and adaptability, often missing in older systems.
By leveraging Generative AI, organizations can achieve a smooth transition to modern system architectures, ensuring substantial returns in performance, scalability, and maintenance costs.
In this article, we will explore:
- the use of Generative AI for rewriting a simple CRUD application
- the use of Generative AI for rewriting a microservice-based application
- the challenges associated with using Generative AI
For these case studies, we used OpenAI's ChatGPT-4 with a context of 32k tokens to automate the rewriting process, demonstrating its advanced capabilities in understanding and generating code across different application architectures.
We'll also present the benefits of using a data analytics platform designed by Grape Up's experts. The platform utilizes Generative AI and neural graphs to enhance its data analysis capabilities, particularly in data integration, analytics, visualization, and insights automation.
Project 1: Simple CRUD application
The source CRUD project was used as an example of a simple CRUD application - one written utilizing .Net Core as a framework, Entity Framework Core for the ORM, and SQL Server for a relational database. The target project containes a backend application created using Java 17 and Spring Boot 3.
Steps taken to conclude the project
Rewriting a simple CRUD application using Generative AI involves a series of methodical steps to ensure a smooth transition from the old codebase to the new one. Below are the key actions undertaken during this process:
- initial architecture and data flow investigation - conducting a thorough analysis of the existing application's architecture and data flow.
- generating target application skeleton - creating the initial skeleton of the new application in the target language and framework.
- converting components - translating individual components from the original codebase to the new environment, ensuring that all CRUD operations were accurately replicated.
- generating tests - creating automated tests for the backend to ensure functionality and reliability.
Throughout each step, some manual intervention by developers was required to address code errors, compilation issues, and other problems encountered after using OpenAI's tools.
Initial architecture and data flows’ investigation
The first stage in rewriting a simple CRUD application using Generative AI is to conduct a thorough investigation of the existing architecture and data flow. This foundational step is crucial for understanding the current system's structure, dependencies, and business logic.
This involved:
- codebase analysis
- data flow mapping – from user inputs to database operations and back
- dependency identification
- business logic extraction – documenting the core business logic embedded within the application
While OpenAI's ChatGPT-4 is powerful, it has some limitations when dealing with large inputs or generating comprehensive explanations of entire projects. For example:
- OpenAI couldn’t read files directly from the file system
- Inputting several project files at once often resulted in unclear or overly general outputs
However, OpenAI excels at explaining large pieces of code or individual components. This capability aids in understanding the responsibilities of different components and their data flows. Despite this, developers had to conduct detailed investigations and analyses manually to ensure a complete and accurate understanding of the existing system.
This is the point at which we used our data analytics platform. In comparison to OpenAI, it focuses on data analysis. It's especially useful for analyzing data flows and project architecture, particularly thanks to its ability to process and visualize complex datasets. While it does not directly analyze source code, it can provide valuable insights into how data moves through a system and how different components interact.
Moreover, the platform excels at visualizing and analyzing data flows within your application. This can help identify inefficiencies, bottlenecks, and opportunities for optimization in the architecture.
Generating target application skeleton
As with OpenAI's inability to analyze the entire project, the attempt to generate the skeleton of the target application was also unsuccessful, so the developer had to manually create it. To facilitate this, Spring Initializr was used with the following configuration:
- Java: 17
- Spring Boot: 3.2.2
- Gradle: 8.5
Attempts to query OpenAI for the necessary Spring dependencies faced challenges due to significant differences between dependencies for C# and Java projects. Consequently, all required dependencies were added manually.
Additionally, the project included a database setup. While OpenAI provided a series of steps for adding database configuration to a Spring Boot application, these steps needed to be verified and implemented manually.
Converting components
After setting up the backend, the next step involved converting all project files - Controllers, Services, and Data Access layers - from C# to Java Spring Boot using OpenAI.
The AI proved effective in converting endpoints and data access layers, producing accurate translations with only minor errors, such as misspelled function names or calls to non-existent functions.
In cases where non-existent functions were generated, OpenAI was able to create the function bodies based on prompts describing their intended functionality. Additionally, OpenAI efficiently generated documentation for classes and functions.
However, it faced challenges when converting components with extensive framework-specific code. Due to differences between frameworks in various languages, the AI sometimes lost context and produced unusable code.
Overall, OpenAI excelled at:
- converting data access components
- generating REST APIs
However, it struggled with:
- service-layer components
- framework-specific code where direct mapping between programming languages was not possible
Despite these limitations, OpenAI significantly accelerated the conversion process, although manual intervention was required to address specific issues and ensure high-quality code.
Generating tests
Generating tests for the new code is a crucial step in ensuring the reliability and correctness of the rewritten application. This involves creating both unit tests and integration tests to validate individual components and their interactions within the system.
To create a new test, the entire component code was passed to OpenAI with the query: "Write Spring Boot test class for selected code."
OpenAI performed well at generating both integration tests and unit tests; however, there were some distinctions:
- For unit tests , OpenAI generated a new test for each if-clause in the method under test by default.
- For integration tests , only happy-path scenarios were generated with the given query.
- Error scenarios could also be generated by OpenAI, but these required more manual fixes due to a higher number of code issues.
If the test name is self-descriptive, OpenAI was able to generate unit tests with a lower number of errors.

Project 2: Microservice-based application
As an example of a microservice-based application, we used the Source microservice project - an application built using .Net Core as the framework, Entity Framework Core for the ORM, and a Command Query Responsibility Segregation (CQRS) approach for managing and querying entities. RabbitMQ was used to implement the CQRS approach and EventStore to store events and entity objects. Each microservice could be built using Docker, with docker-compose managing the dependencies between microservices and running them together.
The target project includes:
- a microservice-based backend application created with Java 17 and Spring Boot 3
- a frontend application using the React framework
- Docker support for each microservice
- docker-compose to run all microservices at once
Project stages
Similarly to the CRUD application rewriting project, converting a microservice-based application using Generative AI requires a series of steps to ensure a seamless transition from the old codebase to the new one. Below are the key steps undertaken during this process:
- initial architecture and data flows’ investigation - conducting a thorough analysis of the existing application's architecture and data flow.
- rewriting backend microservices - selecting an appropriate framework for implementing CQRS in Java, setting up a microservice skeleton, and translating the core business logic from the original language to Java Spring Boot.
- generating a new frontend application - developing a new frontend application using React to communicate with the backend microservices via REST APIs.
- generating tests for the frontend application - creating unit tests and integration tests to validate its functionality and interactions with the backend.
- containerizing new applications - generating Docker files for each microservice and a docker-compose file to manage the deployment and orchestration of the entire application stack.
Throughout each step, developers were required to intervene manually to address code errors, compilation issues, and other problems encountered after using OpenAI's tools. This approach ensured that the new application retains the functionality and reliability of the original system while leveraging modern technologies and best practices.
Initial architecture and data flows’ investigation
The first step in converting a microservice-based application using Generative AI is to conduct a thorough investigation of the existing architecture and data flows. This foundational step is crucial for understanding:
- the system’s structure
- its dependencies
- interactions between microservices
Challenges with OpenAI
Similar to the process for a simple CRUD application, at the time, OpenAI struggled with larger inputs and failed to generate a comprehensive explanation of the entire project. Attempts to describe the project or its data flows were unsuccessful because inputting several project files at once often resulted in unclear and overly general outputs.
OpenAI’s strengths
Despite these limitations, OpenAI proved effective in explaining large pieces of code or individual components. This capability helped in understanding:
- the responsibilities of different components
- their respective data flows
Developers can create a comprehensive blueprint for the new application by thoroughly investigating the initial architecture and data flows. This step ensures that all critical aspects of the existing system are understood and accounted for, paving the way for a successful transition to a modern microservice-based architecture using Generative AI.
Again, our data analytics platform was used in project architecture analysis. By identifying integration points between different application components, the platform helps ensure that the new application maintains necessary connections and data exchanges.
It can also provide a comprehensive view of your current architecture, highlighting interactions between different modules and services. This aids in planning the new architecture for efficiency and scalability. Furthermore, the platform's analytics capabilities support identifying potential risks in the rewriting process.
Rewriting backend microservices
Rewriting the backend of a microservice-based application involves several intricate steps, especially when working with specific architectural patterns like CQRS (Command Query Responsibility Segregation) and event sourcing . The source C# project uses the CQRS approach, implemented with frameworks such as NServiceBus and Aggregates , which facilitate message handling and event sourcing in the .NET ecosystem.
Challenges with OpenAI
Unfortunately, OpenAI struggled with converting framework-specific logic from C# to Java. When asked to convert components using NServiceBus, OpenAI responded:
"The provided C# code is using NServiceBus, a service bus for .NET, to handle messages. In Java Spring Boot, we don't have an exact equivalent of NServiceBus, but here's how you might convert the given C# code to Java Spring Boot..."
However, the generated code did not adequately cover the CQRS approach or event-sourcing mechanisms.
Choosing Axon framework
Due to these limitations, developers needed to investigate suitable Java frameworks. After thorough research, the Axon Framework was selected, as it offers comprehensive support for:
- domain-driven design
- CQRS
- event sourcing
Moreover, Axon provides out-of-the-box solutions for message brokering and event handling and has a Spring Boot integration library , making it a popular choice for building Java microservices based on CQRS.
Converting microservices
Each microservice from the source project could be converted to Java Spring Boot using a systematic approach, similar to converting a simple CRUD application. The process included:
- analyzing the data flow within each microservice to understand interactions and dependencies
- using Spring Initializr to create the initial skeleton for each microservice
- translating the core business logic, API endpoints, and data access layers from C# to Java
- creating unit and integration tests to validate each microservice’s functionality
- setting up the event sourcing mechanism and CQRS using the Axon Framework, including configuring Axon components and repositories for event sourcing
Manual Intervention
Due to the lack of direct mapping between the source project's CQRS framework and the Axon Framework, manual intervention was necessary. Developers had to implement framework-specific logic manually to ensure the new system retained the original's functionality and reliability.
Generating a new frontend application
The source project included a frontend component written using aspnetcore-https and aspnetcore-react libraries, allowing for the development of frontend components in both C# and React.
However, OpenAI struggled to convert this mixed codebase into a React-only application due to the extensive use of C#.
Consequently, it proved faster and more efficient to generate a new frontend application from scratch, leveraging the existing REST endpoints on the backend.
Similar to the process for a simple CRUD application, when prompted with “Generate React application which is calling a given endpoint” , OpenAI provided a series of steps to create a React application from a template and offered sample code for the frontend.
- OpenAI successfully generated React components for each endpoint
- The CSS files from the source project were reusable in the new frontend to maintain the same styling of the web application.
- However, the overall structure and architecture of the frontend application remained the developer's responsibility.
Despite its capabilities, OpenAI-generated components often exhibited issues such as:
- mixing up code from different React versions, leading to code failures.
- infinite rendering loops.
Additionally, there were challenges related to CORS policy and web security:
- OpenAI could not resolve CORS issues autonomously but provided explanations and possible steps for configuring CORS policies on both the backend and frontend
- It was unable to configure web security correctly.
- Moreover, since web security involves configurations on the frontend and multiple backend services, OpenAI could only suggest common patterns and approaches for handling these cases, which ultimately required manual intervention.
Generating tests for the frontend application
Once the frontend components were completed, the next task was to generate tests for these components. OpenAI proved to be quite effective in this area. When provided with the component code, OpenAI could generate simple unit tests using the Jest library.
OpenAI was also capable of generating integration tests for the frontend application, which are crucial for verifying that different components work together as expected and that the application interacts correctly with backend services.
However, some manual intervention was required to fix issues in the generated test code. The common problems encountered included:
- mixing up code from different React versions, leading to code failures.
- dependencies management conflicts, such as mixing up code from different test libraries.
Containerizing new application
The source application contained Dockerfiles that built images for C# applications. OpenAI successfully converted these Dockerfiles to a new approach using Java 17 , Spring Boot , and Gradle build tools by responding to the query:
"Could you convert selected code to run the same application but written in Java 17 Spring Boot with Gradle and Docker?"
Some manual updates, however, were needed to fix the actual jar name and file paths.
Once the React frontend application was implemented, OpenAI was able to generate a Dockerfile by responding to the query:
"How to dockerize a React application?"
Still, manual fixes were required to:
- replace paths to files and folders
- correct mistakes that emerged when generating multi-staged Dockerfiles , requiring further adjustments
While OpenAI was effective in converting individual Dockerfiles, it struggled with writing docker-compose files due to a lack of context regarding all services and their dependencies.
For instance, some microservices depend on database services, and OpenAI could not fully understand these relationships. As a result, the docker-compose file required significant manual intervention.
Conclusion
Modern tools like OpenAI's ChatGPT can significantly enhance software development productivity by automating various aspects of code writing and problem-solving. Leveraging large language models, such as OpenAI over ChatGPT can help generate large pieces of code, solve problems, and streamline certain tasks.
However, for complex projects based on microservices and specialized frameworks, developers still need to do considerable work manually, particularly in areas related to architecture, framework selection, and framework-specific code writing.
What Generative AI is good at:
- converting pieces of code from one language to another - Generative AI excels at translating individual code snippets between different programming languages, making it easier to migrate specific functionalities.
- generating large pieces of new code from scratch - OpenAI can generate substantial portions of new code, providing a solid foundation for further development.
- generating unit and integration tests - OpenAI is proficient in creating unit tests and integration tests, which are essential for validating the application's functionality and reliability.
- describing what code does - Generative AI can effectively explain the purpose and functionality of given code snippets, aiding in understanding and documentation.
- investigating code issues and proposing possible solutions - Generative AI can quickly analyze code issues and suggest potential fixes, speeding up the debugging process.
- containerizing application - OpenAI can create Dockerfiles for containerizing applications, facilitating consistent deployment environments.
At the time of project implementation, Generative AI still had several limitations .
- OpenAI struggled to provide comprehensive descriptions of an application's overall architecture and data flow, which are crucial for understanding complex systems.
- It also had difficulty identifying equivalent frameworks when migrating applications, requiring developers to conduct manual research.
- Setting up the foundational structure for microservices and configuring databases were tasks that still required significant developer intervention.
- Additionally, OpenAI struggled with managing dependencies, configuring web security (including CORS policies), and establishing a proper project structure, often needing manual adjustments to ensure functionality.
Benefits of using the data analytics platform:
- data flow visualization: It provides detailed visualizations of data movement within applications, helping to map out critical pathways and dependencies that need attention during re-writing.
- architectural insights : The platform offers a comprehensive analysis of system architecture, identifying interactions between components to aid in designing an efficient new structure.
- integration mapping: It highlights integration points with other systems or components, ensuring that necessary integrations are maintained in the re-written application.
- risk assessment: The platform's analytics capabilities help identify potential risks in the transition process, allowing for proactive management and mitigation.
By leveraging GenerativeAI’s strengths and addressing its limitations through manual intervention, developers can achieve a more efficient and accurate transition to modern programming languages and technologies. This hybrid approach to modernizing legacy applications with Generative AI currently ensures that the new application retains the functionality and reliability of the original system while benefiting from the advancements in modern software development practices.
It's worth remembering that Generative AI technologies are rapidly advancing, with improvements in processing capabilities. As Generative AI becomes more powerful, it is increasingly able to understand and manage complex project architectures and data flows. This evolution suggests that in the future, it will play a pivotal role in rewriting projects.
Do you need support in modernizing your legacy systems with expert-driven solutions?
.................
Sources:
- https://www.verifiedmarketresearch.com/product/application-modernization-market/
- https://www2.deloitte.com/content/dam/Deloitte/us/Documents/deloitte-analytics/us-ai-institute-state-of-ai-fifth-edition.pdf