How to run Selenium BDD tests in parallel with AWS Lambda

Have you ever felt annoyed because of the long waiting time for receiving test results? Maybe after a few hours, you’ve figured out that there had been a network connection issue in the middle of testing, and half of the results can go to the trash? That may happen when your tests are dependent on each other or when you have plenty of them and execution lasts forever. It's quite a common issue. But there’s actually a solution that can not only save your time but also your money - parallelization in the Cloud.
How it started
Developing UI tests for a few months, starting from scratch, and maintaining existing tests, I found out that it has become something huge that will be difficult to take care of very soon. An increasing number of test scenarios made every day led to bottlenecks. One day when I got to the office, it turned out that the nightly tests were not over yet. Since then, I have tried to find a way to avoid such situations.
A breakthrough was the presentation of Tomasz Konieczny during the Testwarez conference in 2019. He proved that it’s possible to run Selenium tests in parallel using AWS Lambda. There’s actually one blog that helped me with basic Selenium and Headless Chrome configuration on AWS. The Headless Chrome is a light-weighted browser that has no user interface. I went a step forward and created a solution that allows designing tests in the Behavior-Driven Development process and using the Page Object Model pattern approach, run them in parallel, and finally - build a summary report.
Setting up the project
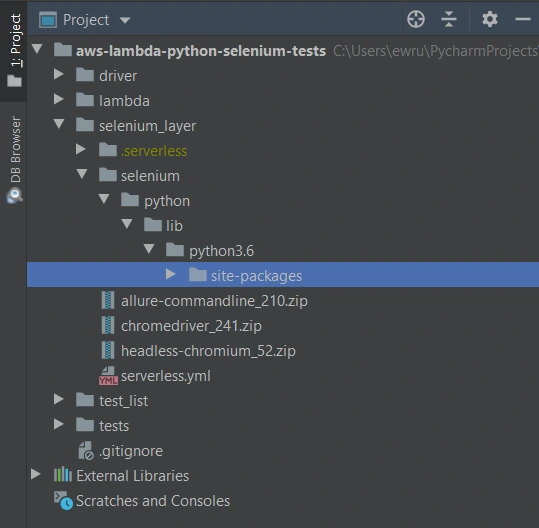
The first thing we need to do is signing up for Amazon Web Services. Once we have an account and set proper values in credentials and config files (.aws directory), we can create a new project in PyCharm, Visual Studio Code, or in any other IDE supporting Python. We’ll need at least four directories here. We called them ‘lambda’, ‘selenium_layer’, ‘test_list’, ‘tests’ and there’s also one additional - ‘driver’, where we keep a chromedriver file, which is used when running tests locally in a sequential way.
In the beginning, we’re going to install the required libraries. Those versions work fine on AWS, but you can check newer if you want.
requirements.txt
allure_behave==2.8.6
behave==1.2.6
boto3==1.10.23
botocore==1.13.23
selenium==2.37.0
What’s important, we should install them in the proper directory - ‘site-packages’.
We’ll need also some additional packages:
Allure Commandline ( download )
Chromedriver ( download )
Headless Chromium ( download )
All those things will be deployed to AWS using Serverless Framework, which you need to install following the docs . The Serverless Framework was designed to provision the AWS Lambda Functions, Events, and infrastructure Resources safely and quickly. It translates all syntax in serverless.yml to a single AWS CloudFormation template which is used for deployments.
Architecture - Lambda Layers
Now we can create a serverless.yml file in the ‘selenium-layer’ directory and define Lambda Layers we want to create. Make sure that your .zip files have the same names as in this file. Here we can also set the AWS region in which we want to create our Lambda functions and layers.
serverless.yml
service: lambda-selenium-layer
provider:
name: aws
runtime: python3.6
region: eu-central-1
timeout: 30
layers:
selenium:
path: selenium
CompatibleRuntimes: [
"python3.6"
]
chromedriver:
package:
artifact: chromedriver_241.zip
chrome:
package:
artifact: headless-chromium_52.zip
allure:
package:
artifact: allure-commandline_210.zip
resources:
Outputs:
SeleniumLayerExport:
Value:
Ref: SeleniumLambdaLayer
Export:
Name: SeleniumLambdaLayer
ChromedriverLayerExport:
Value:
Ref: ChromedriverLambdaLayer
Export:
Name: ChromedriverLambdaLayer
ChromeLayerExport:
Value:
Ref: ChromeLambdaLayer
Export:
Name: ChromeLambdaLayer
AllureLayerExport:
Value:
Ref: AllureLambdaLayer
Export:
Name: AllureLambdaLayer
Within this file, we’re going to deploy a service consisting of four layers. Each of them plays an important role in the whole testing process.
Creating test set
What would the tests be without the scenarios? Our main assumption is to create test files running independently. This means we can run any test without others and it works. If you're following clean code, you'll probably like using the Gherkin syntax and the POM approach. Behave Framework supports both.
What gives us Gherkin? For sure, better readability and understanding. Even if you haven't had the opportunity to write tests before, you will understand the purpose of this scenario.
01.OpenLoginPage.feature
@smoke
@login
Feature: Login to service
Scenario: Login
Given Home page is opened
And User opens Login page
When User enters credentials
And User clicks Login button
Then User account page is opened
Scenario: Logout
When User clicks Logout button
Then Home page is opened
And User is not authenticated
In the beginning, we have two tags. We add them in order to run only chosen tests in different situations. For example, you can name a tag @smoke and run it as a smoke test, so that you can test very fundamental app functions. You may want to test only a part of the system like end-to-end order placing in the online store - just add the same tag for several tests.
Then we have the feature name and two scenarios. Those are quite obvious, but sometimes it’s good to name them with more details. Following steps starting with Given, When, Then and And can be reused many times. That’s the Behavior-Driven Development in practice. We’ll come back to this topic later.
Meantime, let’s check the proper configuration of the Behave project.

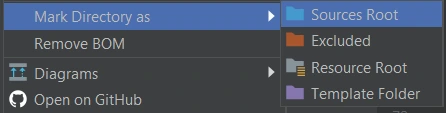
We definitely need a ‘feature’ directory with ‘pages’ and ‘steps’. Make the ‘feature’ folder as Sources Root. Just right-click on it and select the proper option. This is the place for our test scenario files with .feature extension.
It’s good to have some constant values in a separate file so that it will change only here when needed. Let’s call it config.json and put the URL of the tested web application.
config.json
{
"url": "http://drabinajakuba.atthost24.pl/"
}
One more thing we need is a file where we set webdriver options.
Those are required imports and some global values like, e.g. a name of AWS S3 bucket in which we want to have screenshots or local directory to store them in. As far as we know, bucket names should be unique in whole AWS S3, so you should probably change them but keep the meaning.
environment.py
import os
import platform
from datetime import date, datetime
import json
import boto3
from selenium import webdriver
from selenium.webdriver.chrome.options import Options
REPORTS_BUCKET = 'aws-selenium-test-reports'
SCREENSHOTS_FOLDER = 'failed_scenarios_screenshots/'
CURRENT_DATE = str(date.today())
DATETIME_FORMAT = '%H_%M_%S'
Then we have a function for getting given value from our config.json file. The path of this file depends on the system platform - Windows or Darwin (Mac) would be local, Linux in this case is in AWS. If you need to run these tests locally on Linux, you should probably add some environment variables and check them here.
def get_from_config(what):
if 'Linux' in platform.system():
with open('/opt/config.json') as json_file:
data = json.load(json_file)
return data[what]
elif 'Darwin' in platform.system():
with open(os.getcwd() + '/features/config.json') as json_file:
data = json.load(json_file)
return data[what]
else:
with open(os.getcwd() + '\\features\\config.json') as json_file:
data = json.load(json_file)
return data[what]
Now we can finally specify paths to chromedriver and set browser options which also depend on the system platform. There’re a few more options required on AWS.
def set_linux_driver(context):
"""
Run on AWS
"""
print("Running on AWS (Linux)")
options = Options()
options.binary_location = '/opt/headless-chromium'
options.add_argument('--allow-running-insecure-content')
options.add_argument('--ignore-certificate-errors')
options.add_argument('--disable-gpu')
options.add_argument('--headless')
options.add_argument('--window-size=1280,1000')
options.add_argument('--single-process')
options.add_argument('--no-sandbox')
options.add_argument('--disable-dev-shm-usage')
capabilities = webdriver.DesiredCapabilities().CHROME
capabilities['acceptSslCerts'] = True
capabilities['acceptInsecureCerts'] = True
context.browser = webdriver.Chrome(
'/opt/chromedriver', chrome_options=options, desired_capabilities=capabilities
)
def set_windows_driver(context):
"""
Run locally on Windows
"""
print('Running on Windows')
options = Options()
options.add_argument('--no-sandbox')
options.add_argument('--window-size=1280,1000')
options.add_argument('--headless')
context.browser = webdriver.Chrome(
os.path.dirname(os.getcwd()) + '\\driver\\chromedriver.exe', chrome_options=options
)
def set_mac_driver(context):
"""
Run locally on Mac
"""
print("Running on Mac")
options = Options()
options.add_argument('--no-sandbox')
options.add_argument('--window-size=1280,1000')
options.add_argument('--headless')
context.browser = webdriver.Chrome(
os.path.dirname(os.getcwd()) + '/driver/chromedriver', chrome_options=options
)
def set_driver(context):
if 'Linux' in platform.system():
set_linux_driver(context)
elif 'Darwin' in platform.system():
set_mac_driver(context)
else:
set_windows_driver(context)
Webdriver needs to be set before all tests, and in the end, our browser should be closed.
def before_all(context):
set_driver(context)
def after_all(context):
context.browser.quit()
Last but not least, taking screenshots of test failure. Local storage differs from the AWS bucket, so this needs to be set correctly.
def after_scenario(context, scenario):
if scenario.status == 'failed':
print('Scenario failed!')
current_time = datetime.now().strftime(DATETIME_FORMAT)
file_name = f'{scenario.name.replace(" ", "_")}-{current_time}.png'
if 'Linux' in platform.system():
context.browser.save_screenshot(f'/tmp/{file_name}')
boto3.resource('s3').Bucket(REPORTS_BUCKET).upload_file(
f'/tmp/{file_name}', f'{SCREENSHOTS_FOLDER}{CURRENT_DATE}/{file_name}'
)
else:
if not os.path.exists(SCREENSHOTS_FOLDER):
os.makedirs(SCREENSHOTS_FOLDER)
context.browser.save_screenshot(f'{SCREENSHOTS_FOLDER}/{file_name}')
Once we have almost everything set, let’s dive into single test creation. Page Object Model pattern is about what exactly hides behind Gherkin’s steps. In this approach, we treat each application view as a separate page and define its elements we want to test. First, we need a base page implementation. Those methods will be inherited by all specific pages. You should put this file in the ‘pages’ directory.
base_page_object.py
from selenium.webdriver.common.action_chains import ActionChains
from selenium.webdriver.support.ui import WebDriverWait
from selenium.webdriver.support import expected_conditions as EC
from selenium.common.exceptions import *
import traceback
import time
from environment import get_from_config
class BasePage(object):
def __init__(self, browser, base_url=get_from_config('url')):
self.base_url = base_url
self.browser = browser
self.timeout = 10
def find_element(self, *loc):
try:
WebDriverWait(self.browser, self.timeout).until(EC.presence_of_element_located(loc))
except Exception as e:
print("Element not found", e)
return self.browser.find_element(*loc)
def find_elements(self, *loc):
try:
WebDriverWait(self.browser, self.timeout).until(EC.presence_of_element_located(loc))
except Exception as e:
print("Element not found", e)
return self.browser.find_elements(*loc)
def visit(self, url):
self.browser.get(url)
def hover(self, element):
ActionChains(self.browser).move_to_element(element).perform()
time.sleep(5)
def __getattr__(self, what):
try:
if what in self.locator_dictionary.keys():
try:
WebDriverWait(self.browser, self.timeout).until(
EC.presence_of_element_located(self.locator_dictionary[what])
)
except(TimeoutException, StaleElementReferenceException):
traceback.print_exc()
return self.find_element(*self.locator_dictionary[what])
except AttributeError:
super(BasePage, self).__getattribute__("method_missing")(what)
def method_missing(self, what):
print("No %s here!", what)
That’s a simple login page class. There’re some web elements defined in locator_dictionary and methods using those elements to e.g., enter text in the input, click a button, or read current values. Put this file in the ‘pages’ directory.
login.py
from selenium.webdriver.common.by import By
from .base_page_object import *
class LoginPage(BasePage):
def __init__(self, context):
BasePage.__init__(
self,
context.browser,
base_url=get_from_config('url'))
locator_dictionary = {
'username_input': (By.XPATH, '//input[@name="username"]'),
'password_input': (By.XPATH, '//input[@name="password"]'),
'login_button': (By.ID, 'login_btn'),
}
def enter_username(self, username):
self.username_input.send_keys(username)
def enter_password(self, password):
self.password_input.send_keys(password)
def click_login_button(self):
self.login_button.click()
What we need now is a glue that will connect page methods with Gherkin steps. In each step, we use a particular page that handles the functionality we want to simulate. Put this file in the ‘steps’ directory.
login.py
from behave import step
from environment import get_from_config
from pages import LoginPage, HomePage, NavigationPage
@step('User enters credentials')
def step_impl(context):
page = LoginPage(context)
page.enter_username('test_user')
page.enter_password('test_password')
@step('User clicks Login button')
def step_impl(context):
page = LoginPage(context)
page.click_login_button()
It seems that we have all we need to run tests locally. Of course, not every step implementation was shown above, but it should be easy to add missing ones.
If you want to read more about BDD and POM, take a look at Adrian’s article
All files in the ‘features’ directory will also be on a separate Lambda Layer. You can create a serverless.yml file with the content presented below.
serverless.yml
service: lambda-tests-layer
provider:
name: aws
runtime: python3.6
region: eu-central-1
timeout: 30
layers:
features:
path: features
CompatibleRuntimes: [
"python3.6"
]
resources:
Outputs:
FeaturesLayerExport:
Value:
Ref: FeaturesLambdaLayer
Export:
Name: FeaturesLambdaLayer
This is the first part of the series covering running Parallel Selenium tests on AWS Lambda. More here !

Grape Up guides enterprises on their data-driven transformation journey
Ready to ship? Let's talk.
Check related articles
Read our blog and stay informed about the industry's latest trends and solutions.
Testing iOS applications using Appium, Cucumber, and Serenity - a recipe for quality
iOS devices still claim a significant part of the mobile market, taking up to 22 percent of the sales globally. As many devoted clients come back for new Apple products, there is also a great demand for iOS applications. In this article, we are going to look at ensuring the quality of iOS apps striving for the usage of best practices using Appium, Cucumber and Serenity tools.
Structure
The Page Object Model is one of the best approaches to testing that QA engineers can apply to a test automation project. It is such a way of structuring the code in an automation project that improves code quality and readability, test maintenance and on top of that, it is a great way of avoiding chaos. The basic idea behind it comes to keeping all references to mobile elements and methods performing operations on them in one class file for each page or screen of the app (or web page for non-native web applications).
What are the benefits of this approach, you may ask? Firstly, it makes automation really straightforward. Basically, it means finding elements in our iOS app via inspector and then performing operations on them. Another main advantage is the coherent structure of the project that allows anyone to navigate through it quickly.
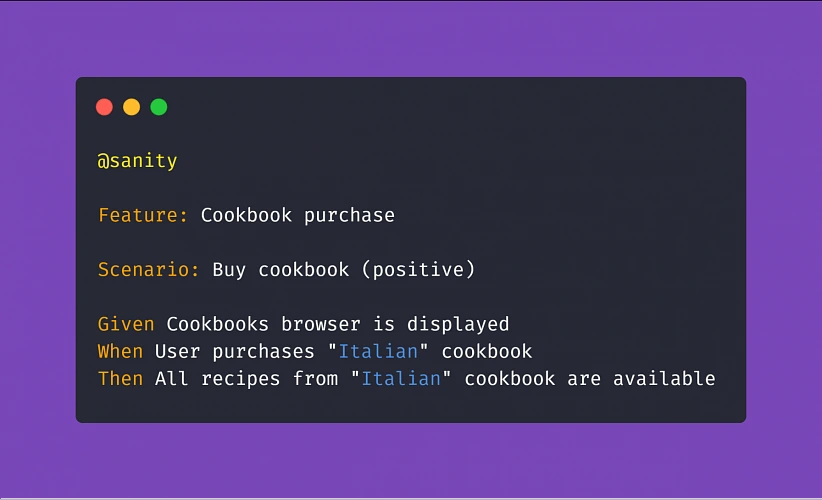
Let's take an example of an app that contains recipes. It shows the default cookbook with basic recipes on startup, which will be our first page. From there, a user can navigate to any available recipe, thus marking a second page. On top of that, the app also allows to browse other cookbooks or purchase premium ones, making it the third page and consequently - a page object file.
Similarly, we should create corresponding step definition files. This is not an obligatory practice, but keeping all step definitions in one place causes unnecessary chaos.
While creating your pages and step definition class files it is advised to choose names that are related to the page (app screen) which contents you are going to work on. Naming these files after a feature or scenario can seem right at first glance, but as the project expands, you will notice more and more clutter in its structure. Adopting the page naming convention ensures that anyone involved in the project can get familiar with it straight away and start collaboration on it in no time. Such practice also contributes to reusability of code - either step definitions or methods/functions.
Contrary to the mentioned step and step definition files, the Cucumber feature files should be named after a feature they verify. Clever, isn’t it? And again, structuring them into directories named in relation to a particular field of the application under test will make the structure more meaningful.
Serenity’s basic concept is to be a 'living documentation'. Therefore, giving test scenarios and feature files appropriate names helps the team and stakeholders understand reports and the entire project better.
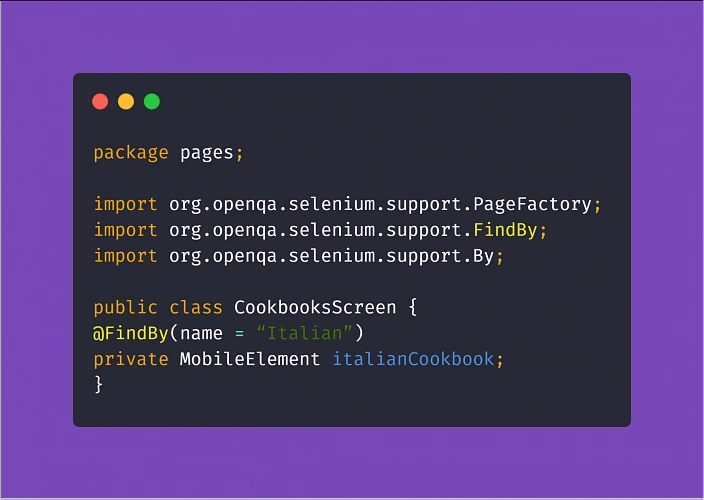
Another ingredient expanding the benefits of the Page Object Model in the test automation project is PageFactory. It is a tool that helps you reduce the coding work and easily put MobileElements locators in code, using @FindBy notation. From there, finding elements for Appium to interact with them in tests is much simpler.
Assertion
Running tests via Appium can be very resource-consuming. To make things easier for your MacOS machine running tests on your iOS device, make sure you are not constantly asserting the visibility of all objects on a page. This practice significantly increases the test execution time, which usually is not the most desirable thing.
What is more, when you do have to check if an element is visible, enabled, clickable, or anything in between - try to avoid locating mobile elements using Xpath. The Appium inspector tip has a valid point! You should do what you can to convince the development team to make an extra effort and assign unique IDs and names to the elements in the app. This will not only make automation testing easier and quicker, consequently making your work as a tester more effective, ultimately resulting in increasing the overall quality of the product. And that is why we are here. Not to mention that the maintenance of the tests (e.g. switching to different locators when necessary) will become much more enjoyable.
Understanding the steps
Another aspect of setting up this kind of project comes down to taking advantage of Cucumber and using Gherkin language.
Gherkin implements a straightforward approach with Given, When, Then notation with the help of the additional And and But which seems fairly easy to use. You could write pretty much anything you want in the test steps of your feature files. Ultimately, the called methods are going to perform actions.
But the reason for using the Behavior Driven Development approach and Cucumber itself is enabling the non-tech people involved in the project to understand what is going on in the tests field. Not only that, writing test scenarios in Given/When/Then manner can also act in your advantage. Such high-level test descriptions delivered by the client or business analyst will get you coding in no time, provided that they are written properly. Here are some helpful tips:
Test scenarios written in Gherkin should focus on the behavior of the app (hence Behavior Driven Development).
Here's an example of how NOT to write test scenarios in Gherkin, further exploring the theme of cookbook application:
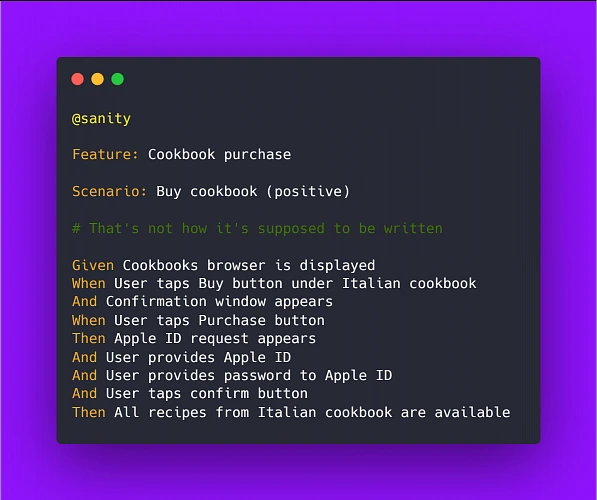
Above example illustrates two bad practices we should avoid: It focuses on the implementation instead of behavior and it uses hard-coded values rather than writing test steps in such a way to enable reusability by changing values within a step.
Therefore, a proper scenario concerning purchasing a cookbook in our example app should look like:
Another example:

Adopting this approach means less work creating and coding the test steps whenever the implementation of a particular feature changes.
Apart from the main notation of Given/When/Then , Cucumber supports usage of conjunction steps. Using And and But step notations will make the test steps more general and reusable, which results in writing less code and maintaining order within the project. Here is a basic example:
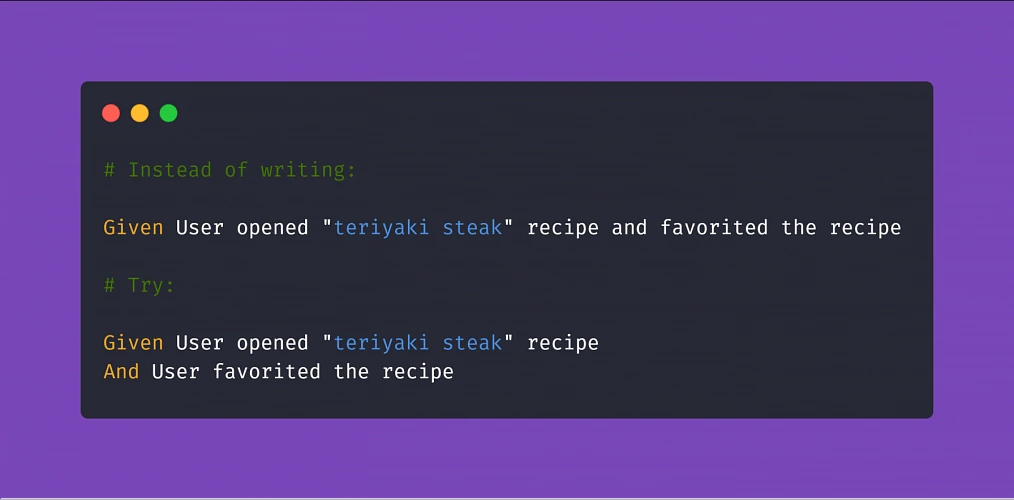
Doing so, if you code the above 'Given' step to locate our recipe element by searching its name, you can reuse it many times just changing the string value in the step (provided that you code the step definition properly later on). On top of that, The 'And' step can be a part of any test scenario that involves such action.
Putting it all together
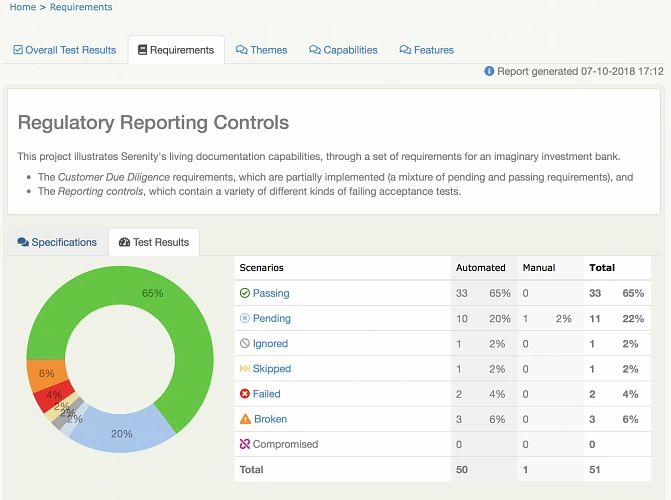
After setting up a project utilizing the practices described above, the most visible parts of using Serenity are the generated test reports. After adopting the @RunWith(CucumberWithSerenity.class) tag in your TestRunner class file, running the test suite will result in Serenity generating an aggregated test results report, which can be useful in evaluating the quality of the app under test and presenting the status of the product to the stakeholders or the development team.
Appium, Cucumber, Serenity - summary
As you can see, the concept of best practices in automation testing can be summarized in three words: reusability, readability, and performance. Reusability means fewer coding, consequently diminishing the time needed to finish the job. Readability improves understanding, which is crucial to ensure that the product does what it needs to do. Finally, performance saves execution time and improves stability. All three contributing not only to the quality of the test automation project but have a significant role in enhancing the overall quality of the delivered app.
Sources:
Serverless - why, when and how?
This is the first article of the mini-series that will get you started with a Serverless architecture and the Function-as-a-Service execution model - whose popularity is constantly growing. In this part, you will get answers to some of the most popular questions regarding Serverless, including: what is it, why it’s worth your attention, how does it work under the hood and which cloud provider meets your needs.
No servers at all?
Not really, your code has to be executed somewhere. Okay, so what is it all about then?
Serverless is a cloud computing execution model in which computer resources are dynamically allocated and managed by a cloud provider of your choice. Among serverless databases, storages, analytic tools, and many others, there is also Function-as-a-Service that we will focus on in this article.
FaaS is a serverless backend service that lets you execute and manage your code without bothering about the infrastructure that used to run your apps on it. In simple terms, you can order a function call without caring about how and where it is performed.
Why?
For money, as Serverless is extremely cost-effective in cases described in the next paragraph. In the serverless cloud execution model, you pay only for used resources, you don’t pay a penny when your code is not being executed!
Moreover, neither actual hardware nor public cloud infrastructure costs a company as much as software engineers’ time. Employees are the most cost-consuming resources. Serverless lets developers focus on functionalities instead of server provisioning, hardening and maintaining infrastructure.
Serverless services scale automatically when needed. You can control their performance by toggling memory and throughput. Furthermore, you don’t have to worry about thunderstorms or any other issues! Serverless services come with built-in high availability and fault tolerance features, meaning your function will be executed even if the primary server has blown up.
When to consider serverless?
Whenever you are preparing a proof of concept or prototyping application… Serverless functions do not generate costs at low workloads and are always ready to deal with the situations they increase. Combining this feature with no server management, it significantly accelerates the delivery of MVP.
When it comes to production, a Serverless architecture fits stateless applications like REST / GraphQL APIs very well. It is much easier, faster and cheaper to get such applications up and running. Services with unpredictable load pikes and inactivity periods, as well as cron jobs (running periodically) are also a great use case examples of FaaS.
Imagine the management of an application for ordering lunch. It has very high load peaks around noon, and it is unused for the rest of the day. Why pay for servers hosting such an application 24 hours a day, instead of paying just for the time when it is really used?
A Serverless architecture is often used for data processing, video streaming and handling IoT events. It is also very handy when it comes to integrating multiple SaaS services. Implementing a facade on top of a running application, for the purpose of migrating it or optimization can also be done much easier using this approach. FaaS is like cable ties and insulating tape in a DIY toolbox.
Where’s the catch?
It would be too good if there weren’t any catches. Technically, you could get a facebook-like application up and running using Serverless services, but it would cost a fortune! It turns out that such a solution would cost thousands of times more than hosting it on regular virtual machines or your own infrastructure. Serverless is also a bad choice for applications using sockets to establish a persistent connection with a server described in Rafal’s article about RSocket . Such a connection would need to be reestablished periodically as Lambda stays warmed-up for about 10 minutes after the last call. In this approach, you would be billed for the time of established connection.
Moreover, your whole solution becomes vendor bound. There are situations when a vendor raises prices, or another cloud provider offers new cool features. It is harder to switch between them, once you have your application up and running. The process takes time, money and the other vendor may not offer all the services that you need.
Furthermore, It is harder to troubleshoot your function, and almost every vendor enforces you to use some additional services to monitor logs from the execution - that generate extra costs. There is also a bit less comfortable FaaS feature that we have to take into account - “Cold start”. From time to time, it makes your function work much longer than usual. Depending on the vendor, there are different constraints on function execution time, which might be exceeded because of it. The following paragraph will explain this FaaS behavior in detail.
How does it work?
It is a kind of a mystery what can we find under the hood of FaaS. There are many services and workers that are responsible for orchestrating function invocations, concurrency management, tracking containers busy and idle states, scheduling incoming invocations appropriately, etc. The technology stack differs between vendors, but the general scheme is the same and you can find it below.
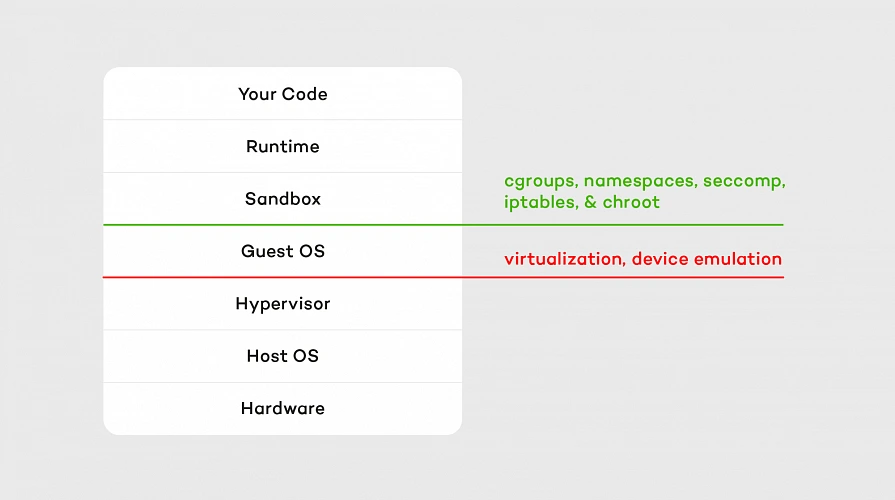
Hypervisor which emulates real devices is the first layer of isolation. The second one consists of containers and OS separation that comes with it. Our code is executed on a sandbox container with an appropriate runtime installed on it. A sandbox is being set up (so-called “Cold start” mentioned above) whenever a function is called for the first time after making changes or hasn’t been invoked for 5 - 15 minutes (depending on the vendor). It means that containers persist between calls, which accelerates execution but is also a bit tricky sometimes. For example, if we choose one of the interpreted languages as a runtime, all invocations are being performed on the same interpreter instance as long as the container lives. That means global variables and context are cached in memory between function executions, so keeping there sensitive data like tokens or passwords is a bad idea.
Containers’ load is balanced similarly to CPU resource allocation, which means they are not loaded equally. The workload is concentrated as much as possible, so runtime consumes the maximum capacity of a container. Thanks to that, other containers in the pool are unused and ready to run another function in the meantime.
Which vendor to pick?
Serverless services are offered by many cloud providers like AWS, GCP, Microsoft Azure, and IBM among others. It’s hard to say which one to choose, as it depends on your needs. The main differences between them are: pricing, maximum execution time, supported runtimes and concurrency. Let’s take a brief look at the comparison below.
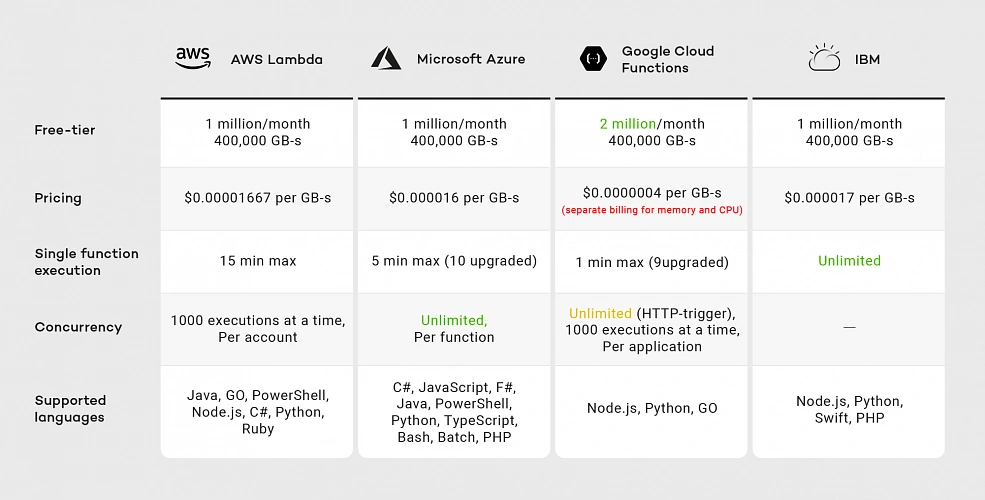
As of the second half of 2019, you can see that all vendors provide similar pricing except Google. Although Google’s free-tier offer seems promising because of the doubled number of free requests, when we exceed this limit, we have two separate billings for memory and CPU, meaning Google’s pricing model is the most expensive.
Considering execution time IBM and AWS Lambda are the best choices. Although IBM has no time limit for single-function execution, it’s concurrency rate remains unclear. IBM documentation does not guarantee that functions will run concurrently. Google provides 1000 executions at a time per project, while AWS provides the same limit per account. That means you can run multiple Google Cloud Functions with the same concurrency, while on AWS you have to divide this limitation between all your functions.
If you look for a wide variety of supported runtimes, AWS and Azure are the best choices. While AWS supported languages list has not changed much since 2014, Google was providing only JavaScript runtime until June 2019. That means AWS runtimes may be more reliable than Google’s.
In the next article in the series, I will focus on AWS, which has a wide range of services that can be integrated with AWS Lambda for the purpose of building more complete applications. Moreover, AWS has a large community around it, which helps when a problem arises.
Summary
In this article, I tried to address the most common questions regarding Serverless architecture and the Function-as-a-Service execution model. I suggested when to use it, and when not to. We took a brief tour of what lays under the hood of FaaS and compared its vendors.
In the next articles, we will explore AWS. I will guide you through Amazon serverless services and help you create your first serverless application using them.
Interested in our services?
Reach out for tailored solutions and expert guidance.