The path towards enterprise level AWS infrastructure – architecture scaffolding

This article is the first one of the mini-series which will walk you through the process of creating an enterprise-level AWS infrastructure. By the end of this series, we will have created an infrastructure comprising a VPC with four subnets in two different availability zones with a client application, backend server, and a database deployed inside. Our architecture will be able to provide scalability and availability required by modern cloud systems. Along the way, we will explain the basic concepts and components of the Amazon Web Services platform. In this article, we will talk about the scaffolding of our architecture to be specific a Virtual Private Cloud (VPC), Subnets, Elastic IP Addresses, NAT gateways, and route tables. The whole series comprises of:
- Part 1 - Architecture Scaffolding (VPC, Subnets, Elastic IP, NAT)
- Part 2 - The Path Towards Enterprise Level AWS Infrastructure – EC2, AMI, Bastion Host, RDS
- Part 3 - Load Balancing and Application Deployment (Elastic Load Balancer)
The cloud, as once explained in the Silicon Valley tv-series, is “this tiny little area which is becoming super important and in many ways is the future of computing.” This would be accurate, except for the fact that it is not so tiny and the future is now. So let’s delve into the universe of cloud computing and learn how to build highly available, secure and fault-tolerant cloud systems, how to utilize the AWS platform for that, what are its key components and how to deploy your applications on AWS.
Cloud computing
Over the last years, the IT industry underwent a major transformation in which most of the global enterprises moved away from their traditional IT infrastructures towards the cloud. The main reason behind that is the flexibility and scalability which comes with cloud computing, understood as provisioning of computing services such as servers, storage, databases, networking, analytic services, etc. over the Internet ( the cloud ). In this model organizations only pay for the cloud resources they are actually using and do not need to manage the physical infrastructure behind it. There are many cloud platform providers on the market with the major players being Amazon Web Services (AWS), Microsoft Azure and Google Cloud. This article focuses on services available on AWS, but bear in mind that most of the concepts explained here will have their equivalents on the other platforms.
Infrastructure overview
Let’s start with what we will build throughout this series. The goal is to create a real-life, enterprise-level AWS infrastructure that will be able to host a user management system consisting of a React.js web application, Java Spring Boot server and a relational database.
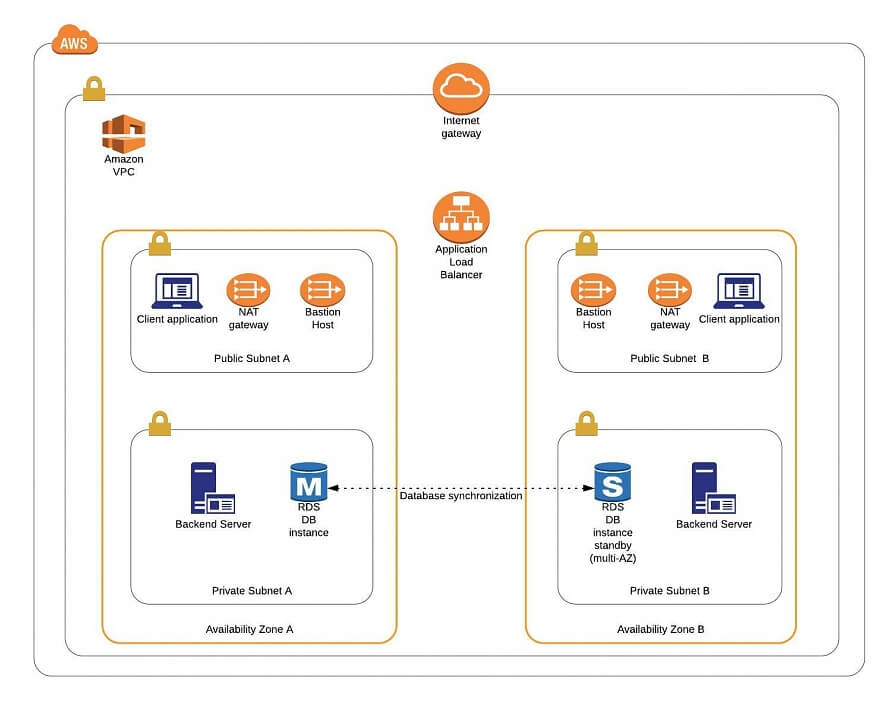
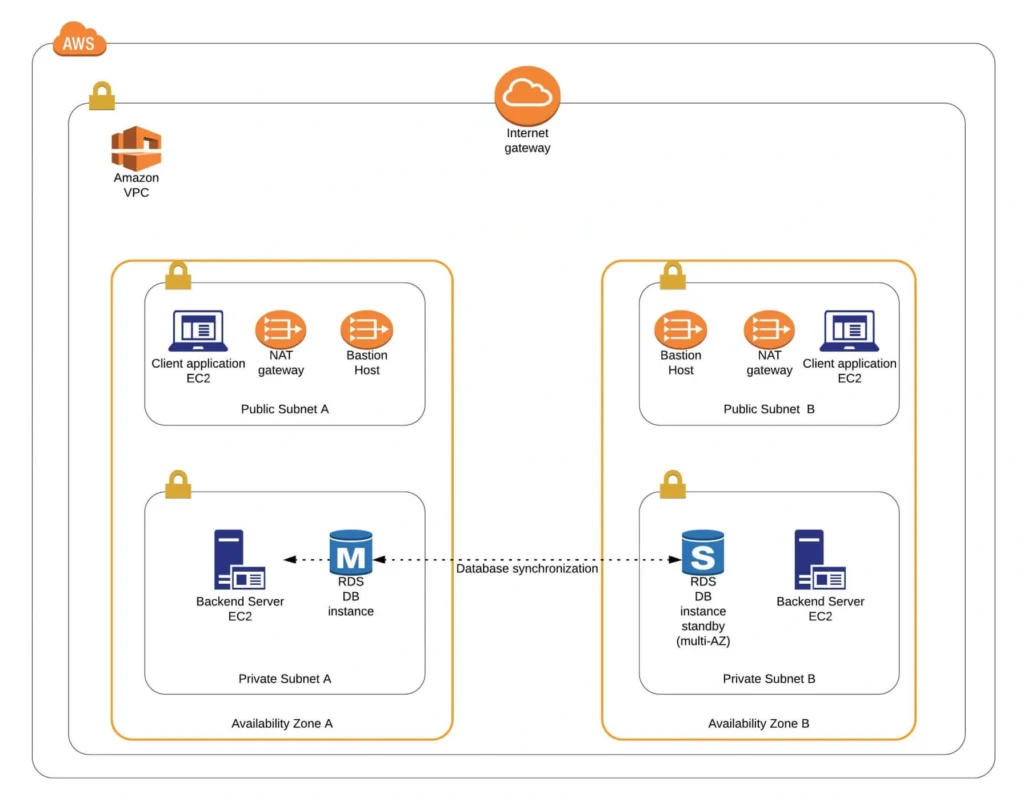
The architecture diagram is shown in figure 1. It comprises a VPC with four subnets (2 public and 2 private) distributed across two different availability zones. In public subnets are hosted a client application, a NAT gateway and a Bastion Host (more on that later), while our private subnets contain backend server and database instances. The infrastructure also includes Internet Gateway to enable access to the Internet from our VPC and a Load Balancer. The reasoning behind placing the backend server and database in private subnets is to protect those instances from being directly exposed to the Internet as they may contain sensitive data. Instead, they will only have private IP addresses and be behind a NAT gateway and a public-facing Elastic Load Balancer. Presented infrastructure provides a high level of scalability and availability through the introduction of redundancy with instances deployed in two different availability zones and the use of auto-scaling groups which provide automatic scaling and health management of the system.
Figure 2 presents the view of the user management web application system we will host on AWS:
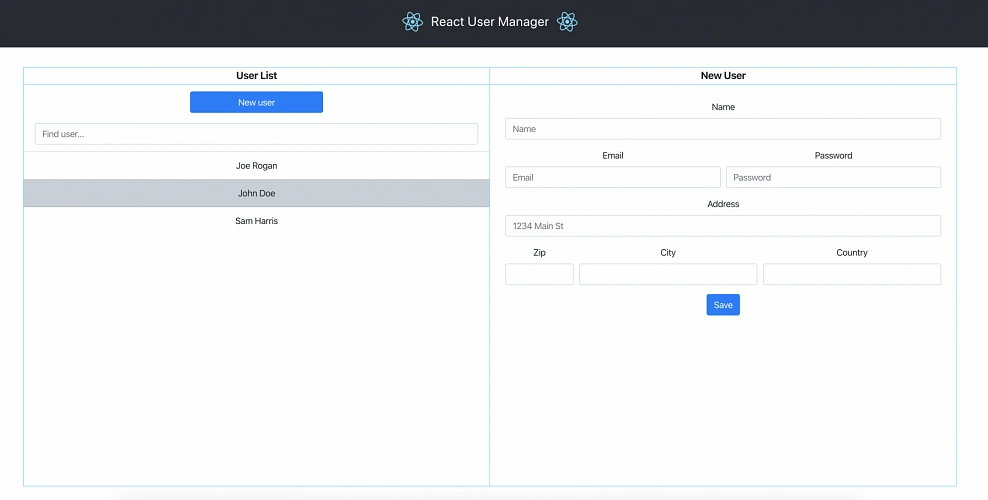
The applications can be found on GitHub.
In this part of the article series, we will focus on the scaffolding of the infrastructure, namely allocating elastic IP addresses, setting up the VPC, creating the subnets, configuring NAT gateways and route tables.
AWS Free Tier Note
AWS provides its new users with a 12-month free tier, which gives customers the ability to use their services up to specified limits free of charge. Those limits include 750 hours per month of t2.micro size EC2 instances, 5GB of Amazon S3 storage, 750 hours of Amazon RDS per month, and much more. In the AWS Management Console, Amazon usually provides indicators in which resource choices are part of the free tier, and throughout this series, we will stick to those. If you want to be sure you will not exceed the free tier limits, remember to stop your EC2 and RDS instances whenever you finish working on AWS. You can also set up a billing alert that will notify you if you exceed the specified limit.
AWS theory
1. VPC
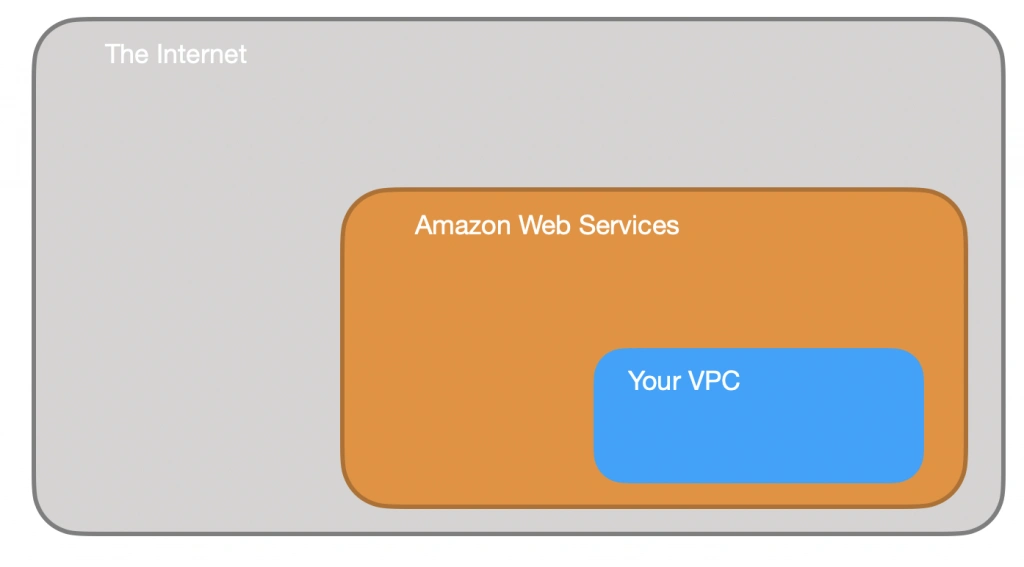
The first step of our journey into the wide world of the AWS infrastructure is getting to know Amazon Virtual Private Cloud (VPC). VPC allows developers to create a virtual network in which they can launch resources and have them logically isolated from other VPCs and the outside world. Within the VPC your resources have private IP addresses with which they can communicate with one another. You can control the access to all those resources inside the VPC and route outgoing traffic as you like.
Access to the VPC is configured with the use of several key structures:
Security groups - They basically work like mini firewalls defining allowed incoming and outgoing IP addresses and ports. They can be attached at the instance level, be shared among many instances and provide the possibility to allow access from other security groups instead of IPs.
Routing tables - Routing tables are responsible for determining where the network traffic from a subnet or gateway should be directed. There is a main route table associated with your VPC, and you can define custom routing tables for your subnets and gateways.
Network Access Control List (Network ACL) - It acts as an IP filtering table for incoming and outgoing traffic and can be used as an additional security layer on top of security groups. Network ACLs act similarly to the security groups, but instead of applying rules on the instance level, they apply them to the entire VPC or subnet.
2. Subnets
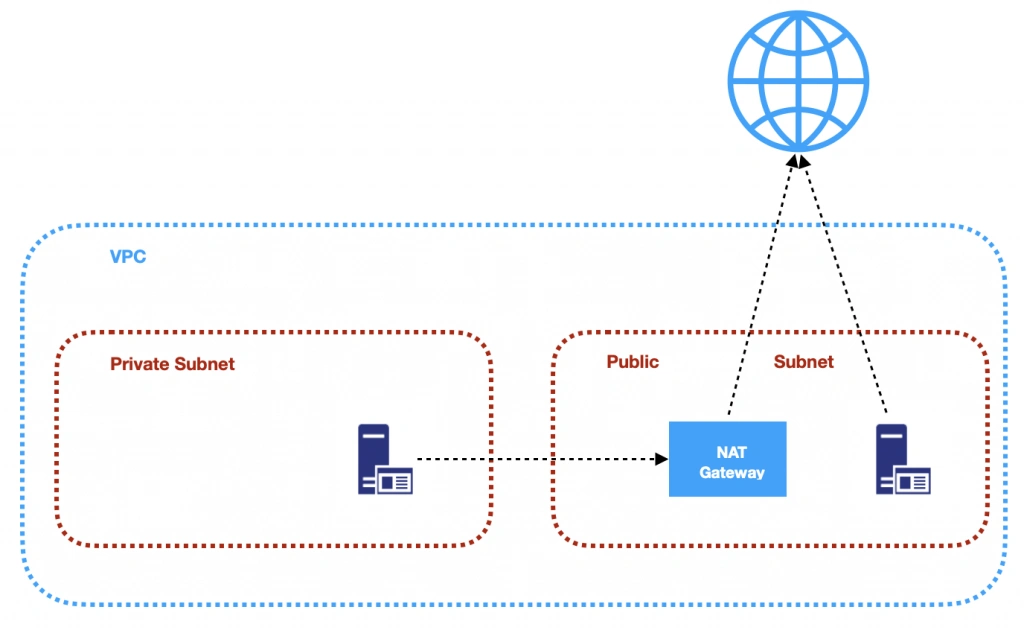
Instances cannot be launched directly into a VPC. They need to live inside subnets. A Subnet is an additional isolated area that has its own CIDR block, routing table, and Network Access Control List. Subnets allow you to create different behaviors in the same VPC. For instance, you can create a public subnet that can be accessed and have access to the public internet and a private subnet that is not accessible through the Internet and must go through a NAT (Network Address Translation) gateway in order to access the outside world.
3. NAT (Network Address Transfer) gateway
NAT Gateways are used in order to enable instances located in private subnets to connect to the Internet or other AWS services, while still preventing direct connections from the Internet to those instances. NAT may be useful for example when you need to install or upgrade software or OS on EC2 instances running in private subnets. AWS provides a NAT gateway managed service which requires very little administrative effort. We will use it while setting up our infrastructure.
4. Elastic IP
AWS provides a concept of Elastic IP Address which is used to facilitate the management of dynamic cloud computing. Elastic IP Address is a public, static IP Address that is associated with your AWS account and can be easily allocated to one of your EC2 instances. The idea behind it is that the address is not strongly associated with your instance but instead elasticity of the address allows in a case of any failure in the system to swiftly remap the address to another healthy instance in your account.
5. AWS Region
AWS Regions are geographical areas in which AWS has data centers. Regions are divided into Availability Zones (AZ) which are independent data centers placed relatively close to each other. Availability Zones are used to provide redundancy and data replication. The choice of AWS region for your infrastructure should be determined to take into account factors such as:
- Proximity - you would usually want your application to be deployed close to your region of operation for latency or regulatory reasons.
- Cost - different regions come with different pricing.
- Feature selection - not all services are available in all regions, this is especially the case for newly introduced features.
- Several availability zones - all regions have at least 2 AZ, but some of them have more. Depending on your needs, this may be a key factor.
Practice
AWS Region
Let’s commence with a selection of the AWS region to operate in. In the top right corner of the AWS Management Console, you can choose a region. At this point, it does not really matter which region you choose (as discussed earlier, it may for your organization). However, it is important to note that you will always only view resources launched in the currently selected region.
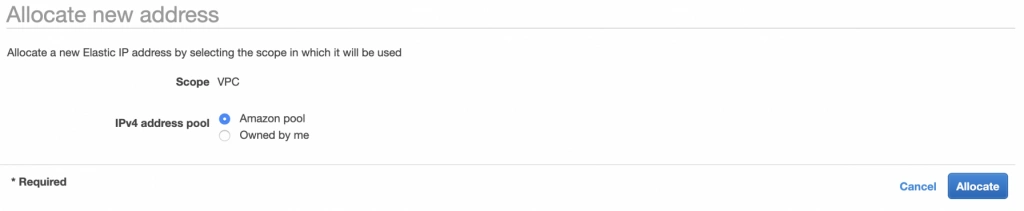
Elastic IP
The next step is the allocation of an elastic IP address. For that purpose, go into the AWS Management console, and find the VPC service. In the left menu bar, under the Virtual Private Cloud section, you should see the Elastic IPs link. There you can allocate a new address owned by yourself or from the pool of Amazon’s available addresses.
Availability Zone A configuration
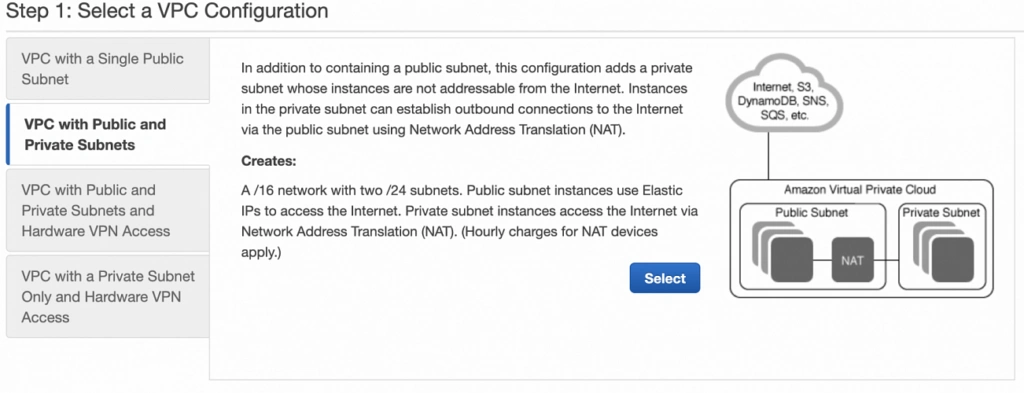
Next, let’s create our VPC and subnets. For now, we are going to set up only Availability Zone A and we will work on High Availability after the creation of the VPC. So go again into the VPC service dashboard and click the Launch VPC Wizard button. You will be taken to the screen where you can choose what kind of a VPC configuration you want Amazon to set you up with. In order to match our target architecture as closely as possible, we are going to choose VPC with Public and Private Subnets .
The next screen allows you to set up your VPC configuration details such as:
- name,
- CIDR block,
- details of the subnets:
- name,
- IP address range - a subset of the VPC CIDR range,
- availability zone,
As shown in the architecture diagram (fig. 1), we need 4 subnets in 2 different availability zones. So let’s set our VPC CIDR to 10.0.0.0/22, and have our subnets as follows:
- public-subnet-a: 10.0.0.0/24 (zone A)
- private-subnet-a: 10.0.1.0/24 (zone A)
- public-subnet-b: 10.0.2.0/24 (zone B)
- private-subnet-b: 10.0.3.0/24 (zone B)
Set everything up as shown in figure 7. The important aspects to note here are the choice of the same availability zone for public and private subnets, and the fact that Amazon will automatically set us up with a NAT gateway for which we just need to specify our previously allocated Elastic IP Address. Now, click the Create VPC button, and Amazon will configure your VPC.

NAT gateway
When the creation of the VPC is over, go to the NAT Gateways section, and you should see the gateway created for you by AWS. To make it more recognizable, let us edit its Name tag to nat-a .

Route tables
Amazon also configured Route Tables for your VPC. Go to the Route Tables section, and you should have there two route tables associated with your VPC. One of them is the main route table of your VPC, and the second one is currently associated with your public-subnet-a. We will modify that setting a bit.
First, select the main route table, go to the routes tab and click Edit routes . There are currently two entries. The first one means Any IP address referencing local VPC CIDR should resolve locally and we shouldn’t modify it. The second one is pointing to the NAT gateway, but we will change it to configure the Internet Gateway of our VPC in order to let outgoing traffic reach the outside world.

Next, go to the Subnet Associations tab and associate the main route table with public-subnet-a. You can also edit its Name tag to main-rt . Then, select the second route table associated with your VPC, edit its routes to route every outgoing Internet request to the nat-a gateway as shown in figure 10. Associate this route table with private-subnet-a and edit its Name tag to private-a-rt .

Availability Zone B Configuration
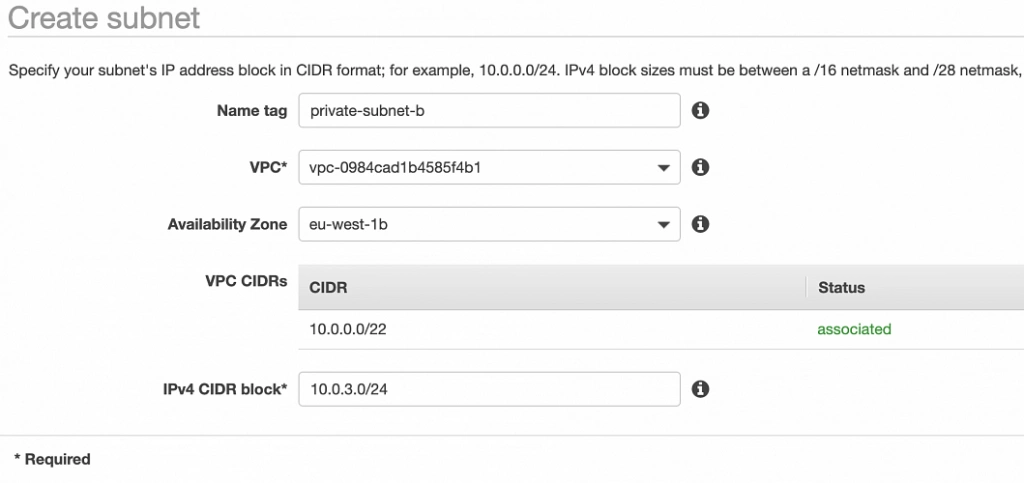
Well done, availability zone A is configured. In order to provide High Availability, we need to set everything up in the second availability zone as well. The first step is the creation of the subnets. Go again to a VPC dashboard in the AWS management console and in the left menu bar find the Subnets section. Now, click the Create subnet button and configure everything as shown in figures 11 and 12.
public-subnet-b

private-subnet-b
NAT gateway
For availability zone B we need to create the NAT gateway manually. For that, find the NAT Gateways section in the left menu bar of the VPC dashboard, and click Create NAT Gateway . Select public-subnet-b , allocate EIP and add a Name tag with value nat-b .
Route tables
The last step is the configuration of the route tables for the subnets in availability zone B. For that, go to the Route Tables section again. Our public-subnet-b is going to have the same routing rules as the public-subnet-a, so let’s add a new association to our main-rt table for public-subnet-b. Then, click the Create route table button, name it private-b-rt , choose our VPC and click create . Next, select the newly created table go to the Routes tab and Edit routes by analogy with the private-a-rt table, but instead of directing every outside going request to nat-a gateway route it to nat-b (fig. 13).

In the end, you should have three route tables associated with your VPC as shown in figure 14.

Summary
That’s it, the scaffolding of our VPC is ready. The diagram shown in fig.15 presents a view of the created infrastructure. It is now ready for the creation of required EC2 instances, Bastion Hosts, configuration of an RDS database and deployment of our applications, which we will do in the next part of the series .

Sources:
- https://azure.microsoft.com/en-us/overview/what-is-cloud-computing/
- https://aws.amazon.com/what-is-aws/
- https://docs.aws.amazon.com/AWSEC2/latest/UserGuide/elastic-ip-addresses-eip.html
- https://docs.aws.amazon.com/vpc/latest/userguide/VPC_Route_Tables.html
- https://docs.aws.amazon.com/vpc/latest/userguide/VPC_SecurityGroups.html#DefaultSecurityGroup
- https://docs.aws.amazon.com/vpc/latest/userguide/vpc-network-acls.html
- https://medium.com/@datapath_io/elastic-ip-static-ip-public-ip-whats-the-difference-8e36ac92b8e7
- https://cloudacademy.com/blog/aws-bastion-host-nat-instances-vpc-peering-security/
- https://aws.amazon.com/blogs/aws/internal-elastic-load-balancers/
- https://aws.amazon.com/quickstart/architecture/linux-bastion/
- https://aws.amazon.com/blogs/security/securely-connect-to-linux-instances-running-in-a-private-amazon-vpc/
- http://thebluenode.com/exposing-private-ec2-instances-behind-public-elastic-load-balancer-elb-aws
- https://app.pluralsight.com/library/courses/aws-developer-getting-started/table-of-contents
- https://app.pluralsight.com/library/courses/aws-developer-designing-developing/table-of-contents
- https://app.pluralsight.com/library/courses/aws-networking-deep-dive-vpc/table-of-contents
- https://datanextsolutions.com/blog/using-nat-gateways-in-aws/
- https://docs.aws.amazon.com/vpc/latest/userguide/vpc-nat-gateway.html

Grape Up guides enterprises on their data-driven transformation journey
Ready to ship? Let's talk.
Check related articles
Read our blog and stay informed about the industry's latest trends and solutions.
The path towards enterprise level AWS infrastructure – EC2, AMI, Bastion Host, RDS
Let’s pick up the thread of our journey into the AWS Cloud, and keep discovering the intrinsics of the cloud computing universe while building a highly available, secure and fault-tolerant cloud system on the AWS platform. This article is the second one of the mini-series which walks you through the process of creating an enterprise-level AWS infrastructure and explains concepts and components of the Amazon Web Services platform. In the previous part, we scaffolded our infrastructure; specifically, we created the VPC, subnets, NAT gateways, and configured network routing. If you have missed that, we strongly encourage you to read it first. In this article, we will build on top of the work we have done in the previous part, and this time we focus on the configuration of EC2 instances, the creation of AMI images, setting up Bastion Hosts, and RDS database.
The whole series comprises of:
- Part 1 - Architecture Scaffolding (VPC, Subnets, Elastic IP, NAT).
- Part 2 - The Path Towards Enterprise Level AWS Infrastructure – EC2, AMI, Bastion Host, RDS.
- Part 3 - Load Balancing and Application Deployment (Elastic Load Balancer)
Infrastructure overview
The diagram below presents our designed infrastructure. If you would like to learn more about design choices behind it, please read Part 1 - Architecture Scaffolding (VPC, Subnets, Elastic IP, NAT) . We have already created a VPC, subnets, NAT Gateways, and configured network routing. In this part of the series, we focus on the configuration of required EC2 instances, the creation of AMI images, setting up Bastion Hosts, and the RDS database.

AWS theory
1. Elastic cloud compute cloud (EC2)
Elastic Cloud Compute Cloud (EC2) is an Amazon service that allows you to manage your virtual computing environments, known as EC2 instances, on AWS. An EC2 instance is simply a virtual machine provisioned with a certain amount of resources such as CPU, memory, storage, and network capacity launched in a selected AWS region and availability zone. The elasticity of EC2 means that you can scale up or down resources easily, depending on your needs and requirements. The network security of your instances can be managed with the use of security groups by the configuration of protocols, ports, and IP addresses that your instances can communicate with.
There are five basic types of EC2 instances, which you can use based on your system requirements.
- General Purpose,
- Compute Optimized,
- Memory Optimized,
- Accelerated Computing,
- Storage Optimized.
In our infrastructure, we will use only general-purpose instances, but if you would like to learn more about different features of instance types, see the AWS documentation.
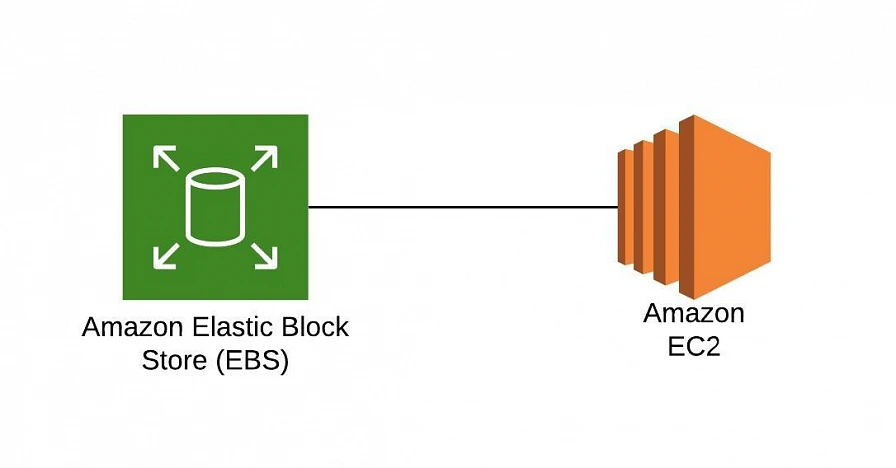
All EC2 instances come with instance store volumes for temporary data that is deleted whenever the instance is stopped or terminated, as well as with Elastic Block Store (EBS) , which is a persistent storage volume working independently of the EC2 instance itself.
2. Amazon Machine Images (AMI)
Amazon utilizes templates of software configurations, known as Amazon Machine Images (AMI) , in order to facilitate the creation of custom EC2 instances. AMIs are image templates that contain software such as operating systems, runtime environments, and actual applications that are used to launch EC2 instances. This allows us to preconfigure our AMIs and dynamically launch new instances on the go using this image instead of always setting up VM environments from scratch. Amazon provides some ready to use AMIs on the AWS Marketplace, which you can extend, customize, and save as your own (which we will do soon).
3. Key pair
Amazon provides a secure EC2 login mechanism with the use of public-key cryptography. During the instance boot time, the public key is put in an entry within ~/.ssh/authorized_keys , and then you can securely access your instance through SSH using a private key instead of a password. The public and private keys are known as a key pair.
4. IAM role
IAM means Identity and Access Management and it defines authentication and authorization rules for your system. IAM roles are IAM identities which comprise a set of permissions that control access to AWS services and can be attached to AWS resources such as users, applications, or services. As an example, if your application needs access to a specific AWS service such as an S3 Bucket, its EC2 instance needs to have a role with appropriate permission assigned.
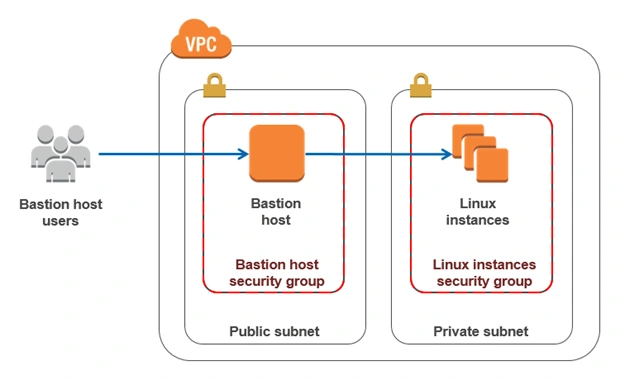
5. Bastion Host
Bastion Host is a special purpose instance placed in a public subnet, which is used to allow access to instances located in private subnets while providing an increased level of security. It acts as a bridge between users and private instances, and due to its exposure to potential attacks, it is configured to withstand any penetration attempts. The private instances only expose their SSH ports to a bastion host, not allowing any direct connection. What is more, bastion hosts may be configured to log any activity providing additional security auditing.
6. Amazon Relational Database Service (RDS)
6.1. RDS
RDS is an Amazon service for the management of relational databases in the cloud. As of now (23.04.2020), it supports six database engines specifically Amazon Aurora, PostgreSQL, MySQL, MariaDB, Oracle Database, and SQL Server. It is easy to configure, scale and it provides high availability and reliability with the use of Read Replicas and Multi-AZ Deployment features.
6.2. Read replicas
RDS Read Replicas are asynchronous, read-only instances that are replicas of a primary “master” db instance. They can be used for handling queries that do not require any data change, thus reliving the workload from the master node.
6.3. Multi-AZ deployment
AWS Multi-AZ Deployment is an option to allow RDS to create a secondary, standby instance in a different AZ, and replicate it synchronously with the data from the master node. Both master and standby instances run on their own physically independent infrastructures, and only the primary instance can be accessed directly. The standby replica is used as a failover in case of any master’s failure, without changing the endpoint of your DB.
This reduces downtime of your system and makes it easier to perform version upgrades or create backup snapshots, as they can be done on the spare instance. Multi-AZ is usually used only on the master instance. However, it is also possible to create read replicas with Multi-AZ deployment, which results in a resilient disaster recovery infrastructure.
Practice
We have two applications that we would like to run on our AWS infrastructure. One is a Java 11 Spring Boot application, so the EC2 which will host it is required to have Java 11 installed. The second one is a React.js frontend application, which requires a virtual machine with a Node.js environment. Therefore, as the first step, we are going to set up a Bastion Host, which will allow us to ssh our instances. Then, we will launch and configure those two EC2 instances manually in the first availability zone. Later on, we will create AMIs based on those instances and use them for the creation of EC2s in the second availability zone.
1. Availability Zone A
1.1. Bastion Host
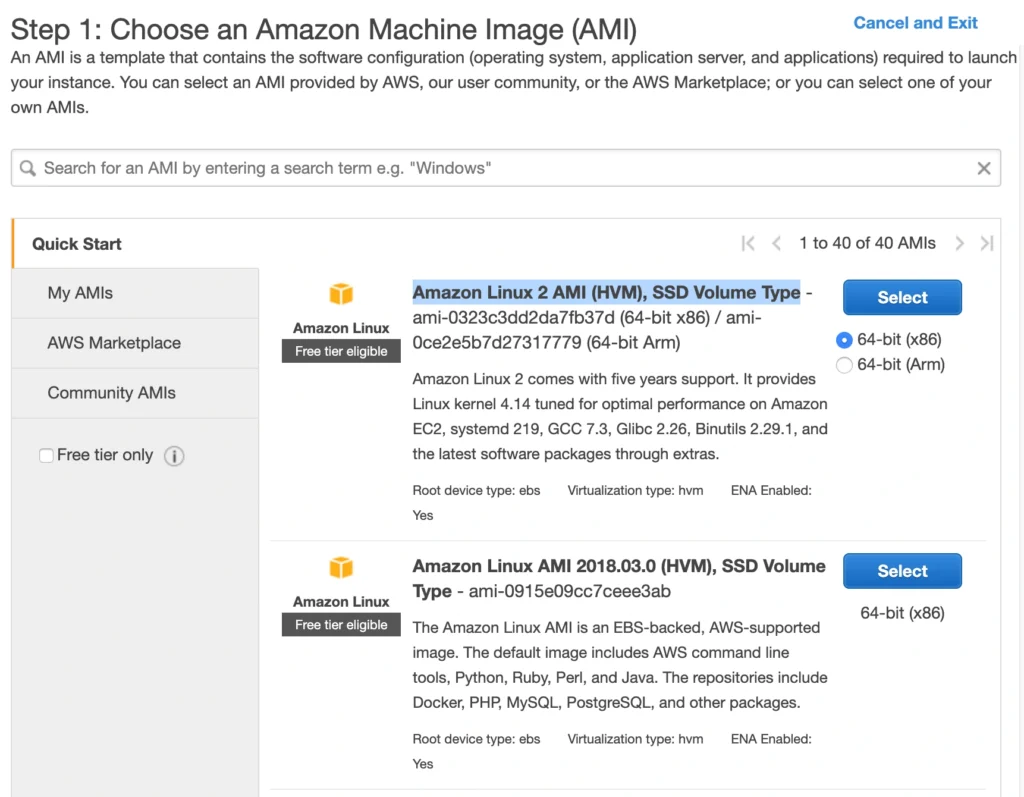
A Bastion Host is nothing more than a special-purpose EC2 instance. Hence, in order to create a Bastion Host, go into the AWS Management Console, and search for EC2 service. Then click the Launch Instance button, and you will be shown with an EC2 launch wizard. The first step is the selection of an AMI image for your instance. You can filter AMIs and select one based on your preferences. In this article, we will use the Amazon Linux 2 AMI (HVM), SSD Volume Type image.
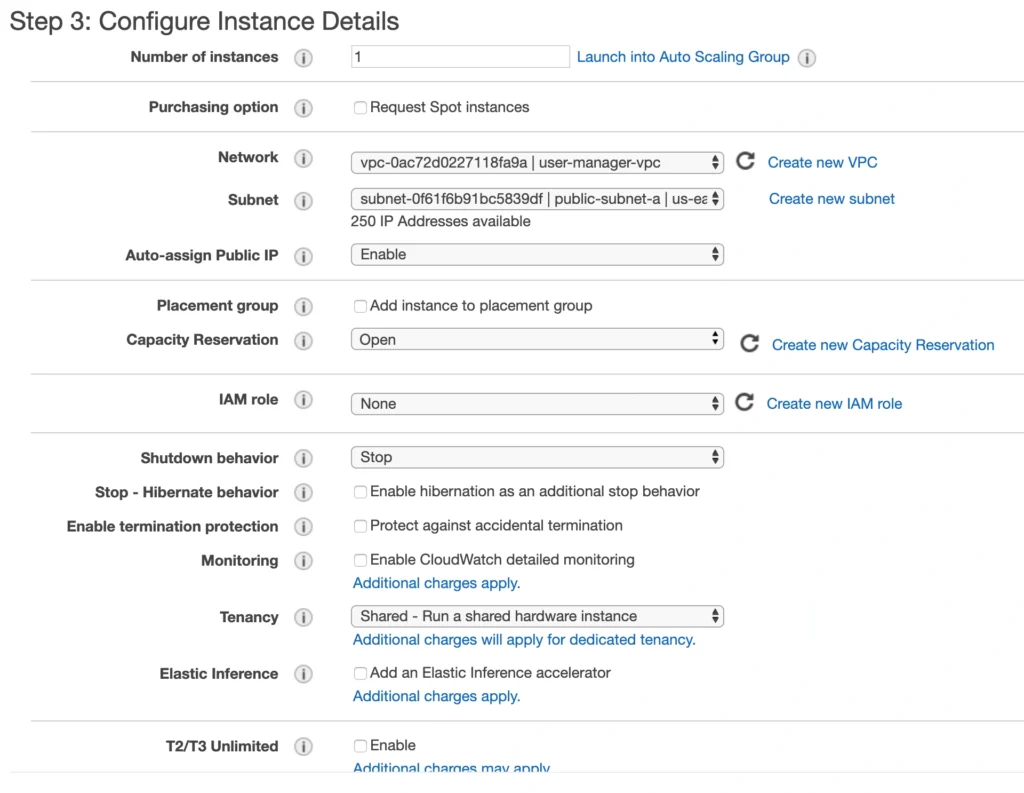
On the next screen, we need to choose an instance type for our image. Here, I am sticking with the AWS free tier program, so I will go with the general-purpose t2.micro type. Click Next: Configure instance Details . Here, we can define the number of instances, network settings, IAM configuration, etc. For now, let’s start with 1 instance, we will work on the scalability of our infrastructure later. In the Network section, choose your previously created VPC and public-subnet-a and enable Public IP auto-assignment. We do not need to specify any IAM role as we are not going to use any of the AWS services.
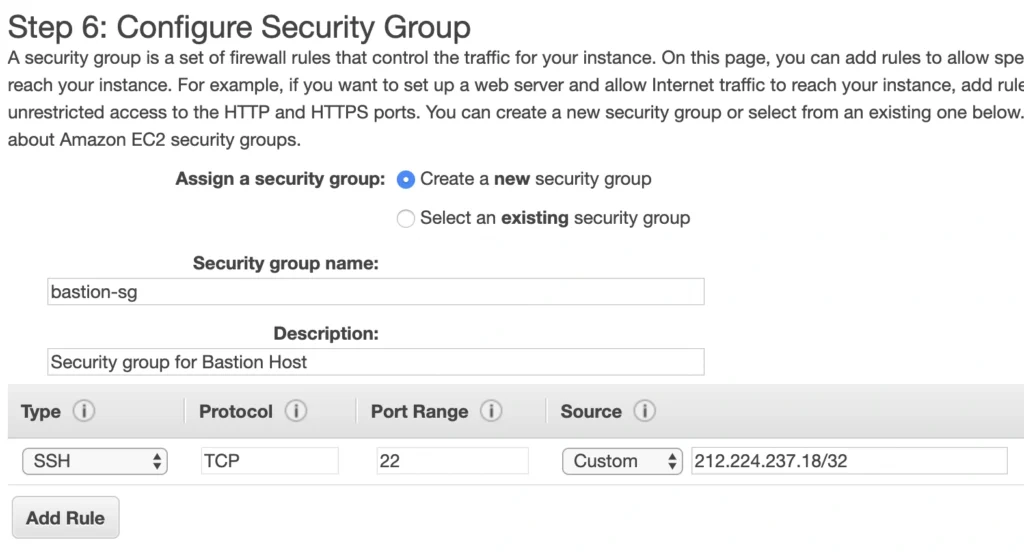
Click Next . Here you can see that the wizard automatically configures your instance with an 8GB EBS storage, which is enough for us. Click Next again. Now, we can add tags to improve the recognizability of our instance. Let’s add a Name tag bastion-a-ec2 . On the next screen, we can configure a security group for our instance. Create a new security group, name it bastion-sg .
You can see that there is already one predefined rule exposing our instance for SSH sessions from 0.0.0.0/0 (anywhere). You should change it here to allow only connections from your IP address. The important thing to note here is that in the production environment you would never expose your instances to the whole world, instead, you would whitelist the IP addresses of employees allowed to connect to your instance.
In the next step, you can review your EC2 configuration and launch it. The last action is the creation of a key pair. This is important because we need this key pair to ssh to our instance. Name the key pair e.g. user-manager-key-pair , download the private key, and store it locally on your machine. This is it, Amazon will take some time, but in the end, your EC2 instance will be launched.
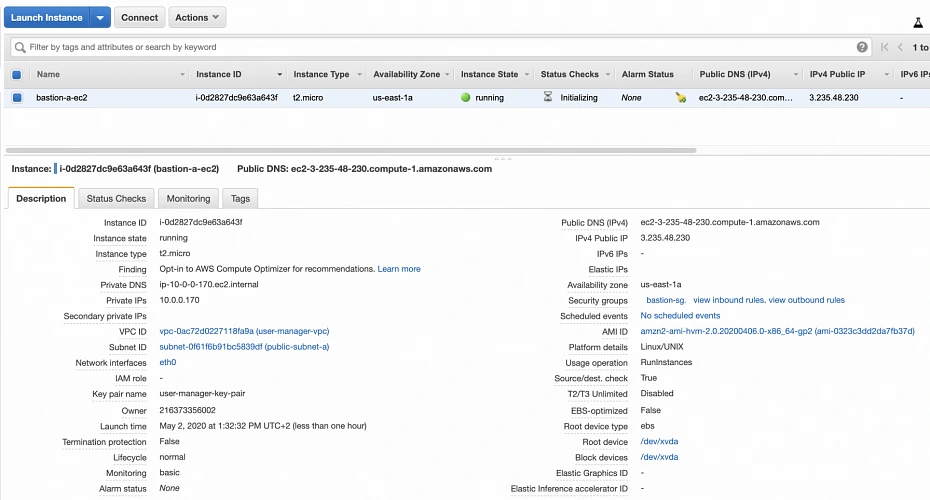
In the instance description section, you can find the public IP address of your instance. We can use it to ssh to the EC2. That is where we will need previously generated and hopefully locally saved private key (*.pem file). That’s it, our instance is ready for now. However, in production, it would be a good idea to harden the security of the Bastion Host even more. If you would like to learn more about that, we recommend this article .
1.2. Backend server EC2
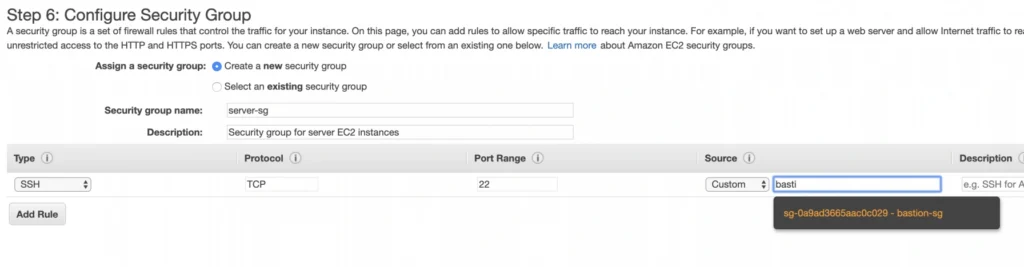
Now, let’s create an instance for the backend server. Click Launch instance again, choose the same AMI image as before, place it in your user-manager-vpc, private-subnet-a, and do not enable public IP auto-assignment this time. Move through the next steps as before, add a server-a-ec2 name tag. In the security group configuration, create a new security group, and modify its settings to allow SSH incoming communication only from the bastion-sg .
Launch the instance. You can create a new key pair or use the previously created one (for simplicity I recommend using the same key pair for all instances). In the end, you should have your second instance up and running.

You can see that server-a-ec2 does not have any public IP address. However, we can access it through the bastion host. First, we need to add our key to a keychain and then we can ssh to our bastion host instance adding -A flag to the ssh command. This flag enables agent-forwarding, which will let you ssh into your private instance without explicitly specifying private key again. This is a recommended way, which lets you avoid storage of the private key on the bastion host instance which could lead to a security breach.
ssh-add -k
ssh -A -i path-to-your-pem-file ec2-user@bastion-a-ec2-instance-public-ip
Then, inside your bastion host execute the command:
ssh ec2-user@server-a-ec2-instance-private-ip
Now, you should be inside your server-a-ec2 private instance. Let’s install the required software on the machine by executing those commands:
sudo yum update -y &&
sudo amazon-linux-extras enable corretto8 &&
sudo yum clean metadata &&
sudo yum install java-11-amazon-corretto &&
java --version
As a result, you should have java 11 installed on your server-a-ec2 instance. You can go back to the local command prompt by executing the exit command twice.
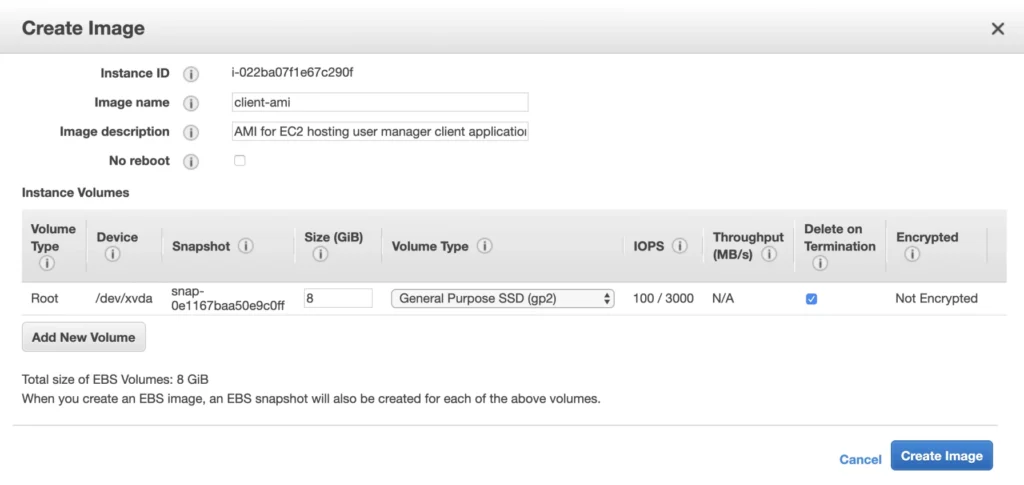
AMI
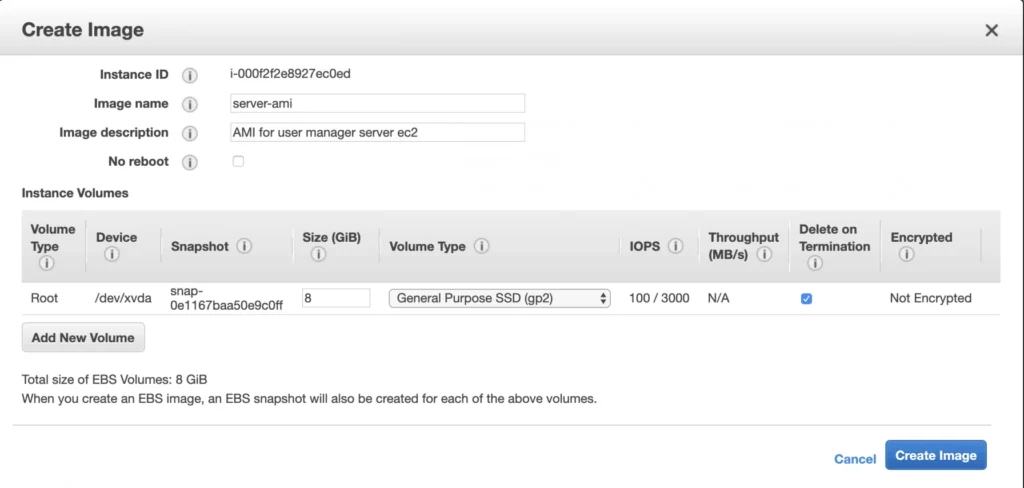
The ec2 instance for the backend server is ready for the deployment. In the second availability zone, we could follow exactly the same steps. However, there is an easier way. We can create an AMI image based on our pre-configured instance and use it later for the creation of the corresponding instance in availability zone b. In order to do that, go again into the Instances menu, select your instance, click Actions -> Image -> Create image . Your AMI image will be created and you will be able to find it in the Images/AMIs section.
1.3. Client application EC2
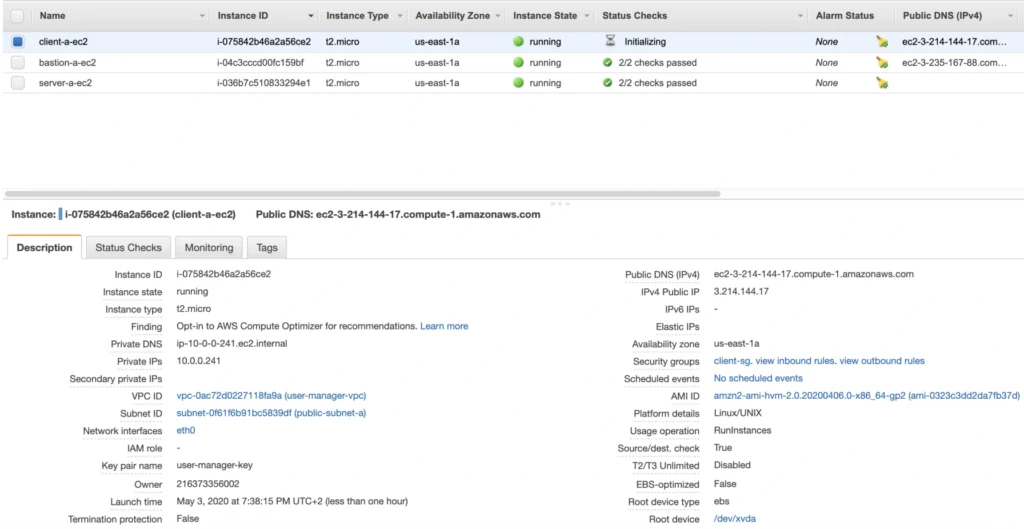
The last EC2 instance we need in the Availability Zone A will host the client application. So, let’s go once again through the process of EC2 creation. Launch instance, select the same base AMI as before, select your VPC, place the instance in the public-subnet-a , and enable public IP assignment. Then, add a client-a-ec2 Name tag, and create a new security group client-sg allowing SSH incoming connection from the bastion-sg security group. That’s it, launch it.
Now, SSH to the instance through the bastion host, and install the required software.
ssh -A -i path-to-your-pem-file ec2-user@bastion-a-ec2-instance-public-ip
Then, inside your bastion host execute the command:
ssh -A -i path-to-your-pem-file ec2-user@bastion-a-ec2-instance-public-ip
Inside client-a-ec2 command prompt, execute :
sudo yum update &&
curl -sL https://rpm.nodesource.com/setup_12.x | sudo bash - &&
sudo yum install -y nodejs &&
node -v &&
npm -v
Exit the EC2 command prompt and create a new AMI image based on it.
2. Availability Zone B
2.1. Bastion Host
Create the second bastion host instance following the same steps as for availability zone a, but this time place it in public-subnet-b , add Name tag bastion-b-ec2 , and assign to it previously created bastion-sg security group.
2.2. Backend server EC2
For the backend server EC2, go again to the Launch Instance menu, and this time instead of using Amazon’s AMI switch to My AMI’s tab and select the previously created server-ami image. Place the instance in the private-subnet-b , add a name tag server-b-ec2 , and assign to it the server-sg security group.
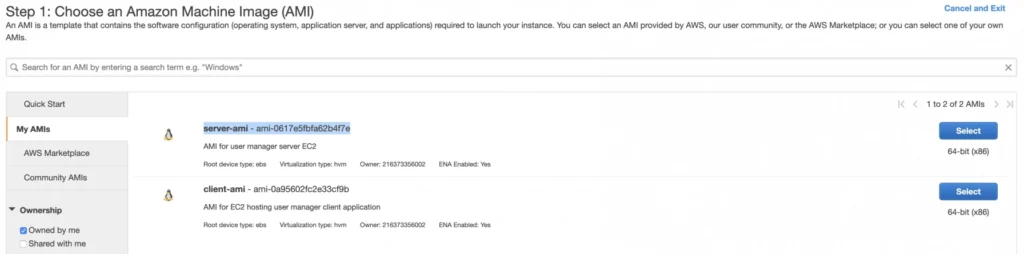
2.3. Client application EC2
Just as for the backend server instance, launch the client-b-ec2 using your custom AMI image. This time select the client-ami image, place EC2 in the public-subnet-b , enable automatic IP assignment, and choose the client-sg security group.
3. RDS
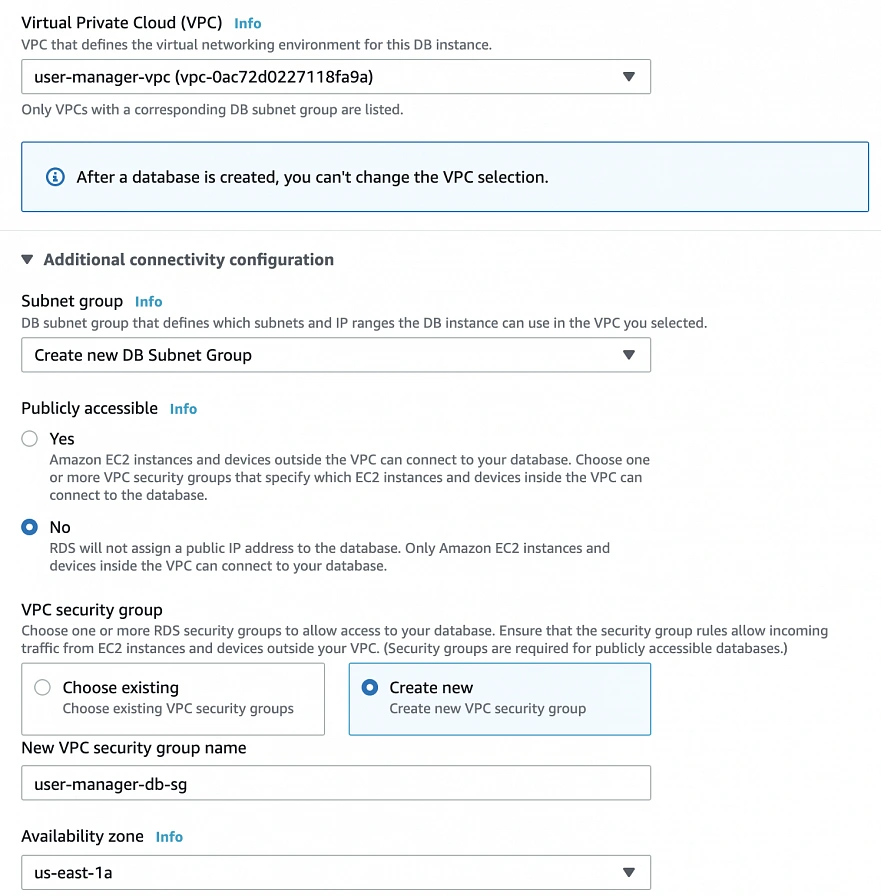
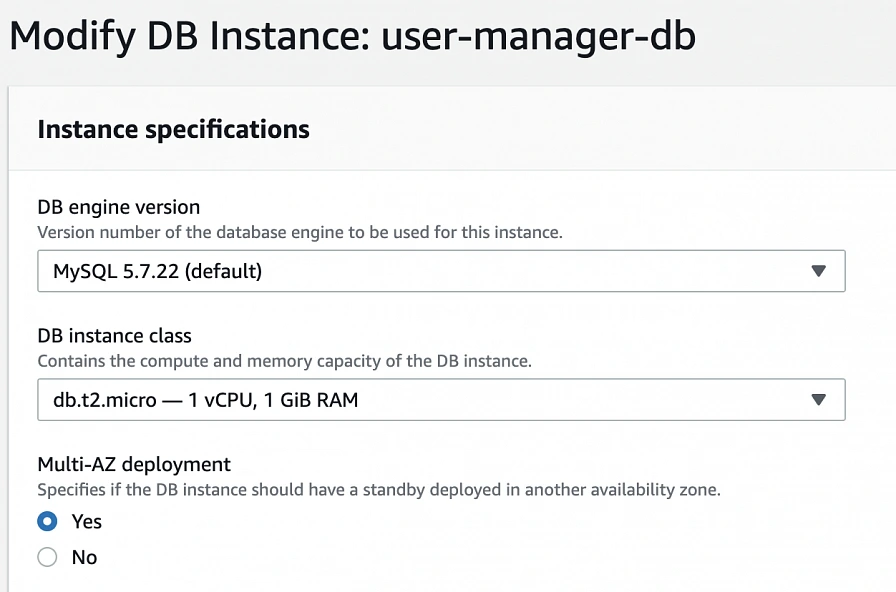
We have all our EC2 instances ready. The last part which we will cover in this article is the configuration of RDS. For that, go into the RDS service in the AWS Management Console and click Create database. In the database configuration window, follow the standard configuration path. Select MySQL db engine, and select Free tier template. Set your db name as user-manager-db , specify master username and password, select your user-manager-vpc , availability zone a, and make the database publicly not accessible. Create also a new user-manager-db-sg security group.
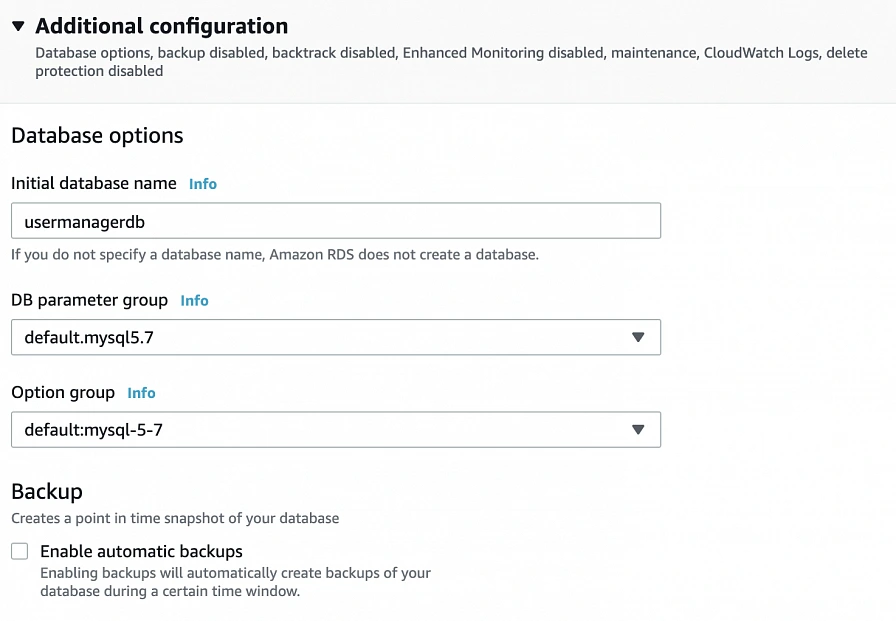
In the Additional configuration section, specify the initial db name, and finally create a database.
After AWS finishes the creation process, you will be able to get the database endpoint, which we will use to connect to the database from our application later on. Now, in order to provide high availability of the database, click the Modify button on the created database screen, and enable Multi-AZ deployment. Please, bear in mind that Multi-AZ deployment is not included in the free tier program, so if you would like to avoid any charges, skip this point.
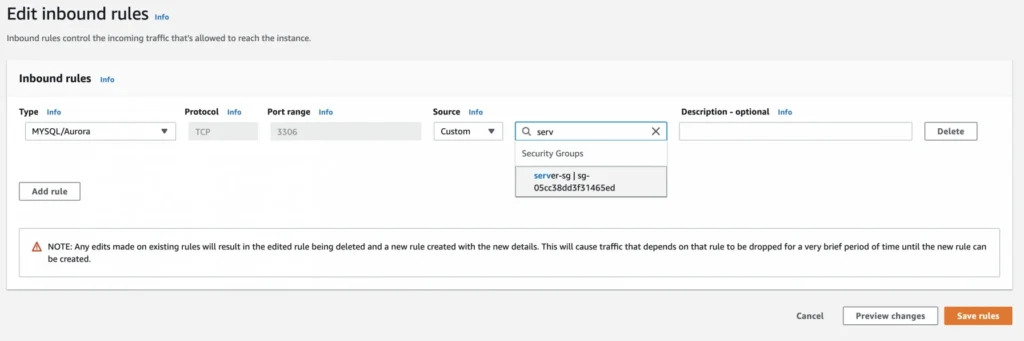
As the last step, we need to add a rule to the user-manager-db-sg to allow incoming connections from our server-sg on port 3306 in order to allow communication between our server and the database.
EC2, AMI, Bastion Host, RDS - Summary
Congratulations, our infrastructure is almost ready for deployment. As you can see in our final diagram, the only thing which is missing is the load balancer. In the next part of the series, we will take care of that, and deploy our applications to have a fully functioning system running on AWS infrastructure!
Sources:
- https://cloudacademy.com/blog/aws-bastion-host-nat-instances-vpc-peering-security/
- https://aws.amazon.com/quickstart/architecture/linux-bastion/
- https://aws.amazon.com/blogs/security/securely-connect-to-linux-instances-running-in-a-private-amazon-vpc/
- https://app.pluralsight.com/library/courses/aws-developer-getting-started/table-of-contents
- https://app.pluralsight.com/library/courses/aws-developer-designing-developing/table-of-contents
- https://app.pluralsight.com/library/courses/aws-networking-deep-dive-vpc/table-of-contents
- https://www.techradar.com/news/what-is-amazon-rds
- https://medium.com/kaodim-engineering/hardening-ssh-using-aws-bastion-and-mfa-45d491288872
- https://cloudacademy.com/blog/aws-bastion-host-nat-instances-vpc-peering-security/
- https://docs.aws.amazon.com/IAM/latest/UserGuide/id_roles.html
- https://docs.aws.amazon.com/AWSEC2/latest/UserGuide/ec2-key-pairs.html
- https://aws.amazon.com/ec2/instance-types/
- https://docs.aws.amazon.com/AWSEC2/latest/UserGuide/concepts.html
Interested in our services?
Reach out for tailored solutions and expert guidance.