Server Side Swift – quick start

Building Swift web applications allows you to reuse the skills you already have. However, you can also start from scratch if you are not an ”iPhone mac„ developer. This article shows you the most popular Server-Side Swift frameworks and lets you dive into the world of faster and safer APIs using Swift.
Swift was released in 2014. Ever since then, it has become a popular solution for the iOS and macOS development. Since Swift was the open source and people started playing with it. There were a lot of attempts to find other usages of Swift. They turned out to be perfect for the server-side while being faster and safer than other languages. The next step in the process was to apply Swift to the server-side development. Here, it is important to mention that Swift can be compiled on macOS as well as Linux and even Windows. Moreover, some frameworks allow developers to create cloud applications .
Just after Server-Side Swift has been released I felt the urge to take a quick look on it. It was really hard to tell if it at that point, it was ready for commercial use. Now, as I look at it, I would say it is stable enough. So let’s try to compare the most popular frameworks. Personally, I would recommend trying each framework before you even pick the one that works best for you – there are slight differences between them.
Currently, the most popular Server-Side Swift frameworks are Vapor, Perfect and Kitura. There are also a few other ones such as Zewo and NozelIO, however they’re not as popular, but that doesn’t take away from their value. As a matter of fact, I looked into each framework and my verdict is: Perfect and Vapor.
Why Server-Side Swift?
A few years ago, when Server-Side Swift was still new to me, I wasn’t convinced that it would be the optimal language for backend specific. Why? Because it worked just like every other backend solution and there was nothing particularly specific in it making it special, but still for me as an IOS developer it allowed me to be at a full-stack. I know Java and JS and, in my opinion, the newest technologies are good to get hold of mainly because they let us become better developers. I haven’t found too many tutorials or articles about it. Certainly not as many as there are about Java or JS. Therefore, you have to create lots of things on your own. In my opinion, Swift is also faster than other languages. If you want to compare it with others, here is the benchmark server-side swift frameworks vs nodeJS.
Tools
SPM - Swift Package Manager - manages the distribution Swift code, integrated with the build system to automate downloading, compiling and linking dependencies process runs on Mac and Linux.
XCode – Apple IDE to compile and debug Obj-C and Swift code.
AppCode – Jetbrains IDE for compile and debug Obj-C and Swift code.
Other text editors like Brackets, VS Code, Sublime etc. + SPM
There are also a bunch of very specific tools for the frameworks and I will tell a bit more about that in a quick overview below.
Overview
Vapor
It has a very active community and simple syntax as well. This framework is mostly focused on being written purely in Swift. Just as the Vapor - Swift is a very readable and understandable API, due to the fact that it keeps the naming and conventions.
Data formats:
JSON, XML
Databases:
MySQL, PostgresSQL, SQLite, MongoSB
Cloud:
Heroku, Amazon Web Services and Vapor Cloud
Tools:
Vapor toolbox
Perfect:
The most popular framework for the server-side swift development and as the author claims, it is production ready and can be used with commercial products. This one is highly recommended to use as it’s big, powerful and fast. The framework is updated on a monthly basis.
Data formats:
JSON, XML, native support for direct operations on files, directories and .zip files
Databases:
MySQL, PostgresSQL, SQLite, CouchDB, MongoSB, MariaDB, FileMaker
Cloud:
Heroku, Amazon Web Services
Tools:
Perfect Assistant
Kitura:
This Framework is like a WebFramework. Kitura is unique in its approach to databases. Example SQL DB types Kitura uses abstraction layer called "Kuery" instead of "Query". Kuery supports MySQL, SQLite and PostgreSQL. Kitura also has support for Redis, CouchDB, Apache Cassandra and ScyllaDB, but through native packages these are not related to Kuery.
Supported Data formats:
JSON, Aphid MQTT (IoT/IoT Messaging)
Databases:
MySQL, PostgresSQL, SQLite, CouchDB, Apache Cassandra, ScyllaDB
Cloud:
Heroku, Amazon Web Services, Pivotal Web Services, IBM Bluemix
Tools:
Kitura CLI
Summary
Server-Side Swift is a fast growing solution and can be used commercially with the newest technologies like cloud. After a few years, we have acquired a mature language and amazing frameworks which constantly make Server-Side Swift better. When it comes to the Vapor and Perfect, both of them seems to be in a pretty good shape by now. Vapor, for example, is growing quite fast since its first release in September 2016 and currently there is 3.1 version of it available. Perfect has similar qualities and was first released in November 2015. As I mentioned before, I would personally recommend trying to play a bit with each framework before choosing the right one.
Tutorials and code examples
Perfect
Vapor
Kitura
Swift NIO:
Released by Apple on 1st March 2018 – low-level, cross platform, event driven network application framework.
Other frameworks
There are also Zewo and NozelIO but those just based on Swift and Zewo is a Go-Style framework, NozelIO is the node.js style framework.
Swift for specific OS

Grape Up guides enterprises on their data-driven transformation journey
Ready to ship? Let's talk.
Check related articles
Read our blog and stay informed about the industry's latest trends and solutions.
Server Side Swift with Vapor - end to end application with Heroku cloud
In this tutorial, I want to show you the whole production process of back-end and front-end swift applications and push the backend side to the heroku cloud.
First, please make sure that you have installed at least Xcode 10. Let’s start from the backend side:
Open a terminal and check your Swift version and make sure that your swift version is 4.2.
swift –-version

Time to install Vapor CLI, for this one we should use homebrew.
brew install vapor/tap/vapor
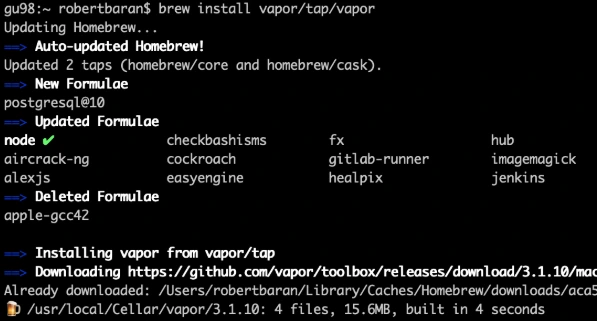
Vapor CLI is already installed.
Let’s create a new project. Vapor CLI have simple commands for lots of things. Most of them you will learn in this tutorial later.
Vapor new {your-project-name}

Go into the project directory and build it using "vapor build" command:
vapor build

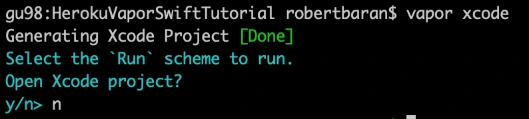
Let’s create xcode project using vapor xcode which will be needed later.
And verify if your backend works fine locally:
vapor run
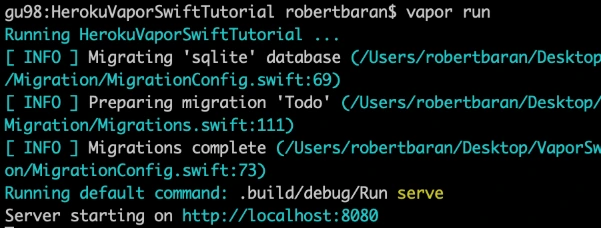
As we can see the server is starting on our machine to be sure if that works fine, go to the web browser and check the localhost:8080.
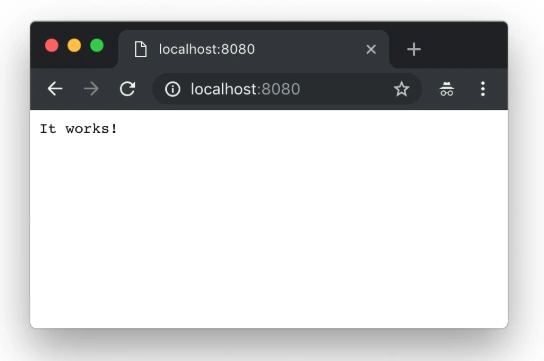
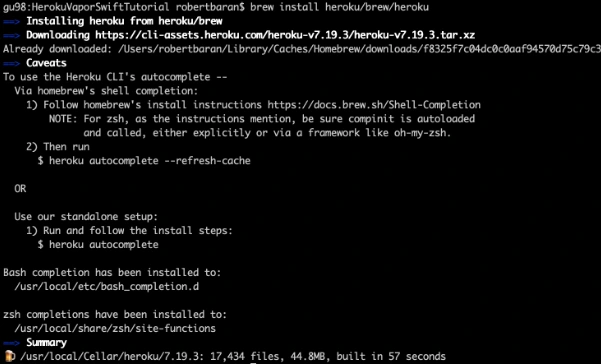
Yupi! Here is your first application running with Perfect Swift. Let's try to deploy it to the cloud, but first, we need to install heroku cli.
brew install heroku/brew/ heroku
Now, deploy your first application to the cloud, but first you need to create free Heroku account. I will skip this process in tutorial. When the account was created go to the terminal install Heroku CLI and try to deploy.
vapor heroku init
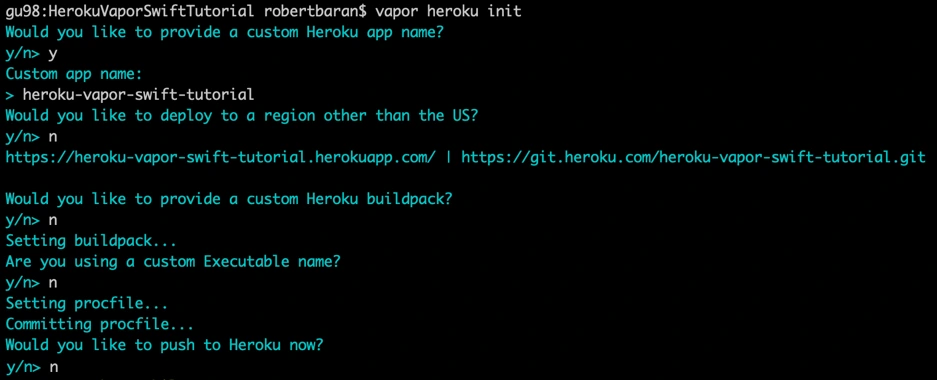
Before we push to Heroku we have to change Heroku stack from 18 to 16 as 18 is in the beta stage and doesn’t support vapor yet.

Let’s deploy: git push Heroku master.

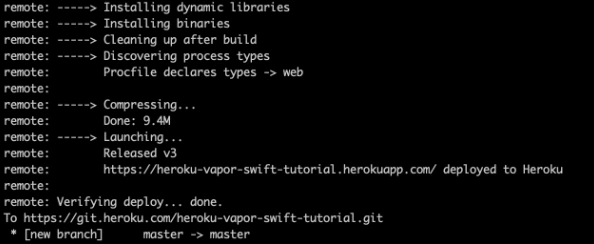
The app is already deployed. You can log in via a web browser to your Heroku account and see if it is running and if it works!
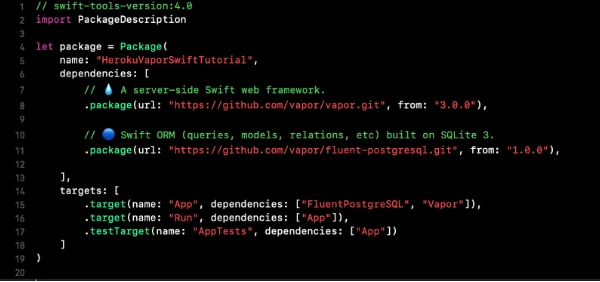
Now we need to configure the project. Go to Xcode or other source editor and install PostgreSQL framework. In Package.swift we need to add the FluentPostreSQL. In Package.swift we need to add the FluentPostreSQL.
Run vapor clean, vapor build and then vapor Xcode.
It's time to configure the database and clean up the project. First of all, go to configure.swift file and remove FluentSQL and remove related functions related to it. Then we need to configure the PostgreSQL database in our project. We need to remember that few things need to be done like at the beginning import the FluentPostgreSQL and register provider into services.
try services.register(FluentPostgreSQLProvider())
Then we need to create a database config and register the database.
// Configure a database
var databases = DatabasesConfig()
let databaseConfig: PostgreSQLDatabaseConfig
if let url = Environment.get("DATABASE_URL") {
guard let urlConfig = PostgreSQLDatabaseConfig(url: url) else {
fatalError("Failed to create PostgresConfig")
}
print(urlConfig)
databaseConfig = urlConfig
} else {
let databaseName: String
let databasePort: Int
if (env == .testing) {
databaseName = "vapor-test"
if let testPort = Environment.get("DATABASE_PORT") {
databasePort = Int(testPort) ?? 5433
} else {
databasePort = 5433
}
}
else {
databaseName = Environment.get("DATABASE_DB") ?? "vapor"
databasePort = 5432
}
let hostname = Environment.get("DATABASE_HOSTNAME") ?? "localhost"
let username = Environment.get("DATABASE_USER") ?? "robertbaran"
databaseConfig = PostgreSQLDatabaseConfig(hostname: hostname, port: databasePort, username: username, database: databaseName, password: nil)
}
let database = PostgreSQLDatabase(config: databaseConfig)
databases.add(database: database, as: .psql)
services.register(databases)
Once the database is registered we need to create our model and controller. In the example project, we have todo model and controller you could remove that as we will create a new model and controller. The idea for the app is creating a shopping list, so we need to think about what we need for that. So we have already database registered so we have to create a model which will contain our productName and id. Create ShoppingList.swift file which will be our PostgreSQL model.
import FluentPostgreSQL
import Vapor
final class ShoppingList: PostgreSQLModel {
var id: Int?
var productName: String
init(id: Int? = nil, productName: String) {
print("Shopping List Model was sucesfully created")
self.id = id
self.productName = productName
}
}
extension ShoppingList: Migration { }
extension ShoppingList: Content { }
extension ShoppingList: Parameter { }
Go back to the configuration file and register database migration for that model.
var migrations = MigrationConfig()
migrations.add(model: ShoppingList.self, database: .psql)
services.register(migrations)>
The model is already done, the database is registered so it’s time to create a controller which we gonna use for getting, creating and deleting data from our database. We have provided functions for that:
import Vapor
final class ShoppingListController {
func index(_ req: Request) throws -> Future<[ShoppingList]> {
return ShoppingList.query(on: req).all()
}
func create(_ req: Request) throws -> Future {
return try req.content.decode(ShoppingList.self).flatMap { item in
return item.create(on: req)
}
}
func delete(_ req: Request) throws -> Future {
return try req.parameters.next(ShoppingList.self).flatMap { item in
return item.delete(on: req)
}.transform(to: .ok)
}
}
Also, we need to configure the routes. Go to routes.swift and initialize ShoppingListController and create routes for the functions which we already created in the controller:
let shoppingListController = ShoppingListController()
router.get("shoppingList", use: shoppingListController.index)
router.post("shoppingList", use: shoppingListController.create)
router.delete("shoppingList", ShoppingList.parameter, use: shoppingListController.delete)
Try to build the project. Once the project is built successfully you can test that locally but first, you need to setup PostgreSQL locally. I would recommend you to configure Postgres on Heroku and push it directly. First, add Heroku add-ons. I’m using the free hobby-dev database for this project:
heroku addons:create heroku-postgresql:hobby-dev
Then:
heroku config
Edit procfile web: Run serve --env production --port $PORT --hostname 0.0.0.0
Commit the changes and push to Heroku .
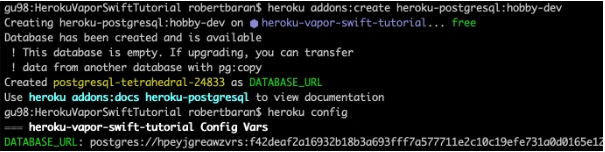
gu98:VaporSwiftTutorial robertbaran$ cd HerokuVaporSwiftTutorial/
gu98:HerokuVaporSwiftTutorial robertbaran$ clear
gu98:HerokuVaporSwiftTutorial robertbaran$ heroku addons:create heroku-postgresql:shoppingList-dev
Creating heroku-postgresql:shoppingList-dev on ⬢ heroku-vapor-swift-tutorial... !
▸ Couldn't find either the add-on service or the add-on plan of "heroku-postgresql:shoppingList-dev".
gu98:HerokuVaporSwiftTutorial robertbaran$ clear
gu98:HerokuVaporSwiftTutorial robertbaran$ heroku addons:create heroku-postgresql:hobby-dev
Creating heroku-postgresql:hobby-dev on ⬢ heroku-vapor-swift-tutorial... free
Database has been created and is available
! This database is empty. If upgrading, you can transfer
! data from another database with pg:copy
Created postgresql-tetrahedral-24833 as DATABASE_URL
Use heroku addons:docs heroku-postgresql to view documentation
gu98:HerokuVaporSwiftTutorial robertbaran$ heroku config
=== heroku-vapor-swift-tutorial Config Vars
DATABASE_URL: postgres://hpeyjgreawzvrs:f42deaf2a16932b18b3a693fff7a577711e2c10c19efe731a0d0165e12d5a6c4@ec2-23-21-188-236.compute-1.amazonaws.com:5432/dab0tadl6uco6a
gu98:HerokuVaporSwiftTutorial robertbaran$
Verify the Heroku build, you can use it for that Postman or any other tool for API Development. Make post/get/delete and verify if that works. If you followed this tutorial everything should work fine.
Now let's begin work on the iOS app for creating a shopping list. Usually, I create a workspace and new project for iOS, but you can do it whatever you like. There are a few options. You can have 2 separate projects for frontend and backend, you can group everything in one project and use different targets for it or you can have a workspace with 2 projects. In this tutorial, I will be working with the workspace and 2 separates projects.
Save your backend project as a workspace from Xcode -> File menu now close the current project and open the workspace. Create SingleViewApplication for frontend application select shared scheme for it and drag n drop your project file to the workspace. Now you have to close Xcode and open again your workspace. All projects should appear properly.
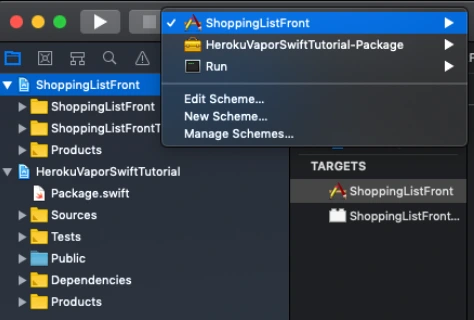
Make sure that you have all schemes here and also your projects appear properly.
Let’s start working on the iOS app. This will be just quick as we need just add a button text field and table view with the list. I’m not gonna create MVVM but it’s recommended also will use just NSURLSession for it as this tutorial it’s not about it. I just want to show you how quick and easy the whole application can be created.
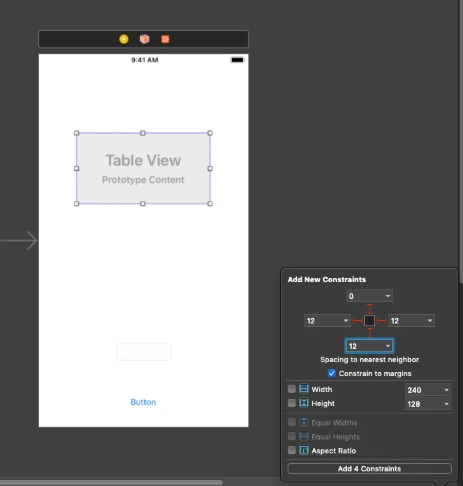
Go to Main.storyboard and create UI for this app first. Add tableView, button, and textField into you view Controller and setup constraints.
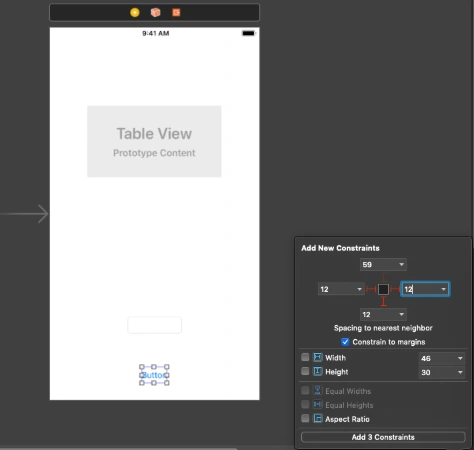
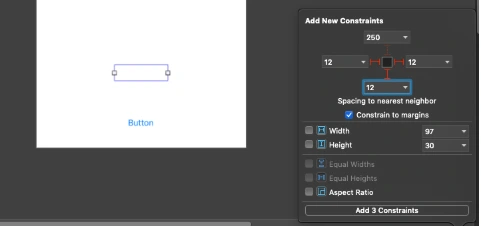
Create outlets for button, textField and connect delegate and dataSource for the tableView. Create an action for the button, create an extension for tableView delegate and data source. Create CellView. In your storyboard, you could create a prototype cell and use it in the data source. You could also create some labels and loading indicator to make that application a nice look. This tutorial is not about swift – iOS so I just give you an example of usage APIs here. You can find the whole project here. This for both frontend and backend with the workspace created. To be able to run it first you need to follow all the changes related to backend specific and Heroku as URL needs to be changed here for Heroku deployed an app or if you want to run it locally you need to configure PostgreSQL database on your machine and change database configuration in the configure.swift file.
Conclusion
Vapor is the best choice until you don’t need to use a non-SQL database like Kassandra as there is no easy way to configure that and make it work. As for me, this is no issue at all. This tutorial is easy but this is just to show you how that simple is writing backend in Swift. It’s the most important thing for the ios developers and also for every other delveloper as in my opinion this language is becoming to be the most popular language in a few years. I’m not a backend developer just enthusiast of server-side swift but thinking about change my frontend role to become a full stack.
Interested in our services?
Reach out for tailored solutions and expert guidance.