
Read articles
EU Data Act compliance tools compared: 7 solutions ranked for 2026
The EU Data Act (Regulation (EU) 2023/2854) changes who controls the data generated by connected products. From September 2025, manufacturers of IoT and connected devices have to give users access to the data their products generate, let them share it with third parties, and - in business-to-business settings - handle compensation under FRAND terms. Articles 3, 4, and 5 are the core of it: access by design, user access, and third-party sharing.
If you make connected products, this is now an engineering and legal problem at the same time. A handful of vendors have built software to handle it. Others position broad privacy or governance platforms as adjacent help. This article ranks seven of them by how directly they address the Data Act, based on product documentation, pricing pages, and published case studies reviewed in June 2026.
A note on scope before the ranking: not every tool here was built for the Data Act. Three were. The rest cover it partially, indirectly, or not at all - and we say so plainly in each entry. We’ve left out pure consent-management platforms (cookie banners, GDPR/CCPA consent) because they don’t touch the Data Act’s access and sharing obligations, which is a different problem.
The ranking at a glance

How we scored the tools
Each tool received a fit score from 0 to 10 for how well it addresses the EU Data Act specifically - not privacy or governance in general. The factors: whether the product is dedicated to the Data Act, which articles it covers, the breadth of relevant functionality, deployment model, target users, pricing transparency, and whether there are published case studies tied to the regulation.
The ranking
1. Databoostr (Grape Up) - 9.5/10
Databoostr is built specifically for the EU Data Act and covers the widest functional range of any tool reviewed. It provides a B2C portal for user data access and consent, a B2B portal for partners, and - unusually - handles the compensation and FRAND-terms side of Articles 3, 4, 5, and 9. It’s the only tool in this comparison that pairs compliance with data monetization, treating the regulation as a data-sharing capability rather than only a cost.
It is built by Grape Up, an EU-based company headquartered in Poland, so it offers EU data residency and is developed under EU jurisdiction - relevant where sovereignty is a requirement. It targets OEMs and manufacturers of connected products across automotive, home appliances, manufacturing, and material handling. Deployment is flexible: SaaS or on-premises on the customer’s own infrastructure. It also supports related regulations including Right to Repair and preparation for FIDA, and works alongside GDPR.
It’s the only tool here with published case studies tied to the Data Act: two automotive OEM deployments, one in Europe and one in Japan, covering six relevant articles.
The trade-offs: pricing isn’t public and depends on the scope of integrations and deployment, and a full rollout with integrations can take weeks to months. There may be associated consulting work on the legal, process, and technical sides.
2. Steelbridge - 8.5/10
Steelbridge, from Helsinki, Finland, is fully dedicated to the EU Data Act and offers one of the broadest module sets among the dedicated tools. It covers consent management (GDPR-aligned), a data-access API (REST and webhooks), a compliance dashboard with audit logs, emergency data access for public bodies under Article 15, trade-secret protection, and - like Databoostr - a billing and monetization layer that turns third-party access into a revenue stream rather than only a cost. There is also a white-label option for OEMs and resellers.
It is one of only two tools here with fully public pricing: EUR 250, 500, or 750 per month, billed monthly with cancel-anytime terms, plus optional onboarding at EUR 1,500 and custom enterprise/white-label tiers. It targets IoT manufacturers, industrial machinery makers, energy companies, and mobility providers, quotes go-live in roughly 6–8 weeks, and - being based in Finland - offers EU data residency. It has also received innovation funding from Business Finland.
It lands neck-and-neck with Data Act Kit (both 8.5): Steelbridge edges ahead on breadth of modules and the white-label option, Data Act Kit on raw speed of integration. The shared limitation is maturity - Steelbridge is an early-stage company with no published customer case studies yet, so the product and pricing are well developed but the market track record isn’t there.
3. Data Act Kit - 8.5/10
Data Act Kit, built in Germany, is the fastest route to compliance among the dedicated tools. It’s a “plug-and-play” set of APIs plus a white-label portal: one API connects to your backend, and the kit handles real-time data distribution to an unlimited number of third parties. It covers Articles 4 and 5 - user and third-party access.
It’s also one of only two tools in this comparison with public pricing. The Standard plan is EUR 690 per month for the full feature set, with an Enterprise tier above it. There’s a 21-day full-access trial with no card required, and onboarding and implementation support are included. Because there’s no infrastructure to build, integration runs in days to weeks.
The main limitation is vendor maturity. It’s a young, very small operation with no published case studies yet. For teams that need a fast, narrow path to Articles 4 and 5 and can accept a small vendor, it’s a strong option.
4. EU Data Act Software - 8/10
This Danish product is dedicated to the EU Data Act and states its coverage of Articles 3, 4, and 5 explicitly. It provides a data-request portal for both users and third parties, request handling, and governance rules. Hosting is in the EU with multiple options, and the architecture is multi-tenant, aimed at everyone from small IoT firms to large enterprises.
It’s a sensible choice where EU data residency and sovereignty matter, given EU-only hosting and GDPR rules built into governance. There’s a free trial and a demo.
What’s missing is public proof. There’s no published pricing (you request a quote), no case studies yet, and the company is young with a limited public track record. It runs a partner program for advisors.
5. Stream Analyze (SA Data Broker) - 6.5/10
Stream Analyze, from Sweden, is primarily an Edge AI and streaming-analytics platform, with a dedicated Data Broker module for the Data Act layered on top. The core technology is genuinely strong: an on-device agent with an engine as small as 17 kB, paired with a Data Broker that runs in the cloud or on-premises. It addresses Article 3 (access by design), 4, and 5 (porting and streaming), and is unusual in starting from the device rather than the cloud.
It fits industrial settings - transport, manufacturing, energy, mobile machinery - where data originates on the device and low footprint matters. Stream Analyze has published case studies, but they’re about Edge AI (for example, failure prediction for mining loaders), not the EU Data Act.
The reason it sits mid-table: the EU Data Act is a side product relative to the Edge AI core, there are no EU Data Act-specific case studies, pricing is by individual quote, and deployment requires access to device firmware and software, which lengthens rollout to weeks or months.
6. BigID - 5/10
BigID (US/Israel) is a broad data security, privacy, and AI-governance platform - DSPM at its core - rather than a Data Act tool. Its strength as a foundation is data discovery and classification across IoT, SaaS, and structured and unstructured sources, which is genuinely useful groundwork for the access and transparency the regulation requires. It addresses Data Act concerns indirectly: portability, processing transparency, FRAND-adjacent governance.
It’s aimed at large enterprises and regulated sectors, and supports a long list of other regulations: GDPR, CCPA, the EU AI Act, data sovereignty, and more.
But there’s no dedicated Data Act module - the positioning lives in a blog post about the regulation going live, not a product. Pricing is enterprise-scale: typically USD 15,000 to 175,000 per year, with large deployments much higher (one public figure reaches USD 698,000). Rollout is a multi-week-to-month enterprise project, and addressing the Data Act through governance modules adds complexity..
7. OneTrust - 4/10
OneTrust (US) is the broadest compliance platform in the comparison - consent and preferences, privacy automation (DSAR), data-use governance, and AI governance, supporting GDPR, the EU AI Act, SOC 2, and hundreds of regulations. With 14,000+ customers, it’s also the most established vendor here.
For the Data Act specifically, though, there’s no product or module - only educational blog content. The relevant capabilities (consent, access requests, governance) touch the regulation indirectly at best. Pricing starts around USD 10,000 per year (as of Q2 2026), with a median near USD 11,500; implementation fees typically run 20-40% of the annual subscription, and time to deploy is commonly 3-6 months. There are no Data Act case studies, only the educational material. Strong privacy and GRC platform; not an EU Data Act solution.
What these tools have in common - and where they diverge
The four dedicated tools (Databoostr, Steelbridge, Data Act Kit, EU Data Act Software) share a functional core: a data-request portal, consent and access management, and third-party sharing aligned to Articles 3-5. The broader platforms (BigID, OneTrust) come at it from the other direction - they grew out of GDPR/CCPA privacy and governance, and treat the Data Act as one more regulation among many rather than a built-for-purpose product.
Dedication. Fully dedicated: Databoostr, Steelbridge, Data Act Kit, EU Data Act Software. Dedicated module: Stream Analyze. Indirect via governance: BigID, OneTrust.
Architecture starting point. From the device (edge agent): Stream Analyze. From the cloud or API: the dedicated tools and the platforms.
Pricing transparency. Public pricing: Data Act Kit (EUR 690/month) and Steelbridge (EUR 250–750/month) among the serious Data Act options. Everyone else quotes individually.
Time to compliance. Fastest: Data Act Kit (one API, days to weeks), with Steelbridge close behind (about 6–8 weeks). Slower: tools requiring device-level integration or enterprise rollouts (Stream Analyze, BigID, OneTrust, at 3–6 months for the platforms).
Data monetization. Two tools build billing for third-party access into the product, turning compliance into a possible revenue stream: Databoostr and Steelbridge.
Market evidence. Data Act case studies exist for only one tool: Databoostr (two automotive OEMs). Others have case studies in adjacent domains, or - like Steelbridge - only illustrative examples, but nothing tied to the regulation.
Data residency. EU-based options: Databoostr (Grape Up, Poland), Steelbridge (Finland), EU Data Act Software (Denmark, EU hosting), and Data Act Kit (Germany) lead here, which matters where sovereignty is a requirement.
How to choose
If you need the widest functional coverage and want to treat data sharing as a capability rather than only a compliance cost, Databoostr covers the most ground and is the only option with Data Act case studies behind it. If you want broad module coverage with transparent pricing and a monetization layer, Steelbridge is the closest alternative. If your priority is the fastest, cheapest path to Articles 4 and 5 and you can work with a small vendor, Data Act Kit is the most direct. If EU data residency is non-negotiable, EU Data Act Software is built around it (and Steelbridge, Databoostr, and Data Act Kit are also EU-based). If your data lives on industrial edge devices, Stream Analyze’s architecture is the natural fit. And if you already run BigID or OneTrust for privacy and governance, they can support parts of the work - but you’ll be assembling compliance from general-purpose modules rather than buying a Data Act product.
The honest summary: four tools were built for this regulation, and they should be the starting point for most connected-product manufacturers. The broad platforms are worth considering only if you already own them and want to extend what you have.
Frequently asked questions
What does the EU Data Act require from manufacturers of connected products?
From September 2025, makers of IoT and connected devices must give users access to the data their products generate (Article 4), let users share that data with third parties (Article 5), and design products so the data is accessible in the first place (Article 3, access by design). In business-to-business settings, data sharing has to happen on fair, reasonable, and non-discriminatory (FRAND) terms, which can include compensation (Article 9).
Which tools are dedicated to the EU Data Act?
Four of the seven reviewed are built specifically for the Data Act: Databoostr (Grape Up, an EU-based company from Poland), Steelbridge (Finland), Data Act Kit, and EU Data Act Software. Stream Analyze offers a dedicated Data Broker module on top of an Edge AI core. BigID and OneTrust address the regulation only indirectly through general privacy and governance features.
Which EU Data Act tool is the fastest and cheapest to deploy?
Data Act Kit is the fastest dedicated route: a single API plus a white-label portal, integration in days to weeks, public pricing at EUR 690 per month, and a 21-day free trial. It covers Articles 4 and 5. Steelbridge is the other publicly priced option (EUR 250–750 per month) and goes live in about 6–8 weeks with a broader module set. The shared trade-off is vendor maturity - both are young, with no published case studies yet.
Which EU Data Act tool has the widest coverage?
Databoostr covers the most ground in this comparison: B2C and B2B portals, consent and access management, and the compensation/FRAND side of Articles 3, 4, 5, and 9. It is also the only reviewed tool with published case studies tied to the Data Act (two automotive OEM deployments). Pricing is by individual quote, and a full rollout can take weeks to months.
Do privacy platforms like OneTrust or BigID cover the EU Data Act?
Not directly. Both are strong privacy, security, and governance platforms (GDPR, CCPA, the EU AI Act, and more), and their data discovery, consent, and governance features can support parts of Data Act work. But neither has a dedicated Data Act product or module - OneTrust offers only educational content, and BigID positions through a blog post. Neither has Data Act-specific case studies.
Which tools support EU data residency?
Databoostr (Grape Up) is an EU-based company headquartered in Poland and offers EU data residency. Steelbridge (Finland), EU Data Act Software (Denmark, EU hosting with GDPR rules built into governance), and Data Act Kit (Germany) are also EU-based. These are the strongest fits where data sovereignty is a hard requirement.
Kubernetes as a solution to container orchestration
Containerization
Kubernetes has become a synonym for containerization. Containerization, also known as operating-system-level virtualization provides the ability to run multiple isolated containers on the same Kernel. That is, on the same operating system that controls everything inside the system. It brings a lot of flexibility in terms of managing application deployment.
Deploying a few containers is not a difficult task. It can be done by means of a simple tool for defining and running multi-container Docker applications like Docker Compose. Doing it manually via command line interface is also a solution.
Challenges in the container environment
Since the container ecosystem moves fast it is challenging for developers to stay up-to-date with what is possible in the container environment. It’s usually in the production system where things get more complicated as mature architecture can consist of hundreds or thousands of containers. But then again, it’s not the deployment of such swarm that’s the biggest challenge.
What’s even more confusing is the quality of our system called High Availability. In other words, it is when multiple instances of the same container must be distributed across nodes available in the cluster. The type of the application that lives in a particular container that dictates the distribution algorithm that should be applied. Once the containers are deployed and distributed across the cluster, we encounter another problem: the system behavior in the presence of node failure.
Luckily enough, modern solutions provide a self-healing mechanism. Therefore, if a node hits the capacity limits or its down issues, the container will be redeployed on a different node to ensure stability. With that said, managing multiple containers without a sophisticated tool is almost impossible. This sophisticated tool is known as a container orchestrator. Companies have many options when it comes to platforms for running containers. Deciding which one is the best for a particular organization can be a challenging task itself. There are plenty of solutions on the market among which the most popular one is Kubernetes [1].
Kubernetes
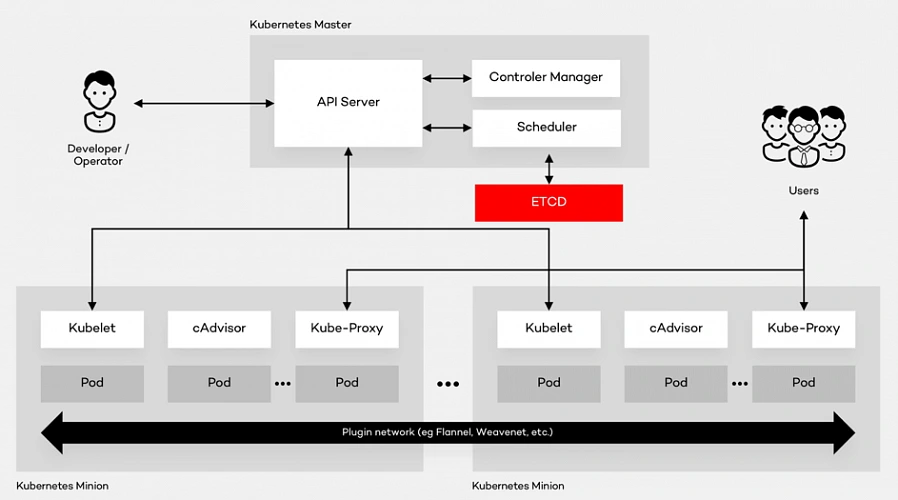
Kubernetes is the open source container platform first released by Google in 2014. The name Kubernetes, translated from Ancient Greek and means “Helmsman”. The whole idea behind this open-source project was based on Google’s experience of running containers at an enormous scale. The company uses Kubernetes for the Google Container Engine (GKE), their own Container as a Service (CaaS). And it shouldn’t be a surprise to anyone that numerous other platforms out there such as IBM Cloud, AWS or Microsoft Azure support Kubernetes. The tool can manage the two most popular types of containers – Docker & Rocket. Moreover, it helps organize networking, computing and storage – three nightmares of the microservice world. Its architecture is based on two types of nodes – Master and Minion as shown below:
Architecture glossary
- PI Server – entry point for REST commands. It processes and validates the requests and executes the logic.
- Scheduler – it supports the deployment of configured pods and services onto the nodes.
- Controller Manager – uses an apiserver to control the shared state of the cluster and makes changes if necessary.
- ETCD Storage – key-value store used mainly for shared configuration and service discovery.
- Kubelet – receives the configuration of a pod from the apiserver and makes sure that the right containers are running. It also communicates with the master node.
- cAdvisor – (Container Advisor) it collects and processes information about each running container. Most importantly, it helps container users understand the resource usage and performance characteristics of their containers.
- Kube - Proxy – runs on each node. It manages the networking routing for TCP (Transmission Control Protocol) and UDP (User Datagram Protocol) packets which are used for sending bits of data.
- Pod – the fundamental element of the architecture, a group of containers that, in a non-containerized setup, would all run on a single server.
Architecture description
A Pod provides abstraction of the container and makes it possible to group them and deploy on the same host. The containers that are in the same Pod share a network, storage and a run specification. Every single Minion Node runs a kubelet agent process which connects it to the Master Node as well as a kube-proxy which can do simple TCP and UDP stream forwarding. The Kubernetes architecture model assumes that Pods can communicate with other Pods, regardless of which host they land on. Besides, they also have a short lifetime: they’re created, destroyed and then created again depending on the server. Connectivity can be implemented in various methods (kube-router, L2 network etc.). In many cases, a simple overlay network based on a Flannel is a sufficient solution.
Summary
As a company with years of experience in the cloud evolution, we advise enterprises to think even up to ten years into the future when choosing the right platform . It all depends on where they see technology heading. Hopefully, this summary will help you understand the fundamentals of component containerization, the Kubernetes architecture and, in the end, make the right decision.
The path towards enterprise level AWS infrastructure – EC2, AMI, Bastion Host, RDS
Let’s pick up the thread of our journey into the AWS Cloud, and keep discovering the intrinsics of the cloud computing universe while building a highly available, secure and fault-tolerant cloud system on the AWS platform. This article is the second one of the mini-series which walks you through the process of creating an enterprise-level AWS infrastructure and explains concepts and components of the Amazon Web Services platform. In the previous part, we scaffolded our infrastructure; specifically, we created the VPC, subnets, NAT gateways, and configured network routing. If you have missed that, we strongly encourage you to read it first. In this article, we will build on top of the work we have done in the previous part, and this time we focus on the configuration of EC2 instances, the creation of AMI images, setting up Bastion Hosts, and RDS database.
The whole series comprises of:
- Part 1 - Architecture Scaffolding (VPC, Subnets, Elastic IP, NAT).
- Part 2 - The Path Towards Enterprise Level AWS Infrastructure – EC2, AMI, Bastion Host, RDS.
- Part 3 - Load Balancing and Application Deployment (Elastic Load Balancer)
Infrastructure overview
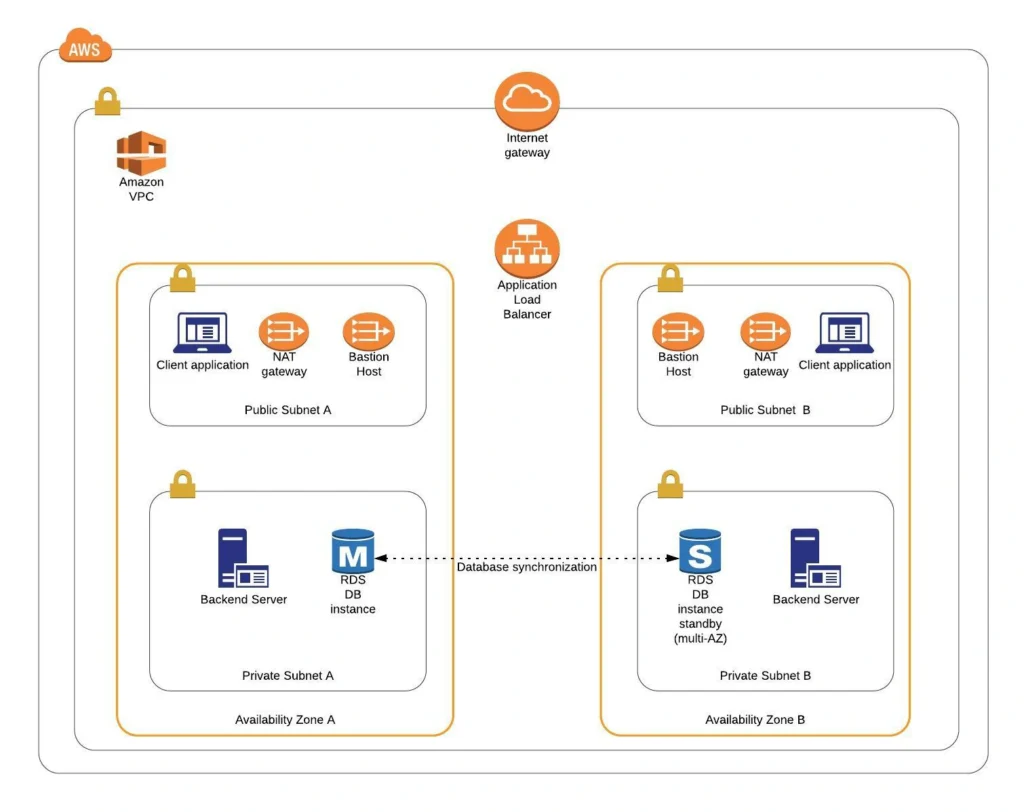
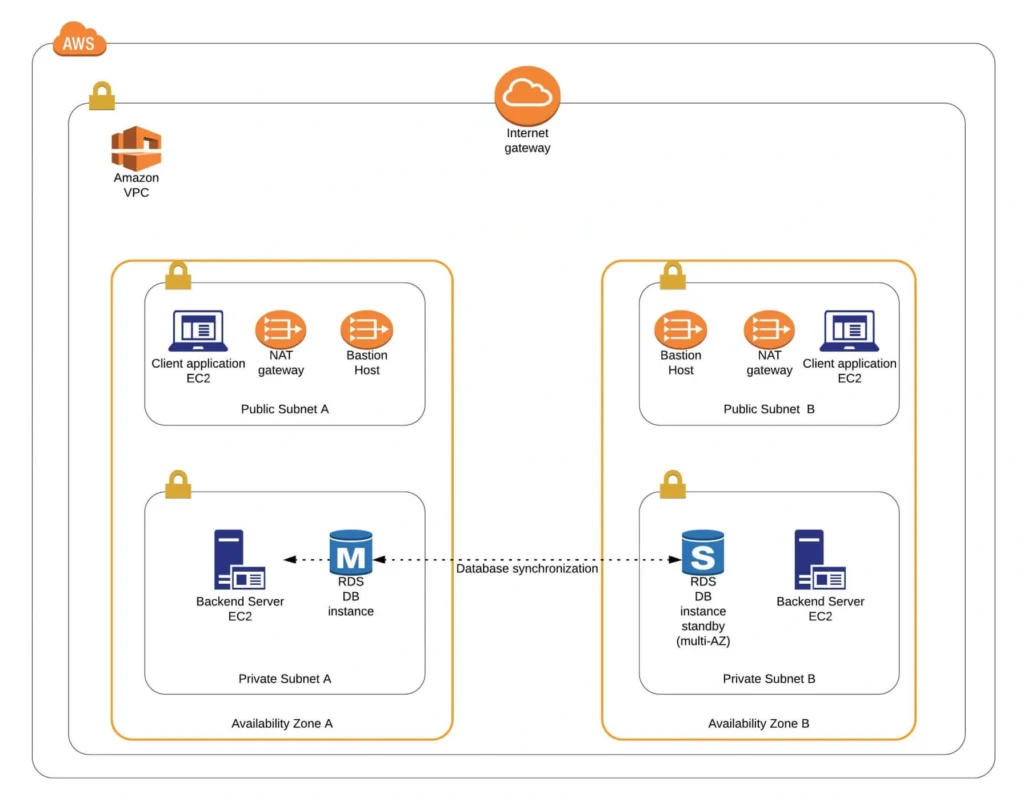
The diagram below presents our designed infrastructure. If you would like to learn more about design choices behind it, please read Part 1 - Architecture Scaffolding (VPC, Subnets, Elastic IP, NAT) . We have already created a VPC, subnets, NAT Gateways, and configured network routing. In this part of the series, we focus on the configuration of required EC2 instances, the creation of AMI images, setting up Bastion Hosts, and the RDS database.
AWS theory
1. Elastic cloud compute cloud (EC2)
Elastic Cloud Compute Cloud (EC2) is an Amazon service that allows you to manage your virtual computing environments, known as EC2 instances, on AWS. An EC2 instance is simply a virtual machine provisioned with a certain amount of resources such as CPU, memory, storage, and network capacity launched in a selected AWS region and availability zone. The elasticity of EC2 means that you can scale up or down resources easily, depending on your needs and requirements. The network security of your instances can be managed with the use of security groups by the configuration of protocols, ports, and IP addresses that your instances can communicate with.
There are five basic types of EC2 instances, which you can use based on your system requirements.
- General Purpose,
- Compute Optimized,
- Memory Optimized,
- Accelerated Computing,
- Storage Optimized.
In our infrastructure, we will use only general-purpose instances, but if you would like to learn more about different features of instance types, see the AWS documentation.
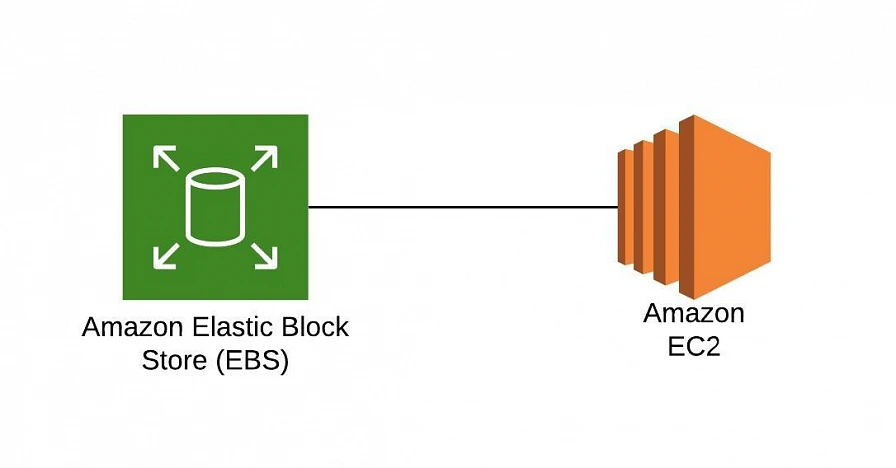
All EC2 instances come with instance store volumes for temporary data that is deleted whenever the instance is stopped or terminated, as well as with Elastic Block Store (EBS) , which is a persistent storage volume working independently of the EC2 instance itself.
2. Amazon Machine Images (AMI)
Amazon utilizes templates of software configurations, known as Amazon Machine Images (AMI) , in order to facilitate the creation of custom EC2 instances. AMIs are image templates that contain software such as operating systems, runtime environments, and actual applications that are used to launch EC2 instances. This allows us to preconfigure our AMIs and dynamically launch new instances on the go using this image instead of always setting up VM environments from scratch. Amazon provides some ready to use AMIs on the AWS Marketplace, which you can extend, customize, and save as your own (which we will do soon).
3. Key pair
Amazon provides a secure EC2 login mechanism with the use of public-key cryptography. During the instance boot time, the public key is put in an entry within ~/.ssh/authorized_keys , and then you can securely access your instance through SSH using a private key instead of a password. The public and private keys are known as a key pair.
4. IAM role
IAM means Identity and Access Management and it defines authentication and authorization rules for your system. IAM roles are IAM identities which comprise a set of permissions that control access to AWS services and can be attached to AWS resources such as users, applications, or services. As an example, if your application needs access to a specific AWS service such as an S3 Bucket, its EC2 instance needs to have a role with appropriate permission assigned.
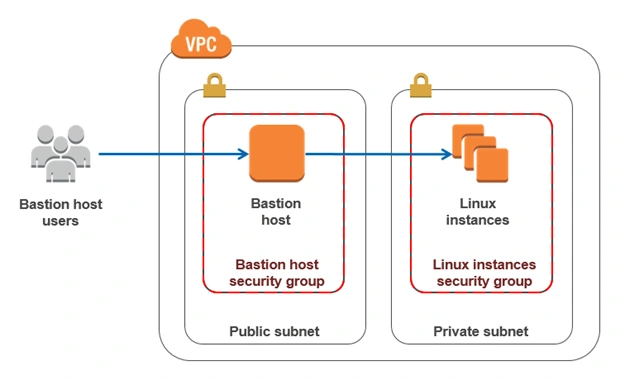
5. Bastion Host
Bastion Host is a special purpose instance placed in a public subnet, which is used to allow access to instances located in private subnets while providing an increased level of security. It acts as a bridge between users and private instances, and due to its exposure to potential attacks, it is configured to withstand any penetration attempts. The private instances only expose their SSH ports to a bastion host, not allowing any direct connection. What is more, bastion hosts may be configured to log any activity providing additional security auditing.
6. Amazon Relational Database Service (RDS)
6.1. RDS
RDS is an Amazon service for the management of relational databases in the cloud. As of now (23.04.2020), it supports six database engines specifically Amazon Aurora, PostgreSQL, MySQL, MariaDB, Oracle Database, and SQL Server. It is easy to configure, scale and it provides high availability and reliability with the use of Read Replicas and Multi-AZ Deployment features.
6.2. Read replicas
RDS Read Replicas are asynchronous, read-only instances that are replicas of a primary “master” db instance. They can be used for handling queries that do not require any data change, thus reliving the workload from the master node.
6.3. Multi-AZ deployment
AWS Multi-AZ Deployment is an option to allow RDS to create a secondary, standby instance in a different AZ, and replicate it synchronously with the data from the master node. Both master and standby instances run on their own physically independent infrastructures, and only the primary instance can be accessed directly. The standby replica is used as a failover in case of any master’s failure, without changing the endpoint of your DB.
This reduces downtime of your system and makes it easier to perform version upgrades or create backup snapshots, as they can be done on the spare instance. Multi-AZ is usually used only on the master instance. However, it is also possible to create read replicas with Multi-AZ deployment, which results in a resilient disaster recovery infrastructure.
Practice
We have two applications that we would like to run on our AWS infrastructure. One is a Java 11 Spring Boot application, so the EC2 which will host it is required to have Java 11 installed. The second one is a React.js frontend application, which requires a virtual machine with a Node.js environment. Therefore, as the first step, we are going to set up a Bastion Host, which will allow us to ssh our instances. Then, we will launch and configure those two EC2 instances manually in the first availability zone. Later on, we will create AMIs based on those instances and use them for the creation of EC2s in the second availability zone.
1. Availability Zone A
1.1. Bastion Host
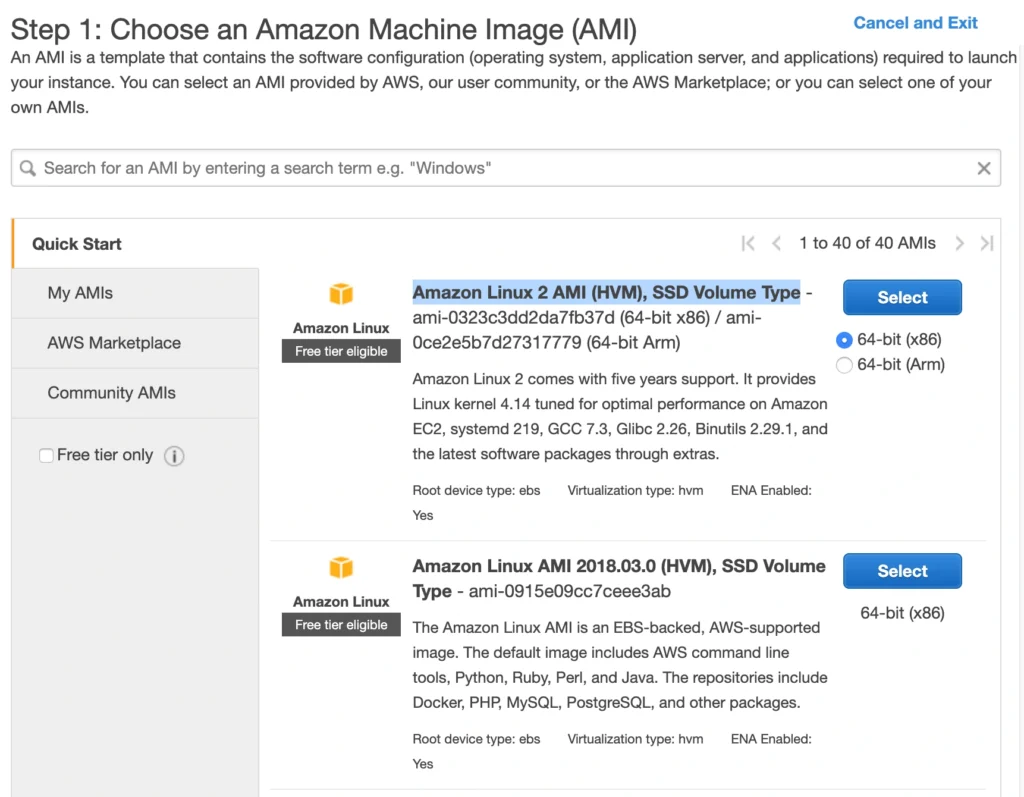
A Bastion Host is nothing more than a special-purpose EC2 instance. Hence, in order to create a Bastion Host, go into the AWS Management Console, and search for EC2 service. Then click the Launch Instance button, and you will be shown with an EC2 launch wizard. The first step is the selection of an AMI image for your instance. You can filter AMIs and select one based on your preferences. In this article, we will use the Amazon Linux 2 AMI (HVM), SSD Volume Type image.
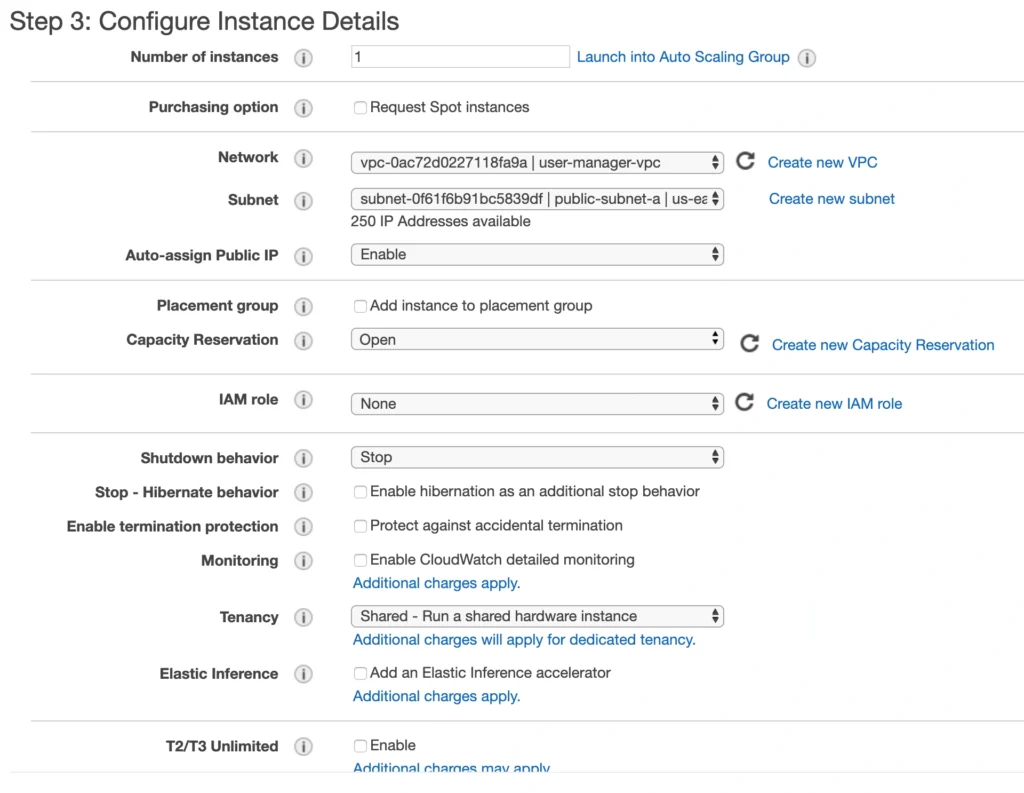
On the next screen, we need to choose an instance type for our image. Here, I am sticking with the AWS free tier program, so I will go with the general-purpose t2.micro type. Click Next: Configure instance Details . Here, we can define the number of instances, network settings, IAM configuration, etc. For now, let’s start with 1 instance, we will work on the scalability of our infrastructure later. In the Network section, choose your previously created VPC and public-subnet-a and enable Public IP auto-assignment. We do not need to specify any IAM role as we are not going to use any of the AWS services.
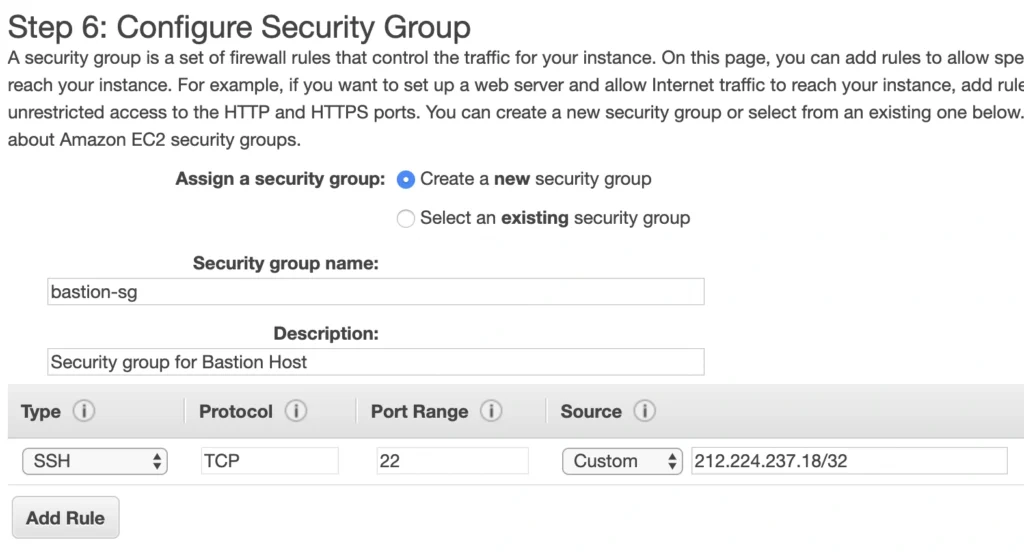
Click Next . Here you can see that the wizard automatically configures your instance with an 8GB EBS storage, which is enough for us. Click Next again. Now, we can add tags to improve the recognizability of our instance. Let’s add a Name tag bastion-a-ec2 . On the next screen, we can configure a security group for our instance. Create a new security group, name it bastion-sg .
You can see that there is already one predefined rule exposing our instance for SSH sessions from 0.0.0.0/0 (anywhere). You should change it here to allow only connections from your IP address. The important thing to note here is that in the production environment you would never expose your instances to the whole world, instead, you would whitelist the IP addresses of employees allowed to connect to your instance.
In the next step, you can review your EC2 configuration and launch it. The last action is the creation of a key pair. This is important because we need this key pair to ssh to our instance. Name the key pair e.g. user-manager-key-pair , download the private key, and store it locally on your machine. This is it, Amazon will take some time, but in the end, your EC2 instance will be launched.
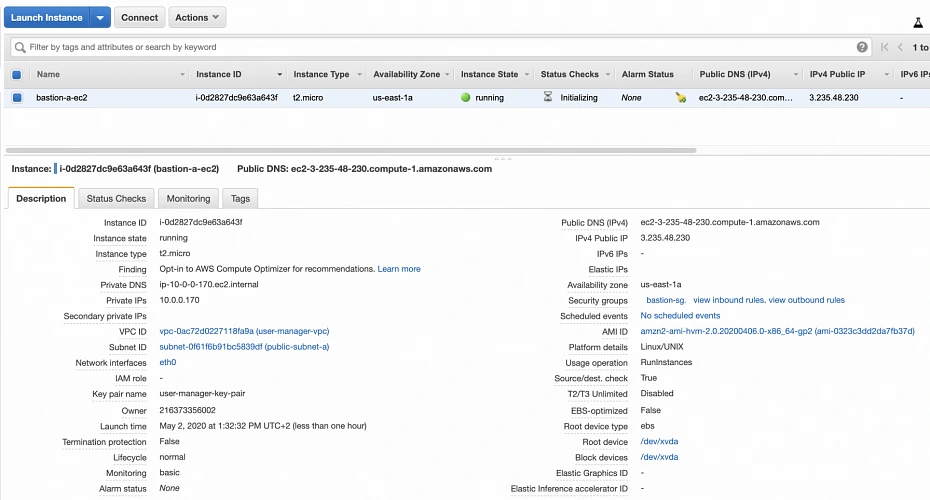
In the instance description section, you can find the public IP address of your instance. We can use it to ssh to the EC2. That is where we will need previously generated and hopefully locally saved private key (*.pem file). That’s it, our instance is ready for now. However, in production, it would be a good idea to harden the security of the Bastion Host even more. If you would like to learn more about that, we recommend this article .
1.2. Backend server EC2
Now, let’s create an instance for the backend server. Click Launch instance again, choose the same AMI image as before, place it in your user-manager-vpc, private-subnet-a, and do not enable public IP auto-assignment this time. Move through the next steps as before, add a server-a-ec2 name tag. In the security group configuration, create a new security group, and modify its settings to allow SSH incoming communication only from the bastion-sg .
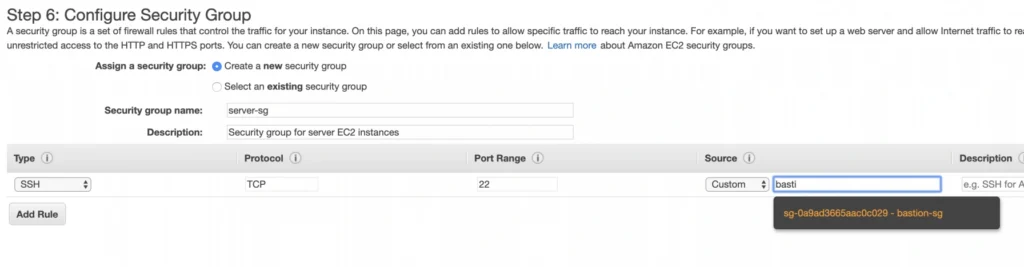
Launch the instance. You can create a new key pair or use the previously created one (for simplicity I recommend using the same key pair for all instances). In the end, you should have your second instance up and running.

You can see that server-a-ec2 does not have any public IP address. However, we can access it through the bastion host. First, we need to add our key to a keychain and then we can ssh to our bastion host instance adding -A flag to the ssh command. This flag enables agent-forwarding, which will let you ssh into your private instance without explicitly specifying private key again. This is a recommended way, which lets you avoid storage of the private key on the bastion host instance which could lead to a security breach.
ssh-add -k
ssh -A -i path-to-your-pem-file ec2-user@bastion-a-ec2-instance-public-ip
Then, inside your bastion host execute the command:
ssh ec2-user@server-a-ec2-instance-private-ip
Now, you should be inside your server-a-ec2 private instance. Let’s install the required software on the machine by executing those commands:
sudo yum update -y &&
sudo amazon-linux-extras enable corretto8 &&
sudo yum clean metadata &&
sudo yum install java-11-amazon-corretto &&
java --version
As a result, you should have java 11 installed on your server-a-ec2 instance. You can go back to the local command prompt by executing the exit command twice.
AMI
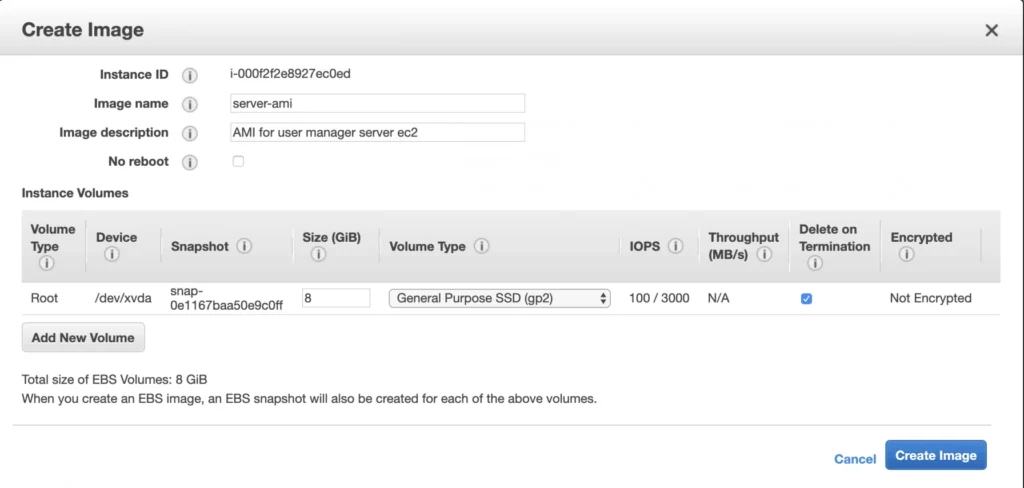
The ec2 instance for the backend server is ready for the deployment. In the second availability zone, we could follow exactly the same steps. However, there is an easier way. We can create an AMI image based on our pre-configured instance and use it later for the creation of the corresponding instance in availability zone b. In order to do that, go again into the Instances menu, select your instance, click Actions -> Image -> Create image . Your AMI image will be created and you will be able to find it in the Images/AMIs section.
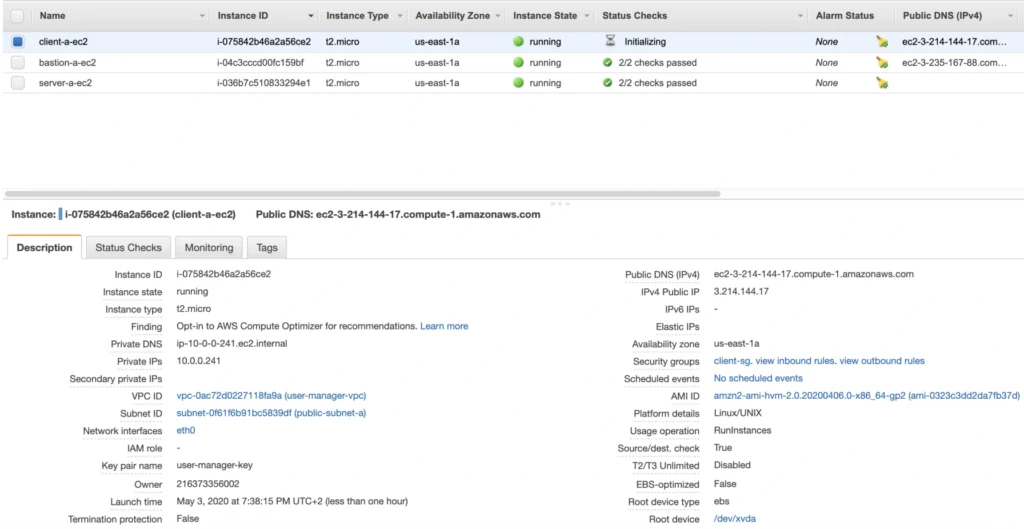
1.3. Client application EC2
The last EC2 instance we need in the Availability Zone A will host the client application. So, let’s go once again through the process of EC2 creation. Launch instance, select the same base AMI as before, select your VPC, place the instance in the public-subnet-a , and enable public IP assignment. Then, add a client-a-ec2 Name tag, and create a new security group client-sg allowing SSH incoming connection from the bastion-sg security group. That’s it, launch it.
Now, SSH to the instance through the bastion host, and install the required software.
ssh -A -i path-to-your-pem-file ec2-user@bastion-a-ec2-instance-public-ip
Then, inside your bastion host execute the command:
ssh -A -i path-to-your-pem-file ec2-user@bastion-a-ec2-instance-public-ip
Inside client-a-ec2 command prompt, execute :
sudo yum update &&
curl -sL https://rpm.nodesource.com/setup_12.x | sudo bash - &&
sudo yum install -y nodejs &&
node -v &&
npm -v
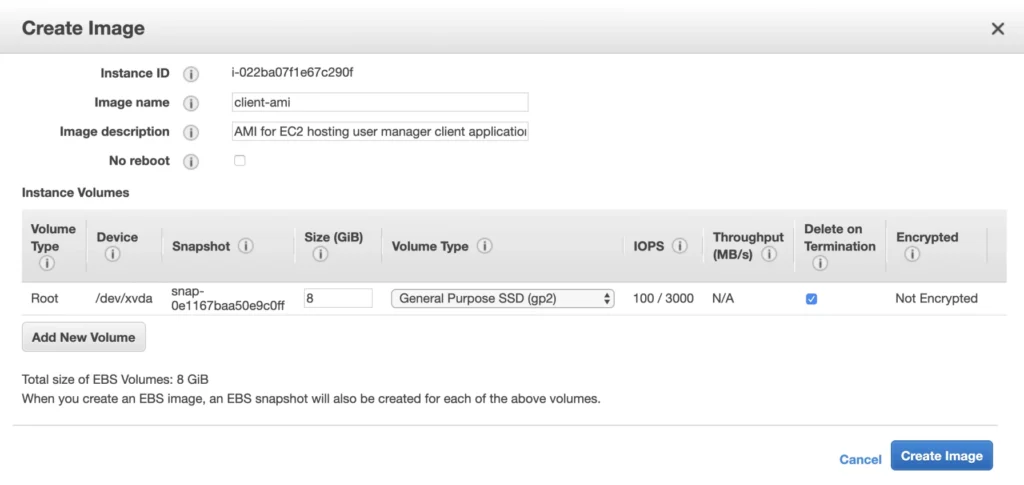
Exit the EC2 command prompt and create a new AMI image based on it.
2. Availability Zone B
2.1. Bastion Host
Create the second bastion host instance following the same steps as for availability zone a, but this time place it in public-subnet-b , add Name tag bastion-b-ec2 , and assign to it previously created bastion-sg security group.
2.2. Backend server EC2
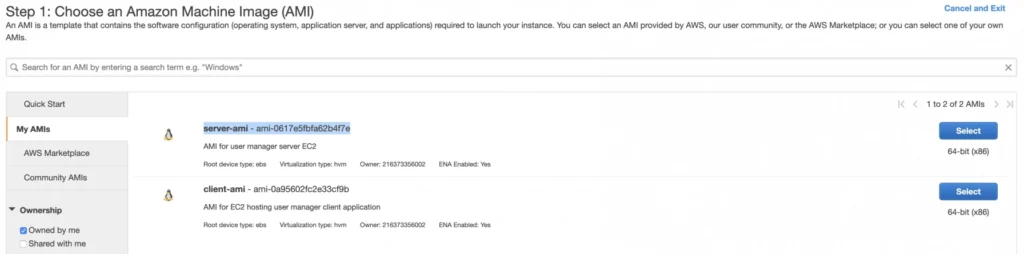
For the backend server EC2, go again to the Launch Instance menu, and this time instead of using Amazon’s AMI switch to My AMI’s tab and select the previously created server-ami image. Place the instance in the private-subnet-b , add a name tag server-b-ec2 , and assign to it the server-sg security group.
2.3. Client application EC2
Just as for the backend server instance, launch the client-b-ec2 using your custom AMI image. This time select the client-ami image, place EC2 in the public-subnet-b , enable automatic IP assignment, and choose the client-sg security group.
3. RDS
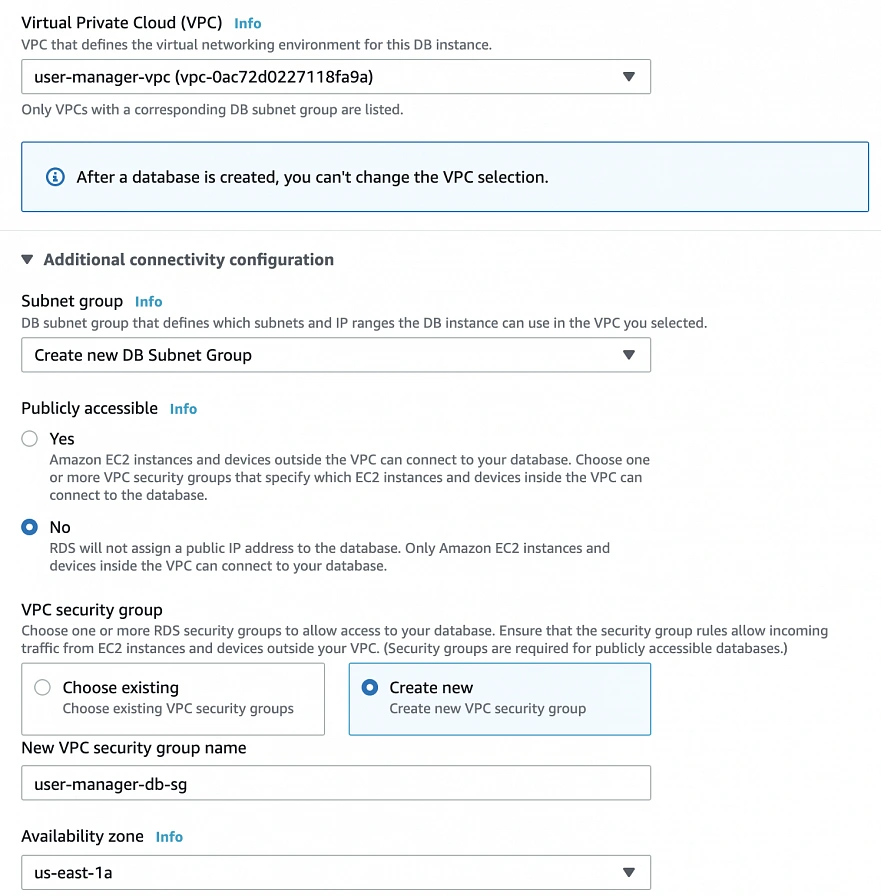
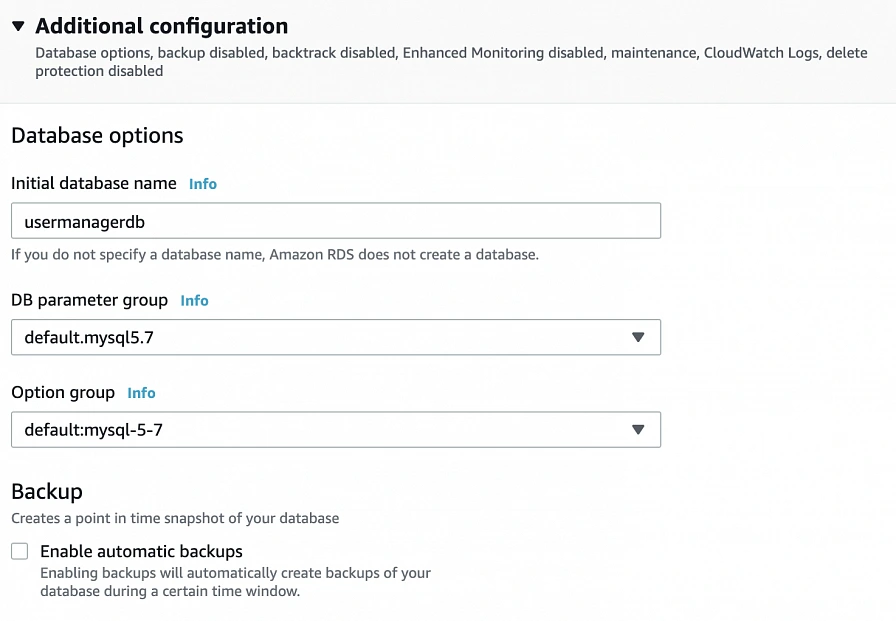
We have all our EC2 instances ready. The last part which we will cover in this article is the configuration of RDS. For that, go into the RDS service in the AWS Management Console and click Create database. In the database configuration window, follow the standard configuration path. Select MySQL db engine, and select Free tier template. Set your db name as user-manager-db , specify master username and password, select your user-manager-vpc , availability zone a, and make the database publicly not accessible. Create also a new user-manager-db-sg security group.
In the Additional configuration section, specify the initial db name, and finally create a database.
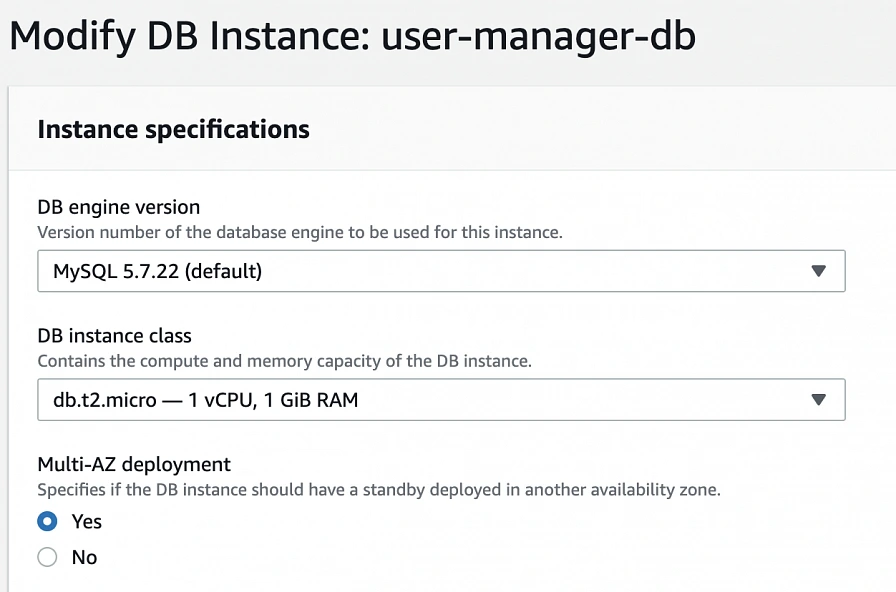
After AWS finishes the creation process, you will be able to get the database endpoint, which we will use to connect to the database from our application later on. Now, in order to provide high availability of the database, click the Modify button on the created database screen, and enable Multi-AZ deployment. Please, bear in mind that Multi-AZ deployment is not included in the free tier program, so if you would like to avoid any charges, skip this point.
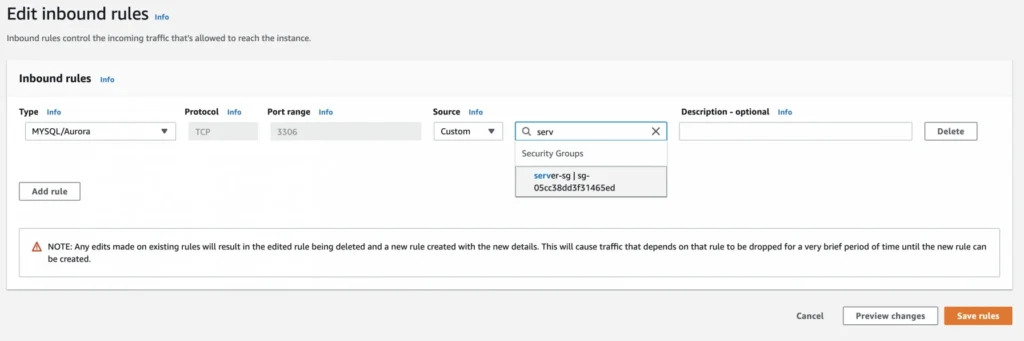
As the last step, we need to add a rule to the user-manager-db-sg to allow incoming connections from our server-sg on port 3306 in order to allow communication between our server and the database.
EC2, AMI, Bastion Host, RDS - Summary
Congratulations, our infrastructure is almost ready for deployment. As you can see in our final diagram, the only thing which is missing is the load balancer. In the next part of the series, we will take care of that, and deploy our applications to have a fully functioning system running on AWS infrastructure!
Sources:
- https://cloudacademy.com/blog/aws-bastion-host-nat-instances-vpc-peering-security/
- https://aws.amazon.com/quickstart/architecture/linux-bastion/
- https://aws.amazon.com/blogs/security/securely-connect-to-linux-instances-running-in-a-private-amazon-vpc/
- https://app.pluralsight.com/library/courses/aws-developer-getting-started/table-of-contents
- https://app.pluralsight.com/library/courses/aws-developer-designing-developing/table-of-contents
- https://app.pluralsight.com/library/courses/aws-networking-deep-dive-vpc/table-of-contents
- https://www.techradar.com/news/what-is-amazon-rds
- https://medium.com/kaodim-engineering/hardening-ssh-using-aws-bastion-and-mfa-45d491288872
- https://cloudacademy.com/blog/aws-bastion-host-nat-instances-vpc-peering-security/
- https://docs.aws.amazon.com/IAM/latest/UserGuide/id_roles.html
- https://docs.aws.amazon.com/AWSEC2/latest/UserGuide/ec2-key-pairs.html
- https://aws.amazon.com/ec2/instance-types/
- https://docs.aws.amazon.com/AWSEC2/latest/UserGuide/concepts.html