The Path Towards Enterprise Level AWS Infrastructure – Load Balancing and Application Deployment


Let’s finish up the process of building our AWS infrastructure and discover the last crucial elements of the AWS Cloud needed for our highly available, secure and fault-tolerant cloud system.
This article is the third and the last one of the mini-series which walks you through the process of creating an enterprise-level AWS infrastructure and explains concepts and components of the Amazon Web Services platform. In the previous parts, we created the VPC, subnets, NAT gateways, configured network routing, set up required EC2 instances, bastions hosts, and the RDS database. If you have missed any of the previous parts, we strongly encourage you to check them out.
In this article, we will finish up the infrastructure, by setting up a load balancer, target groups, and deploying our applications on our platform.
The whole series comprises of:
- Part 1 – Architecture Scaffolding (VPC, Subnets, Elastic IP, NAT).
- Part 2 – The Path Towards Enterprise Level AWS Infrastructure – EC2, AMI, Bastion Host, RDS
- Part 3 – Load Balancing and Application Deployment (Elastic Load Balancer)
Infrastructure Overview
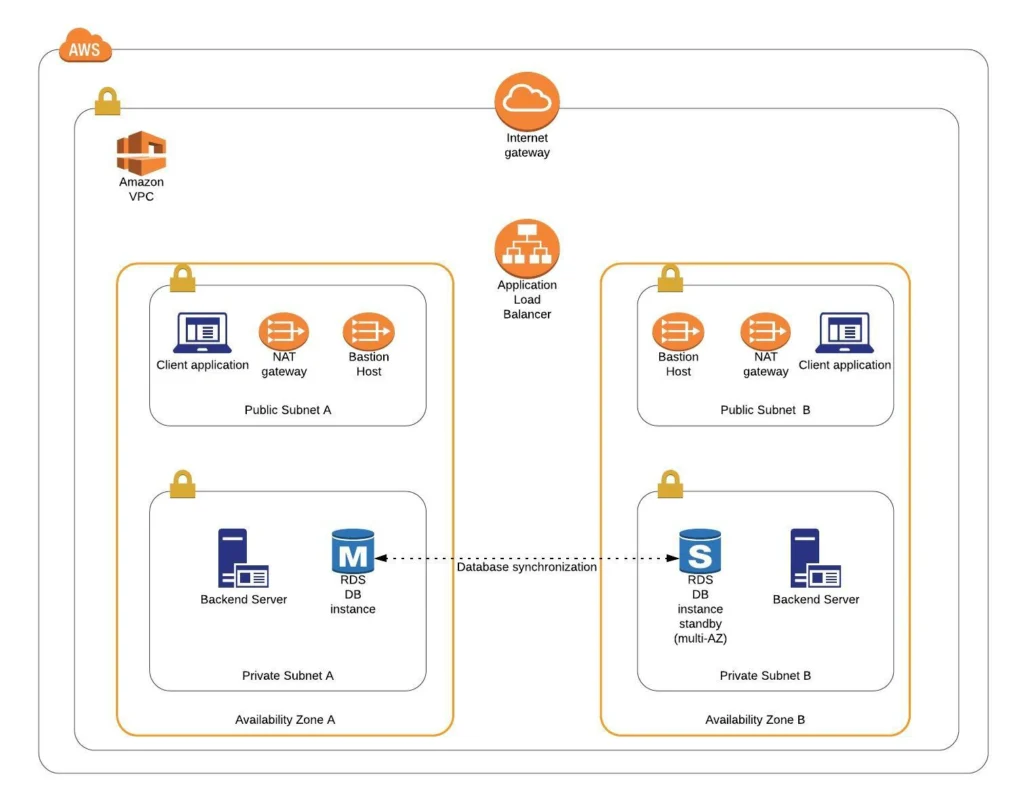
Let’s remind ourselves of what we are building throughout this series. The goal is to create a real-life, enterprise-level AWS infrastructure that will host a user management system consisting of a React.js web application, Java Spring Boot server, and a relational database. We have already built the major part of the architecture in the previous articles. Hence, we already have in place a VPC with four subnets (2 public and 2 private) distributed across two different availability zones.
In public subnets, we have EC2 instances ready for our client applications, NAT gateways, and bastion hosts. At the same time, our private subnets contain EC2 instances for the backend servers and the RDS databases. The only element that is missing is the Load Balancer. Therefore, in this part of the series, we will set it up. In the end, we will have a ready platform with backend servers and frontend applications running on it.
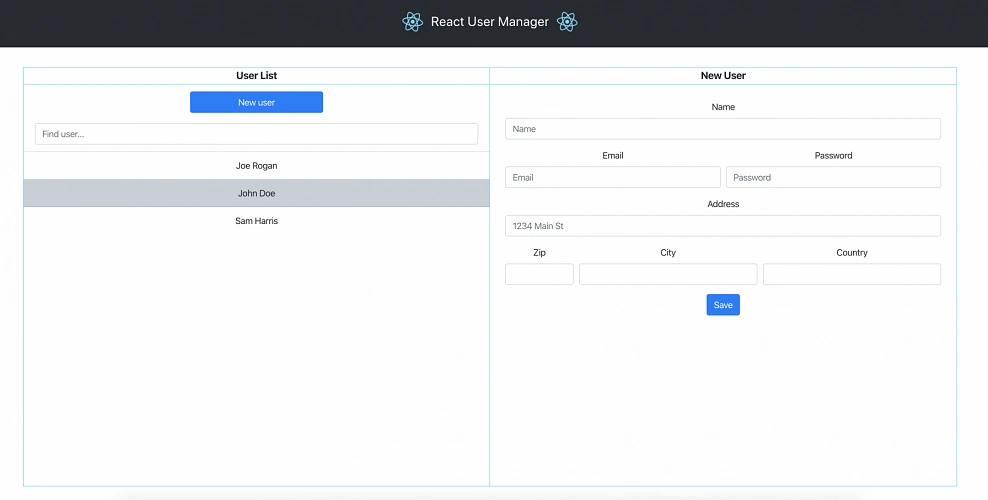
Below you can find the view of the user management web application system hosted on AWS.

The applications can be found on Github.
Now, let’s dive into some theory!
AWS Theory
1. Elastic Load Balancer (ELB)
Load balancing is the process of efficient incoming traffic distribution across all of the request targets (servers, application instances, databases, etc.). A load balancer is placed in front of your infrastructure and routes incoming client requests across all components able to handle those requests. This minimizes latency and ensures that no targets are overloaded, increasing the overall performance of the system.
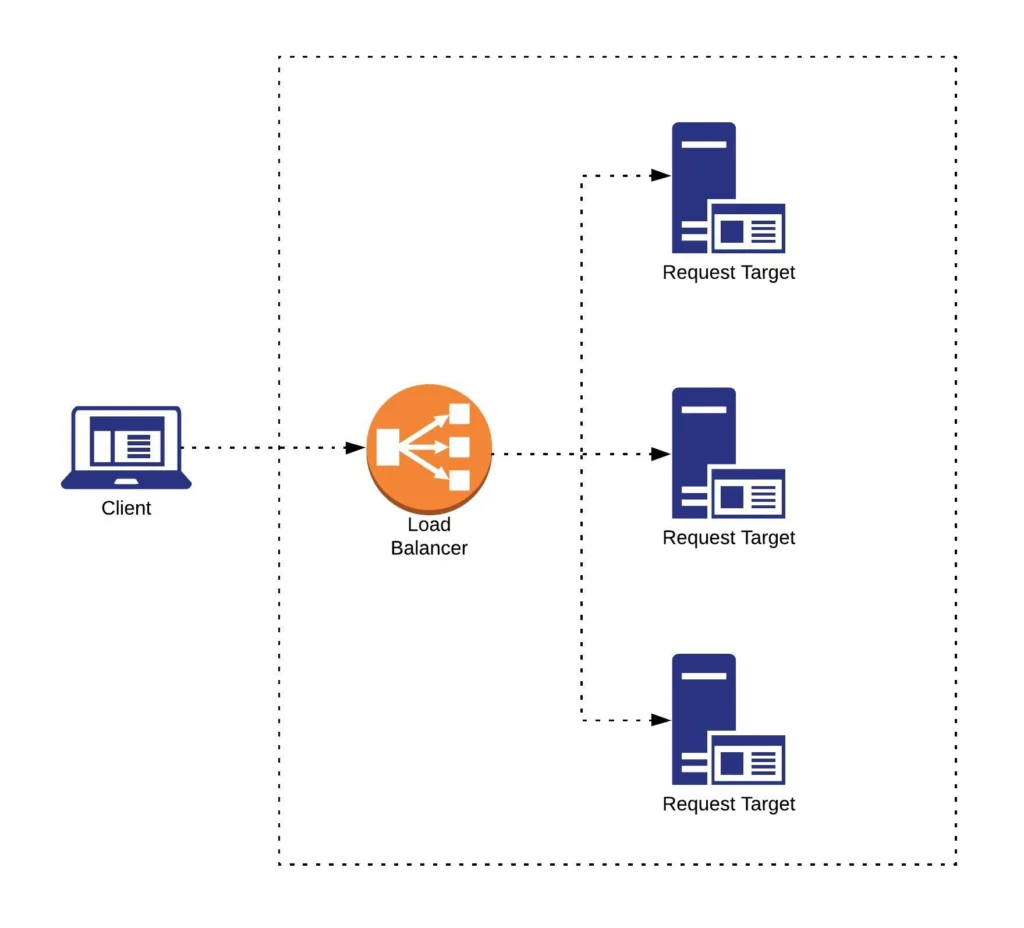
Elastic Load Balancer automatically distributes incoming requests across multiple targets such as EC2 instances, containers, IP addresses, and lambda functions, defined in a target group. Target groups allow you to define a set of targets that are supposed to handle the same type of traffic. Each ELB has a set of listener rules that consist of request conditions and a target group to which the requests fulfilling those conditions are supposed to be routed. You can create different target groups for different types of requests, for instance one target group for client application requests and another for the backend server requests.
Furthermore, target groups allow you to add or remove targets dynamically, and define health check settings that are later used by the load balancer to continuously monitor the status of the targets registered within the target group. If any of the targets go down, the load balancer redirects the traffic to the healthy instances, and when a new healthy instance is up, the load balancer automatically adds it to the traffic distribution. This way ELB ensures fault tolerance, and with the help of Auto Scaling Groups, provides the scalability required by modern systems.
ELB also facilitates operational monitoring of your system, through integration with CloudWatch and X-Ray AWS services, as well as central certificate management.
There are three types of ELB:
– Application Load Balancer – operates on the application layer and is best suited for load balancing of HTTP/HTTPS requests.
– Network Load Balancer – operates on the transport layer and is best suited for TCP, UDP, and TLS traffic where high performance is required.
– Classic Load Balancer – it is a legacy type for applications built within the EC2-classic network.
What kind of benefits does ELB provide?
- High availability,
- Fault tolerance,
- Scalability,
- Security features,
- SSL/TLS certificate management,
- Operational monitoring.
Practice
1. Target Groups
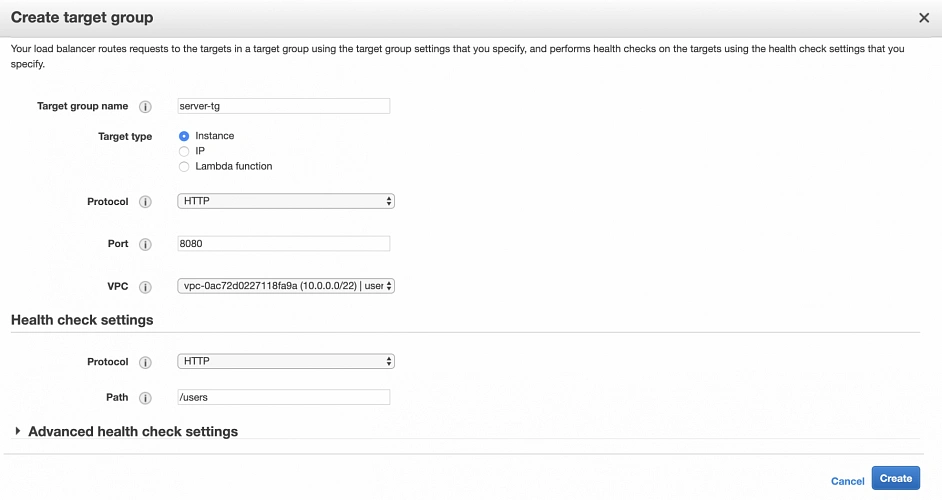
Let’s start the configuration of the load balancer by setting up the required target groups. Go into the EC2 service dashboard, and in the left menu bar find the Load Balancing submenu. Go into the Target Groups section, click Create target group, set the target group name, select Target type as Instance, and set a port to 5000 ( this is the port our client application will be listening on). Associate the target group with our user-manager-vpc.
After creation, go to the Targets tab and click Edit. Add client-a and client-b EC2s as target instances and save.
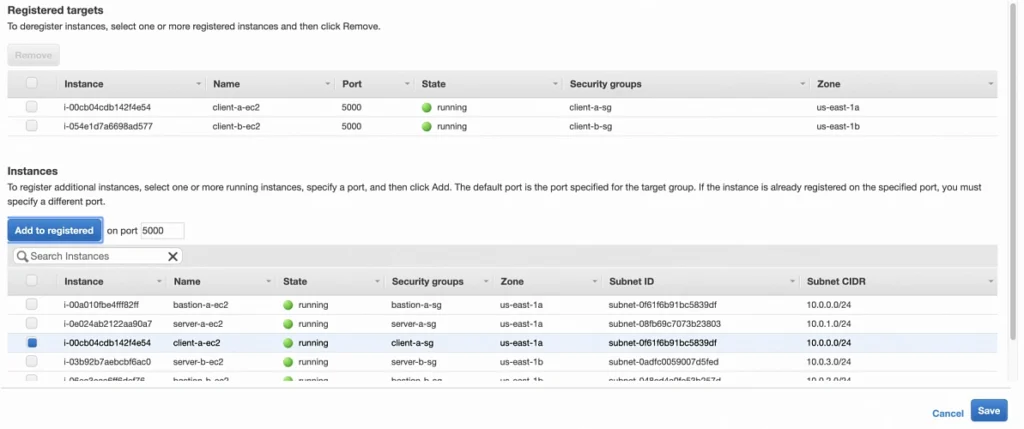
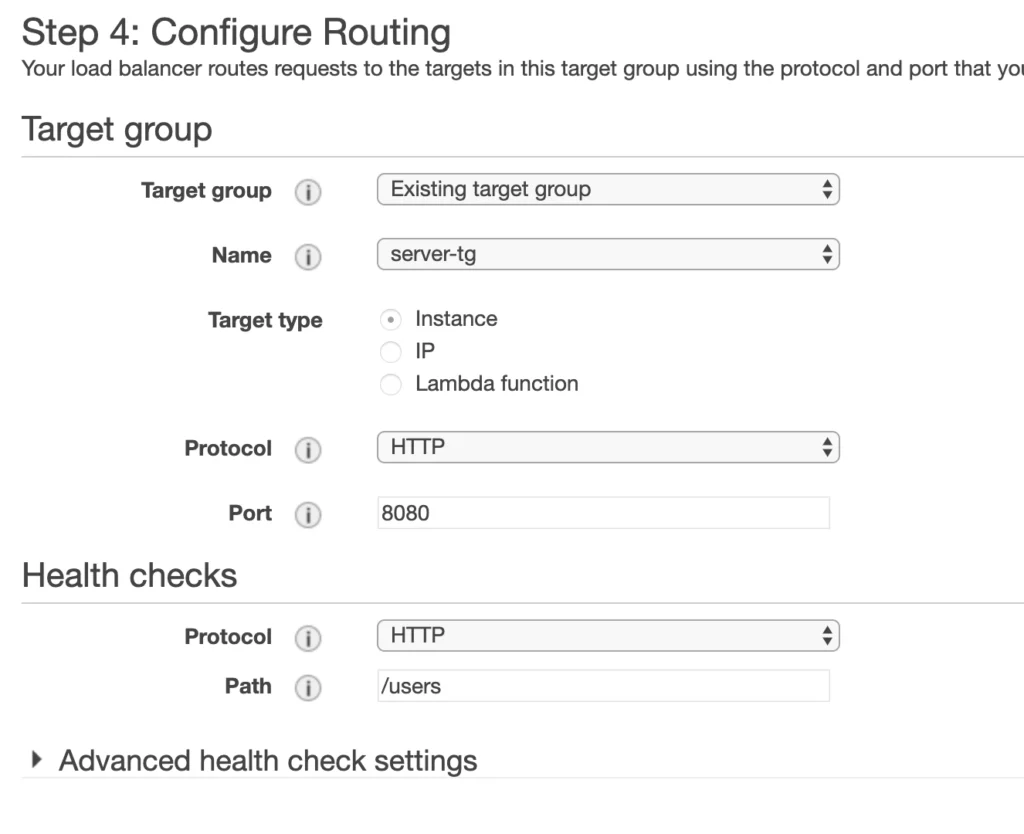
Next, create another target group for our server instances, and add server-a and server-b EC2s as its targets. Change the health check path to /users (our server does not expose / endpoint).
2. Elastic Load Balancer
Finally, go to the Load Balancers menu, click Create Load Balancer, and select the Application Load Balancer. In the Load Balancer’s configuration form, add two HTTP listeners one on port 8080, and another on port 5000. Select user-manager-vpc, and both our public subnets.
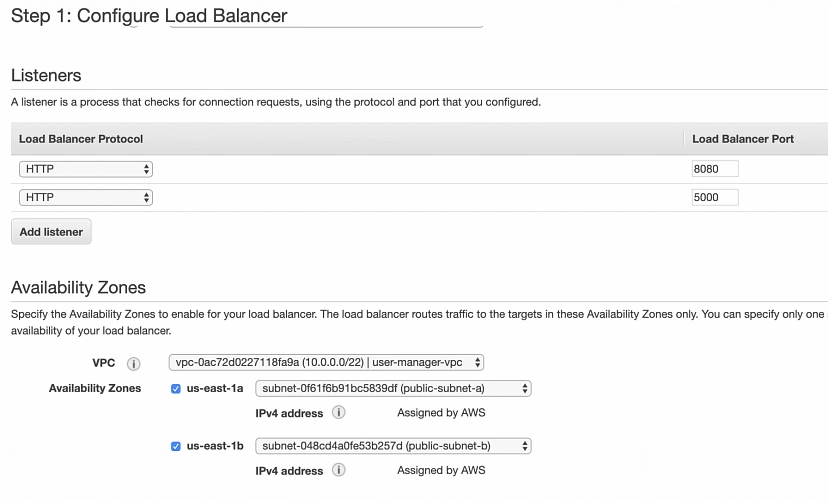
Configure the Load Balancer’s security group in order to allow incoming traffic from everywhere on ports our applications will be running on.


In Routing configuration, select the existing server-tg target group. We will add the client-tg target group after the creation of ELB.
After the load balancer is created, go to the Listeners tab, select HTTP port 5000 listener and edit it changing action associated with it to forward all traffic on port 5000 to client-tg instead of the server-tg. That is it the load balancer is ready, you should be able to see its DNS name in the Description tab. The last step is the modification of the server and client security groups to allow incoming connections on appropriate ports from the load balancer’s security group.
3. Application deployment
In order to facilitate the deployment of our applications, I prepared deployment scripts that will automatically deploy our applications to the platform. You can find them in the GitHub repositories in the base directories of the projects in the deploy.sh files. I believe the scripts are pretty self-explanatory, so we won’t walk through them in detail.
You need to run 4 script executions in total: 2 for the server instances and 2 for the client application instances.
3.1 Server deployment
An exemplary execution of the script:
sh deploy.sh 3.235.167.88 10.0.3.121 ~/Documents/keys/user-manager-key.pem jdbc:mysql://user-manager-db.cfitmuokdhyi.us-east-1.rds.amazonaws.com/usermanagerdb password
Script:
#!/bin/bash -e

if [ -z "$1" ] || [ -z "$2" ] || [ -z "$3" ] || [ -z "$4" ] || [ -z "$5" ]; then
 printf "Usage $0 bastion_public_ip instance_private_ip private_key db_address db_password n"
 exit 1
fi

bastion_address=$1
instance_address=$2
private_key=$3
db_address=$4
db_password=$5

export PROJECT_VERSION=$(mvn help:evaluate -Dexpression=project.version -q -DforceStdout)
printf "nProject version: %sn" "$PROJECT_VERSION"

mvn clean install -DskipTests=true

printf "n"
printf "Adding key to keychainn"
ssh-add -k "${private_key}"

printf "Creating working directory on Bastion Hostn"
ssh -A ec2-user@"${bastion_address}" "mkdir -p ~/workdir/usermanagerservice"

printf "Copying jar to Bastion Hostn"
scp ./target/usermanagerservice-"${PROJECT_VERSION}".jar ec2-user@"${bastion_address}":~/workdir/usermanagerservice/

printf "Creating working directory on private instancen"

ssh -A ec2-user@"${bastion_address}" "ssh -o StrictHostKeyChecking=no -o UserKnownHostsFile=/dev/null ec2-user@${instance_address} 'mkdir -p ~/workdir/usermanagerservice'"

printf "Copying jar to private instancen"
ssh -A ec2-user@"${bastion_address}" "scp -o StrictHostKeyChecking=no -o UserKnownHostsFile=/dev/null ~/workdir/usermanagerservice/usermanagerservice-""${PROJECT_VERSION}"".jar ec2-user@${instance_address}:~/workdir/usermanagerservice/"

printf "Stopping process running on port 8080 if existsn"
ssh -A ec2-user@"${bastion_address}" "ssh -o StrictHostKeyChecking=no -o UserKnownHostsFile=/dev/null ec2-user@${instance_address} 'sudo fuser -k 8080/tcp'"

printf "Running the applicationn"
ssh -A ec2-user@"${bastion_address}" "ssh -o StrictHostKeyChecking=no -o UserKnownHostsFile=/dev/null ec2-user@${instance_address} 'export SPRING_PROFILES_ACTIVE=dev && export SPRING_DATASOURCE_URL=${db_address} && export SPRING_DATASOURCE_PASSWORD=${db_password} && java -jar ~/workdir/usermanagerservice/usermanagerservice-${PROJECT_VERSION}.jar'"

printf "Exit"
3.2 Client application deployment
An exemplary execution of the script:
sh deploy.sh 3.84.51.190 10.0.0.241 ~/Documents/keys/user-manager-key.pem http://user-manager-lb-1600627179.us-east-1.elb.amazonaws.com:8080
Script:
#!/bin/bash -e

if [ -z "$1" ] || [ -z "$2" ] || [ -z "$3" ] || [ -z "$4" ]; then
 printf "Usage $0 bastion_address instance_address private_key server_urln"
 exit 1
fi

bastion_address=$1
instance_address=$2
private_key=$3
server_url=$4

export REACT_APP_API_URL=${server_url}
npm run build

printf "n"

printf "Adding key to keychainn"
ssh-add -k "${private_key}"

printf "Creating working directory on Bastion Hostn"
ssh -A ec2-user@"${bastion_address}" "mkdir -p ~/workdir/usermanager"

printf "Copying project files to Bastion Hostn"
rsync -av -e ssh --exclude='node_modules' ./ ec2-user@"${bastion_address}":~/workdir/usermanager

printf "Creating working directory on private instancen"
ssh -A ec2-user@"${bastion_address}" "ssh -o StrictHostKeyChecking=no -o UserKnownHostsFile=/dev/null ec2-user@${instance_address} 'mkdir -p ~/workdir/usermanager'"

printf "Copying project files to private instancen"
ssh -A ec2-user@"${bastion_address}" "scp -o StrictHostKeyChecking=no -o UserKnownHostsFile=/dev/null -r ~/workdir/usermanager/ ec2-user@${instance_address}:~/workdir"

printf "Stopping process running on port 5000 if existsn"
ssh -A ec2-user@"${bastion_address}" "ssh -o StrictHostKeyChecking=no -o UserKnownHostsFile=/dev/null ec2-user@${instance_address} 'sudo fuser -k 5000/tcp'"

printf "Running the applicationn"
ssh -A ec2-user@"${bastion_address}" "ssh -o StrictHostKeyChecking=no -o UserKnownHostsFile=/dev/null ec2-user@${instance_address} 'cd ~/workdir/usermanager && npx serve -s -n build'"

printf "Exit"
Summary
Hats off to you! Throughout this series we have created from scratch a highly available, secure, and fault-tolerant cloud system on AWS. Our infrastructure is now ready, and our applications are up and running. Moreover, we have covered an outstanding amount of theory, and even though there is of course much more to AWS than that, we hope this series provided you with a solid ground for a deeper dive into the waters of cloud computing and the Amazon Web Services platform.
Sources:
- https://aws.amazon.com/elasticloadbalancing/
- https://docs.aws.amazon.com/elasticloadbalancing/latest/application/load-balancer-target-groups.html
- https://medium.com/containers-on-aws/using-aws-application-load-balancer-and-network-load-balancer-with-ec2-container-service-d0cb0b1d5ae5
- https://app.pluralsight.com/library/courses/aws-developer-getting-started/table-of-contents
- https://app.pluralsight.com/library/courses/aws-developer-designing-developing/table-of-contents
- https://app.pluralsight.com/library/courses/aws-networking-deep-dive-vpc/table-of-contents
Is it insightful?
Share the article!
Check related articles
Read our blog and stay informed about the industry's latest trends and solutions.
see all articles