Automating Your Enterprise Infrastructure. Part 2: Cloud Infrastructure as Code in practice (AWS Cloud Formation example)

Given that you went through Part 1 of the Infrastructure automation guide, and you already know basic Infrastructure as Code and AWS Cloud Formation concepts, we can proceed with getting some hands-on experience!
Learn more about services provided by Grape Up
You are at Grape Up blog, where our experts share their expertise gathered in projects delivered for top enterprises. See how we work.
Enabling the automotive industry to build software-defined vehicles
Empowering insurers to create insurance telematics platforms
Providing AI & advanced analytics consulting
Note that in this article, we’ll build Infrastructure as Code scripts for the infrastructure described by Michal Kapiczynski in the series of mini-articles.
HINT Before we begin:
If you’re building your Cloud Formation scripts from scratch, we highly recommend starting with spinning the infrastructure manually from the AWS console, and later on, use the AWS CLI tool to get a ‘description’ of the resource. The output will show you the parameters and their values that were used to create the resource.
E.g use:aws ec2 describe-instances
to obtain properties for EC2 instances.
Let’s recall what is our target state:
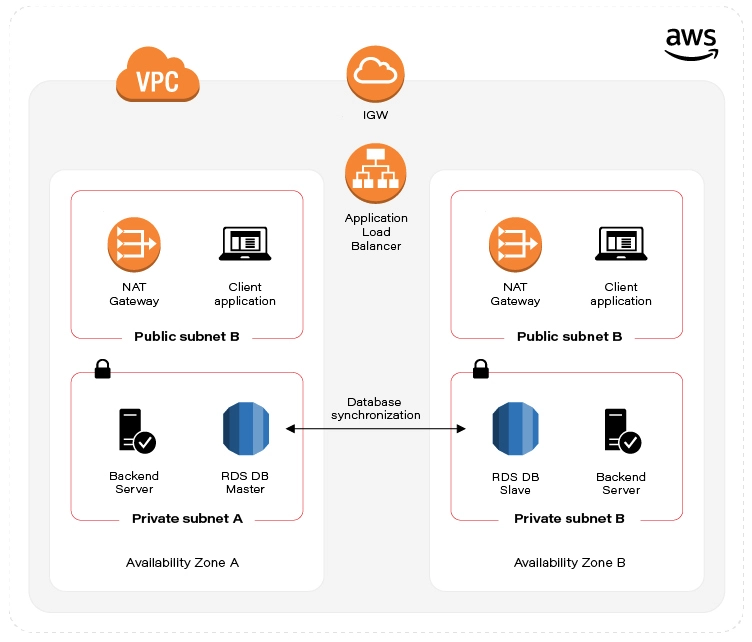
As already mentioned in the first part of the automation guide, we’ve split the infrastructure setup into two Templates (scripts). Let’s start with the first one, called infra-stack, as it contains Architecture scaffolding resources:
- VPC
- Subnets
- Internet gateway
- Elastic IP
- NAT
- Route Tables
Note: All of the Cloud Formation scripts presented below and even more are publicly accessible in this GitHub repository.
VPC
The backbone – Virtual private cloud, in fact a network that hosts all of our resources. Cloud Formation definition for this one is a simple one. See:
UserManagementVpc:
    Type: AWS::EC2::VPC
    Properties:
      CidrBlock: "10.0.0.0/22"
      Tags:
        - Key: "Name"
          Value: "UserManagementVpc"
Just a few lines of code. The first line defines the Amazon resource name, we’ll use this name later on to reference the VPC. Type specifies whether this is VPC, Subnet, EC2 VM, etc. The Properties section contains a set of configuration key-value pairs fixed for a particular resource. The only required property that we define here is CidrBlock of our VPC. Note the network mask (256.256.252.0). Additionally, we can specify a Name Tag that might help us to quickly find our VPC amid the VPC list in the AWS console.
Subnets
As stated above, we’ll need 4 subnets. Specifically, one public and one private network subnet in Availability Zone A. The same goes for AZ B. Let’s see public subnet A definition:
  PubSubnetA:
    Type: AWS::EC2::Subnet
    Properties:
      AvailabilityZone: !Sub '${Region}a'
      CidrBlock: 10.0.0.0/24
      Tags:
        - Key: 'Name'
          Value: 'PubSubnetA'
      VpcId: !Ref UserManagementVpc
When specifying AvailabilityZone, we can use !Sub function to substitute Region script parameter variable name with the actual value and at the same time, concatenate it with ‘a’ suffix. This is to have an actual AWS Region name. So, e.g. taking the Region default value, the actual value for AvailabilityZone in the figure above is “eu-central-1a“.
Next, we have to specify CidrBock of the subnet. This one is easy, though note that subnet cidr should be ‘within’ VPC cidr block.
Last but not least, VpcId. At the time we write the script, we don’t know the actual VPC identifier, that’s why we have to reference (!Ref) VPC by its name (UserManagementVpc).
Both of the functions – !Sub and !Ref are so-called intrinsic function references built-in into cloud formation service. More on that here.
We won’t go through the rest of the Subnet definitions, these are basically the same, the only thing that changes is AvailabilityZone suffix and CirdBlock. You can find these definitions in the Github repository.
Internet gateway
This one seems to be a simple one:
  IGW:
    Type: AWS::EC2::InternetGateway
    Properties:
      Tags:
        - Key: "Name"
          Value: "MyIGW"
The only required field is Type. Not so fast though. As we already know IGW should be attached to a specific VPC, but there is no VPC reference here! Here comes the other Resource called VpcGatewayAttachment:
  IgwAttachment:
    Type: AWS::EC2::VPCGatewayAttachment
    Properties:
      InternetGatewayId: !Ref IGW
      VpcId: !Ref UserManagementVpc
As we clearly see, this one is responsible for the association between IGW and VPC. Same as in Subnet definition, we can reference these by name using !Ref.
Elastic IP
Now, let’s take care of the prerequisites for NAT setup. We ought to set up Elastic IP that NAT can reference later on. We need two of these for each AZ:
  EIPa:
    Type: AWS::EC2::EIP
    Properties:
      Tags:
        - Key: "Name"
          Value: "EIPa"
Note ‘a’ suffix which indicates target AZ for the EIP.
NAT (Network Address Translation) Gateway
Since we have prerequisites provisioned, we can now set up two NAT Gateway instances in our public subnets:
 NATa:
    Type: AWS::EC2::NatGateway
    Properties:
      AllocationId: !GetAtt EIPa.AllocationId
      SubnetId: !Ref PubSubnetA
      Tags:
        - Key: "Name"
          Value: "NATa"
As you – the careful reader – noted, to obtain the value for AllocationId we used yet another intrinsic function reference, Fn::GetAtt. This use facilitates obtaining Elastic IP attribute – AllocationId. Next, we reference the target SubnetId. As always, we have to remember to spin up twin NAT in b AZ.
Route Tables
Things get a little bit messy here. First, we’ll create our Main Route table that will hold the rules for our public subnets.
  MainRT:
    Type: AWS::EC2::RouteTable
    Properties:
      Tags:
        - Key: "Name"
          Value: "MainRT"
      VpcId: !Ref UserManagementVpc
This is where our CloudFormation IoC script turns out to be more complicated than a simple setup through Amazon console.
Turns out that Rules specification is yet another resource:
MainRTRoute:
    Type: AWS::EC2::Route
    Properties:
      DestinationCidrBlock: 0.0.0.0/0
      GatewayId: !Ref IGW
      RouteTableId: !Ref MainRT
The essence of this is the DestinationCidrBlock configuration. As you see, we’ve set it to 0.0.0.0/0, which means that we allow for unrestricted access to all IPv4 addresses. Also, we need to reference our Internet gateway and instruct our Route resource to attach itself to the MainRT.
Unfortunately, Route Table configuration doesn’t end here. Additionally, we have to associate RouteTable with the subnet. As we aforementioned, we’ll associate MainRT with our public subnets. See:
  MainRTSubnetAAssociation:
    Type: AWS::EC2::SubnetRouteTableAssociation
    Properties:
      RouteTableId: !Ref MainRT
      SubnetId: !Ref PubSubnetA
Remember to do the same for public subnet b!
For private subnets, the story goes all over again. We need yet another Route table, SubnetRouteTableAssociation, and Route definitions. But in this case, we will enforce all outgoing traffic to be routed through NAT Gateways.
NOTE: In production environments, it’s considered good practice to disable internet access in private networks!
Outputs section
Besides actual resources, the script also defines the Outputs section. The section defines what Stack information may be exposed for others Stacks. This mechanism will allow us to – later on – reference VPC and Subnet identifiers in the second stack.
EC2, Database & Load Balancer stack
Next in line, vm-and-db-stack, it contains declarative definitions of:
- AWS KeyPair – prerequisite
- EC2
- Multi-AZ Database setup
- Load Balancer – AWS Application Elastic Load balancer
The script accepts three parameters (no worry – default values are included):
- NetworkStackName – the name of the infrastructure stack that we created in the previous step.
- DBPass – self-explanatory.
AvailabilityZone – target AWS Availability Zone for the stack. Note that the value has to be coherent with the AZ parameter value specified when running the infrastructure stack script.
AWS KeyPair – prerequisite
Before we proceed with this stack, there is one resource that you, as an account owner, have to provision manually. The thing is AWS KeyPair. Long story short, it’s AWS equivalent to private & public asymmetric cryptographic keys. We’ll need these to access Virtual Machines running in the cloud!
You can do it either through AWS console or use aws cli tool:
$ aws ec2 create-key-pair --key-name=YourKeyPairName \
--query ‘KeyMaterial’ --output text > MySecretKey.pem
Remember the key name since we’ll reference it later.
EC2
Eventually, we need some VM to run our application! Let’s see an example configuration for our EC2 running in a private subnet in AZ a:
  ServerAEC2:
    Type: AWS::EC2::Instance
    Properties:
      AvailabilityZone: !Sub '${Region}a'
      KeyName: training-key-pair
      BlockDeviceMappings:
        - DeviceName: '/dev/sda1'
          Ebs:
            VolumeSize: 8 # in GB
      ImageId: 'ami-03c3a7e4263fd998c' # Amazon Linux 2 AMI (64-bit x86)
      InstanceType: 't3.micro' # 2 vCPUs & 1 GiB
      NetworkInterfaces:
        - AssociatePublicIpAddress: false
          PrivateIpAddress: '10.0.1.4'
          SubnetId:
            Fn::ImportValue:
              Fn::Sub: "${InfrastructureStackName}-PrivSubnetA"
          DeviceIndex: '0'
          Description: 'Primary network interface'
          GroupSet:
            - !Ref ServerSecurityGroup
      Tags:
        - Key: Name
          Value: ServerAEC2
This one is a little bit longer. First, as aforementioned, we reference our KeyPair name (KeyName parameter) that we’ve created as a prerequisite.
There comes persistence storage configuration – BlockDeviceMappings. We state that we’re going to need 8 GB of storage, attached to /dev/sda1 partition.
Next, we choose the operating system – ImageId. I’ve used Amazon Linux OS, but you can use whatever AMI you need.
In the networking section (NetworkInterfaces), we’ll link our EC2 instance with the subnet. SubnetId sub-section uses another intrinsic function – Fn::ImportValue. We use it to capture the output exported by the infrastructure stack (Outputs section). By combining it with Fn::Sub we can easily reference private subnet ‘a’.
NetworkInterfaces property also contains a list named GroupSet, although the name might not indicate so, this is a list containing Security Group references that should be attached to our EC2. We’ll follow up with the Security Group resource in the next section.
Remember to follow this pattern to create a Client facing EC2 VMs in public subnets. These are pretty much the same, the only notable difference is security groups. For client-facing machines, we’ll reference ClientSecurityGroup.
Security Groups
Security is undoubtedly one of the most significant topics for modern Enterprises. Having it configured the right way will prevent us from pervasive data breaches.
  ServerSecurityGroup:
    Type: AWS::EC2::SecurityGroup
    Properties:
      GroupDescription: 'Server security group'
      GroupName: 'ServerSecurityGroup'
      SecurityGroupIngress:
        - CidrIp: '0.0.0.0/0'
          IpProtocol: TCP
          FromPort: 22
          ToPort: 22
        - SourceSecurityGroupId: !Ref LoadBalancerSecurityGroup
          IpProtocol: TCP
          FromPort: 8080
          ToPort: 8080
      SecurityGroupEgress:
        - CidrIp: '0.0.0.0/0' # Not for Prod
          IpProtocol: -1 # Allow all
      VpcId:
        Fn::ImportValue:
          Fn::Sub: "${InfrastructureStackName}-VpcId"
      Tags:
        - Key: 'Name'
          Value: 'ServerSecurityGroup'
An example above shows the Security Group configuration for the backend server. We apply 2 main rules for incoming traffic (SecurityGroupIngress). First of all, we open port 22 – this one is to be able to ssh to the machine. Note that the best practice in production environments nowadays would be to use AWS systems manager instead. Another ingress rule allows traffic coming from LoadBalancerSecurityGroup (which we configure in the last section of this guide), the restriction also states that only port 8080 can receive traffic from LoadBalancer. For Client facing machines, on the other hand, we’ll expose port 5000.
The only rule in the SecurityGroupEgress section states that we allow for any outgoing traffic hitting the internet. Note this is not recommended for production configuration!
Multi-AZ Database setup
Database security group
Same as for EC2 machines, databases need to be secured. For this reason, we’ll set up a Security Group for our MySQL AWS RDS instance:
  DBSecurityGroup:
    Type: AWS::EC2::SecurityGroup
    Properties:
      GroupDescription: 'DB security group'
      GroupName: 'UserManagerDBSg'
      SecurityGroupIngress:
        - SourceSecurityGroupId: !Ref ServerSecurityGroup
          IpProtocol: TCP
          FromPort: 3306
          ToPort: 3306
      SecurityGroupEgress:
        - CidrIp: '0.0.0.0/0'
          IpProtocol: -1 # Allow all
      Tags:
        - Key: 'Name'
          Value: 'UserManagerDBSg'
      VpcId:
        Fn::ImportValue:
          Fn::Sub: "${InfrastructureStackName}-VpcId"
Ingress traffic is only allowed from Server machines, and the only port that we can hit is 3306 – the default MySQL port. Same as for the Server security group, for production deployments, we strongly revive to allow outgoing internet access.
Database subnet group
DBSubnetGroup:
 Type: AWS::RDS::DBSubnetGroup
 Properties:
   DBSubnetGroupDescription: "DBSubnetGroup for RDS MySql instance"
   DBSubnetGroupName: DBSubnetGroup
   SubnetIds:
     - Fn::ImportValue:
         Fn::Sub: "${InfrastructureStackName}-PrivSubnetA"
     - Fn::ImportValue:
         Fn::Sub: "${InfrastructureStackName}-PrivSubnetB"
AWS::RDS::DBSubnetGroup resource simply gathers a set of subnets that DB is going to reside in. Notably, it is required that these subnets reside in different Availability zones. The motivation behind this resource is to inform the database in which Subnet (AZ) can be replicated. So having this resource in place is a highway to achieving database High Availability!
Database itself
Data persistence is the cornerstone of our systems. If the data is not there, there is no point in having the system at all. So let’s have a minute to look into it.
DB:
    Type: AWS::RDS::DBInstance
    Properties:
      AllocatedStorage: 20
      BackupRetentionPeriod: 0 # default: 1
      CopyTagsToSnapshot: true # default: false
      DBInstanceClass: db.t2.micro
      DBInstanceIdentifier: usermanagerdb
      DBName: 'UserManagerDB'
      DBSubnetGroupName: 'DBSubnetGroup'
      Engine: 'mysql'
      EngineVersion: '8.0.20'
      LicenseModel: 'general-public-license'
      MasterUsername: 'admin'
      MasterUserPassword: !Ref DBPass
      MaxAllocatedStorage: 1000
      MultiAZ: true
      PubliclyAccessible: false
      StorageType: gp2
      VPCSecurityGroups:
        - Ref: DBSecurityGroup
First of all, let’s make sure that we have enough storage. Depending on the use, 20GB that we configured in the example above, may or may not be enough, although that’s a good starting point. Actually, we don’t really have to take care if this is enough since we also configured the MaxAllocatedStorage property, which enables storage autoscaling for us!
We’ll choose db.t2.micro as DBIstanceClass because this is the only one that is free tier eligible.
Next, we set the database password by referencing our DBPass script parameter. Remember not to hardcode your passwords in the code!
According to the plan, we set the value for the MultiAZ property to true. We can do that thanks to our SubnetGroup!
Elastic Load Balancer
Target Groups
There are two main goals for the Target Group resource. The first one is to group EC2 machines handling the same type of traffic. In our case, we’ll create one Target Group for our Server and the other for machines running the client application.
The latter is to achieve reliable and resilient application deployments through Health Check definition for our applications. Let’s see how it goes:
  ServerTG:
    Type: AWS::ElasticLoadBalancingV2::TargetGroup
    Properties:
      HealthCheckEnabled: true
      HealthCheckPath: /users
      HealthCheckProtocol: HTTP
      Matcher:
        HttpCode: '200'
      Port: 8080
      Protocol: HTTP
      ProtocolVersion: HTTP1
      Name: ServerTG
      TargetType: instance
      Targets:
        - Id: !Ref ServerAEC2
          Port: 8080
        - Id: !Ref ServerBEC2
          Port: 8080
      VpcId:
        Fn::ImportValue:
          Fn::Sub: "${InfrastructureStackName}-VpcId"
Health check configuration is pretty straightforward. For the sample application used throughout this guide, we need /users endpoint to return 200 HTTP code to consider an application as healthy. Underneath, we reference our EC2 instances running in a and b private subnets. Naturally, the target port is 8080.
Load Balancer Security groups
We went through the Security Group configuration before, so we won’t go into details. The most important thing to remember is that we need to allow the traffic coming to LB only for two ports, that is 8080 (server port) and 5000 (UI application port).
Load Balancer Listeners
This resource is a glue connecting Load Balancer with Target Groups. We’ll have to create two of these, one for the server Target group and one for the client target group.
 LBClientListener:
    Type: "AWS::ElasticLoadBalancingV2::Listener"
    Properties:
      DefaultActions:
        - TargetGroupArn: !Ref ClientTG
          Type: forward
      LoadBalancerArn: !Ref LoadBalancer
      Port: 5000
      Protocol: "HTTP"
The key setting here is TargetGroupArn and Action Type. In our case, we just want to forward the request to the ClientTG target group.
Load Balancer itself
The last component in this guide will help us with balancing the traffic between our EC2 instances.
  LoadBalancer:
    Type: AWS::ElasticLoadBalancingV2::LoadBalancer
    Properties:
      IpAddressType: ipv4
      Name: UserManagerLB
      Scheme: internet-facing
      SecurityGroups:
        - !Ref LoadBalancerSecurityGroup
      Type: application
      Subnets:
        - Fn::ImportValue:
              Fn::Sub: "${InfrastructureStackName}-PubSubnetA"
        - Fn::ImportValue:
              Fn::Sub: "${InfrastructureStackName}-PubSubnetB"
We expect it to be an internet-facing load balancer by exposing the IPv4 address. Further, we restrict the access to the LB by referencing LoadBalancerSecurityGroup, thus allowing clients to exclusively hit ports 5000 and 8080. Last, we’re required to associate LB with target subnets.
Booting up the Stacks
Now that we have everything in place, let’s instruct AWS to build our infrastructure! You can do it in a few ways. The fastest one is to use bash scripts we’ve prepared, by issuing: ./create-infra.sh && ./create-vm-and-db.sh in your terminal.
Alternatively, if you want to customize script parameters, you can issue aws cli command by yourself. Take this as a good start:
aws cloudformation create-stack --template-body=file://./infra-stack.yml \ --stack-name=infrastructure
aws cloudformation create-stack --template-body=file://./vm-and-db-stack.yml --stack-name=vm-and-db
Note that infrastructure stack is a foundation for vm-and-db-stack, therefore you have to run the commands sequentially.
The third way is to just enter Cloud Formation Stacks UI and upload the script from the console by clicking on “Create stack” and then “With new resources (standard)”. AWS console will guide you through the procedure

After you successfully issued our cloud formation scripts to Cloud Formation service, you can see the script progressing in the AWS console:
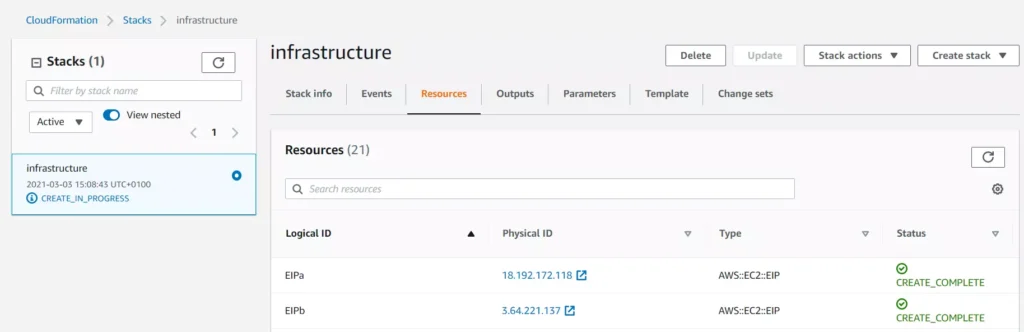
You may find Events and Resource tabs useful while you follow the resource creation procedure.
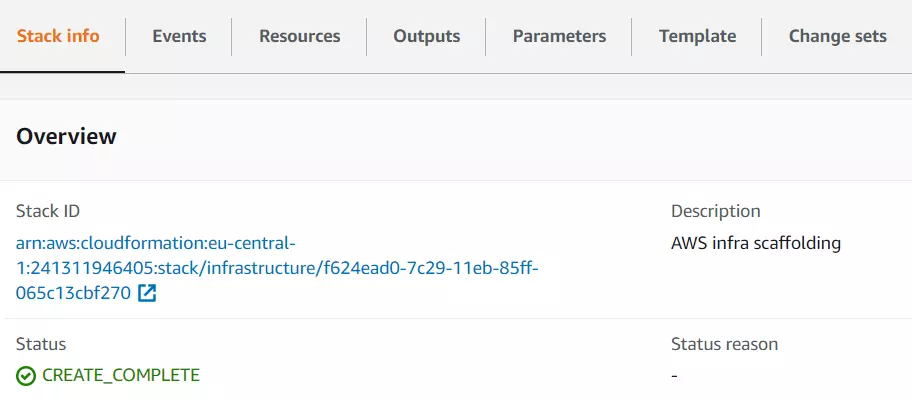
Once all infrastructure components are up and running, you’ll see your stack status marked as CREATE_COMPLETE :
In case your infrastructure definition contained any errors, you will be able to see them in the Cloud Formation console events tab. The status reason column will contain an error message from Cloud Formation or a specific resource service. For example:

For more information on troubleshooting CloudFormation, visit the AWS documentation page.
Summary – Cloud Infrastructure as Code in practice
If you’re reading this, congrats then! You’ve reached the end of this tutorial. We went through the basics of what Infrastructure as Code is, how it works and when to use it. Furthermore, we got a grasp of hands-on experience with Cloud Formation.
As a next step, we strongly encourage you to take a deep dive into AWS Cloud Formation documentation. It will help you adjust the infrastructure to your specific needs and make it even more bulletproof. Eventually, now with all of your infrastructure scripted, you can shout out loud: look ma, no hands!
Supplement – aka. Cloud Formation tips and tricks
When you’re done playing around with your CF Stacks, remember to delete them! Otherwise, AWS will charge you!
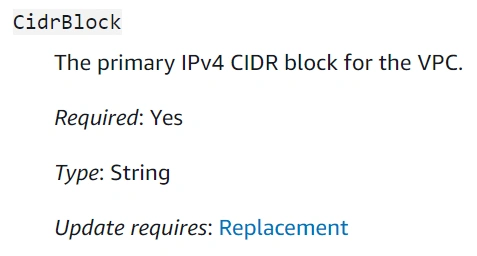
Cloud Formation does not warn you if your updated stack definition might cause infrastructure downtime (resource replacement needed). However, there are two ways to validate that before you deploy. The first one – manual – is to double-check specific resource documentation, especially if the updated property description contains Update requires: Replacement clause. See example for CidrBlock VPC property:
The second way is to use the Change Sets mechanism provided by Cloud Formation. This one would automatically validate the template and tell you how these changes might impact your infrastructure. See the docs.
Cloud Formation does not watch over your resources after they’re created. Therefore, if you make any manual modifications to the resource that is maintained by CF Stack, the stack itself won’t be updated. A situation where the actual infrastructure state is different from its definition (CF script) is called configuration drift. CF comes in handy and lets you see the actual drift for the stack in the console – see this.
If you create your own Cloud Formation script and looking for more examples, the CF registry might come in handy.
Is it insightful?
Share the article!
Check related articles
Read our blog and stay informed about the industry's latest trends and solutions.
see all articles
Automating Your Enterprise Infrastructure. Part 1: Introduction to Cloud Infrastructure as Code (AWS Cloud Formation example)
Read the article
