How to Run Selenium BDD Tests in Parallel with AWS Lambda


Have you ever felt annoyed because of the long waiting time for receiving test results? Maybe after a few hours, you’ve figured out that there had been a network connection issue in the middle of testing, and half of the results can go to the trash? That may happen when your tests are dependent on each other or when you have plenty of them and execution lasts forever. It’s quite a common issue. But there’s actually a solution that can not only save your time but also your money – parallelization in the Cloud.
How it started
Developing UI tests for a few months, starting from scratch, and maintaining existing tests, I found out that it has become something huge that will be difficult to take care of very soon. An increasing number of test scenarios made every day led to bottlenecks. One day when I got to the office, it turned out that the nightly tests were not over yet. Since then, I have tried to find a way to avoid such situations.
A breakthrough was the presentation of Tomasz Konieczny during the Testwarez conference in 2019. He proved that it’s possible to run Selenium tests in parallel using AWS Lambda. There’s actually one blog that helped me with basic Selenium and Headless Chrome configuration on AWS. The Headless Chrome is a light-weighted browser that has no user interface. I went a step forward and created a solution that allows designing tests in the Behavior-Driven Development process and using the Page Object Model pattern approach, run them in parallel, and finally – build a summary report.
Setting up the project
The first thing we need to do is signing up for Amazon Web Services. Once we have an account and set proper values in credentials and config files (.aws directory), we can create a new project in PyCharm, Visual Studio Code, or in any other IDE supporting Python. We’ll need at least four directories here. We called them ‘lambda’, ‘selenium_layer’, ‘test_list’, ‘tests’ and there’s also one additional – ‘driver’, where we keep a chromedriver file, which is used when running tests locally in a sequential way.
In the beginning, we’re going to install the required libraries. Those versions work fine on AWS, but you can check newer if you want.
requirements.txt
allure_behave==2.8.6
behave==1.2.6
boto3==1.10.23
botocore==1.13.23
selenium==2.37.0
What’s important, we should install them in the proper directory – ‘site-packages’.

We’ll need also some additional packages:
All those things will be deployed to AWS using Serverless Framework, which you need to install following the docs. The Serverless Framework was designed to provision the AWS Lambda Functions, Events, and infrastructure Resources safely and quickly. It translates all syntax in serverless.yml to a single AWS CloudFormation template which is used for deployments.
Architecture – Lambda Layers
Now we can create a serverless.yml file in the ‘selenium-layer’ directory and define Lambda Layers we want to create. Make sure that your .zip files have the same names as in this file. Here we can also set the AWS region in which we want to create our Lambda functions and layers.
serverless.yml
service: lambda-selenium-layer

provider:
  name: aws
  runtime: python3.6
  region: eu-central-1
  timeout: 30

layers:
  selenium:
    path: selenium
    CompatibleRuntimes: [
      "python3.6"
    ]
  chromedriver:
    package:
      artifact: chromedriver_241.zip
  chrome:
    package:
      artifact: headless-chromium_52.zip
  allure:
    package:
      artifact: allure-commandline_210.zip

resources:
  Outputs:
    SeleniumLayerExport:
       Value:
         Ref: SeleniumLambdaLayer
       Export:
         Name: SeleniumLambdaLayer
    ChromedriverLayerExport:
       Value:
         Ref: ChromedriverLambdaLayer
       Export:
         Name: ChromedriverLambdaLayer
    ChromeLayerExport:
      Value:
        Ref: ChromeLambdaLayer
      Export:
        Name: ChromeLambdaLayer
    AllureLayerExport:
      Value:
        Ref: AllureLambdaLayer
      Export:
        Name: AllureLambdaLayer
Within this file, we’re going to deploy a service consisting of four layers. Each of them plays an important role in the whole testing process.
Creating test set
What would the tests be without the scenarios? Our main assumption is to create test files running independently. This means we can run any test without others and it works. If you’re following clean code, you’ll probably like using the Gherkin syntax and the POM approach. Behave Framework supports both.
What gives us Gherkin? For sure, better readability and understanding. Even if you haven’t had the opportunity to write tests before, you will understand the purpose of this scenario.
01.OpenLoginPage.feature
@smoke
@login

Feature: Login to service

  Scenario: Login
    Given Home page is opened
    And User opens Login page
    When User enters credentials
    And User clicks Login button
    Then User account page is opened

  Scenario: Logout
    When User clicks Logout button
    Then Home page is opened
    And User is not authenticated
In the beginning, we have two tags. We add them in order to run only chosen tests in different situations. For example, you can name a tag @smoke and run it as a smoke test, so that you can test very fundamental app functions. You may want to test only a part of the system like end-to-end order placing in the online store – just add the same tag for several tests.
Then we have the feature name and two scenarios. Those are quite obvious, but sometimes it’s good to name them with more details. Following steps starting with Given, When, Then and And can be reused many times. That’s the Behavior-Driven Development in practice. We’ll come back to this topic later.
Meantime, let’s check the proper configuration of the Behave project.
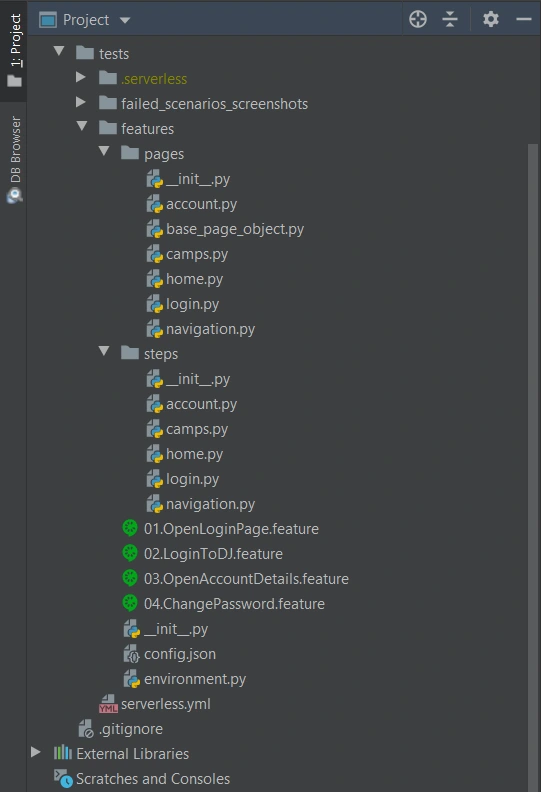
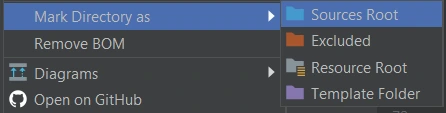
We definitely need a ‘feature’ directory with ‘pages’ and ‘steps’. Make the ‘feature’ folder as Sources Root. Just right-click on it and select the proper option. This is the place for our test scenario files with .feature extension.
It’s good to have some constant values in a separate file so that it will change only here when needed. Let’s call it config.json and put the URL of the tested web application.
config.json
{
  "url": "http://drabinajakuba.atthost24.pl/"
}
One more thing we need is a file where we set webdriver options.
Those are required imports and some global values like, e.g. a name of AWS S3 bucket in which we want to have screenshots or local directory to store them in. As far as we know, bucket names should be unique in whole AWS S3, so you should probably change them but keep the meaning.
environment.py
import os
import platform
from datetime import date, datetime
import json

import boto3
from selenium import webdriver
from selenium.webdriver.chrome.options import Options

REPORTS_BUCKET = 'aws-selenium-test-reports'
SCREENSHOTS_FOLDER = 'failed_scenarios_screenshots/'
CURRENT_DATE = str(date.today())
DATETIME_FORMAT = '%H_%M_%S'
Then we have a function for getting given value from our config.json file. The path of this file depends on the system platform – Windows or Darwin (Mac) would be local, Linux in this case is in AWS. If you need to run these tests locally on Linux, you should probably add some environment variables and check them here.
def get_from_config(what):
    if 'Linux' in platform.system():
        with open('/opt/config.json') as json_file:
            data = json.load(json_file)
            return data[what]
    elif 'Darwin' in platform.system():
        with open(os.getcwd() + '/features/config.json') as json_file:
            data = json.load(json_file)
            return data[what]
    else:
        with open(os.getcwd() + '\\features\\config.json') as json_file:
            data = json.load(json_file)
            return data[what]
Now we can finally specify paths to chromedriver and set browser options which also depend on the system platform. There’re a few more options required on AWS.
def set_linux_driver(context):
    """
    Run on AWS
    """
    print("Running on AWS (Linux)")
    options = Options()
    options.binary_location = '/opt/headless-chromium'
    options.add_argument('--allow-running-insecure-content')
    options.add_argument('--ignore-certificate-errors')
    options.add_argument('--disable-gpu')
    options.add_argument('--headless')
    options.add_argument('--window-size=1280,1000')
    options.add_argument('--single-process')
    options.add_argument('--no-sandbox')
    options.add_argument('--disable-dev-shm-usage')
    capabilities = webdriver.DesiredCapabilities().CHROME
    capabilities['acceptSslCerts'] = True
    capabilities['acceptInsecureCerts'] = True

    context.browser = webdriver.Chrome(
        '/opt/chromedriver', chrome_options=options, desired_capabilities=capabilities
    )


def set_windows_driver(context):
    """
    Run locally on Windows
    """
    print('Running on Windows')
    options = Options()
    options.add_argument('--no-sandbox')
    options.add_argument('--window-size=1280,1000')
    options.add_argument('--headless')
    context.browser = webdriver.Chrome(
        os.path.dirname(os.getcwd()) + '\\driver\\chromedriver.exe', chrome_options=options
    )


def set_mac_driver(context):
    """
    Run locally on Mac
    """
    print("Running on Mac")
    options = Options()
    options.add_argument('--no-sandbox')
    options.add_argument('--window-size=1280,1000')
    options.add_argument('--headless')
    context.browser = webdriver.Chrome(
        os.path.dirname(os.getcwd()) + '/driver/chromedriver', chrome_options=options
    )


def set_driver(context):
    if 'Linux' in platform.system():
        set_linux_driver(context)
    elif 'Darwin' in platform.system():
        set_mac_driver(context)
    else:
        set_windows_driver(context)
Webdriver needs to be set before all tests, and in the end, our browser should be closed.
def before_all(context):
    set_driver(context)


def after_all(context):
    context.browser.quit()
Last but not least, taking screenshots of test failure. Local storage differs from the AWS bucket, so this needs to be set correctly.
def after_scenario(context, scenario):
    if scenario.status == 'failed':
        print('Scenario failed!')
        current_time = datetime.now().strftime(DATETIME_FORMAT)
        file_name = f'{scenario.name.replace(" ", "_")}-{current_time}.png'
        if 'Linux' in platform.system():
            context.browser.save_screenshot(f'/tmp/{file_name}')
            boto3.resource('s3').Bucket(REPORTS_BUCKET).upload_file(
                f'/tmp/{file_name}', f'{SCREENSHOTS_FOLDER}{CURRENT_DATE}/{file_name}'
            )
        else:
            if not os.path.exists(SCREENSHOTS_FOLDER):
                os.makedirs(SCREENSHOTS_FOLDER)
            context.browser.save_screenshot(f'{SCREENSHOTS_FOLDER}/{file_name}')
Once we have almost everything set, let’s dive into single test creation. Page Object Model pattern is about what exactly hides behind Gherkin’s steps. In this approach, we treat each application view as a separate page and define its elements we want to test. First, we need a base page implementation. Those methods will be inherited by all specific pages. You should put this file in the ‘pages’ directory.
base_page_object.py
from selenium.webdriver.common.action_chains import ActionChains
from selenium.webdriver.support.ui import WebDriverWait
from selenium.webdriver.support import expected_conditions as EC
from selenium.common.exceptions import *
import traceback
import time

from environment import get_from_config


class BasePage(object):

    def __init__(self, browser, base_url=get_from_config('url')):
        self.base_url = base_url
        self.browser = browser
        self.timeout = 10

    def find_element(self, *loc):
        try:
            WebDriverWait(self.browser, self.timeout).until(EC.presence_of_element_located(loc))
        except Exception as e:
            print("Element not found", e)
        return self.browser.find_element(*loc)

    def find_elements(self, *loc):
        try:
            WebDriverWait(self.browser, self.timeout).until(EC.presence_of_element_located(loc))
        except Exception as e:
            print("Element not found", e)
        return self.browser.find_elements(*loc)

    def visit(self, url):
        self.browser.get(url)

    def hover(self, element):
        ActionChains(self.browser).move_to_element(element).perform()
        time.sleep(5)

    def __getattr__(self, what):
        try:
            if what in self.locator_dictionary.keys():
                try:
                    WebDriverWait(self.browser, self.timeout).until(
                        EC.presence_of_element_located(self.locator_dictionary[what])
                    )
                except(TimeoutException, StaleElementReferenceException):
                    traceback.print_exc()

                return self.find_element(*self.locator_dictionary[what])
        except AttributeError:
            super(BasePage, self).__getattribute__("method_missing")(what)

    def method_missing(self, what):
        print("No %s here!", what)
That’s a simple login page class. There’re some web elements defined in locator_dictionary and methods using those elements to e.g., enter text in the input, click a button, or read current values. Put this file in the ‘pages’ directory.
login.py
from selenium.webdriver.common.by import By

from .base_page_object import *


class LoginPage(BasePage):

    def __init__(self, context):
        BasePage.__init__(
            self,
            context.browser,
            base_url=get_from_config('url'))

    locator_dictionary = {
        'username_input': (By.XPATH, '//input[@name="username"]'),
        'password_input': (By.XPATH, '//input[@name="password"]'),
        'login_button': (By.ID, 'login_btn'),
    }

    def enter_username(self, username):
        self.username_input.send_keys(username)

    def enter_password(self, password):
        self.password_input.send_keys(password)

    def click_login_button(self):
        self.login_button.click()
What we need now is a glue that will connect page methods with Gherkin steps. In each step, we use a particular page that handles the functionality we want to simulate. Put this file in the ‘steps’ directory.
login.py
from behave import step

from environment import get_from_config
from pages import LoginPage, HomePage, NavigationPage


@step('User enters credentials')
def step_impl(context):
    page = LoginPage(context)
    page.enter_username('test_user')
    page.enter_password('test_password')


@step('User clicks Login button')
def step_impl(context):
    page = LoginPage(context)
    page.click_login_button()
It seems that we have all we need to run tests locally. Of course, not every step implementation was shown above, but it should be easy to add missing ones.
If you want to read more about BDD and POM, take a look at Adrian’s article
All files in the ‘features’ directory will also be on a separate Lambda Layer. You can create a serverless.yml file with the content presented below.
serverless.yml
service: lambda-tests-layer

provider:
  name: aws
  runtime: python3.6
  region: eu-central-1
  timeout: 30

layers:
  features:
    path: features
    CompatibleRuntimes: [
      "python3.6"
    ]

resources:
  Outputs:
    FeaturesLayerExport:
       Value:
         Ref: FeaturesLambdaLayer
       Export:
         Name: FeaturesLambdaLayer
This is the first part of the series covering running Parallel Selenium tests on AWS Lambda. More here!
Is it insightful?
Share the article!
Check related articles
Read our blog and stay informed about the industry's latest trends and solutions.
see all articles

Testing iOS Applications Using Appium, Cucumber, And Serenity – A Recipe For Quality
Read the article